| Oracle® Fusion Middleware Upgrade Guide for Oracle Business Intelligence 11g Release 1 (11.1.1) Part Number E16452-04 |
|
|
PDF · Mobi · ePub |
| Oracle® Fusion Middleware Upgrade Guide for Oracle Business Intelligence 11g Release 1 (11.1.1) Part Number E16452-04 |
|
|
PDF · Mobi · ePub |
This chapter provides a high-level summary of the steps that are required to upgrade the following Oracle Business Intelligence components from Oracle Business Intelligence 10g to Oracle Business Intelligence 11g:
Oracle Business Intelligence Enterprise Edition (Oracle BI EE)
Oracle Business Intelligence Publisher (Oracle BI Publisher)
Oracle Real-Time Decisions (Oracle RTD)
This chapter includes the following topics:
Section 2.2, "Flow Chart of the Oracle Business Intelligence Upgrade Process"
Section 2.4, "Steps in the Oracle BI Publisher Upgrade Process"
Section 2.5, "Steps in the Oracle Real-Time Decisions Upgrade Process"
Upgrading Oracle Business Intelligence from 10g to 11g is an out-of-place process performed by Upgrade Assistant. You run a clean installation of Oracle BI 11g and import data from the 10g system. Run Upgrade Assistant once to upgrade the repository and catalog, or Publisher Repository, and once to upgrade the Scheduler schema. Upgrade Assistant configures the 11g installation with the imported 10g repository and catalog, so if you updated system A, then system B using the same Upgrade Assistant, you would have a running 11g system B, with all the users and groups from both system A and B.
Upgrade Assistant does not upgrade customizations that were made to the Oracle BI 10g system. Any configurations made in 10g must be manually copied over to the 11g system after the upgrade process is complete. For other post-upgrade tasks and considerations, see Chapter 8, "Oracle Business Intelligence Post-Upgrade Tasks and Considerations."
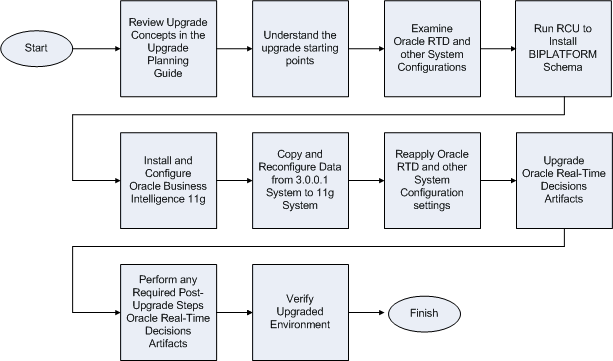
You cannot upgrade Oracle Real-Time Decisions using Upgrade Assistant. See the high-level procedures for upgrading Real-Time Decisions in Figure 2-2. For a road map of the procedure, see Table 2-3. For the Oracle Real-Time Decisions upgrade procedure, see Chapter 7, "Upgrading Oracle Real-Time Decisions."
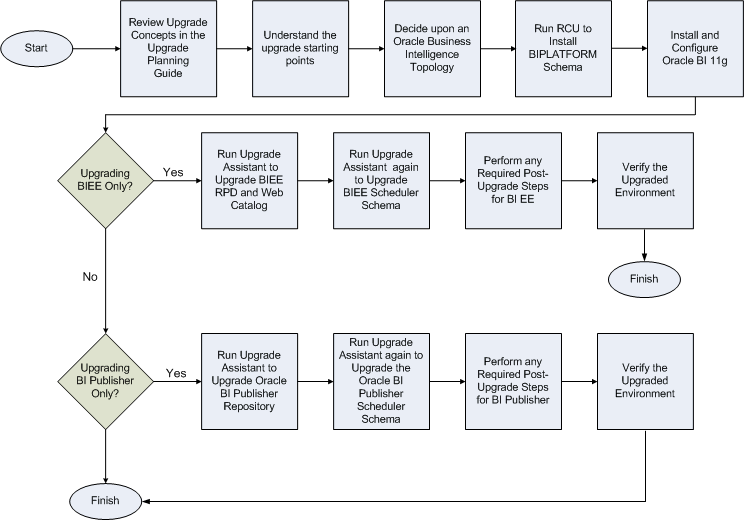
Figure 2-1 provides a flow chart of the Oracle Business Intelligence upgrade process. Review this chart to become familiar with the steps that you must follow, based on the existing environment.
Figure 2-2 provides a flow chart of the Oracle Real-Time Decisions upgrade process. Review this chart to become familiar with the steps that you must follow, based on the existing environment.
Figure 2-1 Flow Chart of the Oracle Business Intelligence Upgrade Process

Figure 2-2 Flow Chart of the Oracle Real-Time Decisions Upgrade Process

Table 2-1 describes each of the steps in the upgrade process flow chart for Oracle BI EE, shown in Figure 2-1. The table also provides information on where to obtain more information on each step in the process.
Table 2-1 Steps in the Oracle BI EE Upgrade Process
| Step | Description | More Information |
|---|---|---|
|
Review the Upgrade Concepts in Oracle Fusion Middleware Upgrade Planning Guide |
Oracle Fusion Middleware Upgrade Planning Guide provides a high-level overview of how to upgrade Oracle Fusion Middleware, including compatibility information and instructions for upgrading any databases that support the middleware components. |
|
|
Understand the upgrade starting points |
Before planning the upgrade, become familiar with the supported starting points for an Oracle Business Intelligence upgrade. |
Task 1: Understand the Starting Points for Oracle BI EE Upgrade |
|
Decide on an Oracle Business Intelligence topology |
Before you begin an upgrade, ensure that you are familiar with the basic topologies in Oracle Business Intelligence 11g. |
Task 2: Decide Upon an Oracle Business Intelligence Topology |
|
Run RCU to install the BIPLATFORM schema |
Run the Repository Creation Utility to create the destination Oracle Business Intelligence 11g BIPLATFORM schema, which can be on a different database instance than the 10g schema. |
Task 3: Run RCU to Create the Destination BIPLATFORM Schemas |
|
Install and configure Oracle BI 11g |
For upgrade purposes, use the Enterprise install option. These options lead to the creation of an 11g configuration that contains a domain with a single managed server instance. |
|
|
Run Upgrade Assistant to upgrade the Oracle BI repository and catalog. |
Upgrade the repository and catalog for Oracle BI EE . If the destination is on a different machine than the source, then the source repository and catalog files must be accessible from the destination machine. When prompted:
|
|
|
Run Upgrade Assistant again to upgrade the Oracle BI EE Scheduler schema |
Upgrade the Oracle BI EE scheduler schema. When prompted:
|
|
|
Perform any required post-upgrade manual steps for Oracle BI EE |
The Upgrade Assistant automates many of the upgrade tasks, but there are cases where you must manually modify the configuration settings after running Upgrade Assistant. |
Task 7: Perform Any Required Post-Upgrade Configuration Tasks |
|
Verify the upgraded environment |
Log into the 11g Oracle BI EE system to verify that the upgrade was successful. |
Table 2-2 describes each of the steps in the upgrade process flow chart for BI Publisher, shown in Figure 2-1. The table also provides information on where to obtain more information on each step in the process.
Table 2-2 Steps in the BI Publisher Upgrade Process
| Step | Description | More Information |
|---|---|---|
|
Review the Upgrade Concepts in Oracle Fusion Middleware Upgrade Planning Guide |
Oracle Fusion Middleware Upgrade Planning Guide provides a high-level overview of how to upgrade Oracle Fusion Middleware, including compatibility information and instructions for upgrading any databases that support the middleware components. |
|
|
Understand the upgrade starting points |
Before planning the upgrade, become familiar with the supported starting points for an Oracle Business Intelligence upgrade. |
Task 1: Understand the Starting Points for BI Publisher Upgrade |
|
Decide on an Oracle Business Intelligence topology |
Before you begin an upgrade, ensure that you are familiar with the basic topologies in Oracle Business Intelligence 11g. |
Task 2: Decide Upon an Oracle Business Intelligence Topology |
|
Run RCU to install the BIPLATFORM Schema |
Run the Repository Creation Utility to create the destination BIPLATFORM schemas within the same, or a separate database instance from where the 10g schema exists. Note: If you have already run RCU to create the destination BIPLATFORM schema for Oracle BI EE, then you are not required to perform Task 3. Oracle BI EE and BI Publisher share the BIPLATFORM schema. |
Task 3: Run RCU to Create the Destination BIPLATFORM Schemas |
|
Install and configure Oracle BI 11g |
If you have already installed Oracle BI EE and selected the option to install BI Publisher, then you are not required to perform Task 4. |
|
|
Run Upgrade Assistant to upgrade the BI Publisher Repository |
Upgrade the BI Publisher repository. When prompted:
|
|
|
Run Upgrade Assistant again to upgrade the BI Publisher Scheduler Schema. Note: You can upgrade the repository and Scheduler Schema in any order. |
Upgrade BI Publisher Scheduler schemas. When prompted:
|
|
|
Perform any required post-upgrade manual steps for BI Publisher |
The Upgrade Assistant automates many of the upgrade tasks, but there are cases where you must manually modify the configuration settings after running Upgrade Assistant. |
Task 7: Perform Any Required Post-Upgrade Configuration Tasks |
|
Verify the upgraded environment |
Log into the 11g BI Publisher system to verify that the upgrade was successful. |
Table 2-3 describes each of the steps in the upgrade process flow chart for Oracle Real-Time Decisions, shown in Figure 2-2. The table also provides information on where to obtain more information on each step in the process.
Table 2-3 Steps in the Oracle Business Intelligence Real-Time Decisions Upgrade Process
| Step | Description | More Information |
|---|---|---|
|
Review the Upgrade Concepts in Oracle Fusion Middleware Upgrade Planning Guide |
Oracle Fusion Middleware Upgrade Planning Guide provides a high-level overview of how to upgrade Oracle Fusion Middleware, including compatibility information and instructions for upgrading any databases that support the middleware components. |
|
|
Understand the upgrade starting points |
Before planning the upgrade, become familiar with the supported starting points for an Oracle Real-Time Decisions upgrade. |
Task 1: Understand the Starting Points for Oracle Real-Time Decisions Upgrade |
|
Examine Oracle RTD and other system configurations |
If you have customized the 3.0.0.1 Oracle Real-Time Decisions system with specific server-side configuration parameter values, then examine and note down the customizations. If they have a direct equivalent, then you can replicate them later in the 11g upgraded system. |
Task 2: Examine Oracle RTD and Other System Configuration Settings |
|
Run RCU to install the BIPLATFORM Schema |
Run the Repository Creation Utility to create the destination BIPLATFORM schemas within the same, or a separate database instance from where the 10g schema exists. If you have already run RCU to create the BIPLATFORM schema for Oracle BI EE, or BI Publisher, then ignore this step. |
|
|
Install and configure Oracle Business Intelligence 11g. |
Installs Oracle Real-Time Decisions 11g on the same machine as the 10g installation. |
Task 4: Install and Configure Oracle Real-Time Decisions 11g |
|
Copy and reconfigure data from the 3.0.0.1 system to the 11g system |
There are three broad categories of data that affect Oracle RTD users, and the upgrade considerations for each category are slightly different. The three categories are:
|
Task 5: Copy and Reconfigure Data from 3.0.0.1 System to 11g System |
|
Reapply Oracle RTD and other system configuration settings |
If you had previously customized the Version 3.0.0.1 Oracle Real-Time Decisions system with specific server-side configuration parameter values, then you can reapply the settings that have a direct equivalent in 11g. |
Task 6: Reapply Oracle RTD and Other System Configuration Settings |
|
Upgrade Oracle Real-Time Decisions artifacts |
Upgrade the existing Oracle RTD 3.0 artifacts. |
|
|
Perform any required post-upgrade steps for Oracle Real-Time Decisions artifacts |
If you have Oracle RTD 3.0 clients, such as Java Smart Client, then turn off Web service security and run the clients in the new 11g environment. (This assumes that you do not need Web service security for the clients.) |
Task 8: Perform Any Required Post-Upgrade Configuration Tasks |
|
Verify the upgraded environment |
To verify that the Oracle Real-Time Decisions upgrade was successful, run test integration points in the Inline Services, then log into Decision Center, and verify that your reports are visible. |