| Oracle® Fusion Middleware Platform Developer's Guide for Oracle Real-Time Decisions 11g Release 1 (11.1.1) Part Number E16630-04 |
|
|
PDF · Mobi · ePub |
| Oracle® Fusion Middleware Platform Developer's Guide for Oracle Real-Time Decisions 11g Release 1 (11.1.1) Part Number E16630-04 |
|
|
PDF · Mobi · ePub |
In the previous chapter, we added an Advisor that returns an offer to the CRM application so the call center agent can present it to the customer. Once presented to the customer, we want to track whether the customer has accepted the offer and thus close the loop on the offer presentation/acceptance process. The feedback loop can be closed in different ways and at different times. It is not unusual to know the results only days or weeks after a decision or offer is made. Even then, in many cases, only the positive result is seen, but not the negative. Feedback can come directly from customers, from the agents handling the call, from operational systems that handle service, fulfillment or billing, or even from batch processes.
The way the feedback loop is closed with an Inline Service is by notifying the Real-Time Decision Server through the use of Informants.
This chapter contains the following topics:
In most cases, there are different events in the lifetime of an offer that are interesting from the point of view of tracking success. For example, the events in the life of a credit card offer may be:
Offer presented
Customer showed interest
Applied for the card
Received the card
Used the card
An argument could be made that only when the customer uses the credit card is there any real success. The goal is to bring more customers that not only show interest, apply and get the card, but for them to also use it, as card usage is what brings revenue to the company.
Usually, it is easier to track events that are closer to the presentation of the offer. For example, if an offer is presented in the call center by an agent, the agent can gauge the degree of interest shown by the customer. For an offer presented in a Web site, a click-through may be the indicator of interest.
Events further down the life of an offer may be much more difficult to track and decide on the right offer. Therefore, it is not unusual to begin a project having only the immediate feedback loop closed, and adding events further down the road as the system matures. Nevertheless, even with only immediate feedback, Oracle RTD can provide significant lift in marketing decisions.
This section contains the following topics:
Events are defined at the Choice Group level. While they can be defined at any level in the hierarchy, they are usually found at the highest level, close to the root.
We will define two events, one to represent the fact that an offer was presented to the customer, and the other to represent the fact that the offer was accepted. For the tutorial, we will assume that every offer selected as a result of the Advisor will be presented, and that the acceptance of offers is known immediately.
To define events in a choice group:
In the Inline Service Explorer, under Choices, double-click the Choice Group Cross Selling Offer.
Select the Choice Events tab. Click Add to add two events, one named presented and the second named accepted. Note that these event names are simply labels and do not correspond to any internal state of the offer. These events will be used in a Choice Event Model (described in the next section), where these event names will take on meaning.
For each event, set the Statistic Collector to Choice Event Statistic Collector using the drop-down list. This is the default statistics collector. This will provide for statistics gathering regarding each of the events.
Make sure that Event History (days) is set to Session Duration.
Leave the Value Attribute empty.
This is used for the automatic computation of the event. In this tutorial, we will be causing the events to be recorded from the logic of the feedback Informant.
Choose File > Save All.
Events are defined and are ready to have statistics tracked. In addition to tracking statistics, we are interested in having a self-learning-model learn about the correlations between the characteristics of the customers, calls and agents, and the success or failure of offers. This knowledge is useful in two ways:
It is useful for providing insight and understanding to the marketing and operations people.
It is useful to provide automatic predictions of the best offer to present in each situation.
In this tutorial, we will show both usages.
To define a choice event model:
In the Inline Service Explorer, right-click the Models folder and select New Choice Event Model. Call the new model Offer Acceptance Predictor and click OK.
In the Editor, deselect Default time window and set Time Window to a week.
Under Choice Group, select Cross Selling Offer.
This is the group at the top of the choice hierarchy for which we will track offer acceptance using this model.
Under Base Event, select presented. Recall that you had defined these event names in the choice group in the previous section.
This is the event from which we want to measure the success. We want to track whether an offer was accepted after it was presented.
In Positive Outcome Events, click Select, choose accepted, and click OK. For the tutorial, this is the only positive outcome. If more events were being tracked, we would add them here also.
Optionally, you can change the labels to be more offer-centric.
There are other settings that are useful for Choice Event Models. Using the Attributes tab, you see there are two main settings: partitioning attributes and excluded attributes. The following sections describe these and other settings.
This section contains the following topics:
Partitioning attributes are used to divide the model along strong lines that make a big difference. For example, the same offer is likely to have quite different acceptance profiles when presented in the Web or the call center, thus the presentation channel can be set as a partitioning attribute.
You can have more than one partitioning attribute, but you should be aware that there may be memory usage implications. Each partitioning attribute multiplies the number of models by the number of values it has. For example, a model having one partitioning attribute with three possible values and another with four possible values will use twelve times the memory used by a non-partitioned model. Nevertheless, do use partitioning attributes when it makes sense to do so, as it can significantly improve the predictive and descriptive capabilities of the model.
Sometimes, it does not make sense to have an attribute be an input to a model. For example, we saw in the Reason Analysis model (as described in Section 3.1.2, "Viewing Analysis Results in Decision Center") that having the reason code as an input created a correlation between reason code and the call reason choices. This relationship was entirely expected due to the logic we had written in Section 2.9.4, "Adding Logic for Selecting Choices." Since this correlation was artificial and did not offer insight, we excluded reason code from the model.
It should be noted that the reason code could be an important factor for other models and should not be excluded. This is why we exclude the reason code attribute at the model level instead of at the entity attribute level (by unchecking the "Use For Analysis" property), as the latter option would have excluded it across all of the Inline Service's models. For example, in the Offer Acceptance Predictor model, we would be very interested to see if offer acceptance was correlated with the reason code.
The Learn Location tab has the settings for the location in the process where model learning happens. The default, On session close, is a good one for most cases. Learning on specific Integration Points may be useful when it is desired to learn from more than one state in a session.
The choice event model is complete and it is ready to be used. In order to feed it with the right information, we need to complete the logic for closing the loop.
In order to have available which offer was extended, we will remember the offer ID in the session. This is not absolutely necessary, as the front-end client could remember that, but here we do not want to make any assumptions about the capabilities of the front end. We will just use a simple String attribute to remember the offer; in more complex cases we would use an array to remember many choices.
To remember the extended offer:
In the Inline Service Explorer, double-click Session under Entities.
Click Add Attribute, then add an attribute named Offer Extended.
Enter a description. Deselect Show in Decision Center and Use for Analysis. Click OK.
We do so because for now, we will treat this as an internal variable, not to be seen by the business users.
In the Inline Service Explorer, double-click Get Cross Sell Offer under Integration Points > Advisors.
In the Asynchronous Logic tab, update the existing code by adding several lines to record the presented event and to set the OfferExtended session attribute with the value of the choice id. The completed code should be as follows:
logInfo("Integration Point - Get Cross Sell Offer");
logInfo("  Customer age = " + session().getCustomer().getAge() );
// 'choices' is array returned by the 'Select Offer' decision
if (choices.size() > 0) {
  //Get the first offer from array
  Choice offer = choices.get(0);
  //For the selected offer, record that it has been 'presented'
  offer.recordEvent("Presented");
  //Set the session attribute 'OfferExtended' with the offer's ID.
  session().setOfferExtended(offer.getSDOId());
  logInfo("  Offer presented: '" + offer.getSDOLabel() + "'");
}
This will assign the SDOId of the selected choice to the OfferExtended attribute of the session entity. The SDOId is a unique identifier. Every object in an Oracle RTD configuration has a unique SDOId. It will also record the Presented event for the selected offer. Note the event name is in lowercase and corresponds to the choice event id for Presented. To see the id, go to Inline Service Explorer, expand Choices, double-click on Cross Selling Offer, click on the Choice Events tab, and click the label/id Toggle icon:
At this point of the decision, the session knows which offer has been chosen to be presented to the customer by the call center agent (through the Get Cross Sell Offer Advisor). We do not yet know the response from the customer. The response will be sent through a feedback Informant described in the next section.
This Informant provides Oracle RTD with the information needed to determine the result of the offer selection decision.
To create the feedback Informant:
In the Inline Service Explorer, expand Integration Points, right-click the Informants folder, and select New Informant. Call the Informant Offer Feedback.
In the Editor, type a description. Under External System, select CRM. Under Order, enter 4.
To add a session key to the Offer Feedback Informant, click Select next to the Session Keys list. Select customerId and click OK.
Click Add to add an incoming parameter. Call it Positive.
Select the data type String if is not already selected and click OK.
Leave it unmapped. We do not need to map it to any session attribute because we will use this argument immediately to determine whether the offer was accepted or not. A yes value will be used to indicate offer acceptance.
Using the Logic tab, enter the following under Logic to record the acceptance event when appropriate.
logInfo("Integration Point - Offer Feedback");
//"yes" or "no" to accept offer.
String     positive = request.getPositive();
positive = positive.toLowerCase();

//Get the offer id from session attribute 'OfferExtended'
String extendedOfferID = session().getOfferExtended();
if (extendedOfferID != null) {
   //Get the offer from choice group 'Cross Selling Offer'
   Choice offer = CrossSellingOffer.getChoice(extendedOfferID);
   if (offer != null){
     String offerId = offer.getSDOId();
     //If response is "yes", then record the offer as accepted.
    if (positive.equals("yes")) {
      offer.recordEvent ("Accepted");
      logInfo("  Offer '" + offer.getSDOLabel() + "' accepted");
    }
  }
}
Save all and redeploy the Inline Service. On the Deploy dialog, check Terminate Active Sessions (used for testing).
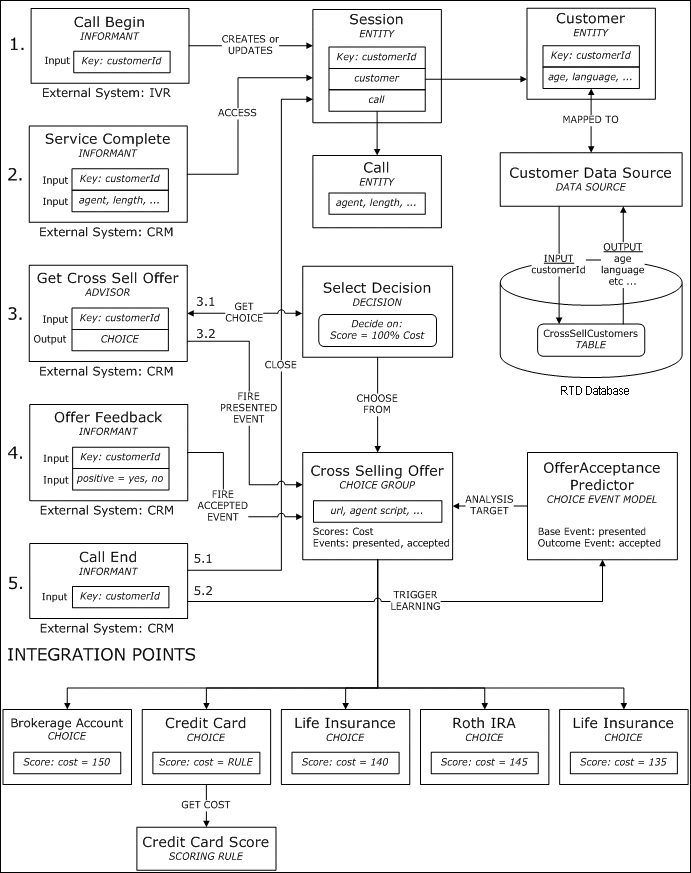
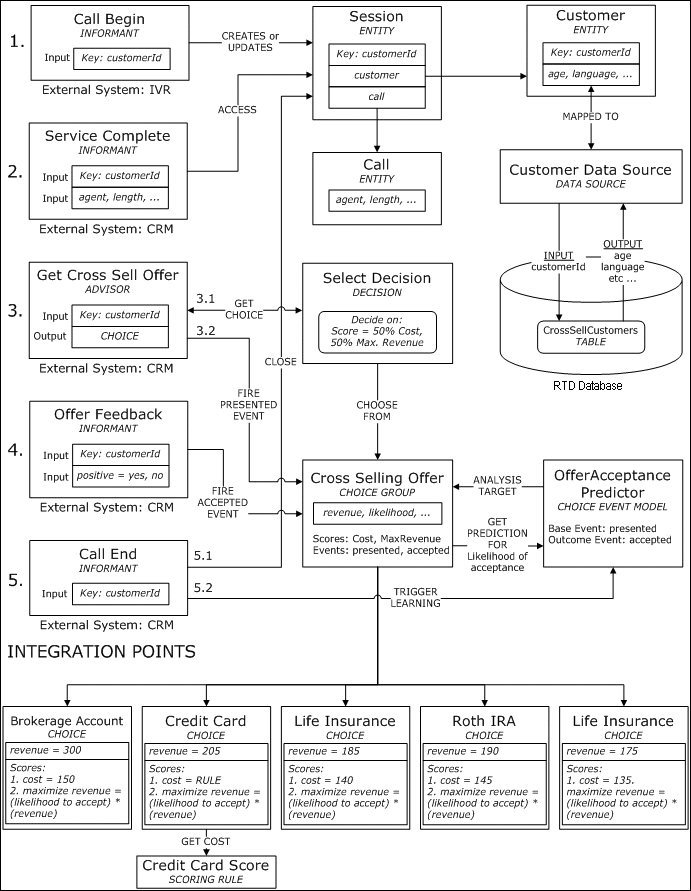
The following diagram shows how the Get Cross Sell Offer Advisor retrieves and presents an offer, and then the Offer Feedback Informant accepts or rejects the offer. When the Call End Informant closes the session, the Offer Acceptance Predictor model is updated with the offer Presented/Accepted events.
Figure 5-1 Tutorial Inline Service Objects: Advisor/Informant Flow
In order to test the Offer Feedback Informant, we need to first call the Get Cross Sell Offer to retrieve and present an offer.
To test the feedback Informant:
In Test View, select the Integration Point Get Cross Sell Offer. Enter a value for the customerId, such as 10.
Click the Send icon:
Then, confirm in the Response subtab that an offer was retrieved. In the Log subtab, you should see something similar to the following:
00:45:28,466 Integration Point - Get Cross Sell Offer
00:45:28,466   Customer age = 38
00:45:28,466   Offer presented: 'Credit Card'
Note that even if you tried different values for customerId, the offer presented is always Savings Account or Credit Card. This is because we have only one performance goal at this point - to minimize cost, and Savings Account or Credit Card is the lowest cost, depending on the age of the customer.
Now select the Offer Feedback Informant from the Integration Point drop-down list. Leave the customerId as it is, as we want to continue with the same session. Enter a value for input Positive, such as yes.
Click Send and confirm in the Log subtab that the offer retrieved by the Get Cross Sell Offer Advisor is accepted. You should see something similar to the following:
00:46:01,418 Integration Point - Offer Feedback
00:46:01,418   Offer 'Credit Card' accepted
Change the input Positive value to no and re-Send the Offer Feedback Informant. The Log subtab will look something similar to the following:
00:47:31,494 Integration Point - Offer Feedback
We will now update the Load Generator script to include calls to the GetCrossSellOffer Advisor and the OfferFeedback Informant. Note that these integration point calls should take place after the ServiceComplete Informant but before the CallEnd Informant, which closes the session. The logic is: 1) call begins, 2) regular service is complete - we record and analyze call reasons using the ReasonAnalysis model, 3) agent presents a cross sell offer to customer, based on lowest Cost goal, 4) we record if customer has accepted offer, 5) call/session ends, OfferAcceptancePredictor model learns on offer presented/accepted.
To add the GetCrossSellOffer Advisor to the Load Generator script:
Open Load Generator by running RTD_HOME\scripts\loadgen.cmd. Then, open the previous script.
Select the Edit Script tab, then right-click the left tree view and select Add Action. The action is of type Message and the Integration Point name should be GetCrossSellOffer.
In Input Fields, right-click and chose Add item to add an input field. Click in the space under Name and type customerId, then press Enter.
Click Variable for the input field and use the drop-down list to choose the matching variable, var_customerId (see Section 3.1.1, "Creating the Load Generator Script" for more information). Mark customerId as a session key by selecting Session Key.
After we add this action to the script, it is placed at the bottom of the actions list. We need to adjust the order so that GetCrossSellOffer is called after ServiceComplete. In the left side of the Edit Script tab, right-click GetCrossSellOffer and select Move Up or Move Down so that the order is CallBegin, ServiceComplete, GetCrossSellOffer, and CallEnd.
Save the Load Generator script.
To add the OfferFeedback Informant to the Load Generator script:
Before we add the call to OfferFeedback in the Edit Script tab, we need to create a new variable in the Variables tab. Recall in the definition of the OfferFeedback Informant, the parameter positive is used to indicate offer acceptance. In Load Generator, we will set the value of this parameter to randomly be yes 30% of the time and no 70% of the time. We do this by using a weighted string array.
In the Variables tab, in the left side, right-click on the folder Script and select Add Variable. Enter var_positive for Variable name, then set the Contents type to Weighted String Array. Add two items to the array (right-click in the space below the content type and select Add Item). For the first item, double-click in the Weight cell to make it editable and type the value 30, and in the corresponding String cell, type the value yes. The second item should have the weight value of 70 and string value of no. Note that the weights do not have to add up to 100, because they are normalized automatically. Weight values of 6 and 14 would have the same desired effect.
Figure 5-2 Weighted String Array Variable

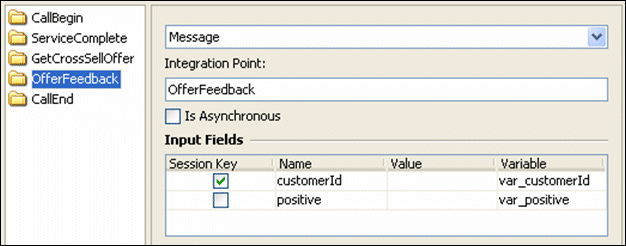
Select the Edit Script tab, then right-click the left tree view and select Add Action. The action is of type Message and the Integration Point name should be OfferFeedback.
In Input Fields, right-click and chose Add item to add an input field. Click in the space under Name and add customerId. In the Variable column, select the matching variable, var_customerId (see Section 3.1.1, "Creating the Load Generator Script" for more information). Mark customerId as a session key by selecting Session Key.
Again in Input Fields, right-click and chose Add item to add an input field. Click in the space under Name and add positive. In the Variable column, select the matching variable, var_positive.
After we add this action to the script, it is placed at the bottom of the actions list. We need to adjust the order so that OfferFeedback is called after GetCrossSellOffer. In the left side of the Edit Script tab, right-click OfferFeedback and select Move Up or Move Down so that the order is CallBegin, ServiceComplete, GetCrossSellOffer, OfferFeedback, and CallEnd.
Figure 5-3 Adding the OfferFeedback Informant to the Load Generator Script
In the Security tab, enter your User Name and Password.
Save the Load Generator script.
You can run the Load Generator script at this point. Again, it is recommended that you remove existing data before running the script so the results are not mixed with older data - see Section 3.2, "Resetting the Model Learnings" for information about how to do this.
If you do run the Load Generator script, you can view the results in Decision Center. Log in to Decision Center and click the Cross Selling Offer choice group to show the results of the Offer Acceptance Predictor model. Click the Performance tab and then the Counts subtab. The distribution of offers and the Pareto graph should look like the one shown in Figure 5-4.
Figure 5-4 Decision Center Performance Counts for Cross Selling Offer
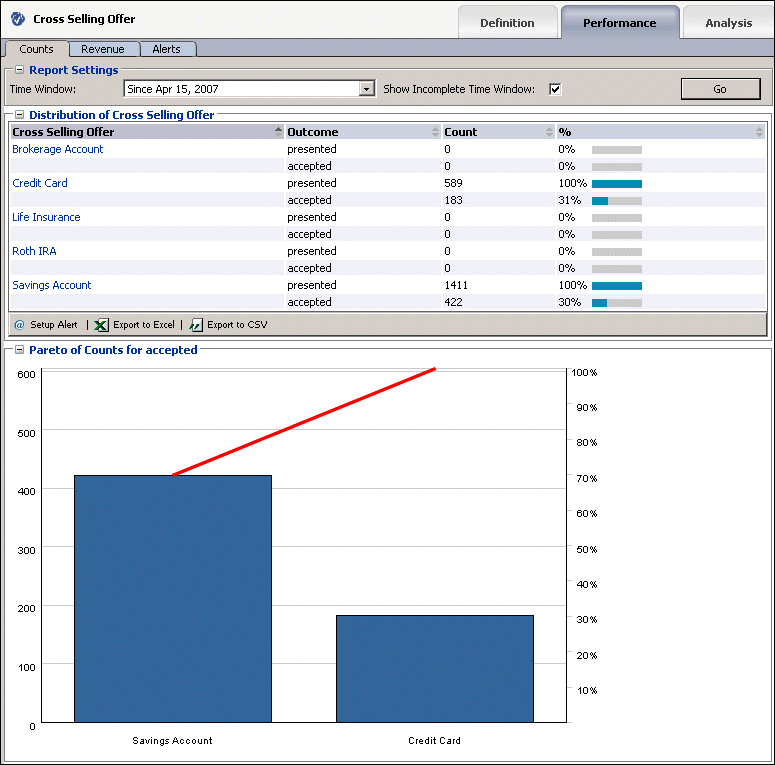
Notice that only two offers were presented - Credit Card and Savings Account, and each one had an acceptance rate of about 30%. This is entirely expected due to the logic we have set up so far: 1) Only one performance goal - minimizing Cost - was to be met, and the Cost is lowest for Savings Account or Credit Card, depending on the age of the customer (see Section 4.4, "Scoring the Choices"). In the Load Generator script, we specified that 30% of the time, a positive response to an offer is registered through the OfferFeedback Informant. If we drill down into the analysis reports of individual offers, we will not see much correlation between the acceptance of an offer and session attributes. This is because we are using random customer profile data and forcing the acceptance rate to be 30%, regardless of customer or other attributes (such as call length, call agent name, call reason, and so on).
We have now demonstrated how to use performance goal to decide which offer to present and how to use a choice event model to record how often presented offers are accepted. We have only used the model for analysis so far. In the next section, we will add a second performance goal (Maximize Revenue) and use what the model has learned in order to influence which offer is to be presented. We will also introduce an artificial bias that increases the likelihood of customers who have two or more children to accept the Life Insurance offer if it is presented. We will then be able to see how the bias affects the model results.
The model we have created learns the correlations between the characteristics of the customers, the call characteristics, and the cross selling results. This model can be used in a predictive fashion, to predict the likelihood an offer will be accepted. We can use the likelihood information to adjust the values of offers when deciding which offer to present. For example, if offer A is twice as likely to be accepted as offer B, it is reasonable to favor offer A when an offer is picked to be presented. In this section, we will introduce a second performance goal - Maximize Revenue - whose value/score is calculated as the product of the likelihood of acceptance and the base Revenue.
For example, if the base Revenue for the Brokerage Account offer is $300, and the likelihood of acceptance is 30% (0.3), then the Maximize Revenue score is $300 x 0.3 = $90. If the base Revenue for the offer Life Insurance is $185, but the likelihood of acceptance is 60% (0.6), then the Maximize Revenue score is $185 x 0.6 = $111. Even though Brokerage Account had a higher base Revenue value, the Life Insurance offer would be favored because its Maximize Revenue score is higher.
Note that we will be choosing the offer to present based on both the Cost and Maximize Revenue performance goals, so in the previous example, Brokerage Account may still win if the weighted total of its Cost and Maximize Revenue is higher than the total for Life Insurance.
We will begin this section by adding a base Revenue, then adding the second performance goal Maximize Revenue. Then we will set the score for the Maximize Revenue goal to Revenue multiplied by the likelihood of acceptance. Afterwards, we will update the Select Offer decision so that both Cost and Maximize Revenue goals are considered when choosing an offer to present. Finally, in the Offer Feedback, we will add logic to introduce offer acceptance bias for customers with a certain profile who are presented the Life Insurance offer.
This section contains the following topics:
Section 5.2.2, "Adding a Second Performance Goal (Maximize Revenue)"
Section 5.2.3, "Calculating Score Value for the Maximize Revenue Performance Goal"
Section 5.2.4, "Updating the Select Offer Decision to Include the Second Performance Goal"
Section 5.2.5, "Adding a Choice Attribute to View Likelihood of Acceptance"
Section 5.2.7, "Introducing Offer Acceptance Bias for Selected Customers"
To add a base Revenue choice attribute:
In the Inline Service Explorer, under Choices, double-click the Cross Selling Offer Choice Group. In the Choice Attributes tab, click Add.
Set the name of this attribute to Revenue of data type Integer. Make sure the Overridable option is selected, as we will assign a different value for each of the offers, then click OK.
For each choice under the Cross Selling Offer Choice Group, set the value of the Revenue attribute as shown in Table 5-1.
Earlier in this tutorial, we defined a Cost performance goal. Now we will add a second performance goal called Maximize Revenue. We will use the likelihood of acceptance and the base Revenue of the choice in calculating the score for this new performance metric. The formula for this is: (Revenue) * (likelihood of acceptance) = potential revenue score.
To add a second performance goal:
In the Inline Service Explorer, double-click Performance Goals to open the editor. Click Add to add a Performance Metric. Name the metric Maximize Revenue, then click OK.
In Optimization, choose Maximize and make the metric Required. Since $1 of cost equals $1 of revenue, the Normalization Factor does not need to be adjusted.
Next, we need to add this metric to the Cross Selling Offer Choice Group. In the Inline Service Explorer, double-click Cross Selling Offer. In the Scores tab, click Select Metrics. In the Select dialog, select Maximize Revenue and click OK.
To calculate the score value for the Maximize Revenue goal, we need the base Revenue and the likelihood of acceptance value as determined by the Offer Acceptance Predictor choice event model. This can be retrieved using the edit value dialog by changing the value source to Model Prediction.
To calculate the score value for the Maximize Revenue goal:
In the Inline Service Explorer, under Choices, double-click the Cross Selling Offer choice group. In the Scores tab, click in the Score column for the Maximize Revenue metric, then click the ellipsis to bring up the Edit Value dialog.
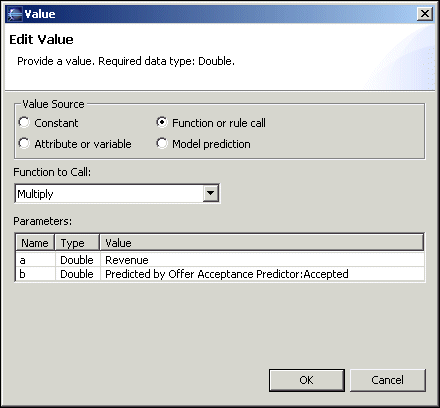
For the Value Source, select Function or rule call. Under Function to Call, choose the function Multiply. In the Parameters table, click in the Value cell for parameter a. Click the ellipsis and choose Attribute or variable, then expand the Choice folder, select Revenue, and click OK. In the Parameters table, click in the Value cell for parameter b. Click the ellipsis and choose Model Prediction. Choose the likelihood predicted by the Offer Acceptance Predictor model and the Accepted event, then click OK. Click OK again in the Edit Value dialog.
Figure 5-5 Edit Value Dialog for Maximize Revenue Score
The actual value of the likelihood is from 0 to 1, 1 being 100% likely to accept. It is also possible for the value to be NaN (Not a number), which means the model did not have enough data to compute a likelihood value. In such situations, the Maximize Revenue score cannot be computed and the offer selection by the Select Offer decision will be based on built-in score comparison logic, which depends on whether the score is or is not required.
By defining the score for Maximize Revenue on the choice group level, all of the choices within this group will inherit the definition and apply choice-specific values for Revenue and likelihood of acceptance during run time.
We have so far defined a new performance metric and how to calculate its value. We will now update the Select Offer decision to consider both performance metrics when choosing an offer to present.
To update the Select Offer Decision:
In the Inline Service Explorer, expand the Decisions folder and double-click Select Offer.
In the Selection Criteria tab, you should see only one Performance Goal in the Priorities for the "Default" Segment table, Cost, with a Weight value of 100%. Click Goals, then select the goal Maximize Revenue and click OK.
The priorities table now shows two performance goals, each with a Weight of 50%. The default is to evenly split weighting between all selected metrics. If you wanted the Maximize Revenue performance goal to take precedence over Cost, you could adjust the percentages so that it had more weight. We will use the default Weight of 50% in this tutorial.
Table 5-2 shows an example of how the Select Offer decision calculates a total score for a particular offer, assuming the offer's Cost score is 150 and its Maximize Revenue score is 215.
Table 5-2 Calculating a Total Score for an Offer
| Performance Goal | Score | Weight | Max/Min | Norm. | Weighted Score |
|---|---|---|---|---|---|
|
Cost |
150 |
50% |
Min |
1 |
-75 |
|
Maximize Revenue |
215 |
50% |
Max |
1 |
107.5 |
The Total Score based on the values in Table 5-2 is 32.5. The weighted Cost score is negative because the optimization is Minimize. The total score of the offer is the sum of the two weighted scores. The total score is calculated for each offer, and the offer with the highest value will be selected.
To view the value of the likelihood of acceptance, we can add a choice attribute and display it through logInfo or in the Response tab of Test view.
To add a choice attribute:
In the Inline Service Explorer, under Choices, double-click the Cross Selling Offers choice group. In the Choice Attributes tab, click Add to add an attribute. In the properties dialog, set the Display Label to Likelihood Of Acceptance. Set the Data Type to Double.
Deselect the option Overridable, because all choices in this choice group will use the same definition for this attribute. Then, select the option Send to client and click OK.
In the Value column for the Likelihood Of Acceptance attribute, click the ellipsis to set its value. In the Edit Value dialog, set the Value Source to Model prediction. Choose the Offer Acceptance Predictor model and the Accepted event, then click OK.
Save all changes to the Inline Service.
To view values of the likelihood, add a logInfo statement in the Get Cross Sell Offer Advisor, as follows:
In the Inline Service Explorer, double-click the Get Cross Sell Offer folder under Integration Points > Advisors.
In the Asynchronous Logic tab, update the existing code by adding several lines to print the value of the Likelihood Of Acceptance. The completed code should appear as follows:
logInfo("Integration Point - Get Cross Sell Offer");
logInfo("  Customer age = " + session().getCustomer().getAge() );
// 'choices' is array returned by the 'Select Offer' decision.  The
// name 'choices' was set (and can be changed) in the 'Choice Array'
// text box in the 'Select Offer' decision's 'Pre/Post Selection
// Logic' tab.
if (choices.size() > 0) {
  //Get the first offer from array
  Choice offer = choices.get(0);
  //For the selected offer, record that it has been 'presented'
  offer.recordEvent("Presented");
  //Set the session attribute 'OfferExtended' with the offer's ID.
  session().setOfferExtended(offer.getSDOId());
  logInfo("  Offer presented: '" + offer.getSDOLabel() + "'");
  //Cast selected offer to type CrossSellingOfficeChoice -
  //the base Choice type of choice group 'Cross Selling Offer'
  CrossSellingOfferChoice cso = (CrossSellingOfferChoice) offer;
  logInfo("  Likelihood of Acceptance = " + cso.getLikelihoodOfAcceptance());
}
To see the effect of the changes to the Advisor, save all and deploy the Inline Service.
In Test view, select the Get Cross Sell Offer Integration Point and input a value for customerId, such as 8. Click Send. In the Response subtab in Test View, you should see something similar to the image shown in Figure 5-6.
In the Log subtab, you should see something similar to the following:
14:07:37,908 Integration Point - Get Cross Sell Offer
14:07:37,908   Customer age = 57
14:07:37,908   Offer presented: 'Savings Account'
14:07:37,908   Likelihood of Acceptance = 0.30354643094453865
If you are getting a value of NaN (Not A Number) for Likelihood Of Acceptance, this means the model did not have enough data to compute the likelihood value for this offer. The number of iterations necessary to reach model convergence (likelihood numbers no longer NaN) depends on the application and quality of the data.
In our case, we had imposed a definite offer acceptance rate of about 30% (see Section 5.1.7, "Updating the Load Generator Script"), and since we are using random customer profile data, the Offer Acceptance Predictor model should converge quickly and be able to compute likelihood of acceptance values within just a few hundred iterations. Before the model has reached convergence, the offer selection process is based on built-in score comparison logic, which depends on whether the score is required.
The following diagram shows the Get Cross Sell Offer Advisor retrieving an offer from the Cross Selling Offer choice group, where the total score of each offer is a weighted sum of two scores - Cost and Maximize Revenue.
Figure 5-7 Tutorial Inline Service Objects: Weighted Sum
Earlier in the Offer Feedback Informant, we specified whether to accept a presented offer through the Positive Informant parameter. We then updated the Load Generator script so that when this Informant is called, we pass the value yes to the parameter Positive 30% of the time (see Section 5.1.7, "Updating the Load Generator Script"). This percentage did not depend on any customer profile data - any presented offer had a 30% chance of being accepted by any customer.
If we run the Load Generator script at this point, the models would not show any strong correlation between customer attribute to the acceptance of the offer. We will introduce an artificial bias in the Offer Feedback Informant logic which will always record positive offer acceptances for customers who have two or more children and who were presented the Life Insurance offer. This logic is in addition to the default acceptance rate (as defined in the Load Generator script) and will skew the acceptance rate for the Life Insurance offer to more than 30%. In Decision Center, we will be able to see clear correlations between the number of children and the acceptance rate of this offer.
To introduce the Offer Acceptance bias:
In the Inline Service Explorer, double-click Offer Feedback under Integration Points > Informants.
In the Logic tab, update the existing code by adding several lines to add offer acceptance bias for customers who have two or more children and who were presented the Life Insurance offer. The completed code should appear as follows:
logInfo("Integration Point - Offer Feedback");
//"yes" or "no" to accept offer.
String    positive = request.getPositive();
positive = positive.toLowerCase();

//Get the offer id from session attribute 'OfferExtended'
String extendedOfferID = session().getOfferExtended();
if (extendedOfferID != null) {
  //Get the offer from choice group 'Cross Selling Offer'
  Choice offer = CrossSellingOffer.getChoice(extendedOfferID);
  if (offer != null){
    String offerId = offer.getSDOId();
    //Introduce artificial bias for customers with 2 or more
    //children to always accept "LifeInsurance" if it was
    //selected after scoring.
    //If data source is Oracle, change the following method from
    //getNumberOfChildren() to getNumberofchildren()
    int numOfChildren = session().getCustomer().getNumberOfChildren();
    if ( numOfChildren >= 2 && offerId.equals("LifeInsurance")) {
       positive="yes";
    }
    //If response is "yes", then record the offer as accepted.
    if (positive.equals("yes")) {
      offer.recordEvent ("Accepted");
      logInfo("  Offer '" + offer.getSDOLabel() + "' accepted");
    }
  }
}
Save all changes and deploy the inline service.
In Section 5.1.7, "Updating the Load Generator Script," we updated the Load Generator Script to include the GetCrossSellOffer Advisor and the OfferFeedback Informant. At that point, the offer selection process was based on only one performance goal - to minimize Cost. We then added a second performance goal, Maximize Revenue, which uses predicted values of acceptance likelihoods as computed by the Offer Acceptance Predictor model. The offer selection process now depends on both performance goals. We have also introduced an artificial acceptance bias for customers who fit a certain profile, and who were presented the Life Insurance offer. We will now run the Load Generator script again to see the results.
To run the Load Generator script:
Remove all the operational data for this Inline Service through the System MBean Browser for Oracle RTD in Enterprise Manager, as described in steps 1 through 7 of Section 3.2, "Resetting the Model Learnings."
Start Load Generator and open the Load Generator script previously defined. There should be no changes necessary.
In the Security tab, enter your User Name and Password, then start the Load Generator script. After about 200 total finished scripts, click the Pause icon to temporarily stop sending requests to the server:
Then, view the server's output in the server log file, which is in the RTD_RUNTIME_HOME\log directory. The generic name of the server log file is server_name-diagnostic[-<n>].log.
You will see that the printed Likelihood Of Acceptance values are NaN for all sessions. This is an indication that the model has not yet learned enough data to be able to compute the likelihood of acceptance. Note that offers are still being presented despite the lack of likelihood values. Offers are being selected using built-in scores comparison logic.
Un-pause the Load Generator script and let it finish running for 2000 total finished scripts. In the server output, you should now see actual values for Likelihood Of Acceptance, varying around 0.3 for all offers except Life Insurance, which has higher values because of the bias introduced.
It is important to note that the model-predicted Likelihood Of Acceptance values for a given offer will differ for different customer profiles. For example, suppose we have two customers John and Tom, who only differ in the number of children they have. If we printed the Likelihood Of Acceptance values for the Life Insurance offer for these two customers (at a snapshot in time), we will see a higher value for Tom, as shown in Table 5-3. This is because Tom has three children, and is therefore more likely to accept the Life Insurance offer, if it is presented to him.
Table 5-3 Likelihood of Acceptance for Life insurance Offer
| Customer | Number of Children | Likelihood of Acceptance for Life Insurance Offer |
|---|---|---|
|
John Doe |
0 |
.32 |
|
Tom Smith |
3 |
.89 |
Since we determine which offer to present to the customer based on the combination of Cost and Maximize Revenue scores, and because Maximize Revenue depends on the model's predicted Likelihood Of Acceptance value for each offer, the Life Insurance offer will have a high Maximize Revenue value for customers with two or more children, and therefore for such customers, Life Insurance will be presented (and then accepted) far more frequently than other offers!
To view the results of the Load Generator run, log in to Decision Center. Click the Cross Selling Offer Choice Group in the left navigation box. This will show the results of the Offer Acceptance Predictor model. Click the Performance tab and then the Counts subtab. You should see a table similar to the one shown in Figure 5-8.
Figure 5-8 Performance Counts for Cross Selling Offer Choice Group
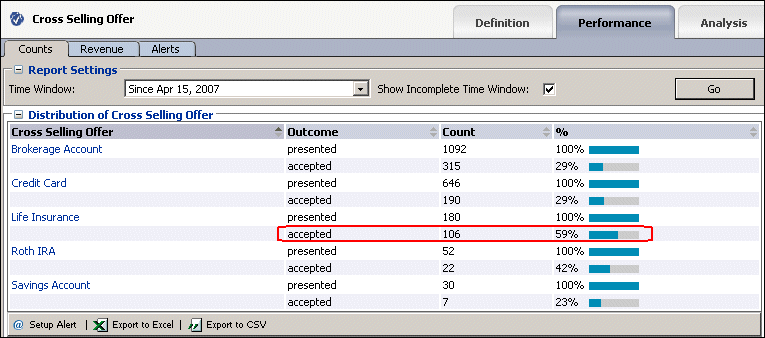
The Decision Center table shows the distribution of the offers - how many were presented and how many were accepted for each offer. Except for Life Insurance, all of the other offers had acceptance rate of about 30%, as shown in Figure 5-8. This is expected because of how we set up the Load Generator script (see Section 5.1.7, "Updating the Load Generator Script"). The acceptance rate for Life Insurance is higher than 30% because of the artificial bias we introduced in Section 5.2.7, "Introducing Offer Acceptance Bias for Selected Customers." The bias dictated that in addition to 30% of the customers accepting any offer, customers who had two or more children and were offered Life Insurance will always accept the offer.
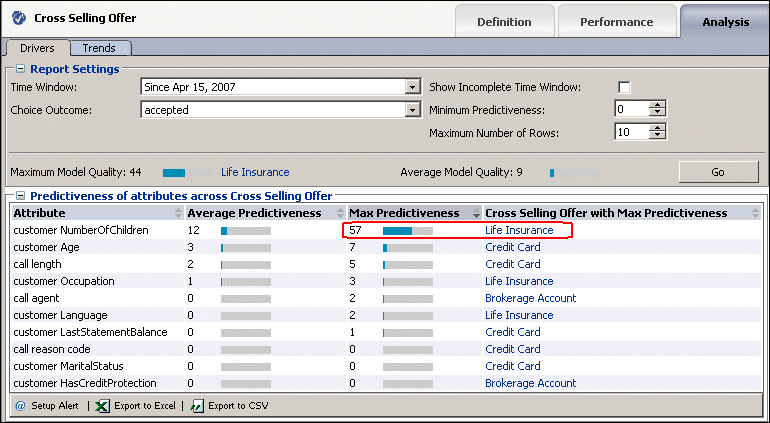
Given the artificial bias, the model results should show that for the Life Insurance offer, the NumberOfChildren attribute will be an excellent predictor for whether or not the offer will be accepted. This is exactly what we see in the Decision Center reports: click the Cross Selling Offer Choice Group and click on the Analysis tab, then the Drivers subtab. In the Report Settings section, change the Minimum Predictiveness value to 0 and then click Go. You will see a list of attributes, ordered by the maximum predictiveness value. The highest value for Max Predictiveness should be for the NumberOfChildren attribute, since it is the only artificial bias we added. The corresponding offer should be Life Insurance, similar to the image shown in Figure 5-9.
Figure 5-9 Cross Selling Offer Analysis Drivers
We can further analyze the importance of the NumberOfChildren attribute for the Life Insurance offer by viewing reports specific to this offer. In the navigation box in Decision Center, expand the Cross Selling Offer Choice Group and click the choice Life Insurance, then click the Analysis tab and finally the Drivers tab. This report shows the important drivers for acceptance of this particular offer (Life Insurance).
In the Report Settings section, change the Minimum Predictiveness value to 0 and then click Go. You will see a list of attributes, ordered by the Predictiveness value. The NumberOfChildren attribute should have the highest predictiveness value. Click the attribute name to display more detailed reports, one of which should look similar to Figure 5-10.
Figure 5-10 Life Insurance Offer Analysis Drivers
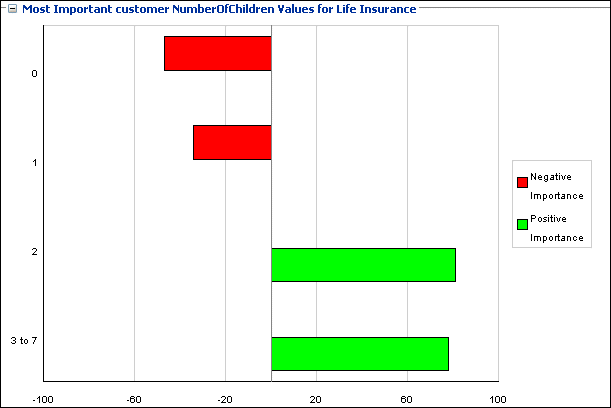
The graph shown in Figure 5-10 shows that for NumberOfChildren values of 2 and above, there is a strong positive correlation for offer acceptance. This means that the number of acceptances of this offer for these attribute values (2 or more) is much higher than expected. Similarly, for values of 0 or 1, the correlation is also very strong, but is negative, meaning that customers with 0 children or 1 child did not accept Life Insurance as much as expected.