| Oracle® WebCenter Content User's Guide for Content Server 11g Release 1 (11.1.1) Part Number E10797-03 |
|
|
PDF · Mobi · ePub |
| Oracle® WebCenter Content User's Guide for Content Server 11g Release 1 (11.1.1) Part Number E10797-03 |
|
|
PDF · Mobi · ePub |
Oracle WebCenter Content Server provides a simple interface using standard Web applications and common navigational tools to provide access to the tasks necessary to find and contribute content.
This chapter provides an overview of the standard Content Server Web pages and describes how to use and customize the navigation features of the interface in the following topics:
Consumers and contributors access Content Server from a standard Web browser. The computer you use to access Content Server is a client computer. You can access Content Server on a supported client computer from a Web browser listed in Table 2-1.
Table 2-1 Supported Web Browsers
| Browser | Versions |
|---|---|
|
7.0 or higher |
|
|
3.5 or higher |
|
|
4.0 or higher |
|
|
10.0 or higher |
Note:
If you are using Firefox, set Firefox to open links in a new window instead of a new tab. In some cases, help pages opened in a new tab are not viewable until the applet that launched the help closes. Opening the help in a separate window makes it viewable while the applet that launched the help runs.
To access Content Server, enter its Web address (Uniform Resource Locater or URL) in a supported browser and log in. The URL specifies the host name and port number for Oracle WebCenter Content Server.
The host name is the name of the computer that is running the Oracle WebCenter Content Managed Server. The default port number for Content Server is 16200.
To access Content Server:
Browse to your Content Server instance with a Web URL in this format:
http://host_name:port_number/cs/
For example:
http://example.com:16200/cs/
On the Content Server home page, click Login.
Enter your user name and password, and click Sign In.
Your Content Server home page opens. For information about this page, see Section 2.3.1, "Home Page."
The Content Server interface is very configurable, so your content server Web pages might look different than those described throughout this guide. For example, you may see special colors, icons, and logos, or your system administrator may choose to add, change, or hide functions on certain pages. For user documentation specific to your content server system, contact your system administrator.
Note:
This documentation assumes that you are using the default Trays layout.
This section covers the following topics:
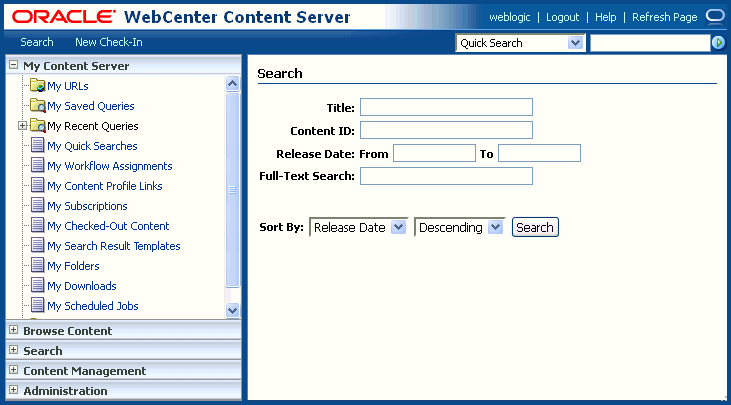
The home page opens when you first log in. The home page typically includes the navigation tray, the top toolbar, and other page content and functions as determined by your system administrator. To return to the home page at any time, click the Content Server link in the upper left.

If you set up a default saved query, the results are displayed on this page (you may have to scroll down to view them).
The trays on the left side of Content Server Web pages provide quick access to most of the functional areas in Content Server. You can add functions you use often, such as predefined searches and links to your favorite Web sites.
Note:
Trays are part of the frame-based Trays layout option, and are the default navigation tool for Content Server. If you select Top Menus on the User Profile page, you can access Content Server functionality from a series of menus located above the main content area. For more information, see Section 2.4.2, "User Profile Page."
| Link | Description |
|---|---|
|
Microsoft Login |
If you are logged in to your Microsoft network, click this link to log in to Content Server. This link is present only if your organization is using Microsoft Network security to log in to Content Server. Many browsers, such as Mozilla Firefox, support logging in with this security. Your Content Server instance may be integrated with your enterprise login system. For more information, ask your system administrator. |
|
My Content Server |
Expands to display URLs and queries you have saved, content you have checked out, open workflow assignments, available metadata profiles, personal folders, and so on. For more information, see Section A.1.4, "My Content Server Tray." |
|
Browse Content |
Expands to display a hierarchy folders. You can expand and collapse the levels of folders in the tray and click on a folder to show the content of the folder in the work area. For more information, see Section 8.2, "Working with Folders." |
|
Search |
Displays the Search tray. From this page, you can perform metadata and full-text searches to find specific files. For more information, see Chapter 3, "Searching for Content Items." |
|
Content Management |
Displays the Content Management tray with options to view content items that are checked out or expired, or that are active in workflow. For more information, see Section A.1.5, "Content Management Tray." |
The toolbar at the top of Content Server Web pages contains navigation links, online help, and the Quick Search feature.

Note:
The Search and New Check-In links may list multiple options if your system administrator creates and enables Content Profiles to provide alternative metadata forms. For more information, see Section 5.6.2, "Content Profiles."
| Link | Description |
|---|---|
|
Displays the Home Page. |
|
|
Search |
Displays the Advanced Search Page, which you can use to perform metadata and full-text searches to find specific files. For more information about searching for content, see Chapter 3, "Searching for Content Items." |
|
Displays the Content Check-In Form, which you can use to check new files into Content Server. For more information about checking in content, see Chapter 5, "Checking In Files." |
|
|
<user_name> profile link |
Displays the User Profile Page and provides information for Editing Your User Profile. The link is either a user name or the user's full name. |
|
Logs out of Content Server. This option is available only if the optional ExtranetLook component is installed. |
|
|
Help |
Displays the online help system. |
|
Refresh Page |
Updates the current page. |
|
Searches for the specified term in the supported metadata fields and in the content item text if supported by your system. For more information, see Section 3.1.1, "Quick Search Field." |
There are three types of actions menus:
Page action menus are below the page heading and list options that apply to the entire page. A page can have multiple actions menus. For example, on a search results page the Change View menu lists options for changing the view of the search results, and the Query Actions menu lists options for searching within the existing search and saving it.
Table action menus are displayed above a table of content items, and the menus list options that you can apply to multiple items selected in the table. For example, if the Upload Files Window or Download Files Window is available, you can select multiple items from a search result list and use the table Actions menu to download them.
These menus expand from the contextual menu in the Actions column next to a content item and list actions that pertain only to the associated content item. For example, among the options in the Actions menu for an item in a search result are links to check out the item and to view the item's content information.
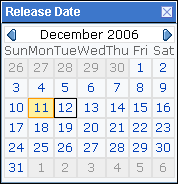
Although you can enter dates directly, the calendar eliminates format and typographical errors because the date field is automatically populated with the date you select. Click the calendar icon to the right of any editable date field to open the Pop-Up Calendar.

Use the arrow keys to move to the next or previous month, or click the name of the month to select a specific month and year. To select a date from the calendar, click the date. The associated date field shows the selected date in the format specified for the user locale.
Note:
The user locale setting determines the date format. For information about user locale, see Section 2.4.3, "Editing Your User Profile."
This section covers the following topics:
When you log in to Content Server, the system retrieves information about you from your user profile. While much of the information in your user profile (such as your user name and security permissions) can be changed only by the system administrator, there are several items you can change:
You can change personal information, such as your full name, password, and e-mail address on the User Profile Page discussed in this section.
You can add links to the My Content Server tray. Links provides quick access to things you use most often, such as predefined searches and your favorite Web sites. For more information, see Section A.1.4, "My Content Server Tray."
You can personalize the way you search for and display content. You can specify the default search form used on the Advanced Search page and create new templates to display search results. For more information about search options, see Chapter 3, "Searching for Content Items."
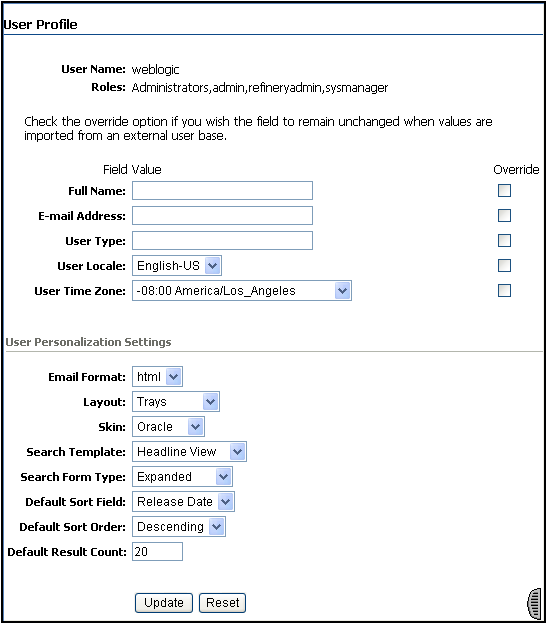
Your user profile defines basic information about you and specifies certain user-selected preferences. To access the user profile page, click the user_name link at the top of the main menu bar.
The options on this page can vary depending on the features that are enabled on your system. The following table describes standard user information fields and preferences.

| Element | Description |
|---|---|
|
The user currently logged in. You cannot modify this field. |
|
|
The roles assigned to your user login. Roles determine what access you have to content and system functions. You cannot modify this field. |
|
|
The full name identifies the user in a more easily recognized way. |
|
|
The e-mail address that subscription and workflow notifications use for the current user. |
|
|
An identifier used by the system administrator to place users in groups. This field should not be changed. |
|
|
Specifies the language and date and time format displayed on content server pages. If the system administrator has enabled multiple locale options, you can select the locale that you prefer. Select the Override check box next to this field to temporarily override the locale setting and to save your language choices. |
|
|
html: Formats subscription and workflow notification e-mails in HTML format. text: Formats subscription and workflow notification e-mails in plain-text format. |
|
|
Specifies the user interface of Content Server. Trays: Trays is the default layout when Content Server is installed. Features include expanding trays in the Trays, including a Search tray and Results tab. Trays is a frame-based layout. Top Menus: Trays are removed from the Trays and replaced by menus located above the content area. The Top Menus layout does not use frames. |
|
|
Skins provide predefined color and icon choices for each layout. Oracle (Default): Predominantly blue and khaki Oracle 2: Predominantly blue and gold |
|
|
Specifies the default template used to present search results. You can change the search result view with the Content Actions menu on a search results page. When selected on a search results page, the view is saved as the default view for subsequent search results. Classic: Each item includes a thumbnail image or content type icon and multiple lines of metadata. Headline: Each item is shown on a single line with no thumbnail and minimal metadata. Thumbnail: Each item is shown with a thumbnail image or content type icon and minimal metadata arranged in multiple columns. Custom Search Template: A variable for a search template that your administrator may have made. A custom search template enables you to select a customized search result view, if this exists in your Content Server instance, including Classic, Thumbnail, and Headline formats for displaying search results. If the |
|
|
Sets the default search form on the Advanced Search page. Expanded Form: Displays all search field options on a single page. Query Builder Form: Offers available search fields for selection from lists, and enables fields for direct edit of the query text. |
|
|
Default Sort Field |
Sets the default field by which to sort search results. |
|
Default Sort Order |
Sets the default order in which search results are displayed. |
|
Default Result Count |
Sets the maximum number of content items listed on a search results field. |
|
Update |
Saves any changes that were made on this page. |
|
Reset |
Resets the fields on this page to the previously saved settings. |
Use the following procedure to edit your user profile information:
Click the user_name link at the top of the main menu bar.
The User Profile Page opens.
Edit your full name, password, and e-mail address as necessary. Please note the following considerations:
If you are changing your password, you must enter the new password in both the Password and Confirm Password fields.
If you are using an enterprise authentication system, the Password field might not be available.
Do not change your user type or user locale; these fields should be changed only by a system administrator.
Select the Override check box next to the User Locale field to temporarily override the locale setting and to save your language choices.
Select an option for e-mail notification format, either HTML or text.
Enable or disable the upload and download applets.
Note:
The check boxes for the upload and download applets are displayed only if the system administrator enabled them.
Select a layout, skin, search template, and search form type.
The documentation shows the user interface with the Trays menu selected.
Click Update.
Use the following procedure to edit links to saved queries in your My Saved Queries tray:
Click the My Saved Queries link in the My Content Server Tray.
The Saved Queries Page opens.
To display the results of a query on the home page, select the Default option for that query, and select the Show Default Query check box.
To set the number of content items displayed on the home page for the selected default query, enter a number in the Results on Portal Page field, and select the Show Default Query check box.
Click Update.
Note:
For information on how to save a query link to your My Saved Queries tray, see Section 3.4.2, "Saving a Query."
Use the following procedure to save links to Web sites in your My URLs tray:
Click the My URLs link in the My Content Server Tray.
The URLs for User page opens.
Enter a descriptive name in the Title field. This name appears as the link in your My URLs tray.
Enter a complete Web address in the URL field; for example:
http://www.oracle.com
Click Update.