| Oracle® Fusion Middleware Installation Guide for Oracle Identity Management 11g Release 1 (11.1.1) Part Number E12002-10 |
|
|
PDF · Mobi · ePub |
| Oracle® Fusion Middleware Installation Guide for Oracle Identity Management 11g Release 1 (11.1.1) Part Number E12002-10 |
|
|
PDF · Mobi · ePub |
This appendix describes the screens of the Oracle Identity Management 11g software Installation and Wizard that enables you to install and configure Oracle Internet Directory, Oracle Virtual Directory, Oracle Directory Services Manager, Oracle Directory Integration Platform, and Oracle Identity Federation.
It contains the following topics:
The Welcome screen is displayed each time you start the Oracle Identity Management 11g Installer wizard.
Click Next to continue.
This screen enables you to search for and install software updates before you install Oracle Identity Management.
To get updates from My Oracle Support, you can select Search My Oracle Support for Updates, specify a user name and password, and then click Search for Updates. Before you search, you can click Proxy Settings to change the settings for the proxy server and Test Connection to test the credentials.
To get updates that you have saved to your computer, you can select Search Local Directory for Updates, specify a directory, and then click Search for Updates.
If you do not want to update any software, you can select Skip Software Updates. The link on the left changes from My Oracle Support Updates to Skip Software Updates.
Click Next to start the software updates or continue the installation.
This screen enables you to select the installation type.
The Select Installation Type screen presents two options: Install and Configure and Install Software - Do Not Configure.
Choose the Install and Configure option to install Oracle Identity Management components and simultaneously configure some of their fundamental elements, such as passwords, user names, and so on. Oracle Identity Management components start running and are immediately ready for use after deploying them using the Install and Configure option.
Choose the Install Software - Do Not Configure option to install Oracle Identity Management components without configuring them during installation. If you choose the Install Software - Do Not Configure option, the Installer installs the component software and then closes. Oracle Identity Management components will not start running after deploying them using the Install Software - Do Not Configure option, as additional configuration is needed.
After you install components using the Install Software - Do Not Configure option, you can configure them at a later time using the Oracle Identity Management 11g Release 1 (11.1.1.6.0) Configuration Wizard. To start the Oracle Identity Management 11g Release 1 (11.1.1.6.0) Configuration Wizard, execute the ORACLE_HOME/bin/config.sh script (config.bat on Windows).
Click Next to continue.
The installation program ensures that you have a certified version, the correct software packages, sufficient space and memory to perform the operations that you have selected. If any issues are detected, errors appear on this page.
The following example screen applies to Windows operating systems only.
On this screen, you can select to Abort, Retry, or Continue with the installation.
If all the prerequisite checks pass inspection, click Next to continue.
This screen allows you to select the Domain. Select one of the following options:
Option 1: Create New Domain
Enter the User Name, User Password, and Domain Name for the domain you want to create.
Click Next to continue.
Option 2: Extend Existing Domain
Enter the Host Name, Port, User Name, and User Password for the existing domain you want to extend into.
Click Next to continue.
Option 3: Expand Cluster
Enter the information for the existing cluster you want to expand your Oracle Identity Management installation into. Enter the Host Name, Port, User Name, and User Password for cluster inclusion.
Click Next to continue.
Option 4: Configure Without a Domain
If you select this option, you will not be creating or extending the domain of your installation.
Click Next to continue.
This screen allows you to enter a location for the new Oracle Identity Management 11g software being installed.
Ensure that Oracle WebLogic Server is already installed on your machine. Navigate to the Oracle Fusion Middleware Home directory by clicking Browse. Enter a name for the new Oracle Home directory for Oracle Identity Management 11g components.
If the Middleware location does not exist, you must install WebLogic Server and create a Middleware Home directory, as described in Installing Oracle WebLogic Server and Creating the Oracle Middleware Home, before running the Oracle Identity Management Installer.
Note:
If you do not specify a valid Middleware Home directory on the Specify Installation Location screen, the Installer displays a message and prompts you to confirm whether you want to proceed with the installation of only Oracle Identity Manager Design Console and Oracle Identity Manager Remote Manager. These two components of Oracle Identity Manager do not require a Middleware Home directory.If you want to install only Oracle Identity Manager Design Console or Remote Manager, you do not need to install Oracle WebLogic Server or create a Middleware Home directory on the machine where Design Console or Remote Manager is being configured.
Click Next to continue.
This screen allows you to provide your E-mail address to be informed of the latest product issues.
Click Next to continue.
This screen allows you to select the Oracle Identity Management components that you wish to install and configure.
Click Next to continue.
This screen allows you to choose how you want the Installer to configure ports.
The screen presents two options:
Select Auto Port Configuration if you want the Installer to configure ports from a predetermined range.
Select Specify Ports using Configuration File if you want the Installer to configure ports using the staticports.ini file. You can click View/Edit File to update the settings in the staticports.ini file.
Click Next to continue.
This screen is displayed if you selected Oracle Internet Directory. This screen allows you to choose whether to use an existing schema or to create a new one using the Installer.
Figure A-12 Specify Schema Database Screen
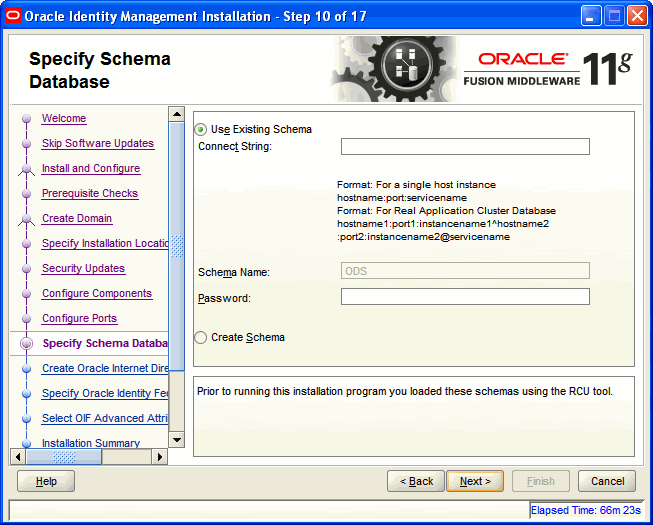
The Specify Schema Database screen presents two options:
Note:
If you want to use an existing schema, it must currently reside in the database to continue with the installation. If it does not currently reside in the database, you must create it now using the Oracle Fusion Middleware Repository Creation Utility.Use Existing Schema
To use an existing schema:
Select Use Existing Schema.
Enter the database connection information in the Connect String field. The connection string must be in the form of hostname:port:servicename. For Oracle Real Application Clusters (RAC), the connection string must be in the form of hostname1:port1:instance1^hostname2:port2:instance2@servicename.
Enter the password for the existing ODS schema in the Password field.
Click Next to continue.
Note:
If your existing ODS and ODSSM schemas have different passwords, the Specify ODSSM Password screen will appear after you click Next. Enter the password for your existing ODSSM schema and click Next.Create Schema
To create a new schema:
Select Create Schema.
Enter the database connection information in the Connect String field. The connection string must be in the form of hostname:port:servicename. For Oracle Real Application Clusters (RAC), the connection string must be in the form of hostname1:port1:instance1^hostname2:port2:instance2@servicename.
Enter the name of the database user in the User Name field. The user you identify must have DBA privileges.
Note:
If you are using Oracle Database 11g Release 2 (11.2) or higher version, the database user should be only 'SYS'.Enter the password for the database user in the Password field.
Click Next. The Enter OID Passwords screen appears.
Create a password for the new ODS schema by entering it in the ODS Schema Password field.
Enter it again in the Confirm ODS Schema Password field.
Create a password for the new ODSSM schema by entering it in the ODSSM Schema Password field.
Enter it again in the Confirm ODSSM Schema Password field.
Click Next to continue.
This screen is displayed if you selected Oracle Virtual Directory. This screen allows you to specify Oracle Virtual Directory information.
Figure A-13 Specify Oracle Virtual Directory Information Screen
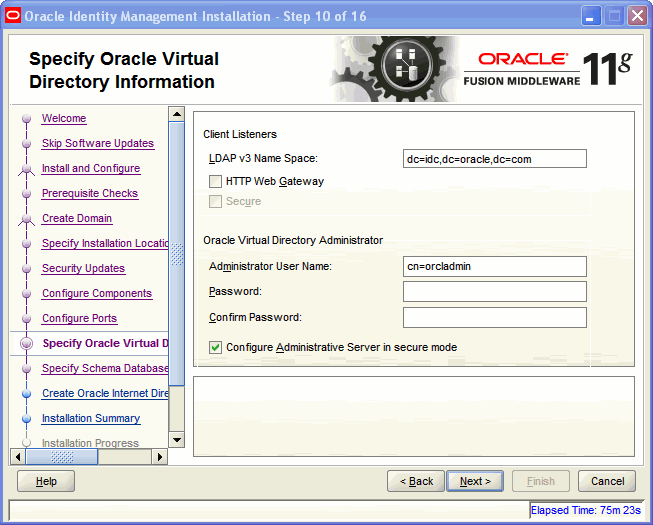
Enter the following information:
LDAP v3 Name Space: Enter the name space for Oracle Virtual Directory. The default value is dc=us,dc=oracle,dc=com.
HTTP Web Gateway: Select this option to enable the Oracle Virtual Directory HTTP Web Gateway.
Secure: Select this option if you enabled the HTTP Web Gateway and you want to secure it using SSL.
Administrator User Name: Enter the user name for the Oracle Virtual Directory administrator. The default value is cn=orcladmin.
Password: Enter the password for the Oracle Virtual Directory administrator.
Confirm Password: Enter the password for the Oracle Virtual Directory administrator again.
Configure Administrative Server in secure mode: Select this option to secure the Oracle Virtual Directory Administrative Listener using SSL. This option is selected by default. Oracle recommends selecting this option.
Click Next to continue.
This screen is displayed if you selected Oracle Internet Directory.
Figure A-14 Specify OID Administrator Password Screen
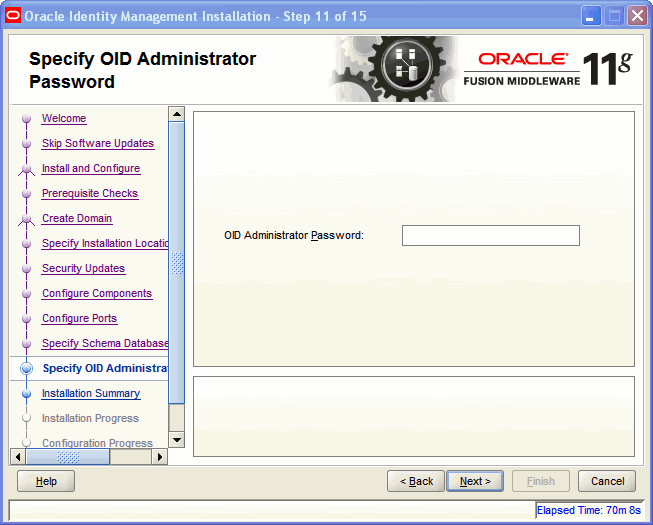
Enter the password for the Oracle Internet Directory administrator.
Click Next to continue.
This screen is displayed if you selected Oracle Identity Federation.
Figure A-15 Select Oracle Identity Federation Configuration Type Screen
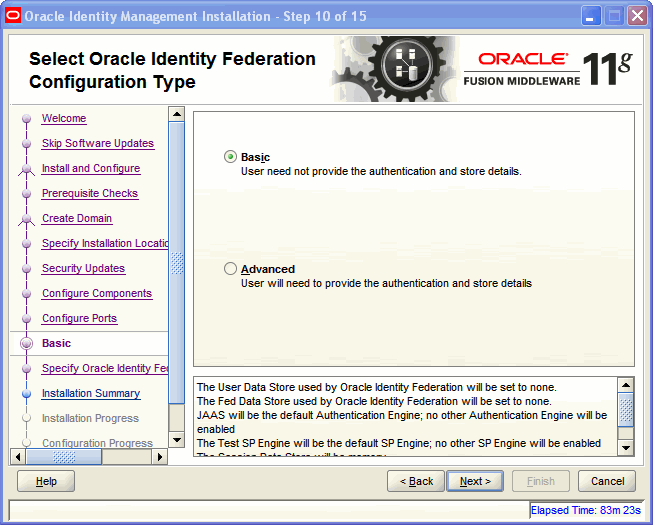
Select one of the following configuration types:
Basic: You do not need to choose the datastore and authentication engine types or specify the connection details for Oracle Identity Federation.
Advanced: This option will enable you to choose the configuration types for the datastores, the authentication engine, and specify the connection details datastores and authentication engine.
Click Next to continue.
This screen is displayed if you selected Oracle Identity Federation.
Figure A-16 Specify Oracle Identity Federation Details Screen
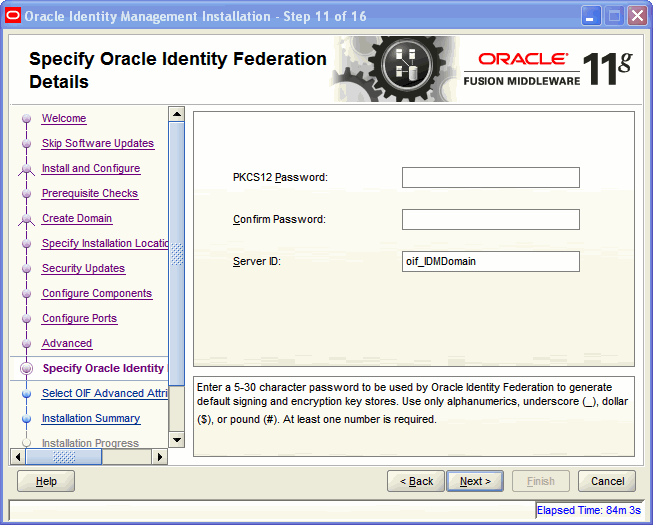
Enter the following information:
PKCS12 Password: Enter the password Oracle Identity Federation will use for encryption and for signing wallets. The Installer automatically generates these wallets with self-signed certificates. Oracle recommends using the wallets only for testing.
Confirm Password: Enter the PKCS12 password again.
Server ID: Enter a string that will be used to identify this Oracle Identity Federation instance. A prefix oif will be added to the beginning of the string you enter. Each logical Oracle Identity Federation instance within an Oracle WebLogic Server administration domain must have a unique Server ID. Clustered Oracle Identity Federation instances acting as a single logical instance will have the same Server ID.
Click Next to continue.
This screen displays a summary of your Oracle Identity Management 11g installation.
Review the contents of this screen, and click Install to start installing the Oracle Identity Management 11g software.
This screen displays the progress of the Oracle Identity Management installation.
If you want to quit before the installation is completed, click Cancel. The installation progress indicator gives a running inventory of the files that are being installed. If you are only installing the software binaries, installation is complete after all of the binaries have been installed.
Click Next to continue.
This screen displays the progress of the Oracle Identity Management configuration.
If you want to abort the configuration before the configuration is completed, click Abort. If you want to retry the configuration, click Retry.
Click Next to continue.
This screen displays a summary of the installation parameters, such as Location, Disk Space, and Applications. To save the installation configuration in a response file, which is used to perform silent installations, click Save.
Click Finish to complete the installation process.