| Oracle® Fusion Middleware Publishing Reports to the Web with Oracle Reports Services 11g Release 1 (11.1.1) Part Number B32121-01 |
|
|
View PDF |
| Oracle® Fusion Middleware Publishing Reports to the Web with Oracle Reports Services 11g Release 1 (11.1.1) Part Number B32121-01 |
|
|
View PDF |
Oracle Reports11g Release 1 (11.1.1) provides support for database authentication using proxy users:
Additional security through control of users that are allowed to connect to the database through Oracle Reports.
Scalability, through reuse of a single database connection.
You can use the pre-11g security mechanism of Oracle Internet Directory integration for authentication without using Oracle Platform Security Services in either of the following ways:
In Oracle Enterprise Manager, select Reports > Administration > Manage Reports Security Policies to display the Reports Security Policies page.
Step 1. Using Delegated Administration Service (DAS)
To define a user in Oracle Internet Directory:
Determine the configuration values of Oracle Internet Directory for application identity store. For example:
host:port: stbpo44.oracle.com:3060
user name: cn=orcladmin
password: welcome1
Use the DAS URL if you want to add new users or use the existing users on Oracle Internet Directory. For example
http://stbpo44.oracle.com:7788/oiddas
Step 2. Configure the standalone Report Server to use the RWSecurity to enable the non-Oracle Platform Security Services way of using Oracle Internet Directory (as in 10g Release 2 (10.1.2)).
Navigate to the Reports Server component.
Check out rwserver.conf.
Enable the RWSecurity element.
Make sure that the security id for the job element reflects the security id of the RWSecurity element.
Save rwserver.conf.
Add the following line in rwservlet.properties:
<singlesignon>no</singlesignon>
Restart the Reports Server component (see Chapter 5, "Starting and Stopping Oracle Reports Services").
Test authentication using the following URL:
http://host:port/reports/rwservlet/showjobs?server=reports_server_name
You can configure proxy user authentication in the database as follows:
Create a proxy user in the database. All clients connecting to the middle tier share this user connection.
Run the following:
CREATE USER proxy_user1 IDENTIFIED BY welcome1;
Assign the following minimum privileges to proxy_user1:
GRANT CONNECT, RESOURCE, CREATE ANY DIRECTORY, DROP ANY DIRECTORY TO proxy_user1
The actual user already exists in the database.
Log in as the actual user, and assign privileges to the proxy user to connect to the database on behalf of the actual user.
ALTER USER scott GRANT CONNECT THROUGH proxy_user1;
Or you can define the roles that the proxy user can connect to the database as.
ALTER USER scott GRANT CONNECT THROUGH proxy_user WITH ROLE admin;
Repeat Step A or Step C for all actual database users.
The proxy user with minimum privileges is created. However, this proxy user can connect as the actual user with the assigned role. The middle tier can connect to the database as the proxy user first, and then connect as an actual user through the proxy user account.
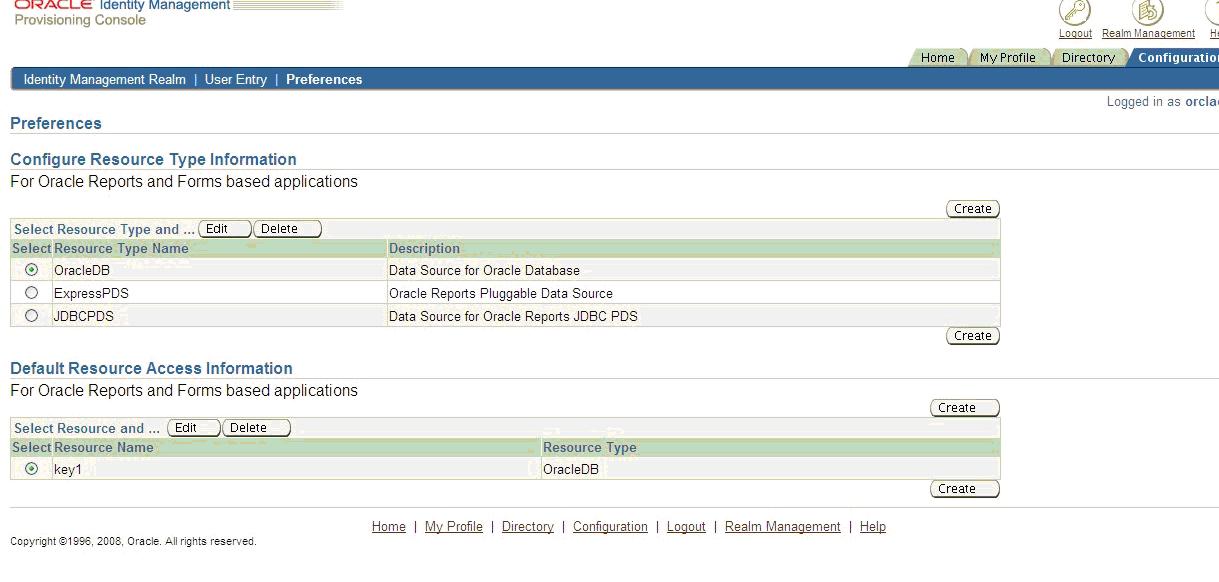
You can configure a new resource in Oracle Internet Directory in the user RAD or default RAD. You can use this key to obtain proxy access information, including user name, password , and database information from Oracle Internet Directory. This information allows you to connect to the database.To create a key in the default RAD, complete the following steps:
Log in to the Oracle Internet Directory configuration page (http://oidhost:port/oiddas).
Click the Configuration tab.
Click Preferences.
In the Preferences page, create a new Resource of type OracleDB under Default Resource Access Information, as shown in the Figure 14-5.
Figure 14-5 Oracle Internet Directory Configuration

When creating the resource, in the Resource Access Information section, enter the database proxy user name, database proxy password, and the database value in the respective fields.
A new key is created, and you can pass this key as a value for the dbproxyConn parameter. The number of proxy user connections and their access levels are set by the database administrator.
To use the database proxy feature, you must add and modify configuration settings in the Reports configuration files.
In the rwserver.conf file, the dbproxy key is set as follows:
<dbProxyConnKeys>
      <dbProxyKey name=key1 database=db1/>
      <dbProxyKey name=key2 database=db2/>
 </dbProxyConnKeys>
This configuration is optional. The dbproxy key is taken from the rwserver.conf file if the dbproxyConn parameter is not passed on the command line. The dbproxykey is obtained from this configuration, based on the database that you specified in the userid command-line parameter.
To use the database proxy feature through rwservlet, edit the enabledbproxy setting in the rwservlet.properties file as follows:
<enabledbproxy>yes</enabledbproxy>
By default, enabledbproxy is set to no. For rwclient, this configuration setting is not required.