| Oracle® Fusion Middleware Enterprise Deployment Guide for Oracle Identity Management 11g Release 1 (11.1.1) Part Number E12035-02 |
|
|
View PDF |
| Oracle® Fusion Middleware Enterprise Deployment Guide for Oracle Identity Management 11g Release 1 (11.1.1) Part Number E12035-02 |
|
|
View PDF |
This chapter describes how to install and configure Oracle Access Manager 10.1.4.3 for use in the Oracle Identity Management enterprise deployment.
This chapter includes the following topics:
Section 7.1, "Introduction to Installing Oracle Access Manager"
Section 7.3, "Identity System Installation and Configuration"
Section 7.5, "Backing Up the Oracle Access Manager Configuration"
Oracle Access Manager allows your users to seamlessly gain access to web applications and other IT resources across your enterprise. It provides a centralized and automated single sign-on (SSO) solution, which includes an extensible set of authentication methods and the ability to define workflows around them. It also contains an authorization engine, which grants or denies access to particular resources based on properties of the user requesting access as well as based on the environment from which the request is made. Comprehensive policy management, auditing, and integration with other components of your IT infrastructure enrich this core functionality.
Oracle Access Manager consists of various components including Access Server, Identity Server, WebPass, Policy Manager, WebGates, AccessGates, and Access SDK. The Access Server and Identity Server are the server components necessary to serve user requests for access to enterprise resources. Policy Manager and WebPass are the administrative consoles to the Access Server and Identity Server respectively. WebGates are web server agents that act as the actual enforcement points for Oracle Access Manager while AccessGates are the application server agents. Finally, the Access SDK is a toolkit provided for users to create their own WebGate or AccessGate should the out-of-the-box solutions be insufficient. Follow the instructions in this chapter and Chapter 8, "Configuring Single Sign-On for Administration Consoles" to install and configure the Oracle Access Manager components necessary for your enterprise deployment.
For more information about Oracle Access Manager 10.1.4.3 and its various components, refer to the "Road Map to Manuals" section in the Oracle Access Manager Introduction manual, which includes a description of each manual in the Oracle Access Manager 10.1.4.3 documentation set.
This manual recommends Oracle Access Manager as the single sign-on solution. However, for customers who have deployed 10g Oracle Single Sign-on and would like to continue to use that as a solution, they can do so. In cases where customers have deployed Oracle E-Business Suite, have deployed or will be deploying Portal, Forms, Reports or Discoverer, Oracle Single Sign-On and Oracle Delegated Administration Service are mandatory components.
Oracle Single Sign-On and Oracle Delegated Administration Service are not part of the 11g release. Customers must download the 10.1.4.* versions of these products, which are compatible with 11g Oracle Internet Directory and Oracle Directory Integration Platform, to form what was known in 10g as the Application Server Infrastructure. For deployment instructions on these 10g products, please read Chapter 4 "Installing and Configuring JAZN-SSO/DAS" in the Oracle Application Server Enterprise Deployment Guide (B28184-02) for Oracle Identity Management release 10.1.4.0.1. This manual is available on Oracle Technology Network at:
http://download.oracle.com/docs/cd/B28196_01/core.1014/b28184/toc.htm
This enterprise deployment described in this manual (Figure 1-1) shows Oracle Access Manager using Oracle Internet Directory as the only LDAP repository. Oracle Access Manager uses a single LDAP for policy and configuration data. It is possible to configure another LDAP as the identity store where users, organizations and groups reside. For example, an Oracle Access Manager instance may use Oracle Internet Directory as its policy and configuration store and point to an instance of Microsoft Active Directory for users and groups.
In addition, the identity stores can potentially be front-ended by Oracle Virtual Directory to virtualize the data sources.
To learn more about the different types of directory configuration for Oracle Access Manager, please consult the 10g Oracle Access Manager documentation at Oracle Technology Network. Customers considering these variations should adjust their directory tier and Oracle Access Manager deployment accordingly.
These are the basic prerequisites for installing Oracle Access Manager components:
On Linux systems, you are prompted at component install time to provide the location of libgcc_s.so.1 and libstdc++.so.5 that is compatible with the GCC 3.3.2 runtime libraries. These files are available from Oracle Technology Network at:
http://www.oracle.com/technology/software/products/ias/htdocs/101401.html
Copy these libraries to a location accessible from the host where Oracle Access Manager is being installed. For example, use the home directory of the user installing Oracle Access Manager. In this case it is /home/oracle
There is a known bug with the Oracle Access Manager installer that sometimes manifests as a hang at install time on Linux. This is a third-party issue caused by InstallShield.
To work around this issue, follow these steps:
Copy and paste the following in the shell where you start the installer:
cd /tmp
mkdir bin.$$
cd bin.$$
cat > mount <<EOF
#! /bin/sh
exec /bin/true
EOF
chmod 755 mount
export PATH=`pwd`:$PATH
Run the installation.
When the installer is finished running, clean the temporary directory using this command:
rm -r /tmp/bin.$$
For a complete list of prerequisites, refer to the Oracle Access Manager Installation Guide.
This section provides steps to install and configure the Oracle Access Manager Identity System. The Identity System components include Identity Server and WebPass.
The following sections describe how to install Oracle Access Manager Identity Server on OAMHOST1 and OAMHOST2.
Follow these steps to install Oracle Access Manager Identity Server on OAMHOST1:
Ensure that the system, patch, and other requirements are met. These are listed in the "Installing the Identity Server" chapter of the Oracle Access Manager Installation Guide.
Locate the Identity Server Installer on your Oracle Access Manager Software disk and start the installer as shown below. Pass the "-gui" option to bring up the Installers GUI console:
./Oracle_Access_Manager10_1_4_3_0_linux_Identity_Server -gui
On the Welcome to the InstallShield Wizard for Oracle Access Manager Identity Server screen, click Next.
Enter the username and group that the Identity Server will use. Specify oracle/oinstall.
Click Next.
Specify the installation directory for Oracle Access Manager Identity Server. Specify the following value:
/u01/app/oracle/product/fmw/oam
Note:
The base location for the Oracle Access Manager installation is/u01/app/oracle/product/fmw/oam. Oracle Access Manager components are installed in subdirectories automatically created by the installer under this location.
The Identity Server is installed in the identity subdirectory created by the installer under the base location.
The ORACLE_HOME location for the Oracle Access Manager Identity Server installation is:
/u01/app/oracle/product/fmw/oam/identity
Click Next.
Oracle Identity Manager will be installed in the following location (the identity directory is created by the installer automatically):
/u01/app/oracle/product/fmw/oam/identity
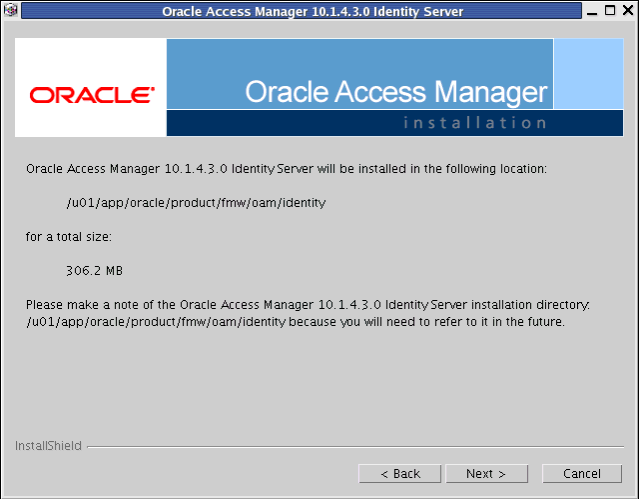
Specify the location of the GCC runtime libraries, for example, /home/oracle/oam_lib.
Click Next.
On the Installation Progress screen, click Next.
On the first Identity Server Configuration screen, specify the transport security mode between the WebPass/Identity client and the Identity Server. The choices are:
Open Mode: No encryption.
Simple Mode: Encryption through SSL and a Public Key Certificate provided by Oracle.
Cert Mode: Encryption through SSL and a Public Key Certificate provided by an external CA.
Choose Open Mode.
Click Next.
On the next Identity Server Configuration screen, specify the Identity Server ID, host name and port number for the Identity Server connection:
Enter a unique name for the Identity Server ID. For example: IdentityServer_OAMHOST1
Enter the hostname where the Identity Server will be installed. Make sure that the hostname can be resolved. For example: oamhost1.mycompany.com
Enter the port number on which this Identity Server communicates with its clients. For example, the default port number is 6022.
Click Next.
On the next Identity Server Configuration screen, you are prompted whether this is the first Identity Server installation in the network for this LDAP directory server.
Select Yes.
Click Next.
On the next Identity Server Configuration screen, select the appropriate options if you want to set up SSL between the Identity Server and the Directory Server.
Directory Server hosting user data is in SSL
Directory Server hosting Oracle data is in SSL
The enterprise deployment described in this manual does not use SSL for communication between components behind the firewall.
Do not select anything.
Click Next.
On the first Configure Directory Server hosting user data screen, specify the details for the LDAP enabled User Directory Store.
The Identity Server connects to an LDAP enabled directory server to store your User Data. Choose the appropriate directory server from the drop down list:
If you are planning on using Oracle Virtual Directory as the user store; select Data Anywhere from the drop down list.
If you are planning on using Oracle Internet Directory for the user store, select Oracle Internet Directory from the drop down list.
Make the appropriate choice based on the needs in your environment and click Next.
On the next Configure Directory Server hosting user data screen, specify if the User and Oracle Data will be stored in different directory servers. Make the appropriate choice based on the requirements in your environment.
Select the Oracle data will be in the user data directory option.
The enterprise deployment in this manual has the Oracle and user data in the same directory.
Click Next.
On the next Configure Directory Server hosting user data screen, specify if the OAM Installer should automatically update the User Store Directory Schema to include the Oracle Access manager schema
Select Yes and click Next.
Specify your directory server configuration details:
Host machine or IP in which the directory server resides:
oid.mycompany.com (if your user store is in Oracle Internet Directory)
ovd.mycompany.com (if your user store is in Oracle Virtual Directory)
Port Number: 389 (non-SSL port)
Root DN: cn=orcladmin (This is the default, unless you change the person object class during Identity System set up.)
Root Password: The password for the user data directory server Root DN.
Click Next.
The Updating Directory schema to Directory Server screen appears. The update process can take some time.
Review the Readme file.
Click Next to display an installation summary.
The installation summary provides the details that you specified during this installation and instructs you to start the Identity Server at the conclusion of this installation.
Click Next.
Click Finish to complete the installation.
Start the Identity Server to validate that the install completed successfully. Run the start_ois_server script, located under the ORACLE_HOME/identity/oblix/apps/common/bin directory to start the Identity Server on OAMHOST1, where ORACLE_HOME is the Identity Server install location.
Follow these steps to install the second Oracle Access Manager Identity Server on IDMHOST2:
Ensure that the system, patch, and other requirements are met. These are listed in the "Installing the Identity Server" chapter of the Oracle Access Manager Installation Guide.
Locate the Identity Server Installer on your Oracle Access Manager Software disk and start the installer as shown below. Pass the "-gui" option to bring up the Installers GUI console:
./Oracle_Access_Manager10_1_4_3_0_linux_Identity_Server -gui
On the Welcome to the InstallShield Wizard for Oracle Access Manager Identity Server screen, click Next.
Enter the username and group that the Identity Server will use. Specify oracle/oinstall.
Click Next.
Specify the installation directory for Oracle Access Manager Identity Server. Specify the following value:
/u01/app/oracle/product/fmw/oam
Note:
The base location for the Oracle Access Manager installation is/u01/app/oracle/product/fmw/oam. Oracle Access Manager components are installed in subdirectories automatically created by the installer under this location.
The Identity Server is installed in the identity subdirectory created by the installer under the base location.
The ORACLE_HOME location for the Oracle Access Manager Identity Server installation is:
/u01/app/oracle/product/fmw/oam/identity
Click Next.
Oracle Identity Manager will be installed in the following location (the identity directory is created by the installer automatically):
/u01/app/oracle/product/fmw/oam/identity

Specify the location of the GCC runtime libraries, for example, /home/oracle/oam_lib.
Click Next.
On the Installation Progress screen, click Next.
On the first Identity Server Configuration screen, specify the transport security mode between the WebPass/Identity client and the Identity Server. The choices are:
Open Mode: No encryption.
Simple Mode: Encryption through SSL and a Public Key Certificate provided by Oracle.
Cert Mode: Encryption through SSL and a Public Key Certificate provided by an external CA.
Choose Open Mode.
Click Next.
On the next Identity Server Configuration screen, specify the Identity Server ID, host name and port number for the Identity Server connection:
Enter a unique name for the Identity Server ID. For example: IdentityServer_OAMHOST2
Enter the hostname where the Identity Server will be installed. Make sure that the hostname can be resolved. For example: oamhost2.mycompany.com
Enter the port number on which this Identity Server communicates with its clients. For example, the default port number is 6022.
Click Next.
On the next Identity Server Configuration screen, you are prompted whether this is the first Identity Server installation in the network for this LDAP directory server.
Select No.
Click Next.
On the next Identity Server Configuration screen, select the appropriate options if you want to set up SSL between the Identity Server and the Directory Server.
Directory Server hosting user data is in SSL
Directory Server hosting Oracle data is in SSL
The enterprise deployment described in this manual does not use SSL for communication between components behind the firewall.
Do not select anything.
Click Next.
This displays the configuration screen. After the configuration is completed, the ReadMe file displays.
Review the Readme file.
Click Next to display an installation summary.
The installation summary provides the details that you specified during this installation and instructs you to start the Identity Server at the conclusion of this installation.
Click Next.
Click Finish to complete the installation.
Start the Identity Server to validate that the install completed successfully. Run the start_ois_server script, located under the ORACLE_HOME/identity/oblix/apps/common/bin directory to start the Identity Server on OAMHOST2, where ORACLE_HOME is the Identity Server install location.
This section describes how to install Oracle HTTP Server components on OAMADMINHOST.
Follow these steps to install Oracle HTTP Server on OAMADMINHOST:
Ensure that the system, patch, kernel and other requirements are met. These are listed in the Oracle Fusion Middleware Installation Guide for Web Tier in the Oracle Fusion Middleware documentation library for the platform and version you are using.
Oracle HTTP Server is installed on port 7777 by default. Ensure that ports 7777, 8889, and 4443 are not in use by any service on OAMADMINHOST by issuing these commands for the operating system you are using. If a port is not in use, no output is returned from the command.
On UNIX:
netstat -an | grep "7777"
netstat -an | grep "8889"
netstat -an | grep "4443"
If the ports are in use (if the command returns output identifying the port), you must free it.
On UNIX:
Remove the entries for ports 7777, 8889, and 4443 in the /etc/services file if the ports are in use by a service and restart the services, or restart the computer.
Copy the staticports.ini file from the Disk1/stage/Response directory to a temporary directory.
Edit the staticports.ini file that you copied to the temporary directory to assign the following custom port:
#The http main port for ohs component
OHS Port = 7777

#This port indicates the OHS Proxy Port
OHS Proxy Port = 8889

#This port indicates the OHS SSL port
OHS SSL Port = 4443
Start the Oracle Universal Installer for Oracle Fusion Middleware 11g Web Tier Utilities CD installation as follows:
On UNIX, issue this command: runInstaller
The runInstaller file is in the ../install/platform directory where platform is a platform such as Linux or Solaris.
The Specify Oracle Inventory screen is displayed.
On the Specify Inventory Directory screen, enter values for the Oracle Inventory Directory and the Operating System Group Name. For example:
Specify the Inventory Directory: /u01/app/oraInventory
Operating System Group Name: oinstall
A dialog box appears with the following message:
"Certain actions need to be performed with root privileges before the install can continue. Please execute the script /u01/app/oraInventory/createCentralInventory.sh now from another window and then press "Ok" to continue the install. If you do not have the root privileges and wish to continue the install select the "Continue installation with local inventory" option"
Login as root and run the "/u01/app/oraInventory/createCentralInventory.sh"
This sets the required permissions for the Oracle Inventory Directory and then brings up the Welcome screen.
Note:
The Oracle Inventory screen is not shown if an Oracle product was previously installed on the host. If the Oracle Inventory screen is not displayed for this installation, make sure to check and see:If the /etc/oraInst.loc file exists
If the file exists, the Inventory directory listed is valid
The user performing the installation has write permissions for the Inventory directory
On the Welcome screen, click Next.
On the Select Installation Type screen, select Install and Configure, and then click Next.
On the Prerequisite Checks screen, ensure that all the prerequisites are met, and then click Next.
On the Specify Installation Location screen set the location on OAMADMINHOST to:
/u01/app/oracle/product/fmw/web
Click Next.
Note:
The ORACLE_HOME location for the Oracle HTTP Server install is/u01/app/oracle/product/fmw/webOn the Configure Components screen, select the following and deselect any other components:
Oracle HTTP Server
Associate Selected Components with WebLogic Domain
Click Next.
On the Specify WebLogic Domain screen, enter the location where you installed Oracle WebLogic Server. Note that the Administration Server must be running:
Domain Host Name: idmhost1.mycompany.com
Domain Port No: 7001
User Name: weblogic
Password: ******
Click Next.
On the Specify Component Details screen, set the following values for OAMADMINHOST:
Instance Home Location:
/u01/app/oracle/admin/oamAdmin_ohs
Instance Name: oamAdmin_ohs
OHS Component Name: oamAdmin_ohs
Click Next.
On the Configure Ports screen, select Specify Ports Using Configuration File, and enter the full pathname to the staticports.ini file that you edited in the temporary directory.
Click Next.
On the Email Address for Security Updates screen, specify these values:
Email Address: Provide the email address for your My Oracle Support account.
Oracle Support Password: Provide the password for your My Oracle Support account.
Check the checkbox next to the I wish to receive security updates via My Oracle Support field.
Click Next.
On the Configuration Summary screen, ensure that the selections are correct and click Install.
On the Configuration screen, multiple configuration assistants are launched in succession; this process can be lengthy. When it completes, the Configuration Completed screen appears.
On the Configuration Completed screen, click Finish to exit.
Validate the installation of Oracle HTTP Server by following these steps:
Run the opmnctl status command from the INSTANCE_HOME/bin directory. For example:
$ cd /u01/app/oracle/admin/oamAdmin_ohs
$ ./opmnctl status
Processes in Instance: oamAdmin_ohs
---------------------------------+--------------------+---------+---------
ias-component                    | process-type       |     pid | status
---------------------------------+--------------------+---------+---------
oamAdmin_ohs                     | OHS                |   28575 | Alive
Open a web browser and go to the URL http://hostname.mycompany.com:port to view the default Oracle HTTP Server Home page. For example:
http://oamadminhost.mycompany.com:7777
Follow these steps to install WebPass for Oracle Access Manager on OAMADMINHOST:
Ensure that the system, patch, and other requirements are met. These are listed in the "Installing WebPass" chapter of the Oracle Access Manager Installation Guide.
Locate the WebPass Installer on your Oracle Access Manager Software disk and start the installer as shown below. Pass the "-gui" option to bring up the GUI console:
./Oracle_Access_Manager10_1_4_3_0_linux_OHS11g_WebPass -gui
On the Welcome to the InstallShield Wizard for Oracle Access Manager 10.1.4.3.0 WebPass screen, click Next.
On the Customer Information screen, enter the username and group that the Identity Server will use. The default value for username and group is nobody. For example, enter oracle/oinstall.
Click Next.
Specify the installation directory for Oracle Access Manager WebPass. For example, enter:
/u01/app/oracle/product/fmw/oam/webcomponents
Click Next.
Note:
The base location for the Oracle Access Manager Web components installation is/u01/app/oracle/product/fmw/oam/webcomponents. The Oracle Access Manager Web components are installed in subdirectories automatically created by the installer under this location.
WebPass is installed in the identity subdirectory created by the installer under the base location.
The ORACLE_HOME location for the Oracle Access Manager WebPass installation is:
/u01/app/oracle/product/fmw/oam/webcomponents/identity
Oracle Access Manager 10.1.4.3 WebPass will be installed in the following directory:
/u01/app/oracle/product/fmw/oam/webcomponents/identity
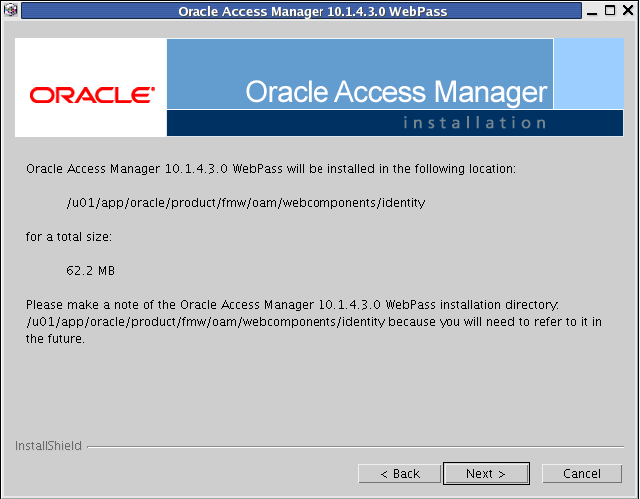
On the Oracle Access Manager WebPass Configuration screen, specify the location of the GCC runtime libraries. For example: /home/oracle/oam_lib
Click Next.
The Installing Oracle Access Manager WebPass screen appears.
When the WebPass Configuration screen appears, specify the Transport Security Protocol between the WebPass/Identity client and the Identity Server. Make sure to choose the same protocol as you did for the Identity Server. Select Open Mode.
Click Next.
The next screen in the WebPass Configuration series appears. Specify the WebPass ID, host name and port number for the Identity Server connection:
Enter a unique name for this WebPass ID. For example: WebPass_OAMADMINHOST
Enter the hostname of the Identity Server with which this WebPass should communicate. For example: oamhost1.mycompany.com
Enter the port number of the Identity Server with which this WebPass should communicate. For example, the default port number is 6022.
Click Next.
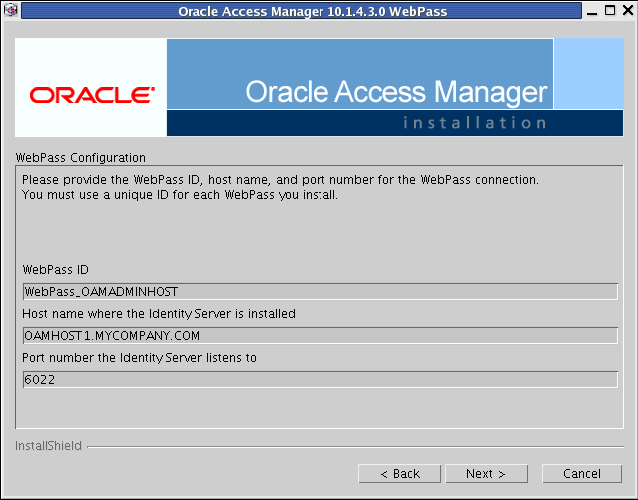
Oracle Access Manager WebPass is installed under your Oracle Access Manager WebPass installation directory. In order to use the Oracle Access Manager WebPass module, configure your web server by modifying the configuration in your web server directory.
Select Yes when the Proceed with Automatic update of httpd.conf? question appears.
Click Next.
Enter the absolute path of httpd.conf in your Web Server config directory. The absolute path of the httpd.conf file is:
/u01/app/oracle/admin/instanceName/config/OHS/componentName/httpd.conf
For example:
/u01/app/oracle/admin/oamAdmin_ohs/config/OHS/oamAdmin_ohs/httpd.conf
Click Next.
A screen displays that advises you that if the web server is set up in SSL mode, then the httpd.conf file needs to be configured with the SSL parameters.
To manually tune your SSL configuration, follow the instructions that are displayed.
Click Next.
A screen displays that advises you that information on the rest of the product setup and your web server configuration is available in the document: documentLocation. The screen asks you whether you would like the installer to launch a browser to view the document.
Select No, then click Next.
A screen displays that advises you to launch a browser and open the documentLocation document for further information on configuring your web server.
Click Next.
On the Coreid 10.1.4.3.0 ReadMe screen, click Next.
The installation summary provides the details that you specified during this installation and instructs you to start the Identity Server at the conclusion of this installation. Click Next.
Click Finish to complete the installation.
To establish communication between WebPass and its Identity Server, follow these steps:
Stop the WebPass Web server instance:
OHS_INSTANCE_HOME/bin/opmnctl stopall
Update the OHS_INSTANCE_HOME/config/OPMN/opmn/opmn/opmn.xml file to set the environment variable LD_ASSUME_KERNEL for the OHS1 component, as shown in this example:
...
<ias-component id="oamAdmin_ohs">
    <process-type id="OHS" module-id="OHS1">
        <environment>
            <variable id="LD_ASSUME_KERNEL" value="2.4.19"/>
        </environment>
        <module_data>
...
Stop and then start Identity Server on OAMHOST1 and OAMHOST2:
ORACLE_HOME/identity/oblix/apps/common/bin/restart_ois_server
where ORACLE_HOME refers to the location where the Identity Server is installed.
Start the WebPass Web server instance:
OHS_INSTANCE_HOME/bin/opmnctl startall
Follow these steps to validate the WebPass installation:
To make sure that your Identity Server and WebPass Web server are running, navigate to the Identity System Console by specifying the following URL in your web browser:
http://hostname:port/identity/oblix
where hostname refers to the host where WebPass Oracle HTTP Server instance is running and port refers to the HTTP port of the Oracle HTTP Server instance.
For example, enter the following URL in your web browser:
http://oamadminhost.mycompany.com:7777/identity/oblix
The Identity System landing page should appear.
Do not select any link on the Identity System landing page because the system has not yet been set up.
This section describes how to configure the Identity Servers on OAMHOST1 and OAMHOST2 using WebPass.
After the Identity Server and the WebPass instance are installed, you must specify the associations between them to make the system functional. Follow these steps to configure the first Identity Server:
Navigate to the Identity System Console by specifying the following URL in your web browser:
http://hostname:port/identity/oblix
where hostname refers to the host where WebPass Oracle HTTP Server instance is running and port refers to the HTTP port of the Oracle HTTP Server instance.
For example, enter the following URL in your web browser:
http://oamadminhost.mycompany.com:7777/identity/oblix
Click the Identity System Console link.
On the System Console Application is not set up page, click the Setup button.
On the Product Setup page, specify your user data directory server type. Select Oracle Virtual Directory or Oracle Internet Directory based on how your environment is configured.
Click Next.
On the Schema Change page, click Next. You do not need to do anything because the schema was updated during Identity Server installation.
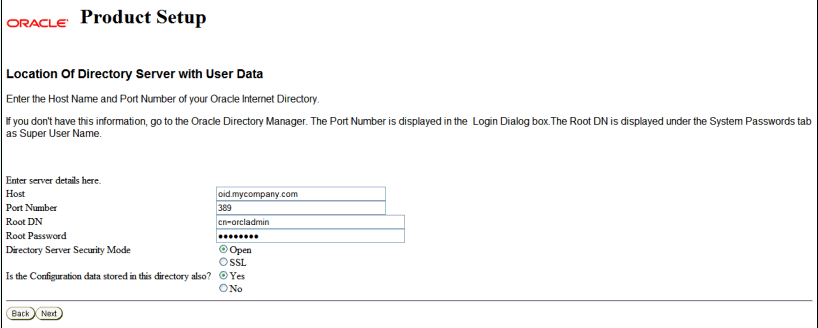
Specify the user data directory details based on your installation:
Host: The DNS host name of the user data directory server. Enter:
oid.mycompany.com (if your user store is in Oracle Internet Directory)
ovd.mycompany.com (if your user store is in Oracle Virtual Directory)
Port Number: The port of the user data directory server. For example: 389
Root DN: The bind distinguished name of the user data directory server. For example: cn=orcladmin
Root Password: The password for the bind distinguished name.
Directory Server Security Mode: Open or SSL-enabled between the user data directory server and Identity Server. Select Open.
Is Configuration data stored in this directory also?: Yes (default)
Click Next.
On the Location of Configuration Data and the Oracle Access Manager Searchbase page, specify the distinguished name (DN) for the configuration data and the searchbase for user data. The configuration DN is the directory tree where Oracle Access Manager stores its configuration data. The searchbase is the node in the directory tree where the user data is stored and is usually the highest base for all user searches.
When the user data and configuration data are in the same directory, the entries can be specified as follows:
Configuration DN: dc=us,dc=mycompany,dc=com
Searchbase: dc=us,dc=mycompany,dc=com
Click Next.
Note:
The configuration DN for the Oracle Access Manager Identity Server and the Oracle Access Manager Access Server must be the same. Also, if the configuration data and the search data are in different directories they should have unique DNs and the searchbase cannot beo=Oblix, configurationDN or ou=Oblix, configurationDN.On the Person Object Class screen, specify the Person object class for the User Manager as shown below:
Person Object Class: inetorgPerson
Click the Auto configure objectclass text box.
Click Next.
Note:
The person object class specified during this setup is the person object class used by the User Manager application.On the Group Object Class screen, specify the Group object class as shown below. For example, the Group object class would be an entry resembling the following:
Group Object Class: GroupofUniqueNames
Click the Auto configure objectclass text box.
Click Next.
Note:
The group object class specified during this setup is the only group object class used by the Group Manager application.Stop the WebPass Web server instance on OAMADMINHOST.
Stop and then start the Identity Servers on OAMHOST1 and OAMHOST2.
Start the WebPass Web server instance on OAMADMINHOST.
In the Return to the Oracle Access Manager Product Setup window, click Next.
A screen appears summarizing the person object class changes that were made automatically with the following question: "Is the following configuration correct for the objectclass 'inetorgperson'?
Review the Person object class attributes and then click Yes.
Review the Group object class attributes and then click Yes.
A screen appears summarizing the group object class changes that were made automatically with the following question: "Is the following configuration correct for the objectclass 'groupOfUniqueNames'?
Review the Group object class attributes and then click Yes.
On the Configure Administrators page, the user orcladmin is configured as the Master Administrator by default. If you do not want to add any additional Administrator users, click Next.

To add additional users as administrators, click the Select User button to bring up the Selector page.

On the Selector page, complete the fields with the search criteria for the user you want to select as an administrator and click Go. A minimum of three characters is required to return search results.

Search results matching the specified criteria appear.
Click Add next to the person you want to select as an administrator.
The name of the person appears under the Selected column on the right.
Add other names as needed.
Click Done.
On the Configure Administrators page, view the selected users listed as administrators.
Click Next.
On the Securing Data Directories page, click Done to complete the Identity System setup.
Verify the configuration by performing these steps:
Access the Oracle Access Manager system console at this URL:
http://OAMADMINHOST:port/identity/oblix
where port is the Oracle HTTP Server port.
For example, enter the following URL in your web browser:
http://oamadminhost.mycompany.com:7777/identity/oblix
Click User Manager, Group Manager, or Org. Manager and log in with the newly created administrator user's credentials.
Follow these steps to configure the second Identity Server:
Navigate to the Identity System Console by specifying the following URL in your web browser:
http://hostname:port/identity/oblix
where hostname refers to computer that hosts the WebPass Web server and port refers to the HTTP port number of the WebPass Web server instance.
For example, enter the following URL in your web browser:
http://oamadminhost.mycompany.com:7777/identity/oblix
Click the Identity System Console link.
A login dialog box appears.
Provide the administrator user name and password.
Click Login.
On the System Configuration screen, click the Identity System Console and select System Configuration > Identity Servers.
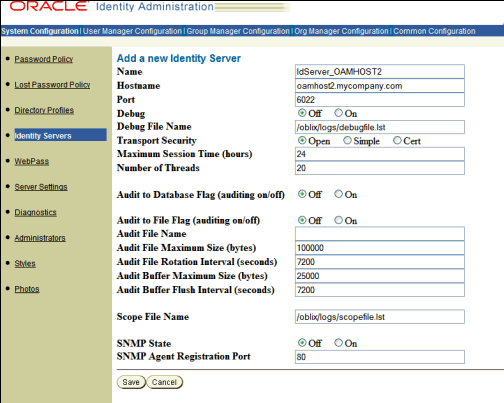
Click Add and specify the values shown below on the Add a new Identity Server screen:
Name: idserver_oamhost2
Hostname: oamhost2.mycompany.com
Port: 6022
Debug: Off
Debug File Name: /oblix/logs/debugfile.lst
Transport Security: Open
Accept the default values for the remaining parameters, unless required in your environment:
Maximum Session Time (hours): 24 (default)
Number of Threads: 20 (default)
Audit to Database Flag (auditing on/off): Off (default)
Audit to File Flag (auditing on/off): Off (default)
Audit File Name: Leave blank (default)
Audit File Maximum Size (bytes): 100000 (default)
Audit File Rotation Interval (seconds): 7200 (default)
Audit Buffer Maximum Size (bytes): 25000 (default)
Audit Buffer Flush Interval (seconds): 7200 (default)
Scope File Name: /oblix/logs/scopefile.lst (default)
SNMP State: Off (default)
SNMP Agent Registration Port: 80 (default)
Click the Identity System Console and select System Configuration > WebPass.
The OAMWebPass_OAMADMINHOST instance is listed.
Click the WebPass instance for OAMADMINHOST.
On the Details for WebPass screen, click List COREid Servers.
The Identity Servers associated with the WebPass are listed.
Click Add.
On the Add a new Identity Server to the WebPass screen:
Select the identity server installed on OAMHOST2.
Select Primary Server and specify 2 connections.
Click Add.
This completes the configuration of the Identity System.
You can now begin the installation of the Access System, which includes the Policy Manager, Access Server, and WebGate components.
This section provides details about the Access System installation and configuration. Access System components include the Policy Manager, Access Server, and WebGate components.
The first step in installing the Access System is to install and configure the Policy Manager.
The Oracle Access Manager Policy Manager can be installed directly.
The Policy Manager must be installed in the same base directory as WebPass on OAMADMINHOST.
To install the Policy Manager, follow these steps:
Ensure that the system, patch, and other requirements are met. These are listed in the "Installing the Policy Manager" chapter of the Oracle Access Manager Installation Guide.
Locate the Policy Manager Installer on your Oracle Access Manager Software disk and start the installer as shown below. Pass the "-gui" option to bring up the GUI console.
./Oracle_Access_Manager10_1_4_3_0_linux_OHS11g_PolicyManager -gui
On the Welcome to the InstallShield Wizard for Oracle Access Manager Policy Manager screen, click Next.
On the Customer Information screen, enter the username and group that the Identity Server will use. The default value for username and group is nobody. For example, enter oracle/oinstall.
Click Next.
You are prompted for the installation directory.
Specify the directory where you installed WebPass, for example:
/u01/app/oracle/product/fmw/oam/webcomponents
Click Next.
Note:
The base location for the Oracle Access Manager WebPass and Policy Manager installations is/u01/app/oracle/product/fmw/oam/webcomponents. The WebPass and Policy Manager components are installed in subdirectories automatically created by the installer under this location.
The Policy Manager is installed in the access subdirectory created by the installer under the base location.
The ORACLE_HOME location for the Oracle Access Manager Policy Manager Server installation is:
/u01/app/oracle/product/fmw/oam/webcomponents/access
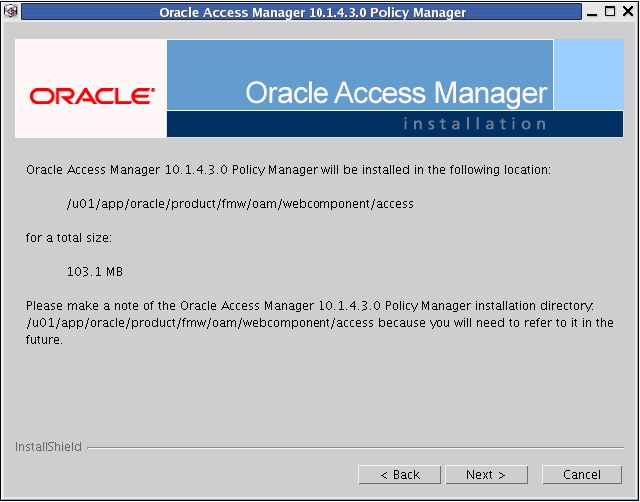
Oracle Access Manager Policy Manager will be installed in the following directory:
/u01/app/oracle/product/fmw/oam/webcomponents/access
Specify the location of the GCC runtime libraries. For example, specify: /home/oracle/oam_lib.
Click Next.
A progress message appears, then the Configure Directory Server for Policy Data screen appears with the Directory Server Type drop down list.
Select Oracle Internet Directory.
You are prompted to specify whether policy data is in a separate directory server than the directory containing Oracle configuration data or user data, and if so, whether you would like the installer to automatically configure the directory server containing policy data.
Select No.
Click Next.
On the Configure Access Manager for using SSL mode with Directory Server screen, you are prompted for the communication method for Oracle Internet Directory.
These three options appear:
Directory Server hosting user data is in SSL
Directory Server hosting Oracle data is in SSL
Directory Server hosting Policy data is in SSL
Do not select any of these options. Click Next.
On the Policy Manager Configure screen, you are asked to specify the transport security mode between this Access Manager and Access Servers that you plan to install in the future.
Choose Open Mode.
Click Next.
On the Configure Web Server screen, select Yes for the Proceed with automatic updates of httpd.conf? option.
Click Next.
Specify the full path of the directory containing the httpd.conf file. The path defaults to the httpd.conf file location for the Oracle HTTP Server installed on OAMADMINHOST.
Click Next.
A message informs you that the Web Server Configuration has been modified for Policy Manager.
A screen displays that advises you that if the web server is set up in SSL mode, then the httpd.conf file needs to be configured with the SSL parameters.
To manually tune your SSL configuration, follow the instructions that are displayed.
Click Next.
A screen displays that advises you that information on the rest of the product setup and your web server configuration is available in the document: documentLocation. The screen asks you whether you would like the installer to launch a browser to view the document.
Select No, then click Next.
A screen displays that advises you to launch a browser and open the documentLocation document for further information on configuring your web server.
Click Next.
On the Coreid 10.1.4.3.0 ReadMe screen, click Next.
A message appears informing you that the installation was successful.
Click Finish.
Stop and start the Oracle HTTP Server installed on OAMADMINHOST using the opmnctl commands shown below:
ORACLE_INSTANCE/bin/ opmnctl stopproc ias-component=ohs1

ORACLE_INSTANCE/bin/opmnctl startproc ias-component=ohs1
Stop and start the Identity Server installed on OAMHOST1 and OAMHOST2 using these commands:
ORACLE_HOME/identity/oblix/apps/common/bin/stop_ois_server

ORACLE_HOME/identity/oblix/apps/common/bin/start_ois_server
where ORACLE_HOME refers to the directory where the Identity Server is installed.
Validate that the Policy Manager installation was successful by opening a web browser and bringing up the Policy Manager Home page:
http://oamadminhost.mycompany.com:7777/access/oblix
The Policy Manager must be configured to communicate with Oracle Internet Directory. Follow these steps to configure the communication:
Make sure your Web server is running.
Navigate to the Access System Console by specifying the following URL in your web browser:
http://hostname:port/access/oblix
where hostname refers to the host where the Policy Manager Oracle HTTP Server instance is running and port refers to the HTTP port of the Oracle HTTP Server instance.
For example, enter the following URL in your web browser:
http://oamadminhost.mycompany.com:7777/access/oblix
Note:
The WebPass and Policy Manager components share the same Oracle HTTP Server instance on OAMADMINHOST.Click the Access System Console link.
A message informs you that the Administration Console Application is not yet set up.
Click the Setup button.
You are prompted for the User Directory Server Type.
If you are using Oracle Virtual Directory, choose Data Anywhere and if you are using Oracle Internet Directory, choose Oracle Internet Directory.
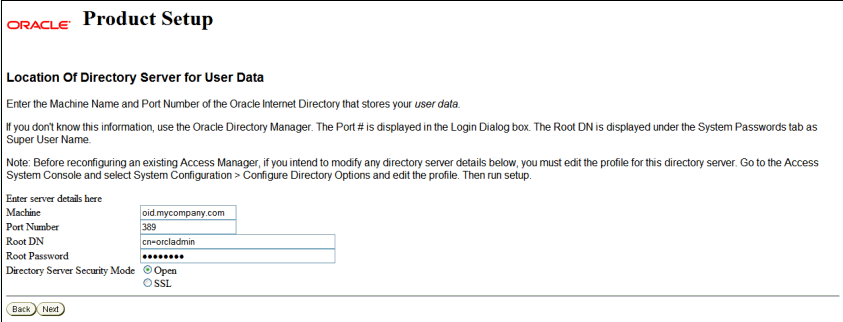
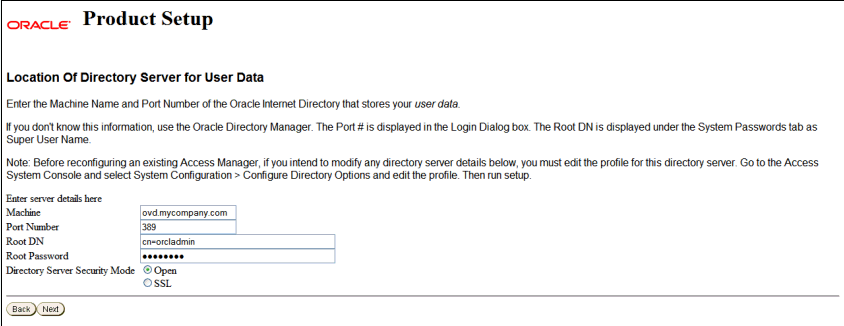
On the Location of Directory Server for User Data screen, specify the following server details:
Machine: Specify the DNS host name of the user data directory server. Enter:
oid.mycompany.com (if your user store is in Oracle Internet Directory)
ovd.mycompany.com (if your user store is in Oracle Virtual Directory)
Port Number: Specify the port of the user data directory server. Enter the non-SSL port for the directory server. For example: 389
Root DN: Specify the bind DN (distinguished name) for the user data directory server. For example: cn=orcladmin
Root Password: Specify the password for the bind distinguished name.
Directory Server Security Mode: Select Open.
This screen capture shows the values for the Location of Directory Server for User Data screen if your user store is Oracle Internet Directory:
This screen capture shows the values for the Location of Directory Server for User Data screen if your user store is Oracle Virtual Directory:
Click Next.
On the Directory Server Type containing Configuration Data screen, choose Oracle Internet Directory.
Click Next.
On the Directory Server containing User Data and Directory Server containing Configuration Data screen, a message informs you that the user data and configuration data can be stored in either the same or different directories.
Select Store Configuration Data in the User Directory Server.
Click Next.
On the Directory Server containing User Data and Directory Server containing Policy Data screen, a message informs you that the user data and policy data can be stored in either the same or different directories.
Select Store Policy Data in the User Directory Server.
On the Location of the Oracle Access Manager Configuration data, the Searchbase, and the Policybase screen, specify the appropriate information for your installation. For example:
Searchbase: dc=us,dc=mycompany,dc=com (This must be the same searchbase you specified during Identity Server configuration)
Configuration DN: dc=us,dc=mycompany,dc=com (This must be the same configuration DN you specified during Identity Server configuration)
Policy Base: dc=us,dc=mycompany,dc=com
Click Next.
On the Person Object Class screen, specify the Person object class that was specified during Identity Server system configuration:
Person Object Class: inetorgperson
Click Next.
You are prompted to restart the Web server. The Identity Servers must be restarted, along with the Web Server instance. Follow the sequence shown below:
Stop the Oracle HTTP Server on OAMADMINHOST.
Restart the Identity Server on OAMHOST1 and OAMHOST2.
Start the Oracle HTTP Server on OAMADMINHOST.
Click Next.
On the Root Directory for the Policy Domains screen, specify the root directory for policy domains.
Accept the default root directory for policy domains, for example:
Policy Domain Root: /
Click Next.
On the Configuring Authentication Schemes screen, select Yes to automatically configure authentication schemes.
Click Next.
On the next screen, select both Basic Over LDAP and Client Certification authentication schemes.
Click Next.
On the Define a new authentication scheme screen, specify the Basic over LDAP parameters. The values on the screen are prefilled. Review the parameters. Change the parameter values, if required by your environment:
Name: Basic Over LDAP
Description: This scheme is Basic over LDAP, using the built-in browser login mechanism
Level: 1
Challenge Method: Basic
Challenge Parameter: realm: LDAP User Name/Password
Plugin(s):
Plugin Name: credential_mapping
Plugin Parameters:
obMappingBase="dc=us,dc=mycompany,dc=com",
obMappingFilter="(&(objectclass=inetorgperson)
(uid=%userid%))"
Plugin Name: validate_password
Plugin Parameters: obCredentialPassword="password"
Click Next.
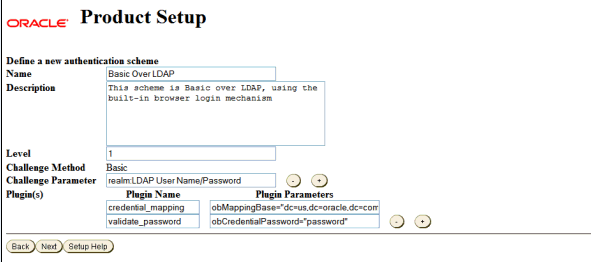
On the next Define a new authentication scheme screen, specify the Client Certificate parameters. The values on the screen are prefilled. Review the parameters. Change the parameter values, if required by your environment.
Name: Client Certificate
Description: This scheme uses SSL and X.509 client certificates
Level: 2
Challenge Method: Client Certificate
Challenge Parameter: realm: LDAP User Name/Password
Plugin(s):
Plugin Name: cert_decode
Plugin Parameters:
Plugin Name: credential_mapping
Plugin Parameters:
obMappingBase="dc=us,dc=mycompany,dc=com",
obMappingFilter="(&(objectclass=inetorgperson)
(mail=%certSubject.E%))"
Click Next. 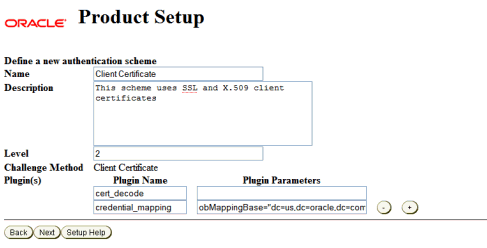
Description of the illustration screenshot56.gif
On the Configure Policies to Protect NetPoint Identity System and Access Manager screen, select Yes to configure policies to protect Access System related URLs.
Click Next.
On the next page, instructions for Securing Data Directories and Configuring Identity and Access policy domains are shown. Review the instructions to complete the tasks and then restart the Identity Servers and web server instances by following the steps below:
Stop the WebPass/Policy Manager Web server instance on OAMADMINHOST.
Stop and then start the Identity Servers on OAMHOST1 and OAMHOST2.
Start the WebPass/Policy Manager Web server instance on OAMADMINHOST.
Verify that all the processes are back up again and then click Done.
The Policy Manager home page appears.
Confirm that the Policy Manager is installed correctly by performing the following steps:
Navigate to the Access System Console from your browser. For example:
http://hostname:port/access/oblix
where hostname refers to the host where WebPass Oracle HTTP Server instance is running and port refers to the HTTP port of the Oracle HTTP Server instance.
For example, enter the following URL in your web browser:
http://oamadminhost.mycompany.com:7777/access/oblix
Select the Access System Console link.
Log in as an administrator.
Select the Access System Configuration tab, then click Authentication Management when it appears in the left column.
A list of the authentication schemes configured appears.

The second step in installing the Access System is to install the Access Server.
Before you begin installing the Access Server, you need to create an instance for it within the Access system Console.
Follow these steps to create an Access Server instance:
Log into the Access System Console by specifying the following URL in your web browser:
http://hostname:port/access/oblix
where hostname refers to the host where WebPass Oracle HTTP Server instance is running and port refers to the HTTP port of the Oracle HTTP Server instance.
For example, enter the following URL in your web browser:
http://oamadminhost.mycompany.com:7777/access/oblix
On the Access System main page, click the Access System Console link, then log in as the administrator.
Click the Access System Configuration tab, then click Access Server Configuration when the side navigation bar appears.
Click Add to display the Add Access Server page with some defaults.
Specify the parameters shown below for the Access Server you plan to install:
Name: Descriptive name for the Access Server that is different from any others already in use on this directory server. For example: AccessServer_OAMHOST1
Hostname: Name of the computer where the Access Server will be installed. The Access Server does not require a Web server instance. For example: oamhost1.mycompany.com
Port: Port on which the Access Server will listen. For example: 6023
Transport Security: Transport security between all Access Servers and associated WebGates must match. Specify Open.
Access Management Service: This should be enabled only if the WebGate is using the Policy Manager API. In this case, select ON, since the WebGate will be using the PolicyManager API.
Review the remaining prefilled default values. Modify these values, if required by your environment.
Click Save.
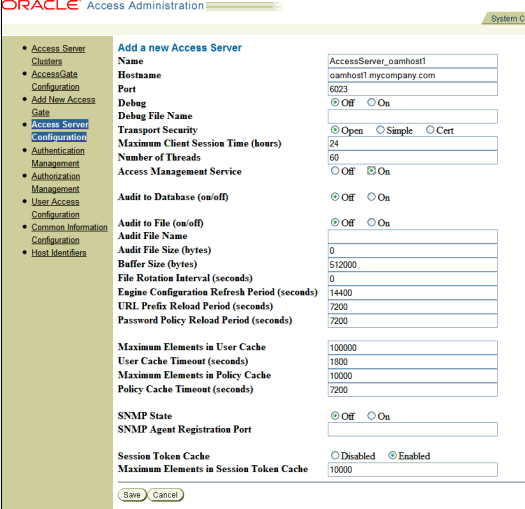
The Access Server Configuration: List All Access Servers page appears with a link to this instance. Verify that the Access Server has been created with the correct values by clicking on the link for the Access Server just created.
Repeat steps 3 through 6 for each additional Access Server you want to install. Substitute values where appropriate. For example, when creating the second Access Server instance, specify the following values:
Name: AccessServer_OAMHOST2
Hostname: oamhost2.mycompany.com
Click Logout and then close the browser window.
Follow these steps to start the Access Server installation:
Locate the AccessServer Installer on your Oracle Access Manager Software disk and start the installer as shown below. Pass the "-gui" option to bring up the GUI console. Log in as a user with Administrator privileges.
./Oracle_Access_Manager10_1_4_3_0_linux_Access_Server -gui
On the Welcome to the InstallShield Wizard for Oracle Access Manager Access Server screen, click Next.
On the Customer Information screen, enter the username and group that the Identity Server will use. The default value for username and group is nobody. For example, enter oracle/oinstall.
Click Next.
Specify the installation directory for Oracle Access Manager Access Server. For example, enter:
/u01/app/oracle/product/fmw/oam
Note:
The base location for the Oracle Access Manager Access Server installation is/u01/app/oracle/product/fmw/oam. Oracle Access Manager components are installed in subdirectories automatically created by the installer under this location.
The Access Server is installed in the access subdirectory created by the installer under the base location.
The ORACLE_HOME location for the Oracle Access Manager Access Server installation is:
/u01/app/oracle/product/fmw/oam/access
Click Next.
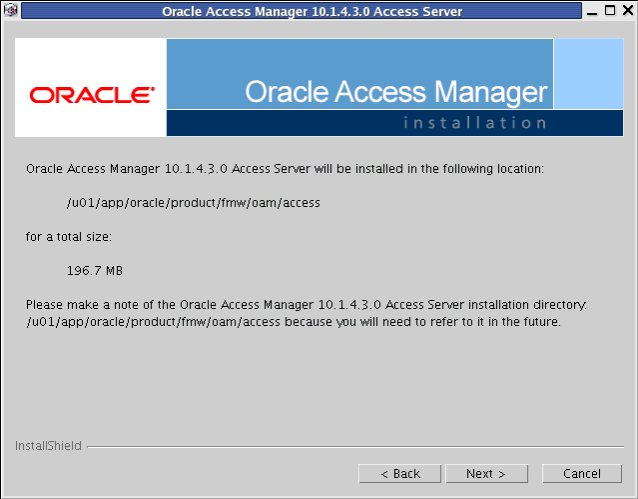
Oracle Access Manager Access Server will be installed in the following location (the access directory is created by the installer automatically):
/u01/app/oracle/product/fmw/oam/access
Click Next.
Specify the location of the GCC runtime libraries. For example: /home/oracle/oam_lib.
Click Next.
The installation progress screen is shown. After the installation process completes, the Access Server Configuration screen appears.
On the Access Server Configuration screen, you are prompted for the transport security mode.
Specify the transport security mode. The transport security between all Access System components (Policy Manager, Access Servers, and associated WebGates) must match. Select one of the following: Open Mode, Simple Mode, or Cert Mode.
Select Open Mode.
Click Next.
On the next Access Server Configuration screen, you are prompted for the mode in which the Directory Server containing Oracle configuration data is running.
Select Open. This is the default choice.
On the same screen, specify the following directory server details:
Host: Specify the DNS hostname of the Oracle configuration data directory server. For example: oid.mycompany.com
Port Number: Specify the port of the Oracle configuration data directory server. For example: 389 (OID non-SSL Port)
Root DN: Specify the bind distinguished name of the Oracle configuration data directory server. For example: cn=orcladmin
Root Password: Specify the password for the bind distinguished name.
Type of the Directory Server containing Oracle configuration data: Select Oracle Internet Directory.
Click Next.
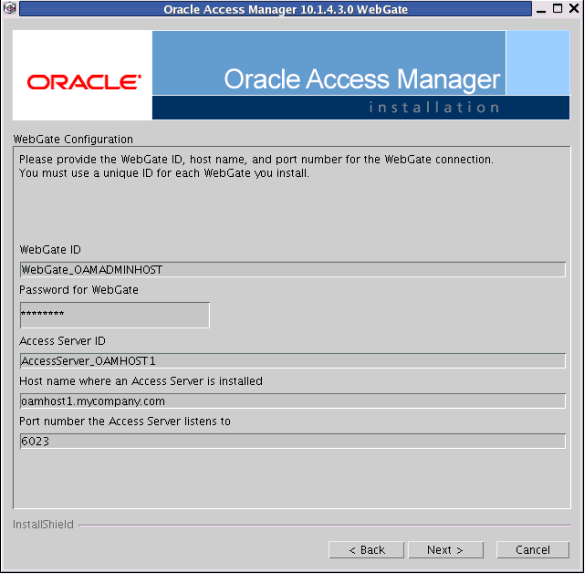
On the next Access Server Configuration screen, specify where the Oracle Access Manager Policy data is stored. Select Oracle Directory and click Next.
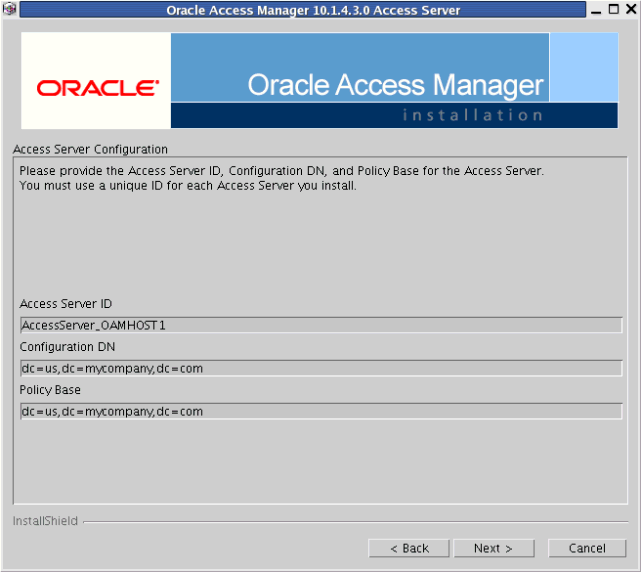
On the next Access Server Configuration screen, specify the Access Server ID, the Configuration DN and the Policy Base specified when creating the Access Server instances in Section 7.4.2.1, "Creating an Access Server Instance."
Enter the requested details, for example:
Access Server ID: AccessServer_OAMHOST1
Configuration DN: dc=us,dc=mycompany,dc=com
Policy Base: dc=us,dc=mycompany,dc=com
Review the information on the Oracle COREId 10.1.4.3 ReadMe screen.
Click Next.
A message appears informing you that the installation was successful.
Click Finish.
Start the Access Server so that you can confirm the Access Server is installed and operating properly.
To start the Access Server, follow these steps:
Go to the following directory:
ORACLE_HOME/access/oblix/apps/common/bin
where ORACLE_HOME is the location where Oracle Access Manager Access Server is installed.
Execute the following script:
start_access_server
If you want to use the NPTL threading model, execute the following script instead:
start_access_server_nptl
Repeat the preceding steps on OAMHOST2, substituting the hostname where appropriate.
The third step in installing the Access System is to install WebGate.
This section includes these topics:
The WebGate profile can be created manually or automatically:
Manual Creation: The WebGate profiles can be created manually by using the Access System Console. If you choose to create the WebGate profiles manually, follow the steps in this section. However, make sure to use appropriate values for the WebGate profile ID and the Host Identifier. These values are passed as parameters to the OAM Configuration Tool to enable single sign-on as discussed in Chapter 8, "Configuring Single Sign-On for Administration Consoles."
Automatic Creation: The WebGate profiles can be created automatically by the Oracle Access Manager Configuration Tool as discussed in Chapter 8. If you choose to create the WebGate profiles automatically, do the following:
Do not perform the steps in the "Steps for Manually Creating the WebGate Profile Using the Access System Console" section below.
Proceed to Section 8.2, "Running the Oracle Access Manager Configuration Tool" and perform the steps described in that section.
After running the Oracle Access Manager Configuration Tool successfully, return to Section 7.4.3.2, "Assigning an Access Server to the WebGate" and preform the steps in that section.
Perform the steps in Section 7.4.3.3, "Installing the WebGate," using the WebGate profile ID that was created by the OAM Configuration Tool.
Steps for Manually Creating the WebGate Profile using the Access System Console
Follow these steps to create a WebGate profile using the Access System Console:
Navigate to the Access System Console by specifying the following URL in your web browser:
http://hostname:port/access/oblix
where hostname refers to the host where WebPass Oracle HTTP Server instance is running and port refers to the HTTP port of the Oracle HTTP Server instance.
For example, enter the following URL in your web browser:
http://oamadminhost.mycompany.com:7777/access/oblix
On the Access System main page, click the Access System Console link, then log in as an Administrator.
On the Access System Console main page:
Click the Access System Configuration tab, then select Host Identifiers.
Click Add.
Specify the following parameters for your host identifier:
Name: Name of the host identifier. For example: idmedg_wd
Description: A brief description of the host identifier. For example: This is the host identifier for the IDM domain.
Hostname variations: All possible hostname variations for this host. Click the plus and minus symbols to add or delete fields as necessary. The Preferred HTTP Host value used in the Access System Configuration must be added as one of the hostname variations. For example: idmedg_wd, webhost1.mycompany.com:7777, admin.mycompany.com
Note:
One of the hostname variations provided here will be passed as a value for theweb_domain parameter while running the OAM Configuration Tool to enable Single Sign-On. For more information, refer to Section 8.2.2, "Running the OAM Configuration Tool."For more information about host identifiers, refer to the Oracle Access Manager Access Administration Guide.

Click Access System Configuration, then select Add New Access Gate.
Specify the following parameters for your WebGate:
AccessGate Name: Provide a unique, descriptive name for this WebGate. This is also the WebGate ID or Access Gate ID. For example: WebGate_WebHost1
Description: Specify additional descriptive information about the WebGate. This is an optional parameter.
Hostname: Specify the name of the computer where the WebGate will be installed. For example: webhost1.mycompany.com
Port: Specify the port the WebGate Web server is listening to. This is an optional parameter.
AccessGate Password and Re-type AccessGate Password: Enter a password for the WebGate.
Transport Security: The level of transport security between the Access Server and associated WebGates. Specify Open (the transport security mode must be the same between all Access Servers and WebGates).
Maximum Connections: This parameter is based on how many Access Server connections are defined to each individual Access Server. In this case, the value to be used is 4 (2 connections per access server and there are 2 access servers)
Preferred HTTP Host: The value provided for the Preferred HTTP Host must be one of the following:
An existing host identifier as provided in step 4 of this section. For example: idmedg_wd
SERVER_NAME
HOST_HTTP_SERVER
Click Save.
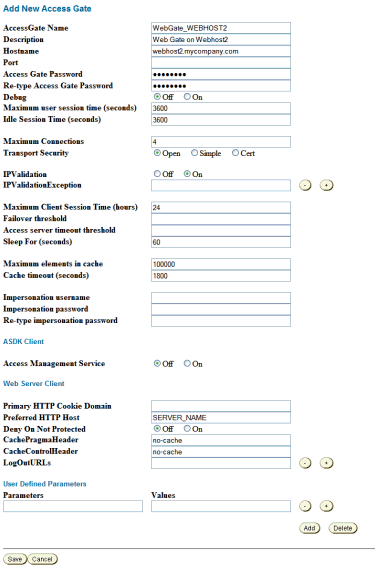
Details for the WebGate instance appear, and you are prompted to associate an Access Server or Access Server cluster with the WebGate.
Note the details on this page for future reference, then click the Back button.
Follow these steps to assign an Access Server to the WebGate:
Log in as the Administrator.
Navigate to the Details for AccessGate page, if necessary. (From the Access System Console, select Access System Configuration, then AccessGate Configuration, then the link for the WebGate.).
On the Details for AccessGate page, click List Access Servers.
A page appears with a message that there are no primary or secondary Access Servers currently configured for this WebGate.
Click Add.
On the Add a new Access Server page, select an Access Server from the Select Server list, specify Primary Server, and define 2 connections for the WebGate.
Click the Add button to complete the association.
A page appears, showing the association of the Access Server with the WebGate.
Click the link to display a summary and print this page for use later.
Repeat steps 3 through 6 to associate another Access Server to the WebGate.
Follow these steps to install the WebGate on OAMADMINHOST, WEBHOST1, and WEBHOST2:
Locate the WebGate Installer on your Oracle Access Manager Software disk and start the installer as shown below. Pass the "-gui" option to bring up the GUI console.
./Oracle_Access_Manager10_1_4_3_0_linux_OHS11g_WebGate -gui
On the Welcome to the InstallShield Wizard for Oracle Access Manager WebGate screen, click Next.
On the Customer Information screen, enter the username and group that the Identity Server will use. The default value for username and group is nobody. For example, enter oracle/oinstall.
Click Next.
Specify the installation directory for Oracle Access Manager Access Server. For example, enter:
/u01/app/oracle/product/fmw/oam/webgate
Click Next.
Note:
The base location for the Oracle Access Manager WebGate installation is/u01/app/oracle/product/fmw/oam/webgate. The WebGate component is installed in a subdirectory automatically created by the installer under this location.
The WebGate is installed in the access subdirectory created by the installer under the base location.
The ORACLE_HOME location for the Oracle Access Manager WebGate installation is:
/u01/app/oracle/product/fmw/oam/webgate/access
Oracle Access Manager WebGate will be installed in the following location (the access directory is created by the installer automatically):
/u01/app/oracle/product/fmw/oam/webgate/access
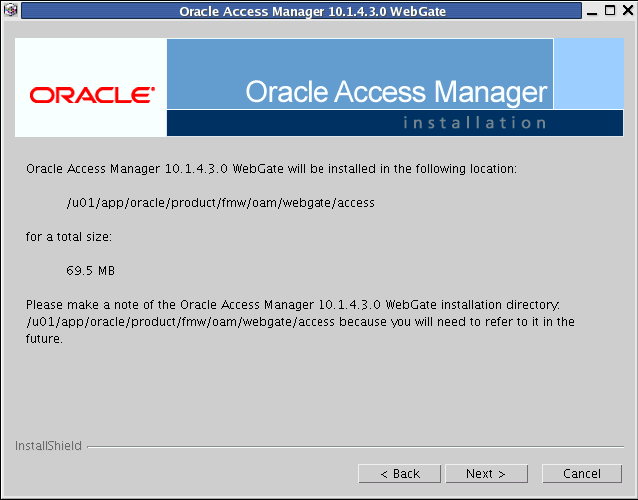
Specify the location of the GCC runtime libraries, for example: /home/oracle/oam_lib.
Click Next.
The installation progress screen is shown. After the installation process completes, the WebGate Configuration screen appears.
On the WebGate Configuration screen you are prompted for the transport security mode.
Specify the transport security mode. The transport security between all Access System components (Policy Manager, Access Servers, and associated WebGates) must match; select one of the following: Open Mode, Simple Mode, or Cert Mode.
Select Open Mode.
Click Next.
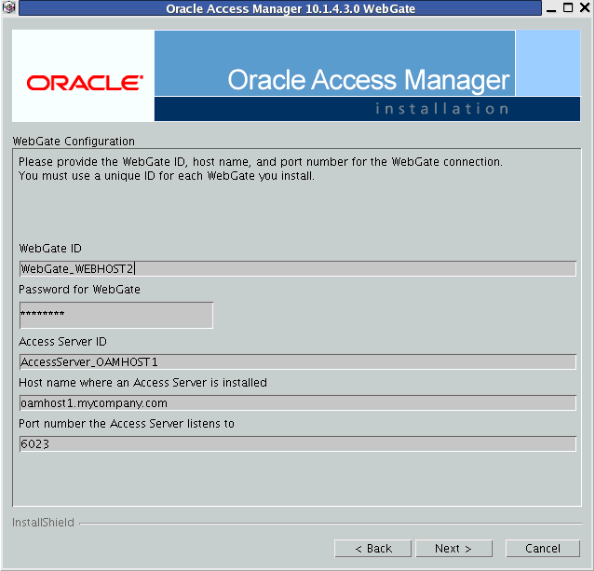
On the next WebGate Configuration screen, specify the following WebGate details:
WebGate ID: Specify the unique ID that identifies the WebGate profile in the Access System Console. If the profile was created manually, use the Access Gate Name provided in Section 7.4.3.1, "Creating a WebGate Profile." If the profile was created by the OAM Configuration Tool, use the Access Gate ID that is shown in the output after the tool completes successfully. Refer to Section 8.2.2, "Running the OAM Configuration Tool" for more information.
Password for WebGate: Specify the password defined in the Access System Console.
Access Server ID: Specify the Access Server associated with the WebGate. For example: AccessServer_OAMHOST1
DNS Hostname: Specify the DNS host name where the Access Server associated with this WebGate is installed. For example: oamhost1.mycompany.com
Port Number: Specify the listen port for the Access Server.
Click Next.
On the Configure Web Server screen, click Yes to automatically update the web server, then click Next.
On the next Configure Web Server screen, specify the full path of the directory containing the httpd.conf file. The httpd.conf file is located under the following directory:
/u01/app/oracle/admin/ohsInstance/config/OHS/ohsComponentName
For example:
/u01/app/oracle/admin/ohs_instance2/config/OHS/ohs2/httpd.conf
Click Next.
On the next Configure Web Server page, a message informs you that the Web Server configuration has been modified for WebGate.
Click Next.
Stop and start your Web server to enable configuration updates to take effect.
Click Next.
On the next Configure Web Server screen, the following message is displayed: "If the web server is setup in SSL mode, then httpd.conf file needs to be configured with the SSL related parameters. To manually tune your SSL configuration, please follow the instructions that come up".
Click Next.
On the next Configure Web Server screen, a message with the location of the document that has information on the rest of the product setup and Web Server configuration is displayed.
Select No and click Next.
The final Configure Web Server screen appears with a message to manually launch a browser and open the html document for further information on configuring your Web Server.
Click Next.
The Oracle COREid Readme screen appears. Review the information on the screen and click Next.
A message appears (along with the details of the installation) informing you that the installation was successful.
Click Finish.
Restart your Web server.
Verify the installation by performing the following steps:
Ensure that the Identity Server, WebPass Web server, Policy Manager and Web Server, Access Server, and WebGate Web Server are running.
Specify the following URL for WebGate diagnostics:
http(s)://hostname:port/access/oblix/apps/webgate/bin/webgate.cgi?progid=1
Where hostname refers to the host where the WebGate instance is running and port refers to HTTP port of the Oracle HTTP Server instance that is associated with the WebGate instance.
For example, use these URLs for the WebGate on each of the following hosts:
OAMADMINHOST:
http(s)://oamadminhost.mycompany.com:7777/access/oblix/apps/webgate/bin/webgate.cgi?progid=1

WEBHOST1:
http(s)://webhost1.mycompany.com:7777/access/oblix/apps/webgate/bin/webgate.cgi?progid=1

WEBHOST2:
http(s)://webhost2.mycompany.com:7777/access/oblix/apps/webgate/bin/webgate.cgi?progid=1
The WebGate diagnostic page should appear. If the WebGate diagnostic page appears, the WebGate is functioning properly and you can dismiss the page.
It is an Oracle best practices recommendation to create a backup file after successfully completing the installation and configuration of each tier or a logical point. Create a backup of the installation after verifying that the install so far is successful. This is a quick backup for the express purpose of immediate restore in case of problems in later steps. The backup destination is the local disk. This backup can be discarded once the enterprise deployment setup is complete. After the enterprise deployment setup is complete, the regular deployment-specific Backup and Recovery process can be initiated. More details are described in the Oracle Fusion Middleware Administrator's Guide.
For information on database backups, refer to the Oracle Database Backup and Recovery User's Guide.
To back up the installation at this point, follow these steps:
Back up the Oracle Access Manager Identity Server.
Stop the Identity Server using the stop_ois_server script located under the Identity_Server_ORACLE_HOME/oblix/apps/common/bin directory.
Create a backup of the Identity_Server_ORACLE_HOME directory as the root user:
tar -cvpf BACKUP_LOCATION/IdentityServer.tar Identity_Server_ORACLE_HOME
Start the Identity Server using the start_ois_server script located under the Identity_Server_ORACLE_HOME/oblix/apps/common/bin directory.
Back up the Oracle Access Manager Access Server.
Stop the Access Server using the stop_access_server script located under the Access_Server_ORACLE_HOME/oblix/apps/common/bin directory.
Create a backup of the Access_Server_ORACLE_HOME directory as the root user:
tar -cvpf BACKUP_LOCATION/accessServer.tar Access_Server_ORACLE_HOME
Start the Access Server using the start_access_server script located under the Access_Server_ORACLE_HOME/oblix/apps/common/bin directory.
Back up the Oracle Access Manager WebPass, Policy Manager, Oracle HTTP Server, and WebGate.
Stop the Oracle Access Manager WebPass, Policy Manager, Webgate and Oracle HTTP Server instance. Stopping the Oracle HTTP Server instance using opmnctl stops all four components, for example:
ORACLE_INSTANCE/bin/opmnctl stopall
Create a backup of the Oracle HTTP Server Middleware Home on the web tier as the root user:
tar -cvpf BACKUP_LOCATION/webtier.tar MW_HOME
Create a backup of the INSTANCE_HOME on the web tier as the root user:
tar -cvpf BACKUP_LOCATION/instance_backup.tar ORACLE_INSTANCE
Create a backup of the WebPass and Policy Manager ORACLE_HOMEs as the root user:
tar -cvpf BACKUP_LOCATION/webPass.tar WEBPASS_ORACLE_HOME
tar -cvpf BACKUP_LOCATION/policyMgr.tar POLICY_MGR_ORACLE_HOME
Create a backup of the WebGate ORACLE_HOME as the root user:
tar -cvpf BACKUP_LOCATION/webGate.tar WEBGATE_ORACLE_HOME
Start up the instance using opmnctl under the ORACLE_INSTANCE/bin directory:
ORACLE_INSTANCE/bin/opmnctl startall
Back up the directory tier:
Shut down the instance using opmnctl located under the ORACLE_INSTANCE/bin directory:
ORACLE_INSTANCE/bin/opmnctl stopall
Create a backup of the Middleware Home on the directory tier as the root user:
tar -cvpf BACKUP_LOCATION/directorytier.tar MW_HOME
Create a backup of the INSTANCE_HOME on the directory tier as the root user:
tar -cvpf BACKUP_LOCATION/instance_backup.tar ORACLE_INSTANCE
Start up the instance using opmnctl under the ORACLE_INSTANCE/bin directory:
ORACLE_INSTANCE/bin/opmnctl startall
Note:
Create backups on all the machines in the directory tier by following the steps shown above.Perform a full database backup (either a hot or cold backup). Oracle recommends that you use Oracle Recovery Manager. An operating system tool such as tar can be used for cold backups.
Back up the Administration Server domain directory. This saves your domain configuration. All the configuration files exist under the MW_HOME/user_projects/domains/domainName directory:
IDMHOST1> tar cvf edgdomainback.tar MW_HOME/user_projects/domains/domainName
For more information about backing up the Oracle Access Manager configuration, see Section 10.4, "Performing Backups and Recoveries."