| Oracle® Fusion Middleware Developer's Guide for Oracle WebCenter 11g Release 1 (11.1.1) Part Number E10148-02 |
|
|
View PDF |
| Oracle® Fusion Middleware Developer's Guide for Oracle WebCenter 11g Release 1 (11.1.1) Part Number E10148-02 |
|
|
View PDF |
Web Clipping is a publishing portlet that enables you to integrate any web application with your WebCenter application. Web Clipping is designed to give you quick integration by leveraging the existing user interface of a web application. With Web Clipping, you can collect web content into portlets in a single centralized web page. You can use Web Clipping to consolidate content from web sites scattered throughout a large organization.
This chapter includes the information you are required to know to use Web Clipping in your Oracle JDeveloper environment. For information on how to use Web Clipping at runtime, refer to the Oracle Fusion Middleware User's Guide for Oracle WebCenter.
This chapter includes the following sections:
For information about additional Web Clipping portlet producer configuration like repository and proxy settings and producer security, see Appendix E, "Additional Portlet Configuration."
Note:
You can find more information about developing different types of portlets and information about producers and other portlet technologies in Chapter 27, "Overview of Portlets."Web Clipping enables the clipping of an entire web page or a portion of it and reusing it as a portlet. Basic and HTML-form-based sites may be clipped. Use Web Clipping when you want to copy content from an existing web page and expose it in your WebCenter application as a portlet.
Web Clipping portlets support the following features:
Navigation through various styles of login mechanisms, including form- and JavaScript-based submission and HTTP Basic and Digest Authentication with cookie-based session management.
Fuzzy matching of clippings, enabling the Web Clipping engine to correctly identify a web clipping and deliver it as portlet content even if the web clipping gets reordered within the source page or if its character font, size, or style changes.
Reuse of wide range of web content, including basic support of pages written with HTML 4.0.1, JavaScript, applets, and plug-in enabled content, retrieved through HTTP GET and POST methods of form submission.
Personalization, enabling page designers to expose input parameters that page viewers can modify when page viewers personalize the portlet. These parameters can be exposed as public parameters that a page designer can map as page parameters. This feature enables end users to obtain personalized clippings.
Integrated authenticated web content through Single Sign-On, including integration with external applications, which enables you to leverage Oracle Single Sign-On and to clip content from authenticated external web sites.
Inline rendering, enabling you to set up Web Clipping portlets to display links within the context of the portlet. As a result, when a user clicks a link in the Web Clipping portlet, the results display within the same portlet. You can use this feature with internal and external web sites.
Proxy authentication, including support for global proxy authentication and authentication for each user. You can use this feature if proxy servers require authentication. You can specify proxy server authentication details including type (Basic or Digest) and realm in the provider.xml file. In addition, you can specify one of the following schemes for entering user credentials:
All users automatically log in using a user name and password you provide.
All users are required to log in using a user name and password they provide.
All public users (not authenticated into the WebCenter application) automatically log in using a user name and password you provide, while valid users (authenticated into the WebCenter application) log in by using a user name and password they provide.
For more information, see Section E.3.2, "HTTP or HTTPS Proxy Configuration."
Navigation and clipping of HTTPS-based external web sites, if appropriate server certificates are acquired. For information about server certificates, see Section E.3.3.1, "Adding Certificates for Trusted Sites."
Open Transport API for customizing authentication mechanisms to clipped sites. By default, Web Clipping provider supports only HTTP challenge-based authentication methods like Basic and Digest and form submission logins. To support custom authentication methods like Kerberos proxy authentication, users can use the Web Clipping Transport API. For more information, see Section 32.4.1, "Using Web Clipping Open Transport API."
Clipping of page content from HTML 4.0.1 pages, including the following:
Clipping of <applet>, <body>, <div>, <embed>, <img>, <object>, <ol>, <span>, <table>, and <ul> tagged content
Preservation of <head> styles and fonts, and Cascading Style Sheets (CSS)
Navigation through hyperlinks (HTTP GET), form submissions (HTTP POST), frames, and URL redirection
Globalization Support in URLs and URL parameters. For information about how Web Clipping determines the character set of clipped content, see Section 32.5, "Current Limitations of Web Clipping".
Web Clipping definitions are stored persistently in a repository. By default, in Oracle JDeveloper, the Web Clipping producer is configured to use Oracle Metadata Services (MDS), which is file-based, as a repository. You can alternatively select to use a database schema for your Web Clipping repository. For information about configuring a Web Clipping repository, see Section E.3.1, "Web Clipping Repository Configuration."
Any secure information, such as passwords, is stored in an encrypted form, according to the Data Encryption Standard (DES), by using Oracle encryption technology.
As described in Chapter 9, "Consuming Portlets", you can add a Web Clipping portlet to a JSP document created through Oracle JDeveloper. The Web Clipping portlet producer is included in the Integrated WebLogic Server (WLS), the default server installed with Oracle JDeveloper.
Note:
The Web Clipping portlet producer is also included within theWLS_Portlets managed server in the default domain in a full Oracle Fusion Middleware installation. Therefore, for your application, you can choose to register this producer from the WLS_Portlets managed server and the default producer in Integrated WLS.In Oracle JDeveloper, after you start Integrated WLS, you can register the Web Clipping producer by using the Register Oracle PDK-Java Portlet Producer wizard. When this producer is registered, portlets become available either in the Application Resources panel or the Resource Palette. From here, you can drag portlets onto your *.jspx page.
For more information about:
Registering the producer, see Section 9.2, "Registering Portlet Producers with a Custom WebCenter Application."
The following is a sample URL that you may specify for the Web Clipping producer:
http://localhost:7101/portalTools/webClipping/providers/webClipping
Installing, initializing, and stopping the default server Integrated WLS, see Section 3.8, "Using Integrated WLS."
Adding an instance of Web Clipping portlet to your page, see Section 9.3, "Adding Portlets to a Page."
After you register the Web Clipping portlet producer, you can simply drag the Web Clipping portlet onto your page. If you are using a PanelCustomizable or ShowDetailFrame component, then drag the portlet on top of that component instead of af:form. In the Structure pane, the Web Clipping portlet must display under the PanelCustomizable or ShowDetailFrame component. In the Page Editor, the portlet must display inside the PanelCustomizable or ShowDetailFrame component.
Note:
When you add an instance of Web Clipping onto your page in Oracle JDeveloper, open the Property Inspector for the portlet and ensure that the AllModesSharedScreen and RenderPortletInIFrame properties are set as follows:
AllModesSharedScreen is set to False to display the Customize and Personalize in full page size. If you do not set this property to False, then when you personalize the Web Clipping portlet at runtime, the text displayed on the page may be distorted.
RenderPortletInIFrame is set to True to display the Web Clipping in its own iFrame in the View mode.
When you run your application page, the Web Clipping portlet displays in your default browser. For information about how to work with a Web Clipping portlet at runtime, see the "Working with the Web Clipping Portlet" chapter in the Oracle Fusion Middleware User's Guide for Oracle WebCenter.
Note:
To clip SSL-enabled web sites, you must add certificates of those sites to the certificate store. You are not required to add certificates of SSL-enabled web sites that use Equifax, VeriSign, or Cybertrust certificates because these certificates are included in the default certificate store.For information about adding certificates, see Section E.3.3.1, "Adding Certificates for Trusted Sites."
You can leverage Oracle Single Sign-On to integrate content from external web sites that require authentication, into a Web Clipping portlet. This section walks you through an example that demonstrates how you can do this.
The example integrates a secured page from an external application named My Oracle Support into a Web Clipping portlet.
To integrate an external application:
Open your WebCenter application in Oracle JDeveloper.
Register the external application, specifying the authentication information by performing the following steps.
In the Applications Navigator, right-click your project and choose New.
In the New Gallery, expand the General category, select External Application, then select External Application on the right, and click OK.
On the Name page of the Register External Application wizard, enter a name and display name for the external application, for example, MyOracleSupport.
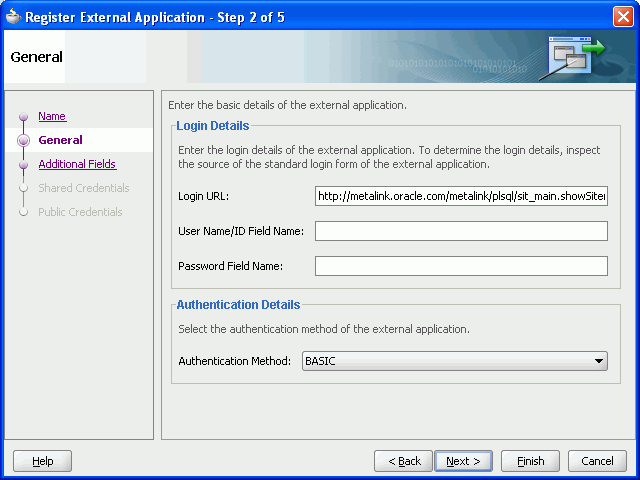
On the General page, enter the following details:
In Login URL, enter the URL of the application, for example, http://metalink.oracle.com/metalink/plsql/sit_main.showSitemap?p_showTitle=0. To determine the URL, navigate to the desired application in a browser and note the URL.
For Form-based Authorization, view the source of the login page for the external application and note the URL to be accessed during the login action.
In User Name/ID Field Name, enter the field name that the external application uses for the user name. Determine the field name by viewing the source for the desired page. If the Authentication method uses Basic Authentication, then you are not required to enter a field name. For MyOracleSupport, you can leave this field blank.
In Password Field Name, enter the field name that the external application uses for the password. Determine the field name by viewing the source for the desired page. If the authentication method uses Basic Authentication, then you are not required to enter a field name. For MyOracleSupport, you can leave this field blank.
Select BASIC as the authentication method.
Figure 32-1 shows the General page of the Register External Application wizard.
Figure 32-1 Registering an External Application
On the Additional Fields page, you can specify names and values of any additional fields that are submitted with the login form of the external application. To specify a field name that is used to indicate a redirection URL, enter redirectFieldName in Field Name and specify the required value in Default Field Value. For this example, you are not required to enter additional fields.
Figure 32-2 shows the Additional Fields page of the Register External Application wizard.
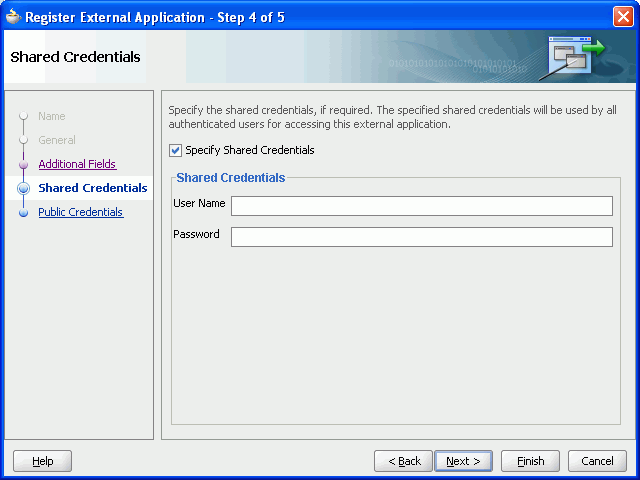
On the Shared Credentials page, specify whether you want to use shared credentials that enable authenticated users to access the external application. To enable the shared credentials feature, select the Specify Shared Credentials checkbox. Then enter the user name and password and click Next.
Figure 32-3 shows the Shared Credentials page of the Register External Application wizard.
Figure 32-3 Specifying Shared Credentials
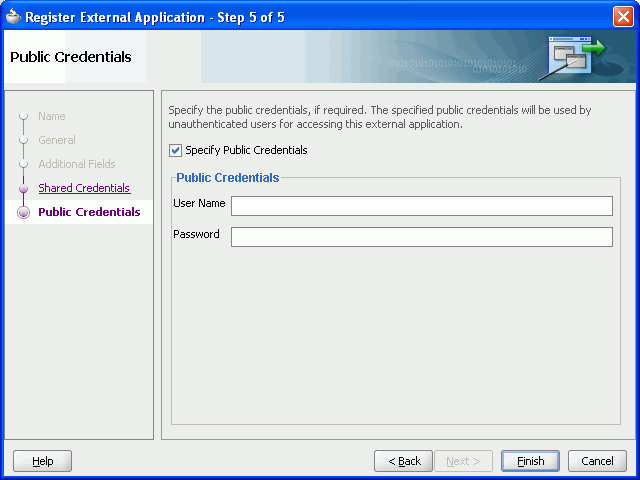
On the Public Credentials page, specify whether unauthenticated users (public users) can access the external application. To enable the public credentials feature, select the Specify Public Credentials checkbox. Then enter the user name and password.
Figure 32-4 shows the Public Credentials page of the Register External Application wizard.
Figure 32-4 Specifying Public Credentials
Click Finish.
For the Web Clipping portlet, register the Web Clipping producer by performing the following steps:
In the Applications Navigator, right-click your project and choose New.
In the New Gallery, expand the Web Tier category, select Portlets, then select Oracle PDK-Java Producer Registration from the list on the right, and click OK.
On the Specify Producer Name page of the Register Oracle PDK-Java Portlet Producer wizard, enter the producer name, for example webClippingMyOracleSupport.
Click Next.
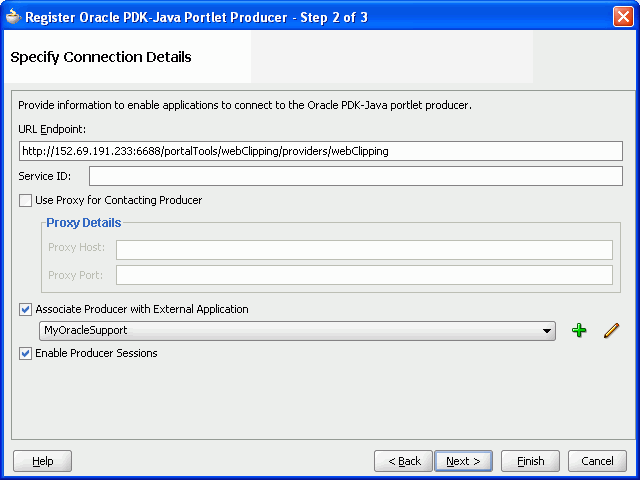
On the Specify Connection Details page, specify the following details:
In the URL Endpoint field, specify the URL for the Web Clipping producer in the following format:
http://host:port/portalTools/webClipping/providers/webClipping
Note that host:port refers to the host and port where the Web Clipping producer is located.
If you use a proxy server to contact web producers from your application, then select the Use Proxy for Contacting Producer checkbox and enter the proxy details.
Select the Associate Producer with External Application checkbox, and from the list of values, select MyOracleSupport that you registered earlier. The Enable Producer Sessions checkbox also gets selected in this step.
Figure 32-5 shows the Specify Connection Details page of the Register Oracle PDK-Java Portlet Producer wizard.
Figure 32-5 Associating a Web Clipping Producer with an External Application
Click Next.
On the Specify Additional Registration Details page, specify the execution timeout, subscriber ID, and shared key values, if required.
Click Finish.
Add a portlet to a *.jspx page, using the webClippingMyOracleSupport producer that you just registered.
Run the *.jspx page.
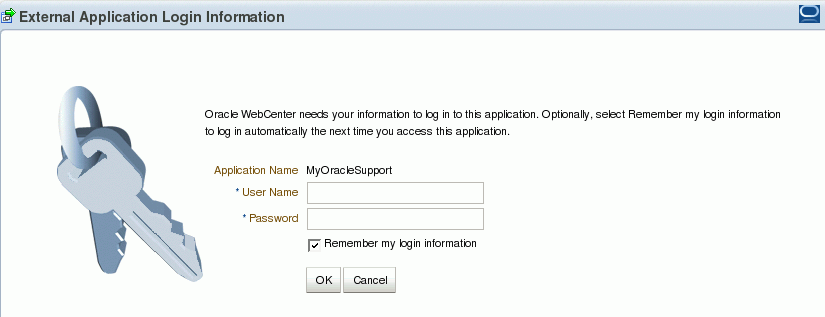
If you did not specify shared or public credentials for the external application representing MyOracleSupport, then the portlet contains an Update login information link. Click this link and enter your credentials. Then, click OK to log on to MyOracleSupport. (Figure 32-6)
Figure 32-6 Logging into the Integrated External Application
Select a section of a page that you intend to display in the Web Clipping portlet by performing the following steps:
Click the Actions icon on the header of the Web Clipping portlet, and select Customize.
The Find a Web Clipping page displays.
In the URL Location field, the default URL for the external application is displayed. (Figure 32-7)
Click Start. The Web Clipping Studio displays the page from the integrated external application.
Browse to the web page that contains the content you want to clip. After you navigate to the required web page, click Section in the Web Clipping Studio banner.
Web Clipping Studio divides the web page into clippable sections.
At the top-left corner of the section you want to clip, click Choose.
Web Clipping Studio displays a preview of your selected section. If it is the section you want to clip, then click Select on the Web Clipping Studio banner.
The Web Clipping Studio displays the Find a Web clipping page, showing the properties of the clipping.
From the URL Rewriting list, choose Inline to specify that link targets open inside the portlet, rather than in a new browser window.
Click OK to display the selected web clipping in the Web Clipping portlet on your page.
Now, the web clipping, even though it is from a page requiring authentication, is available in your portlet.
Note that you can associate only one external application with a producer. For each external application, you must register a new producer. Each WebCenter application user accesses the authenticated content using their user name and password for that system, not the page designer's credentials.
Web Clipping supports certain advanced features. You can configure custom authentication methods by using the Web Clipping Transport API and rewrite image links to use a resource proxy.
To support custom authentication methods, users can use the Web Clipping Transport API. To extend the Web Clipping transport layer to support custom authentication methods, users must perform the following implementation and deployment procedures:
Implementation
Users can implement their own transport classes.
Users can override two use cases of the oracle.portal.wcs.transport.http.HttpTransportLiaison interface. In Web Clipping, this interface is used to abstract the HTTP transport layer. By default, the two use cases of this interface are manifested by following implementations:
HttpClientStudioTransportLiaison, which handles HTTP transport in Web Clipping Studio mode
HttpClientProviderTransportLiaison, which handles HTTP transport in Web Clipping Producer show mode
To support more authentication methods, users must override the addRequestHeaders methods for both the Studio and Provider HttpClientTransportLiaison implementations to add their own authentication-specific headers. For information, see Oracle WebLogic Server Web Clipping API Reference.
Users must compile the new subclasses and package them into a JAR file. For example, to compile the new subclasses, users can use the following command:
javac -classpath path_to_wcejar -d classes/
Where, path_to_wcejar refers to the path to the wce.jar file.
To create the JAR file, for example, users can run the following command from the classes directory:
jar cvf ../mytransport.jar
Where, mytransport.jar refers to the JAR file users want to create.
Deployment
Users must deploy the JAR file to support the custom authentication method.
To deploy the JAR file, users must perform the following tasks:
Place the JAR file into the class path or shared library that is used by the Web Clipping producer at runtime.
Register the transport class in the web.xml file for Web Clipping producer by making the following modifications to the context parameters defined for HttpClientProviderTransportLiaison and HttpClientStudioTransportLiaison:
Change the parameter value for oracle.webclipping.provider.TransportLiaisonClass to the name of the new class extended from the HttpClientProviderTransportLiaison class.
Change the parameter value for oracle.webclipping.studio.TransportLiaisonClass to the name of the new class extended from the HttpClientStudioTransportLiaison class.
Restart the producer server for the changes to take effect.
Web Clipping enables users to rewrite image links to use a resource proxy. To enable this feature, you must add the following entry in the web.xml file of the Web Clipping producer:
<env-entry>
    <env-entry-name>oracle/webclipping/rewriteImageLink</env-entry-name>
    <env-entry-type>java.lang.Boolean</env-entry-type>
    <env-entry-value>false</env-entry-value>
</env-entry>
This section lists current limitations of Web Clipping.
If the site that you intend to clip uses a large amount of JavaScript to manipulate cookies or uses the document.write JavaScript method to modify the HTML document being written, then you may not be able to clip content from the site.
When you integrate with partner applications (by using mod_osso), you cannot clip directly through those partner applications in an authenticated manner. However, you can use partner applications through the external application framework.
You cannot use the Web Clipping portlet to clip Oracle Portal pages and ADF pages. As a workaround, reregister the same producer in the destination portal and edit the portal manually.
You cannot use the Web Clipping portlet to clip a web page that contains multiple frames, that is, a frameset.
Note the following about Web Clipping and the use of a CSS:
If a web page contains multiple portlets that use a CSS, then they should not conflict if the CSS uses distinct style names, such as OraRef, to specify a style within an HTML tag, rather than using an HTML tag name, such as <A>, as the name of the style.
If one portlet uses a CSS, and that CSS overwrites the behavior of HTML tags by using the name of the tag, such as <A>, as the name of the style, and a second portlet on the same page does not use a CSS, the second portlet is affected by the style instructions of the CSS of the first portlet.
If two portlets on the same page use a different CSS and each CSS overwrites the behavior of HTML tags by using the name of an HTML tag, such as <A>, as the name of the style, then the style that is displayed depends on the browser.
Web Clipping checks for Globalization Support settings in the following way:
Web Clipping checks the Content-Type in the HTTP header for the charset attribute. If this is present, then it assumes that this is the character encoding of the HTML page.
If the charset attribute is not present, then it checks the HTML META tag on the page to determine the character encoding.
If the HTML META tag is not found, then Web Clipping uses the charset in the previous browsed page. If this is the first page, then it defaults to the ISO-8859-1 character encoding.
If the value of the charset for Content-Type or META tag is not supported (for example, if the charset was specified as NONE), then Web Clipping uses the default character set, ISO-8859-1, not the charset in the previously browsed page.
To use the Web Clipping portlet, you must use Netscape 7.0 or later, Microsoft Internet Explorer 5.5 or later for Windows 2000, or Microsoft Internet Explorer 6.0 or later for Windows XP. If you use browser versions older than these, then you may encounter JavaScript errors.