| Oracle® Fusion Middleware Developer's Guide for Oracle SOA Suite 11g Release 1 (11.1.1) Part Number E10224-03 |
|
|
View PDF |
| Oracle® Fusion Middleware Developer's Guide for Oracle SOA Suite 11g Release 1 (11.1.1) Part Number E10224-03 |
|
|
View PDF |
This chapter provides an overview of routing rules and describes how to specify routing rules for an Oracle Mediator (Mediator) service component.
This chapter includes the following sections:
Oracle Mediator enables you to route data between service consumers and service providers. As the data flows from service to service, it must be transformed. These two tasks, routing and transformations, are the core responsibilities of the Mediator. You can use the routing rules to specify how a message processed by a Mediator reaches its next destination. Routing rules specify where a Mediator sends the message, how it sends it, and what changes should be made to the message structure before sending it to the target service.
Routing rules can be of the following two types:
Static Routing Rules
A Mediator routing rule that is statically defined and is not expected to change depending on the invocation context.
Dynamic Routing Rules
A Mediator routing rule that enables you to externalize the routing logic to a Oracle Rules Dictionary, which in turn enables dynamic modification of the routing logic in a routing rule.
For more information on these routing rules, refer to Section 20.2.2, "Creating Static Routing Rules" and Section 20.2.3, "Creating Dynamic Routing Rules".
Routing rules can be defined only for a Mediator with defined interface. For more information on how to define an interface, refer to Section 19.3.1.2, "How to Define an Interface for a Mediator with no Interface Definition".
This section includes the following sections:
You can define the routing rules by using the Routing Rules panel of the Mediator Editor. You can access the Mediator Editor by using any one of the following methods:
From the SOA Composite Editor:
Double-click the icon that represents the Mediator for which you want to specify the routing rules.
Click the Plus (+) icon next to the Routing Rules panel.
From the Applications Navigator:
In the Applications Navigator, expand the SOA project, followed by the SOA Content folder.
In the SOA Content folder, double-click the name of the Mediator for which you want to specify the routing rules. The Mediator file has mplan extension.
Click the Plus (+) icon next to the Routing Rules panel.
Figure 20-1 shows the Mediator Editor with Routing Rules panel.
Figure 20-1 Mediator Editor- Routing Rules Panel
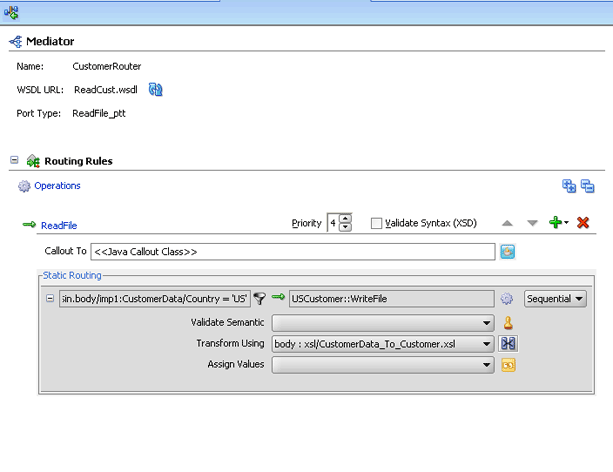
The icons in the Routing Rules panel are summarized in Figure 20-2.
When you configure static routing rules, you can specify the following details:
Target service
Specifies the service to which the message should be sent. See Section 20.2.2.1, "Specifying Mediator Services or Events" for more information about how to invoke a target service.
Execution type
Specifies the way in which routing rules are executed. You can specify either of the following execution types: sequential or parallel.
See Section 20.2.2.2, "Specifying Sequential or Parallel Execution" for information about how to specify an execution type.
Reply, callback, and fault handlers
Specify how to handle synchronous reply, callback, and fault messages. See Section 20.2.2.3, "Handling Response Messages" and Section 20.2.2.5, "Handling Faults" for information about synchronous reply, callback, and fault messages handling.
Filter expression
Specifies the filter expression to be applied. A filter expression specifies that the contents (payload or headers) of a message be analyzed before any service is invoked. For example, you might apply a filter expression that specifies that a service be invoked only if the message includes a customer ID, or if the value for that customer ID matches a certain pattern. See Section 20.2.2.6, "Specifying Expression for Filtering Messages" for information about how to specify filter expressions.
Transformations
Specify the transformation to be applied. You can use transformation to set a value on the target payload. You can perform transformation by using mappings or by assigning values.
The XSLT mapper enables you to define transformations that apply to the whole message body, to convert messages from one XML schema to another. The Assign dialog, however, works on individual fields. Using this dialog, you can assign values from the message (payload, headers), from constant, or from various system properties, such as the properties of an adapter present in the data path. See Section 20.2.2.7, "Creating Transformations" and Section 20.2.2.8, "Assigning Values" for information about how to create transformations.
Accessing Header Variables from Expressions
Detects any SOAP headers that are used in building the expression for the current routing rule operation. See Section 20.2.2.9, "Access Headers for Filters and Assignments" and Section 20.2.2.9.2, "Manual Expression Building for Accessing Properties for Filters and Assignments" for information about how to access headers for filters and transformations.
Schematron based validations
Specify the Schematron files for validating different parts of an inbound message.
See Section 20.2.2.10, "Using Semantic Validation" for information about how to perform Schematron based validations.
Java callout
Invokes custom Java class callouts. It enables the use of regular expressions together with Java code, when regular expressions do not suffice. See Section 20.2.2.11, "Support for Java Callouts" for information about how to use Java callouts.
User-defined extension functions
These are your own set of functions that can be used by the XSL Mapper. See Section 20.2.2.6.1, "Using User-Defined Extension Functions" for information about how to use user-defined extension functions.
The various types of static routing rules that can be defined for a service or event subscription are the following:
Section 20.2.2.2, "Specifying Sequential or Parallel Execution"
Section 20.2.2.6, "Specifying Expression for Filtering Messages"
Section 20.2.2.9, "Access Headers for Filters and Assignments"
After creating the Mediator, you associate it to inbound service operations or event subscriptions and specify the targets of the Mediator. Targets are outbound service operations or event publishing. A target specifies the next service or event to which a Mediator should send the message and what service operation is to be invoked. You can specify a service or an event as target type.
You can also echo source messages back to the initial caller after any transformations, validations, assignments, or sequencing are performed. Whether the echo is synchronous or asynchronous, depends on the WSDL file of the caller. The echo option is only available for inbound service operations and is not available for event subscriptions.
The purpose of the echo option is to expose all the Mediator functionality as a callable service, without having to route to any other service. For example, you can call a Mediator to perform a transformation, a validation, or an assignment, and then echo the Mediator back to your application, without routing anywhere else.
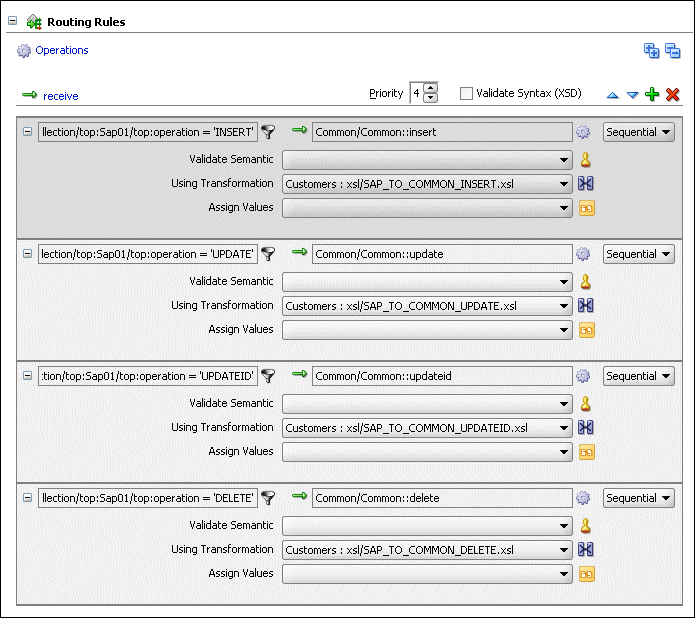
You can specify multiple routings for an inbound operation or event. Each routing is mapped to one target service invocation or event. Therefore, to specify multiple service invocations or raise multiple events, you must specify one routing rule for each target. For example, a message payload, you want to invoke an operation from the following operations defined in a service:
insert
update
updateid
delete
You must create four routings, one for each operation. Later, when you specify a filter expression, you can specify which target and operation is applied to each message instance, because of the message payload as shown in Figure 20-3.
Figure 20-3 Multiple Routings for an Inbound Operation
To invoke a service:
In the Routing Rules panel, click Add.
The Target Type dialog is displayed as shown in Figure 20-4.
Click Service.
In the Target Services dialog, navigate to, and then select an operation provided by a service, as shown in Figure 20-5.
Note:
A service can consist of multiple operations as shown in Figure 20-5.Click OK.
To raise an event:
In the Routing Rules panel, click Add.
The Target Type dialog is displayed as shown in Figure 20-6.
Click Event.
The Event Chooser dialog is displayed.
Click Search to the right of Event Definition field.
The SCA Resource Browser dialog is displayed.
Select an event file and click OK.
The Event field is populated with the events defined in the selected file as shown in Figure 20-6.
Select an event.
Click OK.
To echo a service:
In the Routing Rules panel, click Add.
The Target Type dialog is displayed as shown in the following figure:
Click Echo.
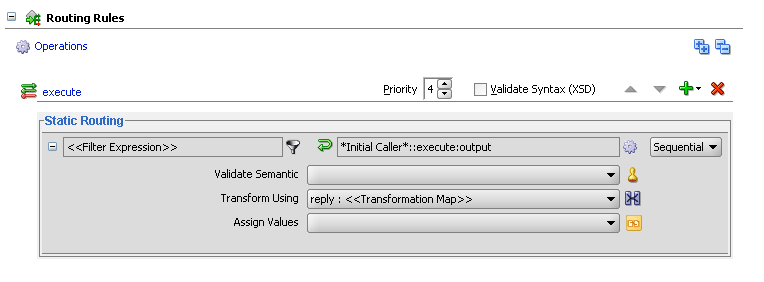
The following figure shows a routing rule with a synchronous echo:
Note:
An asynchronous echo has an icon with a dotted line on the return.Figure 20-8 Sample Mediator Supporting Echo Operation
Restrictions on Using Echo Option
The echo option has the following limitations:
The echo option is supported only with the Mediator interfaces having the following types of WSDL files:
Request/Reply
Request/Reply/Fault
Request/Callback
Note:
The echo option is not available for Mediator interfaces having Request/Reply/Fault/Callback WSDL Files.The echo option is available for synchronous operations like Request/Reply and Request/Reply/Fault.
Note:
The echo option is available for the synchronous operations only when the routing rule is sequential because parallel routing rules are not supported for Mediators with synchronous operations.For synchronous operations, having a conditional filter set, the echo option does not return any response to the caller, when the filter condition is set to false. Instead, a null response is returned to the caller.
The echo option is available for asynchronous operations only if the Mediator interface has a callback operation. In this case, the echo is run on a separate thread.
Note:
The asynchronous echo option is available only when the routing rule is parallel. To use the echo option, then sequential routing rules are not supported for Mediators with asynchronous operations.You can specify execution type for a routing rule. A routing rule execution type can be parallel or sequential. To specify an execution type for a routing rule, select Sequential or Parallel execution type from the Routing Rules panel.
This section describes the following sections:
Basic Principles of Sequential Routing Rules
In sequential execution, routings are evaluated and actions are performed sequentially. Sequential routings are evaluated in the same thread and transaction as the caller.
Mediator always enlists itself into the global transaction propagated through the thread that is processing the incoming message. For example, if an inbound JCA adapter invokes a Mediator, then the Mediator enlists itself to the transaction that the JCA adapter has initiated.
Mediator propagates the transaction through the same thread as the target components, while executing the sequential routing rules.
Mediator never commits or rolls back transactions propagated by external entities.
Mediator manages the transaction only if the thread-invoking Mediator does not have an active transaction already. For example, if Mediator is invoked from inbound SOAP services, then Mediator starts a transaction, and commits or rolls back the transaction depending on success and failure.
Basic Principles of Parallel Routing Rules
In parallel execution, routings are queued and evaluated in parallel in different threads.
For parallel processing, the messages of each Mediator component are retrieved in weighted round robin fashion. This ensures that all Mediator components receive parallel processing cycles, even if one or more Mediator components produce higher number of messages compared to other components. The weight used is the message priority set during design time of a Mediator component. Higher number of parallel processing cycles are allocated to the components that have higher message priority.
You can use the Priority user interface Construct to set the priority of a Mediator component. You can a set a priority from zero to nine, nine being the highest priority. The default priority is four.
Note:
The Priority user interface Construct is applicable only to parallel routing rules.A new transaction is initiated by the Mediator for processing each parallel rule. The initiated transaction ends with an enqueue to the Mediator parallel message dehydration store.
For example, if a Mediator component has one parallel routing rule, then one message is enqueued on the Mediator parallel message dehydration store. Then, the parallel message dispatcher to the store initiates a transaction, reads the message from the Database store and invokes the target component or service of this routing rule. This transaction initiated by the listener thread is a completely new transaction and is propagated to the target components.
Note:
Dehydrating of messages means storing the incoming messages in database for parallel routing rules, so that they can be processed later by worker threads.In parallel execution, Mediator commits or rolls back transactions because it is the initiator of these transactions.
If an operation or event has both sequential and parallel routing rules, first sequential routing rules are evaluated and actions are performed, and then parallel routings are queued for parallel execution.
Note:
If a Mediator service component with a request-response interface has only parallel routing rules, then the Mediator component does not send any response back to the caller. Though you can create such a Mediator component, the caller of the Mediator component does not get any response at runtime.You can specify how to handle the response messages in synchronous and asynchronous interactions. In case of synchronous interactions, you can specify the transformations and assignments for the response and the fault message. You can forward the response and the fault message to another service or event. Otherwise, you can send them back to the initial caller, if the initial caller is expecting responses and faults.
In case of asynchronous interaction, you can specify a timeout period for receiving the response. The timeout period can be specified in seconds, hours, days, months, or years. By default, the timeout period is infinite. If a callback response does not come within the specified timeout period, then a timeout response can be forwarded to another service, event, or back to the initial caller.
You cannot route a Mediator response to a two-way service. If you want to route a response to a two-way service, then you should use a one-way Mediator in between the first Mediator and the two-way service. The response should first be forwarded to the one-way Mediator, which in turn should call the two-way service.
Note:
Zero is an unsupported value to be specified as a timeout period.
If the callback is received, but processing of callback fails, then by default, the timeout handler is invoked for processing the action specified in the timeout handler.
Typically, the caller receives the callback after waiting for 100 milliseconds. But, if you have a bridge Mediator with a sequential routing rule and a connection to a synchronous interface service, then due to the complex flow of the program with all sequential routing rules, the caller may take longer time to be ready to receive the callback. You can work around this issue by changing the routing rule of the bridge Mediator to parallel.
Specifying a Timeout Period
Perform the following steps to specify a timeout period:
Click the Browse for target service operation icon next to the <<Target Operation>> field in the Callback section.
The Target Type dialog is displayed.
Select Service or Event.
The Target Service or the Event Chooser dialog is displayed depending upon the selection you made.
Select an event or service.
Click OK.
The timeout response is forwarded to the specified service or event.
Note:
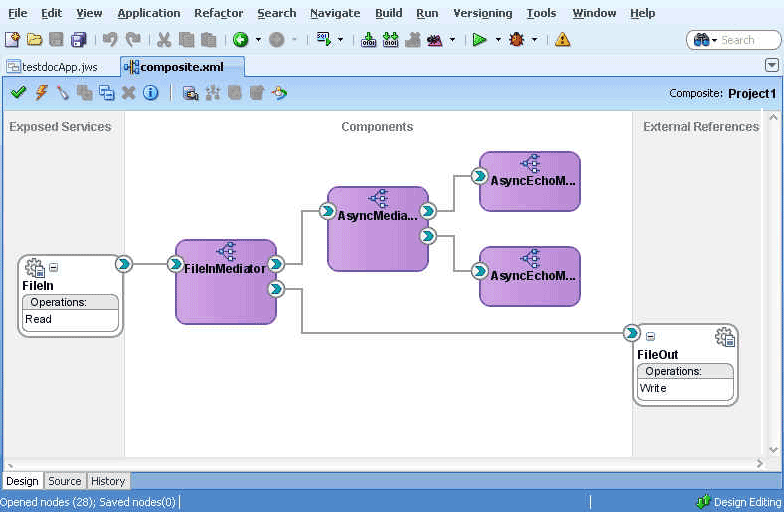
If the number of routing rules is larger, and the time taken to execute the routing rules exceeds the transaction timeout, then you must set the transaction timeout to a value that is greater than the time taken to execute all the routing rules.A single Mediator cannot handle multiple callbacks. If you have a composite application with a Mediator that receives multiple callbacks, then the behavior of the composite application is undetermined. For example, consider the scenario shown in Figure 20-9, where, AsyncMediator forwards the callback response from AsyncEchoMediator1 and AsyncEchoMediator2 to FileInMediator. In such a flow, the AsyncMediator may return the callback from both the AsyncEchoMediator1 and AsyncEchoMediator2, or from either one of them. The exact behavior is stochastic and cannot be predicted.
Figure 20-9 Sample Mediator Handling Multiple Callback
If you create a new routing rule, where the target service WSDL operation has one or more faults, then you still see a single Fault routing section in the Mediator Editor window. If the source Mediator service supports one or more faults, then the fault is routed back to the caller by default. You can choose the source and target fault names to be routed. You may also use the service browser to route the fault to another target.
To route another fault, click Add another fault routing button shown in the following figure:
This adds another fault section to the routing rule. In the following figure, a second fault is being routed to a File adapter service:
Note:
It is possible to route the same fault to many different targets using different transformations.While choosing the target for a fault routing, if you want to remove a fault routing section, then you must click Delete the selected fault routing as shown in Figure 20-12.
Otherwise, you can also click Clear Target on the Target Type dialog as shown in the following figure:
The filter expression routing rule enables you to filter messages based on their payload. If the filter expression for a given message instance evaluates to true, then the message is delivered to the target service or event specified within the routing rule.
For example, suppose you want to route your data to customers in two different countries: US and Canada. However, you only want notices regarding the product line of type MOBILE to be sent to the customers in US and the product line of type LANDLINE to the customers in Canada. To implement this routing, you must define a routing rule for each component/operation pair that sends messages to the target customers. In addition, you specify filter expressions for the routing rules that send messages to the customers in US or Canada.
You can also define filter expressions message properties or message headers.
Filter Expression Message Properties
Following two are examples of filter expressions message properties:
$in.property.custom.Priority = '1'

$in.property.tracking.ecid = '2'
Filter Expression Message Headers
Following two are examples of filter expressions message headers:
$in.header.wsse_Security/wsse:Security/Priority = '234'

$in.header.wsse_Security/wsse:Security/Priority = '234'
For the preceding filter expressions message headers to work, you must add the following attribute to the root element of the .mplan file:
wsse = "http://docs.oasis-open.org/wss/2004/01/oasis-200401-wss-wssecurity-secext-1.0.xsd"
You can specify a filter expression by using the Expression Builder dialog as shown in Figure 20-14. The Expression Builder dialog is displayed when you click the icon to the right of the filter expression field in the Routing Rules panel.
The Expression Builder dialog contains the components and controls that assist you in designing a filter expression. Briefly, you double-click a value in the Variables field or the Functions palette, to add the value to the Expression field. Using a combination of Variable elements, functions, and manually entered text, you can build an expression by which you want message payloads to be filtered for a given routing rule.
The following list describes each of the fields in the Expression Builder dialog:
Expression field
You can enter the filter expression – either manually, or by using the Variable field and the Functions palette in this field.
The icons on the upper right side of this field enable you to undo the last edit made, redo the last edit made, or clear the entire Expression field, respectively.
Variables field
This field contains the message defined for a Mediator. Oracle JDeveloper parses the Mediator WSDL file and presents the message definition in the Variables field. The input message is stored in the $in variable. You can use $in.properties to access properties of an input message.
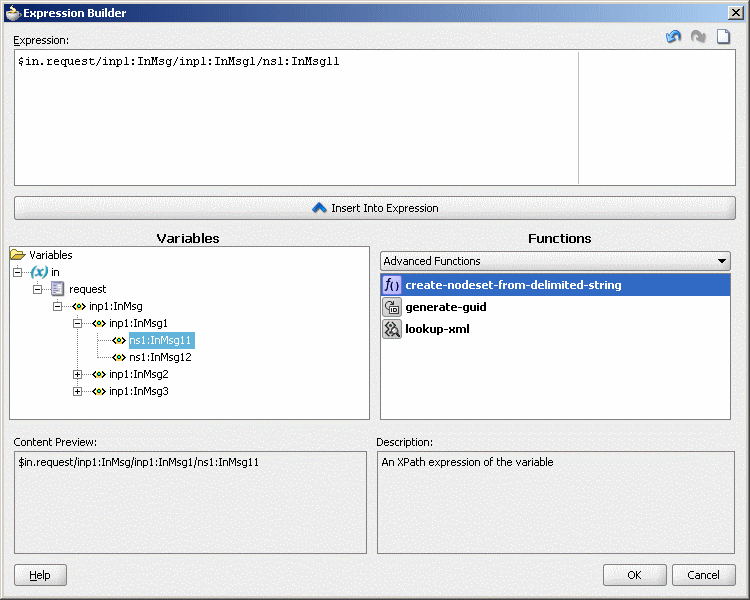
If the input message consists of multiple parts, then you can use $in.<partname> to access a part of an input message as shown in Figure 20-15.
Figure 20-15 Multiple Part Message in Expression Builder
Functions Palette
This list enables you to select different functions to include in an expression. When you select a function, a preview of how that function appears when added to the Expression field is presented in the Content Preview field, and a description of the function is presented in the Description field.
Content Preview
This field indicates how a value selected from the Variables field or Functions palette appears when it is inserted into the Expression field.
Description
This field describes the value selected from the Variables field or Functions palette.
To specify a filter expression on a message payload, follow these steps:
In the Routing Rules panel, click the Add Filter Expression icon, shown in Figure 20-2.
The Expression Builder dialog is displayed.
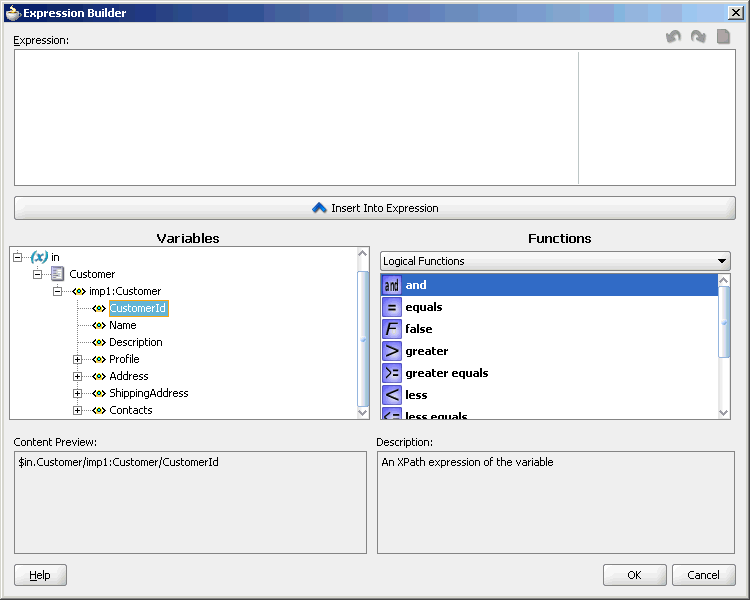
In the Variables field, expand the message definition and select the message element on which you want to base the expression. For example, CustomerID element is shown selected in Figure 20-16.
Figure 20-16 Expression Builder Dialog – Variables Element Selected
Click Insert Into Expression.
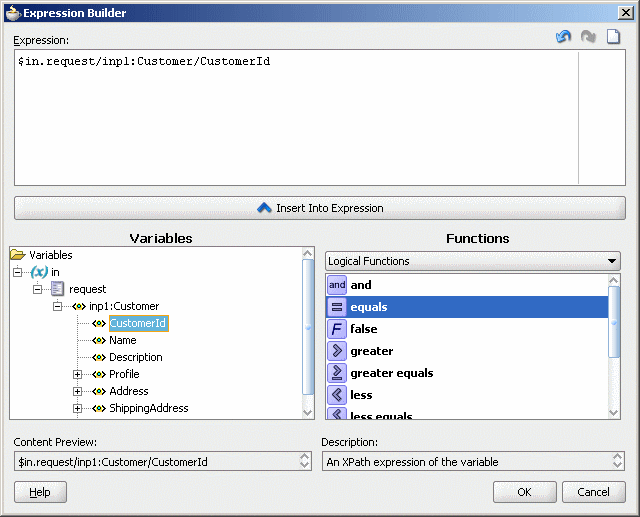
The expression is added in the Expression field, as shown in Figure 20-17.
Figure 20-17 Expression Builder Dialog – Variables Element Inserted
From the Function list, select the function to apply to the message payload. For example, equals.
Functions are grouped in categories that are listed when you click the down arrow in the Functions list. For example, if you click the down arrow and select Logical Functions, the list appears as shown in Figure 20-17. When you select a function within the Logical Functions list, a description of that function is presented in the Description box.
Click Insert Into Expression.
The XPath expression for the selected function is inserted in to the Expression field.
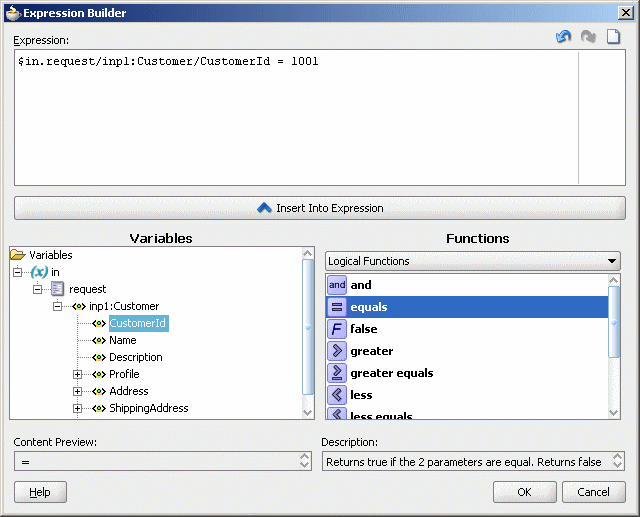
Complete the expression. In this example, a value of 1001 is entered, as shown in Figure 20-18.
Figure 20-18 Sample Expression Builder Dialog – Value Entered
You can edit the expression manually, or use the expression editing icons, which are summarized in Figure 20-19.
Click OK.
The expression is added to the Routing Rule panel.
To modify or delete a filter expression, double-click the Add Filter Expression icon, and then modify or delete the expression in the Expression field of the Expression Builder.
You can use the Expression Builder to use the user-defined extension functions. Perform the following steps to use the user-defined extension functions:
Create an XPath function.
Register the Jaxen XPath function with a Mediator component in the xpath-function.xml file on the server side.
Open JDeveloper.
Use the Builder Expression to customize the expression.
Deploy the JDeveloper project to Oracle WebLogic Server.
Copy the JAR file containing the user-defined extension functions to the beahome/user_projects/domains/soainfra/autodeploy/soa-infra/APP-INF/lib directory.
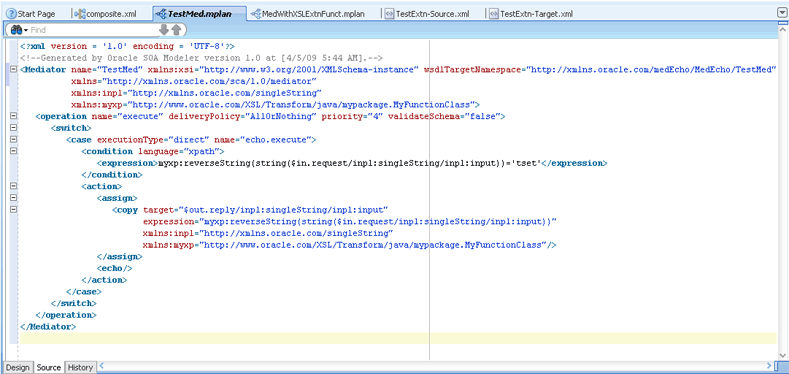
Modify the .mplan file of the project in the following way:
Add the function namespace you have defined for the extension functions under Mediator element
Add the function names under Expression element
This has been illustrated in Figure 20-20.
Figure 20-20 Project .mplan file – Modified to Use User-Defined Extension Functions
Invoke the test page with a suitable payload.
Oracle JDeveloper provides an XSLT Data Mapper tool that enables you to specify a mapper file (XSL file) to transform data from one XML schema (expressed as an XSD file) to another. This tool enables data interchange among applications using different schemas. For example, you can map incoming source purchase order schema to an outgoing invoice schema. After you define an XSL file, you can reuse it in multiple routing rule specifications.
When you click the transformation map icon to the right of the Transform Using field in the Routing Rules panel, the Request Transformation Map dialog is displayed. You can select an existing XSL file or create a new XSL file with the Data Mapper tool to perform the required transformation.
You can also specify transformations for a synchronous reply, callback response message, or a fault message. In case of synchronous reply or fault message, the Reply Transformation Map dialog or the Fault Transformation Map dialog contains the Include Request in the Reply Payload option. Figure 20-21 shows a Reply Transformation Map dialog with this option.
Figure 20-21 Reply Transformation Map Dialog

When you select this option, an $initial variable is created which contains the original message of a synchronous interaction as shown in Figure 20-22.
Figure 20-22 Initial Variable in XSL File

An initial message can also consist of multiple parts. You can use $initial.<partname> to access a part of the initial message.
Note:
If the parts of the inbound and outbound messages are identical, then no transformation is required for data interchange.For information about the Data Mapper tool, see Chapter 35, "Creating Transformations with the XSLT Mapper".
You can use the Assign Values field to specify the properties of a target message. Figure 20-23 shows the Assign Values dialog that is displayed when you click the Assign Values icon in the routing rules panel.
To set the properties of the target message:
Click Add in the Assign Values dialog.
The Assign Value dialog is displayed as shown in Figure 20-24.
In the From section, select any of the following options from Type box:
Property: Select this option to assign value of a property to the target message. The property list contains a list of predefined message properties. You can also enter any user-defined property name.
Expression: Select this option to assign value of an expression to the target message. When you click the Invoke Expression Builder icon to the right of Expression field, the Expression Builder dialog similar to the one shown in Figure 20-14 is displayed.
For more information about the Expression Builder dialog, see Section 20.2.2.6, "Specifying Expression for Filtering Messages".
Constant: Select this option to assign a constant value to the target message.
In the To section, select any of the following options:
Property: Select this option to copy the value to a message property. The Variable field of the Expression Builder dialog contains an $out variable that contains the output message. You can use $out.properties to access properties of an output message.
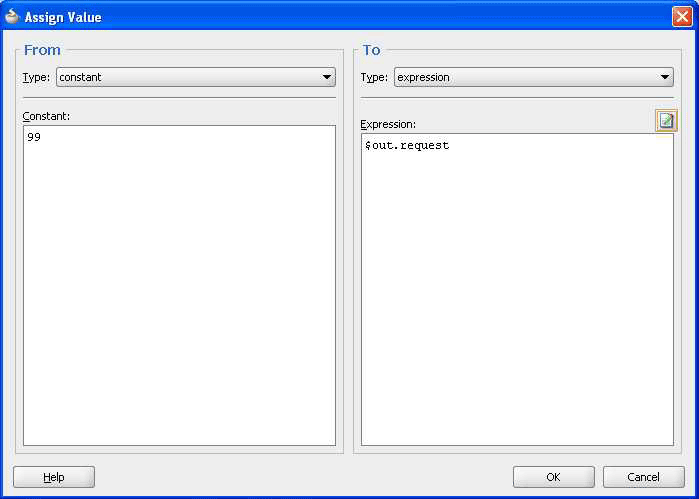
Expression: Select this option to copy the value to an expression. When you click the Invoke Expression Builder icon to the right of Expression field, the Expression Builder dialog is displayed. The Variable field of the Expression Builder dialog contains an $out variable that contains the output message. You can use $out.<partname> to access a complete output message or part of an output message. Note that you cannot assign any value after the <partname>. For example, in Figure 20-25, the expression is $out.request and you cannot modify it to add any value after request.
Figure 20-25 shows a sample Assign Value dialog in which a constant value is specified as an expression.
Figure 20-25 Populated Assign Value Dialog
Click OK in the Assign Value dialog.
Click OK. The expression is added to Assign Values field of the Routing Rules panel.
Note:
When you assign values to a particular Mediator property during an event publishing, the assigned value does not get propagated to the subscribing event.
You can workaround this issue by using transformations to have the property as part of the event body.
You cannot assign values to the jca.db.userName and jca.db.password properties on WebLogic Server because their data sources do not support setting user name or password dynamically to the getConnection method.
By default, SOAP headers are not passed through by Mediator. You must add the passThroughHeader endpoint property to the corresponding Mediator routing service. For adding this property, modify the Composite.xml file in the following way:
<component name="Mediator1">
     <implementation.mediator src="Mediator1.mplan"/>
     <property name="passThroughHeader">true</property>
</component>
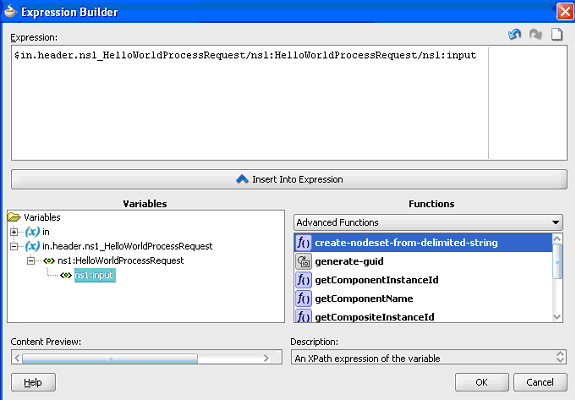
When the Expression Builder is invoked from a Mediator, either for defining a filter or for defining an assignment source or target, the WSDL file is parsed. This automatically detects any SOAP headers for the current routing rule operation and makes them visible as Variables under the in or out folder as header./ns_elementName/, as shown in Figure 20-26. Here, ns is the namespace prefix and elementName is the root element name for the header schema.
For example:
Example 1
Suppose, the namespace prefixes wsse and ns1 are already defined in the WSDL file or the .mplan file, then you can write an XPath expression as the following:
$in.header.wsse_Security/wsse:Security/ns1:Foo/Priority
Example 2
Suppose, you want to use a schema that does not have a namespace predefined in the WSDL file, then the Expression Builder is enhanced to allow you to enter {full_namespace} instead of a prefix. The Expression Builder then generates a unique prefix and the prefix definition is added to the .mplan file.
For example, enter the following expression in the Expression Builder:
$in.header.{http://docs.oasis-open.org/wss/2004/01/oasis-200401-wss-wssecurity-sec
ext-1.0.xsd}_Security/
{"http://docs.oasis-open.org/wss/2004/01/oasis-200401-wss-wssecurity-secext-1.0.xs
d"}:
Security/{"http://www.globalcompany.com/ns/OrderBooking"}:Foo/Priority
The .mplan file contains the following:
xmlns:ns1="http://docs.oasis-open.org/wss/2004/01/oasis-200401-wss-wssecurity-secext-1.0.xsd"

xmlns:ns2="http://www.globalcompany.com/ns/OrderBooking"

...

expression="$in.header.ns1_Security/ns1:Security/ns2:Foo/Priority"
Figure 20-26 Expression Builder Dialog - Automatic Header Detection
By default, SOAP headers are not passed through by Mediator. You must add the following endpoint property to the corresponding Mediator routing service:
<property name="passThroughHeader">true</property>
For example, to add this property, you can modify the Composite.xml file in the following way:
<component name="Mediator1">
     <implementation.mediator src="Mediator1.mplan"/>
     <property name="passThroughHeader">true</property>
</component>
Note:
The user interface supports both SOAP 1.1 and SOAP 1.2.
For automatic header detection, a concrete WSDL file must be used, when creating the Mediator component.
Assignments execute after filters. So, if you are assigning a value in a custom header, then the particular assignment is not visible to the filter.
There are use cases, where the header schemas cannot be determined from the WSDL files. For example, security headers that are appended to message, or the headers for a Mediator that was created using an abstract WSDL file. To access these headers, you must manually type in the XPath into the Expression Builder.
The syntax for header expressions is:
$in.header.<header root element namespace prefix>_<header root element name>/<xpath>
So, for the following header:
<wsse:Security xmlns:wsse="http://docs.oasis-open.org/wss/2004/01/oasis-200401-wss-wssecurity-sec
ext-1.0.xsd">
<Priority>234</Priority>
</wsse:Security>
The filter expression is:
$in.header.wsse_Security/wsse:Security/Priority = '234'
The assignment expression is:
<copy target="$out.property.jca.jms.priority"
 expression="$in.header.wsse_Security/wsse:Security/Priority"/>
For the preceding expressions to work, you must add the following attribute to the root element of the .mplan file:
wsse = "http://docs.oasis-open.org/wss/2004/01/oasis-200401-wss-wssecurity-secext-1.0.xsd"
Example of a filter expression is
$in.property.tracking.ecid = '2'
Example of an assignment expression is
<copy target="$out.property.tracking.ecid" value="$in.property.tracking.ecid"/>
You can specify Schematron files for validating an inbound message and its various parts. Schematron version 1.5 is the supported version.
Perform the following steps for specifying a Schematron schema to validate an inbound message and its various parts:
Click the Select Validation File icon to the right of Validate Semantic field.
The Validations dialog is displayed.
Click Add.
The Add Validation dialog is displayed.
From the Part list, select a message part.
Click Search to the right of the File field.
The SCA Resource Browser dialog is displayed.
Select a Schematron file and click OK.
Note:
Schematron files usually have a .sch extension.
No error message or warning is displayed if the selected Schematron file is empty.
The Add Validation dialog is updated, as shown in Figure 20-27.
Click OK.
The Validation dialog is updated, as shown in Figure 20-28.
Click Add to specify a Schematron file for another message part or click OK.
For more information about building a Schematron schema, refer to the resources available at
Note:
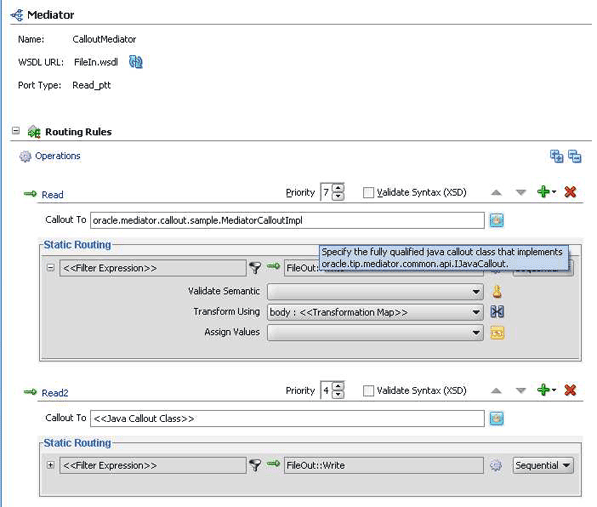
In semantic validation, if you check for the length of each element name, then the element name may change for different set of input. This happens when there are white spaces between nodes because the parser treats the white spaces as test nodes.Java callouts enable you to use external Java classes to manipulate messages flowing through the Mediator. Only one Java callout is supported per WSDL operation or event subscription. The callout class must implement the oracle.tip.mediator.common.api.IjavaCallout interface. Callouts are available for both static and dynamic routings. Figure 20-29 shows a sample Mediator with two operations, where both the operations have one routing rule each and the first operation has a callout class.
Figure 20-29 Sample Mediator Supporting Java Callout
You must ensure that the Java callout class is available on the server. You can use any of the following methods for this:
Copy the Java class to the SCA-INF/classes folder
Copy the JAR containing the Java class to the SCA-INF/lib folder
Copy the JAR containing the Java class to the $DOMAIN_HOME/lib folder
If you want to make the Java callout class to be available to multiple Mediators, then you must copy the JAR containing the Java class to the $DOMAIN_HOME/lib folder.
You can manually enter the name of the Java callout class in the Callout To field as shown in Figure 20-30. In this case, JDeveloper's auto-completion information feature completes the address, the classes in the current project.
You can also click Select java callout class button to invoke the standard JDeveloper Class Browser as shown in Figure 20-31.
The Class Browser is filtered so that it only displays classes that implement the oracle.tip.mediator.common.api.IjavaCallout interface.
If you have a Java callout in Mediator and use a filter expression in the same Mediator, then you must set the root element for the payload as follows:
changexmldoc = XmlUtils.getXmlDocument(ChangedDoc);
String mykey = "request";
message.addPayload(mykey,changexmldoc.getDocumentElement());
Table 20-1 discusses the methods in the oracle.tip.mediator.common.api.IjavaCallout interface.
Table 20-1 Description of Methods in the IjavaCallout Interface
| Method | Description |
|---|---|
|
|
This method is invoked when the callout implementation class is instantiated for the first time. |
|
|
This method is called before Mediator starts executing the cases. You can customize this method to include validations and enhancements. |
|
|
This method is called before Mediator starts executing any particular case. You can customize this method to include case-specific validations and enhancements. |
|
|
This method is called before Mediator finishes executing callback handling. You can customize this method to perform callback auditing and custom fault tracking. |
|
|
This method is called after Mediator finishes executing the cases. You can customize this method to perform response auditing and custom fault tracking. |
|
|
This method is called after Mediator starts executing the cases. You can customize this method to perform response auditing and custom fault tracking. |
|
|
This method is called after Mediator finishes executing callback handling. You can customize this method to perform callback auditing and custom fault tracking. |
Note:
If you change the message properties of a Mediator by using Java callout in thepreRoutingRule method or the preRouting method, then you must explicitly copy the changed property to the outbound message by using Mediator assignment functionality. For example, if you are changing the jca.file.FileName property in Java callout, then you must update the Mediator assignment statement in the following way:
<assign>
<copy target="$out.property.jca.file.FileName" expression="$in.property.jca.file.FileName"/>
</assign>
Table 20-2 discusses the methods in the CalloutMediatorMessage interface.
Table 20-2 Description of Methods in the CalloutMediatorMessage Interface
| Method | Description |
|---|---|
|
|
This method sets payload of the Mediator messages. |
|
|
This method adds property to the Mediator messages. |
|
|
This method adds header to the Mediator messages. |
|
|
This method retrieves Mediator message properties by providing the property name. |
|
|
This method retrieves Mediator message properties. |
|
|
This method retrieves instance ID of the Mediator messages. This instance ID is the Mediator instance ID created for that particular message. |
|
|
This method retrieves payload of the Mediator messages. |
|
|
This method retrieves header of the Mediator messages. |
|
|
This method retrieves componentDN for the Mediator component. |
Note:
The oracle.tip.mediator.common.api.AbstractJavaCalloutImpl class is a dummy implementationFoot 1 of the IJavaCallout interface. This class defines all the methods present in the IJavaCallout interface. So, you can extend this class to override only a few specific methods of the IJavaCallout interface.
Details of the processing happening within the Java callout, are not displayed in the Mediator Audit Trail screen.
The basic idea behind dynamic routing is to separate the control logic, which determines the path taken by the process, from the execution of the process. In the dynamic routing scenario, a decision matrix is used to determine the type of Level-2 service to be chosen for each routing. The factors that affect the decision on the type of Level-2 service are channel, customer type, and so on. The solution allows this decision matrix to be modified externally by business analysts without changing the routing. The decision matrix must be evaluated to determine the outbound service.
Dynamic routing rules can be created by using the Dynamic Routing Rule option of Mediator Editor window, as shown in Figure 20-32:
Figure 20-32 Mediator Editor Window Displaying Dynamic Routing Rule Option
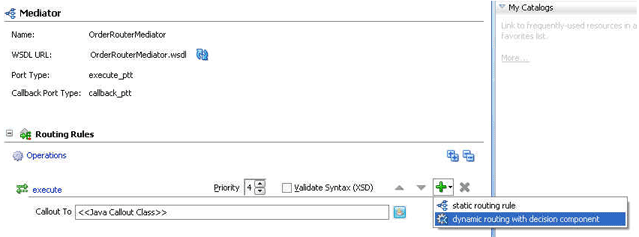
This creates a new Business Rules component and the Business Rule component is wired to the Mediator component within the SCA composite of the Mediator component. The wire links between the Business Rule component and the Mediator component are considered implementation details and are shown as dotted lines in the SCA editor, as shown in Figure 20-33:
Figure 20-33 SCA Editor with Wire Links Between the Business Rule Component and the Mediator Component
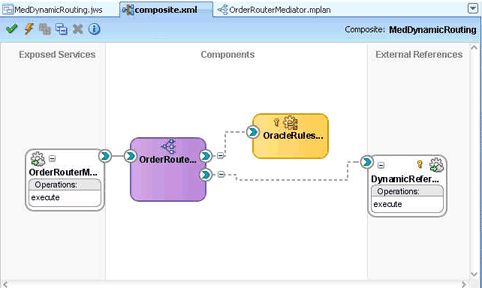
The Business Rule component comprises of a rule dictionary. The rule dictionary is a metadata container for the rule engine artifacts, such as fact types, rulesets, rules, decision tables and so on. As part of creating the Business Rules component, the rule dictionary is pre-initialized with the following data:
Fact Type Model
The fact type model is the data model that can be used for modeling rules. The rule dictionary is populated with a fact type model that corresponds to the input of the phase activity, and some fixed data model that is required as part of the contract between the Mediator component and the Business Rules component.
Ruleset
A ruleset is a container of rules and used as a kind of grouping mechanism for rules. A ruleset can be exposed as a service. As part of creating the Business Rules component, one ruleset is created within the rule dictionary.
Decision Table (or Matrix)
From a rule engine perspective, a decision table is a collection of rules with the same fact type model elements in the condition and action part of the rules. The decision table enables to visualize rules in a tabular format. As part of creating the Business Rules component, a new decision table is created within the ruleset.
Decision Service
As part of creating the Business Rules component, a decision service is created to expose the ruleset as a service of the Business Rules SCA component. The service interface is used by the Mediator component to evaluate the decision table.
After all the required artifacts of the phase activity are created, the wizard starts modeling the phase decision matrix (PDM). The wizard launches the Rule Designer window of JDeveloper and enables you to edit the phase decision matrix. Figure 20-34 shows a sample decision table within the Rule Designer:
Figure 20-34 Sample Decision Table Within the Rule Designer
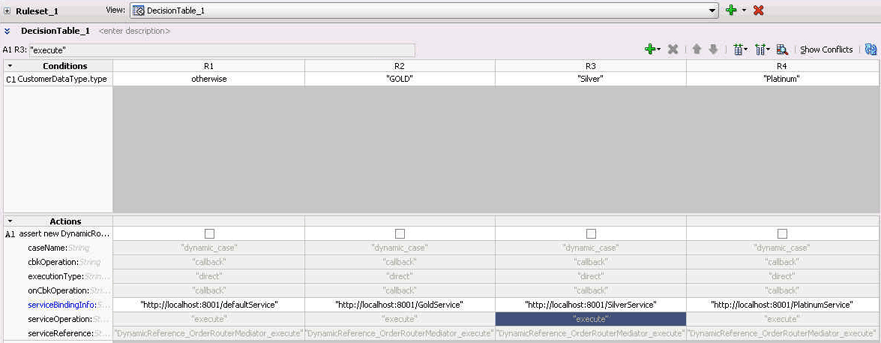
Once the dynamic routing is created, you can modify the associated decision matrix by clicking Edit Dynamic Rules. This launches the Rule Designer and enables modification of the associated decision table of the Business Rules component. After you create dynamic routing for the Mediator component, you cannot go back to static routing without deleting the dynamic routing. Currently, there is no option for mixing these two types of routing.
The Mediator mplan file looks like the following after dynamic routing option is chosen:
Figure 20-35 Mediator mplan File for a Mediator with Dynamic Routing Rule
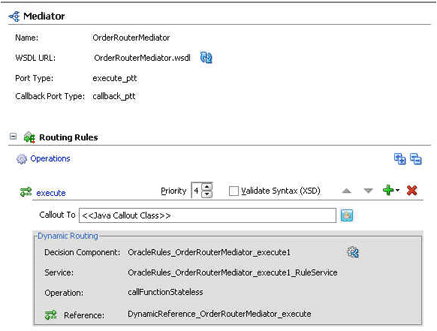
You see the following changes in the source view:
<Mediator name="Shipment" xmlns:xsi="http://www.w3.org/2001/XMLSchema-instance"
          xmlns="http://xmlns.oracle.com/sca/1.0/mediator">
 <operation name="execute" deliveryPolicy="AllOrNothing" priority="0">
  <switch decisionServiceRef="Phase1DecisionService"
          decisionServiceOperation="executeFunction"></switch>
 </operation>
</Mediator>
The switch element contains the decision service reference and operation details to enable the Mediator component to invoke the decision service in runtime for getting the dynamic routing decisions. Dynamic decisions are returned by rule engine user configuration in Runtime.
External service invocation contains an extra attribute called bindingInfo, which contains binding information to make the invocation dynamic.
Limitations on Mediators Using Dynamic Routing Rules
Following are some limitations on Mediators using dynamic routing rules:
As of now, only SOAP bindings are supported. There is a dummy SOAP binding in the composite.xml file. This endpoint is overridden by Mediator in runtime through NM property. So, outbound services can be called only over SOAP.
Payload manipulation is limited for dynamic routing rules. No assignment, transformation, or validation can be performed.
The reference WSDL file (Layer 2 or Called References) should have the same abstract WSDL file as the Phase Reference that gets auto created.
Dynamic Routing is not possible for Mediators with synchronous or one-way interface.
The CustomerRouter use case provides an overview of how to use a Mediator in a SOA composite sample application to route messages the payload. For downloading the sample files mentioned in this section, visit the following URL:
http://www.oracle.com/technology/sample_code/products/mediator
The CustomerRouter use case consists of the following steps:
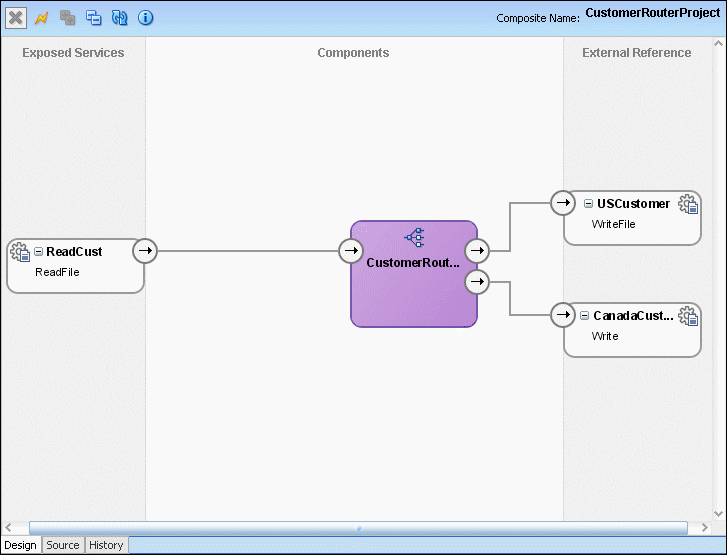
Legacy customer files are picked up from a directory by an adapter service named ReadCust.
The ReadCust adapter service sends the file data to the CustomerRouter Mediator.
The CustomerRouter Mediator applies a filter to the XML message payload to determine whether the message should be routed to the USCustomer reference or CanadaCustomer reference.
The CustomerRouter Mediator then transforms the message to the structure required by the adapter reference.
The external reference delivers the message to its associated external application.
Figure 20-36 provides an overview of the CustomerRouter use case.
Figure 20-36 Overview of CustomerRouter Use Case
This section provides the design-time tasks for creating, building, and deploying the use case. These tasks should be performed in the order in which they are presented.
Section 20.3.1.1, "Task 1: Creating an Oracle JDeveloper Application and Project"
Section 20.3.1.2, "Creating CustomerRouter Mediator Component"
Section 20.3.1.6, "Creating Oracle Application Server Connection"
To create an application and a project for the use case:
In Oracle JDeveloper, click File and select New.
The New Gallery dialog appears.
In the New Gallery, expand the General node, and select the Applications category.
In the Items list, select SOA Application and click OK.
The Create SOA Application Wizard appears.
In the Application Name field, enter CustomerRouter and then click Next.
The Name your project screen appears.
In the Project Name field, enter CustomerRouterProject and click Next.
The Configure SOA settings screen appears.
In the Composite Template list, select Empty Composite and then click Finish.
The Applications Navigator of Oracle JDeveloper is populated with the new application and the project, and the Design tab contains a blank palette.
From the File menu, click Save All.
To create a Mediator named CustomerRouter:
From the Component Palette, select SOA.
Drag and drop a Mediator to the Components design area.
The Create Mediator dialog is displayed.
Enter CustomerRouter in the Name field.
Select Define Interface Later from Templates.
Click OK.
A Mediator with name CustomerRouter is created.
You must create a File adapter service named ReadCust to read the XML files from a directory.
Note:
Mediator may process the same file twice when run against Oracle RAC planned outages. This is because a File adapter is a non-XA compliant adapter. So, when it participates in a global transaction, it may not follow the XA interface specification of processing each file only once.To create a File adapter service:
From the Components Palette, select SOA.
Select File Adapter and drag it to the Exposed Services design area.
The Adapter Configuration Wizard Welcome page is displayed.
Click Next.
The Service Name page is displayed.
In the Service Name field, enter ReadCust.
Click Next.
The Adapter Interface page is displayed.
Select Define from operation and schema (specified later) and click Next.
The Operation page is displayed.
In the Operation Type field, select Read File.
In the Operation Name field, replace Read with ReadFile.
Click Next.
The File Directories page is displayed.
In the Directory for Incoming Files (physical path) field, enter the directory from which you want to read the files. For example, C:\Customer\In.
Click Next.
The File Filtering page is displayed.
In the Include Files with Name Pattern field, enter *.xml, and then click Next.
The File Polling page is displayed.
Change the Polling Frequency field value to 10 seconds, and then click Next.
The Messages page is displayed.
Click Search to the right of the URL field.
The Type Chooser dialog is displayed.
Click Import Schema File.
The Import Schema File dialog is displayed.
Click Search to the right of the URL field and select the LegacyCustomer.xsd file present in the Samples folder.
Click OK.
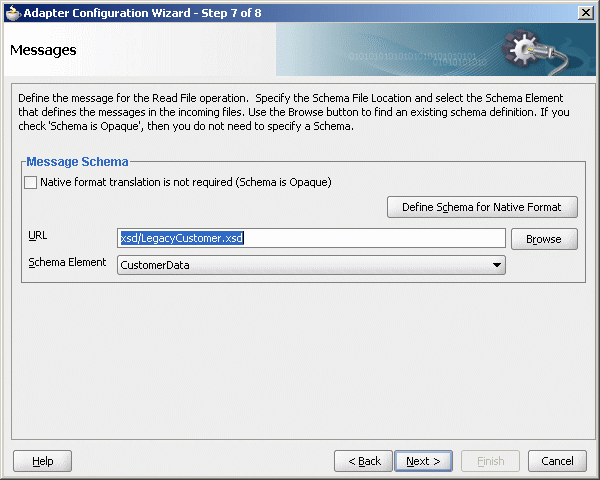
Expand the navigation tree to Type Explorer\Imported Schemas\LegacyCustomer.xsd and select CustomerData, as shown in Figure 20-37.
Click OK.
The Adapter Configuration wizard appears as shown in Figure 20-38.
Figure 20-38 Adapter Configuration Wizard – Messages page
Click Next.
The Finish page is displayed.
Click Finish.
From the File menu, click Save All.
You must create a File adapter reference USCustomer.
To create a File adapter reference:
From the Component Palette, select SOA.
Select File Adapter and drag it to the External References design area.
The Adapter Configuration Wizard Welcome page is displayed.
Click Next.
The Service Name page is displayed.
In the Service Name field, enter USCustomer.
Click Next.
The Adapter Interface page is displayed.
Select Define from operation and schema (specified later) and click Next.
The Operation page is displayed.
Click Next.
The Operation page is displayed.
In the Operation Type field, select Write File.
In the Operation Name field, enter WriteFile.
Click Next.
The File Configuration page is displayed.
In the Directory for Outgoing Files (physical path) field, enter the name of the directory where you want to write the files.
For example, C:\Customer\out.
In the File Naming Convention field, enter customer_%SEQ%.xml and click Next.
The Messages page is displayed.
Click Search to the right of the URL field.
The Type Chooser dialog is displayed.
Click Import Schema File.
The Import Schema File dialog is displayed.
Click Search to the right of the URL field and select the USCustomer.xsd file present in the Samples folder.
Click OK.
Expand the navigation tree to Type Explorer\Imported Schemas\USCustomer.xsd and then select Customer.
Click OK.
Click Next.
The Finish page is displayed.
Click Finish.
From the File menu, click Save All.
Create another File adapter reference CanadaCustomer in similar way by using the CanCustomer.xsd file.
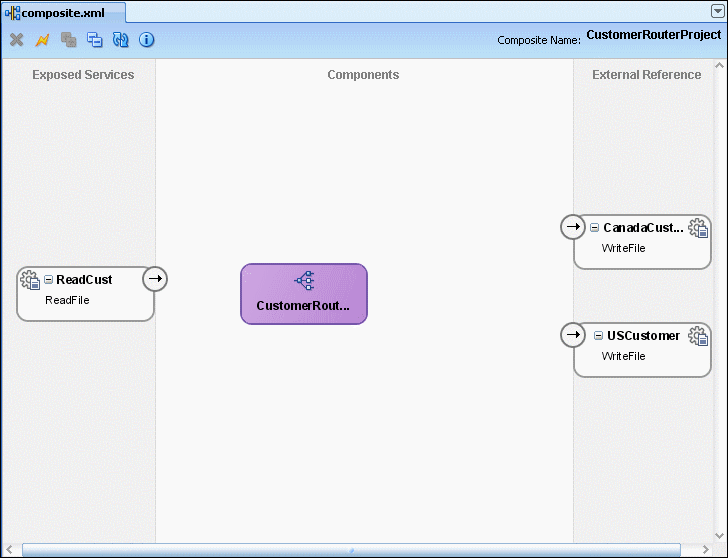
Figure 20-39 shows how the SOA composite editor appears after performing this task.
Figure 20-39 Mediator Component with Adapter Services and References
You must specify the path that messages take from the ReadCust adapter service to external references.
To specify routing rules:
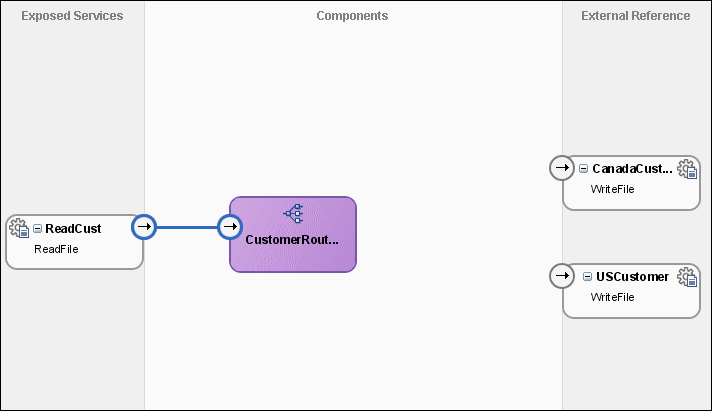
Connect the ReadCust service to the CustomerRouter Mediator as shown in Figure 20-40.
This specifies the File adapter service to invoke the CustomerRouter Mediator while reading a file from the input directory.
Figure 20-40 Connecting ReadCust Service to the CustomerRouter Mediator
Double-click CustomerRouter Mediator to open the CustomerRouter.mplan editor shown in Figure 20-41.
Figure 20-41 CustomerRouter Mediator in Mediator Editor
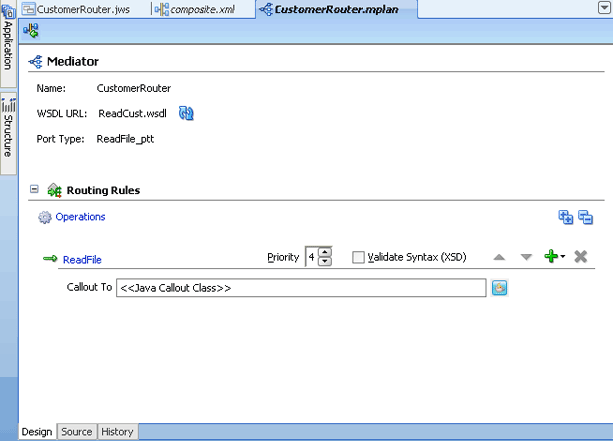
In the Routing Rules section, click Add to the extreme right side of ReadFile and then click static routing rule.
The Target Type dialog is displayed.
Click Service.
The Target Services dialog is displayed.
Navigate to CustomerRouterProject, References, USCustomer and select WriteFile as shown in Figure 20-42.
Click OK.
The Routing Rules panel is displayed, as shown in Figure 20-43.
Figure 20-43 The Routing Rules Panel - MapCustomerData Added
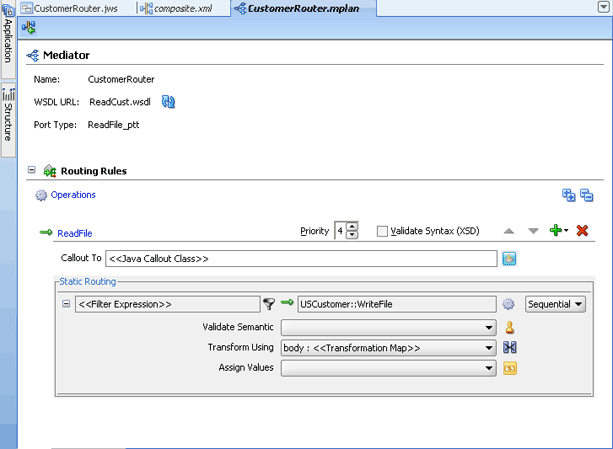
Click the filter icon next to the <<Filter Expression>> field to create a filter expression for this routing rule.
The Expression Builder dialog is displayed.
In the Variables field, navigate to Variables, in, body, imp1:CustomerData, and then select Country.
Double-click Country.
The Country node is added in the Expression field as shown in Figure 20-44.
Modify the expression to the following:
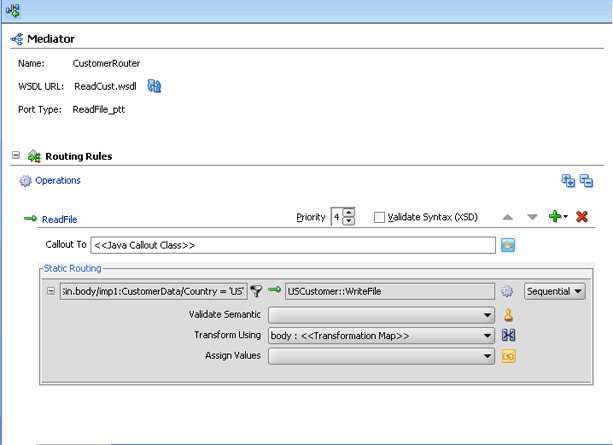
$in.CustomerData/imp1:CustomerData/Country='US'
Click OK.
The <<Filter Expression>> field of the Routing Rules panel is populated with the expression as shown in Figure 20-45.
Figure 20-45 Populated Filter Field of Routing Rules Panel
Click the icon to the right of the Transform Using field.
The Request Transformation Map dialog is displayed, as shown in Figure 20-46.
Select Create New Mapper File and click OK.
A CustomerData_To_Customer.xsl tab is added, as shown in Figure 20-47.
Figure 20-47 CustomerData_To_Customer.xsl Tab – Initially
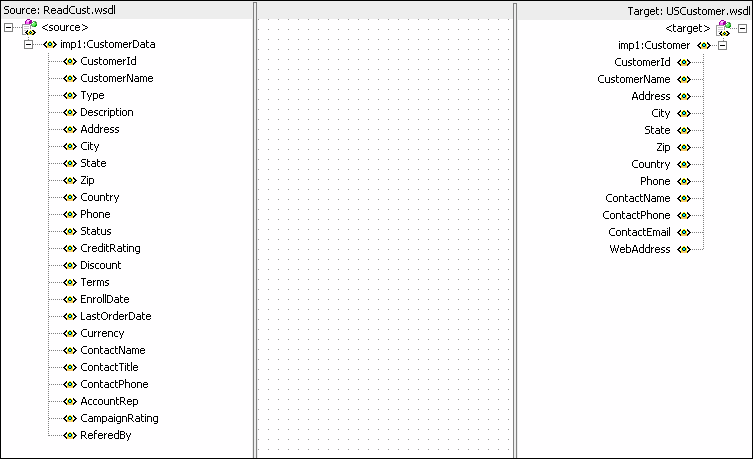
Drag and drop the imp1:CustomerData source element to imp1:Customer target element.
The Auto Map Preferences dialog is displayed.
From the During Auto Map options, deselect Match Elements Considering their Ancestor Names.
The Auto Map Preferences dialog is shown in Figure 20-48.
Click OK.
The CustomerData_To_Customer.xsl tab appears as shown in Figure 20-49.
Figure 20-49 CustomerData_To_Customer.xsl Tab – Auto Mapped Connections
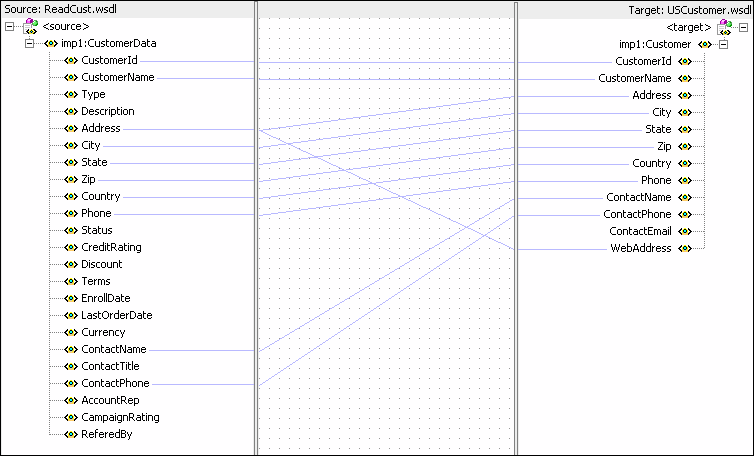
From the File menu, click Save All.
Repeat the steps mentioned in Step 3 through 17 to specify CanadaCustomer reference as the target service. In the Expression builder dialog, specify the following expression:
Note:
For repeating the steps, you must reenter the Mediator Editor by closing the Mapper Editor or by clicking theCustomerRouter.mplan tab.$in.CustomerData/imp1:CustomerData/Country='CA'
Figure 20-50 shows how the Mediator editor would appear after you have specified CanadaCustomer reference as target service.
Figure 20-50 Routing Rules Panel with Target Services Defined

After performing all the steps mentioned in this section, the SOA composite editor would appear as shown in Figure 20-36.
An Oracle Application Server connection is required for deploying your SOA composite application. For information on creating Oracle Application Server connection, refer to Oracle Fusion Middleware User's Guide for Technology Adapters.
Deploying the CustomerRouterProject composite application to Oracle Application Server consists of following steps:
Creating an Application Deployment Profile
Deploying the Application Deployment Profile to Oracle Application Server
For detailed information about these steps, see Section 38.7.1, "Deploying a Single SOA Composite in Oracle JDeveloper".
After deploying the CustomerRouterProject application, you can run it by copying the input xml files to the input folder. The payload, the files are written to the specified output directories.
For monitoring the running instance, you can use the Oracle Enterprise Manager Console at the following URL:
http://hostname:portnumber/em
where hostname is the host on which you installed the Oracle SOA Suite infrastructure and portnumber is the port of the server, where Enterprise Manager is installed.
For detailed information about these steps, see Section 38.7.1, "Deploying a Single SOA Composite in Oracle JDeveloper".
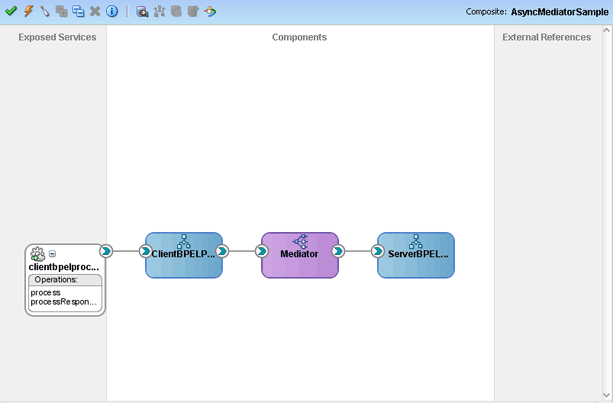
This sample demonstrates asynchronous request response scenario using Mediator. This composite has a client BPEL process invoking a Mediator, which invokes a server BPEL process. All the invocations are done as asynchronous request response.
Figure 20-51 provides an overview of the AsyncMediator use case.
Figure 20-51 Overview of AsyncMediator Use Case
For downloading the sample files mentioned in this section, visit the following URL:
http://www.oracle.com/technology/sample_code/products/mediator
This section provides the design-time tasks for creating, building, and deploying the use case. These tasks should be performed in the order in which they are presented.
Section 20.4.1.1, "Task 1: Creating an Oracle JDeveloper Application and Project"
Section 20.4.1.5, "Task 5: Creating the Invoke, Receive, and Assignment Activities"
Section 20.4.1.6, "Task 6: Configuring Oracle Application Server Connection"
Section 20.4.1.7, "Task 7: Deploying the Composite Application"
To create an application and a project for the use case:
In Oracle JDeveloper, click File and select New.
The New Gallery dialog appears.
In the New Gallery, expand the General node, and select the Applications category.
In the Items list, select SOA Application and click OK.
The Create SOA Application Wizard appears.
In the Application Name field, enter AsyncMediator and then click Next.
The Name your project screen appears.
In the Project Name field, enter AsyncMediatorSample and click Next.
The Configure SOA settings screen appears.
In the Composite Template list, select Empty Composite and then click Finish.
The Applications Navigator of Oracle JDeveloper is populated with the new application and the project, and the Design tab contains a blank palette.
From the File menu, click Save All.
To create a server BPEL process:
In the Application Navigator, double-click composite.xml. The composite.xml window is displayed.
From the Component Palette, select SOA.
Drag and drop a BPEL process to the Components design area.
The Create BPEL Process dialog is displayed.
In the Name field, enter ServerBPELProcess.
In the Template field, select Asynchronous BPEL Process.
Uncheck Expose as a SOAP service and click OK. The ServerBPELProcess is created in the composite.xml window.
To create a Mediator named Mediator:
From the Component Palette, select SOA.
Drag and drop a Mediator to the Components design area.
The Create Mediator dialog is displayed.
Enter Mediator in the Name field and select Asynchronous Interface from Template.
Uncheck Create Composite Service with SOAP Bindings.
Click OK.
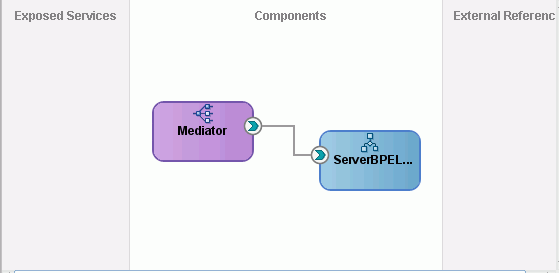
A Mediator with name Mediator is created, as shown in Figure 20-52.
Figure 20-52 Mediator and ServerBPELProcess in the Composite Window
Double-click the Mediator Mediator.
The Mediator.mplan window is displayed.
In the Routing Rules section, click Add to the extreme right side of execute and then static routing rules.
The Target Type dialog is displayed.
Select Service.
The Target Services dialog is displayed.
Navigate to AsyncMediatorSample, BPEL Processes, ServerBPELProcess, Services, serverbpelprocess_client, and process, as shown in Figure 20-53.
Click OK.
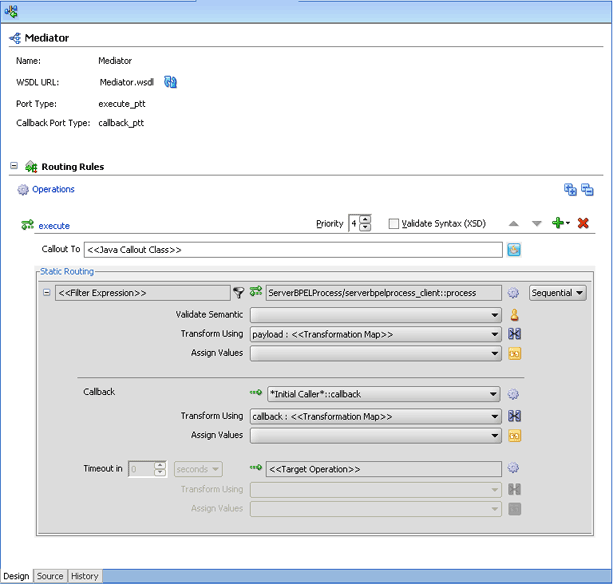
The Routing Rules panel is displayed, as shown in Figure 20-54.
Figure 20-54 The Routing Rules Panel - initiate Added
Click the icon to the right of the Transform Using field, below <<Filter Expression field>>.
The Request Transformation Map dialog is displayed.
Select Create New Mapper File and click OK.
A singleString_To_process.xsl tab is added.
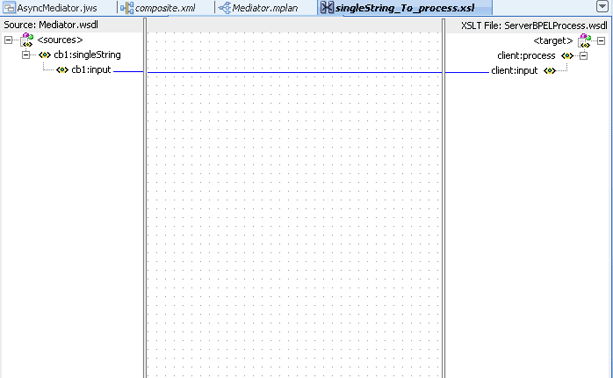
Drag and drop the cb1:input source element to client:input target element.
The Auto Map Preferences dialog is displayed.
From the During Auto Map options, deselect Match Elements Considering their Ancestor Names and click OK. The singleString_To_process.xsl window is displayed, as shown in Figure 20-55.
Figure 20-55 singleString_To_process.xsl Window
In the Routing Rules panel, under Callback, click the icon to the right of the Transform Using field.
The Request Transformation Map dialog is displayed.
Select Create New Mapper File and click OK.
A processResponse_To_singleString.xsl tab is added.
Drag and drop the client:processResponse source element to cb1:singleString target element.
The Auto Map Preferences dialog is displayed.
From the During Auto Map options, deselect Match Elements Considering their Ancestor Names and click OK.
To create a client BPEL Process:
In the Application Navigator, double-click composite.xml. The composite.xml window is displayed.
From the Component Palette, select SOA.
Drag and drop a BPEL process to the Components design area.
The Create BPEL Process dialog is displayed.
In the Name field, enter ClientBPELProcess.
In the Template field, select Asynchronous BPEL Process.
Click OK. The ClientBPELProcess is created in the composite.xml window.
Drag and drop the ClientBPELProcess BPEL process to the Mediator Mediator. The composite.xml appears as shown in Figure 20-51.
To create the invoke activity:
Double-click ClientBPELProcess. The ClientBPELProcess.bpel page is displayed.
Drag and drop an Invoke activity from the Component Palette to the design area.
Double-click the Invoke activity. The Invoke dialog is displayed.
Enter InvokeMediator in the Name field.
Click Browse Partner Links next to the Partner Link field. The Partner Link Chooser dialog is displayed.
Select Operation - execute, and click OK.
Click the Auto-Create Variable icon to the right of the Variable field in the Receive dialog. The Create Variable dialog is displayed.
Enter InvokeMediator_execute_InputVariable_1 in the Variable field and click OK. The Invoke dialog is displayed.
Click OK. The Oracle JDeveloper ClientBPELProcess.bpel page appears.
To create the receive activity:
Drag and drop a Receive activity from the Component Palette to the design area.
Double-click the Receive activity. The Receive dialog is displayed.
Enter ReceiveFromMediator in the Name field.
Click Browse Partner Links next to the Partner Link field. The Partner Link Chooser dialog is displayed.
Select Operation - callback, and click OK.
Click the Auto-Create Variable icon to the right of the Variable field in the Receive dialog. The Create Variable dialog is displayed.
Select the default variable name and click OK. The Variable field is populated with the default variable name.
Check Create Instance, and click OK. The Oracle JDeveloper ClientBPELProcess.bpel page appears.
To create the assignment activity:
Drag and drop an Assign activity from the Component Palette between the ReceiveFromMediator and InvokeMediator activities in the design area.
Double-click the Assign activity. The Assign dialog is displayed.
Enter AssignRequest in the Name field.
Click the Copy Operation tab. The Assign dialog is displayed.
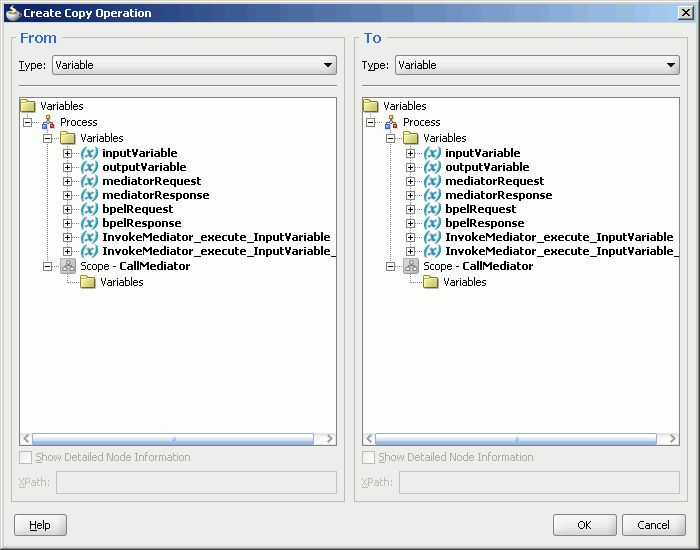
Select Copy Operation. The Create Copy Operation dialog is displayed.
Create the copy operation between the triggers file name and the file variable, as shown in Figure 20-56.
Figure 20-56 The Create Copy Operation Dialog
Click OK in the Create Copy Operation dialog.
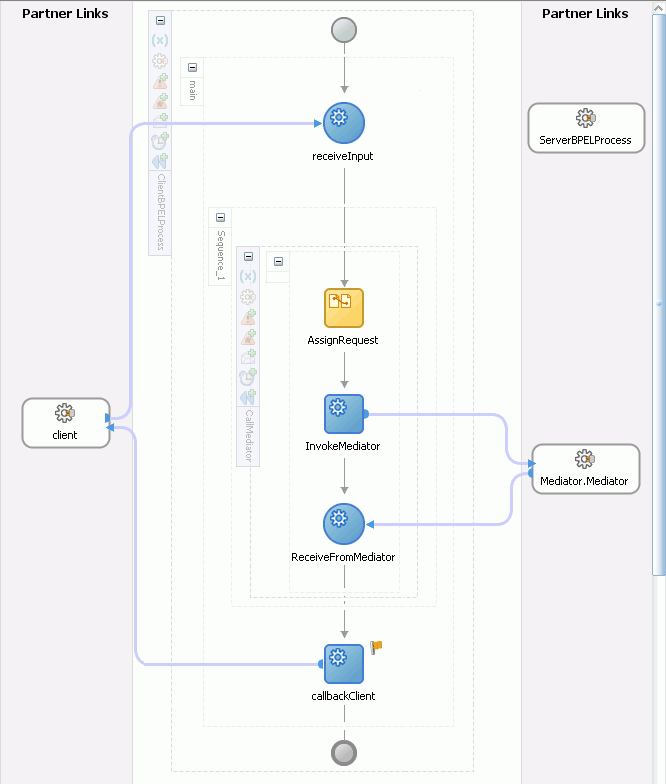
Click OK to return to the Oracle JDeveloper ClientBPELProcess.bpel page, as shown in Figure 20-57.
Figure 20-57 The Oracle JDeveloper - ClientBPELProcess.bpel
Click File, Save All.
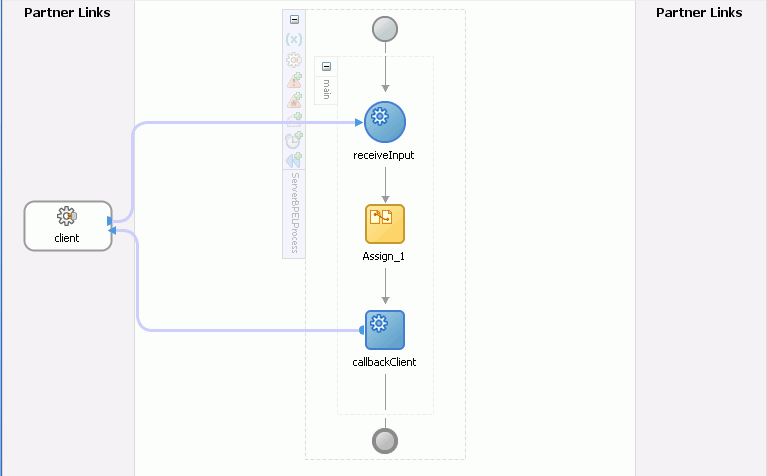
To create an assign activity in the ServerBPELProcess.bpel Window
Double-click the ServerBPELProcess.bpel BPEL process. The ServerBPELProcess.bpel window is displayed.
Drag and drop an Assign activity from the Component Palette between the receiveInput and callbackClient activities in the design area.
Double-click the Assign activity. The Assign dialog is displayed.
Click the Copy Operation tab. The Assign dialog is displayed.
Select Copy Operation. The Create Copy Operation dialog is displayed.
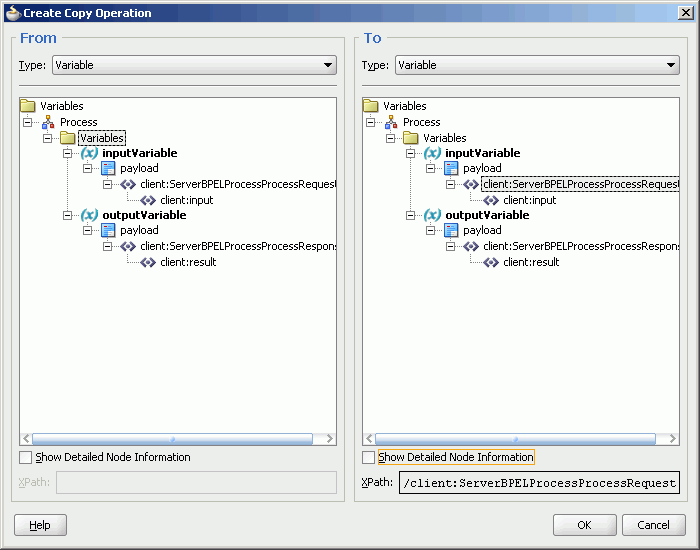
Create the copy operation between the triggers file name and the file variable, as shown in Figure 20-58.
Figure 20-58 The Create Copy Operation Dialog
Click OK in the Create Copy Operation dialog.
Click OK to return to the Oracle JDeveloper ServerBPELProcess.bpel page, as shown in Figure 20-59.
Figure 20-59 The Oracle JDeveloper - ServerBPELProcess.bpel
Click File, Save All.
An Oracle Application Server connection is required for deploying your SOA composite application. For information on creating Oracle Application Server connection, refer to Section 20.3.1.6, "Creating Oracle Application Server Connection".
Deploying the EventMediatorApp composite application to Oracle Application Server consists of following steps:
Creating an Application Deployment Profile
Deploying the Application to Oracle Application Server
For detailed information about these steps, see Section 38.7.1, "Deploying a Single SOA Composite in Oracle JDeveloper".