| Oracle® Fusion Middleware User's Guide for Oracle B2B 11g Release 1 (11.1.1) Part Number E10229-03 |
|
|
View PDF |
| Oracle® Fusion Middleware User's Guide for Oracle B2B 11g Release 1 (11.1.1) Part Number E10229-03 |
|
|
View PDF |
The final steps in the Oracle B2B process flow, shown in Figure 6-1, are to create and deploy the agreement.
A trading partner agreement defines the terms that enable two trading partners, the initiator and the responder, to exchange business documents. It identifies the trading partners, trading partner identifiers, document definitions, and channels.
This chapter contains the following topics:
See the following for more information:
Chapter 8, "Managing Deployments," for how to export agreements and manage deployment states
Chapter 10, "Importing and Exporting Data," for how to export agreements
An agreement consists of two trading partners—the host trading partner and one remote trading partner, and represents one type of business transaction between those partners. For example, if Acme and GlobalChips participate in both EDIFACT and RosettaNet exchanges with each other, you create an agreement for each of the exchanges. Some exchanges are bidirectional, requiring an agreement for each direction.
For example, if Acme sends a sales order to GlobalChips using a Custom document sent using the Generic File protocol, you create an agreement for the outbound direction, where Acme sends the order, and for the inbound direction, where Acme is the receiver. A change to a component of an agreement (for example, a change to the document definition) is effective automatically in the agreement.
Creating an agreement is the last step in the design of a B2B transaction. Before you create an agreement, you must have already created the document definitions and configured the trading partners. See Chapter 4, "Creating Document Definitions," and Chapter 5, "Configuring Trading Partners," for more information.
Figure 6-2 shows the Oracle B2B interface for working with agreements. Click a remote trading partner name to see its agreements with the host trading partner.
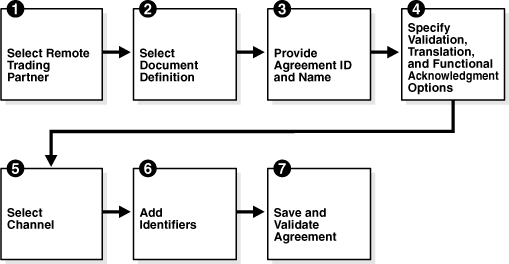
Figure 6-3 shows the steps to create an agreement.
Figure 6-3 Steps to Creating an Agreement (Workflow Overview)

Step 1: Identify the remote trading partner
The host trading partner is automatically included in an agreement, so you need only identify the remote trading partner. You can do this in two ways: select the partner from the Partners region before adding the agreement, or select the host trading partner, click Add in the Agreements region, and click the Select Partner icon in the New Agreement region.
Step 2: Select the document definition
The document definition is selected for the host trading partner, as reflected in the Select Document Definition dialog, shown in figure Figure 6-4.
Figure 6-4 Selecting the Document Definition

For an exchange in which you need both outbound and inbound agreements, do the following:
For the outbound agreement, select the document definition in which the host trading partner is the sender (Acme --> Globalchips in Figure 6-4)
For the inbound agreement, select the document definition in which the host trading partner is the receiver (Acme <-- GlobalChips in Figure 6-4)
Step 3: Provide the agreement ID and name
Provide any agreement identifier and agreement name. These fields can have the same value if you need only one for tracking purposes.
Step 4: Select validation, translation, and functional acknowledgment options
Table 6-1 describes the validation, translation, and functional acknowledgments available when you create an agreement.
Table 6-1 Agreement Options
| Option | Description |
|---|---|
|
Validate |
Select to enable validation of the document against the configured ECS file. |
|
Translate |
Select to enable the translation of XML to native format and vice versa (for EDI and HL7, for example). If Translate is not selected (no translation), then B2B cannot correlate the business message with the functional acknowledgment, irrespective of the value of the B2B Handle FA property. See Section B.1, "Properties To Set in Fusion Middleware Control," for information about the property. |
|
Functional Ack |
Select to enable the functional acknowledgment for success or error criterion. |
Step 5: Select the channel for the remote trading partner
A list of channels that you created when you set up the remote trading partner is available. (Listening channels are not part of an agreement.)
Step 6: Add identifiers
Identifier types for the host and remote trading partners are listed. Select the identifiers that apply to this agreement. You can shift-click to select multiple identifiers.
For outbound agreements, use the identifier types listed in Table 6-2 with the exchange protocols.
Table 6-2 Identifier Types To Use with Exchange Protocols
| Exchange Protocol | Identifier Type |
|---|---|
|
Generic File-1.0 |
Name |
|
Generic FTP-1.0 |
Name |
|
Generic SFTP-1.0 |
Name |
|
Generic AQ-1.0 |
Name |
|
Generic JMS-1.0 |
Name |
|
AS2-1.1 |
Name, AS2 Identifier |
|
AS1-1.0 |
Name, AS1 Identifier |
|
ebMS-1.0, ebMS-2.0 |
Name, ebMS Identifier |
|
RosettaNet-V02.00, RosettaNet-01.10 |
Name, DUNS |
|
MLLP exchange |
Name, MLLP ID |
|
Generic HTTP-1.0 |
Name, Generic Identifier |
|
Generic Email-1.0 |
Name, Generic Identifier |
See Chapter 9, "Creating Types," for more information about identifier types.
Step 7: Save and validate the agreement
Clicking Save also validates the agreement.
To create an agreement:
Click the Partners tab.
In the Agreements region, click Add.
Click Select Partner.
Select a remote trading partner.
Click Select Document Definition.
Select a document definition for the initiator.
Provide an agreement ID and name.
Select from the validation, translation, and functional acknowledgment options, as described in Table 6-1.
Provide an optional description, a callout (if previously created), and start and end dates.
Use callouts to transform the formats of messages exchanged between remote and host trading partners. See Chapter 12, "Managing Callouts."
An agreement cannot be deployed after an end date entered here because the agreement will have expired.
For the host trading partner, click Add and select identifiers.
For the remote trading partner, select a channel.
In the remote trading partner, click Add and select identifiers.
Click Save.
After you create an agreement, it is ready to be deployed. It is listed on the Administration > Deploy page. See Section 6.3, "Deploying an Agreement," to continue.
Deployment is the process of activating an agreement from the design-time repository to the run-time repository.
After deploying an agreement, use the Manage Deployments tab and the Reports tab. See the following for more information:
After you create, save, and validate an agreement, you can deploy it as follows:
From the same page (Partners > Agreement tab), using the Deploy button (see Figure 6-2)
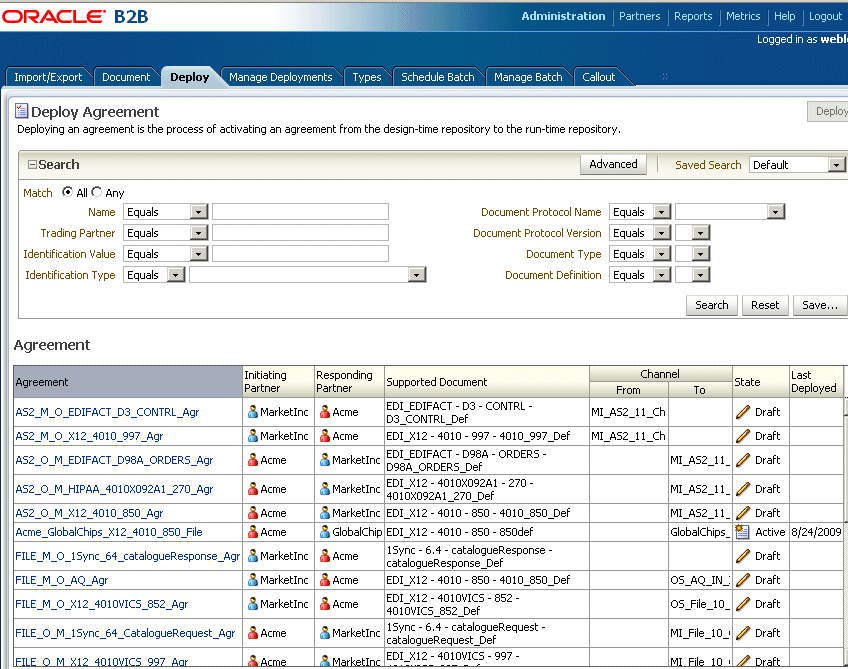
From the Administration > Deploy page, as shown in Figure 6-5. Use this option to select multiple agreements to deploy at the same time.
Figure 6-5 The Deploy Tab—Lists Valid Agreements

Note:
Turn off validation during deployment by setting the propertyb2b.deploy.validation=false.
Turning off validation is useful when deploying large numbers of agreements, where you are certain that the data is valid. It requires a SOA Server restart.
To deploy an agreement from the Deploy tab:
Click the Administration tab.
Click the Deploy tab.
Use the search parameters to find the agreement you want to deploy and click Search.
Highlight one or more agreements and click Deploy.
Only agreements in the draft state can be deleted. Purging an agreement returns its status to the draft state. Agreements that have deployed versions in active, inactive, or retired states cannot be deleted.
An agreement can be exported to a ZIP file by using the Export button on the Agreement tab.