| Oracle® Fusion Middleware Developer's Guide for Oracle WebCenter 11g Release 1 (11.1.1) Part Number E10148-04 |
|
|
View PDF |
| Oracle® Fusion Middleware Developer's Guide for Oracle WebCenter 11g Release 1 (11.1.1) Part Number E10148-04 |
|
|
View PDF |
In custom WebCenter applications, you can provide users with the ability to search the data, or a portion of the data, presented to them on a page. To achieve this type of functionality, use a web service data control to call the searching function of Oracle Secure Enterprise Search (SES).
For more information on Oracle SES, see the Oracle Secure Enterprise Search documentation that comes with the product.
This appendix demonstrates how to create a web service data control to search SES data.
This involves the following steps:
You can leverage Oracle SES APIs using a data control to build custom UIs. To build a data control that uses Oracle Secure Enterprise Search:
After installing Oracle Secure Enterprise Search, create a custom WebCenter application in Oracle JDeveloper.
Right-click the project where you want to incorporate searching and select New from the context menu.
In the New Gallery, make sure to filter by All Technologies.
Expand Business Tier and select Web Services.
In the Items list, select Web Service Data Control and click OK.
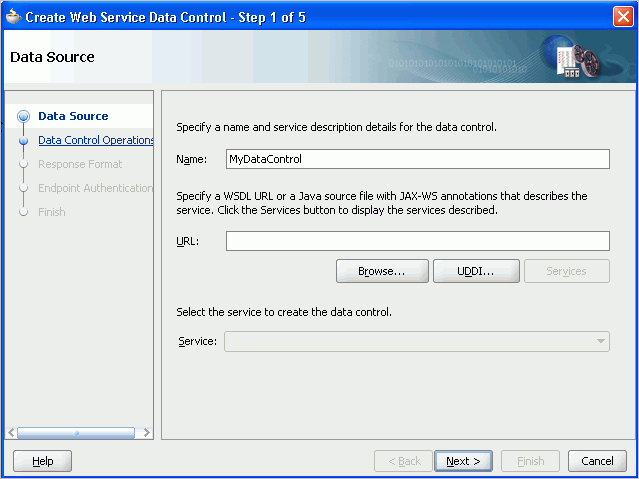
Enter a name for the data control. The wizard page should look similar to Figure E-1.
Figure E-1 Data Source Page of Web Service Data Control Wizard

Enter a Web Services Description Language (WSDL) URL. The WSDL URL for Oracle Secure Enterprise Search has the following form:
http://host:port/search/query/OracleSearch?WSDL
Note:
When Oracle Secure Enterprise Search is installed, the endpoint listed in the WSDL points to a placeholder location. After the data control is created, you must correct the endpoint URL using the Structure panel. This step is described later in this procedure.If the service is not automatically provided, then click Services.
Click Next.
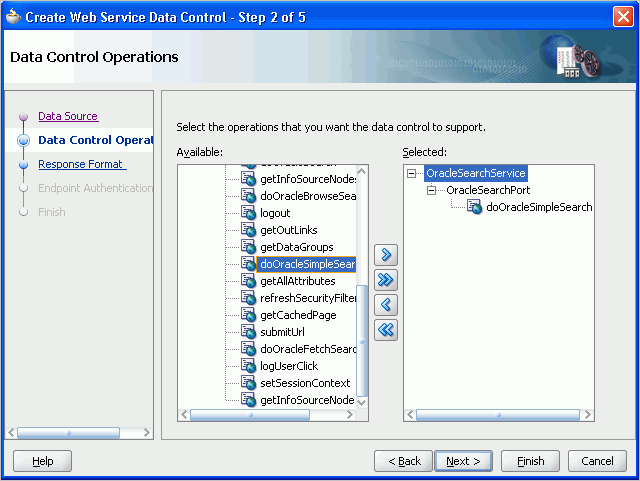
From the Data Control Operations page, select the methods you want to expose by moving them from the Available list to the Selected list. For the purposes of this example, move doOracleSimpleSearch to the Selected list. When you are done, the page should look similar to Figure E-2.
Figure E-2 Data Control Operations Page of Web Service Data Control Wizard

Click Finish. To review the other pages of the wizard first, click Next until you reach the end of the wizard, and then click Finish.
In the Application Navigator, expand Application Sources and then view.
Click DataControls.dcx and its structure will appear in the Structure panel below the Application Navigator.
Right-click your data control in the Structure panel and select Edit Web Service Connection from the context menu.
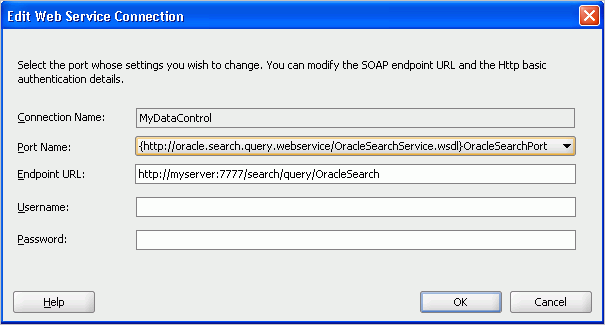
The Edit Web Service Connection dialog appears as shown in Figure E-3. As noted earlier, the endpoint listed in the WSDL now points to a placeholder location. Enter again the same endpoint URL.
Figure E-3 Edit Web Service Connection Dialog

Click OK.
This section describes how to drop your new data control onto a page.
To create a new page, right-click your project and select New from the context menu. Under Web Tier, select JSF. Under Items, select JSF Page, and click OK. On the Create JSP Page, accept the default settings for everything except File Name. Select a meaningful file name, and click OK.
You should see your data control listed under the Data Controls section of the Application Navigator. Expand the top level node of your data control and then expand Return and Return. Now you can see all the data that is returned by the data control.
For the purposes of this example, drag and drop resultElements onto your page.
Select Tables, ADF Read-only Table from the context menu that appears.
The Edit Table Columns dialog appears. (Figure E-4) Select lastModified and click the Delete icon. Click OK.
For the sake of simplicity, you can hard code the values for each parameter as shown in Table E-1.
The dialog should look like Figure E-5. Click OK, and then click OK again.
Now you can run your page. In the Application Navigator, right-click the page and select Run from the context menu.
At runtime, you can browse through your output and see how occurrences of a word, for example "oracle," are surrounded by <b></b> tags.
Figure E-6 shows a small sample fragment of this output. Currently, the search results are not formatted because you have not yet converted the view component that renders this column to OutputFormatted.
Figure E-6 Sample of Searched Output, Hits Unformatted

To format the search output:
To format the output, return to Oracle JDeveloper and display the page containing the data control by clicking its tab in the Design view.
In the Structure panel, find and expand one of the columns that contains oracle ; for example, the description column.
Right-click af:outputText - #{row.snippet} for that column.
In the Source view, change af:outputText to af:outputFormatted.
Run the page again to see the changes. You should see output similar to that in Figure E-7. Notice how the <b></b> around the word oracle is now interpreted so that search hits appear in bold.
Figure E-7 Sample of Searched Output, Hits Formatted

Using the Structure panel, right-click and delete any extraneous columns of your table.
Repeat steps 1-5 for each of the remaining columns on your page.
Save and run the page again.
The rest of this section describes some other formatting features you can include.
You might see automatic pagination in the upper right corner of the table. The default number of rows for an Oracle ADF table is 10, but you chose to return 20 results.
To enhance the page, you can provide an estimated count. From the Application Navigator , under Data Controls, drag and drop estimatedHitCount onto the page, before the table. Select Texts, ADF Output Text w/ Label from the context menu.
Another useful feature for this table would be a link to open the document. Drag a Go Link from under ADF Faces in the Component Palette and drop it right in front of outputFormatted of the description column. Note that you can perform this step a little more accurately in the Structure panel.
In the Property Inspector, change the Text attribute to Open. For the Destination attribute, enter the following: #{row.url}.
Click the Source tab. You should see something similar to the following in the source for your page:
<af:goLink text="Open" destination="#{row.url}"/>
You could also add an input box and a Submit button to enable users to perform their own custom searches. Click the Design tab.
From the Application Navigator , under Data Controls, expand the Parameters node under your data control.
Drag query and drop it just above the left corner of your table. Select Texts, ADF Input Text w/ Label from the context menu.
Drag doOracleSimpleSearch and drop it just below the parameter input box you just created. Select Methods, ADF Button from the context menu.
To avoid getting an error when someone first runs the page, you must set a default value for the query parameter. Go to the page definition, PageDef.xml.
In the Structure panel, expand variables under executables and select doOracleSimpleSearch_query.
In the Property Inspector, select the DefaultValue property and enter a default search; for example, oracle.
Run the page. Enter a different search term in the box and click the button you just created. The results should change.
Note:
Because you previously limited the number of results returned, the hit count you added at the bottom of the page is now artificially limited. To get an accurate hit count, find the following line in your page definition file:<NamedData NDName="returnCount" NDValue="false" NDType="java.lang.Boolean"/>
and change it to:
<NamedData NDName="returnCount" NDValue="true"
   NDType="java.lang.Boolean"/>