| Oracle® Complex Event Processing Developer's Guide 11g Release 1 (11.1.1) for Eclipse Part Number E14301-03 |
|
|
View PDF |
| Oracle® Complex Event Processing Developer's Guide 11g Release 1 (11.1.1) for Eclipse Part Number E14301-03 |
|
|
View PDF |
Using Oracle CEP IDE for Eclipse, you can manage and deploy to the Oracle CEP server: the core of an Oracle CEP application. It provides the runtime in which your Oracle CEP application executes.
This chapter describes:
The Oracle CEP IDE for Eclipse provides features that allow you to set up and manage Oracle CEP servers that are used during development. These tools help you to:
Configure instances of Oracle CEP servers
Attach to external Oracle CEP server instances
Manage Oracle CEP server lifecycle with start, stop, and debug commands
Associate applications with and deploy applications to Oracle CEP servers during development
Table 4-1 maps Eclipse terminology used by the Oracle CEP IDE for Eclipse to Oracle CEP server terminology.
Table 4-1 Eclipse and Oracle CEP Server Concepts
| Eclipse IDE Concept | Oracle CEP Server Concept | Description |
|---|---|---|
|
Runtime |
Oracle CEP server installation |
The Oracle CEP IDE for Eclipse has the concept of a runtime. The runtime defines the location where the Oracle CEP IDE for Eclipse can find the installation of a particular Oracle CEP server. This information is used to find JAR files and OSGi bundles to add to the project classpath and to further define Servers and Server Instances. Note that a Runtime is not itself a runnable artifact. |
|
Server and Server Instance |
Domain |
The Oracle CEP IDE for Eclipse uses the term Server to describe an actual runnable Oracle CEP server instance. You can think of it as something that has start scripts, for example. In Oracle CEP server terminology, this equates to a Domain. When you set up a server, you specify the domain that this instance will run. For more information on domains, see:
|
|
Publish |
Deploy |
The Oracle CEP IDE for Eclipse typically uses the term Publish to describe physically deploying an application to a server. |
|
Project |
Application or Deployment |
A project in the Oracle CEP IDE for Eclipse becomes a single Oracle CEP application packaged as an OSGi bundle. It is deployed to a server and shows in the Oracle CEP server's |
Server definitions are the central concept in controlling an Oracle CEP server from the Oracle CEP IDE for Eclipse. It is from the server definition that you start and stop the server. After associating a project with the server, you can publish (deploy) the application to and unpublish (undeploy) the application from the server, all without having to leave the Oracle CEP IDE for Eclipse. For more information, see Section 4.2, "Creating Oracle CEP Servers".
You can communicate with a running Oracle CEP server using Oracle CEP IDE for Eclipse in the following ways:
Start a server from within Oracle CEP IDE for Eclipse.
In this case, the Oracle CEP server console is sent directly to the console view in Oracle CEP IDE for Eclipse. All of the Oracle CEP server features (such as start, stop, publish, unpublish, debug, and launching the Oracle CEP Visualizer) are available. The Oracle CEP server process itself is managed from within Oracle CEP IDE for Eclipse. In other words, stopping the Oracle CEP server from the Oracle CEP IDE for Eclipse will terminate the actual Oracle CEP server process. Console messages from the Oracle CEP server are sent to the Oracle CEP IDE for Eclipse Console view.
For more information, see:
Attach to a running Oracle CEP server.
In this case, the user starts the Oracle CEP server from the command line, then clicks the Start button for that server in Oracle CEP IDE for Eclipse. A dialog is shown asking whether or not to attach and, if the user clicks Yes, Oracle CEP IDE for Eclipse enters attached mode. All of the Oracle CEP server features except debug are available. However, the Oracle CEP server process is not managed by the Oracle CEP IDE for Eclipse. Clicking the Stop button simply disconnects from the attached Oracle CEP server; it does not terminate the actual Oracle CEP server process. Console messages from the Oracle CEP server are sent to the Oracle CEP server console (standard output to the terminal window in which it is running). Oracle CEP IDE for Eclipse only shows limited Oracle CEP IDE for Eclipse operation messages in the console view.
For more information, see:
Creating a server allows you to start and stop the server instance from within the Oracle CEP IDE for Eclipse, as well as automatically deploy your applications to that server.
You can create a local or remote Oracle CEP server:
Local server: a local Oracle CEP server is one in which both the server and server runtime are on the same host
Remote server: a remote Oracle CEP server is one in which the server and server runtime are on different hosts. The server is on a remote host and the server runtime is on the local host (the host on which you are executing the Oracle CEP IDE for Eclipse).
This section describes:
Section 4.2.1, "How to Create a Local Oracle CEP Server and Server Runtime"
Section 4.2.2, "How to Create a Remote Oracle CEP Server and Server Runtime"
This section describes how to create both a local server and server runtime. After creating the initial server and server runtime, you can create additional server runtimes.
A local Oracle CEP server is one in which both the server and server runtime are on the same host.
Alternatively, you can create a remote server and server runtime.
For more information, see:
To create a local Oracle CEP server and server runtime:
Select Window > Show View > Servers.
The Servers view appears as shown in Figure 4-1.
Figure 4-1 Oracle CEP IDE for Eclipse Server View
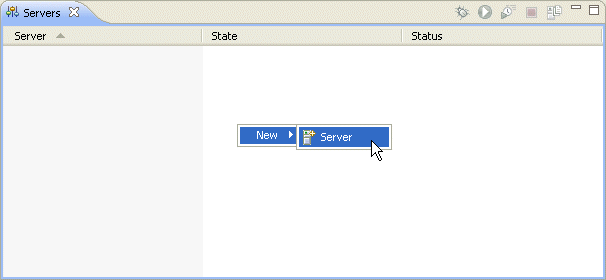
Right-click in the Servers view pane and select New > Server.
Consider whether or not server runtimes have been created:
If this is the first time you have created an Oracle CEP server, there will be no installed server runtimes:
In this case, the New Server: Define New Server dialog appears as Figure 4-2 shows.
Figure 4-2 New Server: Define New Server Dialog (No Installed Runtimes)
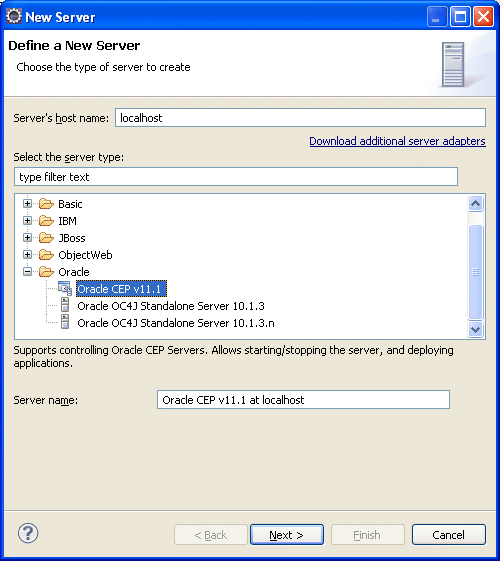
Configure the new server as follows:
Configure the dialog as shown in Table 4-2.
Table 4-2 New Server: Define New Server Dialog (No Installed Runtimes) Attributes
| Attribute | Description |
|---|---|
|
Server's host name |
The host name of the computer on which you installed Oracle CEP server. For development, this will typically be |
|
Select the server type |
The type of Oracle CEP server. In this example, choose |
|
Server name |
The name of this Oracle CEP server. Default: Where |
Click Next.
The New Server: New Oracle CEP v11 Runtime dialog appears as shown in Figure Figure 4-3.
Figure 4-3 New Server: New Oracle CEP v11.1 Runtime Dialog
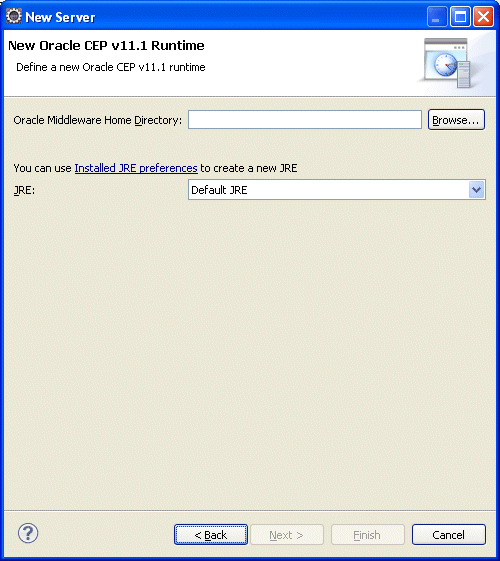
Configure the dialog as shown in Table 4-3.
Table 4-3 New Server: New Oracle CEP v11 Runtime Dialog Attributes
| Attribute | Description |
|---|---|
|
Oracle Middleware Home Directory |
The fully qualified path to the Oracle CEP server installation directory. This is the same as the "Middleware Home" that was selected when installing the server. When selecting this directory, select the directory that contains the Oracle CEP installation rather than the Oracle CEP directory itself. For example, choose: C:\OracleCEP But do not choose: C:\OracleCEP\ocep_11.1 The runtime wizard will use the installation to find the appropriate Oracle CEP installation directory. |
|
JRE |
The type of JRE to use. Select the type of JRE to use from the pull-down menu or click the Installed JRE preferences link to create a new JRE. Be sure to choose a Java 6 JRE. NOTE: The Oracle CEP server JRE is ultimately set by the |
Proceed to step 6.
If this is not the first time you have created an Oracle CEP server, there will be one or more installed server runtimes.
In this case, the New Server: Define New Server dialog appears as Figure 4-4 shows.
Figure 4-4 New Server: Define New Server (Installed Runtimes) Dialog
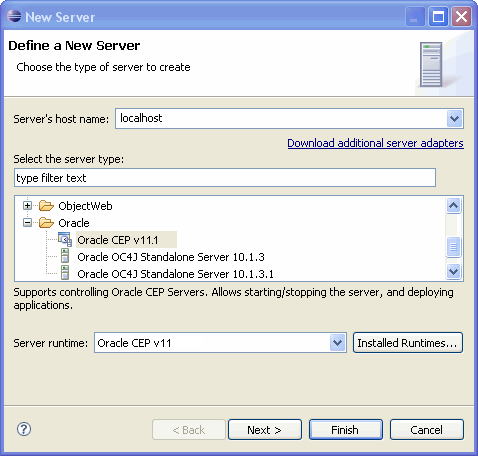
Configure the dialog as shown in Table 4-4.
Table 4-4 New Server: Define New Server (Installed Runtimes) Dialog Attributes
| Attribute | Description |
|---|---|
|
Server's host name |
The host name of the computer on which you installed Oracle CEP server. For development, this will typically be |
|
Select the server type |
The type of Oracle CEP server. In this example, choose |
|
Server runtime |
Select the server runtime from the pull-down menu. To create or edit server runtimes, click Installed Runtimes. For more information, see Section 4.2.3, "How to Create an Oracle CEP Server Runtime". |
Click Next.
The New Server: New Oracle CEP v11.1 Server dialog appears as Figure 4-5 shows.
Figure 4-5 New Server: New Oracle CEP v11.1 Server
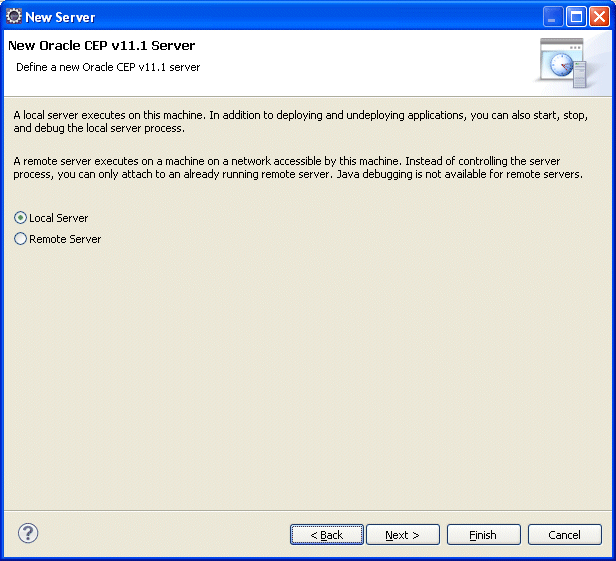
Select Local Server.
Click Next.
The New Server: New Oracle CEP v11 Server dialog appears as Figure 4-6 shows.
Figure 4-6 New Server: New Oracle CEP v11 Server Dialog for a Local Server
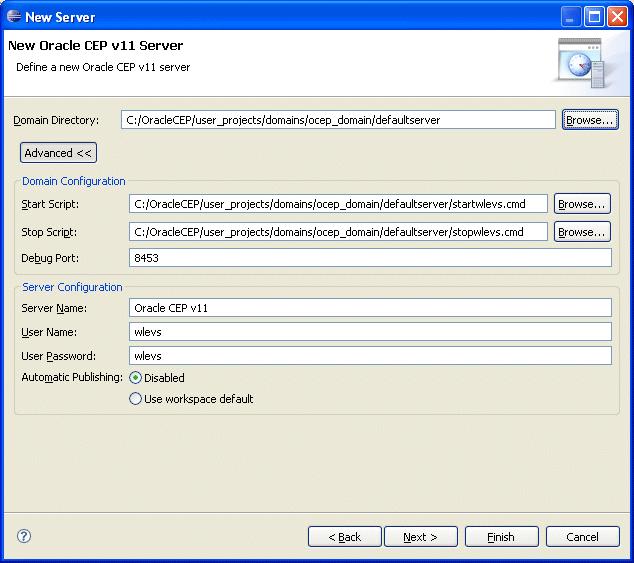
Click Advanced and configure the dialog as shown in Table 4-5.
Table 4-5 New Server: New Oracle CEP v11 Server Dialog Attributes for a Local Server
| Attribute | Description |
|---|---|
|
Domain Directory |
The fully qualified path to the directory that contains the domain for this server. Click Browse to choose the directory. Default: |
|
Start Script |
The script that Oracle CEP IDE for Eclipse uses to start the Oracle CEP server. Default on UNIX: Default on Windows: |
|
Stop Script |
The script that Oracle CEP IDE for Eclipse uses to stop the Oracle CEP server. Default on UNIX: Default on Windows: |
|
Debug Port |
The Oracle CEP server port that Oracle CEP IDE for Eclipse connects to when debugging the Oracle CEP server. Default: 8453. |
|
Server Name |
The name of the Oracle CEP server. Default: Oracle CEP v11 |
|
User Name |
The user name Oracle CEP IDE for Eclipse uses when logging into the Oracle CEP server. Default: |
|
User Password |
The user password Oracle CEP IDE for Eclipse uses when logging into the Oracle CEP server. Default: |
|
Automatic Publishing |
By default, when you change an application, you must manually publish the changes to the Oracle CEP server. Select Use Workspace Default to configure Oracle CEP IDE for Eclipse to automatically publish changes to the Oracle CEP server. Default: |
Click Finish.
If you configured Automatic Publishing to Use Workspace Default, select Windows > Preferences.
The Preferences dialog appears as Figure 4-7 shows.
Select the Server option.
Configure your automatic publishing options:
Automatically publish to local servers: enable or disable this option, as required.
Default: enabled.
Publishing interval: configure the frequency at which the Oracle CEP IDE for Eclipse publishes changes to the server (in seconds).
Default: 60 seconds.
Automatically publish to remote servers: enable or disable this option, as required.
Default: enabled.
Publishing interval: configure the frequency at which the Oracle CEP IDE for Eclipse publishes changes to the server (in seconds).
Default: 60 seconds.
Click OK.
This section describes how to create both a remote server and server runtime. After creating the initial server and server runtime, you can create additional server runtimes.
A remote Oracle CEP server is one in which the server and server runtime are on different hosts. The server is on a remote host and the server runtime is on the local host (the host on which you are executing the Oracle CEP IDE for Eclipse).
Alternatively, you can create a local server and server runtime.
For more information, see:
To create a remote Oracle CEP server and server runtime:
Select Window > Show View > Servers.
The Servers view appears as shown in Figure 4-1.
Figure 4-8 Oracle CEP IDE for Eclipse Server View

Right-click in the Servers view pane and select New > Server.
Consider whether or not server runtimes have been created:
If this is the first time you have created an Oracle CEP server, there will be no installed server runtimes:
In this case, the New Server: Define New Server dialog appears as Figure 4-2 shows.
Figure 4-9 New Server: Define New Server Dialog (No Installed Runtimes)

Configure the new server as follows:
Configure the dialog as shown in Table 4-2.
Table 4-6 New Server: Define New Server Dialog (No Installed Runtimes) Attributes
| Attribute | Description |
|---|---|
|
Server's host name |
The host name of the computer on which you installed Oracle CEP server. For development, this will typically be |
|
Select the server type |
The type of Oracle CEP server. In this example, choose |
|
Server name |
The name of this Oracle CEP server. Default: Where |
Click Next.
The New Server: New Oracle CEP v11 Runtime dialog appears as shown in Figure Figure 4-3.
Figure 4-10 New Server: New Oracle CEP v11.1 Runtime Dialog

Configure the dialog as shown in Table 4-3.
Table 4-7 New Server: New Oracle CEP v11 Runtime Dialog Attributes
| Attribute | Description |
|---|---|
|
Oracle Middleware Home Directory |
The fully qualified path to the Oracle CEP server installation directory. This is the same as the "Middleware Home" that was selected when installing the server. When selecting this directory, select the directory that contains the Oracle CEP installation rather than the Oracle CEP directory itself. For example, choose: C:\OracleCEP But do not choose: C:\OracleCEP\ocep_11.1 The runtime wizard will use the installation to find the appropriate Oracle CEP installation directory. |
|
JRE |
The type of JRE to use. Select the type of JRE to use from the pull-down menu or click the Installed JRE preferences link to create a new JRE. Be sure to choose a Java 6 JRE. NOTE: The Oracle CEP server JRE is ultimately set by the |
Proceed to step 6.
If this is not the first time you have created an Oracle CEP server, there will be one or more installed server runtimes.
In this case, the New Server: Define New Server dialog appears as Figure 4-4 shows.
Figure 4-11 New Server: Define New Server (Installed Runtimes) Dialog

Configure the new server as follows:
Table 4-8 New Server: Define New Server (Installed Runtimes) Dialog Attributes
| Attribute | Description |
|---|---|
|
Server's host name |
The host name of the computer on which you installed Oracle CEP server. For development, this will typically be |
|
Select the server type |
The type of Oracle CEP server. In this example, choose |
|
Server runtime |
Select the server runtime from the pull-down menu. To create or edit server runtimes, click Installed Runtimes. For more information, see Section 4.2.3, "How to Create an Oracle CEP Server Runtime". |
Click Next.
The New Server: New Oracle CEP v11.1 Server dialog appears as Figure 4-5 shows.
Figure 4-12 New Server: New Oracle CEP v11.1 Server

Select Remote Server.
Click Next.
The New Server: New Oracle CEP v11 Server dialog appears dialog appears as Figure 4-13 shows.
Figure 4-13 New Server: New Oracle CEP v11 Server Dialog for a Remote Server
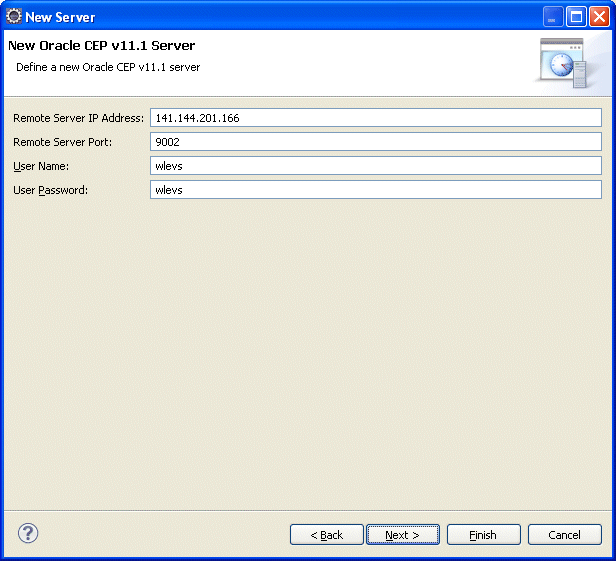
Configure the dialog as shown in Table 4-9.
Table 4-9 New Server: New Oracle CEP v11 Server Dialog Attributes for a Local Server
| Attribute | Description |
|---|---|
|
Remote Server IP Address |
The IP address of the remote Oracle CEP server. Default: IP address of localhost. |
|
Remote Server Port |
The port you specified in the remote Oracle CEP server The port number is the value of the <Netio>
<Name>NetIO</Name>
<Port>9002</Port>
</Netio>
Default: |
|
User Name |
The user name that the Oracle CEP IDE for Eclipse uses to log into the remote server. Default: |
|
User Password |
The password that the Oracle CEP IDE for Eclipse uses to log into the remote server. Default: |
Click Finish.
Before you can create a server, you must configure the Oracle CEP IDE for Eclipse with the location of your Oracle CEP server installation by creating a server runtime using the runtime wizard. You can access the runtime wizard from several places including the new server wizard, the new project wizard, and the workspace preferences dialog.
You only need to create a runtime explicitly if you have not yet created an Oracle CEP server.
For more information, see:
Section 4.2.1, "How to Create a Local Oracle CEP Server and Server Runtime"
Section 4.2.2, "How to Create a Remote Oracle CEP Server and Server Runtime"
To create an Oracle CEP server runtime:
Select Windows > Preferences.
The Preferences dialog appears as Figure 4-14 shows.
Figure 4-14 Preferences - Server - Installed Runtimes
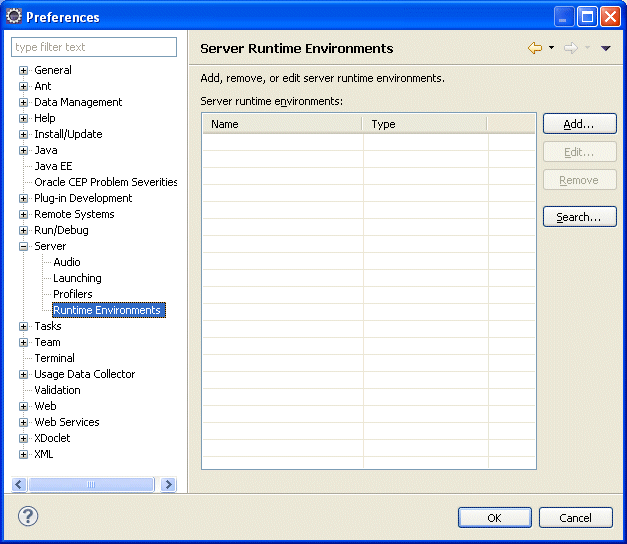
Expand the Server option and select Runtime Environments.
Click Add.
The New Server Runtime Environment dialog appears as shown in Figure 4-15.
Figure 4-15 New Server Runtime Environment Dialog
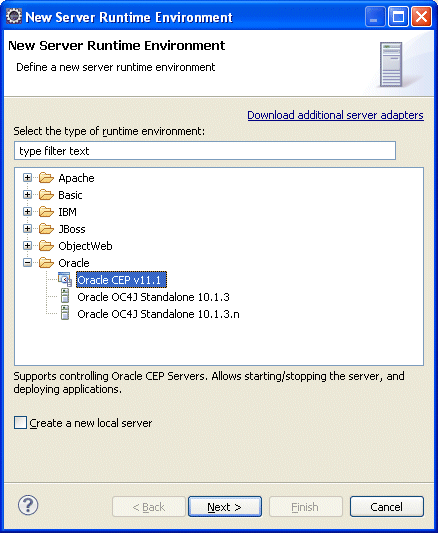
Configure the dialog as shown in Table 4-10.
Table 4-10 New Server Runtime Dialog Attributes
| Attribute | Description |
|---|---|
|
Select the type of runtime environment |
The type of Oracle CEP server. In this example, choose |
|
Create a new local server |
Optionally, check this to create a new local server if you have not yet created a server. For more information, see Section 4.2.1, "How to Create a Local Oracle CEP Server and Server Runtime". |
Click Next.
The New Server Runtime Environment dialog appears as shown in Figure 4-16.
Figure 4-16 New Server Runtime Environment: New Oracle CEP v11.1 Runtime Dialog
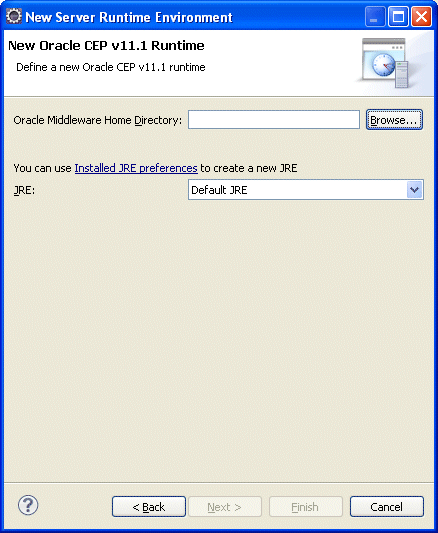
Configure the dialog as shown in Table 4-11.
Table 4-11 New Server Runtime Dialog Attributes
| Attribute | Description |
|---|---|
|
Oracle Middleware Home Directory |
The fully qualified path to the Oracle CEP server installation directory. This is the same as the "Middleware Home" that was selected when installing the server. When selecting this directory, select the directory that contains the Oracle CEP installation rather than the Oracle CEP directory itself. For example, choose: C:\OracleCEP But do not choose: C:\OracleCEP\ocep_11.1 The runtime wizard will use the installation to find the appropriate Oracle CEP installation directory. |
|
JRE |
The type of JRE to use. Select the type of JRE to use from the pull-down menu or click the Installed JRE preferences link to create a new JRE. Be sure to choose either JRockit Real Time 2.0 or the JRockit JDK installed with your Oracle CEP installation. |
Click Finish.
Using the Oracle CEP IDE for Eclipse and the Oracle CEP Visualizer accessible from the Oracle CEP IDE for Eclipse, you can manage many aspects of your Oracle CEP server during development.
This section describes the following Oracle CEP server management tasks you can perform from the Oracle CEP IDE for Eclipse:
Section 4.3.3, "How to Attach to an Existing Local Oracle CEP Server Instance"
Section 4.3.4, "How to Attach to an Existing Remote Oracle CEP Server Instance"
Section 4.3.5, "How to Detach From an Existing Oracle CEP Server Instance"
Section 4.3.6, "How to Deploy an Application to an Oracle CEP Server"
Section 4.3.7, "How to Configure Connection and Control Settings for Oracle CEP Server"
Section 4.3.8, "How to Configure Domain (Runtime) Settings for Oracle CEP Server"
Section 4.3.9, "How to Start the Oracle CEP Visualizer from Oracle CEP IDE for Eclipse"
After you create a local server, you can start the Oracle CEP server from the Oracle CEP IDE for Eclipse.
You can also start the local Oracle CEP server in debug mode.
Alternatively, you can start the local Oracle CEP server from the command line and attach to it using Oracle CEP IDE for Eclipse.
For more information, see:
Section 4.2.1, "How to Create a Local Oracle CEP Server and Server Runtime"
Section 4.4.1, "How to Debug an Oracle CEP Application Running on an Oracle CEP Server"
Section 4.3.3, "How to Attach to an Existing Local Oracle CEP Server Instance"
To start a local Oracle CEP server:
Select Window > Show Views > Servers.
The Servers view opens as shown in Figure 4-17.
Figure 4-17 Starting an Oracle CEP Server
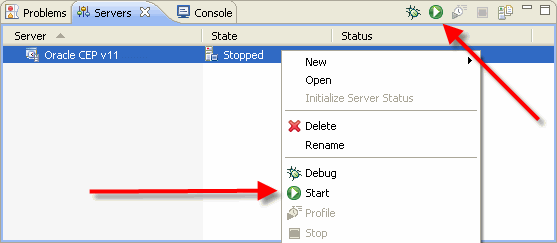
Start the server by choosing one of the following:
Click the Start the Server icon in the Servers view tool bar.
Right-click a server in the Servers view and select Start.
After starting the server you will see log messages from the server in the Console view.
After you start a local Oracle CEP server from the Oracle CEP IDE for Eclipse, you can stop the Oracle CEP server from the Oracle CEP IDE for Eclipse.
For more information, see Section 4.3.1, "How to Start a Local Oracle CEP Server".
To stop a local Oracle CEP server:
Select Window > Show Views > Servers.
The Servers view opens as shown in Figure 4-18.
Figure 4-18 Stopping an Oracle CEP Server
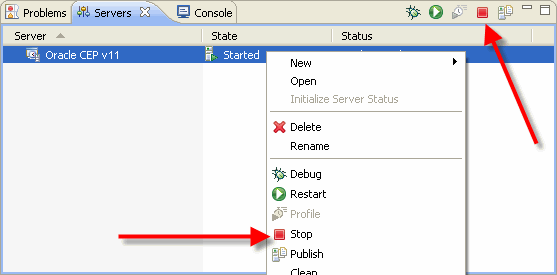
Stop the server by choosing one of the following:
Click the Stop the Server icon in the Servers view tool bar.
Right-click a server in the Servers view and select Stop.
After you create a local server, you can start the local Oracle CEP server from the command line and attach Oracle CEP IDE for Eclipse to this existing, already running local Oracle CEP server instance.
Alternatively, you can start the local Oracle CEP server directly from within Oracle CEP IDE for Eclipse.
For more information, see:
To attach to an existing local Oracle CEP server instance:
Start the Oracle CEP server from the command line.
For more information, see "Starting and Stopping Oracle CEP Servers" in the Oracle CEP Administrator's Guide.
Select Window > Show Views > Servers.
The Servers view opens as shown in Figure 4-17.
Figure 4-19 Attaching to an Existing Local Oracle CEP Server Instance

Attach to the already running local server by choosing one of the following:
Click the Start the Server icon in the Servers view tool bar.
Right-click a server in the Servers view and select Start.
The Attach to Running CEP Server dialog appears as Figure 4-20 shows.
Click Yes.
After attaching to the server you will not see log messages from the server in the Console view.
You can view the server console using the Oracle CEP Visualizer. For more information, see "How to View Console Output" in the Oracle CEP Visualizer User's Guide.
After you create a remote server, you can start the remote Oracle CEP server from the command line and attach Oracle CEP IDE for Eclipse to this existing, already running remote Oracle CEP server instance.
For more information, see Section 4.2.2, "How to Create a Remote Oracle CEP Server and Server Runtime".
To attach to an existing remote Oracle CEP server instance:
Start the remote Oracle CEP server from the command line.
For more information, see "Starting and Stopping Oracle CEP Servers" in the Oracle CEP Administrator's Guide.
Select Window > Show Views > Servers.
The Servers view opens as shown in Figure 4-17.
Figure 4-21 Attaching to an Existing Remote Oracle CEP Server Instance

Attach to the already running remote server by choosing one of the following:
Click the Start the Server icon in the Servers view tool bar.
Right-click a server in the Servers view and select Start.
After attaching to the remote server, Oracle CEP IDE for Eclipse writes one status message to the Console view, reading:
[3/23/10 12:32 PM] Attached to remote CEP server at address 10.11.12.13 and port 9002
You will not see log messages from the remote server in the Console view.
You can view the server console using the Oracle CEP Visualizer. For more information, see "How to View Console Output" in the Oracle CEP Visualizer User's Guide.
After you attach to an existing, running Oracle CEP server instance, you can detach from the Oracle CEP server and leave it running.
For more information, see:
Section 4.3.3, "How to Attach to an Existing Local Oracle CEP Server Instance"
Section 4.3.4, "How to Attach to an Existing Remote Oracle CEP Server Instance"
To detach from an existing Oracle CEP server instance:
Select Window > Show Views > Servers.
The Servers view opens as shown in Figure 4-18.
Figure 4-22 Stopping an Oracle CEP Server

Detach from the server by choosing one of the following:
Click the Stop the Server icon in the Servers view tool bar.
Right-click a server in the Servers view and select Stop.
Oracle CEP IDE for Eclipse detaches from the Oracle CEP server instance. The Oracle CEP server instance continues to run.
If you detach from a remote Oracle CEP server, Oracle CEP IDE for Eclipse writes a log message to the Console view reading:
[3/23/10 12:47 PM] Server communication stopped
A project in the Oracle CEP IDE for Eclipse is built as an Oracle CEP application, then deployed to the server. To deploy an application, a server must first be defined. To then deploy an application, simply add it to the server. The application will be deployed immediately if the server is already started, or when the server is next started if the server is stopped.
For more information, see:
Section 4.2.1, "How to Create a Local Oracle CEP Server and Server Runtime"
Section 4.2.2, "How to Create a Remote Oracle CEP Server and Server Runtime"
To deploy an application to an Oracle CEP server:
Create an Oracle CEP project (see Section 3.2, "Creating Oracle CEP Projects").
Create a server (see Section 4.2.1, "How to Create a Local Oracle CEP Server and Server Runtime").
Select Window > Show Views > Servers.
The Servers view opens as shown in Figure 4-23.
Figure 4-23 Adding a Project to an Oracle CEP Server
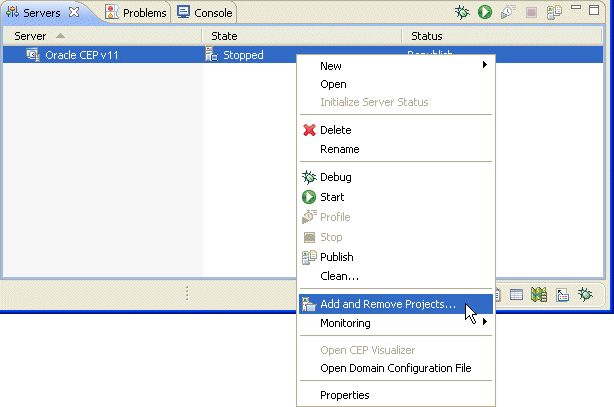
Right-click the server and select Add and Remove.
The Add and Remove dialog appears as shown in Figure 4-24.
Configure the dialog as Table 4-12 shows.
Table 4-12 Add and Remove Dialog Attributes
| Attribute | Description |
|---|---|
|
Available |
Select one or more projects from this list and click Add or Add All to move them into the Configured list. |
|
Configured |
Select one or more projects from this list and click Remove or Remove All to move them into the Available list. |
|
If server is started, publish changes immediately. |
Check this option to immediately publish projects that you modify. Applicable only if the server is already running. |
Click Finish.
Once an application is added, it will show as a child of the server in the Servers view as shown in Figure 4-25.
Figure 4-25 Server View After Adding a Project

To deploy (publish) the application to the Oracle CEP server, right-click the added application and select Force Publish.
If the Oracle CEP server is part of a multi-server domain, the Select Cluster Deployment Group Name dialog appears as Figure 4-26 shows.
Figure 4-26 Select Cluster Deployment Group Name Dialog
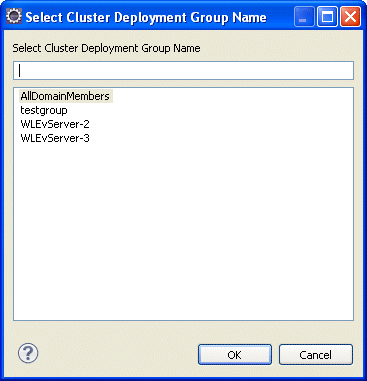
Select the cluster deployment group you want to deploy the application to and click OK.
For more information on clustering, see "Introduction to Multi-Server Domains" in the Oracle CEP Administrator's Guide.
Once an application is deployed (published), it will show as a child of the server in the Servers view as shown in Figure 4-27.
Figure 4-27 Server View After Deploying (Publishing) a Project

After you create a server, you can use the Server Overview editor to configure all the important server connection and control settings that Oracle CEP IDE for Eclipse uses to communicate with the Oracle CEP server.
For more information, see:
Section 4.2.1, "How to Create a Local Oracle CEP Server and Server Runtime"
Section 4.3.8, "How to Configure Domain (Runtime) Settings for Oracle CEP Server"
To configure connection and control settings for Oracle CEP server:
Select Window > Show Views > Servers.
Double-click a server in the Servers view.
The Server Overview editor opens as shown in Figure 4-28.
Configure the Server Overview editor as shown in Table 4-13.
Table 4-13 Server Overview Editor Attributes
| Attribute | Description |
|---|---|
|
Server Name |
The name of this server. Only used within the Oracle CEP IDE for Eclipse as a useful identifier. For more information, see Section 4.2.1, "How to Create a Local Oracle CEP Server and Server Runtime". |
|
Host Name |
The name of the host on which this server is installed. For more information, see Section 4.2.1, "How to Create a Local Oracle CEP Server and Server Runtime". |
|
Runtime Enviroment |
The current installed runtime selected for this server. Select a new runtime from the pull down menu or click the Edit link to modify the configuration of the selected runtime. For more information, see Section 4.2.1, "How to Create a Local Oracle CEP Server and Server Runtime". |
|
Domain DirectoryFoot 1 |
The fully qualified path to the directory that contains the domain for this server. Click Browse to choose the directory. Default: |
|
Start ScriptFootref 1 |
The script that Oracle CEP IDE for Eclipse uses to start the Oracle CEP server. Click Browse to choose the start script. Default on UNIX: Default on Windows: |
|
Stop ScriptFootref 1 |
The script that Oracle CEP IDE for Eclipse uses to stop the Oracle CEP server. Click Browse to choose the stop script. Default on UNIX: Default on Windows: |
|
Debug PortFootref 1 |
The Oracle CEP server port that Oracle CEP IDE for Eclipse connects to when debugging the Oracle CEP server. Default: 8453. |
|
Remote Server IP AddressFoot 2 |
The IP address of the remote Oracle CEP server. Default: IP address of localhost. |
|
Remote Server PortFootref 2 |
The port you specified in the remote Oracle CEP server The port number is the value of the <Netio>
<Name>NetIO</Name>
<Port>9002</Port>
</Netio>
Default: |
|
User NameFootref 2 |
The user name that the Oracle CEP IDE for Eclipse uses to log into the remote server. Default: |
|
User PasswordFootref 2 |
The password that the Oracle CEP IDE for Eclipse uses to log into the remote server. Default: |
|
Publishing |
By default, when you change an application, you must manually publish the changes to the Oracle CEP server. Select Never publish automatically to disable automatic publishing. Select Override default settings to override the default automatic publishing interval. Enter a new publishing interval (in seconds). Default: |
|
Timeouts |
Enter a positive, integer number of seconds in the Start (in seconds) field to specify the time in which the Oracle CEP server must start. Default: 150 seconds. Enter a positive, integer number of seconds in the Stop (in seconds) field to specify the time in which the Oracle CEP server must start. Default: 60 seconds. |
Footnote 1 Click Local Server to modify. Applies to both a local server and the runtime of a remote server.
Footnote 2 Click Remote Server to modify. Applies only to a remote server.
Select File > Save.
Close the Server Overview editor.
After you create a server, you can use the Oracle CEP IDE for Eclipse to configure Oracle CEP server domain (runtime) settings in the Oracle CEP server config.xml file.
Recall that a local Oracle CEP server is one in which both the server and server runtime are on the same host and a remote Oracle CEP server is one in which the server and server runtime are on different hosts: the server is on a remote host and the server runtime is on the local host (the host on which you are executing the Oracle CEP IDE for Eclipse).
For both local and remote Oracle CEP servers, when you configure domain (runtime) settings, you are modifying only the Oracle CEP server config.xml on the local host.
You can also use the Oracle CEP IDE for Eclipse to configure all the important server connection and control settings that Oracle CEP IDE for Eclipse uses to communicate with the Oracle CEP server.
For more information, see:
Section 4.2.1, "How to Create a Local Oracle CEP Server and Server Runtime"
Section 4.2.2, "How to Create a Remote Oracle CEP Server and Server Runtime"
Section 4.3.7, "How to Configure Connection and Control Settings for Oracle CEP Server"
To configure domain (runtime) settings for Oracle CEP server:
Select Window > Show Views > Servers.
Right-click a server in the Servers view and select Open Domain Configuration File as shown in Figure 4-29.
Figure 4-29 Editing the Domain Configuration File
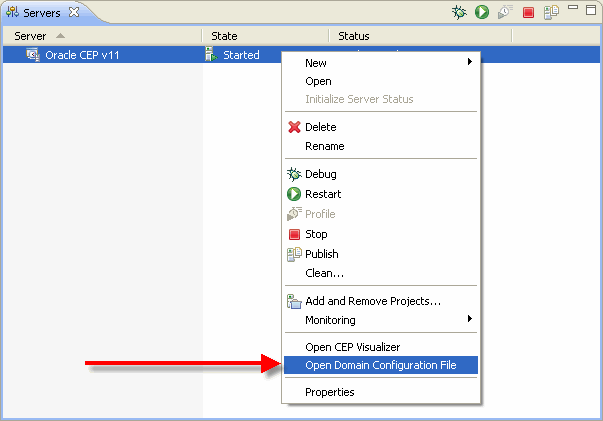
The Oracle CEP server domain configuration file config.xml opens as shown in Figure 4-30.
Figure 4-30 Oracle CEP Domain Configuration File config.xml
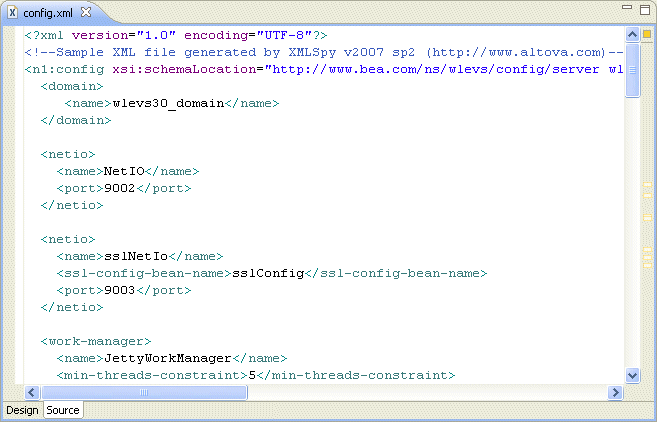
Edit the domain configuration file as required.
Select File > Save.
Close the domain configuration file.
After you create a server, you can start the Oracle CEP Visualizer from the Oracle CEP IDE for Eclipse.
The Oracle CEP Visualizer is the administration console for a running Oracle CEP server. For more information, see the Oracle CEP Visualizer User's Guide.
For more information, see Section 4.2.1, "How to Create a Local Oracle CEP Server and Server Runtime".
To start the Oracle CEP Visualizer from Oracle CEP IDE for Eclipse:
Start the server (see Section 4.3.1, "How to Start a Local Oracle CEP Server").
Right-click the running server in the Servers view and select Open CEP Visualizer as shown in Figure 4-31.
Figure 4-31 Opening the Oracle CEP Visualizer
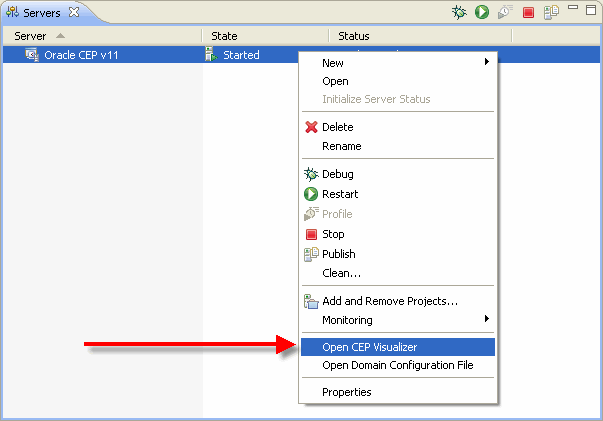
The Oracle CEP Visualizer opens as shown in Figure 4-32.
Use the Oracle CEP Visualizer as the Oracle CEP Visualizer User's Guide describes.
Because Oracle CEP applications are Java applications, standard Java debugging tools including those provided in Eclipse can be used with these applications.
This section describes:
You can also use the load generator and csvgen adapter to simulate data feeds for testing. For more information, see Chapter 21, "Testing Applications With the Load Generator and csvgen Adapter".
This section describes how to debug an Oracle CEP application running on an Oracle CEP server.
To debug an Oracle CEP application running on an Oracle CEP server:
Set a breakpoint in the Java code you wish to debug.
In this case, set the breakpoint by right-clicking in the gutter of the editor and selecting Toggle Breakpoint as Figure 4-33 shows.
Select Window > Show Views > Servers.
Start the server in debug mode by choosing one of the following as shown in Figure 4-34:
Click the Start the Server in debug mode icon in the Servers view tool bar.
Right-click a server in the Servers view and select Debug.
Figure 4-34 Starting the Oracle CEP Server in Debug Mode
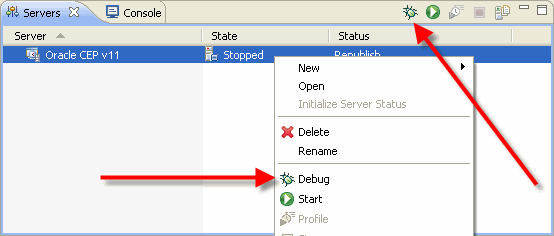
The server will start, and when it gets to your breakpoint the thread will stop.
If the Oracle CEP IDE for Eclipse does not automatically switch to the Debug perspective, switch to that perspective by selecting Window > Open Perspective > Other and selecting the Debug option from the list of perspective.
Debug your application using the Debug perspective.
Note:
In some cases you may get a dialog box warning that it could not install a breakpoint because of missing line number information. This dialog comes from the core Eclipse debugger and is normally a harmless issue with Oracle CEP Service Engine applications. Simply check the Don't Tell Me Again checkbox and continue debugging.When you are finished you can stop the server as usual (see Section 4.3.2, "How to Stop a Local Oracle CEP Server").