| Oracle® Fusion Middleware Creating Domains Using the Configuration Wizard 11g Release 1 (10.3.3) Part Number E14140-03 |
|
|
View PDF |
| Oracle® Fusion Middleware Creating Domains Using the Configuration Wizard 11g Release 1 (10.3.3) Part Number E14140-03 |
|
|
View PDF |
This chapter contains screen shots and descriptions for all of the Fusion Middleware Configuration Wizard screens.

The Welcome screen displays when you start the Configuration Wizard.
Select one of the following options:
Create a new WebLogic domain—Select this option if you want to create a new domain. Typically, the new domain will be based on the WebLogic Server Basic Domain, which includes an Administration Server and the default security realm myrealm. You may, however, choose to use your own domain template to create the domain; your domain template must contain at least an Administration Server.
If you select this option, the Select Domain Source screen is displayed next.
Extend an existing WebLogic domain—Select this option if you already have a WebLogic domain, and you want to add resources to that domain.
If you select this option, the Select a WebLogic Domain Directory screen appears next.
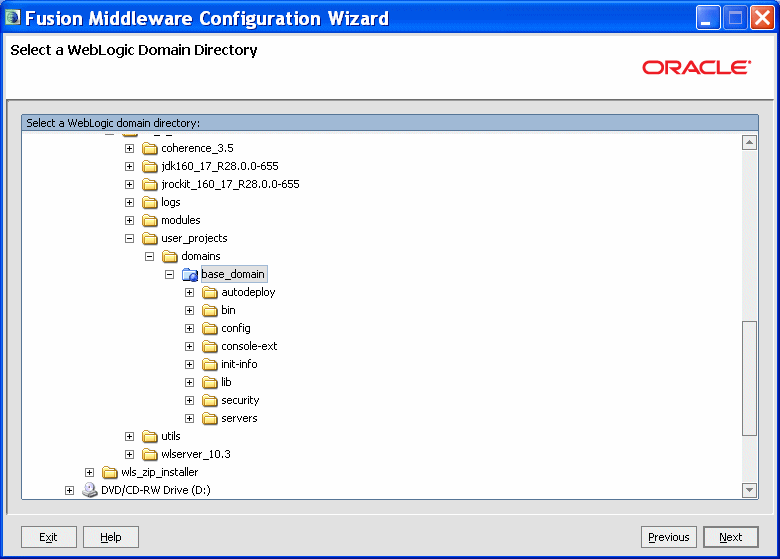
Use the navigation tree to select a valid domain directory. A domain directory contains a config directory, which contains a config.xml file. In the navigation tree, these directories are indicated by a blue folder icon:
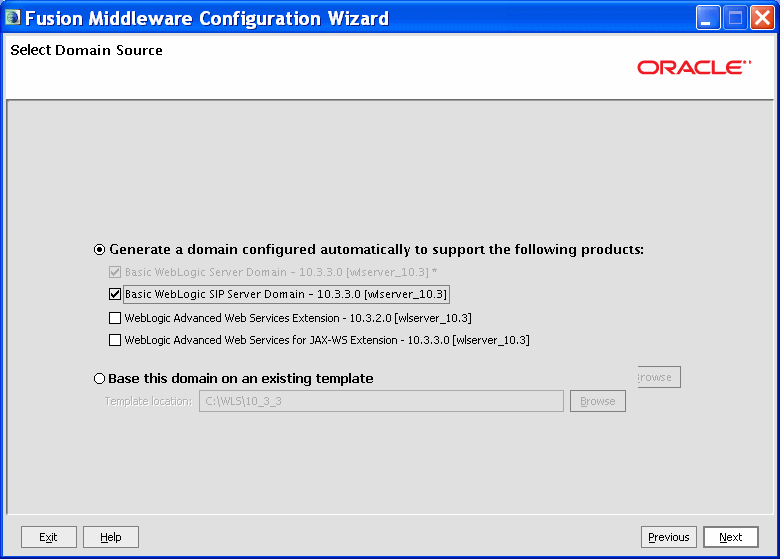
Choose whether to generate a domain that is configured automatically to support selected products, or to create a domain based on an existing domain template. Each product in the displayed list is associated with a single domain or extension template (a JAR file) which configures the domain resources needed for that product.
Select one of the following options:
Generate a domain configured automatically to support the following products— By default, the Basic WebLogic Server Domain option is selected and cannot be cleared. Select the check boxes that correspond to the other products that you want to include in the domain. If you select a product that is dependent on resources provided by another product or products in the list, those products are also selected automatically.
The list of products (templates) differs based on the Fusion Middleware product installation you are configuring. The example shown here is for a standalone WebLogic Server environment. If you installed other Fusion Middleware products, such as SOA or WebCenter, products that you can include in those domains are also listed here.
For information about the various WebLogic Server products (templates) that may be listed on this screen, see the Domain Template Reference.
Notes:
When you click Next, if any of the selected products require resources provided by another product that is not selected, a warning dialog box is displayed. Return to the Select Domain Source screen to select the dependency product before proceeding.Base this domain on an existing template—Select this option if you want to create a domain by using an existing domain template. Enter the full path to the template JAR file in the Template location field, or click Browse to navigate to the directory containing the required template. The template you select must define at least an Administration Server.
Typically, you either select one of the following domain templates provided with WebLogic Server, or select a custom domain template that you created:
Basic WebLogic Server Domain
WL_HOME\common\templates\domains\wls.jar
WebLogic Server Starter Domain
WL_HOME\common\templates\domains\wls_starter.jar
Note:
When you click Next, if the selected template requires resources provided by another template, a warning dialog box is displayed. You must create the domain using the required template first. After doing so, extend the domain using the template you initially selected.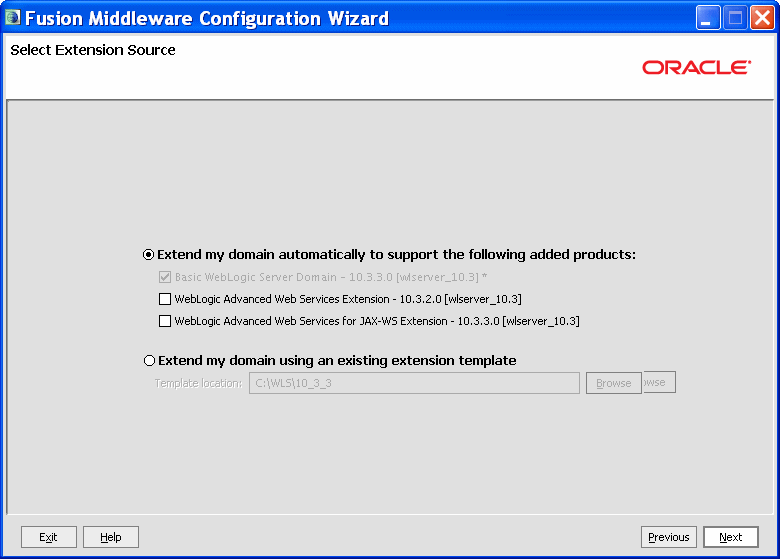
Choose whether to extend the domain by selecting one of the listed products, or by browsing to an extension template.
Extend my domain automatically to support the following added products—Select the check boxes for the products to add to your WebLogic domain. The products already included in your domain are indicated by grayed-out check boxes.
For information about the various WebLogic Server products (templates) that may be listed on this screen, see the Domain Template Reference.
Extend my domain using an existing extension template—Specify the path to the extension template in the Template location field.
Note:
When you click Next, if the selected template requires resources provided by another template, a warning dialog box is displayed. You must create the domain using the required template first. After doing so, extend the domain using the template you initially selected.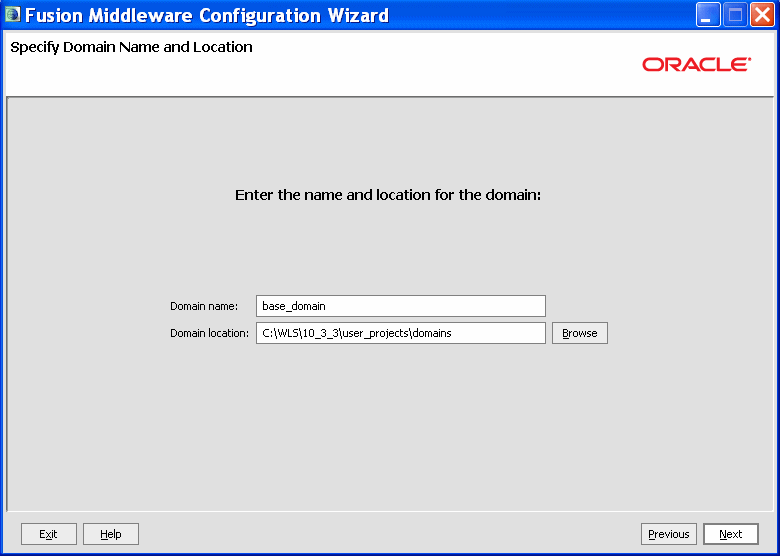
Specify the following items:
Domain name—The name of the domain. The Configuration Wizard stores the config.xml file and all other generated components for the domain in this directory, under the specified Domain directory. For example, if you enter mydomain, your domain files are stored (by default) in MW_HOME\user_projects\domains\mydomain.
Note:
The domain name must not start with a number. This restriction is intended to prevent potential issues with internally generated JDBC store table names, which must start with an alphabetic character.The domain name is also listed on the Windows Start menu. For example, if your domain name is mydomain, and the Domain directory is user_projects, you can access commands for the domain by selecting Oracle WebLogic > user_projects > mydomain from the Windows Start menu.
Domain location—The location in which your domain directory will be stored. The default is MW_HOME\user_projects\domains. The domain location can be anywhere on your local drive or network. It does not have to located in MW_HOME.
On Windows, you must include the drive letter in this path.
Application location—This field is displayed only if you selected a domain template or product that contains applications. This is the location in which your applications will reside. The default is MW_HOME\user_projects\applications.
On Windows, you must include the drive letter in this path.
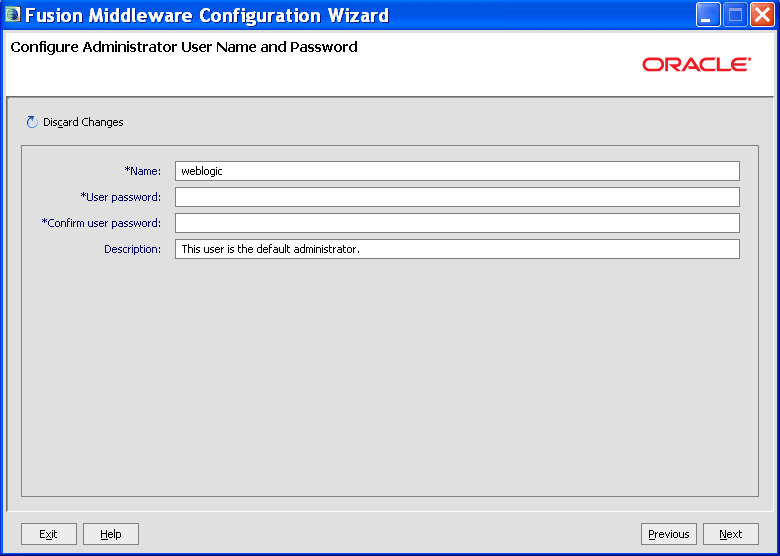
Use this screen to define the default WebLogic Administrator account for the domain. This account is used to boot and connect to the domain's Administration Server.
Name—The login username for the WebLogic Administrator account.
The username must not contain commas, tabs, or any of the following characters:
< > # | & ? ( ) { }
User Password—The password for the WebLogic Administrator account. The password must be at least eight characters, and must contain at least one numeric character or at least one of the following characters:
! " # $ % & ' ( ) * + , - . / : ; < = > ? @ [ \ ] ^ _ ` { | } ~
Confirm User Password—Type the same password in the Confirm User Password xcfield. An error is displayed if the two entries do not match.
Description—Accept the default description or type your preferred description for the Administrator account in this field.
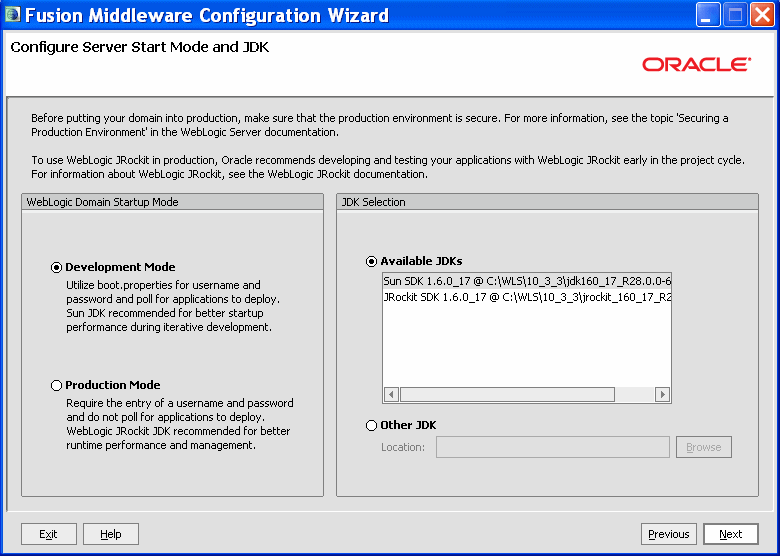
On this screen, specify whether you want to run WebLogic in Production mode or Development mode. You also specify the location of the JDK(s) to use in this domain.
In the WebLogic Domain Startup Mode pane, select one of the following options:
Development Mode—In this mode, the security configuration is relatively relaxed, allowing you to autodeploy applications.
Production Mode—In this mode, the security configuration is relatively stringent, requiring a username and password to deploy applications. Before putting a domain into production, familiarize yourself with procedures for securing a production environment. For more information, see "Ensuring the Security of Your Production Environment" in Securing a Production Environment for Oracle WebLogic Server.
For information about changing the run-time mode after you have created a WebLogic domain, see "Change to Production Mode" in the WebLogic Server Administration Console Online Help.
The following table provides more details on the differences between development mode and production mode:
Table 4-1 Differences Between Development and Production Mode
| Feature | Development Mode | Production Mode |
|---|---|---|
|
SSL |
You can use the demonstration digital certificates and the demonstration keystores provided by the WebLogic Server security services. With these certificates, you can design your application to work within environments secured by SSL. For more information, see "Configuring SSL" in Securing Oracle WebLogic Server. |
You must not use the demonstration digital certificates and the demonstration keystores. If you do so, a warning message is displayed. |
|
Deploying applications |
WebLogic Server instances can deploy and update applications that reside in the Oracle recommends that you use this method only in a single-server development environment. For more information, see "Deploying Applications and Modules with weblogic.deployer" in Deploying Applications to Oracle WebLogic Server. |
The auto-deployment feature is disabled. You must use the WebLogic Server Administration Console, the |
|
Log file rotation |
By default, when you start the WebLogic Server instance, the server automatically renames (rotates) its local server log file as For more information, see "Rotate Log Files" in the WebLogic Server Administration Console Online Help. The default value of the Limit number of retained files setting in Logging Configuration is |
The server rotates the local log file after the size of the file reaches 5000 kilobytes. When the server is configured for production mode, by default, all versions of the log files are kept. Administrators may want to customize the number of log files that are retained. The default value of Limit number of retained files setting in Logging Configuration is |
|
JDBC system resource |
The default capacity is 15 connections. |
The default capacity is 25 connections. |
The JDK Selection pane lists all JDKs that are available for use in the domain. Select one of the following options:
Available JDKs—Select this option to use the listed JDKs in this domain. These are the JDKs that were included with the WebLogic Server installer.
Other JDK—Select this option to use a different JDK than the ones in the available list. Use the Browse button to navigate to the directory where the JDK resides.
Note:
If you select a JDK that is included in the installer, the Configuration Wizard creates server startup scripts to invoke the JDK. If you select a JDK that is not supplied by the installer, the Configuration Wizard does not configure the startup scripts; you must change the startup scripts manually. For more information about startup scripts, see Performance and Tuning for Oracle WebLogic Server.Select only those JDKs that are supported on the platform you are using. For a list of the JDKs that are supported for a specific platform, see Oracle Fusion Middleware Supported System Configurations at http://www.oracle.com/technology/software/products/ias/files/fusion_certification.html. The default selection reflects the JDK that best meets the requirements of your environment, based on the platform on which you are installing the WebLogic domain.
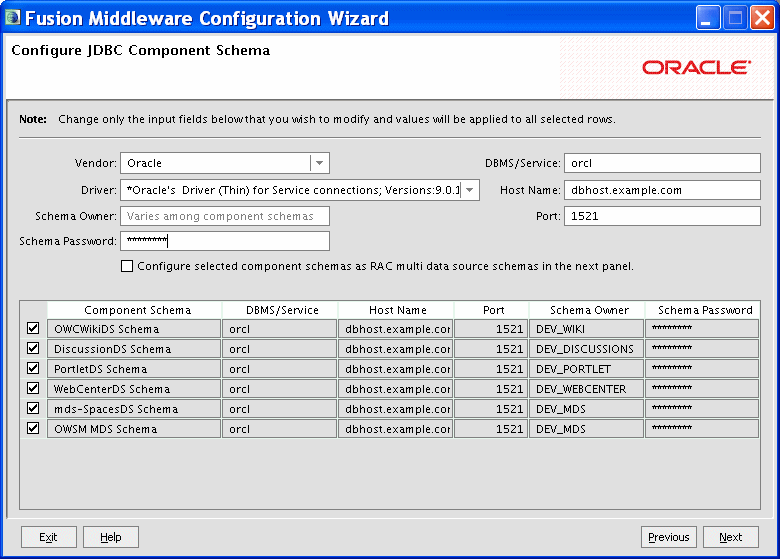
For some Fusion Middleware components (for example, SOA and Web Center Spaces), JDBC data sources might be defined as part of the component's database schema, which are loaded (during installation) by using the Repository Creation Utility (RCU).
When you create a WebLogic domain for such components by using the Configuration Wizard, you can configure the JDBC component schema settings, such as database driver, schema owner, password, and so on.
The JDBC component schemas associated with the products for which you are creating the domain (for example, SOA) are listed in the lower half of the screen.
Note:
To configure one or more of the schemas as Oracle RAC multi data sources, select the check boxes adjacent to the name of the those schemas, and select the Configure selected component schemas as RAC multi data source schemas in the next panel check box. Click Next when done.Select the schemas for which you want to specify data source settings by selecting the check box adjacent to each schema name.
Note:
When you select multiple component schemas, the textVaries among component schemas might be displayed in certain fields, indicating that the current values of those fields are different across the selected component schemas. If you change the values in such fields, the new values are applied uniformly across the selected component schemas.
The default values of component schema parameters such as vendor, driver, host name, and port number depend on the values that are specified in the application templates.
Vendor—Select the database vendor.
Driver—Select the JDBC driver to use to connect to the database. The list includes common JDBC drivers for the selected database vendor.
Schema Owner—Enter the username for connecting to the database.
Schema Password—Enter the password for the specified schema owner.
DBMS/Service—Enter a database DBMS name, or service name if you selected a service type driver.
Host Name—Enter the name of the server hosting the database.
Port—Enter the port number to be used to connect to the server that hosts the database.
The values that you specify are displayed in the appropriate columns in the schema list, for the selected schemas.
Use this screen to configure the component schemas included in the WebLogic domain as Oracle RAC multi data sources.
The component schemas that you opted to configure as Oracle RAC multi data sources in the Configure JDBC Component Schema screen of the wizard are listed in the lower half of the screen.
In the schema list in the lower half of the screen, select the schemas to configure as Oracle RAC multi data sources by selecting the check box adjacent to each schema name.
Note:
When you select multiple data source schemas, the text "Varies among component schemas" might be displayed in certain fields, indicating that the current values of those fields are different across the selected schemas. If you go ahead and change the values in such fields, the new values are applied uniformly across the selected schemas.Driver—Select the JDBC driver to use to connect to the database.
Service Name—Enter a database Oracle RAC service name.
Username—Enter the username for connecting to the database.
Password—Enter the password for the specified username.
Host Name—Enter the name of the server hosting the Oracle RAC database instances.
Instance Name—Enter the name of each Oracle database instance.
Port—Enter the port numbers to be used to connect to the server that hosts the database.
Note:
You must specify the host name, instance name, and port number of at least one database instance.To add a database instance, click Add. Specify the host name, instance name, and port.
The values that you specify are displayed in the appropriate columns in the schema list, for the selected schemas.
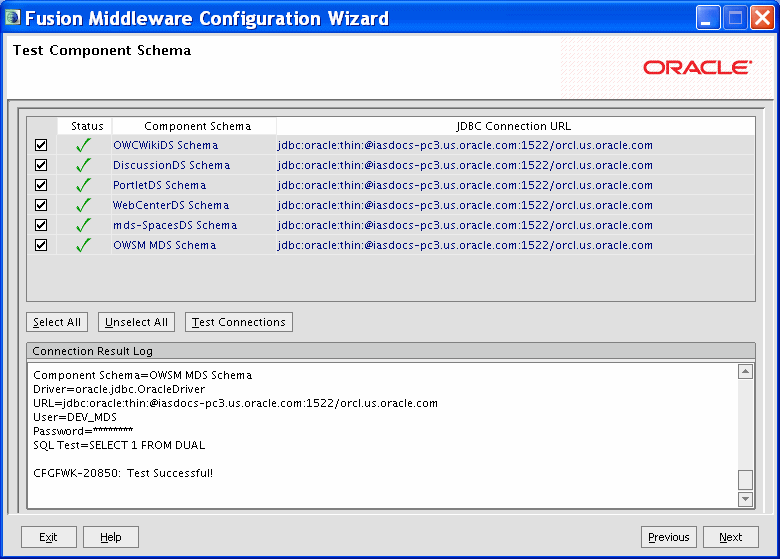
Use this screen to test the configurations that you specified for the data sources in the previous screen.
Select the check boxes adjacent to the names of the schemas to test, and then click Test Connections.
The wizard tests the configuration for each schema by attempting to connect to a URL that is constructed by using the driver, host, port, and other information that you specified while configuring the schema.
The result of the test is indicated in the Status column. Details are displayed in the Connection Result Log section.
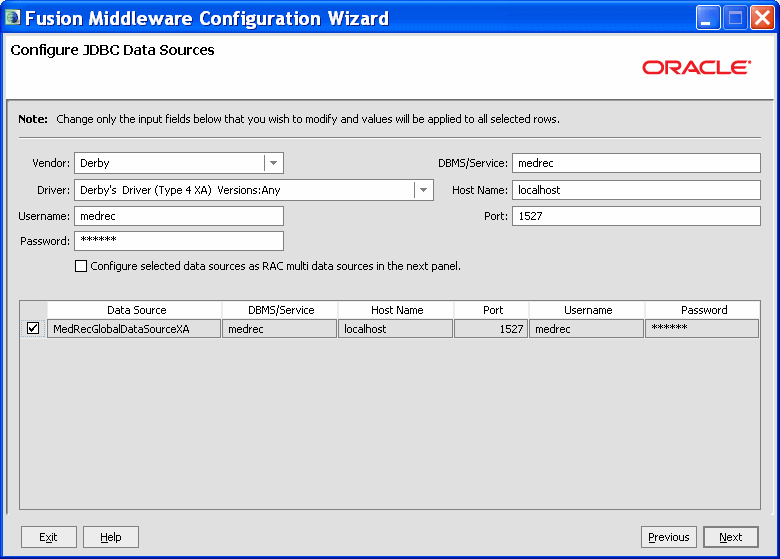
A JDBC data source contains a pool of database connections that are created when the data source instance is created—when it is deployed or targeted, or at server startup. Applications look up a data source on the JNDI tree, and then request a connection. When the applications no longer need the connections, they return the connections to the connection pool in the data source.
Use this screen to configure the JDBC data sources defined in your domain source.
The JDBC data sources associated with the products for which you are creating the domain are listed in the lower half of the screen.
Note:
To configure one or more of the data sources as Oracle RAC multi data sources, select the check box adjacent to the name of the required schema, and select the Configure selected data sources as RAC multi data sources in the next panel check box; then, click the Next button.Select the data source(s) for which you want to specify settings by selecting the check box adjacent to each data source name.
Notes:
When you select multiple data sources, the textVaries among data sources might be displayed in certain fields, indicating that the current values of those fields are different across the selected data sources. If you change the values in such fields, the new values are applied uniformly across the selected data sources.
The default values of data source parameters such as vendor, driver, host name, and port number depend on the values that are specified in the application templates.
Vendor—Select the database vendor.
Driver—Select the JDBC driver to use to connect to the database. The list includes common JDBC drivers for the selected database vendor.
Username—Enter the username for connecting to the database.
Password—Enter the password for the specified username.
DBMS/Service—Enter a DBMS SID or service name. The value that you enter depends on the driver that you selected.
If the name of the Oracle driver that you selected contains the words "for Instance connections," you must enter the SID.
If the name of the Oracle driver contains the words "for Service connections," you must enter the service name.
For information about configuring a DataDirect driver, see the DataDirect documentation.
Host Name—Enter the name of the server hosting the database.
Port—Enter the port number to be used to connect to the server.
The values that you specify are displayed in the appropriate columns in the data source list, for the selected data source.
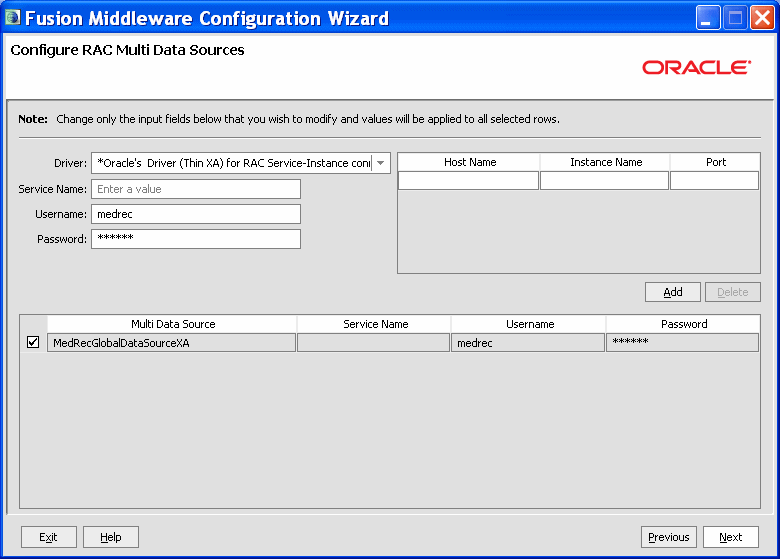
Use this screen to configure the data sources (that are included in the domain) as an Oracle RAC data sources.
The data sources that you opted to configure as Oracle RAC data sources on the Configure JDBC Data Source screen are listed in the lower half of the screen.
Select the data source(s) for which you want to specify settings by selecting the check box adjacent to each data source name.
Note:
When you select multiple data sources, the textVaries among data sources might be displayed in certain fields, indicating that the current values of those fields are different across the selected data sources. If you change the values in such fields, the new values are applied uniformly across the selected data sources.Driver—Select the JDBC driver to use to connect to the database.
Service Name—Enter an Oracle RAC database service name.
Username—Enter the username for connecting to the database.
Password—Enter the password for the specified username.
Host Name—Enter the name of the server hosting the Oracle RAC database instances.
Instance Name—Enter the name of each Oracle database instance.
Port—Enter the port numbers to be used to connect to the server that hosts the database.
To add a new database instance, click Add, and then specify the host name, instance name and port number.
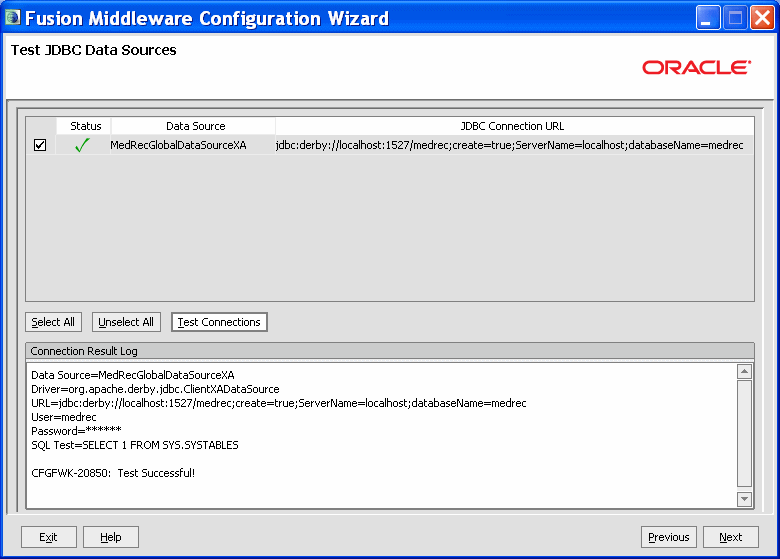
Use this screen to test the data source connections you configured on the Configure JDBC Data Source and Configure Oracle RAC Multi Data Sources screens.
Notes:
In order to test the database connections, the database to which you are connecting must be running.If you do not want to test the connections at this time, do not select any data sources. Click Next to continue.
Select the check box for each data source you want to test, and then click Test Connections.
The wizard tests the configuration for each selected data source by attempting to connect to a URL that is constructed by using the driver, host, port, and other information that you specified while configuring the data source.
The result of the test is indicated in the Status column. Details are displayed in the Connection Result Log section.
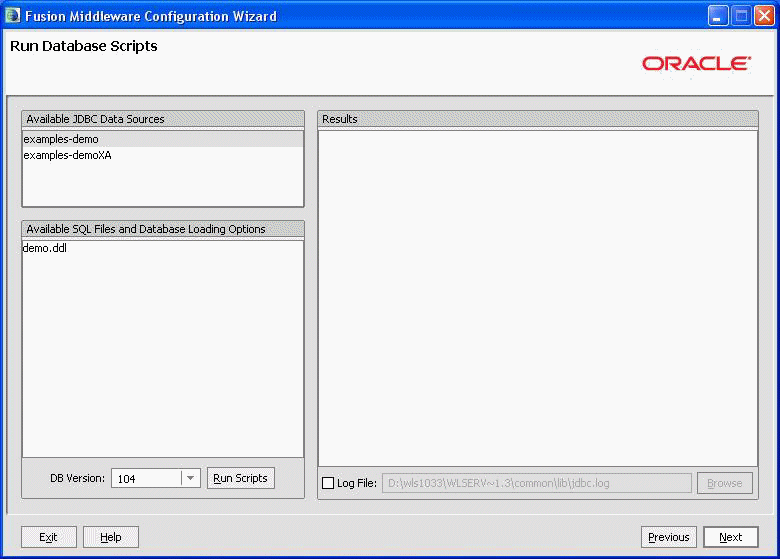
A domain template might contain a set of SQL files organized by database type. If the domain template contains SQL files, you can run them while creating the WebLogic domain, in the Run Database Scripts screen. Database content for each of the data sources defined in your WebLogic domain is set up by using pre-existing SQL or database loading files.
Note:
No databases are defined in the WebLogic Server Base Domain (wls.jar) template. If you selected only the WebLogic Server Base Domain template as the basis for the WebLogic domain, the Configure JDBC Data Sources and the Run Database Scripts screens are not displayed.In the Available JDBC Data Sources section, select the data source for which you want to run the scripts. The scripts that can be executed are displayed in the Available SQL Files and Database Loading Options section.
Select the database version from the DB Version drop-down list.
Click Run Scripts.
All the scripts displayed in the Available SQL Files and Database Loading Options section for the selected data source are executed, and the results are displayed in the Results section. To capture test output in a log file, select the Log File check box and specify the location of the log file.
Repeat steps 1 through 3 for each data source for which you want to execute SQL scripts.
Click Next.
This screen displays one set of Enter Keystore Password/Confirm Password fields for each product that requires a keystore password to be set.
For each set of password fields, enter and confirm the password you want to use for the keystore.
Note:
The keystore password for each product listed on this screen is required to use these products. Note the passwords you enter and provide them to anyone who is authorized to use these products.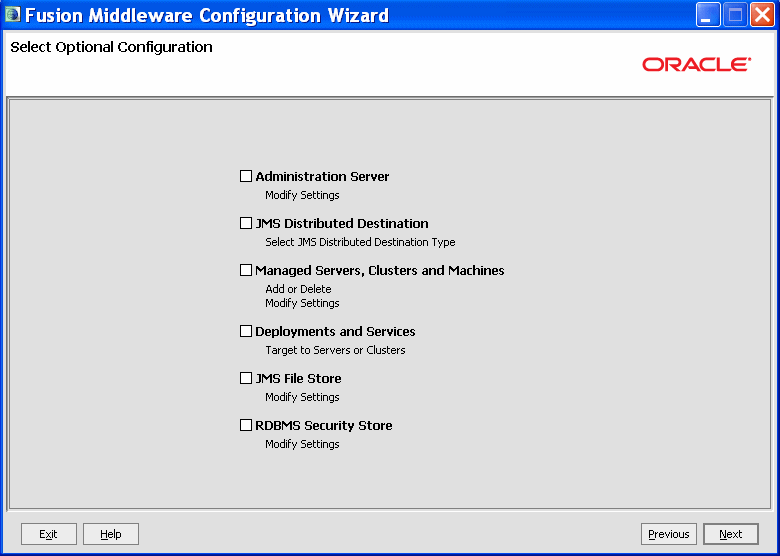
Select all categories (if any) for which you want to perform advanced configuration. For each category you select, the appropriate configuration screen is displayed to allow you to perform advanced configuration. If you do not select any items on this screen, the Configuration Summary screen is displayed next.
Notes:
The categories that are listed on this screen depend on the resources defined in the templates you selected for the domain.The Administration Server and RDBMS Security Store options are not available when you are extending a domain.
Administration Server—Select this option to modify Administration Server settings such as server name, listen address, listen port, and SSL settings. See Configure Adminstration Server.
JMS Distributed Destination—By default, JMS distributed destinations are automatically converted to Weighted Distributed Destinations (WDD). Select this option to change a JMS distributed destination to a Unified Distributed Destination (UDD). See Select JMS Distributed Destination Type.
Managed Servers, Clusters, and Machines—Select this option to
Add Managed Servers, clusters, or machines to the domain
Delete an existing Managed Server, cluster, or machine
Add Managed Servers to an existing cluster
Modify the settings for an existing Managed Server, cluster, or machine.
See Configure Managed Servers, through Assign Servers to Machines.
Deployments and Services—Select this option to customize how application deployments and services are targeted to servers and clusters. See Target Deployments to Clusters or Servers, and Target Services to Clusters or Servers.
JMS File Stores—Select this option to change the settings for your JMS file stores. You can change the name, directory, and synchronous write policy for each file store. See Configure JMS File Stores.
RDBMS Security Store—Select this option to configure an external relational database management system (RDBMS) as a data store for various security providers. See Configure RDBMS Security Store Database.
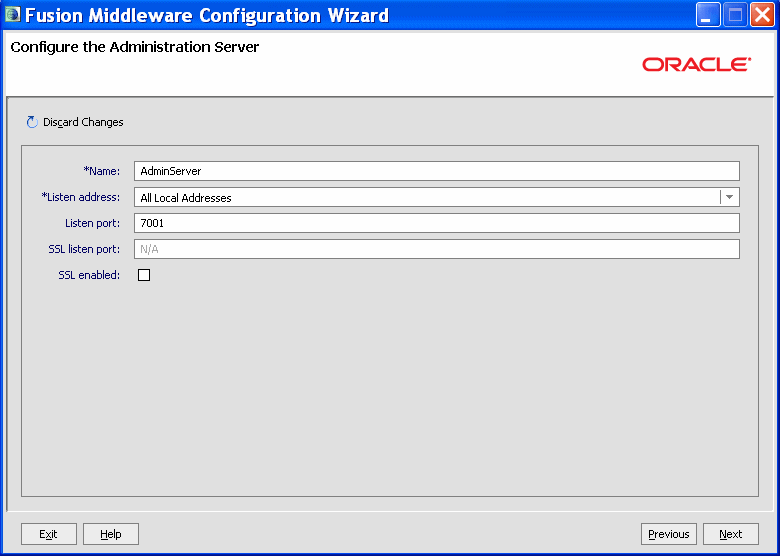
The Administration Server is the central point from which you manage your domain. You can access the Administration Server by using the URL protocol://listen-address:listen-port. The protocol can be any of the following: t3, t3s, http, https.
From this screen, you can congigure or change the following Administration Server settings. Required fields are indicated by an asterisk (*).
Name—The default name is AdminServer. Valid server names are a string of characters (alphabetic and numeric).
Each server instance in a production environment must have a unique name, regardless of the domain or cluster in which it resides, and regardless of whether it is an Administration Server or a Managed Server. In addition, the name of the Administration Server must be unique among all component names within the WebLogic domain.
This value is specified only for identification purposes. It is not used as part of the URL for applications that are deployed on the server. The server name is displayed in the WebLogic Server Administration Console. In addition, if you use WebLogic Server command-line utilities or APIs, you must specify this name to identify the server.
Listen address—From the drop-down list, select a value for the listen address.
For more information, see Specifying the Listen Address.
Listen port—Enter a valid value for the listen port to be used for regular, nonsecure requests (through protocols such as HTTP and T3). The default value is 7001 for the Administration Server. If you leave this field blank, the default value is used. The valid listen port range is from 1 to 65535.
For more information, see Specifying the Listen Port.
SSL enabled—Select this check box to enable the SSL listen port. By default, SSL is disabled for all new servers.
SSL listen port—This field is enabled only if you selected the SSL enabled check box.
Enter a valid value to be used for secure requests (through protocols such as HTTPS and T3S). The default value is 7002. If you leave this field blank, the default value is used. The valid listen port range is from 1 to 65535.
By default, a server instance uses demonstration certificates to authenticate requests from a secure port. In a production environment, you must configure SSL to use certificates from a certificate authority. For more information, see "Configuring SSL" in Securing Oracle WebLogic Server.
This section provides guidelines for specifying the listen address for the Administration Server. These guidelines also apply to all Managed Servers.
If you select localhost as the listen address for a server instance, remote processes cannot connect to that server instance. Only processes on the machine that hosts the server instance can connect to the server instance. If the server instance must be accessible as localhost (for example, if you create administrative scripts that connect to localhost), and it must also be accessible by remote processes, select All Local Addresses. The server instance determines the address of the machine and listens on it.
Table 4-2 describes the behavior of each listen address type.
Table 4-2 Specifying the Listen Address
| Listen Address Type | Behavior |
|---|---|
|
All Local Addresses or a DNS name |
On multi-homed Windows machines, a server instance binds to all available IP addresses. |
|
An IP address or a DNS name |
Note: To resolve a DNS name to an IP address, WebLogic Server must be able to contact an appropriate DNS server or obtain the IP address mapping locally. Therefore, if you specify a DNS name for the listen address, you must either leave a port open long enough for the WebLogic Server instance to connect to a DNS server and cache its mapping or you must specify the IP address mapping in a local file. If you specify an IP address for the listen address, and a client request then specifies a DNS name, WebLogic Server attempts to resolve the DNS name. If it cannot access DNS name mapping, the request fails. |
|
localhost |
|
Note the following guidelines when specifying the listen port for the Administration Server. These guidelines also apply to Managed Servers.
Although you can specify any valid port number, if you specify port 80, you can omit the port number from the HTTP request used to access resources over HTTP. For example, if you define port 80 as the listen port, you can use the URL http://hostname/myfile.html instead of http://hostname:portnumber/myfile.html.
On some operating systems, port 80 can be accessed only by processes run under a privileged user or group ID. In this case, you can assign the server instance to a UNIX machine on which a post-bind UID or GID is defined.
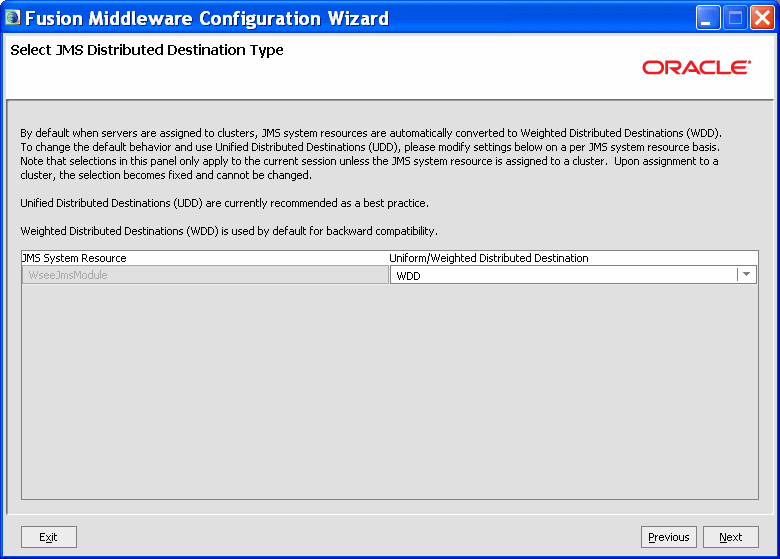
By default, for backward compatibility, JMS distributed destinations are automatically converted to Weighted Distributed Destination (WDD). To change a JMS distributed destination to use Uniform Distributed Destination (UDD) behavior, select UDD from the drop-down list. Oracle recommends using the UDD setting.
Note:
When you change JMS system resource behavior, the setting applies only to the current session unless the JMS system resource is assigned to a cluster. Once the JMS system resource is assigned to a cluster, the setting becomes fixed and cannot be changed.For more information about UDD and WDD, see "Types of Distributed Destinations" in Programming JMS for Oracle WebLogic Server.
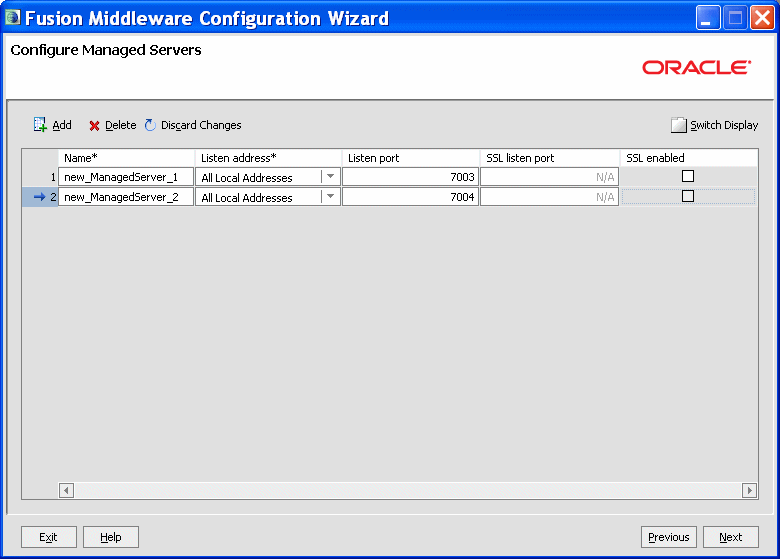
From this screen, you can add or delete Managed Servers. You can also change the settings for an existing Managed Server. Required fields are indicated by an asterisk (*).
Note:
You can create Managed Servers on remote machines by using thepack and unpack commands. For more information, see "Creating and Starting a Managed Server on a Remote Machine" in Creating Templates and Domains Using the Pack and Unpack Commands.Name—The default name is AdminServer. Valid server names are a string of characters (alphabetic and numeric). The name must be unique in the domain.
Listen address—From the drop-down list, select a value for the listen address. See Specifying the Listen Address for information about the available values.
Listen port—Enter a valid value for the listen port to be used for regular, nonsecure requests (through protocols such as HTTP and T3). The default value is 7001 for the Administration Server. If you leave this field blank, the default value is used. The valid listen port range is from 1 to 65535.
For more information, see Specifying the Listen Port.
SSL enabled—Select this check box to enable the SSL listen port. By default, SSL is disabled for all new servers.
SSL listen port—This field is enabled only if you selected the SSL enabled check box.
Enter a valid value to be used for secure requests (through protocols such as HTTPS and T3S). The default value is 7002. If you leave this field blank, the default value is used. The valid listen port range is from 1 to 65535.
To delete a server, select the server and click Delete. You can delete only one server at a time.
To add a server, click Add and configure the settings for the new server. The default name for a new server is new_ManagedServer_n, where n starts at 1 and increments for each new server you add.
To switch the display from the default tabular format to a tabbed format (with one tab for each server), click Switch Display. Click Switch Display again to return to tabular format.
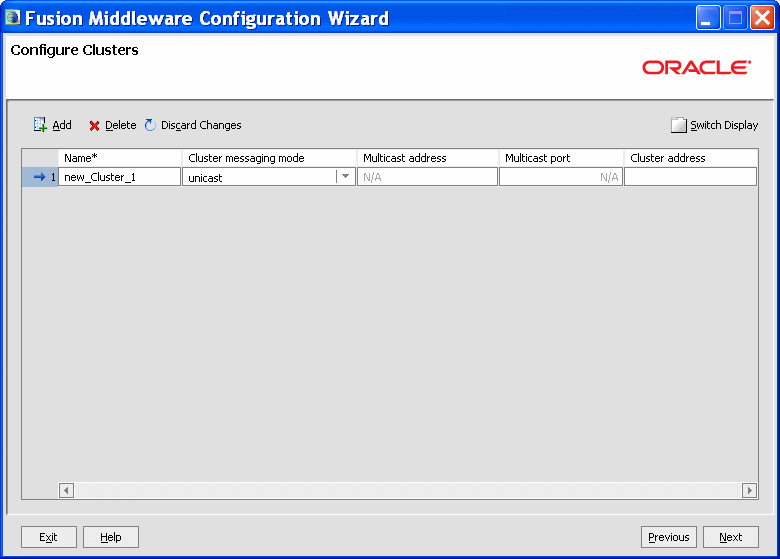
A cluster is a group of WebLogic Server instances that work together to provide scalability and high-availability for applications. By creating clusters, you can group Managed Servers such that they operate as a single unit for hosting applications and resources.
Use this screen to add or delete clusters. You can also change the settings for an existing cluster. Required fields are indicated by an asterisk (*).
Name—Enter a valid name. The name of the cluster must be unique among all component names within the WebLogic domain.
Cluster messaging mode—Select whether the messaging mode is unicast or multicast.
Multicast address—If you selected multicast as the cluster message mode, enter the multicast address for the cluster. This address is used by cluster members to communicate with each other. The default value is 239.192.0.0.
The valid multicast address range is 224.0.0.1 to 239.255.255.255.
Multicast port—If you selected multicast as the cluster message mode, enter the multicast port for the cluster. The multicast port is used by cluster members to communicate with each other. The default value is 7001.
Valid values for multicast ports are from 1 to 65535.
Cluster address—Enter the addresses for identifying the Managed Servers in the cluster. A cluster address can be one of the following:
Comma-separated list of IP addresses or DNS names and ports (for example: dns_name:port, dns_name:port)
DNS name that maps to multiple IP addresses
localhost, DNS name, or IP address if the listen address of all Managed Servers is listening to the same address with unique port numbers
The cluster address is used in entity and stateless EJBs to construct the host name portion of URLs. If the cluster address is not set, EJB handles may not work properly.
To delete a cluster, select the server and click Delete. When you delete a cluster, you do not delete the servers assigned to it; the servers are merely removed from the cluster and can then be added to another cluster. You can delete only one cluster at a time.
To add a cluster, click Add and configure the settings for the new server. The default name for a new cluster is new_Cluster_n, where n starts at 1 and increments for each new cluster you add. To change the default, type the desired name in the Name column.
To switch the display from the default tabular format to a tabbed format (with one tab for each cluster), click Switch Display. Click Switch Display again to return to tabular format.
For more information about clusters, see "Setting Up WebLogic Clusters" in Using Clusters for Oracle WebLogic Server.
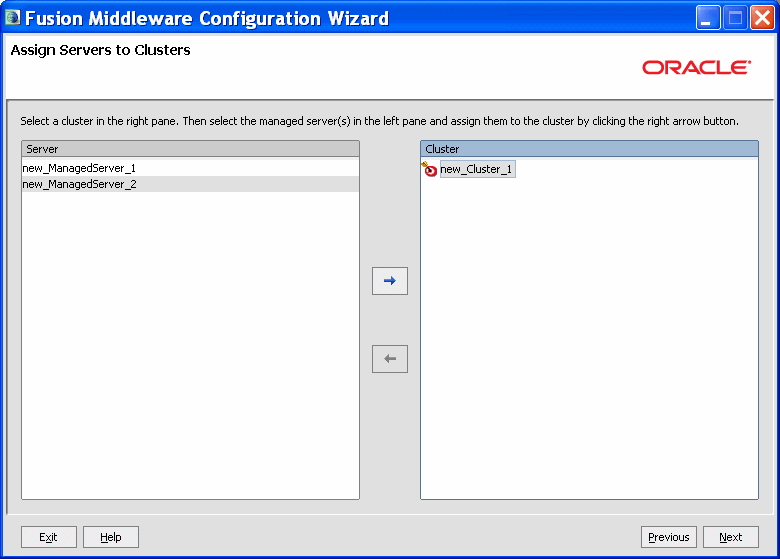
Use this screen to assign Managed Servers to clusters.
Note:
Only Managed Servers are displayed in the Server list box. The Administration Server is not listed because it cannot be assigned to a cluster.To assign one or more servers to a cluster:
In the Cluster list box, select the cluster to which you want to assign a Managed Server.
Assign Managed Servers to the selected cluster in one of the following ways:
Double-click the name of the Managed Server in the Server list box.
Select the Managed Server and click the right arrow.
Shift+click to select multiple Managed Servers; then, click the right arrow.
The name of the Managed Server is removed from the Server list box and added below the name of the target cluster in the Cluster list box.
Repeat steps 1 and 2 for each Managed Server to assign to a cluster.
Review the cluster assignments.
If necessary, you can remove a Managed Server from a cluster in one of the following ways:
Double-click the name of the Managed Server in the Cluster list box.
Select the Managed Server and click the left arrow.
The name of the Managed Server is removed from the Cluster list box and restored to the Server list box.
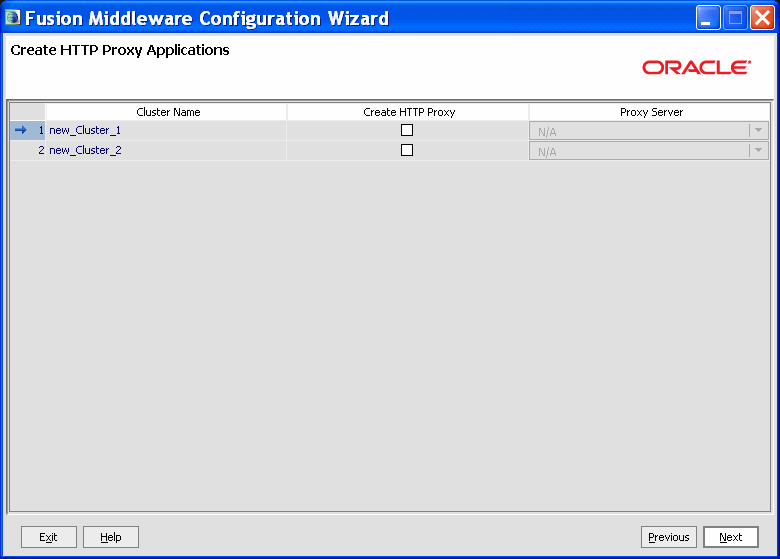
An HTTP proxy application acts as an intermediary for HTTP requests.
Use this screen to create an HTTP proxy application for each cluster, and specify the Managed Server on which the proxy application must be deployed.
This screen is displayed only if both of the following statements are true:
At least one Managed Server is assigned to a cluster.
At least one Managed Server is not assigned to any cluster.
To create HTTP proxy applications:
Select the Create HTTP Proxy check box next to the cluster for which you want to create the HTTP proxy application.
A list of the Managed Servers that are not assigned to any cluster is displayed in the Proxy Server list.
From the Proxy Server list, select a Managed Server on which the proxy application must be deployed.
A proxy application named OracleProxy4_clustername_servername is created and deployed in the Managed Server.
Repeat steps 1 and 2 for each cluster for which you want to create HTTP proxy applications.
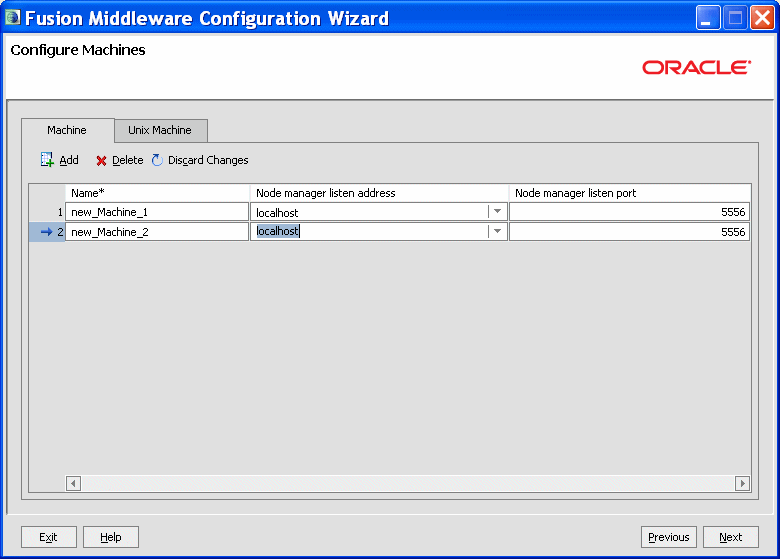
In a WebLogic domain, the machine definitions identify physical units of hardware and are associated with the WebLogic Server instances that they host.
Use this screen to add or delete machines, or to modify the settings for an existing machine. Each machine has the following configuration settings. Required fields are marked with an asterisk (*).
Name—Enter a valid machine name. The machine name is used to identify the machine within the WebLogic domain; it does not have to match the network name for the machine. The name must be unique among all component names within the domain.
Node manager listen address—Select a value from the drop-down list for the listen address used by Node Manager to listen for connection requests. By default, the IP addresses defined for the local system and localhost are shown in the drop-down list. The default value is localhost.
If you specify an IP address for a machine that hosts the Administration Server and you need to access the WebLogic Server Node Manager, you must disable host name verification.
For more information, see "Using Host Name Verification" in Securing Oracle WebLogic Server.
Node manager listen port—Enter a valid value for the listen port used by Node Manager to listen for connection requests.
The valid Node Manager listen port range is from 1 to 65535. The default value is 5556.
Post bind GID enabled—(UNIX machines only) Select this check box to enable a server running on this machine to bind to a UNIX group ID (GID) after it finishes all privileged startup actions. By default, this check box is not selected.
Post bind GID—(UNIX machines only) Enter the UNIX group ID (GID) under which a server on this machine will run after it finishes all privileged startup actions. Otherwise, the server continues to run under the group from which it was started. For this setting to take effect, you must select the Post bind GID enabled check box.
Post bind UID enabled—(UNIX machines only) Select this check box to enable a server running on this machine to bind to a UNIX user ID (UID) after it finishes all privileged startup actions. By default, this check box is not selected.
Post bind UID—(UNIX machines only) Enter the UNIX user ID (UID) under which a server on this machine will run after it finishes all privileged startup actions. Otherwise, the server continues to run under the account from which it was started. For this setting to take effect, you must select the Post bind UID enabled check box.
You might want to create machine definitions in situations such as the following:
The Administration Server uses the machine definition, with the Node Manager application, to start remote servers.
WebLogic Server uses configured machine names when determining the server in a cluster that is best able to handle certain tasks, such as HTTP session replication. WebLogic Server then delegates those tasks to the identified server.
Note:
You must configure machines for each product installation that runs a Node Manager process. The machine configuration must include values for the listen address and port number parameters.Select the Machine tab (for Windows) or the UNIX Machine tab (for UNIX).
Click Add to add a new machine. The default name for a new machine is new_[Unix]Machine_n, where n starts at 1 and increments by 1 for each machine that you add.
Click Delete to delete an existing machine.
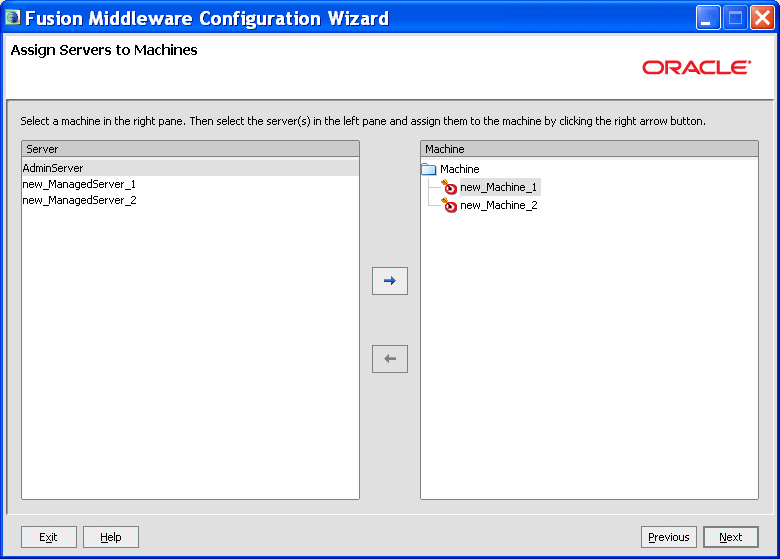
Use this screen to assign WebLogic Server instances to each of the machines you defined.
In the Machine list box, select the Windows or UNIX machine to which you want to assign a WebLogic Server instance.
Assign WebLogic Server instances to the selected machine in one of the following ways:
Double-click the WebLogic Server instance in the Server list box.
Select the appropriate WebLogic Server instance in the Server list box and click the right arrow.
Shift+click to select multiple servers in the Server list box; then, click the right arrow.
The name of the WebLogic Server instance is removed from the Server list box and added, below the name of the target machine, in the Machine list box.
Repeat steps 1 and 2 for each WebLogic Server instance to assign to a machine.
Review the machine assignments.
If necessary, you can remove a WebLogic Server instance from a machine in one of the following ways:
Double-click the name of the appropriate WebLogic Server instance in the Machine list box.
Select the appropriate WebLogic Server instance in the Machine list box and click the left arrow.
The name of the WebLogic Server instance is removed from the Machine list box and restored to the Server list box.
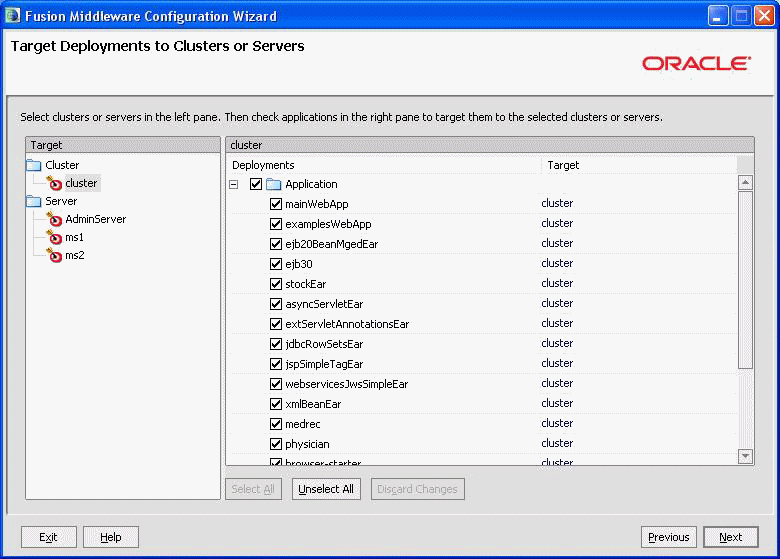
Description of the illustration target_deployments.gif
Use this screen to target applications and libraries for deployment on servers or clusters.
Applications and libraries associated with the product for which you are configuring the domain (for example, SOA) are targeted automatically to the Managed Server created for that product or to the cluster to which that Managed Server is assigned. In this screen, you can target applications and libraries to additional servers and clusters.
To target an application deployment to a cluster or server:
In the Target list box, select the cluster or server on which you want to deploy applications or libraries.
The name of the selected target is displayed as the title of the list box on the right.
In the target_name list box, select the check boxes corresponding to the applications or libraries to deploy on the selected target.
The applications and libraries displayed here vary, depending on the products that you selected in the Select Domain Source screen, earlier in the wizard.
Note:
When you select a Managed Server in the Target list box, some of the check boxes in the target_name list box might be disabled, indicating applications and libraries that are already targeted at the cluster that contains the selected Managed Server.After you select applications and libraries, the names of the targeted clusters and servers are displayed in the Target column in the target_name list box.
Repeat steps 1 and 2 for the other clusters and servers, as required.
After making the required selections, click Next.
When you extend a domain, if you delete a Managed Server or cluster to which applications are currently targeted, the Configuration Wizard automatically retargets those applications as follows:
If the applications were originally targeted solely to the Managed Server or cluster that you are now deleting (that is, after you delete the Managed Server or cluster, the applications would become untargeted in the modified domain), then the Configuration Wizard automatically retargets the applications to all eligible targets.
An eligible target is any cluster or Managed Server that is not defined in the configuration groups specification (config-groups.xml file) of an included template. Servers or clusters that are specified in config-groups.xml are essentially owned by the template and, therefore, are not eligible for automatic targeting.
If the applications were originally targeted to multiple targets (including Managed Servers, clusters, and the Administration Server), and one of the targeted Managed Servers or clusters is deleted, then, in the extended domain, the Configuration Wizard leaves the remaining target associations intact and does not attempt to retarget the applications.
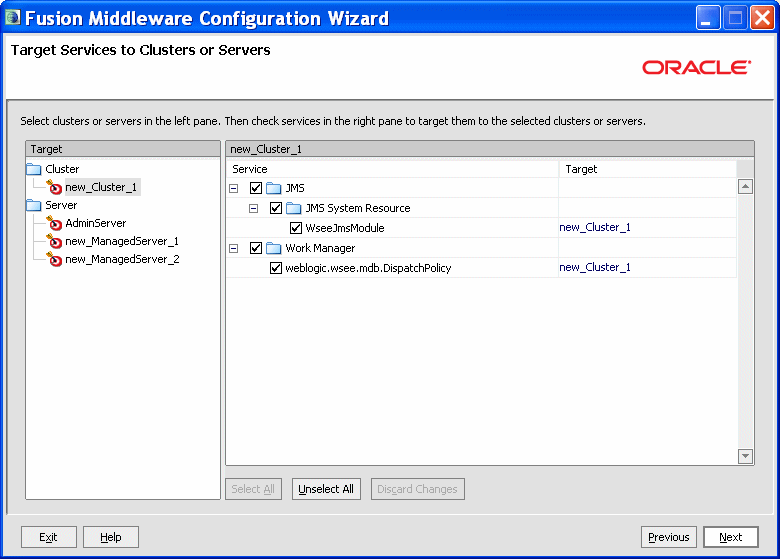
Use this screen to target services to the appropriate Managed Servers or clusters.
Services that are associated with the product for which you are configuring the domain (for example, SOA) are targeted automatically, to the Managed Server created for that product or to the cluster to which that Managed Server is assigned. In this screen, you can target services to additional servers and clusters.
To target services to Managed Servers or clusters:
In the Target list box, select the cluster or server on which you want to deploy services.
The name of the selected target is displayed as the title of the list box on the right.
In the target_name list box, select the check boxes corresponding to the services to deploy on the selected target.
The services displayed here vary, depending on the products that you selected in the Select Domain Source screen earlier in the wizard.
Note:
When you select a Managed Server in the Target list box, some of the check boxes in the target_name list box might be disabled, indicating services that are already targeted at the cluster that contains the selected Managed Server.After you select services, the names of the targeted clusters and servers are displayed in the Target column in the target_name list box.
Repeat steps 1 and 2 for the other clusters and servers, as required.
After making the required selections, click Next.
When you extend a domain, if you delete a Managed Server or cluster to which services are currently targeted, the Configuration Wizard automatically retargets those services as follows:
If the services were originally targeted solely to the Managed Server or cluster that you are now deleting (that is, after you delete the Managed Server or cluster, the services would become untargeted in the modified domain), then the Configuration Wizard automatically retargets the services to all eligible targets.
An eligible target is any cluster or Managed Server that is not defined in the configuration groups specification (config-groups.xml file) of an included template. Servers or clusters that are specified in config-groups.xml are essentially owned by the template and, therefore, are not eligible for automatic targeting.
If the services were originally targeted to multiple targets (including Managed Servers, clusters, and the Administration Server), and one of the targeted Managed Servers or clusters is deleted, then, in the extended domain, the Configuration Wizard leaves the remaining target associations intact and does not attempt to retarget the services.
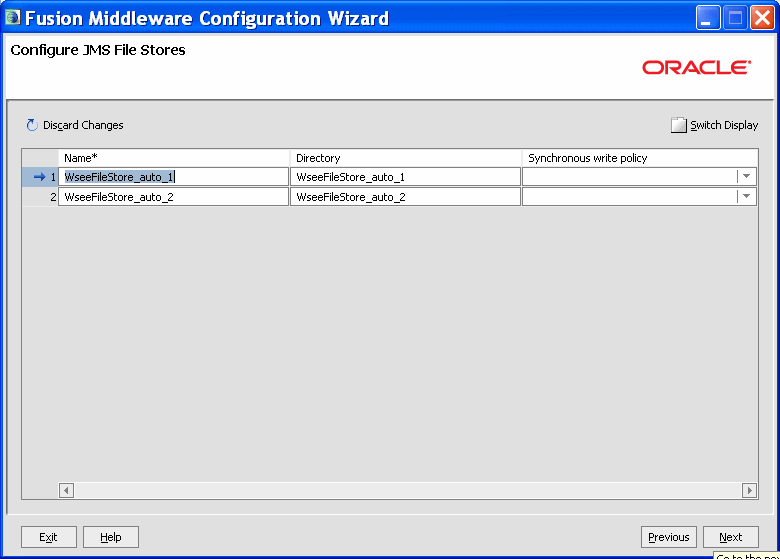
A JMS file store is a disk-based file in which persistent messages can be saved.
Use this screen to modify the JMS file stores that are configured in your domain. It contains the following fields. Required fields are marked with an asterisk (*).
Name—Enter a valid name for the JMS file store. The name must be a string of characters. The name of the JMS file store must be unique among all component names within the domain.
Directory—Enter the path of the directory (in your system) in which the JMS file store resides.
Synchronous write policy—From the drop-down list, select one of the following synchronous write policies to determine how the file store writes data to the disk:
Cache-Flush: Transactions cannot be completed until all their write operations have been flushed to the disk.
Direct-Write: Write operations are performed directly to the disk. This policy is supported on Solaris and Windows. If this policy is active on an unsupported platform, the file store switches automatically to the cache-flush policy.
Disabled: Transactions are complete as soon as the writes are cached in memory. When this policy is active, completion of transactions does not depend on waiting for writes to reach the disk.
This setting affects performance, scalability, and reliability.
Notes:
The use of the direct-write policy is reliable in Solaris systems, but Windows systems may leave transaction data in the on-disk cache without writing it to disk immediately. This is considered unreliable, because a power failure can cause loss of on-disk cache data, possibly resulting in lost or duplicate messages. For reliable writes using the direct-write policy on Windows, either disable all write caching for the disk (enabled by default), or use a disk with a battery-backed cache. Some file systems, however, do not allow this value to be changed (for example, a RAID system that has a reliable cache).If the JMS file store is used exclusively for paging non-persistent messages to the disk, the synchronous write policy is ignored.
To switch the display from the default tabular format to a tabbed format (with one tab for each server), click Switch Display. Click Switch Display again to return to tabular format.
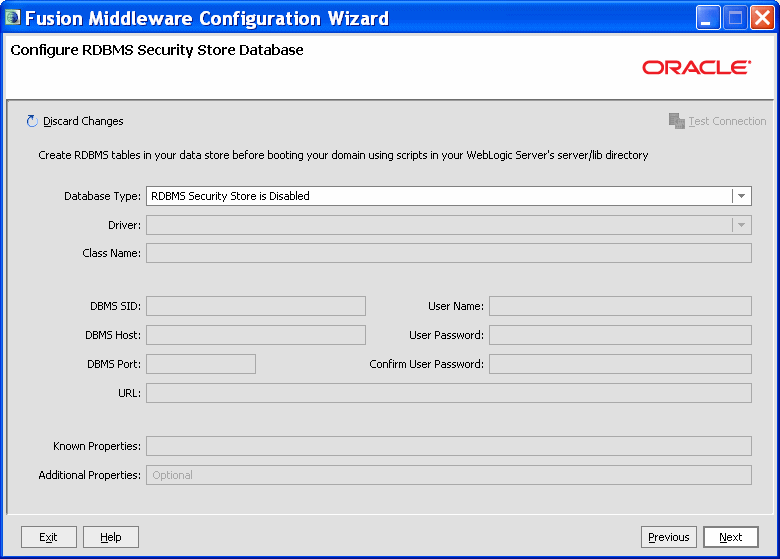
Configure the following RDBMS security store database fields. Required fields are marked with an asterisk (*).
Database Type—From the drop-down list, select the type of database to use as the RDBMS security store.
For information about supported databases, see Oracle Fusion Middleware Supported System Configurations at http://www.oracle.com/technology/software/products/ias/files/fusion_certification.html.
Driver—Select the driver to use for the database. The list of available drivers varies, depending on the database type that you select.
Class Name—No action is required. The class name is displayed automatically, based on the driver that you select.
DBMS SID—Enter the SID of the database.
DBMS Host—Enter the name of the machine that hosts the database.
DBMS Port—Enter the port to be used to connect to the server. The default port number that is associated with the selected database type is displayed automatically.
URL—No action is required. The URL is displayed automatically based on the driver that you select.
User Name—Enter the login name for connecting to the database.
User Password—Enter the password for accessing the database. The password rules vary, depending on the database. The value is encrypted.
Confirm User Password—Re-enter the password.
Known Properties—No action is required. The known properties of the database are displayed automatically based on the driver that you select.
Additional Properties—Enter additional properties, if any, to be passed to the driver.
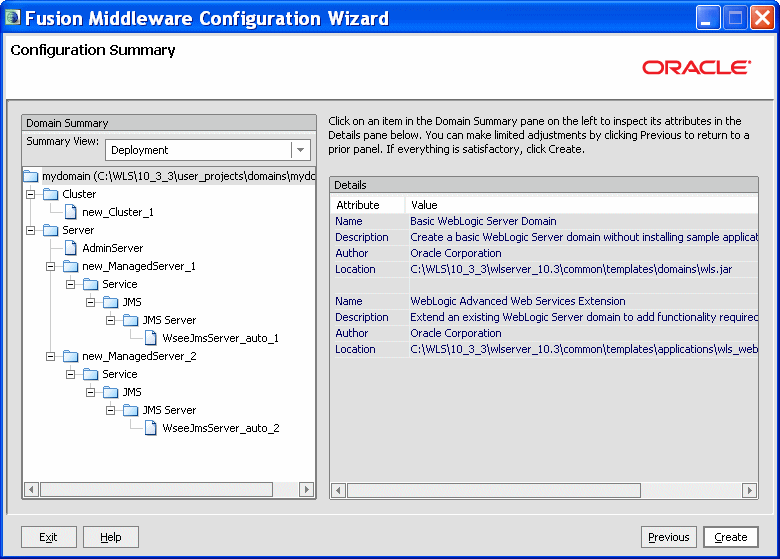
Review the detailed configuration settings of your domain before continuing.
In the Domain Summary pane, select an item to display details about that item in the Details pane on the right.
You can limit the items that are displayed in the Domain Summary pane by selecting a filter option from the Summary View drop-down list.
If you need to change the configuration, click Previous to return to the appropriate screen.
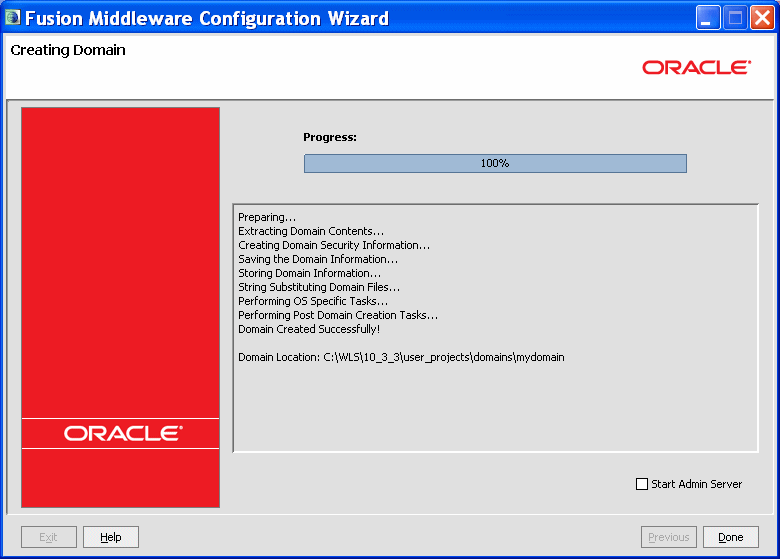
This screen shows the progress of the domain creation.
When the domain creation process completes, click Done to close the Configuration Wizard.
On Windows systems, if you want to start the Administration Server after closing the Configuration Wizard, select the Start Admin Server check box. This check box is not available on UNIX systems.
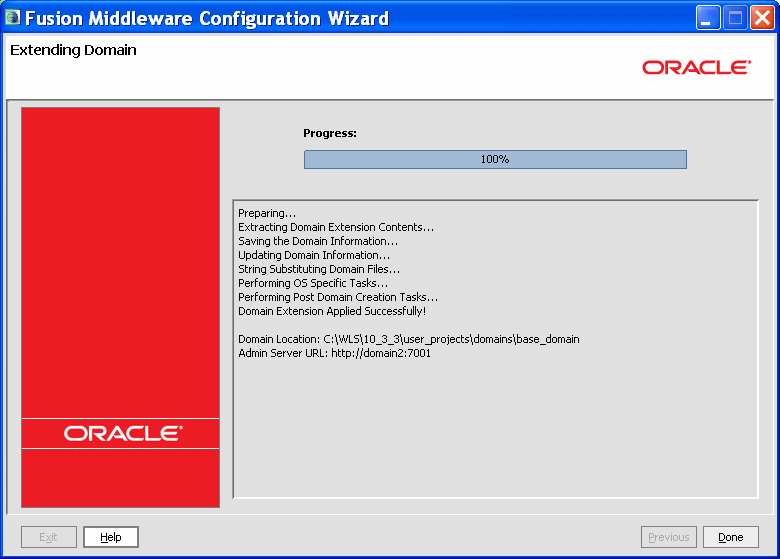
This screen shows the progress of the domain extension process.
When the domain creation process completes, click Done to close the Configuration Wizard.