| Oracle® Fusion Middleware User's Guide for Oracle WebCenter 11g Release 1 (11.1.1) Part Number E10149-04 |
|
|
View PDF |
| Oracle® Fusion Middleware User's Guide for Oracle WebCenter 11g Release 1 (11.1.1) Part Number E10149-04 |
|
|
View PDF |
This chapter provides a brief description of the Web Clipping portlet and producer and explains how you can register a Web Clipping producer and use this producer to add a Web Clipping portlet to a JSP document created through Oracle JDeveloper.
This chapter includes the following sections:
Web Clipping is a publishing portlet that enables you to integrate any web application with your custom WebCenter application and with WebCenter Spaces. It is designed to give you quick integration by leveraging the existing user interface of the web application. With Web Clipping, you can consolidate content from web sites scattered throughout a large organization.
With Web Clipping, you can clip an entire web page, or a portion of it, and reuse it as a portlet. You can clip basic and HTML-form-based sites. Use Web Clipping when you want to copy content from an existing web page and expose it in your WebCenter application as a portlet.
Web Clipping supports the following features:
Navigation through various styles of login mechanisms
Web Clipping supports various login mechanisms including form- and JavaScript-based submission and HTTP Basic and Digest Authentication with cookie-based session management.
Fuzzy matching of clippings
Fuzzy matching enables the Web Clipping engine to correctly identify a web clipping and deliver it as portlet content even if the web clipping is reordered within the source page or if its character font, size, or style changes.
Personalization
Personalization enables you to expose input parameters that end users can modify when they personalize the portlet. Parameters can be exposed as public parameters that you can map as page parameters. This feature enables end users to obtain personalized clippings.
Integrated authenticated web content through single sign-on
You can use external applications and leverage Oracle Single Sign-On to clip content from authenticated external web sites.
Inline rendering
Inline rendering enables you to set up Web Clipping portlets to display links within the context of the portlet. When a user clicks a link in the Web Clipping portlet, the results display within the same portlet. You can use this feature with internal and external web sites.
Proxy authentication
Web Clipping supports proxy authentication, including global proxy authentication and authentication for each user. You can use this feature if proxy servers require authentication. You can specify proxy server authentication details, including type (Basic or Digest) and realm in the provider.xml file. In addition, you can specify a scheme for entering user credentials as follows:
All users automatically log in using a user name and password that you provide.
All users are required to log in using a user name and password that they provide.
All public users (not authenticated into the WebCenter application) automatically log in using a user name and password that you provide, while valid users (authenticated into the WebCenter application) log in using a user name and password that they provide.
For more information, see the "HTTP or HTTPS Proxy Configuration" section in the Oracle Fusion Middleware Developer's Guide for Oracle WebCenter.
Support for HTTPS
Web Clipping enables you to clip content from HTTPS-based external web sites if appropriate server certificates are acquired.
Open Transport API
By default, the Web Clipping provider supports only HTTP challenge-based authentication methods, such as Basic and Digest and form submission logins. To support custom authentication methods, such as Kerberos proxy authentication, you can use the Web Clipping Transport API. For more information, see the "Using Web Clipping Open Transport API" section in the Oracle Fusion Middleware Developer's Guide for Oracle WebCenter.
Reuse of a wide range of web content
Web Clipping provides basic support of pages written with JavaScript, applets, and plug-in enabled content, retrieved through HTTP GET and POST methods of form submission.
Web Clipping also supports clipping of content from pages written with HTML 4.01, including:
Clipping of <applet>, <body>, <div>, <embed>, <img>, <object>, <ol>, <span>, <table>, and <ul> tagged content
Preservation of <head> styles and fonts, and CSS
Support for UTF-8 compliant character sets
Navigation through hyperlinks (HTTP GET), form submissions (HTTP POST), frames, and URL redirection
Globalization support
Web Clipping provides globalization support in URLs and URL parameters. For information about how Web Clipping determines the character set of clipped content, see Section 34.4, "Current Limitations of Web Clipping."
Persistent storage of Web Clipping definitions
Web Clipping definitions are stored persistently in a repository. For information about Web Clipping repository, see the "Web Clipping Portlet Configuration Tips" section in the Oracle Fusion Middleware Developer's Guide for Oracle WebCenter.
Encryption of secure information
Any secure information, such as passwords, is stored in an encrypted form, according to the Data Encryption Standard (DES), using Oracle encryption technology.
This section describes how to clip content for a Web Clipping portlet and make the portlet personalizable. It includes the following subsections:
Section 34.2.2, "Clipping Content for Display in the Web Clipping Portlet"
Section 34.2.3, "Adding a Web Clipping That Users Can Personalize"
The steps for adding a Web Clipping portlet to a page vary between a custom WebCenter application and the WebCenter Spaces application. For one thing, in a custom WebCenter application adding a portlet to a page is a design-time activity, carried out by the application developer. For information about adding a portlet to a page in a custom WebCenter application, see the "Creating Content-Based Portlets with Web Clipping" chapter in the Oracle Fusion Middleware Developer's Guide for Oracle WebCenter.
In WebCenter Spaces, portlets are added to pages at runtime—when you run the application. Portlets are available for dragging and dropping from the Oracle Composer Catalog by any user with sufficient privileges. For information about adding a portlet to a page in WebCenter Spaces, see Section 10.1.5, "Adding Portlets to a Page."
Note:
In WebCenter Spaces, avoid adding a portlet to a Movable Box layout component (For information, see Chapter 9, "Working with Page Layout Components"). The Movable Box layout component duplicates theshowDetailFrame that the portlet provides by default. Adding a portlet to a Movable Box creates an unnecessary and potentially error-prone redundancy.Though the point at which you add a Web Clipping portlet to a page varies between custom applications and WebCenter Spaces—at design time or at runtime—Web Clipping content is defined at runtime for both scenarios.
Run your application, and select either Customize or Personalize from the portlet's Actions menu (Figure 34-1) to start the process of clipping and saving web content. You can select:
Customize, to set up a Web Clipping portlet to display content to all users
Personalize, to set up your own, personal view of a Web Clipping portlet
Figure 34-1 Actions Menu on a Web Clipping Portlet in a Custom Application

Both the Customize and Personalize options take you into Web Clipping Studio, where you can:
Browse for web content
Choose the exact portion of the web content to clip
Preview the clipped content as a portlet
Save the clipped content as a portlet
Set portlet properties and save the updated portlet information
To clip web content for display in the Web Clipping portlet:
From the Actions menu on the header of the Web Clipping portlet (Figure 34-2), select either Customize or Personalize.
Figure 34-2 Actions Menu on a Web Clipping Portlet in a Custom Application

The Find a Web clipping page opens (Figure 34-3).
Note:
When running a portlet that has an Edit mode, the Personalize option on the portlet's Actions menu appears only to authenticated users. Unauthenticated or public users do not see the Personalize option. What this means is that, for personalization to work, some form of security must be implemented for your application.If you are a developer creating portlets and pages, then you may want a quick way to test the Edit mode of your portlet without creating a complete security model for your application. For information about how you can quickly add the necessary security for testing portlet personalization, see the "Configuring Basic Authentication for Testing Portlet Personalization" section in the Oracle Fusion Middleware Developer's Guide for Oracle WebCenter.
In the URL Location field, enter the URL of the web page that contains or links to the content you want to clip.
Click Start.
Web Clipping Studio displays the page you specified (Figure 34-4).
Note:
You can clip Secure Socket Layer (SSL)-enabled web sites if certificates of those sites are added to the certificate store. Certificates of SSL-enabled web sites that use Equifax, VeriSign, or Cybertrust certificates are included in the default certificate store.For information about adding certificates, see the "Adding Certificates for Trusted Sites" section in the Oracle Fusion Middleware Developer's Guide for Oracle WebCenter.
Figure 34-4 A Web Page Displayed in Web Clipping Studio
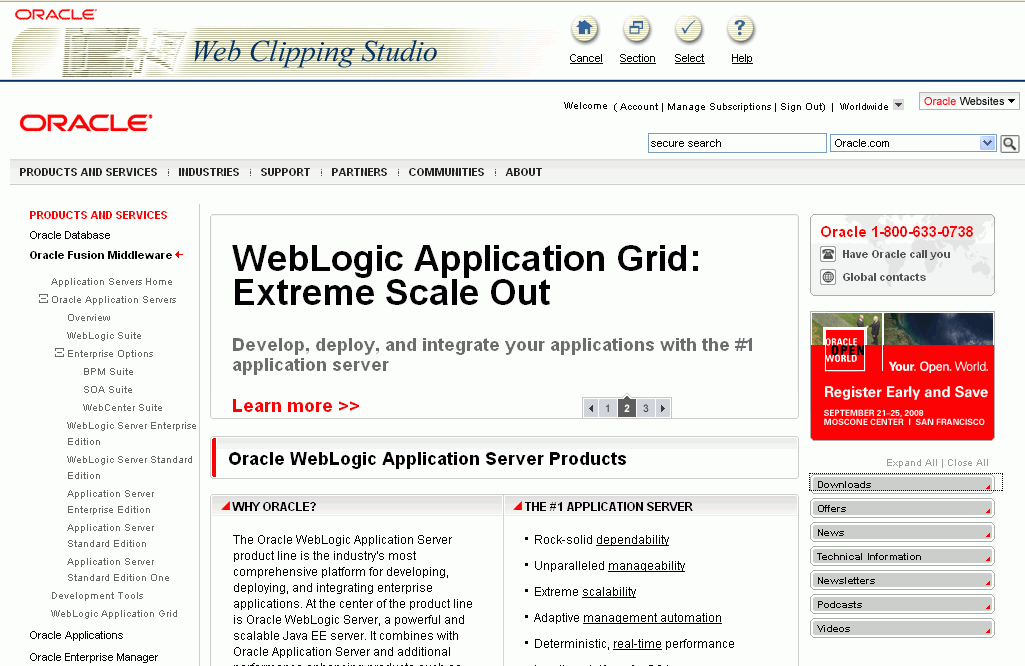
If your starting web page is not the page you plan to clip, then within Web Clipping Studio browse to the content you want to clip.
As you click hyperlinks in the web page, Web Clipping Studio records your navigation links.
Notes:
Only the significant browsing operations are recorded for later playback during the show mode. Any browsing operations that do not contribute to the eventual web clipping are discarded. Discarded links are not visited.For any web sites that require HTTP Basic or Digest Authentication, a form is displayed that requests user name and password information. This encoded authentication information is recorded as part of the browsing information.
On the page that contains the content you want to clip, click the Section icon or link on the Web Clipping Studio banner (Figure 34-5).
If you intend to clip the full web page, it is not necessary to section the page. You can clip the full page by clicking the Select icon or link instead of Section when you are on a page you want to clip.
Figure 34-5 The Section Icon and Link in the Web Clipping Studio Banner

Sectioning divides the target web page into its clippable sections (Figure 34-6).
Figure 34-6 Sectioned Web Page in Web Clipping Studio
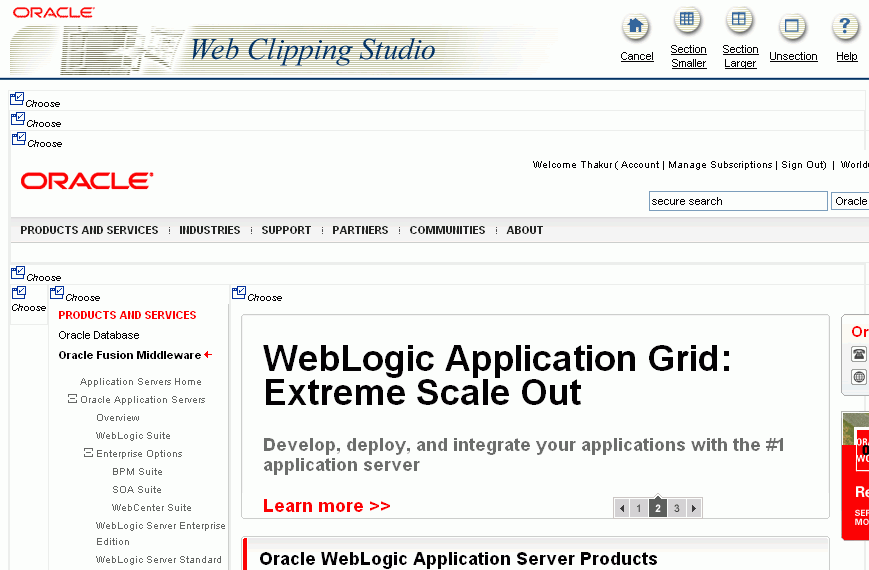
After you click Section, you cannot browse links in the displayed page. If you want to browse to other locations through page links, then click Unsection on the Web Clipping Studio banner. For more information about using Web Clipping, you can click the Help icon or link on any of the Web Clipping pages.
Note:
To adjust sectioning to encompass smaller or larger areas on the web page, use the Section Smaller and Section Larger options on the Web Clipping Studio banner. Click Section Smaller to divide the web page into more, smaller sections. For example, click Section Smaller to drill down one level of nested tables. Click Section Larger to divide the web page into fewer, larger sections.At the top-left corner of the section you want to clip, click Choose.
You can choose only one section at a time. Web Clipping Studio displays a preview of your chosen section.
If the displayed section is the clipping you want, then click Select on the Web Clipping Studio banner.
If the displayed section is not the clipping you want, then click Unselect to return to the page containing the section. You can choose another section on the page, or click Unsection to remove sectioning, enabling you to navigate to another page.
Note:
Some sections may contain no data, only whitespace. For example, a web page may contain an HTML<DIV> tag that contains no text or images. If you click Choose on a section that contains no data, then Web Clipping displays a preview, but the preview correctly shows only whitespace. In this case, click Unselect on the preview page to return to the sectioned page. Then, select a section containing data.Once you have made your selection, the Web Clipping Studio displays the Find a Web clipping page with the selected web clipping's properties.
Adjust the clipping's property values as necessary:
URL Rewriting—Controls the behavior of links embedded in the clipped content.
Select from:
None—To specify that link targets display on a new browser tab.
Inline—To specify that link targets display inside the portlet. If you have integrated with an external application or are logged into the clipped site, and if you choose Inline for URL Rewriting, then the session is maintained to the clipped site while browsing.
Note:
The URL Rewriting option is available only when you customize a portlet. This option is not available when you personalize a portlet.Title—A title to display in the portlet header.
Description—A description of the clipping. The description is not displayed in the portlet.
Time Out (seconds)—The number of seconds to allow for the portlet to render before it times out.
Expires (minutes)—The number of minutes before cached portlet content expires. Once cached content expires, the next time the portlet is refreshed—either by a browser refresh or by clicking the Refresh link in the portlet itself—portlet content is retrieved from the web page from which the clipping originated.
Parameterize Inputs—Options for customizing parameters associated with the clipped content.
Click the Click to start parameterizing checkbox to customize parameters associated with the content, and then perform the following steps:
From the Parameters list, choose the parameters you intend to customize.
From the Personalizable list, select a parameter if you intend to enable users to provide their own parameter values when they personalize the portlet. Select None if you do not want to allow this.
In the Display Name field, enter a name to be displayed for the parameter.
In the Default Value field, enter a default value for the parameter.
For an example of personalizing the parameters of a web clipping, see Section 34.2.3.2, "Parameterizing a Web Clipping Portlet."
Note:
The Parameterize Inputs section displays only if you entered information in a form and then selected the section including the form for your web clipping.Click OK to save changes to property values and to display the selected clipping in the Web Clipping portlet on your page.
Note:
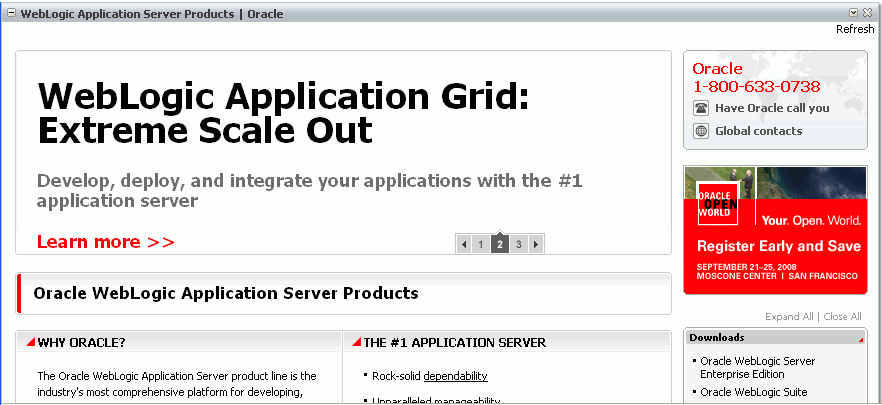
Web Clipping portlets support additional properties that influence the way the portlet is rendered. For information, see Section 34.3, "Setting Web Clipping Portlet Properties."Figure 34-7 shows the selected web clipping in your Web Clipping portlet.
Figure 34-7 Clipped Content in a Web Clipping Portlet
Note:
The Refresh link in the Web Clipping portlet retrieves data from cache or from the originating web site, depending upon the value you provided for Expires (minutes).This section walks you through a demonstration of how you can enable end users to personalize their own view of the content in a Web Clipping portlet. It includes the following subsections:
In this task, you navigate to the Oracle Technology Network (OTN) and search for specific information to clip.
To select a clipping from OTN:
From the Actions menu on the portlet header, select Customize.
The Find a Web clipping page opens.
In the URL Location field, enter the following URL, and click Start:
http://www.oracle.com/technology/products/ias/portal/index.html
OTN displays the Portal page.
Enter a search string in the Search field at the top of the page. For this example, enter web clipping portlet, then click the Search icon.
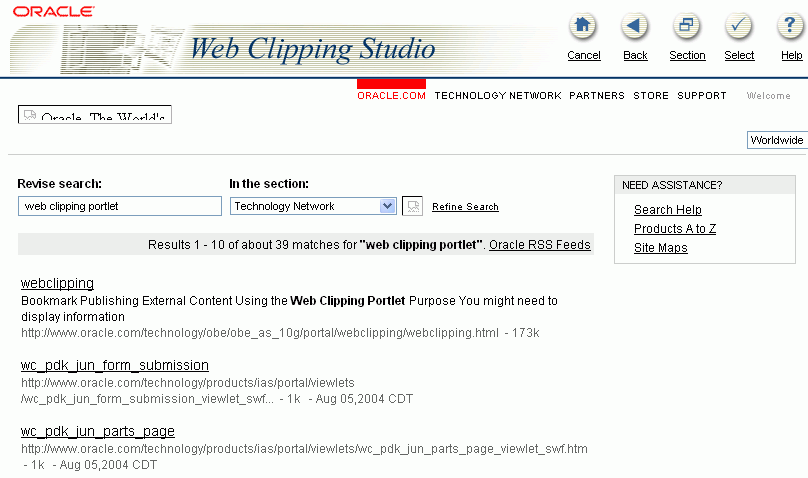
Results display in Web Clipping Studio (Figure 34-8).
Figure 34-8 OTN Search Results in Web Clipping Studio
Click Section on the Web Clipping Studio banner.
Web Clipping Studio divides the target web page into clippable sections (Figure 34-9).
Figure 34-9 The Choose Links on an OTN Search Results Page in Web Clipping Studio
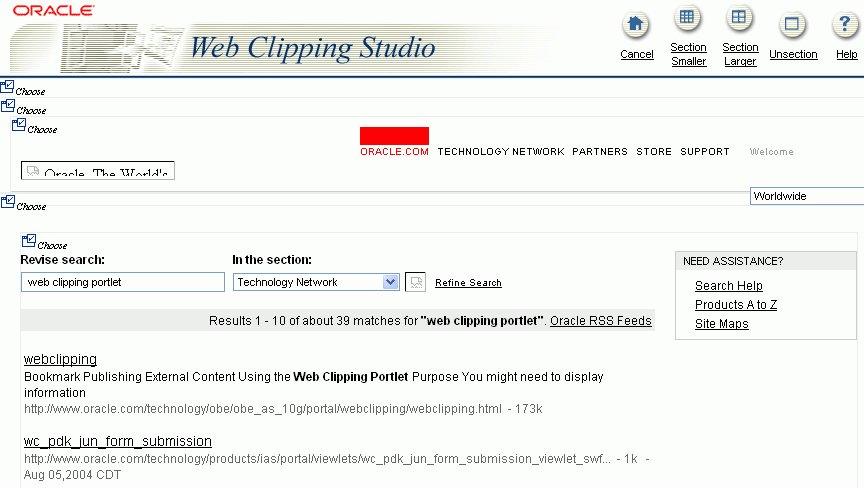
At the top-left corner of the area that contains the search results (just above the text Revise search), click Choose.
A preview of the search result section opens.
Click Select to confirm that the search result section is the one you want to clip.
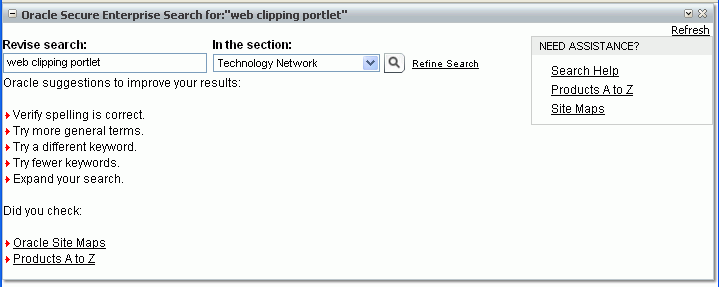
On the Find a Web clipping page, click OK to display the clipped content in the Web Clipping portlet (Figure 34-10).
Figure 34-10 Clipped Content Displayed in Web Clipping Portlet
In this task, you edit the properties of the Web Clipping portlet to enable users to display different search results in the portlet.
To parameterize a Web Clipping portlet:
Once you have clipped the OTN search results as described in Section 34.2.3.1, "Selecting a Clipping from OTN," select Customize from the Web Clipping portlet's Actions menu.
In the Find a Web clipping page, modify the following items in the Properties section:
From the URL Rewriting dropdown list, choose Inline to specify that link targets open inside the portlet, rather than in a new browser window.
In the Title field, enter OTN Search. This title appears in the header of your Web Clipping portlet and on the pages where users can personalize parameters for the web clipping.
Figure 34-11 shows the Properties and Parameterize Inputs sections of the Find a Web clipping page.
Because the content displayed in the portlet was reached by entering information in the Search field on OTN, you can customize the parameters used by the search to enable users to specify their own search string.
Under the Parameterize Inputs section, select Click to start parameterizing, and make the following changes in the parameters table:
In the Parameters column, select keyword from the dropdown list.
In the Personalizable column, select Param1 from the dropdown list.
In the Display Name column, enter OTN Search.
Make sure that Default Value displays web clipping portlet to be sure you have selected the right parameter.
Click OK to display the default search results in the Web Clipping portlet.
In this task, you personalize a Web Clipping portlet to display different search results in the portlet.
To personalize a Web Clipping portlet to display different search results:
Select Personalize from the Actions menu on the Web Clipping header.
Note:
When running a portlet that has an Edit mode, the Personalize option on the portlet's Actions menu appears only to authenticated users. Unauthenticated or public users do not see the Personalize option. What this means is that, for personalization to work, some form of security must be implemented for your application.If you are a developer creating portlets and pages, then you may want a quick way to test the Edit mode of your portlet without creating a complete security model for your application. For information about how you can quickly add the necessary security for testing portlet personalization, see the "Configuring Basic Authentication for Testing Portlet Personalization" section in the Oracle Fusion Middleware Developer's Guide for Oracle WebCenter.
In the resulting Find a Web clipping page, scroll down to the Inputs section.
Notice that the parameter field for the search string is labeled OTN Search, as you specified for the Display Name while parameterizing the Web Clipping portlet. (Figure 34-12).
Figure 34-12 A Web Clipping in the Personalize Mode
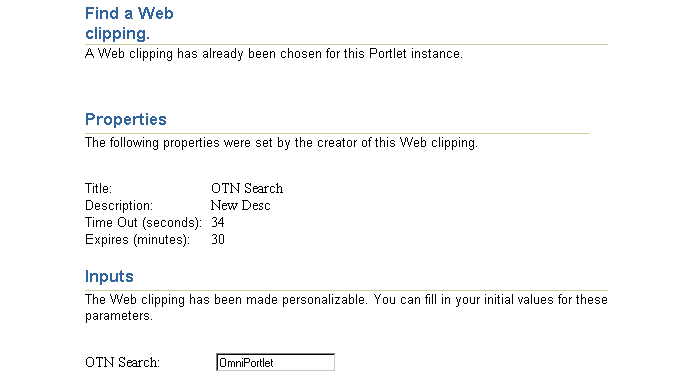
In the OTN Search field, enter a different search string.
For example, enter WebCenter.
Click OK.
The Web Clipping portlet now displays the search results for WebCenter from OTN.
The Web Clipping portlet has associated properties that control the look and feel of the portlet on the page. Users with sufficient privileges can access these properties through the Component Properties dialog (Figure 34-13). Many component properties are common to all portlets, and the method for accessing properties is the same from portlet to portlet. Common component properties and how to access them are discussed in Section 10.4, "Setting Properties on Page Content."
The properties on the Parameters tab of the Component Properties dialog control the default portlet content and facilitate the wiring of the portlet to page parameters and page definition variables. These properties are unique to the portlet. For more information, see Section 10.4.3, "Working with Component Parameters." For information about wiring pages and components, see Chapter 11, "Wiring Pages, Task Flows, Portlets, and UI Components."
Changes to the properties on the Display Options, Style, and Content Style tabs affect the appearance and behavior of the portlet for all users. For more information, see Section 10.4.4, "Working with Component Display Options" and Section 10.4.7, "Working with Style and Content Style Properties."
All properties on the Parameters and Display Options tabs provide access to an Expression Language (EL) editor, which you can use to select or specify a variable value instead of a constant value. Click the Edit icon next to a property field to open the editor. For more information about using the editor and for descriptions of common EL expressions, see Section 10.4.5, "Using Expression Language (EL) Expressions with Component Properties."
Table 34-1 describes the properties that are unique to the Web Clipping portlet.
Table 34-1 Web Clipping Portlet Component Properties
| Property | Description | Location |
|---|---|---|
|
|
Use to map page parameters to the parameters specified when the Web Clipping portlet was defined. These parameters enable you to contextually wire portlets and pages. For more information, see Chapter 11, "Wiring Pages, Task Flows, Portlets, and UI Components." |
Parameters tab |
|
|
Display Options tab |
|
|
|
Use to initialize a partial page refresh, which is a way of refreshing an area of a page without having to redraw the entire page. |
Display Options tab |
|
|
Use to render the portlet in an inline frame (IFRAME), omit an IFRAME, or let the portlet decide. Valid values are:
Placing a portlet inline on a page provides a better user experience as compared to placing it in an IFRAME. However, at times, it may be required to include a portlet in an IFRAME. For example:
|
Display Options tab |
|
|
Enter a title for the Web Clipping portlet, to display in the portlet header. |
Display Options tab |
When you use Web Clipping, you should be aware of the following limitations.
If the site that you intend to clip uses a large amount of JavaScript to manipulate cookies or uses the document.write JavaScript method to modify the HTML document being written, then you may not be able to clip content from the site.
When you integrate with partner applications (by using mod_osso), you cannot clip directly through those partner applications in an authenticated manner. However, you can use partner applications through the external application framework.
You cannot use the Web Clipping portlet to clip Oracle Portal pages and ADF pages. As a workaround, reregister the same producer in the destination portal and edit the portal manually.
You cannot use the Web Clipping portlet to clip a web page that contains multiple frames, that is, a frameset.
Note the following about Web Clipping and the use of a CSS:
If a web page contains multiple portlets that use a CSS, then they should not conflict if the CSS uses distinct style names, such as OraRef, to specify a style within an HTML tag, rather than using an HTML tag name, such as <A>, as the name of the style.
If one portlet uses a CSS, and that CSS overwrites the behavior of HTML tags by using the name of the tag, such as <A>, as the name of the style, and a second portlet on the same page does not use a CSS, the second portlet is affected by the style instructions of the CSS of the first portlet.
If two portlets on the same page use a different CSS and each CSS overwrites the behavior of HTML tags by using the name of an HTML tag, such as <A>, as the name of the style, then the style that is displayed depends on the browser.
Web Clipping checks for globalization support settings in the following way:
Web Clipping checks the Content-Type in the HTTP header for the charset attribute. If this is present, then it assumes that this is the character encoding of the HTML page.
If the charset attribute is not present, then Web Clipping checks the HTML META tag on the page to determine the character encoding.
If the HTML META tag is not found, then Web Clipping uses the charset in the previous browsed page. If this is the first page, then it defaults to the ISO-8859-1 character encoding.
If the value of the charset for Content-Type or META tag is not supported (for example, if the charset was specified as NONE), then Web Clipping uses the default character set, ISO-8859-1, not the charset in the previously browsed page.
To use the Web Clipping portlet, you must use Microsoft Internet Explorer 5.5 or later for Windows 2000, or Microsoft Internet Explorer 6.0 or later for Windows XP. If you use browser versions older than these, then you may encounter JavaScript errors.
This section provides information to help you troubleshoot problems you may encounter while using Web Clipping.
Encountered "x" at line n, column n. Was expecting one of : "x", "y" ...
Parser error message written to the log file.
Problem
The web content displayed in the Web Clipping portlet contains invalid HTML or JavaScript.
Solution
This is a site-specific issue, not a Web Clipping error. Contact the site's administrator for assistance.