| Oracle® Fusion Middleware Tutorial for Oracle WebCenter Developers 11g Release 1 (11.1.1) Part Number E10273-04 |
|
|
View PDF |
| Oracle® Fusion Middleware Tutorial for Oracle WebCenter Developers 11g Release 1 (11.1.1) Part Number E10273-04 |
|
|
View PDF |
This chapter tells you how to obtain the sample files and install the Tutorial and Oracle WebCenter database schemas required for completing this Tutorial. These files and database schemas are necessary for building the complete sample application. You must have administrator's access to the database where you will install the database schemas.
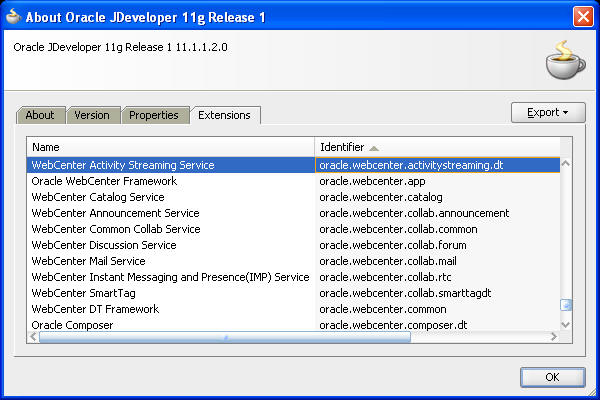
Ensure that you have installed Oracle JDeveloper 11g Release 1 (11.1.1) and the Oracle WebCenter extension (11.1.1). If you are not sure whether you have the WebCenter extension, you can verify this by opening Oracle JDeveloper, then About from the Help menu, then click the Extensions tab. At the top of the About dialog, you should see Oracle JDeveloper 11g Release 1 11.1.1.2.0. On the Extensions list, sort by Identifier to locate the oracle.webcenter.* components. Figure 2-1 shows the Oracle WebCenter components listed in JDeveloper.
Figure 2-1 Oracle WebCenter Framework in Oracle JDeveloper

If you do not see these components, you must install the WebCenter extension.
To install the WebCenter extension to Oracle JDeveloper using the Update Center:
Launch Oracle JDeveloper.
If the Select Default Roles dialog displays, select Default Role to enable all technologies, and click OK.
If a dialog displays asking if you want to migrate settings from an earlier version, click No.
In Oracle JDeveloper, choose Check for Updates from the Help menu.
On the Welcome page, click Next.
Select Search Update Centers, then click Next.
On the Updates page, search for the WebCenter extension, select it, then click Finish.
When prompted, restart JDeveloper.
For more information on obtaining and installing Oracle WebCenter Framework, see the Oracle WebCenter page on OTN (http://webcenter.oracle.com).
At various points throughout this Tutorial, you'll be asked to include certain content and images in your application. This material is contained in a ZIP file, which you can download by following these instructions:
To download the sample Tutorial files:
Open a browser, and in the Address field, enter the URL of the WebCenter Documentation page on OTN:
http://www.oracle.com/technetwork/middleware/webcenter/documentation/index.html
In the Introduction to Oracle WebCenter section of Release Notes, next to Oracle Fusion Middleware Tutorial for WebCenter Developers, click the Supporting Files link.
In the Opening webcentertutorialcontent-11120-128869.zip dialog, click OK.
Unzip the file to a local drive, such as C.
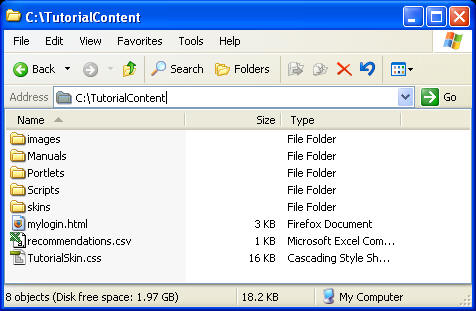
Figure 2-2 shows the file unzipped to: C:\TutorialContent.
Figure 2-2 Sample Content ZIP File Unzipped

Some examples we will use in this Tutorial will access data using SQL. You must add the schema to your database to complete these lessons. However, if you do not have access to a database, you can still complete many of the other lessons in this Tutorial.
You can either install the Tutorial schema using SQL*Plus or by using Oracle JDeveloper. This section shows you how to create the database connection for the database where you will install the Tutorial schema, then add the schema to the database, all within JDeveloper.
To complete the steps in this section, you will need the connection information (such as the location and port number) for your database containing the schema. Take note of this information for use later in the Tutorial.
Note:
If you see an error that says:DROP USER FOD CASCADE*ERROR at line 1:ORA-01918: user 'FOD' does not exist,
you can ignore this message, as it means that the schema does not yet exist.
To add the sample schema to your database:
In Oracle JDeveloper, from the Tools menu, choose Database, then choose SQL Worksheet.
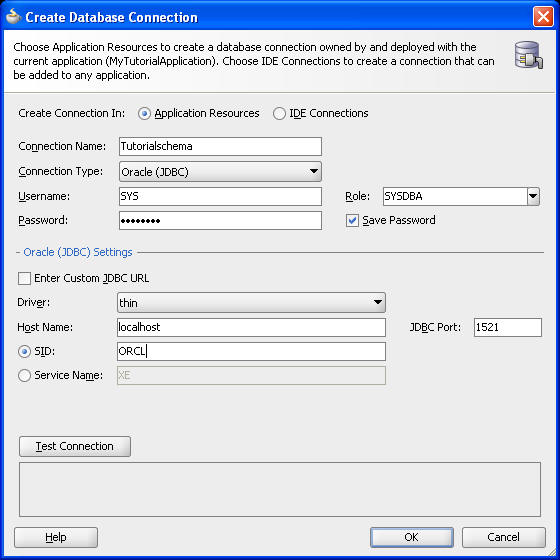
In the Create Database Connection dialog, enter connection information for the system administrator of your database (Figure 2-3):
Connection Name: TutorialSchema
Connection Type: Oracle (JDBC)
User name: <your system administrator user ID>
Password: <your system administrator password>
Role: Choose the appropriate role from the Role list (for example, SYSDBA or SYSOPER; if using the SYSTEM user or a user that does not need the SYSDBA or SYSOPER role, then leave this field blank)
Host: <host name of your database> (for example, localhost)
JDBC Port: <port> (for example, 1521)
SID: <system identifier for the database with the same JDBC port> (for example, ORCL)
Figure 2-3 Database Connection for the Tutorial Schema

Click OK to close the Create Database Connection dialog, then click OK again to close the Select Connection dialog. The SQL Worksheet should display. Otherwise, choose SQL Worksheet from the Tools menu, then select the newly created connection and click OK.
In the SQL Worksheet panel, create the schema by entering the following command (at the bottom of the page that displays, you will see that the tab is called "SQL Worksheet"):
create user fod identified by fusion;
Ensure your cursor is in the SQL statement you just entered, then click the Execute Statement icon at the top of the panel.
In the SQL Worksheet panel, enter the following command:
grant connect, resource to fod identified by fusion;
In doing so, you enable the credentials in the script we provided to access the schema in your database.
Click the Execute Statement icon (the green arrow) at the top of the panel.
From the Tools menu, choose Database, then choose SQL Worksheet.
In the Select Connection dialog, click the pencil icon to edit the connection.
Modify the connection to use the new credentials. Change the Username to fod and the Password to fusion, then click OK to close the Edit Database Connection dialog.
Click OK to close the Select Connection dialog.
Close the SQL Worksheet panel.
Start a new SQL Worksheet using the new connection. Choose SQL Worksheet from the Tools menu again.
Create the schema objects by executing the buildFromJDev.sql script that is located in the Scripts folder (c:\TutorialContent\Scripts):
@@<path>/buildFromJDev.sql
You can ignore the warnings in the Log window:
WARNING: java.io.PipedInputStream.checkStateForReceive(PipedInputStream.java:244)
java.io.IOException: Pipe closed
Note:
You can also manually install the schema using SQL*Plus by using the provided script,c:\TutorialContent\Scripts\build.sql.To use the Tag, Links, and People Connections services, you must have the WebCenter schema installed in your database. You can do this by using the built-in SQL Worksheet utility that you used in the previous step.
To install the WebCenter schema:
From the Tools menu, select SQL Worksheet.
In the Select Connection dialog, click the pencil icon to edit the connection.
Modify the connection to use an administrator username and password, such as SYS (using the SYSDBA role) then click OK.
Click OK to close the Select Connection dialog.
From the Tools menu, choose SQL Worksheet.
Enter the following SQL statement in the SQL Worksheet panel:
@@JDEV_HOME/jdeveloper/jdev/extensions/oracle.webcenter.install/sql/oracle/wc_schema.sql
where JDEV_HOME is the location where JDeveloper is installed on your machine.
Click the Execute Statement icon, or press F9, to run the script.
At the prompt, enter webcenter as the name for the schema and a password for the schema, such as welcome1. The name of the schema must be webcenter.
If prompted for the Default Tablespace and Temporary Tablespaces, re-enter the default values users and temp, then accept them.
Now that you have set up the files and the database for your environment, you are ready to begin!