| Oracle® Fusion Middleware SmartUpgrade User's Guide 11g Release 1 (11.1.1) Part Number E15878-02 |
|
|
View PDF |
| Oracle® Fusion Middleware SmartUpgrade User's Guide 11g Release 1 (11.1.1) Part Number E15878-02 |
|
|
View PDF |
This chapter describes how to use SmartUpgrade within Oracle JDeveloper. Refer to the following sections for more information:
To use SmartUpgrade with Oracle JDeveloper, you must install Oracle JDeveloper 11g Release 1 (11.1.1.1.0) or later.
When you install Oracle JDeveloper 11g, you must also install the Oracle WebLogic Server software that is part of the Oracle JDeveloper installation package. SmartUpgrade automatically uses required libraries and other software from the Oracle WebLogic Server software that you install with Oracle JDeveloper.
Before you begin, verify that the Oracle JDeveloper SmartUpgrade extension has been installed and configured:
Start Oracle JDeveloper.
Select File > New.
In the Categories tree of the New Gallery, select General then Applications.
In the Items list, verify that the Java EE Upgrade Application option appears in the list of Items, as shown in Figure 2-1.
If this option does not appear in the list, then refer to Section 1.7, "Downloading and Installing SmartUpgrade".
Figure 2-1 Java EE Upgrade Application Item in the New Gallery Dialog
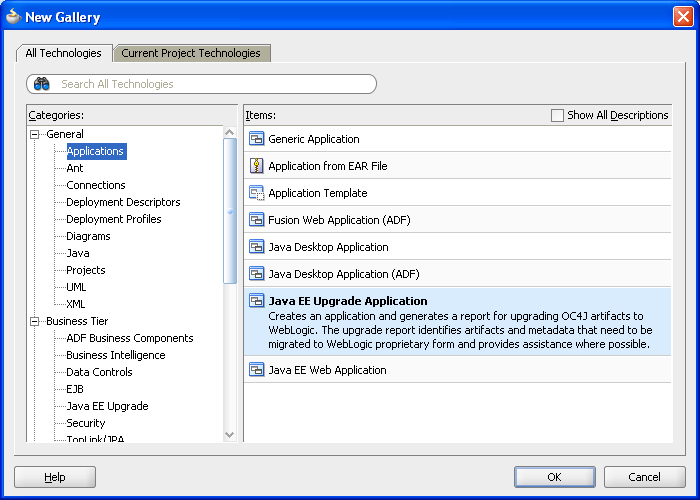
To generate a SmartUpgrade report or to optionally generate artifacts to help you upgrade your applications, you use the Java EE Upgrade Wizard.
Refer to the following sections for more information:
There are two ways to start Java EE Upgrade wizard, which guides you through the process of analyzing your application with SmartUpgrade.
The following sections describe these two options:
To start the Java EE Upgrade wizard and save the results to a new Oracle JDeveloper application:
Choose File > New to display the New Gallery.
In the Categories tree, select General then Applications.
In the Items list, double-click Java EE Upgrade Application(Figure 2-1).
To start the Java EE Upgrade wizard and save the results to a new project within an existing Oracle JDeveloper application:
Choose File > New to display the New Gallery.
You can also right-click an existing project and select New from the context menu.
In the Categories tree, select General then Projects.
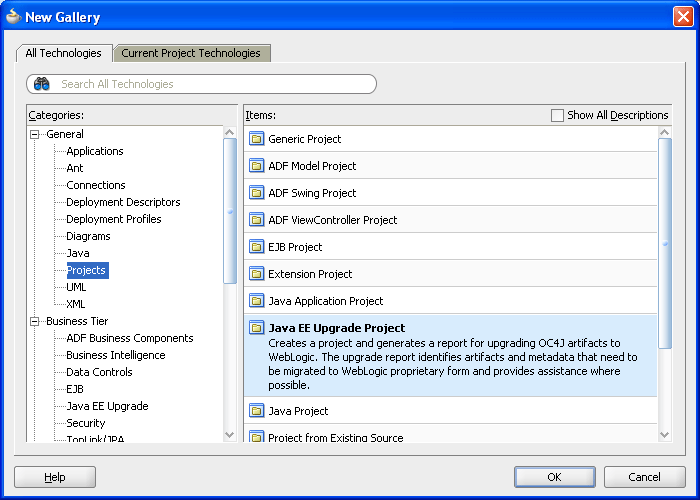
In the Items list, double-click Java EE Upgrade Project (Figure 2-2).
Figure 2-2 Java EE Upgrade Project Item in the New Gallery Dialog
Refer to the following sections for information about using the Java EE Upgrade wizard:
Types of Archives and Projects Supported by the SmartUpgrade Oracle JDeveloper Extension
Limiting the Analysis to Specific SmartUpgrade Rule Categories
Analyzing Applications Deployed on Oracle Application Server 10g Release 2 (10.1.2)
Table 2-1 describes the pages of the Java EE Upgrade wizard. Note that the pages that appear will vary depending on how you started the wizard and the type of report you want to generate.
Table 2-1 Summary of the Java EE Upgrade Application Wizard Pages
| Page Name | Description | More Information |
|---|---|---|
|
This page appears only if you use the Java EE Upgrade Application wizard. Enter a name for the new Oracle JDeveloper application that SmartUpgrade creates after analyzing your OC4J application. The resulting upgrade report will be saved in a project inside the application. |
Press F1 or click Help on the wizard page. |
|
|
Enter a name for the default project that SmartUpgrade creates after analyzing the selected application or project. The resulting upgrade report will be saved in this project. |
Press F1 or click Help on the wizard page. |
|
|
Upgrade Report Type (Figure 2-3) |
Select the type of upgrade report you want to create. Note that if you are creating a new application, then the option to analyze an existing application does not appear on the page. To analyze one or more existing Oracle JDeveloper projects, you must use the Java EE Upgrade Project wizard. |
Press F1 or click Help on the wizard page. |
|
OC4J Artifacts (Figure 2-4) |
The content of this page varies, depending upon the upgrade report type you select on the previous page. Select the enterprise archives, Oracle JDeveloper projects, or OC4J server directory you want to analyze, and specify any related options available on the page. In addition, you can:
|
Press F1 or click Help on the wizard page. Section 2.3.2.3, "Limiting the Analysis to Specific SmartUpgrade Rule Categories" |
|
Required Inputs (Figure 2-5) |
This page appears if the following are true:
|
Section 2.3.3, "Setting Properties on the Required Inputs Page" |
Figure 2-3 Java EE Upgrade Application Wizard - Upgrade Report Type Page
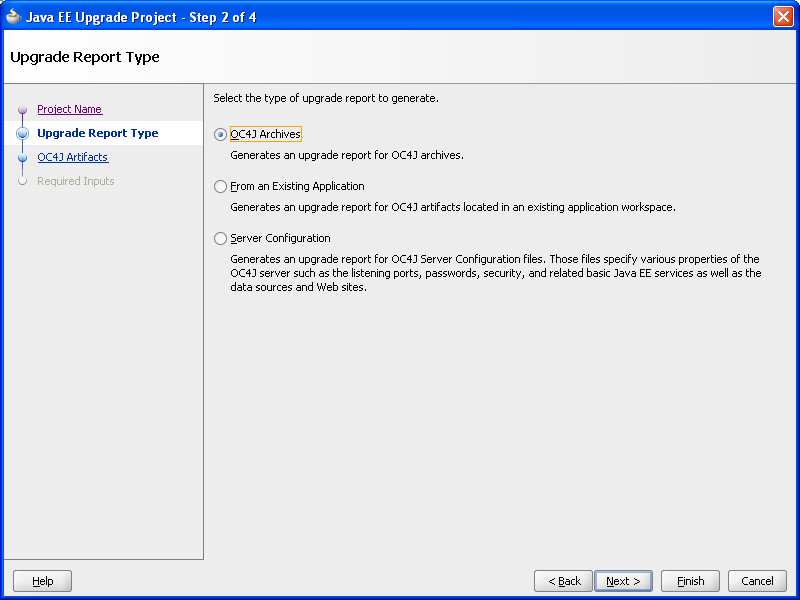
Figure 2-4 Java EE Upgrade Application Wizard - OC4J Artifacts Page When Analyzing an Enterprise Archive
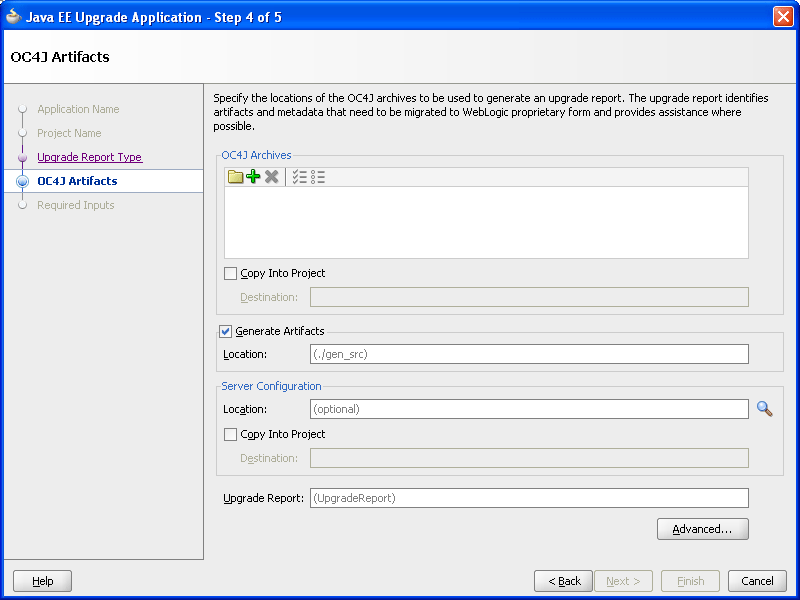
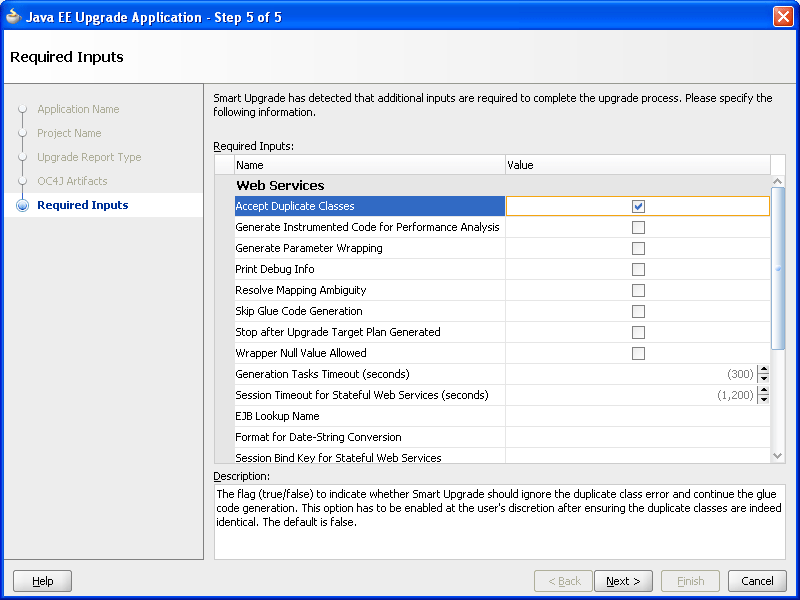
Figure 2-5 Java EE Upgrade Application Wizard - Required Inputs Page
When running SmartUpgrade from Oracle JDeveloper, you can analyze the following:
An existing enterprise archive (EAR) file, Web archive (WAR) file, Java archive (JAR) file, or WinRAR (RAR) file.
One or more Oracle JDeveloper projects within the current Oracle JDeveloper application
If you want to analyze Web services within an application, you must select an EAR file. You cannot analyze or generate artifacts for Web services within an open Oracle JDeveloper application or project.
By default, SmartUpgrade generates a report and optionally generates artifacts by applying all rule categories to the selected archive or OC4J server configuration.
However, if you want to limit the size of the report, or if you want to focus on a particular aspect of your application, you can limit the analysis to a specific set of SmartUpgrade rule categories.
For example, to analyze only the data-source configuration of the myApp.ear application:
Start the Java EE Upgrade wizard, as described in Section 2.3.1, "Starting the Java EE Upgrade Wizard".
On the OC4J Artifacts page in the wizard, click Advanced to display the Rules Management dialog box.
Use the check boxes to select the rules categories you want SmartUpgrade to use during the current application analysis.
For a description of the SmartUpgrade rule categories you can apply when generating your reports and, optionally, your application artifacts, refer to Table 3-4.
By default, SmartUpgrade is configured to analyze applications that were previously deployed on Oracle Application Server 10g Release 3 (10.1.3). However, if you are upgrading from 10g Release 2 (10.1.2), you can indicate the specific version of OC4J you are using:
Start the Java EE Upgrade wizard, as described in Section 2.3.1, "Starting the Java EE Upgrade Wizard".
On the OC4J Artifacts page in the wizard, click Advanced to display the Rules Management dialog box.
Select 10.1.3 or 10.1.2 from the OC4J Server Version section of the dialog box.
If the application you are upgrading contains any Web services, data sources, EJBs or other object types for which SmartUpgrade can generate artifacts, then the Java EE Upgrade wizard usually displays the Required Inputs page (Figure 2-5).
For information about setting some the options on this page, refer to the following sections:
You can learn more about the options on the page by referring to the following resources:
Select a option on the page and review the text in the Description field.
Table 3-2, "Summary of Optional SmartUpgrade Command-Line Options"
Table 3-3, "Summary of the Command-Line Options Specific to Generating Artifacts"
Select the Generate Instrumented Code for Performance Analysis property on the Required Inputs wizard page if you want to collect performance data and generate an HTML report that displays the performance impact of the additional code generated for the upgraded application.
After the upgraded Web service is deployed on Oracle WebLogic Server, it will generate an HTML report that summarizes the performance impact of the glue code. If there are multiple Web services, multiple report files will be generated.
For more information, see Section 4.2.3, "Analyzing the Performance Impact of the Web Services Glue Code Generated by SmartUpgrade".
In some cases, when SmartUpgrade is analyzing the artifacts of your application, it might find that some manual steps are required before the application artifacts can be upgraded. In other cases, it might find that some properties that you did not provide are required.
In those cases, a finding appears in the Upgrade Report called, "Web Service Artifact Generation 10.1.3" or "Web Service Artifact Generation 10.1.2". This finding summarizes the state of upgrade process and provides the steps the user should take.
Note that a warning also appears in the SmartUpgrade log window at the bottom of the Oracle JDeveloper window.
In other cases, the "Web Service Artifact Generation" finding describes additional steps you must take before continuing with the Web services upgrade.
To run SmartUpgrade again and continue with the Web services upgrade process:
Right-click the upgrade report in the Oracle JDeveloper Application Navigator and select Regenerate from the context menu (Figure 2-6).
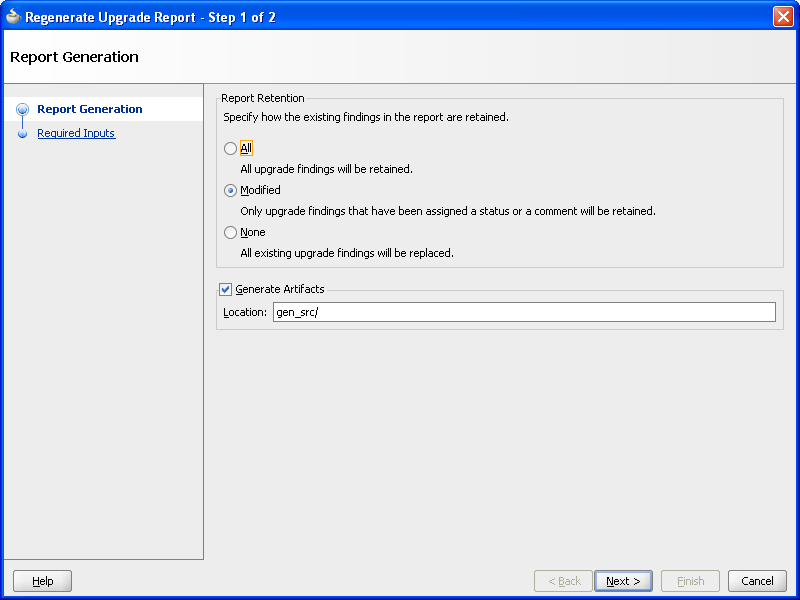
Oracle JDeveloper displays the Report Generation dialog (Figure 2-7). Use this dialog to control whether the original findings in the report are overwritten on SmartUpgrade subsequent run.
If you are using the finding status to keep track of which findings have been implemented and which are currently in progress, select All or Modified.
If you do not select All or Modified, then the entire report is regenerated and any status settings you selected for individual findings will be lost.
For more information, see Section 2.4.5, "Using the Finding Status to Track Your Work".
Click Next to display the Required Inputs dialog box.
Oracle JDeveloper displays the Required Inputs dialog, which is similar to the Required Inputs wizard page that appeared when you first ran SmartUpgrade, except that it contains only the properties you originally supplied, plus the additional properties that are required to continue the upgrade process.
Provide the missing property values and click OK.
SmartUpgrade analyzes the Web services in the application again and attempts to complete the artifact generation. If additional properties are required, you might be prompted to continue the upgrade process again.
Figure 2-6 Selecting Regenerate from the Upgrade Report Context Menu
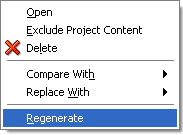
Figure 2-7 Report Generation Screen Displayed When You Choose to Regenerate the SmartUpgrade Report
After you generate a SmartUpgrade upgrade report in Oracle JDeveloper, you can sort and filter the findings. You can use this feature to focus on the most important findings first.
Refer to the following sections for more information:
Using the Upgrade Findings Toolbar to Filter SmartUpgrade Findings
Using the Structure Window to Sort and Filter SmartUpgrade Findings
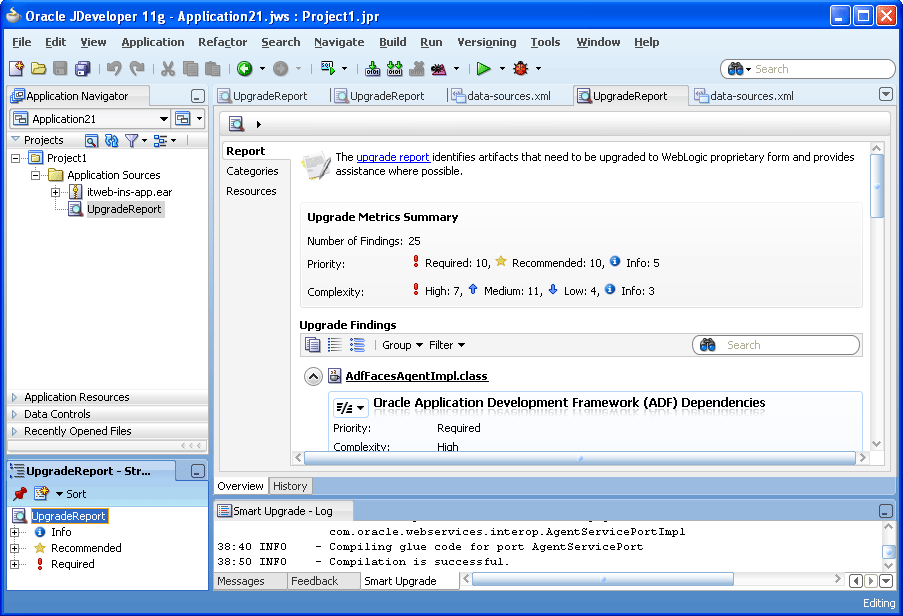
To view the upgrade report, use the Application Navigator to open the project you created with the Java EE Upgrade wizard. Locate the upgrade report under the Application Sources folder in the project and select the upgrade report (Figure 2-8).
Note that the report is divided into three tabs:
The Report tab, which contains a summary of the report and a list containing each finding generated by SmartUpgrade for the selected application
The Categories tab, which lists the categories of SmartUpgrade rules that were applied when generating the report.
The Resources tab, which lists the archives or projects that were analyzed by SmartUpgrade to generate the report.
For more information about the types of information available for each finding on the Report tab, see Section 2.4.2, "Information Available in Each Finding".
Figure 2-8 SmartUpgrade Report in Oracle JDeveloper
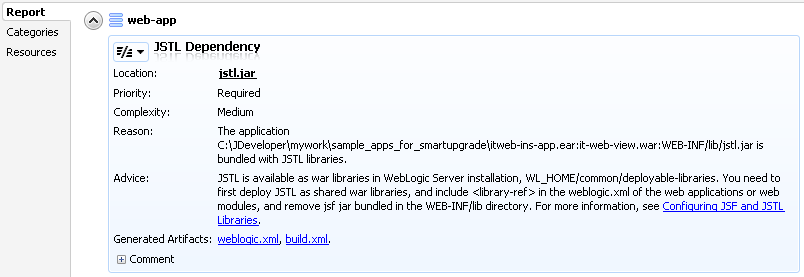
SmartUpgrade provides the following information within each finding within a SmartUpgrade report:
The reason defines why the finding exists. It often identifies a particular element or attribute in the deployment descriptors of the application archive or in the configuration files of the OC4J server. It also identifies the dependency APIs used in the application, which need to be changed before the application can be deployed to Oracle WebLogic Server.
Advice for how to remedy the problem.
The advice identifies the actions you must take to resolve the issues identified in the finding. The advice often includes instructions or references to documentation that can help you modify the application or the Oracle WebLogic Server environment appropriately.
The implications of the finding. The implication is optional (not always shown) and indicates the differences in behavior (if any) that will be noticed in the upgraded application as a result of following the finding's advice.
Links to any generated artifacts associated with the finding. For example, for some data sources, SmartUpgrade generates samples XML code you can use to define the data sources in the application when it is deployed on Oracle WebLogic Server. For more information, see Chapter 4, "Using SmartUpgrade Generated Artifacts".
Figure 2-9 shows a sample finding within a SmartUpgrade report.
Figure 2-9 Sample Finding in a SmartUpgrade Report
If your report contains a long list of findings, you can easily group or filter the list using the Upgrading Findings toolbar (Figure 2-10).
Figure 2-10 Using the Upgrade Findings Toolbar
Table 2-2 describes each of the icons and menus available in the Upgrade Findings toolbar.
Table 2-2 Summary of the Upgrade Findings Toolbar Options
| Icon or Menu | Description |
|---|---|
|
|
Click this icon to copy the contents of the report to the clipboard in regular text format. You can then paste it into a separate document or program. |
|
|
Click this icon to collapse all the findings so you can scroll down and see the main headings for each finding, but not the details. |
|
|
Click this icon to expand all the findings so the detail is displayed for every finding in the report. |
|
Use this submenu to group the findings by finding by artifact, category, complexity, or priority. For example, if you group the findings by priority, all the required findings are listed in the report first, followed by all the findings that SmartUpgrade identifies as recommended, followed by all the findings that are informational. You can also control whether or not the groups are sorted in ascending or descending order. For example, if group your findings by category, you can determine which category of findings appears at the top of the report. |
|
|
Use this submenu to filter the findings by type, priority, or category. When you select an item from this menu, all the findings that do not meet the selected criteria are hidden. For example, you can filter out all but the required findings. |
The structure window (Figure 2-11) under the Oracle JDeveloper navigation pane provides a view of the report structure. You can use this structure window to filter the findings in your report.
Figure 2-11 SmartUpgrade Report Structure Window
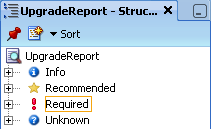
In this default view, you can quickly view all findings of a particular priority. For example, click Required to show only the findings that are marked as "Required."
You can also use the Sort menu in the Structure view to change the list. For example, select Complexity from the Sort menu to show a list of the complexity categories. You can then select one of the categories to view only the findings of that category in the Report window.
At any time, you can click the root node in the structure view (UpgradeReport in Figure 2-11) to view all the findings in the report.
As you review the Upgrade report, note that you can track your progress using the Finding Status menu (Figure 2-12).
For example, for each finding that you finish implementing, select Complete. For those that are not implemented, use the Ignore, Incomplete, or In Progress settings. You can then quickly scan the report to see how much remaining work is required.
Note that if you need to regenerate the report, you must select All or Modified on the Report Generation dialog if you want to don't want the new report to overwrite your status settings.
For more information, see Section 2.3.4, "Continuing with the Upgrade When Generating Artifacts".