| Oracle® Fusion Middleware Upgrade Guide for Oracle Identity Management 11g Release 1 (11.1.1) Part Number E10129-05 |
|
|
View PDF |
| Oracle® Fusion Middleware Upgrade Guide for Oracle Identity Management 11g Release 1 (11.1.1) Part Number E10129-05 |
|
|
View PDF |
This chapter describes how to upgrade your existing Oracle Single Sign-On 10g Release 2 (10.1.2.3) or Oracle Single Sign-On 10g Release 2 (10.1.4.3) to Oracle Access Manager 11g Release 1 (11.1.1.3.0).
This chapter contains the following sections:
Task 3: Use Repository Creation Utility to Install 11g Oracle Access Manager Schemas
Task 4: Install and Configure the Oracle Access Manager Middle Tier
Task 6: Complete Any Required Oracle Access Manager Post-Upgrade Tasks
Before performing any installation or upgrade, you should read the system requirements and certification documentation to ensure that your environment meets the minimum installation requirements for the products you are installing.
For more information, refer to "System Requirements and Prerequisites" in the Oracle Fusion Middleware Installation Planning Guide.
Note:
On AIX platforms, ensure that you have patched your Oracle Internet Directory 10g (10.1.4) to Oracle Internet Directory 10.1.4.3.0 before upgrading to Oracle Access Manager 11g.You can use Oracle Fusion Middleware Upgrade Assistant to upgrade the following:
Oracle Single Sign-On 10g configurations and artifacts
Partner metadata stored by Oracle Single Sign-On 10g Server
Partners registered with Oracle Single Sign-On 10
After you complete the upgrade, Oracle Internet Directory becomes the primary identity store for Oracle Access Manager 11g.
The following components are not upgraded to the Oracle Access Manager 11g environment when you run Upgrade Assistant to upgrade from Oracle Single Sign-On 10g:
Oracle Single Sign-On 10g with Window Native Authentication integration. For more information, see "Configuring Oracle Access Manager to use Windows Native Authentication" in the Oracle Fusion Middleware Integration Guide for Oracle Access Manager.
Logging configuration. For more information see "Logging Component Event Messages" in the Oracle Fusion Middleware Administrator's Guide for Oracle Access Manager.
Oracle Single Sign-On 10g with Oracle Identity Federation integration. For more information see "Integrating Oracle Identity Federation" in the Oracle Fusion Middleware Integration Guide for Oracle Access Manager.
Custom authentication.
X509 configurations. For more information see the Oracle Fusion Middleware Administrator's Guide for Oracle Access Manager.
External Application
Pstore
Multirealm Configuration
Before you upgrade Oracle Single Sign-On 10g to Oracle Access Manager 11g, you must consider your Oracle Single Sign-On 10g infrastructure (Figure 10-1) and depending on the functionality you choose to retain, you must select one of the following scenarios:
Oracle Single Sign-On 10g Infrastructure Before Upgrade
Figure 10-1 illustrates the Oracle Single Sign-On 10g topology, which is the starting point for upgrading to Oracle Access Manager 11g.
Figure 10-1 Oracle Single Sign-On 10g Infrastructure
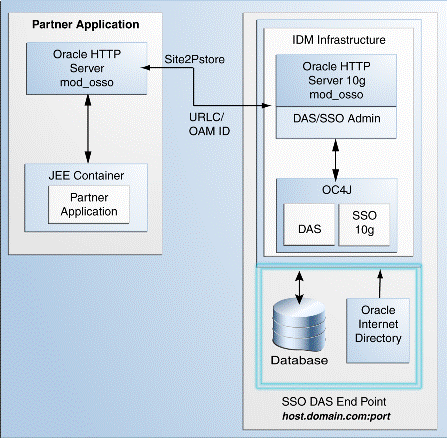
The topology comprises the following:
Partner applications in a JEE container front-ended by Oracle HTTP Server to communicate with the Oracle Single Sign-On infrastructure
Oracle Identity Management infrastructure that includes the Oracle HTTP Server 10g front-ending the Oracle Delegated Administration Services application and the Oracle Single Sign-On Server
The Oracle Single Sign-On endpoint, which consists of a host name and a port number, represents the URL that Oracle Single Sign-On users can use to access the Oracle Single Sign-On Server and the Oracle Delegated Administration Services application.
An example Oracle Single Sign-On endpoint is host.domain.com:port.
Note:
This example is used in this section to illustrate different upgrade scenarios and their Oracle Single Sign-On endpoints.Oracle Delegated Administration Services Required After Upgrading from Oracle Single Sign-On to Oracle Access Manager
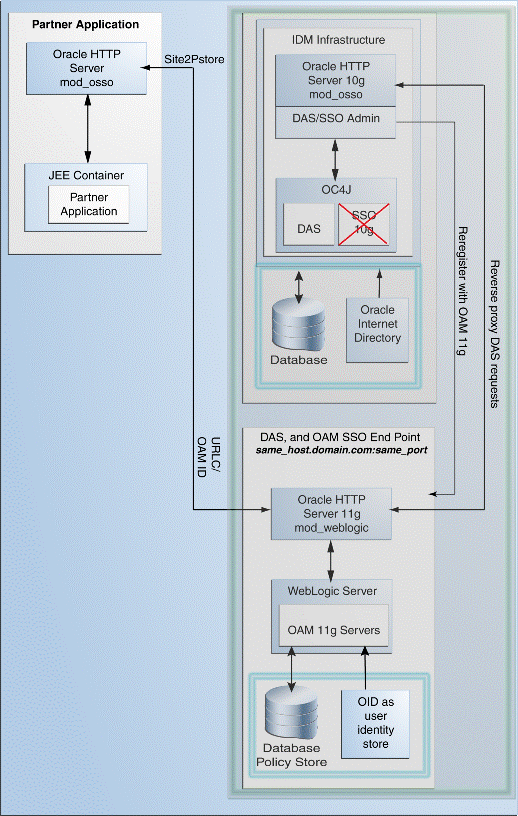
Use this upgrade scenario if you want to continue to use the Oracle Delegated Administration Services application and the Oracle Single Sign-On Admin tool after upgrading from Oracle Single Sign-On 10g to Oracle Access Manager 11g. Figure 10-2 illustrates the scenario.
Note the following points when using this upgrade scenario:
Use this scenario if you are using Oracle Portal, Oracle Forms, Oracle Reports, or Oracle Discoverer partner applications because you require Oracle Delegated Administration Services and Oracle Single Sign-On Admin. Upgrade all partner applications at once.
The Oracle Delegated Administration Services application runs on a new port.
Any Oracle Delegated Administration Services requests from partner applications, such as Oracle Portal, arrive at the Oracle HTTP Server 11g, which front-ends Oracle Access Manager 11g. Such requests are redirected to Oracle HTTP Server 10g port, which front-ends the Oracle Delegated Administration Services 10g application.
Note:
You must reregister Oracle Delegated Administration Services and Oracle Single Sign-On Admin with Oracle Access Manager 11g because their port is changed.You are using the same Oracle HTTP Server 10g port that front-ended Oracle Single Sign-On 10g as the new port for Oracle Access Manager 11g. Therefore, the Oracle Single Sign-On 10g server goes down.
The Oracle Single Sign-On-Oracle Delegated Administration Services endpoint (same_host.domain.com:same_port) remains the same for all the partner applications.
After you perform the upgrade, Oracle Internet Directory is selected as the user identity store automatically.
Figure 10-2 Oracle Delegated Administration Services Required After Upgrading from Oracle Single Sign-On
To use this upgrade scenario, follow the steps listed in Table 10-1.
Oracle Delegated Administration Services Required, but Oracle Single Sign-On Admin Not Required After Upgrading from Oracle Single Sign-On to Oracle Access Manager 11g
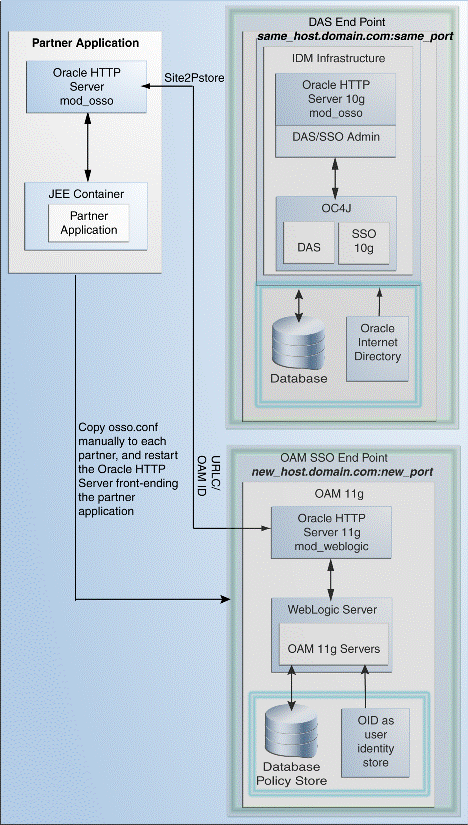
Use this upgrade scenario if you do not require the Oracle Single Sign-On Admin tool application, but you require the Oracle Delegated Administration Services application after upgrading from Oracle Single Sign-On 10g to Oracle Access Manager 11g. Figure 10-3 illustrates the scenario.
Note the following points when using this upgrade scenario:
You are using the Oracle HTTP Server 10g port for Oracle Delegated Administration Services. Therefore, you must install Oracle Access Manager 11g on a different machine.
Upgrade your partner applications in a phased manner.
Oracle Single Sign-On will no longer work after the upgrade. However, Oracle Delegated Administration Services will continue to work.
You must copy the osso.conf files generated during the upgrade manually for each Oracle HTTP Server/mod_osso fronting a set of partner applications. This step associates these applications with Oracle Access Manager as their new Oracle Single Sign-On provider. This step is also necessary for Oracle Delegated Administration Services.
The Oracle Delegated Administration Services endpoint (same_host.domain.com:same_port) remains the same for all the partner applications.
The Oracle Access Manager Oracle Single Sign-On endpoint is new, such as new_host.domain.com:new_port.
After you perform the upgrade, Oracle Internet Directory is selected as the user identity store automatically.
Figure 10-3 Oracle Single Sign-On Administration Server Not required
To use this upgrade scenario, follow the steps listed in Table 10-1.
Oracle Delegated Administration Services Not Required After Upgrading from Oracle Single Sign-On to Oracle Access Manager
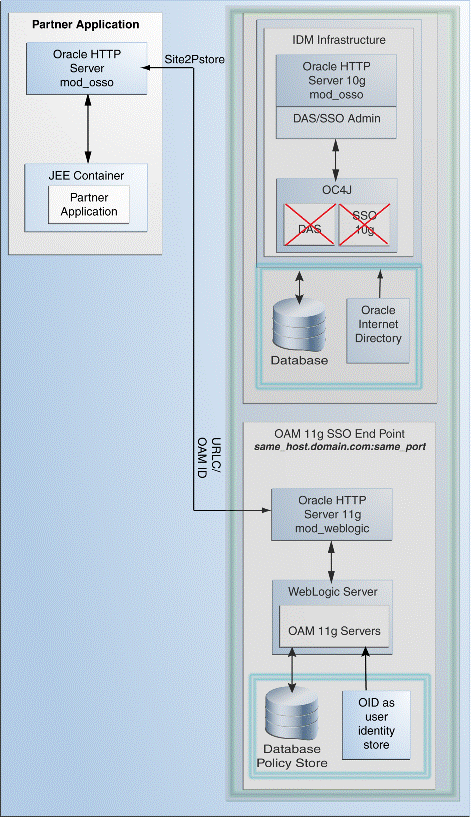
Use this upgrade scenario if you do not require the Oracle Delegated Administration Services application or the Oracle Single Sign-On Admin tool. Figure 10-4 illustrates the scenario.
Note the following points when using this upgrade scenario:
Oracle Single Sign-On and Oracle Delegated Administration Services will no longer work after the upgrade.
Upgrade all partner applications at once.
You are using the same Oracle HTTP Server 10g port that front-ended Oracle Single Sign-On 10g as the new port for Oracle Access Manager 11g. Therefore, the Oracle Single Sign-On 10g server as well as the Oracle Delegated Administration Services application cannot be accessed.
The Oracle Single Sign-On endpoint (same_host.domain.com:same_port) remains the same for all the partner applications.
After you perform the upgrade, Oracle Internet Directory is selected as the user identity store automatically.
Figure 10-4 Oracle Delegated Administration Services Not Required
To use this upgrade scenario, follow the steps listed in Table 10-1.
Table 10-1 describes the Oracle Single Sign-On 10g upgrade scenarios.
Table 10-1 Upgrade Scenarios and Tasks
| Scenario | Steps |
|---|---|
|
Complete the following tasks: |
|
|
Complete the following tasks: |
|
|
Complete the following tasks: |
Before you begin the upgrade process, consider the topology you currently have in Oracle Single Sign-On 10g (10.1.2 and 10.1.4) as well as any requirements for your Oracle Fusion Middleware 11g environment.
For more information, refer to Chapter 9, "Oracle Single Sign-On Topologies".
When you are upgrading an Oracle Access Manager environment, you must ensure that the version of the database where you plan to install the Oracle Access Manager schemas is supported by Oracle Fusion Middleware 11g.
You can install a new database, or upgrade your existing database to a supported version.
For instructions on verifying that your database meets the requirements of Oracle Fusion Middleware 11g, see "Upgrading and Preparing Your Databases" in the Oracle Fusion Middleware Upgrade Planning Guide.
When you are upgrading to Oracle Access Manager, use the Repository Creation Utility to install the schemas in the database you identified and prepared in Task 2: If Necessary, Upgrade the Oracle Database.
For more information, refer to the following sections:
Running Repository Creation Utility for Oracle Access Manager
Selecting the Schemas Required for Oracle Access Manager Upgrade
To run the Repository Creation Utility to install the Oracle Access Manager schema in the database, refer to the following resources:
Oracle Fusion Middleware Installation Guide for Oracle Identity Management
Oracle Fusion Middleware Repository Creation Utility User's Guide
After you start the Repository Creation Utility, follow the instructions on the Repository Creation Utility screens to connect to the database and create the required schemas.
You can use Repository Creation Utility to install the schemas required for all of the Oracle Fusion Middleware software components that require a schema. However, you do not need to install all the schemas unless you plan to install a complete Oracle Fusion Middleware environment and you plan to use the same database for all the Oracle Fusion Middleware component schemas.
For Oracle Access Manager upgrade, you must select the following schemas when you are prompted by the Repository Creation Utility:
Expand AS Common Schemas, and select the Metadata Services schema in the category.
This schema supports Oracle Fusion Middleware Metadata Services (MDS), which is required by the Oracle Access Manager component.
Expand Identity Management, and select Oracle Access Manager schema.
Depending on the upgrade scenario you choose, you must complete one of the following tasks:
Install Oracle Access Manager 11g Using Oracle Single Sign-On 10g Host Name and Port Number
Install Oracle Access Manager 11g Using New Host Name or New Port Number
Table 10-2 lists the steps to install and configure the Oracle Access Manager middle for using the Oracle Delegated Administration Services application and the Oracle Single Sign-On Admin tool after upgrading from Oracle Single Sign-On 10g to Oracle Access Manager 11g.
Table 10-2 Steps to Install and Configure the Oracle Access Manager Middle Tier
| Step | Description | Section |
|---|---|---|
|
1 |
Installing Oracle WebLogic Server and Creating the Oracle Middleware Home |
See section "Installing Oracle WebLogic Server 10.3.3 and Creating the Oracle Middleware Home" in the Oracle Fusion Middleware Installation Guide for Oracle Identity Management. For more information about the Middleware home, see "Understanding Oracle Fusion Middleware Concepts" in the Oracle Fusion Middleware Administrator's Guide. |
|
2 |
Stopping and Configuring the Oracle HTTP Server 10g |
|
|
3 |
Installing Oracle HTTP Server 11g |
Install Oracle HTTP Server 11g and specify the Oracle HTTP Server 10g port number. For more information, see Oracle Fusion Middleware Installation Guide for Web Tier. |
|
4 |
Installing Oracle Access Manager |
See "Installing OAM" in the Oracle Fusion Middleware Installation Guide for Oracle Identity Management. |
|
5 |
Configuring Oracle Access Manager |
See "Configuring Oracle Access Manager (OAM)" in the Oracle Fusion Middleware Installation Guide for Oracle Identity Management. |
|
6 |
Configuring Node Manager to Start Managed Servers |
To configure Node Manager, refer to the section "Configuring Node Manager to Start Managed Servers" in the Oracle Fusion Middleware Administrator's Guide. |
|
7 |
Starting the Oracle WebLogic Server domain |
See section "Starting the Stack" in the Oracle Fusion Middleware Installation Guide for Oracle Identity Management. |
|
8 |
Front-ending the Oracle Access Manager Managed Server with the Oracle HTTP Server 11g |
See Front-Ending Oracle Access Manager Managed Server with Oracle HTTP Server 11g |
|
9 |
Registering the Oracle HTTP Server 10g as a Partner Application |
See Registering Your Applications as Partner Applications of Oracle Access Manager 11g. |
|
10 |
Redirecting the OIDDAS Request to the Oracle HTTP Server 10g server |
See Redirecting the Partner Application Request to Oracle HTTP Server 10g server. |
|
11 |
Verifying the installation |
See "Verifying the OAM Installation" in the Oracle Fusion Middleware Installation Guide for Oracle Identity Management. |
Reconfiguring Oracle HTTP Server 10g
Perform the following steps:
Open the httpd.conf file (Located at ORACLE_HOME\Apache\Apache in Windows or ORACLE_HOME/Apache/Apache in UNIX) in a text editor and change the existing port number and provide a new port number.
Stop Oracle HTTP Server 10g by running the opmnctl command-line tool (Located at ORACLE_HOME\opmn\bin) as follows:
opmnctl stopproc ias-component=<name_of_the_OHS_instance>
Restart Oracle HTTP Server 10g by running the following opmnctl command:
OHS_INSTANCE_HOME/bin/opmnctl stopall
OHS_INSTANCE_HOME/bin/opmnctl startall
Front-Ending Oracle Access Manager Managed Server with Oracle HTTP Server 11g
You must use mod_wl_ohs to front-end Oracle Access Manager Managed Server with Oracle HTTP Server 11g. To do so, complete the following steps:
Open the mod_wl_ohs.conf file (Located at OHS_INSTANCE_HOME\config\OHS\<ohs_instance_name> on Windows) in a text editor and edit as follows:
<IfModule weblogic_module>
             WebLogicHost <OAM Managed Server Host>
             WebLogicPort <OAM Managed Server Port>
             Debug ON
            WLLogFile /tmp/weblogic.log
           MatchExpression *.jsp
      </IfModule>
      <Location />
            SetHandler weblogic-handler
            PathTrim /
            ErrorPage  http:/WEBLOGIC_HOME:WEBLOGIC_PORT/
      </Location>
Restart Oracle HTTP Server 11g by running the following opmnctl command from the 11g ORACLE_INSTANCE (Located at ORACLE_INSTANCE\bin directory on Windows or ORACLE_INSTANCE/bin directory on UNIX):
opmnctl stopall
opmnctl startall
Open the oam-config.xml file (Located at MW_HOME\user_projects\domains\<domain_name>\config\fmwconfig directory on Windows) in a text editor and edit serverhost and serverport entries as shown in the following example:
<Setting Name="OAMSERVER" Type="htf:map">
    <Setting Name="serverhost" Type="xsd:string"><OHS 11G HOST></Setting>
    <Setting Name="serverprotocol" Type="xsd:string">http</Setting>
    <Setting Name="serverport" Type="xsd:string"><OHS 11G PORT></Setting>
    <Setting Name="MaxRetryLimit" Type="xsd:integer">5</Setting>
</Setting>
Restart the Oracle Access Manager Administration Server and Managed server as follows:
On Windows:
MW_HOME\user_projects\domains\domain_name\startWebLogic.cmd
MW_HOME\user_projects\domains\domain_name\bin\startManagedWebLogic.cmd oam_server1
On UNIX:
MW_HOME/user_projects/domains/domain_name/startWebLogic.sh
MW_HOME/user_projects/domains/domain_name/bin/startManagedWebLogic.sh oam_server1
Registering Your Applications as Partner Applications of Oracle Access Manager 11g
You must register the Oracle Internet Directory and Oracle Delegated Administration Services deployed on Oracle HTTP Server 10g partners with Oracle Access Manager 11g. To do so, complete the following steps:
Log in to the Oracle Access Manager console.
Click the System Configuration tab.
In the Welcome page, select Add OSSO Agents.
In the Create OSSO Agent page, enter the following details:
Agent Name: The identifying name for the mod_osso Agent. Agent Base URL: The required protocol, host, and port of the computer on which the Web server for the agent is installed. For example, http://ohs_host:port:ohs_port.
Click Apply.
The agent is created and the osso.conf file is generated at DOMAIN_HOME\output\AGENT_NAME (Windows).
Copy the newly generated agent file to Oracle HTTP Server 10g at OHS_CONF\osso.
Restart Oracle HTTP Server 10g by running the following opmnctl command:
OHS_INSTANCE_HOME/bin/opmnctl stopall
OHS_INSTANCE_HOME/bin/opmnctl startall
Redirecting the Partner Application Request to Oracle HTTP Server 10g server
You must use mod_proxy to redirect the Oracle Internet Directory and Oracle Delegated Administration Services request to the Oracle HTTP Server 10g.
Open the Oracle HTTP Server 11g httpd.conf file in a text editor and add entries of Oracle HTTP Server 10g host name and post name front-ending Oracle Internet Directory and Oracle Delegated Administration Services as shown in the following example:
ProxyPass         /oiddas http://pdcasqa14-3.us.abc.com:8888/oiddas
ProxyPassReverse  /oiddas http://pdcasqa14-3.us.abc.com:8888/oiddas
Note:
The above example is using the Oracle HTTP Server 10g port number.Restart Oracle HTTP Server 11g by running the following opmnctl command:
OHS_INSTANCE_HOME/bin/opmnctl stopall
OHS_INSTANCE_HOME/bin/opmnctl startall
Table 10-3 lists the steps you must perform when installing and configuring the Oracle Access Manager middle tier, using a new host name or port number for Oracle Access Manager.
Table 10-3 Steps to Install and Configure the Oracle Access Manager Middle Tier
| Step | Description | For More Information |
|---|---|---|
|
1 |
Installing Oracle WebLogic Server and Creating the Oracle Middleware Home |
See section "Installing Oracle WebLogic Server 10.3.3 and Creating the Oracle Middleware Home" in the Oracle Fusion Middleware Installation Guide for Oracle Identity Management. For more information about the Middleware home, see "Understanding Oracle Fusion Middleware Concepts" in the Oracle Fusion Middleware Administrator's Guide. |
|
2 |
Installing Oracle Access Manager |
See "Installing OAM" in the Oracle Fusion Middleware Installation Guide for Oracle Identity Management. |
|
3 |
Configuring Oracle Access Manager |
See "Configuring Oracle Access Manager (OAM)" in the Oracle Fusion Middleware Installation Guide for Oracle Identity Management. |
|
4 |
Configuring Node Manager to Start Managed Servers |
To configure Node Manager, refer to the section "Configuring Node Manager to Start Managed Servers" in the Oracle Fusion Middleware Administrator's Guide. |
|
5 |
Starting the Oracle WebLogic Server domain |
See section "Starting the Stack" in the Oracle Fusion Middleware Installation Guide for Oracle Identity Management. |
|
6 |
Verifying the installation |
See "Verifying the OAM Installation" in the Oracle Fusion Middleware Installation Guide for Oracle Identity Management. |
When you install Oracle Access Manager 11g, Upgrade Assistant is installed automatically into the bin directory of your Oracle home.
You run Upgrade Assistant once for each Oracle home that you are upgrading. For example, if you are upgrading two different 10g Release 2 (10.1.2) Oracle homes that are part of the same 10g Release 2 (10.1.2) farm, then you must run Upgrade Assistant two times, once for each of the 10g Release 2 (10.1.2) Oracle homes.
Note:
You can also use the Upgrade Assistant command-line interface to upgrade your Oracle Application Server 10g Oracle homes. For more information, see "Using the Upgrade Assistant Command-Line Interface" in the Oracle Fusion Middleware Upgrade Planning Guide.To upgrade the middle tier, complete the following steps:
Enter the following command to launch Upgrade Assistant.
On UNIX systems (Located at MW_HOME/Oracle_IDM_Home/bin):
./ua
On Windows systems (Located at MW_HOME\Oracle_IDM_Home\bin):
ua.bat
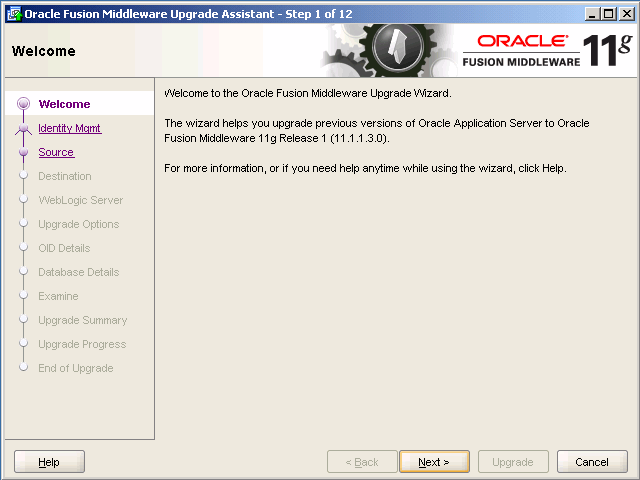
The Oracle Fusion Middleware Upgrade Assistant Welcome screen is displayed, as shown in Figure 10-5.
Figure 10-5 Upgrade Assistant Welcome Screen
Click Next.
The Specify Operation screen is displayed.
Select Upgrade Oracle Access Manager Middle Tier.
The options available in Upgrade Assistant are specific to the Oracle home from which it started. When you start Upgrade Assistant from an Oracle Application Server Identity Management Oracle home, the options shown on the Select Operation screen are the valid options for an Oracle Application Server Identity Management Oracle home.
Click Next.
The Specify Source Details screen is displayed.
Enter the following information:
Properties File: Click Browse and specify the path of the Oracle Single Sign-On 10g policy.properties file.
If your Oracle Access Manager 11g installation is on a separate host from the Oracle Single Sign-On 10g installation, then you must copy the 10g policy.properties file to a temporary directory on the Oracle Access Manager 11g host. Then specify the path of the policy.properties file located in your temporary folder.
Database Host: Enter the database host name that contains the Oracle Single Sign-On schema.
Database Port: Enter the database port number.
Database Service: Enter the database service name.
SYS Password: Enter the password for the SYS database account of the database that you selected from the Database drop-down menu. Upgrade Assistant requires these login credentials before it can upgrade the 10g components schemas.
Note:
Ensure that you enter database details for the Oracle Single Sign-On 10g database configuration.Click Next.
The Specify OID Details screen is displayed.
Enter the following information:
OID Host: Enter the host name of the Oracle Internet Directory 10g server.
OID SSL Port: Enter your Oracle Internet Directory 10g port number.
OID Password: Enter the password for the Oracle Internet Directory 10g administration account (cn=orcladmin).
Click Next.
The Specify WebLogic Server screen is displayed.
Enter the following information:
Host: Enter the host name of the Oracle WebLogic Server domain.
Port: Enter the listening port of the Administration Server. The default server port is 7001.
Username: The user name that is used to log in to the Administration Server. This is the same user name you use to log in to the Administration Console for the domain.
Password: The password for the administrator account that is used to log in to the Administration Server. This is the same password you use to log in to the Administration Console for the domain.
Click Next.
The Specify Upgrade Options screen is displayed
Select Start destination components after successful upgrade, and click Next.
Note:
If you are using external application, then select Upgrade even with external applications.The Examining Components screen is displayed.
Click Next.
The Upgrade Summary screen is displayed.
Click Upgrade.
The Upgrade Progress screen is displayed. This screen provides the following information:
The status of the upgrade
Any errors or problems that occur during the upgrade
See Also:
"Troubleshooting Your Upgrade" in the Oracle Fusion Middleware Upgrade Planning Guide for specific instructions for troubleshooting problems that occur while running the Upgrade Assistant.Click Close.
The Upgrade Complete screen is displayed. This screen confirms that the upgrade was complete.
The following sections describe the manual steps that you must perform after upgrading to Oracle Access Manager 11g:
After upgrading the Oracle Portal's Oracle Single Sign-On server to the Oracle Access Manager server, you must update the Oracle Portal schema with information about the Oracle Access Manager server. To do so, you must update the wwsec_enabler_config_info$ table as follows:
Connect to the database hosting the Oracle Portal schema, and log in with the Portal schema user name and password.
Run the following command to retrieve the Portal schema password.
ldapsearch -v -D "cn=orcladmin" -w "orcladminpassword" -h OIDHost -p OIDPort -s sub -b "cn=IAS Infrastructure Databases, cn=IAS, cn=Products, cn=OracleContext" "orclresourcename=PORTAL" orclpasswordattribute
Run the portal_post_upgrade.sql script (located at MW_HOME\oam\server\upgrade\sql).
When prompted, enter your Oracle Access Manager Managed Server Host name and Port number.
After upgrade, the Oracle Access Manager Administration Console uses the System Identity Store for run-time authentication and authorization. To align the existing roles, you can use the following WLST command:
Start the WebLogic Scripting Tool located at (ORACLE_IDM\common\bin):
wlst.sh
In the WLST shell, enter the following command:
editUserIdentityStore ( name="UserIdentityStoreName",roleSecAdmin="SecurityAdminRoleName" )
Example:
( name="MigratedUserIdentityStore",roleSecAdmin="Administrators" )
If you want to configure a group for Oracle Access Manager Administrator for the Oracle Access Manager Administration Console, complete the following steps:
Create a group for example Administrators in the Oracle Internet Directory.
Add the fully qualified dn for Oracle Access Manager Administrator privileges. For example, enter the following as the unique member of the group:
cn=orcladmin,cn=users,dc=us,dc=abc,dc=com
Start the WebLogic Scripting Tool located at (ORACLE_IDM\common\bin):
wlst.sh
In the WLST shell, enter the following command:
editUserIdentityStore(name="MigratedUserIdentityStore",roleSecAdmin="oam_admin")
Example:
editUserIdentityStore(name="MigratedUserIdentityStore",roleSecAdmin="orcladmin")
If you have retained your existing Oracle Single Sign-On 10g host name and port number during the upgrade process, then the Oracle Upgrade Assistant will generate the osso.conf file for each partner application, in the Oracle_Home/upgrade/temp directory. You must copy this osso.conf file to the location of the partner application registered with Oracle Access Manager 11g.
You must identify the correct osso.conf file associated with the partner application.
Example:
D1BA0396-bi8193.stadq44.us.abc.com_osso.conf
You can identify the correct osso.conf file by verifying the partner application id and instance name. From the above example, D1BA0396 is the partner application id and bi is the name of the instance.
You must perform the following additional post-upgrade tasks after upgrading to Oracle Access Manager 11g:
If the destination topology is front-ended by Oracle HTTP server 11g (installed through the 11g companion CD) on the same machine as the source, then you can run Upgrade Assistant from the Oracle HTTP server 11g installation directory to upgrade the Oracle HTTP server that front-ends Oracle Single Sign-On. In such cases, if you use the Upgrade Assistant retain port option, then no re-association of mod_osso partners with Oracle Access Manager is required.
In all other cases, the post-upgrade step of re-associating mod_osso partners with the newly upgraded Oracle Access Manager 11g is required. The mod_osso configurations generated as part of the upgrade can be used for this purpose.
Before login to the Oracle Portal, you must restart Oracle Web Cache by running the following opmnctl command (Located at ORACLE_INSTANCE\bin directory on Windows or ORACLE_INSTANCE/bin directory on UNIX):
opmnctl stopall
opmnctl startall
After upgrading to Oracle Access Manager 11g, if you are not using Oracle Internet Directory 10g or Oracle Delegated Administration Services 10g, then you can deinstall Oracle Single Sign-On 10g. To do so, undeploy the Oracle Single Sign-On 10g server from the Oracle Identity Manager 10g Server (OC4J_SECURITY) by running the following command on the command line:
java -jar admin_client.jar <uri> <adminId> <adminPassword> -undeploy sso
After the upgrade is complete, the Oracle Access Manager will be in the co-exist mode, by default. To verify that your Oracle Access Manager upgrade was successful:
Run the Upgrade Assistant again, and select Verify Instance on the Specify Operation screen.
Follow the instructions on the screen for information on how to verify that specific Oracle Fusion Middleware components are up and running.
Use the following URL to verify that Oracle Adaptive Access Manager 11g Administration server is up and running:
Oracle Adaptive Access Manager Administration server
http://server:port/oaam_admin
To verify that Oracle Adaptive Access Manager 11g Managed Server is up and running, do the following:
Login to Oracle WebLogic Server Administration Console using the required Administrator credentials.
Expand Domain Structure on the left pane, and select Deployments.
Verify that your managed server is listed in the Summary of Deployments page.
Alternatively, you can check the upgrade log file for any error messages or use Fusion Middleware Control to verify that Oracle Adaptive Access Manager and any other Oracle Identity Management components are up and running in the Oracle Fusion Middleware environment.
For more information, see "Getting Started Using Oracle Enterprise Manager Fusion Middleware Control" in the Oracle Fusion Middleware Administrator's Guide.