| Oracle® Fusion Middleware User's Guide for Oracle WebCenter Spaces 11g Release 1 (11.1.1.5.0) Part Number E10149-07 |
|
|
View PDF |
| Oracle® Fusion Middleware User's Guide for Oracle WebCenter Spaces 11g Release 1 (11.1.1.5.0) Part Number E10149-07 |
|
|
View PDF |
This chapter describes the features and functions of the Notes service, and provides specific how-to information about creating personal notes.
Note:
The Notes service is available only in the WebCenter Spaces application, not in WebCenter Portal applications.This chapter includes the following sections:
Audience
This chapter is intended for WebCenter Spaces users interested in creating personal notes in the WebCenter Spaces application.
The WebCenter Spaces application administrator has the authority to expose or hide a particular service's task flows. Tasks discussed in this chapter are not available to you if the Notes service is hidden.
The Notes service provides useful features for writing yourself reminders in the form of personal notes. You can add notes by using the Notes task flow, which displays the personal notes of the currently logged in user (Figure 66-1). Only the notes that you create are displayed in the Notes task flow. No other user sees your notes, and you do not see any other user's notes.
You can filter your Notes list by note titles. Filtering enables you to narrow the focus of your Notes to just the notes that match your filtering criteria. Consider devising a naming scheme for your notes to make the most of filtering.
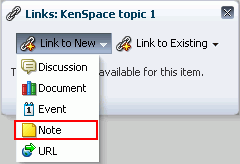
The Notes service is integrated with the Links service. In a Space or Home Space, by using the Link service, you can link a note to an object like a document, list, or announcement. While you can link to a new note (Figure 66-2), you cannot link to existing notes. All users who have access to the object can view the linked note too. For more information, see Section 63.2.2.5, "Adding and Linking to a Note."
Figure 66-2 Linking a Discussion Topic to a New Note
Every work day brings new things that you, and only you, must remember: I before E except after C. Use only bonded 25# paper for your report. John hides his candy in the coffee room stir-stick drawer. WebCenter Spaces offers a way for you to keep track of these useful, sometimes vital, bits of information through Notes.
This section describes how to use the Notes task flow. It includes the following subsections:
Section 66.2.1, "Adding the Notes Service Task Flow to a Resource Catalog"
Section 66.2.2, "Adding the Notes Service Task Flow to a Page"
WebCenter Spaces provides rich Resource Catalogs that expose components and connections that WebCenter Spaces users can add to their pages. You can use a Resource Catalog to populate resources such as page templates, navigation models, pages, and task flows.
As a Spaces administrator or a Space moderator, you can make the Notes task flow available in a custom Resource Catalog so that users can add the task flow to their pages and use it for adding personal notes.
To make the Notes task flow available in a custom Resource Catalog:
Create a Resource Catalog or make a copy of an existing one. Creating a Resource Catalog follows the same procedure as any other resource. For information about creating a blank Resource Catalog, see Section 10.2, "Creating Resources." For information about copying an existing Resource Catalog, see Section 10.4.1, "Copying a Resource."
On the Resources page, select the Resource Catalog to which you want to add the Notes task flow.
From the Edit menu, choose Edit.
If you have created folders (see Section 16.3.1.1, "Creating a Folder") and want to add resources inside a particular folder, select the folder in the Edit dialog.
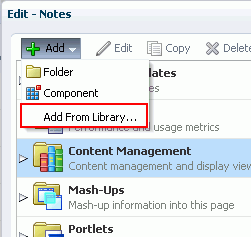
In the Edit dialog, select Add, and then Add From Library, as shown in Figure 66-3.
Figure 66-3 Adding a Resource to a Resource Catalog
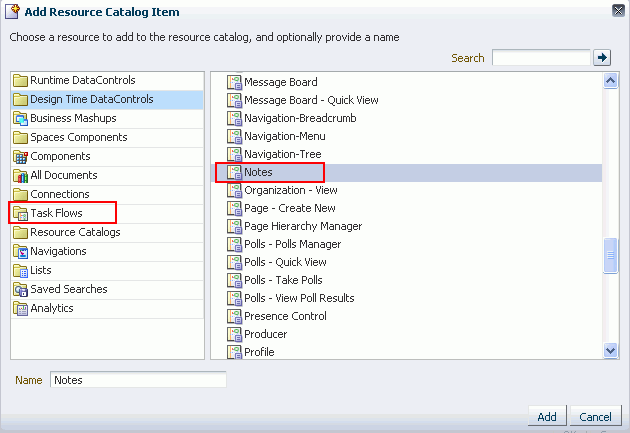
In the Add Resource Catalog Item dialog, select Task Flows from the list displayed on the left.
From the list on the right, select Notes (Figure 66-4).
Figure 66-4 Adding the Notes Task Flow to a Resource Catalog
Click Add.
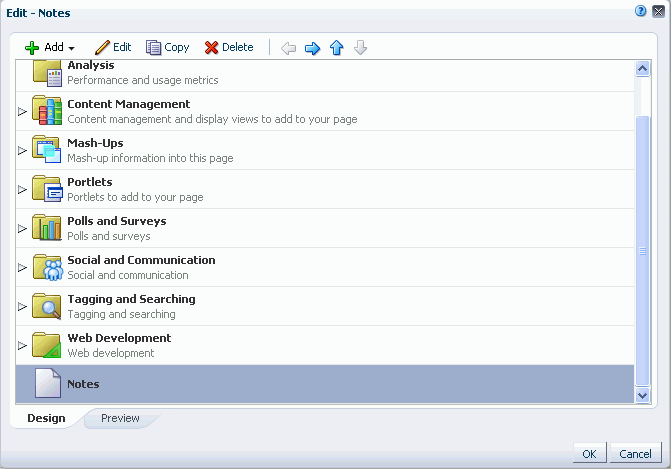
The Notes task flow displays in the Edit dialog of your Resource Catalog (Figure 66-5).
Figure 66-5 Notes Task Flow in a Resource Catalog
Click OK to close the Edit dialog.
Configure the application or Space to use the new catalog as the default one. For information, see Section 16.10, "Configuring Resource Catalogs in Your Application."
To add the Notes task flow to a page, you need to click Add next to the Notes task flow in the Resource Catalog, as shown in Figure 66-5.
The procedure for adding the Notes service task flow to a page is same as adding any other component from the Resource Catalog. For the generic procedure, see Section 17.5.1, "Adding a Component to a Page."
Figure 66-6 Selecting the Notes Task Flow from the Resource Catalog
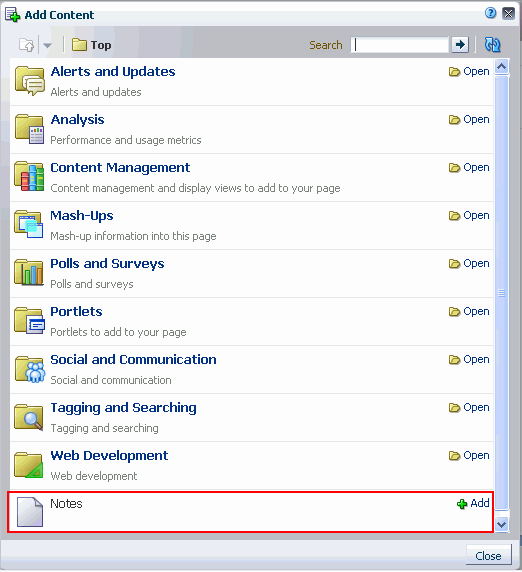
Create notes to track personally relevant bits of information, such as your favorite route to the fifth floor, the place to find the most plentiful desk supplies, and so on. This section describes how to create a note.
To create a note:
Navigate to the page that contains the Notes task flow.
In the Notes task flow, click the Create a new note icon (Figure 66-7).
Figure 66-7 The Create a New Note Icon in a Notes Task Flow
A panel opens with fields for entering your note (Figure 66-8).
Figure 66-8 Panel for Creating a New Note

In the Title field, enter a note title.
The note title is rendered as a link in the list of notes. You can filter your notes by their titles. Consider devising a naming scheme for your notes to make the most of filtering. For more information about filtering, see Section 66.2.4, "Filtering and Clearing Filters on Notes."
In the Detail field, enter note content.
Click Save to save the note.
When you click Save, the detail panel remains open, allowing you to create additional notes. After you finish, click Close to exit the panel.
Your note list may become lengthy, making it a challenge to find a particular note. In a given session with the Notes task flow, you can shorten the list by filtering out all but the note titles that contain your filtering criteria. Enter a filtering value to temporarily limit display to notes that match the value. You can filter the Notes list against whole or partial words. Filtering looks for matches anywhere in the title.
To clear the filter, click the filtering icon again.
To filter notes:
Go to a Notes task flow, and click the Filter notes icon (Figure 66-9).
A filtering toolbar opens.
Enter your filtering term in the field provided in the filtering toolbar, then click the Filter icon next to the field, to apply the filter (Figure 66-10).
Note:
Filtering terms are not case sensitive. Use whole or partial words. Filtering looks for matches anywhere in the title.Click the Cancel Filter icon to remove the filter and display all notes (Figure 66-11).
Things change. This truism may apply to the details you have entered about a particular note. If so, it's an easy matter to revise note details. This section tells you how.
To edit note details:
Go to a Notes task flow, then click the title of the note that you want to edit (Figure 66-12).
Figure 66-12 A Note Title in the Notes Task Flow

Note details display at the top of the task flow (Figure 66-13).
Edit the details in the Title and Detail fields as you prefer.
Click the Update button to save your changes and exit the edit panel.
The Notes task flow includes a Refresh notes icon that you can use to refresh your display of notes (Figure 66-14).
This comes in handy for updating your view of the task flow with any recent changes. Click the Refresh notes icon, and the Notes task flow redraws, reflecting recent changes.
When a note has outlived its usefulness, you can remove it from the Notes task flow. Each note comes equipped with its own Delete note icon. This section describes how to delete a note.
To delete a note:
Go to a Notes task flow, and click the Delete note icon next to the note you want to delete (Figure 66-15).
A Delete Note dialog opens (Figure 66-16).
Click the Delete button to delete the selected note.
The Notes service task flow has associated properties, which users with sufficient privileges can access through the Component Properties dialog in Oracle Composer (Figure 66-17). Many properties are common to all task flows, and the method for accessing task flow properties is the same from task flow to task flow. Common task flow properties and how to access them are discussed in Section 17.5.2, "Setting Properties on Page Components."
Figure 66-17 Notes Service Task Flow Component Properties
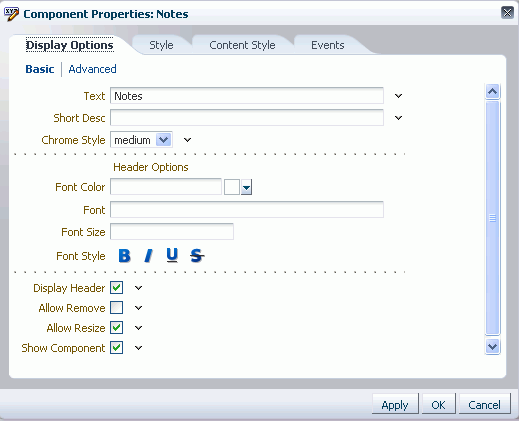
To access the Component Properties dialog, see Section 17.5.2.3, "Setting Component Properties."
The Notes service task flow does not have any unique properties, and therefore no Parameters tab in the Component Properties dialog.
Changes to the properties on the Display Options, Style, and Content Style tabs affect the appearance and behavior of the task flow for all users. These properties are common to all task flows. For more information, see Section 17.5.2.5, "Working with Component Display Options" and Section 17.5.2.7, "Working with Style and Content Style Properties."
The contents of the Events tab depend on the events supported by the task flow. For more information, see Section 17.5.2.8, "Working with Component Contextual Events."
All properties on the Display Options tabs provide access to an Expression Language (EL) editor, which you can use to select or specify a variable value instead of a constant value. Click the Edit icon next to a property field to open the editor. For more information about using the editor and for descriptions of common EL expressions, see Appendix B, "Expression Language Expressions."