|
Oracle® Application Server Repository Creation Assistant Installing the Oracle Application Server Metadata Repository into an Existing Database
10g (9.0.4) for UNIX Part No. B13522-01 |
|
|
Oracle® Application Server Repository Creation Assistant Installing the Oracle Application Server Metadata Repository into an Existing Database
10g (9.0.4) for UNIX Part No. B13522-01 |
|
Copyright © 2003 Oracle. All rights reserved.
Oracle is a registered trademark of Oracle Corporation and/or its affiliates. Other names may be trademarks of their respective owners.
Installing the Oracle Application Server Metadata Repository into an Existing Database
10g (9.0.4) for UNIX
Part No. B13522-01
December 2003
You can choose to install the OracleAS Metadata Repository in an existing database, rather than having the installer create a new database. This document describes how to use the Oracle Application Server Repository Creation Assistant to install your OracleAS Metadata Repository into an existing database. It contains the following sections:
Section 7, "Installing OracleAS Metadata Repository in an Existing Database"
Section 8, "Installing OracleAS Metadata Repository in a Real Application Clusters Database"
Section 9, "Registering the OracleAS Metadata Repository with Oracle Internet Directory"
Section 10, "Using the cleanMR Script to Drop Schemas and Tablespaces"
Section 11, "Cleaning Up a Failed Registration or Deregistering a Metadata Repository"
To install the OracleAS Metadata Repository in an existing database, you run a tool called the Oracle Application Server Repository Creation Assistant ("OracleAS RepCA"). This tool loads the OracleAS Metadata Repository data into an existing database.
CD-ROM: You can find OracleAS RepCA on the "OracleAS RepCA and Utilities" CD-ROM. It is not on Disk 1.
DVD: You can find OracleAS RepCA in the repca_utilities directory on the DVD.
Verify that the database where you want to install the OracleAS Metadata Repository meets the requirements in the following areas:
|
Note: If you want to use a database containing an Oracle E-Business Suite instance for your metadata repository, there will be some limitations in the functionality of your associated Oracle Application Server instance. You will also need to perform additional steps after running OracleAS RepCA before you can use the metadata repository. Refer to OracleMetaLink Note 251627.1 (http://metalink.oracle.com) for more information.
|
You can install the OracleAS Metadata Repository in the following database versions:
Table 1 Supported Database Versions
| Database Series | Supported Versions | See This Section for Details |
|---|---|---|
| Oracle9i Release 1 (9.0.1.x) | 9.0.1.5 or later | Section 2.1.1, "Oracle9i Release 1 (9.0.1.x) Databases"
|
| Oracle9i Release 2 (9.2.x) | 9.2.0.4 or later | Section 2.1.2, "Oracle9i Release 2 (9.2.x) Databases"
|
To check the release of your database, query the PRODUCT_COMPONENT_VERSION view:
prompt> sqlplus "sys/password as sysdba"
SQL> select version from product_component_version
 where product like ’Oracle%i%’;
password specifies the password for the SYS user.
If you have a 9.0.1.x database, ensure that its version is 9.0.1.5 or later.
You can upgrade to release 9.0.1.5 from earlier 9.0.1.x releases by applying the 9.0.1.5 patch set. You can download this patch set from OracleMetaLink (http://metalink.oracle.com).
To check the current patch level, you can query sys.patch$.
prompt> sqlplus "sys/password as sysdba"
SQL> select version from sys.patch$;
The command should return 9.0.1.5.
Applying the 9.0.1.5 Patch Set: If you will be using the database only for running the OracleAS Metadata Repository, you only need to run the following post-installation items:
Run catpatch.sql with the database in single user mode.
Run the upgrade scripts for Oracle Text.
Run the scripts for upgrading the Java option in the database (jvmusrc.sql, initxml.sql, xmlja.sql).
Run utlrp.sql to recompile PL/SQL packages.
All other post-installation steps in the 9.0.1.5 patch set are optional for the OracleAS Metadata Repository. You need to run them only if you use those options outside of Oracle Application Server or, in the case of the Real Application Clusters part of the patch set, if the database is a Real Application Clusters database.
|
Note: Be sure you run thecatpatch.sql script when applying the 9.0.1.5 patch set, as described in the README file for the patch set. Otherwise, you will encounter errors when OracleAS RepCA loads the metadata repository in your database.
|
If you have a 9.2.x database, ensure that its version is 9.2.0.4 or later.
You can upgrade to release 9.2.0.4 from earlier 9.2.0.x releases by applying the 9.2.0.4 patch set. See patch set 3095277. You can download the patch set from OracleMetaLink (http://metalink.oracle.com).
Applying the 9.2.0.4 patch set: Only the following post-installation steps are required for running the OracleAS Metadata Repository:
Make sure that the initialization (init.ora) parameters are set as specified, that SYSTEM tablespace has sufficient free space, and that CLUSTER_DATABASE environment variable is set if necessary.
Run catpatch.sql with the database in single user mode (step 3c in the README file for the patch set).
Run utlrp.sql (step 3h in the README file for the patch set).
Run the Oracle Internet Directory patch only if you were running Oracle Internet Directory version 9.2.0.x. If Oracle Internet Directory has never been used with this database, you do not have to perform this step.
All other post-installation steps in the 9.2.0.4 patch set are optional for the OracleAS Metadata Repository. You need to run them only if you use those options outside of Oracle Application Server.
To check that you have run the catpatch.sql script, you can run the following command in SQL*Plus:
prompt> sqlplus "sys/password as sysdba"
SQL> select comp_name, version, status from dba_registry
 where comp_id = ’CATPROC’;
You should get the following results:
COMP_NAME                     VERSION     STATUS
----------------------------- ----------- --------
Oracle9i Packages and Types   9.2.0.4.0   Valid
If you are using the Standard Edition database, release 9.0.1.x or 9.2.0.x, you will not be able to use Oracle Internet Directory’s multimaster replication feature (because this feature relies on ASR, which is available only on the Enterprise Edition database).
As an alternative, you can use the fan-out replication feature. See the Oracle Internet Directory Administrator's Guide for details.
During installation, the database must have its initialization parameters set to the values specified in Table 2.
After installation, you can change the values of most of these parameters to optimize performance, if necessary.
|
Note: The value of thedb_block_size parameter must be 8192 or greater. This parameter is set when the database was created and cannot be changed. If your database has a lower value for this parameter, this means that you cannot use this database for the metadata repository.
|
To check the values of the initialization parameters using SQL*Plus, you can use the show parameters command:
prompt> sqlplus "sys/password as sysdba"
SQL> show parameters parameter_name
password specifies the password for the SYS user.
Alternatively, you can check the values by querying the V$PARAMETER view:
prompt> sqlplus "sys/password as sysdba"
SQL> select name,value from v$parameter;
The method that you use to change a parameter’s value depends on whether the parameter is static or dynamic, and on whether your database uses a parameter file or a server parameter file.
See the Oracle9i Database Administrator’s Guide for details on parameter files, server parameter files, and how to change parameter values.
If your database uses a parameter file, you can change the parameter values using two different methods:
You can edit the parameter file and restart the database. This method works for both static and dynamic parameters.
To change the values of dynamic parameters, you can use the alter system command, but the new values persist only until the database is shut down. For example:
prompt> sqlplus "sys/password as sysdba"
SQL> alter system set aq_tm_processes=9;
If your database uses a server parameter file, use the alter system command to change the parameter values. For static parameters, set the scope to spfile. You have to restart the database for the new value to take effect. For dynamic parameters, you can set the scope to spfile, memory, or both. For the values to persist, set the scope to spfile or both. For example:
prompt> sqlplus "sys/password as sysdba"
SQL> alter system set aq_tm_processes=9 scope=both;
Table 2 Initialization Parameters: Required Values
| Parameter | Required Value | Parameter Class | Notes |
|---|---|---|---|
db_block_size
|
8192 or greater | Not changeable. See "Notes" column. | You cannot change the value of this parameter once the database has been created. |
aq_tm_processes
|
1 or greater | Dynamic | You can change the value of this parameter after installation. |
open_cursors
|
300 or greater | Dynamic in 9.0.2.x
Static in 9.0.1.x |
You can change the value of this parameter after installation. |
job_queue_processes
|
1 or greater | Dynamic | You can change the value of this parameter after installation. |
db_cache_size
|
150,994,944 (144 MB) or greater | Dynamic | You can change the value of this parameter after installation. |
large_pool_size
|
0 | Dynamic in 9.0.2.x
Static in 9.0.1.x |
When set to 0, the database uses the value from the shared_pool_size parameter instead (see next row).
You can change the value of this parameter after installation. |
shared_pool_size
|
104,857,600 (100 MB) or greater | Dynamic | You can change the value of this parameter after installation. |
java_pool_size
|
67,108,864 (64 MB) or greater | Static | You can change the value of this parameter after installation. |
pga_aggregate_target
|
100,663,296 (96 MB) or greater | Dynamic | You can change the value of this parameter after installation. |
query_rewrite_enabled
|
TRUE
|
Dynamic | Do not change this parameter after installation, because OracleAS Wireless requires this value. |
query_rewrite_integrity
|
trusted or enforced
|
Dynamic | Do not change this parameter after installation, because OracleAS Wireless requires this value. |
sessions
|
400 or greater | Static | You can change the value of this parameter after installation. |
nls_length_semantics
|
BYTE
|
Dynamic | This parameter is not checked by OracleAS RepCA. You have to check manually that this parameter is set to the supported value.
The |
max_commit_propagation_delay
|
99 or lower | Static | This parameter applies only for Real Application Clusters databases.
This parameter is not checked by OracleAS RepCA. If you are using a Real Application Clusters database, you have to check manually that this parameter is set to a supported value. |
The database must have the following database options enabled:
Table 3 Database Options
| Required Option | How to Check if the Option is Installed in the Database |
|---|---|
| OLAP Window Functions
Parallel load |
To check if the database has these options, query the V$OPTION view:
prompt> sqlplus "sys/password as sysdba"
SQL> select * from v$option;
password specifies the password for the SYS user. |
| Java |
prompt> sqlplus "sys/password as sysdba"
SQL> select count(*) from dba_objects where object_type like
 ’JAVA%’  and owner = ’SYS’ and status = ’VALID’;
The count returned should be greater than 0. |
| Intermedia |
prompt> sqlplus "sys/password as sysdba"
SQL> select count(name) from sys.props$
 where name = ’EXPORT_VIEWS_VERSION’;
The count returned should be greater than 0. |
The database must have the following PL/SQL packages installed:
Table 4 Required Packages
| Required Package | How to Check if the Package is Installed in the Database |
|---|---|
DBMS_DDL
|
Query the ALL_OBJECTS view. The following example checks for the DBMS_DDL package:
prompt> sqlplus "sys/password as sysdba"
SQL> select count(object_name) from all_objects where object_name like
 ’DBMS_DDL%’ and status = ’VALID’;
Run the query for each package; replace |
DBMS_TEXT
|
prompt> sqlplus "sys/password as sysdba"
SQL> select count(*) from dba_views where owner = ’CTXSYS’ and view_name = ’CTX_VERSION’;
The count should be greater than 0. |
Check that your database contains the DBMS_LDAP package, and that the package is valid. You need to reinstall the package if it is not valid.
Check that the version of the DBMS_LDAP package is 2. The following SQL command must return 0.
prompt> sqlplus "sys/password as sysdba"
SQL> select dbms_ldap_utl.check_interface_version(’2’) from dual;

DBMS_LDAP_UTL.CHECK_INTERFACE_VERSION('2')
------------------------------------------
                                         0
If the command returns a different value, or if it returns an error such as:
The DBMS_LDAP package supplied with this database doesn't support the
version 2 interface used by 904 components.
you need to reload the package. Go to "Reloading the DBMS_LDAP Package" at the end of this section.
Check that the DBMS_LDAP package is valid. The following SQL command must return 9.
Create a file containing the following lines. You can name the file anything you like (for example, test_ldap.sql).
select count(*) from dba_objects where
( object_name = 'DBMS_LDAP' and
object_type = 'PACKAGE' and
status = 'VALID' and owner = 'SYS'
) OR
( object_name = 'DBMS_LDAP' and
object_type = 'PACKAGE BODY' and
status = 'VALID' and owner = 'SYS'
) OR
( object_name = 'DBMS_LDAP_UTL' and
object_type = 'PACKAGE' and
status = 'VALID' and owner = 'SYS'
) OR
( object_name = 'DBMS_LDAP_UTL' and
object_type = 'PACKAGE BODY' and
status = 'VALID' and owner = 'SYS'
) OR
( object_name = 'DBMS_LDAP' and
object_type = 'SYNONYM' and
status = 'VALID' and owner = 'PUBLIC'
) OR
( object_name = 'DBMS_LDAP_UTL' and
object_type = 'SYNONYM' and
status = 'VALID' and owner = 'PUBLIC'
) OR
( object_name = 'DBMS_LDAP_API_FFI' and
object_type = 'PACKAGE' and
status = 'VALID' and owner = 'SYS'
) OR
( object_name = 'DBMS_LDAP_API_FFI' and
object_type = 'PACKAGE BODY' and
status = 'VALID' and owner = 'SYS'
) OR
( object_name = 'DBMS_LDAP_API_LIB' and
object_type = 'LIBRARY' and
status = 'VALID' and owner = 'SYS'
);
Run the file in SQL*Plus. For example, if you named the file test_ldap.sql, the command would look like the following:
prompt> sqlplus "sys/password as sysdba"
SQL> @test_ldap.sql

  COUNT(*)
----------
         9
If the command returns a value other than 9, you need to reload the package.
Check that the following files exist in the ORACLE_HOME/rdbms/admin directory:
catldap.sql
dbmsldap.sql
prvtldap.plb
prvtldh.plb
Using SQL*Plus, run the catldap.sql command as the SYS user.
prompt> cd $ORACLE_HOME/rdbms/admin
prompt> sqlplus "sys/password as sysdba"
SQL> @catldap.sql
The database must be set up to use password file authentication. For more information on password file authentication, see the Oracle9i Database Administrator’s Guide.
Password file authentication is required only for running the OracleAS RepCA. It is not required once the metadata repository has been installed.
You can check if the database is set up to use password file authentication, in one of two ways.
Look up the value of the remote_login_passwordfile initialization parameter by running the following command in SQL*Plus:
prompt> sqlplus "sys/password as sysdba"
SQL> show parameters remote_login_passwordfile
NAME                            TYPE       VALUE
------------------------------- ---------- ------------
remote_login_passwordfile       string     EXCLUSIVE
The value of the remote_login_passwordfile initialization parameter must be either EXCLUSIVE or SHARED. If the parameter has a different value or if it is not defined, the database is not set up for password file authentication.
Try connecting to the database as sysdba through a SQL*Net connection.
prompt> sqlplus "sys/password@sqlnet_dbname as sysdba"
sqlnet_dbname denotes the entry for the database in the tnsnames.ora file. If the database is not set up for password authentication, you will not be able to connect.
To set up a database for password file authentication:
Create a password file using the orapwd command (all on one line).
prompt> $ORACLE_HOME/bin/orapwd file=fullpath_to_pwfile password=password entries=maxUsers
Values you need to provide:
fullpath_to_pwfile - Enter the full path to the file where the password information will be written. The filename must be orapwsid. Typically, the password file is stored in the ORACLE_HOME/dbs directory.
password - Set the password for the SYS user.
maxUsers - Specify the maximum number of users that the file can contain.
The following example sets the password file for a database whose name is "prodmeta":
prompt> $ORACLE_HOME/bin/orapwd
    file=/opt/oracle/db92/OraHome1/dbs/orapwprodmeta
    password=topsecret entries=9
Set the remote_login_passwordfile initialization parameter to EXCLUSIVE. You can set it to SHARED if you want to use the same password file for multiple databases. If you have a Real Application Clusters database, you must set the parameter to EXCLUSIVE.
Restart the database.
The OracleAS RepCA installs the schemas and tablespaces listed in Table 8 in your existing database. Ensure that the database does not contain schemas and tablespaces of the same name.
If the OracleAS RepCA finds even one schema of the same name in the existing database, it asks for confirmation before it drops and recreates the schema with new data.
If you want to save the data in the schema, do not proceed. You can then back up the data you want to save, restore it under a different schema, and rerun the OracleAS RepCA. This time, you can tell it to drop and recreate the schema.
To get a list of existing schema names in the database, query the ALL_USERS view:
prompt> sqlplus "sys/password as sysdba"
SQL> select username from all_users;
password specifies the password for the SYS user.
See Section 10, "Using the cleanMR Script to Drop Schemas and Tablespaces" if you want to run a script to remove schemas and tablespaces used by OracleAS Metadata Repository.
If the OracleAS RepCA finds even one tablespace of the same name in the existing database, it cannot continue. It displays an error dialog. In this case:
Dismiss the error dialog and exit the OracleAS RepCA.
Back up the data in the tablespace (if desired).
Drop the tablespace.
Rerun the OracleAS RepCA.
To get a list of existing tablespace names in the database, query the V$TABLESPACE view:
prompt> sqlplus "sys/password as sysdba"
SQL> select name from v$tablespace;
password specifies the password for the SYS user.
|
Note: If you run the OracleAS RepCA and cancel it before it completes, it might have created the tablespaces listed in Table 8 in your database. You have to drop these tablespaces before you can rerun OracleAS RepCA.See Section 10, "Using the cleanMR Script to Drop Schemas and Tablespaces" if you want to run a script to remove schemas and tablespaces used by OracleAS Metadata Repository. |
To drop a tablespace, you can run either the cleanMR script or SQL statements manually. See Section 10, "Using the cleanMR Script to Drop Schemas and Tablespaces" for information about the script.
To run SQL statements manually, perform the steps below. The order of the tasks is important. If you delete the data files first, then you cannot drop the tablespace. If the tablespace exists, you cannot rerun OracleAS RepCA.
Use SQL*Plus and log into the database as the SYS user.
prompt> sqlplus "sys/password as sysdba"
Drop the schemas in the tablespace.
SQL> drop user schema_name cascade;
Drop the tablespace.
SQL> drop tablespace tablespace_name including contents cascade constraints;
SQL> exit;
Delete the data files (the .dbf files) associated with the tablespace.
If you are using files (as opposed to raw devices) for tablespaces, select the size for each tablespace that the OracleAS RepCA will create.
OracleAS RepCA offers three choices for sizes (see Table 5). These choices represent light usage, moderate usage, and heavy usage of the component. If you have applications that use a component heavily, you should select the biggest size for the component’s tablespaces. You should select the minimum size for components that you do not plan on using with this repository.
The tablespace sizes are initial sizes. Extensive use of the component may increase the size of the tablespaces because they are set to AUTOEXTEND.
Table 5 Initial Sizes for Tablespaces (in MB)
| Component | Tablespace | Small | Medium | Large |
|---|---|---|---|---|
| OracleAS Portal
|
PORTAL
|
75 | 100 | 150 |
| OracleAS Portal
|
PORTAL_DOC
|
25 | 40 | 50 |
| OracleAS Portal
|
PORTAL_IDX
|
30 | 50 | 60 |
| OracleAS Portal
|
PORTAL_LOG
|
30 | 50 | 60 |
| OracleAS Single Sign-On
OracleAS Wireless Oracle Ultra Search Oracle Workflow
|
IAS_META
|
200 | 300 | 500 |
| OracleAS Discoverer
|
DISCO_PTM5_META
|
5 | 10 | 15 |
| OracleAS Discoverer
|
DISCO_PTM5_CACHE
|
5 | 10 | 15 |
| OracleAS Distributed Configuration Management (DCM) | DCM
|
50 | 100 | 200 |
| OracleAS Syndication Services
|
DSGATEWAY_TAB
|
25 | 35 | 45 |
| OracleAS Web Clipping Support | WCRSYS_TS
|
35 | 45 | 55 |
| OracleAS ProcessConnect
|
IP_RT
|
50 | 75 | 90 |
| OracleAS ProcessConnect
|
IP_DT
|
60 | 75 | 90 |
| OracleAS ProcessConnect
|
IP_IDX
|
20 | 40 | 60 |
| OracleAS ProcessConnect
|
IP_LOB
|
20 | 40 | 60 |
| OracleAS Certificate Authority
|
OCATS
|
15 | 35 | 55 |
| OracleAS UDDI | UDDISYS_TS
|
35 | 50 | 65 |
| Oracle Internet Directory
|
OLTS_ATTRSTORE
|
10 | 15 | 20 |
| Oracle Internet Directory
|
OLTS_BATTRSTORE
|
10 | 15 | 20 |
| Oracle Internet Directory
|
OLTS_CT_STORE
|
10 | 15 | 20 |
| Oracle Internet Directory
|
OLTS_DEFAULT
|
10 | 15 | 20 |
| Oracle Internet Directory
|
OLTS_SVRMGSTORE
|
10 | 15 | 20 |
If your existing database uses raw devices, you do not need to select the sizes for the tablespaces. However, you need to verify that the sizes of the raw devices are adequate for the components (see Table 6 and Table 7). If you are planning on using a component extensively and your database uses raw devices, make sure the raw device for the tablespace has even more space available.
Table 6 Minimum Size for System Tablespaces
| TableSpace | Minimum Size |
|---|---|
| SYSTEM tablespace | 1024 MB |
| TEMP tablespace | 128 MB |
| UNDOTBS1 tablespace | 256 MB |
| UNDOTBS2 tablespace | 256 MB |
| DRSYS tablespace | 64 MB |
Table 7 Raw Devices for the OracleAS Metadata Repository
| Raw Device for | Minimum Size | Recommended Name |
|---|---|---|
| PORTAL tablespace | 128 MB | dbname_raw_portal_128m
|
| PORTAL_DOC tablespace | 64 MB | dbname_raw_portaldoc_64m
|
| PORTAL_IDX tablespace | 64 MB | dbname_raw_portalidx_64m
|
| PORTAL_LOG tablespace | 64 MB | dbname_raw_portallog_64m
|
| DCM tablespace | 256 MB | dbname_raw_dcm_256m
|
| OCATS tablespace | 64 MB | dbname_raw_ocats_64m
|
| DISCO_PTM5_CACHE tablespace | 64 MB | dbname_raw_discoptm5cache_64m
|
| DISCO_PTM5_META tablespace | 64 MB | dbname_raw_discoptm5meta_64m
|
| DSGATEWAY_TAB tablespace | 64 MB | dbname_raw_dsgatewaytab_64m
|
| WCRSYS_TS tablespace | 64 MB | dbname_raw_wcrsysts_64m
|
| UDDISYS_TS tablespace | 64 MB | dbname_raw_uddisysts_64m
|
| OLTS_ATTRSTORE tablespace | 128 MB | dbname_raw_oltsattrstore_128m
|
| OLTS_BTTRSTORE tablespace | 64 MB | dbname_raw_oltsbttrstore_64m
|
| OLTS_CT_STORE tablespace | 256 MB | dbname_raw_oltsctstore_256m
|
| OLTS_DEFAULT tablespace | 128 MB | dbname_raw_oltsdefault_128m
|
| OLTS_SVRMGSTORE tablespace | 64 MB | dbname_raw_oltssvrmgstore_64m
|
| IP_DT tablespace | 128 MB | dbname_raw_ipdt_128m
|
| IP_RT tablespace | 128 MB | dbname_raw_iprt_128m
|
| IP_LOB tablespace | 128 MB | dbname_raw_iplob_128m
|
| IP_IDX tablespace | 128 MB | dbname_raw_ipidx_128m
|
| IAS_META tablespace | 256 MB | dbname_raw_iasmeta1_256m
|
For information on using raw devices, see the database documentation.
Table 8 lists the schemas and tablespaces in the OracleAS Metadata Repository.
Table 8 Schemas and Tablespaces
| Component | Schema | Tablespace | Default Database File |
|---|---|---|---|
| OracleAS Portal
|
PORTAL
|
PORTAL
|
portal.dbf |
| OracleAS Portal
|
PORTAL
|
PORTAL_DOC
|
ptldoc.dbf |
| OracleAS Portal
|
PORTAL
|
PORTAL_IDX
|
ptlidx.dbf |
| OracleAS Portal
|
PORTAL
|
PORTAL_LOG
|
ptllog.dbf |
| OracleAS Portal
|
PORTAL_APP
|
PORTAL
|
portal.dbf |
| OracleAS Portal
|
PORTAL_DEMO
|
PORTAL
|
portal.dbf |
| OracleAS Portal
|
PORTAL_PUBLIC
|
PORTAL
|
portal.dbf |
| OracleAS Single Sign-On
|
ORASSO
|
IAS_META
|
ias_meta01.dbf |
| OracleAS Single Sign-On
|
ORASSO_PA
|
IAS_META
|
ias_meta01.dbf |
| OracleAS Single Sign-On
|
ORASSO_DS
|
IAS_META
|
ias_meta01.dbf |
| OracleAS Single Sign-On
|
ORASSO_PS
|
IAS_META
|
ias_meta01.dbf |
| OracleAS Single Sign-On
|
ORASSO_PUBLIC
|
IAS_META
|
ias_meta01.dbf |
| OracleAS Wireless
|
WIRELESS
|
IAS_META
|
ias_meta01.dbf |
| Oracle Workflow
|
OWF_MGR
|
IAS_META
|
ias_meta01.dbf |
| OracleAS Discoverer
|
DISCOVERER5
|
DISCO_PTM5_META
|
discopltm1.dbf |
| OracleAS Discoverer
|
DISCOVERER5
|
DISCO_PTM5_CACHE
|
discopltc1.dbf |
| OracleAS Distributed Configuration Management (DCM) | DCM
|
DCM
|
dcm.dbf |
| OracleAS Syndication Services
|
DSGATEWAY
|
DSGATEWAY_TAB
|
oss_sys01.dbf |
| OracleAS Web Clipping Support
|
WCRSYS
|
WCRSYS_TS
|
wcrsys01.dbf |
| OracleAS ProcessConnect
|
IP
|
IP_DT
|
ip_dt.dbf |
| OracleAS ProcessConnect
|
IP
|
IP_RT
|
ip_rt.dbf |
| OracleAS ProcessConnect
|
IP
|
IP_LOB
|
ip_lob.dbf |
| OracleAS ProcessConnect
|
IP
|
IP_IDX
|
ip_idx.dbf |
| OracleAS Certificate Authority
|
OCA
|
OCATS
|
oca.dbf |
| OracleAS Certificate Authority
|
ORAOCA_PUBLIC
|
OCATS
|
oca.dbf |
| OracleAS UDDI | UDDISYS
|
UDDISYS_TS
|
uddisys01.dbf |
| Oracle Internet Directory
|
ODS
|
OLTS_ATTRSTORE
|
attrs1_oid.dbf |
| Oracle Internet Directory
|
ODS
|
OLTS_BATTRSTORE
|
battrs1_oid.dbf |
| Oracle Internet Directory
|
ODS
|
OLTS_CT_STORE
|
gcats1_oid.dbf |
| Oracle Internet Directory
|
ODS
|
OLTS_DEFAULT
|
gdefault1_oid.dbf |
| Oracle Internet Directory
|
ODS
|
OLTS_SVRMGSTORE
|
svrmg1_oid.dbf |
| Oracle Ultra Search
|
WKSYS
|
IAS_META
|
ias_meta01.dbf |
| Oracle Ultra Search
|
WKPROXY
|
IAS_META
|
ias_meta01.dbf |
| Oracle Ultra Search
|
WK_TEST
|
IAS_META
|
ias_meta01.dbf |
| Metadata Repository Version | INTERNET_APPSERVER_REGISTRY
|
IAS_META
|
ias_meta01.dbf |
Ensure that the existing database is not already registered with Oracle Internet Directory. You cannot register a database that is already registered with Oracle Internet Directory.
To check if a database is already registered with Oracle Internet Directory, you have to look in Oracle Internet Directory:
Connect to Oracle Internet Directory using Oracle Directory Manager.
Start up Oracle Directory Manager.
prompt> $ORACLE_HOME/bin/oidadmin
In the Connect screen, enter the connect information. Log in as the Oracle Internet Directory superuser (cn=orcladmin).
Check to see if your database is registered with Oracle Internet Directory. Expand these entries:
Expand "Entry Management".
Expand "cn=OracleContext".
If your database is registered with Oracle Internet Directory, you would see an entry called "cn=your_database_name".
To remove the registration, see step 2 in Section 11, "Cleaning Up a Failed Registration or Deregistering a Metadata Repository".
Check to see if your database has a metadata repository that is registered with Oracle Internet Directory. Expand these entries:
Expand "Entry Management".
Expand "cn=OracleContext".
Expand "cn=Products".
Expand "cn=IAS".
Expand "cn=IAS Infrastructure Databases".
If your database has a metadata repository that is registered with Oracle Internet Directory, you would see an entry called "orclReferenceName=your_database_name".
To remove the registration, see step 3 in Section 11, "Cleaning Up a Failed Registration or Deregistering a Metadata Repository".
You must have at least 512 MB of available swap space. See "Swap space" in Chapter 4 of the Oracle Application Server 10g Installation Guide for information on how to check and increase it, if necessary.
If you plan to register the metadata repository with Oracle Internet Directory, the Oracle Internet Directory must be version 9.0.2.x, 10g (9.0.4), or 9.2.0.x.
To check the Oracle Internet Directory version, run the following command:
prompt> oidldapd -version
oidldapd: Release 9.2.0.1.0 - Production on Fri Feb 28 09:26:53 2003
(c) Copyright 2001 Oracle Corporation.  All rights reserved.
The oidldapd command can be found in the ORACLE_HOME/bin directory, where ORACLE_HOME is the root directory of Oracle Application Server containing Oracle Internet Directory.
OracleAS RepCA replaces the ultrasearch directory in the database’s Oracle home directory with a new version. It renames the old version of the directory to ultrasearch_timestamp.
The OracleAS RepCA is a wizard that enables you to install the OracleAS Metadata Repository in an existing database.
|
Note: OracleAS RepCA is on the "OracleAS RepCA and Utilities" CD-ROM. It is not on Oracle Application Server Disk 1.On the DVD, it is located in the |
You run the OracleAS RepCA on the computer where the database is installed. The tool needs to access the binaries in the database’s Oracle home.
Ensure the listener for the existing database and the database itself are up and running before you start the OracleAS RepCA.
If your computer does not mount CD-ROMs or DVDs automatically, you need to set the mount point manually. See Section 5.14, "Setting the Mount Point for the CD-ROM or DVD" in the Oracle Application Server 10g Installation Guide for details.
Insert the "OracleAS RepCA and Utilities" CD-ROM into the CD-ROM drive, or insert the DVD into the DVD drive.
Start up OracleAS RepCA from the CD-ROM or DVD:
CD-ROM: prompt> mount_point/repCA/runRepca [parameters]
DVD:    prompt> mount_point/repca_utilities/runRepca [parameters]
The runRepca command accepts the following parameters.
Table 9 Parameters for the runRepca Command
| Parameter | Required or Optional | Description |
|---|---|---|
-OH oracle_home
|
Required | Specifies the full path to the Oracle home directory of the database where you want to install the metadata repository. If you do not specify this parameter, OracleAS RepCA prompts you to enter it. |
-LOGDIR logdir
|
Optional | Specifies the full path to the directory where OracleAS RepCA can write log files. If not specified, OracleAS RepCA writes the log files to the ORACLE_HOME/assistants/repca/logORACLE_HOME\assistants\repca\log directory. Be sure you have write permission for the log directory.
|
-REGISTER
|
Optional | Specifies that OracleAS RepCA should only register the metadata repository with Oracle Internet Directory. It will not install schemas into the database. |
-RAC
|
Optional | Specifies that the database is a Real Application Clusters database. |
-HELP
|
Optional | Displays help for the parameters. |
Example:
runRepca -OH /opt/oracle/oradb -LOGDIR /opt/oracle/repca/logs
To install the OracleAS Metadata Repository in an existing non-Real Application Clusters database, perform the steps in this section. To install the OracleAS Metadata Repository in a Real Application Clusters database, see Section 8, "Installing OracleAS Metadata Repository in a Real Application Clusters Database".
Ensure that the database meets the requirements listed in Section 2, "Database Requirements".
Start up the OracleAS RepCA on the computer where the database is installed. See Section 6, "Starting OracleAS RepCA". The parameters that you need in this case are -OH and -LOGDIR, if you want to specify a different log directory. For example:
runRepca -OH /opt/oracle/oradb -LOGDIR /opt/oracle/repca/logs
Follow the screens:
Table 10 Steps for Installing OracleAS Metadata Repository in an Existing Database
| Step | Screen | Action |
|---|---|---|
| 1. | Welcome | Click Next. |
| 2. | Specify Database Connect | Enter connect information for the existing database.
SYS Password: Enter the password for the SYS user. Hostname and Port: Enter the name of the computer and the port number for the database. Use the format: Example 1 (same domain): Example 2 (different domain): Service Name: Enter the service name of the database. Note that the service name must include the database domain name. Example: Click Next. |
| 3. | Specify Tablespace Information | Use Same Directory for All Tablespaces: Select this option if you want to place all the files for all the tablespaces in the same directory. Specify the directory in the field below this option. Ensure that the directory has enough free space.
Use Individual Directories for Each Tablespace: Select this option if you want to place the files for the tablespaces in different directories. Tablespaces: Expand the tree to view the tablespaces for each component. Select a tablespace to view or edit its associated datafile or size. Size: Select the largest size for a tablespace if you have applications that use the component heavily. If not, select the smallest size. Filename: Enter the file name for the database file. Example: Directory: Enter the directory where you want to put the database file for the tablespace. You can click the "..." button to browse your file system. Example (UNIX): Example (Windows): Click Next. |
| 4. | Register with Oracle Internet Directory | If you already have an Oracle Internet Directory and know its connect information, select Register Now and enter the name of the computer where Oracle Internet Directory is running and the port number.
Use Only SSL Connections with this Oracle Internet Directory: Select this option if you want OracleAS RepCA to connect to Oracle Internet Directory using SSL when performing the registration. If you do not have an Oracle Internet Directory, or do not know its connect information, select Register Later. Click Next. |
| 5. | Specify Login for Oracle Internet Directory | This screen appears if you selected Register Now in the previous screen.
Enter the Username and Password to log in to Oracle Internet Directory. The user must belong to the iASAdmins group. You can use the user’s simple name (for example, If your Oracle Internet Directory contains more than one realm, you need to enter the realm that contains the specified user. Click Next. |
| 6. | Loading Repository | The OracleAS RepCA creates and populates the tablespaces and schemas. |
| 7. | Finish | Click Finish to exit OracleAS RepCA. |
Unlock the dcm schema and set its password. This step is required only if (1) you want to use the metadata repository only for database clustering of middle tier instances and (2) you did not register the metadata repository with Oracle Internet Directory.
Set the ORACLE_HOME environment variable to point to the full path of the directory where the database is installed.
Set the ORACLE_SID environment variable to the database’s SID.
Unlock the dcm schema and set its password using SQL*Plus.
The alter user command below sets the password to "welcome1", but you can set it to any value.
prompt> $ORACLE_HOME/bin/sqlplus "sys/password as sysdba"
SQL> alter user dcm identified by welcome1 account unlock;
This section describes an environment that uses Real Application Clusters (Figure 1). In this environment, the OracleAS Infrastructure 10g components are installed separately, as described in Table 11.
Figure 1 OracleAS Infrastructure 10g with the OracleAS Metadata Repository in a Real Application Clusters Database
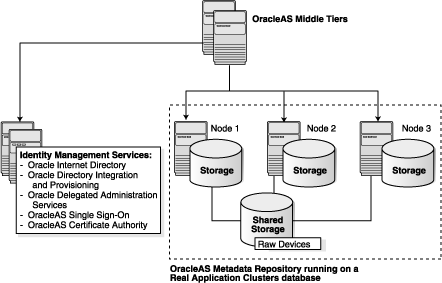
Table 11 OracleAS Infrastructure 10g with Real Application Clusters
| Component | Where Installed |
|---|---|
| OracleAS Metadata Repository
|
Installed in an existing Real Application Clusters database. |
| Identity Management components | Installed on non-clustered computers. |
|
Note: You need an existing Real Application Clusters database to create this environment.You cannot use the installer to create a new Real Application Clusters database containing the OracleAS Metadata Repository. |
To create this environment, install Oracle Application Server as follows:
Install OracleAS Metadata Repository in the existing Real Application Clusters database.
You use OracleAS RepCA to do this. See Section 8.2, "Installation Steps" for details.
|
Note: Do not register the OracleAS Metadata Repository with Oracle Internet Directory, because you have not installed Oracle Internet Directory yet. |
Install the Identity Management components on non-clustered computers.
You can install all the Identity Management components on a single computer, or you can distribute them over multiple computers. See Section 6.20, "Installing Identity Management Components Only (Including Oracle Internet Directory)" in the Oracle Application Server 10g Installation Guide for details.
When the installer prompts for the database hostname in the "Specify Metadata Repository Login and Connect Information" screen, enter all the node names in the Real Application Clusters, plus the port numbers for each node. Use the format node:port. Separate the pairs with a comma character.
For example, if you have three nodes (named node1, node2, and node3) in the cluster, and the listener listens on port 1521 for all nodes, then you would enter:
node1:1521, node2:1521, node3:1521
Install Oracle Application Server middle tiers.
To install the OracleAS Metadata Repository in a Real Application Clusters database:
Ensure that the database meets the requirements listed in Section 2, "Database Requirements".
Create raw devices for the OracleAS Metadata Repository.
See Table 7 for a list of tablespaces for which you have to create raw devices, and their minimum sizes.
The command to create raw devices is specific to the volume manager you are using. For example, if you using VERITAS Volume Manager, the command is vxassist.
Create a file to map the tablespaces to your raw devices.
Each line in the file has the following format:
tablespace_name=raw_device_file_path
You can use the following sample file, replacing the raw device file paths with your values. Append a "1" to the tablespace names, as shown in the sample file.
PORTAL1=/dev/vx/rdsk/oracle/mydb_raw_portal_128m
PORTAL_DOC1=/dev/vx/rdsk/oracle/mydb_raw_portal_doc_64m
PORTAL_IDX1=/dev/vx/rdsk/oracle/mydb_raw_portal_idx_64m
PORTAL_LOG1=/dev/vx/rdsk/oracle/mydb_raw_portal_log_64m
IAS_META1=/dev/vx/rdsk/oracle/mydb_raw_ias_meta_256m
DISCO_PTM5_META1=/dev/vx/rdsk/oracle/mydb_raw_disco_meta_64m
DISCO_PTM5_CACHE1=/dev/vx/rdsk/oracle/mydb_raw_disco_cache_64m
DCM1=/dev/vx/rdsk/oracle/mydb_raw_dcm_256m
DSGATEWAY_TAB1=/dev/vx/rdsk/oracle/mydb_raw_synd_64m
WCRSYS_TS1=/dev/vx/rdsk/oracle/mydb_raw_clip_64m
IP_DT1=/dev/vx/rdsk/oracle/mydb_raw_ip_dt_128m
IP_RT1=/dev/vx/rdsk/oracle/mydb_raw_ip_rt_128m
IP_LOB1=/dev/vx/rdsk/oracle/mydb_raw_ip_lob_128m
IP_IDX1=/dev/vx/rdsk/oracle/mydb_raw_ip_idx_128m
OCATS1=/dev/vx/rdsk/oracle/mydb_raw_oca_64m
UDDISYS_TS1=/dev/vx/rdsk/oracle/mydb_raw_uddi_64m
OLTS_ATTRSTORE1=/dev/vx/rdsk/oracle/mydb_raw_olts_attr_128m
OLTS_BATTRSTORE1=/dev/vx/rdsk/oracle/mydb_raw_olts_battr_64m
OLTS_CT_STORE1=/dev/vx/rdsk/oracle/mydb_raw_olts_ct_store_256m
OLTS_DEFAULT1=/dev/vx/rdsk/oracle/mydb_raw_olts_default_128m
OLTS_SVRMGSTORE1=/dev/vx/rdsk/oracle/mydb_raw_olts_svrmgstore_64m
See Section 2.8, "Schemas and Tablespaces" for a list of tablespaces and schemas in the OracleAS Metadata Repository.
When you run OracleAS RepCA, it reads this file and populates the Specify Tablespace Information screen with the data. You just need to confirm the data on that screen.
If you do not create this file, you can still run the OracleAS RepCA to install the OracleAS Metadata Repository in a Real Application Clusters database. On the screen where OracleAS RepCA would have displayed the data read from the file, it leaves the fields blank, and you need to enter the data manually.
Point the DBCA_RAW_CONFIG environment variable to the file.
For example, if you saved the file as /opt/oracle/repca/tablespace_map.txt, then you would set the environment variable as follows:
setenv DBCA_RAW_CONFIG /opt/oracle/repca/tablespace_map.txt
Start up the OracleAS RepCA on the computer where the database is installed. See Section 6, "Starting OracleAS RepCA". The parameters that you need in this case are -OH, -RAC, and -LOGDIR, if you want to specify a different log directory. For example:
runRepca -OH /opt/oracle/oradb -RAC -LOGDIR /opt/oracle/repca/logs
Follow the screens:
Table 12 Steps for Installing OracleAS Metadata Repository in an Existing Real Application Clusters Database
|
|
Screen | Action |
|---|---|---|
| 1. | Welcome | Click Next. |
| 2. | Specify Database Connect | Enter connect information for the existing database.
SYS Password: Enter the password for the SYS user. Hostname and Port: Enter the name of the computer and the port number for the database. Use the format: Example 1 (same domain): Example 2 (different domain): Service Name: Enter the service name of the database. Note that the service name must include the database domain name. Example: Click Next. |
| 3. | Specify Tablespace Information | This screen displays values read from the file pointed to by the DBCA_RAW_CONFIG environment variable. Correct the values, if necessary, and click Next. |
| 4. | Register with Oracle Internet Directory | If you already have an Oracle Internet Directory and know its connect information, select Register Now and enter the name of the computer where Oracle Internet Directory is running and the port number.
Use Only SSL Connections with this Oracle Internet Directory: Select this option if you want OracleAS RepCA to connect to Oracle Internet Directory using SSL when performing the registration. If you do not have an Oracle Internet Directory, or do not know its connect information, or plan to use the OracleAS Metadata Repository only for OracleAS Cluster, select Register Later. Click Next. |
| 5. | Specify Login for Oracle Internet Directory | This screen appears if you selected Register Now in the previous screen.
Enter the Username and Password to log in to Oracle Internet Directory. The user must belong to the iASAdmins group. You can use the user’s simple name (for example, If your Oracle Internet Directory contains more than one realm, you need to enter the realm that contains the specified user. Click Next. |
| 6. | Loading Repository | The OracleAS RepCA creates and populates the tablespaces and schemas. |
| 7. | Finish | Click Finish to exit. |
Unlock the dcm schema and set its password. This step is required only if (1) you want to use the metadata repository only for database clustering of middle tier instances and (2) you did not register the metadata repository with Oracle Internet Directory.
Set the ORACLE_HOME environment variable to point to the full path of the directory where the database is installed.
Set the ORACLE_SID environment variable to the database’s SID.
Unlock the dcm schema and set its password using SQL*Plus.
The alter user command below sets the password to "welcome1", but you can set it to any value.
prompt> $ORACLE_HOME/bin/sqlplus "sys/password as sysdba"
SQL> alter user dcm identified by welcome1 account unlock;
If you did not register the OracleAS Metadata Repository with an Oracle Internet Directory when you installed it, you can run the OracleAS RepCA again just to do the registration. When you run the OracleAS RepCA with the -REGISTER option, it does not install any schemas or tablespaces in the database.
You cannot use the Database Configuration Assistant (DBCA) to register the OracleAS Metadata Repository with Oracle Internet Directory if the metadata repository is in a Real Application Clusters database. You must use OracleAS RepCA to do the registration.
|
Note:
|
To register the OracleAS Metadata Repository with Oracle Internet Directory:
Start up OracleAS RepCA on the computer where the database is installed. See Section 6, "Starting OracleAS RepCA".
Example 1: Registering a OracleAS Metadata Repository that is installed in a non-Real Application Clusters database:
runRepca -OH /opt/oracle/oradb -REGISTER
Example 2: Registering a OracleAS Metadata Repository that is installed in a Real Application Clusters database:
runRepca -OH /opt/oracle/oradb -RAC -REGISTER
Follow the screens:
Table 13 Steps for Registering the OracleAS Metadata Repository
| Step | Screen | Action |
|---|---|---|
| 1. | Welcome | Click Next. |
| 2. | Specify Database Connect | Enter connect information for the database.
Username and Password: Enter the username and password to log in to the database. The user must have DBA privileges. Hostname and Port: Enter the name of the computer and the port number for the database. Use the format: Example 1 (same domain): Example 2 (different domain): Service Name: Enter the service name of the database. Note that the service name must include the database domain name. Example: Click Next. |
| 3. | Specify Oracle Internet Directory Connect | Hostname: Enter the name of the computer where Oracle Internet Directory is running.
Port: Enter the port number on which Oracle Internet Directory is listening. Use Only SSL Connections with this Oracle Internet Directory: Select this option if you want OracleAS RepCA to connect to Oracle Internet Directory using SSL when performing the registration. Click Next. |
| 4. | Specify Login for Oracle Internet Directory | Enter the Username and Password to log in to Oracle Internet Directory. The user must belong to the iASAdmins group. You can use the user’s simple name (for example, jdoe) or the DN (for example, cn=orcladmin).
If your Oracle Internet Directory contains more than one realm, you need to enter the realm that contains the specified user. Click Finish. |
If you exit OracleAS RepCA before the registration is completed or if the registration fails, you must perform the following manual steps before you run OracleAS RepCA again to re-register.
Remove repository entries from Oracle Internet Directory. See the Oracle Internet Directory Administrator's Guide for details.
Reset all schema passwords to their default values.
prompt> sqlplus "sys/password as sysdba"
SQL> alter user schema_name identified by schema_password;
Lock all schema passwords.
prompt> sqlplus "sys/password as sysdba"
SQL> alter user schema_name account lock password expire;
Once these steps are done, you can restart OracleAS RepCA to register the database.
Instead of removing OracleAS Metadata Repository schemas and tablespaces from your database by running SQL statements manually, you can remove these objects by running the cleanMR script. The script executes the SQL statements in the repca_cleanup.sql file, located in the same directory as the cleanMR script.
You must run the script on the computer that is running the database.
Location of the cleanMR script:
Table 14 Location of the cleanMR Script on the CD-ROM and DVD
| Media | Location of the cleanMR Script |
|---|---|
| CD-ROM | OracleAS RepCA and Utilities: mount_point/repCA/repca/clean/cleanMR
|
| DVD | mount_point/repca_utilities/repca/clean/cleanMR
|
To run the cleanMR script:
Copy the entire clean directory from the CD-ROM or DVD to your hard disk.
You cannot run the cleanMR script from the CD-ROM or DVD because the script needs to create a file in the directory containing the script. The following example copies the directory to the /opt/oracle directory.
CD-ROM (assumes /cdrom is the mount point):
prompt> cp -r /cdrom/repCA/repca/clean /opt/oracle
DVD (assumes /cdrom is the mount point):
prompt> cp -r /cdrom/repca_utilities/repca/clean /opt/oracle
Run the script from the directory where you copied it to.
prompt> cd /opt/oracle/clean
prompt> ./cleanMR -OH db_OH -DBSID sid [-DBUSER dbuser] -DBPASSWD password [-DBROLE dbrole]
Table 15 Parameters for the cleanMR Command
| Parameter | Optional or Required | Description |
|---|---|---|
-OH db_OH
|
Required | Specifies the ORACLE_HOME directory for the database. |
-DBSID sid
|
Required | Specifies the SID of the database. |
-DBUSER dbuser
|
Optional | Specifies the database user that the script will use to connect to the database. If not specified, the default user is "SYS". |
-DBPASSWD password
|
Required | Specifies the password for DBUSER. |
-DBROLE dbrole
|
Optional | Specifies the database user role. If not specified, the default role is "SYSDBA". |
Example:
cleanMR -OH /opt/oracle/oradb -DBSID hrdb -DBPASSWD topsecret
Notes:
The script does not remove the ODS schema, and it does not remove these tablespaces: OLTS_ATTRSTORE, OLTS_BATTRSTORE, OLTS_CT_STORE, OLTS_DEFAULT, OLTS_SVRMGSTORE. These objects pertain to Oracle Internet Directory.
If you want the script to remove these objects, search for the object names and uncomment the corresponding lines in the repca_cleanup.sql file (located in the same directory as the cleanMR script).
The script does not remove data files.
You can also use this procedure if you need to de-register the metadata repository with Oracle Internet Directory.
Connect to Oracle Internet Directory using Oracle Directory Manager.
Start up Oracle Directory Manager.
prompt> $ORACLE_HOME/bin/oidadmin
In the Connect screen, enter the connect information. Log in as the Oracle Internet Directory superuser (cn=orcladmin).
Clean up the database registration entries in Oracle Internet Directory:
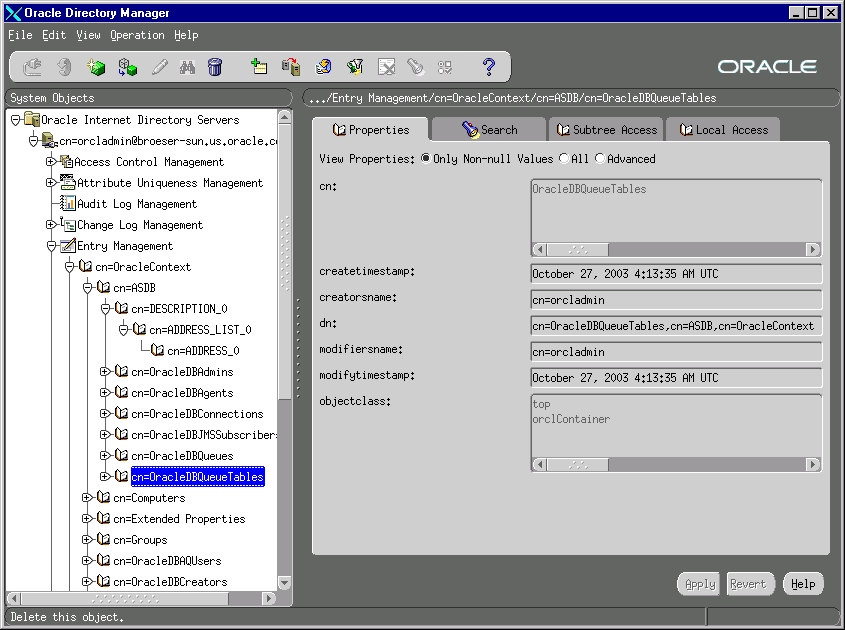
Expand the following entries (as shown in Figure 2):
Expand "Entry Management".
Expand "cn=OracleContext".
Expand "cn=your_database_name".
Delete all the child entries under cn=your_database_name, starting with the bottom-most child entry.
Before deleting the cn=DESCRIPTION_0 entry, expand it until you reach the last child. Then delete each child starting with the innermost child.
To delete an entry, right-click each child entry and select Delete from the pop-up menu. Click Yes in the Confirmation dialog. When deleting some child entries, you may get some error messages. You can ignore these error messages.
Right-click on cn=your_database_name and delete it.
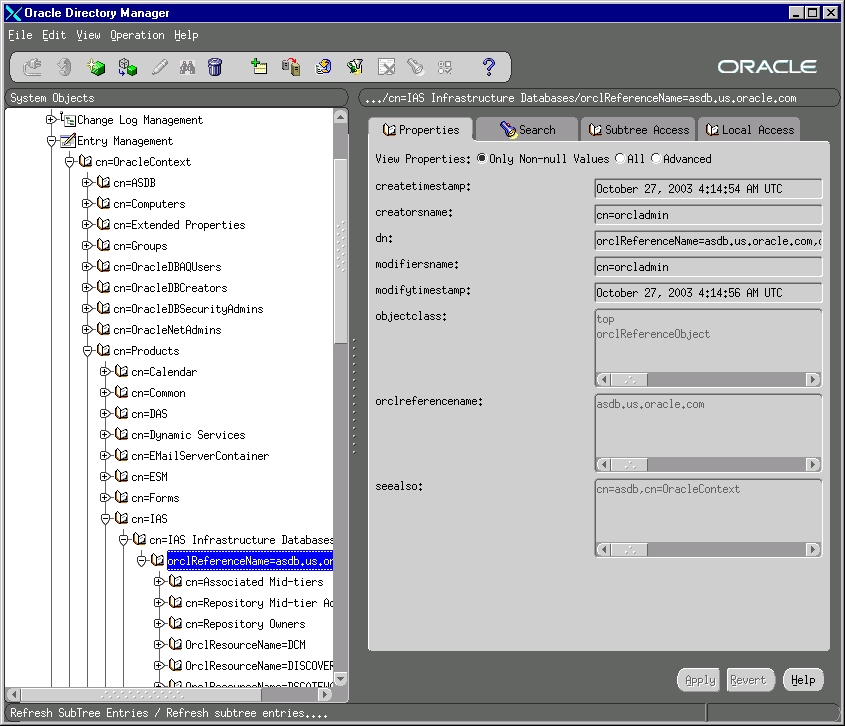
Clean up the metadata repository registration entries in Oracle Internet Directory:
Expand the following entries (as shown in Figure 3):
Expand "Entry Management".
Expand "cn=OracleContext".
Expand "cn=Products".
Expand "cn=IAS".
Expand "cn=IAS Infrastructure Databases".
Expand "orclReferenceName=your_database_name".
Delete each child entry under orclReferenceName=your_database_name.
Delete the orclReferenceName=your_database_name entry.
Figure 3 Clean up Metadata Repository Registration Entries
This section describes problems that might arise when running OracleAS RepCA, and how to resolve them.
Our goal is to make Oracle products, services, and supporting documentation accessible, with good usability, to the disabled community. To that end, our documentation includes features that make information available to users of assistive technology. This documentation is available in HTML format, and contains markup to facilitate access by the disabled community. Standards will continue to evolve over time, and Oracle is actively engaged with other market-leading technology vendors to address technical obstacles so that our documentation can be accessible to all of our customers. For additional information, visit the Oracle Accessibility Program Web site at
http://www.oracle.com/accessibility/
JAWS, a Windows screen reader, may not always correctly read the code examples in this document. The conventions for writing code require that closing braces should appear on an otherwise empty line; however, JAWS may not always read a line of text that consists solely of a bracket or brace.
This documentation may contain links to Web sites of other companies or organizations that Oracle does not own or control. Oracle neither evaluates nor makes any representations regarding the accessibility of these Web sites.
|
|
 Copyright © 2003 Oracle Corporation All rights reserved |
|