|
Oracle® Business Intelligence Discoverer Publishing Workbooks in Oracle Application Server Portal
10g Release 2 (10.1.2.0.0) Part No. B14465-01 |
|
 Previous |
 Next |
|
Oracle® Business Intelligence Discoverer Publishing Workbooks in Oracle Application Server Portal
10g Release 2 (10.1.2.0.0) Part No. B14465-01 |
|
 Previous |
 Next |
This chapter explains how to set up Discoverer Portlet Provider in OracleAS Portal, and contains the following topics:
"An overview of registering Discoverer Portlet Provider with OracleAS Portal"
"How to register Discoverer Portlet Provider with OracleAS Portal"
"How to edit Discoverer Portlet Provider after it has been registered with OracleAS Portal"
"Notes about changing the default performance settings for Discoverer"
"Notes about using Discoverer Portlet Provider 10.1.2 with OracleAS Portal 9.0.4"
The prerequisite tasks for publishing Discoverer portlets in OracleAS Portal are listed below along with the roles that carry out each task:
Install Oracle Application Server Infrastructure.
Oracle Application Server Infrastructure is installed by the OracleAS administrator.
For more information, see Oracle Application Server Installation Guide.
Install Oracle Application Server Portal.
Oracle Application Server Portal is installed by the OracleAS administrator.
Note: To use Discoverer with OracleAS Portal, make sure that the OssoIPCheck parameter value in the mod_osso.conf file is set to FALSE.
For more information, see Oracle Business Intelligence Discoverer Configuration Guide.
Install Oracle Business Intelligence.
Oracle Business Intelligence is installed by the OracleAS administrator.
For more information, see Oracle Business Intelligence Installation Guide.
Associate a standalone Oracle Business Intelligence installation with an Oracle Application Server Infrastructure.
Association is carried out in Oracle Application Server Control by an Oracle Application Server administrator, a middle tier administrator, or the Discoverer manager.
For more information, see Oracle Application Server Installation Guide and Oracle Business Intelligence Discoverer Configuration Guide.
Register Discoverer Portlet Provider.
Discoverer Portlet Provider is registered in Oracle AS Portal by the Oracle Application Server administrator.
For more information, see Chapter 2, "Setting up Discoverer Portlet Provider in OracleAS Portal" (this guide).
Create a Discoverer worksheet.
Discoverer worksheets are created by Discoverer Plus or Discoverer Desktop end users.
For more information, see Oracle Application Server Installation Guide and Oracle Business Intelligence Discoverer Configuration Guide.
Note: Before you can create a Discoverer worksheet the following tasks must have been completed:
Create Metadata (EUL or Discoverer Catalog).
EUL Metadata is created in Oracle Discoverer Administrator by the Discoverer manager. The Discoverer Catalog Metadata is installed in Oracle Application Server Control by the Oracle Application Server administrator.
For more information, see Oracle Application Server Installation Guide and Oracle Business Intelligence Discoverer Configuration Guide.
Create a public/private connection.
Public connections are created in Oracle Application Server Control by the Discoverer manager. Private connections are created in Discoverer Plus and Discoverer Viewer by end users. For more information, see:
Oracle Business Intelligence Discoverer Configuration Guide
Oracle Business Intelligence Discoverer Plus User's Guide
Oracle Business Intelligence Discoverer Viewer User's Guide
Add Discoverer portlets.
Discoverer portlets are added in OracleAS Portal, typically by Discoverer Plus and Discoverer Viewer end users.
For more information, see Chapter 3, "Authoring OracleAS Portal Pages with Discoverer Portlets" (this guide)
Note: Many of the initial tasks listed above are likely to have already been completed during or after installation.
To publish Discoverer portlets in OracleAS Portal, do the following:
(Optional) Make sure that Discoverer Portlet Provider is installed correctly by entering the following URL in an Internet browser:
http://<host.domain>:<port>/discoverer/portletprovider/
If Discoverer Portlet Provider is installed correctly, you will see the PDK-Java test page, displaying the message 'Congratulations! You have successfully reached your Provider's Test Page'. The test page also lists the Discoverer portlet types available.
Register Discoverer Portlet Provider with OracleAS Portal (for more information, see "How to register Discoverer Portlet Provider with OracleAS Portal") .
This step only needs to be performed once (after installation). Typically, Oracle Application Server administrators register the Discoverer Portlet Provider.
Use OracleAS Portal to add Discoverer portlets to portal pages (for more information, see Chapter 3, "Authoring OracleAS Portal Pages with Discoverer Portlets").
Typically, a portal page designer would add Discoverer portlets to portal pages.
You must register Discoverer Portlet Provider with OracleAS Portal before you can publish Discoverer worksheets in OracleAS Portal pages. You can only register Discoverer Portlet Provider with OracleAS Portal once.
When you have registered Discoverer Portlet Provider with OracleAS Portal you can then publish Discoverer portlets in OracleAS Portal pages (for more information, see Chapter 3, "Authoring OracleAS Portal Pages with Discoverer Portlets").
You register Discoverer Portlet Provider to enable OracleAS Portal end users to add Discoverer business intelligence portlets to their portal pages.
To register Discoverer Portlet Provider with OracleAS Portal:
Start a Web browser and enter the URL for OracleAS Portal.
For example:
http://<host.domain>:<port>/pls/portal
For more information about displaying the OracleAS Portal main page, contact the OracleAS Portal administrator.
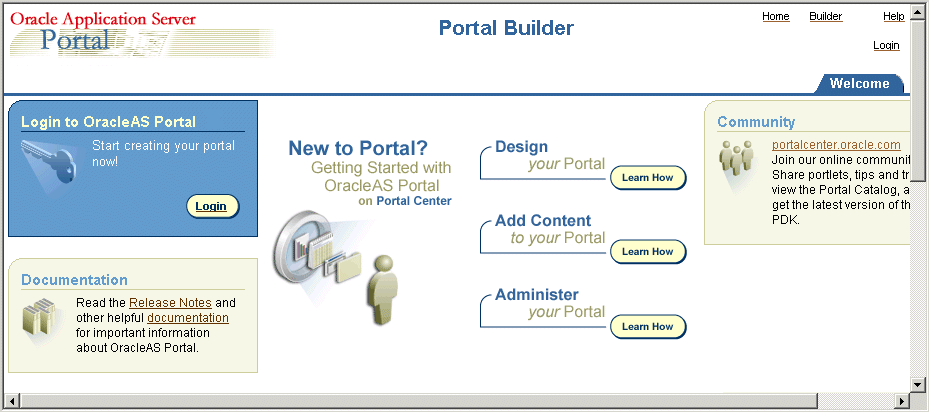
Click Login and connect as a Portal administrator.
Display the Administer tab.
Display the Portlets sub-tab.
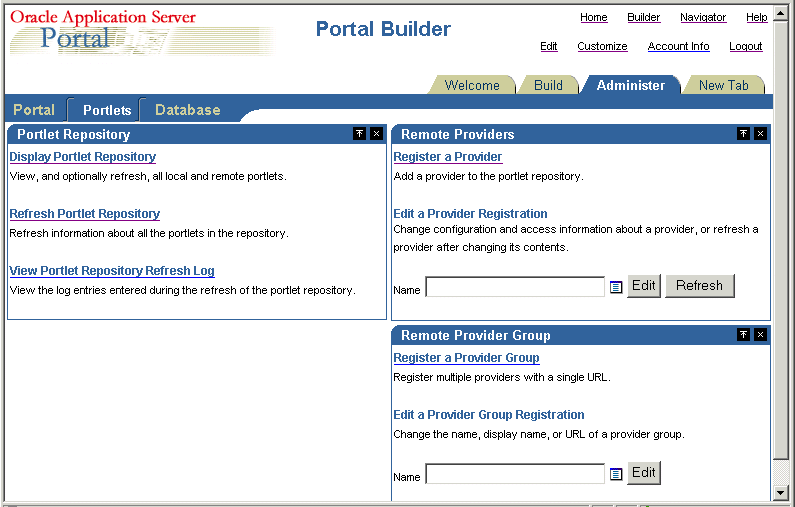
Select the Register a Provider link to display the Provider Information page.
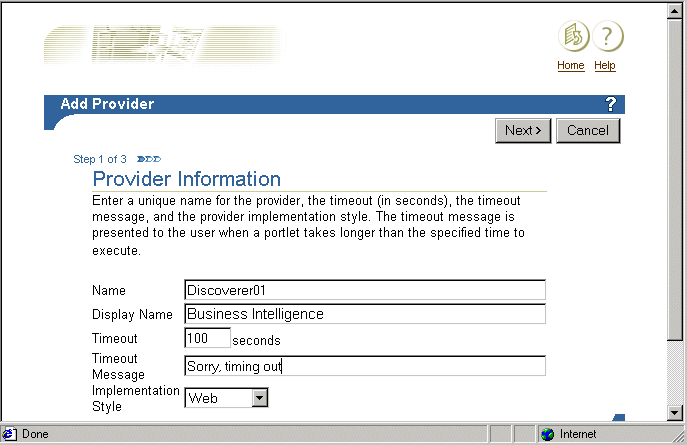
Enter the Discoverer Portlet Provider details.
You can enter any name and display name for the Discoverer Portlet Provider. The name and display name can be different.
Hint: Give the Portlet Provider a useful display name because users will see this name when they add a Discoverer portlet to a portal page.
Choose Web from the Implementation Style drop down list.
Click Next to display the Define Connection page.
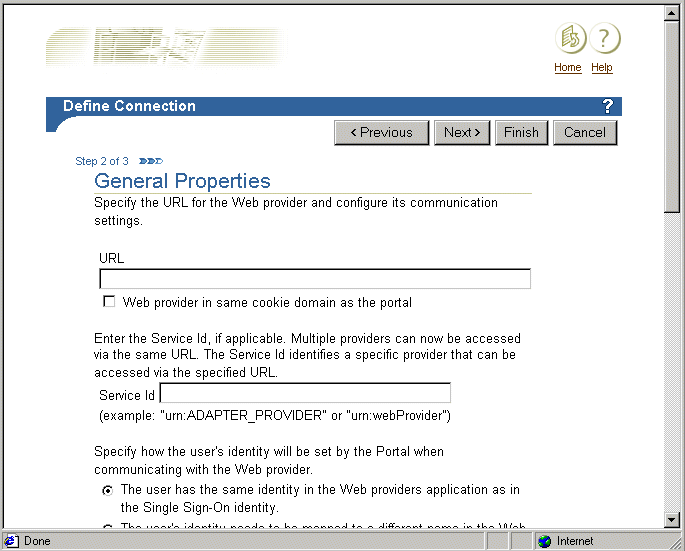
Enter the Portlet Provider general properties as follows:
Enter the URL of the Discoverer Portlet Provider in the URL field, in the form:
http://<host.domain>:<port>/discoverer/portletprovider (e.g. http://myserver:80/discoverer/portletprovider)
Clear the Web Provider in same cookie domain as the portal check box.
Select the The user has the same identity in the Web providers application as in the Single Sign-On identity radio button.
In the User/Session Information area, select the User radio button, and select the Once Per User Session option from the Login Frequency field.
Note: Do not change the default value of other fields.
Click Next to display the Control Access page.
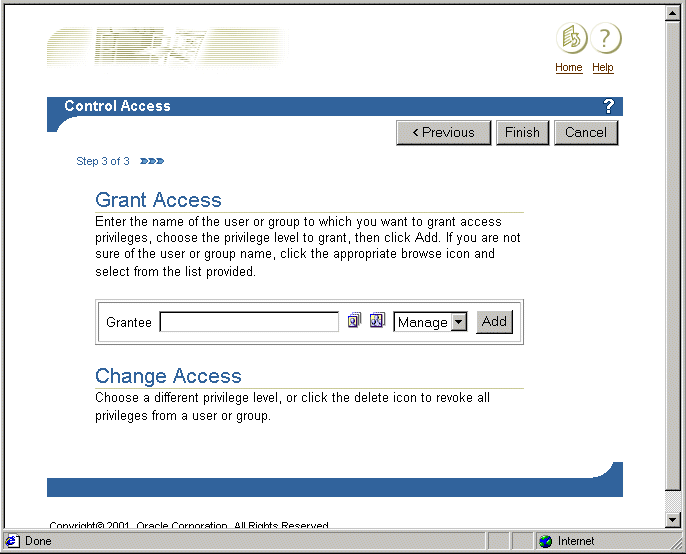
(optional) Change the default access control settings if necessary.
Click Finish.
End users can now use the Discoverer Portlet Provider to add portlets to an OracleAS Portal page.
Notes
If you want Discoverer end users to publish workbooks and worksheets using a public connection, use Oracle Application Server Control to create the public connection (for more information about creating public connections, see the Oracle Business Intelligence Discoverer Configuration Guide).
You edit the Discoverer Portlet Provider when you want to change the way that it works. For example, you might want to change the Discoverer Portlet Provider Display Name, or change its Control Access settings.
To edit the Discoverer Portlet Provider:
Start a Web browser and enter the URL for the OracleAS Portal main page main page.
For example:
http://<host.domain>:<port>/pls/portal
For more information about displaying the OracleAS Portal main page, contact the OracleAS Portal administrator.
Display the Administer tab.
Display the Portlets sub-tab.

In the Remote Providers area, enter the name of the Discoverer Portlet Provider (i.e. its display name) in the Name field, and click Edit to display the Provider Information page.
Hint: If you are not sure of the display name of the Discoverer Portlet Provider, do the following:
Click the Browse Providers icon to the right of the Name field.
Choose the Discoverer Portlet Provider name from the list of Portlet Providers displayed.
Hint: The name that you choose is the display name that was specified when you registered the Discoverer Portlet Provider (for more information, see "How to register Discoverer Portlet Provider with OracleAS Portal").
Click Edit to display the Edit Portlet Provider page.
Make the necessary changes, as follows:
use the Main tab to change provider information (e.g. the display name of the Discoverer Portlet Provider)
use the Connection tab to change general properties (e.g. the URL of the Discoverer Portlet Provider)
use the Access tab to change the access privileges (e.g. the control access settings of the Discoverer Portlet Provider)
Click OK to save the changes you have made.
The Discoverer Portlet Provider is updated according to changes you have made.
You might want to change the default performance settings for Discoverer to improve Discoverer performance.
For more information about changing the default performance settings for Discoverer, see the Oracle Business Intelligence Discoverer Configuration Guide.
To use Discoverer Portlet Provider 10.1.2 with OracleAS Portal 9.0.4 you must upgrade the Metadata Repository (MR) on the OracleAS infrastructure installation from Version 9.0.4 to Version 10.1.2 (for more information, see the Oracle Business Intelligence Discoverer Configuration Guide).