| Oracle® Enterprise Manager Ops Center Feature Reference Guide 12c Release 1 (12.1.1.0.0) Part Number E27511-04 |
|
|
PDF · Mobi · ePub |
| Oracle® Enterprise Manager Ops Center Feature Reference Guide 12c Release 1 (12.1.1.0.0) Part Number E27511-04 |
|
|
PDF · Mobi · ePub |
This chapter describes in detail about jobs, the different roles for managing jobs, viewing jobs, and the different actions that can be performed on jobs.
The following information is included:
Any action performed by Oracle Enterprise Manager Ops Center creates a job. This job is either run on the Enterprise Controller system or picked up by a Proxy Controller to be run on a Proxy Controller or a managed asset. The progress of the job is tracked and displayed in the user interface. Each job is made up of one or more tasks, and has one or more targets; information on the job's progress on any task or target can be viewed.
The Jobs pane is located at the bottom of the user interface and displays a list of all current and historical jobs. From the Jobs pane, you can monitor the progress of current jobs and can also review historical jobs. You can view the status of all jobs, view detailed information about specific jobs, and take actions on jobs.
To view the details of the job, double-click the job in the Job Summary table. The Job Details view displays the targets of the job, and also the following information:
Running – The job is in progress.
Waiting for User Input – The job has started, but needs information from a user before it can be completed.
Failed – The job was not successful.
Partially Successful – Some of the job's tasks were completed successfully. This could be a job with multiple tasks, in which some tasks completed but others failed, or a job with multiple targets, in which the job was successful for only some targets.
Stopped – The job was stopped by the user.
Scheduled – The job has been scheduled to run at a specific time. It might be a one-time job or a recurring job.
Successful – The job has completed. All of its tasks were completed successfully.
Job ID – A unique identification number for the job.
Type of job – For example, the discovery custom type identifies a job as a result of a custom discovery action.
Name of job – A name for the job.
Run ID – If a job has been run multiple times, each run of the job will have a separate run ID.
Mode of job – Simulated or Actual Run. Some jobs can be simulated. Simulated jobs verify that the necessary permissions, images, space, and other job requirements are satisfied. To perform an actual run of a simulated job, you must create a new job.
Owner of job – The user who launched the job.
Start / Scheduled Date – The date and time when the job was started or is scheduled to start.
Elapsed time – The amount of time the job has been running, if the job is running. The amount of time it took for the job to complete, if the job has completed.
Description – Description of the job.
Failure policy – The failure policy of the job, can be one of the following:
Continue on Failure - if a task fails, continue to run other tasks.
Abort on Failure - if a task fails, all remaining tasks are aborted.
Rollback on Failure - if a task fails, abort all remaining tasks, and run the rollback method on the failed task and all previous successful tasks.
Next Scheduled Time (For recurring scheduled jobs) – This option is available only in the job summary table. It displays the time when the job started. If it is scheduled to run in the future, then it displays the next run time.
Next Scheduled Date – The next date that the job will run, or null if the job will not run again.
Start Date – The date/time that the run of this job started.
Creation Date – The date/time that the job was first created.
Sequential - the tasks are run one after another.
Parallel - all the tasks run at the same time.
Sequential_on_task - this applies to tasks that target more than one target. The task must complete on all targets before the next task will begin.
List of tasks – This option is available on the job target details view. It displays the following:
the task target
the last log entry for the task, or the result of the task if the task is completed.
the elapsed time - the amount of time that this task has been running.
Task execution order – The execution order of the task.
Task progress/results – Progress or result of the task.
Event logs - Event logs are generated by tasks as they progress.
You can perform the following actions on jobs:
View details about the job, including the status of all tasks.
Respond to prompts during a job.
Interrupt or stop a running job. You can re-run the job later.
Remove a job from the history.
Re-run a job that had partial success, failed, or was stopped.
Create a new job with a new Job ID based on a previous job; for example, to repeat a successful complex multi-step job on another target.
A cloud user can only view or act on jobs that were created by the user. The cloud user cannot view jobs that were created by another user.
The following table lists the tasks that are discussed in this section and the role required to complete the task. An administrator with the appropriate role can restrict privileges to specific targets or groups of targets. Contact your administrator if you do not have the necessary role or privilege to complete a task. See the Oracle Enterprise Manager Ops Center Administration Guide for information about the different roles and the permissions they grant.
Table 3-1 Job Management Tasks and Roles
| Task | Role |
|---|---|
|
Viewing Job Status |
The same as the role required to launch the job. |
|
Viewing Job Details |
The same as the role required to launch the job. |
|
Monitoring Jobs for an Asset |
The same as the role required to launch the job. |
|
Answering Questions |
The same as the role required to launch the job. |
|
Stopping a Job |
The same as the role required to launch the job. |
|
Re-running a Job |
The same as the role required to launch the job. |
|
Copying a Job |
The same as the role required to launch the job. |
|
Deleting a Job |
The same as the role required to launch the job or Job Management. |
|
Changing the Maximum Time for a Job |
Root access on Enterprise Controller system. |
Note:
If a job has multiple targets, you can only see the targets for which you have the correct role. If you do not have the role for any of the targets, the job is not displayed.The job management service is responsible for managing the execution of jobs and monitoring them. The job manager communicates instructions in the task to one or more agents in the order specified by the task. The job manager monitors the state of execution, logs each successful or unsuccessful operation, and maintains the information state that will enable the job manager to report success or failure. Within job management, you can perform the following actions, depending on what jobs have been launched and their status:
View all jobs
View all jobs with a specific status
View details for a job
Monitor jobs for an asset
Search for jobs
Answer questions for a job
Stop a job
Re-run a job
Re-run a job on failed targets
Copy a job
Delete a job
Debug a job using the OCDoctor
Change the job properties
You can view jobs in different ways. The Jobs pane displays all current and past jobs that have not been deleted. You can also view the details of a specific job, and view all jobs with a specific status or for a specific asset.
You can view a list of all jobs run by Oracle Enterprise Manager Ops Center.
To view all jobs, perform the following steps:
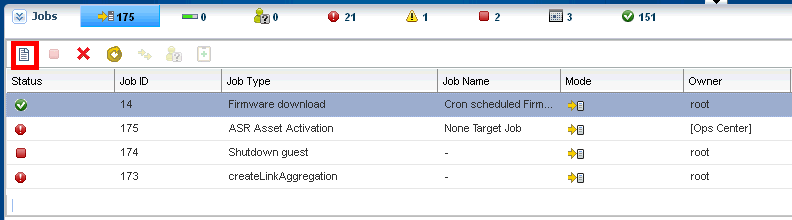
Click and expand the Jobs pane at the bottom of the UI.
The Jobs pane is displayed as shown in the following figure.
In the Jobs pane, click the All Jobs icon (highlighted in the previous figure).
All the jobs including jobs in progress, jobs waiting for user input, failed jobs, partially successful jobs, stopped jobs, scheduled jobs, and successful jobs are displayed.
To view jobs with a specific status (such as jobs in progress, jobs waiting for user input, failed jobs, partially successful jobs, stopped jobs, scheduled jobs, and successful jobs), click the respective job status icon. The jobs with the selected status are displayed.
You can view detailed information about a job, including the status of the tasks that make up the job.
To view job details, perform the following steps:
Select a job in the Jobs pane.
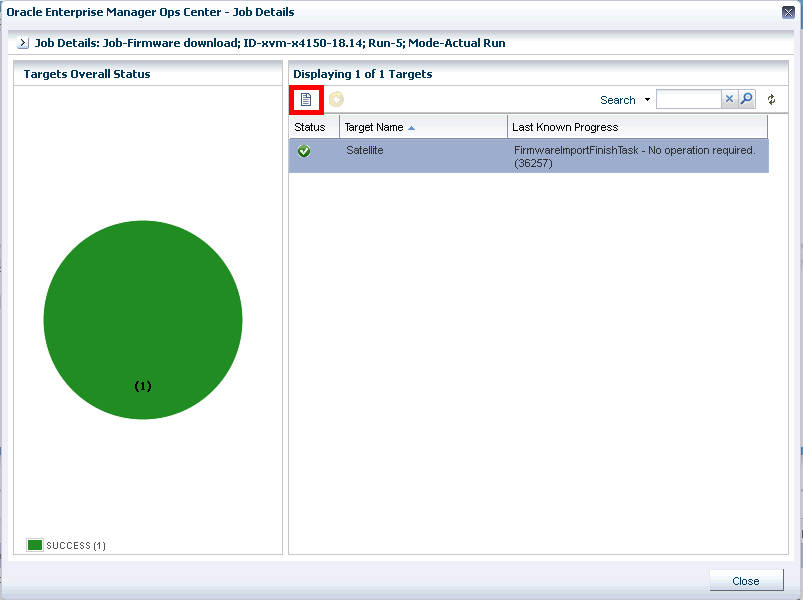
Click the View Job Details icon (highlighted in the above figure) or double-click the job. The Job Details window is displayed.
The overall status of the target is displayed on the left. On the right, a table lists all the targets.
Select a target and click Display Selected Target Details icon (highlighted in the previous figure). You can also double-click the target to display the target details.
The Job Target Details window is displayed.
Double click a task to view the logs. The event logs and task properties are displayed.
The View Target Logs window displays all the task logs in a text area that can be copied from.
Click Export Logs to save the log as a text file.
Select Selected Task Target Log and click Save to save the log as a text file.
Select Full Job Log and click Save to save the log as a text file.
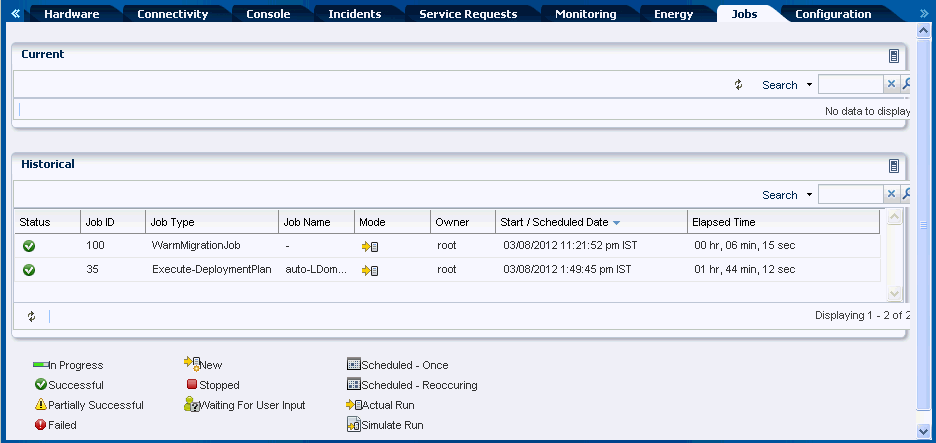
You can view jobs for a particular asset, both running jobs and jobs that have been completed.
To view only those jobs for a particular asset, perform the following steps:
On the Navigation pane, under Assets, select an asset.
Click the Jobs tab on the center pane.
The Current and Historical jobs are listed.
Select a job and double click to view the details of the job.
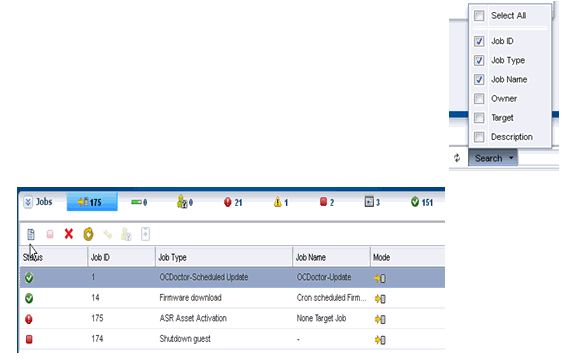
You can search for specific jobs in any state.
To search for a particular job, perform the following steps:
Click Search in the upper right corner of the Jobs pane.
Select one or more job characteristics to search, then enter a search term and click the search icon.
Jobs for which the selected characteristics matches or includes the search term are displayed.
You can take actions on jobs that have been launched. These actions vary depending on the current status of the job. If a job has stopped and is waiting for user input, you can answer questions and resume the job. If a job is running, you can stop it. If a job has completed, you can re-run it entirely, re-run it only on failed targets, copy it to create a new job, or delete it.
Some jobs require user input to complete. A job that requires a response has the status of Waiting for User Input. To provide user input, perform the following steps:
Select a job with the Waiting for User Input status.
Click the Answer Questions icon.
Select Yes or No for each question, or click Yes to All or No to All.
When you have answered each question, click Submit to resubmit the job using the same Job ID and Run ID.
You can stop a job that is running. All tasks in progress are interrupted and tasks that have not yet started are aborted. The completion status of the job depends on the number of tasks that have completed, been interrupted, and not started.
To stop a job, perform the following steps:
Select a job that is running.
Click Stop Selected Jobs.
Click Stop Job to confirm.
If a job is completed, you can repeat the job with a new Run ID.
To re-run a job, perform the following steps:
Click and expand the Jobs pane at the bottom of the UI.
Select the failed job to be re-run.
Click Re-Run Selected Jobs.
Click Run Job.
The job is re-run with a new Run ID.
If a job is partially completed, failed, or stopped, you can repeat the job on failed or incomplete targets.
To re-run a job on failed targets, perform the following steps:
Select the job and view the job details.
Select one or more failed targets from the list of targets and click Re-Run Selected Failed Targets, then click OK.
The job is re-run with the same Run ID on the failed targets.
You can copy an OS or firmware update job, using an old job as a template for a new job.
To copy a job, perform the following steps:
Select the job that you want to copy and click Copy Job.
A new job wizard is displayed, using the information from the existing job.
Modify the job information, select a schedule, and click Submit Job.
The new job is submitted with a new Job ID.
Deleting a job removes it from the queue entirely. It cannot be re-run or resumed, and its job details are not available.
To delete a job, perform the following steps:
Select the job that you want to delete.
Click Delete Selected Jobs, then click Delete Jobs to confirm.
Note:
You cannot delete jobs that are running. You must first stop the job that is running and then delete it.You can debug a job that has been run on a managed asset. This action runs a self-diagnosis using the OCDoctor's --troubleshoot option on the asset.
To debug a job, perform the following steps:
Select the job and click the Debug Job Using OCDoctor icon.
Select either Run New Self Diagnosis to run a new self diagnosis or Work on Previous Self Diagnosis to view the results of a prior self diagnosis. If you select Work on Previous Self Diagnosis, the results of the prior self-diagnosis are displayed, and you can re-run the self diagnosis.
Attempt to fix issues by selecting Attempt to Fix Issues, or select Collect Logs to collect log files from the target.
Review the summary information and click Finish to launch the self-diagnosis job.
Review the job details or rerun the wizard and select Work on Previous Self Diagnosis to view the data gathered by the self diagnosis.
The Enterprise Controller sets several variables for job management, including the time-out values for jobs and tasks. You can modify the values to improve performance. The following are the time-out values for jobs and tasks:
jobtypeweight.FirmwareProvisioningJob - This value sets the relative weight of firmware provisioning jobs. Do not modify this value unless directed by Oracle Support.
taskTimeOut - This value sets the time, in minutes, after which a task will time out and fail.
tierTimeOut - This value sets the time, in minutes, after which a job that has not been picked up by a Proxy Controller will fail.
totalAllowedWeight - Do not modify this value unless directed by Oracle Support.
totalDispatchWeight - This value sets the total weight of jobs that can be performed in parallel. Increase this value if your Enterprise Controller system can handle additional jobs.
To modify the Job Manager values, perform the following steps:
In the Navigation pane, select Administration, then select the Enterprise Controller and click the Configuration tab.
In the drop-down menu, select Job Manager properties.
Edit the values, then click Save.
To follow the progress of a job, view the Job Details. If a job does not complete successfully, you can examine the following log file on Oracle Solaris system: /var/cacao/instances/oem-ec/logs/cacao.*
For instructions on performing actions or to learn more about the role of this feature, refer to the following:
|
Copyright © 2007, 2012, Oracle and/or its affiliates. All rights reserved. Legal Notices |
|