| Oracle® Enterprise Manager Cloud Administration Guide 12c Release 2 (12.1.0.2) Part Number E28814-03 |
|
|
PDF · Mobi · ePub |
| Oracle® Enterprise Manager Cloud Administration Guide 12c Release 2 (12.1.0.2) Part Number E28814-03 |
|
|
PDF · Mobi · ePub |
This chapter describes the Chargeback application and details the administrative tasks necessary to set up and run the application. It then presents various ways to access and use the information Chargeback collects and aggregates.
The chapter contains the following sections:
This section gives a brief overview of the most important aspects of Chargeback. It covers the following topics:
The purpose of Chargeback is to gather data on resource use, allocate charges for the use of these resources, and present the results in a comprehensible format.
Chargeback is used to allocate the costs of IT resources to the people or organizations who consume them. While it can be applied in situations where IT resources are dedicated, it is particularly relevant in situations where resources are shared, as without some way to meter and charge for consumption there will be a tendency for users to use more resources than they need. This problem is exacerbated in cloud environments where users are able to provision their own resources using self-service.
Consider the following primary use cases:
Increasingly, organizations are adopting consolidation platforms such as Oracle Exadata and Oracle Exalogic, where there are multiple applications running on a shared hardware platform. There needs to be a way to meter the resources consumed by each application so charges can be applied accordingly. This, in turn, helps to measure the business value of IT investments so that priority can be given to the applications with the greatest return on investment (ROI).
With the popularity of cloud computing on the rise, where users have the ability to self-service provision resources such as databases and virtual machines, it is highly desirable to be able to meter the resources each cloud consumer uses so that they can be charged based on their consumption. Cloud consumers likewise benefit by rationing their consumption to that which provides optimal business value, thus contributing to the overall ROI of the organization's IT investment.
To sum up, adopting a Chargeback (or Showback) model can deliver significant benefits to both IT and Line of Business users:
Chargeback benefits users by placing them in control of their IT costs.
Chargeback benefits IT by driving up utilization rates while reducing the number of physical servers they need to manage.
Chargeback, as the name implies, is a tool of accountability. The application's primary uses can generally be described as follows:
Provide resource usage metering by aggregating and normalizing the enormous amount of metric data Enterprise Manager collects.
Provide IT a means to "charge" a currency amount to internal organizations that use resources.
Provide internal organizations and users with reports detailing their consumption and charges.
Chargeback has three basic metrics against which to compute resource consumption: CPU usage, and memory and storage allocation. These metrics comprise a universal charge plan that can be applied to any target type configured for Chargeback.
While CPU, memory and storage can be used for Chargeback across a variety of target types, there may be situations where target-specific charges are required. In this instance, an extended charge plan can be used. The extended charge plan provides greater flexibility to Chargeback administrators, enabling them to:
Define target type-specific charges
Define fixed, configuration, and usage-based rates
Override or adjust universal plan rates
Chargeback provides an out-of-box extended plan that you can use as a template for creating your own extended plans tailored to your environment. The shipped extended plan serves an Oracle VM Guest target type where charge items and applicable rates vary depending on machine size. The sample plan derives from the Cloud Infrastructure self-service portal (from the Setup menu, select Cloud, then select Infrastructure).
When charges for the consumption of resources are calculated, these charges must be assigned somewhere. In Chargeback, the assignment of these costs is to a cost center. Cost centers are typically organized in a business hierarchy and may correspond to business units—sales, engineering, human resources, and so forth. The cost center hierarchy is defined within the Chargeback application and is used for rollup and drill-down purposes when reporting on usage and charges.
Enterprise Manager collects metric and configuration information on targets and stores it in the Management Repository. These collections occur with varying frequencies. When a target is added for Chargeback, the application extracts the data from the repository and transforms it for use in Chargeback-dedicated tables. This process of extracting and transforming data is the Chargeback data collection process, which is scheduled to run every 24 hours. Chargeback maintains its own data collection tables because it needs to perform various transformations on the data, and to provide a historical data reference.
Chargeback uses information that Enterprise Manager collects as a basis for metering. Chargeback metrics can be configuration-based, usage-based, or availability-based.
Configuration-based metrics refer to things such as number of CPUs or database version; these metrics are considered static and thus have a daily aggregation.
Usage-based metrics refer to things such as CPU utilization or memory consumption; these metrics have an hourly aggregation.
Availability-based metrics measure the time a target is available, otherwise known as a target's uptime. It is the number of minutes in a given hour a target is considered available. The charge is prorated for downtime.
Charges can also be applied at a fixed rate.
Target types for which charge rates can be defined for specific metrics include host, virtual machine, WebLogic Server, and database. Composite target types can also be added to Chargeback. These include Cluster Database, Oracle WebLogic Cluster, Oracle WebLogic Domain, Oracle VM Zone, Oracle VM Server Pool, and so forth. Adding groups and systems automatically includes all members that are valid Chargeback targets. After a target has been added to Chargeback, a collection job will run once a day against target tables in Enterprise Manager to extract information for use by Chargeback.
Note:
Changes in Chargeback setup are not immediately reflected in reports. For example, if you change a cost center assignment, it may take up to 24 hours (until the next data collection job runs) for reports to show the change. If you have SYSMAN Super Administrator privileges, however, you can initiate data collection on-demand from the Targets tab. To do this, select On-demand data collection from the Action menu.Chargeback targets can be added in dedicated or shared mode.
Dedicated means a consumer or a group of consumers are using a target where charges accrue against a single cost center.
Shared means consumers belong to different groups; charges accrue against different cost centers.
All supported target types can be added as dedicated. Database and WebLogic Server also can be configured as shared.
A shared database makes multiple database services available to sharing groups, which use different service names; charges are by the service.
A shared WebLogic Server makes multiple J2EE applications available to sharing groups; charges are by the application.
A key component of cloud computing is availability of self service applications. Enterprise Manager includes SSAs for Oracle VM, database, and middleware.
To access the respective portal, from the Enterprise menu, select Cloud, then select Self Service Portal.
On the Self Service Portal page, select the respective radio button.
My Servers–to request and manage servers in an Oracle VM zone.
My Databases–to request and manage database services in a PaaS Infrastructure zone.
My Middleware–to request and manage middleware services in a PaaS Infrastructure zone.
Note that each self service portal home page includes a Chargeback tab that shows the charges on the SSA targets requested by the SSA user for the current SSA service. It also shows the total charge for the SSA user in the specific service type, which can be on a single PaaS Infrastructure zone or multiple PaaS Infrastructure zones for the database service.
While performing cloud setup, you can link directly into Chargeback to configure the respective zone. Note that zone setup is a prerequisite.
From the Setup menu, select Cloud, then select as follows:
Infrastructure–to set up VM types.
Database–to set up database resource pools.
Middleware–to set up middleware resource pools.
Each respective home page has a Chargeback selection on the left. Click it to display an informational page on Chargeback setup that includes links into Chargeback to perform setup.
Chargeback supports three zones:
PaaS Infrastructure (includes DBaaS and MWaaS)
Oracle Exalogic (depends on Exalogic zone support in the Enterprise Manager for Oracle Cloud plug-in)
Oracle VM
Within Chargeback, the respective zone hierarchies appear as follows on the Targets tab, under the Servers, Storage and Network category:
Note:
A PaaS Infrastructure zone can contain a database instance, a RAC instance, a Composite application, or any combination of these three, as represented below.| Zones | Zone Hierarchy |
|---|---|
| PaaS Infrastructure | PaaS Infrastructure Zone
Single Instance Database Cluster Database Database Instance1 Database Instance2 Oracle Composite Application WebLogic Domain WebLogic Cluster Oracle WebLogic Server1 Oracle WebLogic Server2 Oracle WebLogic Server |
| Oracle Exalogic | Oracle Exalogic Zone
Oracle Assembly Instance Oracle Tier Instance Oracle VM Guest1 Oracle VM Guest2 |
| Oracle VM | Oracle VM Zone
Oracle VM Server Pool Oracle VM Guest1 Oracle VM Guest2 |
The following characteristics apply to all target type zones:
Adding a zone for Chargeback automatically includes all child instances.
Removing a zone from Chargeback automatically removes all child instances.
A child instance with no explicitly assigned charge plan inherits the plan of its nearest ancestor above it in the hierarchy.
A child instance with no explicitly assigned cost center inherits the cost center of its nearest ancestor above it in the hierarchy.
Querying on charges at a given level within the hierarchy will include all charges for the levels below (either directly or indirectly).
New members discovered or added to a zone are automatically recognized by Chargeback at the next data collection cycle.
The SSA user is automatically associated with the SSA target as the cost center, when the SSA target is added for Chargeback. See Assigning Cost Centers to Targets to learn about assigning cost centers. When assigning charge plans, a plan assigned to a zone applies to all members within the zone that do not otherwise have a plan assigned. See Assigning Charge Plans to Targets to learn about assigning charge plans.
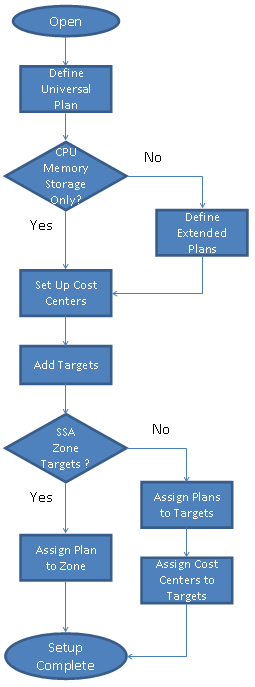
This section describes the following tasks, which must be completed to implement and support Chargeback services:
The person performing these tasks must have the necessary privileges. These privileges can be granted using the EM_CBA_ADMIN role. Figure 4-1 shows a simple workflow of steps required to set up Chargeback.
Following initial setup, you perform tasks on a regular basis, such as:
Adding new targets for Chargeback
Updating charge plans
Assigning charge plans and cost centers
Other events happen automatically:
SSA target charges are rolled up to higher-level cost centers
New targets that are members of a composite target (a VM Guest in a VM zone, for example) are discovered and added for Chargeback
The daily data collection job is responsible for capturing these changes, in addition to collecting metric and configuration data.
As described in the Overview, there are two types of charge plan, the universal charge plan and an extended charge plan.
The universal plan uses three basic metrics against which to compute resource consumption: CPU, memory, and storage.
An extended charge plan enhances the universal plan to include target-specific metrics. You may want to implement charges that relate to specific characteristics of a target. An extended charge plan affords that flexibility. The target type determines the items for which usage rates can be charged.
In defining an appropriate charge plan for use with a given target type, you have to decide on a case-by-case basis whether the three basic metrics of CPU, memory, and storage are sufficient to charge for resource use. If the answer is no, then you have to define an extended plan for the target type.
In any case, you want to define a universal charge plan for general use. You can then indicate in an extended charge plan how the universal plan rates apply.
This section covers the following topics:
The universal charge plan establishes rates for three basic metrics (CPU, memory, and storage). For example, charge a dollar a day for a CPU (generic), two dollars a day per GB of memory, and a dollar a day per GB of storage. Optionally, different rates can be applied per CPU architecture. For example, charge different rates for a PA-RISC, a SPARC, and an x86.
From the Enterprise menu, select Chargeback.
Select the Charge Plans tab.
Set the rates and charge frequency for the three basic metrics.
Select the default CPU row and click Edit.
In the dialog that opens, set the rate and charge frequency and then click OK.
Set rates and charge frequency for memory and storage allocation in similar fashion.
Make additional entries for different CPU architectures, as required. Click the Add button.
In the dialog that opens, select the architecture from the drop-down list, set the rate and charge frequency, and then click OK.
The rates set here are effective from the beginning of the current month, and have no impact on any previous month.
You can also initiate this action (manage universal plan) from the Home tab.
Updating the Universal Charge Plan
Periodically, it may be desirable to adjust the universal plan rates.
From the Enterprise menu, select Chargeback.
Select the Charge Plans tab
Change charge rates and frequencies as appropriate. Select the table row of the base metric you want to change and click Edit. Make the changes and click OK.
You can view rates set for previous months, but can only modify rates when the current plan version (date range) is selected.
An extended charge plan consists of groups of target-type specific charge items. Target-specific charge templates are available for host, virtual machine, database and WebLogic Server target types.
With an extended plan you can base charges on target-specific charge items. For example, you may want an additional charge for a host running Windows OS, or a database with the Partitioning option installed. In addition to configuration- and usage-based charge items, you can include a fixed charge. For example, charge a $100 a month for each host, regardless of consumption.
Conditions introduce considerable flexibility when creating extended charge plans. With conditions, you set charges based on properties. The sample extended plan, for example, sets conditions on a VM Guest target type, based on the machine size of the virtual machine, allowing for different sets of charges to apply depending on machine size.
Similarly, you can place a condition on a charge item that determines if a charge will be applied. For example a condition set on Partitioning means charge only if partitioning is used.
Use the Like condition operator with string-based target type and charge items to match a range of string values. For example, set a Like condition on a database instance to match on all 11g releases (Like 11%). Or use it as a wildcard (Like %) to match on any string of characters (or none). Use an underscore (Like _) to match any single character. Use backslash to escape a wildcard character (Like \%). Use a double backslash to escape the escape character (Like\\%).
Contrast the Like operator with the Equals operator, where the match must be exact, and there is no wildcard recognition. So, for example, Equals 11.2% does not match 11.2.0 or 11.2.1. You must specify Equals 11.2.0 or Equals 11.2.1.
Consider these other condition examples:
For a shared database, set a condition to base the charge on the nodes of a RAC.
For a dedicated database instance, use the SQL Executions charge item to set a charge rate on SQL statement executions per second.
Conditions give you flexibility. For example, you may want to create many charge plans with no conditions and assign individually to targets. Or, you can create a single charge plan with many conditions, and assign to many targets.
An extended charge plan allows you to customize how charges accrue.
From the Enterprise menu, select Chargeback.
Select the Charge Plans tab.
In the Extended Charge Plan region, click Create, type a name for the new charge plan, and then click OK.
On the Edit Extended Charge Plan page, click Add. Complete the dialog that opens as follows:
Select a target type from the drop-down list.
For Database Instance or Oracle WebLogic Server, indicate whether it is shared.
Select whether to apply a condition. Default means match on target type unconditionally
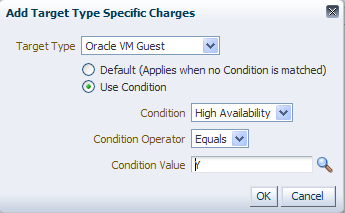
The target type selected drives the list of conditions available. Select from the list, choose an operator, and set the condition value. You can specify a value or click the search icon to select the condition value from a list, or to search for some other value. For the sample extended plan, for example, three conditions are set for target type VM Guest, where the specified value for machine size can be small, medium, or large. To compute charges, Chargeback tests the conditions against the target in question and calculates accordingly. You might, for example, set a condition of high availability equals yes for a VM Guest target type.
Note that you cannot set conditions for a shared WebLogic Server.
Figure 4-2 shows a condition set on a VM Guest target type for high availability.
Add charge items based on target type for billing purposes. In the Charge Items tab, click Add. Complete the dialog that opens as follows:
Select a charge item from the drop-down list. The list of items derives from the target type. The unit of measure to which the charge applies appears as well, where applicable (MB, GB, and so forth). For a shared database, charges are per service. For a shared WebLogic Server, charges are per application.
Select the charge type; that is, whether the charge is usage-based, config-based, or a flat rate. These choices vary, depending on the charge item selected.
Specify the rate at which to charge for the item.
Select from the drop-down list the frequency at which to apply the charges. It's not unusual to have different frequencies for charge items within the same target type, depending on whether the item is a config or metric, and the charge is a flat rate or usage-based.
Select whether to apply a condition; that is, something that must happen, a threshold reached for example, to generate charges. Default means apply unconditionally.
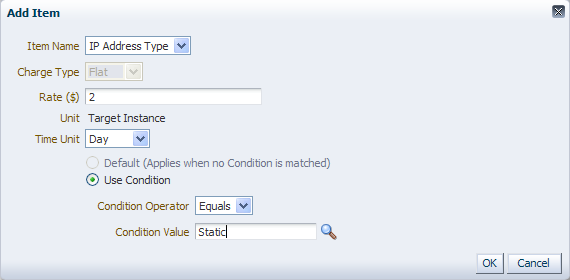
Figure 4-3 shows a condition set on a charge item within the VM Guest target type that sets an additional flat rate charge when the IP address type is static.
Click OK.
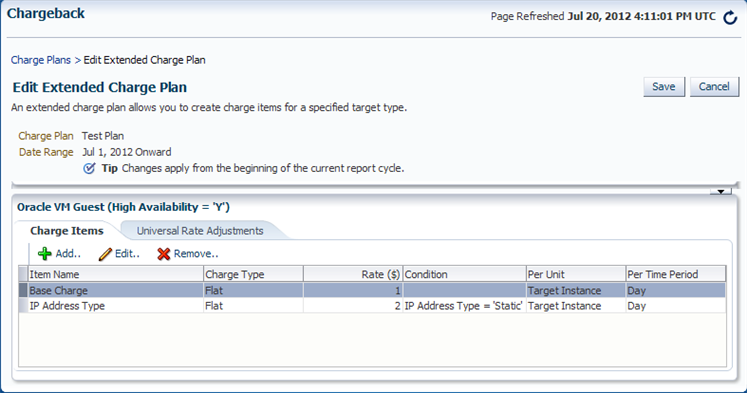
Repeating the step to add an additional charge item of a base rate of a dollar a day, the extended charge plan might be summarized so far as follows: When the target type is a high availability VM Guest, charge a flat base rate of a dollar day per target instance. In addition, if the target has a static IP address, charge an additional flat rate of two dollars a day, as shown in Figure 4-4.
Optional. Make rate adjustments to the basic metrics for this extended charge plan. Make adjustments by specifying a factor of the base rate, where 1, the default, represents the prevailing base rate. So, for example, enter 1.5 to increase the rate by 50 percent; enter .5 to decrease the rate by 50 percent. If you want to ignore a universal plan rate altogether, enter 0.
For a shared database, only the CPU rate can be adjusted. No adjustments can be made for a shared WebLogic Server.
Click Save (top right of the page) to create the new extended charge plan.
You can now assign the extended charge plan to a target instance of the appropriate target type. Remember that extended charge plans are automatically effective from the beginning of the month.
You can also initiate this action (manage extended plans) from the Home tab.
Updating an Extended Charge Plan
Over time and given analysis, you will want to make changes to extended charge plans.
From the Enterprise menu, select Chargeback.
Select the Charge Plans tab.
In the extended charge plan region, select in the drop-down list the plan you want to update and click Edit.
On the Edit Extended Charge Plan page, make the necessary edits to target type-specific charges and charge items by selecting a row in the respective table and clicking the Edit or Remove button, as appropriate. Also make any desired adjustments to universal rates.
Note that you can only modify rates when the current plan version (date range) is selected, such that the date on which you make the changes falls between the start and end dates of the plan version.
Click Save to complete the plan update.
Cost centers are vehicles for aggregating charges. A cost center can be an individual, a department within an organization, or a multitiered business hierarchy that spreads charges across the enterprise. You can create a business hierarchy by setting up cost centers and assigning users to the business units.
A cost center can originate in the following ways:
When you make a server request in the process of setting up a self service application, the Cost Center target property of the target, VM Guest for example, is automatically set to the user login of the person making the request. When the target is configured for Chargeback, the user login appears in the Cost Center column for that target on the Targets tab and is consigned to the default cost center from which it can subsequently be reassigned to another cost center.
Similarly, you can manually set a target's Cost Center target property to an appropriate value (user ID), which will subsequently be imported and appear in the Cost Center column on the Targets tab when the target is configured for Chargeback. The user ID will also be consigned to the default cost center from which it can subsequently be reassigned to another cost center.
To create a cost center in this fashion:
On the All Targets page, select the target in question and go to the target home page.
From the target type menu, select Target Setup, then select Properties.
Click Edit and enter a value for the Cost Center property, then click OK.
The value will appear as described when the target is configured for Chargeback.
Note that if you change the Cost Center property for a target that has already been added for Chargeback, the system does not recognize the new value.
To create a cost center manually:
From the Enterprise menu, select Chargeback.
Select the Cost Centers tab and then click the Add button.
Enter the appropriate information in the New Cost Center dialog:
The cost center takes a unique name by which it is known internally in the system.
The cost center also takes a meaningful name that appears in the user interface and generated reports.
Indicate the cost center's position in the tree hierarchy; that is, whether it should be root or nested. You can subsequently change its position in the hierarchy.
When you click OK, the new cost center appears in the table.
Cost centers typically equate to business organizations. When you select a cost center row, users who are part of the organization appear in the region below. Users can also be unassigned.
In addition to the cost centers you create, there also is a system default cost center that serves as a clearinghouse for unassigned users. Included in this group are the users designated as the Cost Center target property on the target home page. You can reassign these users to roll up charges to a higher-level cost center.
First, select the default cost center row in the Cost Center table. This exposes the users consigned to the default cost center.
Next, select a user row in the Users table.
Click the Assign to Cost Center button that is now active.
In the dialog that opens, designate the cost center to which to assign the user, then click OK.
The user now appears in the designated cost center.
As the cost centers list grows, you may find that you want to combine cost centers, sales under marketing, for example. To do so, select the cost center row, then select Move from the Action menu. The change is effective from the beginning of the current reporting cycle.
In the dialog that opens, indicate whether to include nested cost centers and choose where in the tree to move the cost center, then click OK.
At some point, you may decide to deactivate the cost center. To do so, select the cost center row and click the Remove button. Indicate whether to deactivate nested cost centers as well. The change is effective from the beginning of the current reporting cycle. Deactivation means the cost center can no longer be assigned to a target, but its association with targets remains in previous report cycles; that is, if you run a report for a previous cycle, the target assignment reflects the deactivated cost center.
Note the following about cost center moves, for example when a cost center (and its users) move to a different parent:
The user assignment of a target resource remains the same: the PC assigned to JDoe remains assigned to JDoe.
Likewise, the resource usage assignment remains the same, but the report rollup reflects the new cost center parent child relationship, unless the administrator changes the assignment. The cost center move effects a change in the usage assignment, which is associated with the cost center and user ID.
You can import a business hierarchy from an LDAP server. LDAP servers supported include:
Oracle Internet Directory
Microsoft Active Directory
Sun iPlanet
Novell eDirectory
OpenLDAP
From the Enterprise menu, select Chargeback.
Select the Cost Centers tab.
From the Action menu, select LDAP Settings.
The LDAP Settings dialog opens; it takes the following values:
Select the LDAP server type fro the drop-down list (default is Oracle Internet Directory).
Specify host name of the LDAP server.
Select what to use as the authentication ID (which attribute the LDAP server uses to authenticate: user name or e-mail address).
If a login is required, mark the check box and provide the credentials (where username is the LDAP server Principal, for example, cn=orcladmin).
Enter the port number of the LDAP server.
Check the box for a secure connection.
Check the box to enter a custom search base (base DN where users are stored; for example, dc=oracle,dc=com).
Select the level to which to maintain the cost center. This refers to the level within the cost center hierarchy to be synchronized with the LDAP server at the end of each report cycle. Note that any levels lower in LDAP than the specified level are subsumed into the specified level in Chargeback. So, for example, if you specify level 5, and LDAP has 7 levels, LDAP levels 6 and 7 are subsumed into level 5 in Chargeback.
Click OK.
An LDAP cost center overwrites a manually created cost center of the same name while maintaining target assignments. You can opt to reassign targets to some other cost center.
A successfully imported LDAP cost center hierarchy generates a scheduled repeatable job to run at the beginning of each report cycle (typically the first of the month) to sync the hierarchy with its counterpart on the LDAP server. You can also perform this operation on an ad hoc basis by selecting On-demand LDAP Sync from the Action menu.
Decide on the targets whose resources you want to manage within Chargeback. You have to add targets to start collecting metrics against which to calculate charges. Note that if you want to add a Real Application Cluster (RAC) that has member instances already monitored in Chargeback, you must first remove those instances from Chargeback.
You must have the ADD_CHARGEBACK_TARGET role assigned to add any target monitored in the Enterprise Manager instance that qualifies for Chargeback support. Without this privilege, the Add Targets button is disabled. The VIEW_TARGET role allows you to see Chargeback data related to a specific target. The VIEW_ANY_TARGET role allows you to see Chargeback data related to any target.
From the Enterprise menu, select Chargeback.
Select the Targets tab and click the Add Targets button.
In the Add Targets dialog, select the targets to manage, and then click OK. If there are no targets in the list, click the Target Selector button to search for targets to include.
Select the targets in the search results list and click Select.
In the Add Targets dialog, indicate whether the targets are to be shared across different cost centers. In particular, databases, RACs, and WebLogic Servers can be shared. The check box is disabled if a target is ineligible for sharing.
To share a database instance or a RAC, Enterprise Manager metric collection must be enabled. If you add a target before enabling metric collection, you will have to remove it and add it back in shared mode after enabling metric collection.
Click OK. Selected targets appear in the Target Name column, nested under the major target type categories (Databases, Middleware, and so forth). Selecting a zone automatically includes all targets within the zone.
You can also initiate this action (add targets) from the Home tab.
It may take up to 24 hours after a target is added to Chargeback for its metering data to appear.
To stop collecting data on targets, select the target or targets involved and click the Remove Targets button.
Note:
When you remove a target from Chargeback scope, its usage and charge data are dropped from the current report cycle. A warning to this effect appears as part of the removal process.A RAC can be shared by instance or by service. When shared by instance, each RAC member appears under the RAC node in the tree hierarchy in dedicated mode and so can be assigned to different charge plans and different cost centers. When shared by service, RAC services appear under the RAC node in the tree hierarchy. Services can be assigned to different cost centers, but must all be assigned to the same charge plan.
As new services for cluster members are discovered as part of the daily collection, they appear automatically in the tree hierarchy under the RAC node. The charge plan in effect is automatically assigned. Make cost center assignments accordingly.
Configuring Enterprise Manager Metric Collection for Shared Database Targets
For shared databases and RACs, metric data collection is disabled by default. You have to enable it before Chargeback can manage resources on these targets.
To effect change to metric data collections, you must be assigned the MANAGE_TARGET_METRICS role on the specific target.
From the Targets menu, select Databases.
Locate the target database instance in the table and open its home page (provide credentials if requested).
From the Oracle Database menu, select Monitoring, then select Metric and Collection Settings.
On the Metric and Collection Settings page, change the view to All Metrics.
Enable metric data collection for EM Database Services. Be sure you are enabling EM Database Services, not simply Database Services.
For a RAC, do this for each cluster member.
Cost centers are a way of distributing charges for resource usage. A cost center is automatically assigned to an SSA target as part of SSA setup (Cost Center target property). Use this manual process only for assigning cost centers to non-SSA targets.
From the Enterprise menu, select Chargeback.
Select the Targets tab. Targets without an explicitly assigned cost center should appear at the top. When charges are calculated, unassigned targets are assigned to the default cost center.
Select the target (or targets) to which you want to assign a cost center and click the Assign Cost Center button.
A dialog opens displaying a list of cost centers. Choose the cost center for the target (s) and click OK.
The table of target assignments refreshes to reflect the assignment.
Note that assigning a cost center to a composite target (system or group) maps directly to target members. For a composite target other than a system or group, the cost center assignment is directly to the composite target, and to any children that otherwise have no direct cost center assignment.
Shared services under a RAC node can be assigned to different cost centers.
Note:
For targets requested and provisioned through SSA, the Cost Center target property is set to the user login. Oracle recommends that to change the cost center assignment, you do so from the Cost Centers tab by selecting the user login in the default cost center and assigning to another cost center.To unassign a cost center, select the target or targets involved and select Unassign Cost Center from the Action menu.
The universal charge plan is assigned automatically when a chargeable target instance (host, database, WebLogic Server, VM Guest) that has no parent is added for Chargeback. There is otherwise no automatic assignment so you have the option of assigning plans individually to child members or assigning at an ancestor level and having the child members inherit the assigned plan.
An extended charge plan includes parameters for how to apply universal charge rates to an assigned target. You also can replace an extended plan by reassigning the universal plan to a target.
For SSA targets (zones), the person performing SSA setup assigns the charge plan to the zone as part of setup so that all targets within the zone inherit the plan. Targets within the zone can be assigned a different plan, if necessary, using this process. Note, however, that if a target within a zone already has an assigned plan, and the desire is to have all targets within the zone have the same plan assigned at the zone level, the plan already assigned must be removed from the target.
From the Enterprise menu, select Chargeback.
Select the Targets tab. A hierarchical list of targets appears showing assigned cost centers and extended charge plans.
Select the target or targets to which you want to assign a charge plan and click the Assign Plan button.
A dialog opens displaying a list of plans that apply only to the target type selected. Choose the plan you want to assign, then click OK.
The table of target assignments refreshes to reflect the assignment.
Note that assigning a charge plan to a composite target (system or group) maps directly to target members. For a composite target other than a system or group, the charge plan assignment is directly to the composite target, and to any children that otherwise have no direct plan assignment.
For shared services nested under a RAC node, charge plan assignment is the same for all services. Assigning to one applies to all. Any change in plan assignment is propagated across all services under the RAC node.
A RAC that is shared by instance can have different charge plans assigned to cluster members because they function in dedicated mode.
To unassign a charge plan, select the target or targets involved and select Unassign Plan from the Action menu.
Click the Chargeback Settings link on the Home tab to configure global settings for currency symbol and uptime calculations.
You can change the default currency (USD) by clicking in the currency symbol text box and entering the desired currency symbol. The new selection becomes the default currency across all charge plans; that is, the universal plan and all extended charge plans. All reports, including historical reports, reflect the new currency. Note that no rate conversion occurs when you change the currency; that is, the numbers stay the same. Change from dollars to euros and a one dollar charge becomes a one euro charge.
Select the appropriate radio button to ignore or include uptime in charge calculations. The default is to include uptime as a consideration. Note that to include uptime has an impact on all fixed and configuration-based charge calculations for all targets. Based on the number of targets and charge plans in play, this can affect performance, so use discretion when including uptime in the equation.
Chargeback prorates charges and discounts accordingly. So, for example, if a target was available 22.5 hours in a 24-hour period, the daily charge would be adjusted 1.5 hours. A change in the uptime setting is effective from the beginning of the current report cycle, but does not impact previous report cycles; that is, charges in historical reports are not prorated based on a change made to the setting in the current cycle.
To demonstrate the difference in factoring in uptime, consider the following charge plan configurations:
A universal charge plan that charges two dollars a day per gigabyte of memory allocation, a dollar a day per gigabyte of storage, and no charge for CPU usage
An extended charge plan for a Guest VM (medium), with a base charge of a dollar an hour and a memory allocation adjustment of x5
Given these charge plans, a user requisitions a Guest VM with 4 GB of memory and 100 GB of disk space for two consecutive days. The first day the uptime metric records 20 hours and the second day, 24 hours.
When uptime is not a factor in the calculations, the charge per day is 164 dollars, computed as follows:
Forty dollars a day for memory (4 GB* $2 * 5)
A hundred dollars a day for storage (100 GB * $1)
A base charge of 24 dollars a day (24 hours * $1)
When uptime is a factor, charges for the first day are 137 dollars (rounded up), computed by subtracting the four hours of downtime from the per day charge (20/24 * 164).
The payoff for setting up Chargeback is the wealth of information it puts at your fingertips. The information is available in a variety of formats, including pie charts and bar graphs. You can drill down to details by cost center, target type, and resource. Trending reports show charges and resource utilization over time, up to a year in fact, which can help in IT resource planning. In addition to the reporting function available to administrators within the application, self service users can view Chargeback information related to their targets within the self service portal, and Line of Business users can view Chargeback information in BI Publisher reports.
This section covers the following topics
Once you define charge plans, set up cost centers, and begin to monitor targets, trends in usage and charges emerge. The Home tab displays bar graphs that denote usage and charge trends over time. Each trend region has an Option link in the upper-right corner that opens a dialog where you can customize the display.
Customize the usage trend display as follows:
Time Period–Select the desired time period to chart usage trends; default is the current year
Aggregation–Select how to group usage across the selected time period; default is monthly
Usage Value Type–Show usage as a percent (utilization) or as a consumptive value; default is utilization
Resource–Show usage in terms of a particular metric (CPU, memory, or storage); default is the three metrics
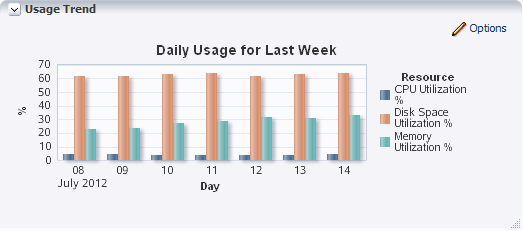
Figure 4-5 displays a usage trend showing CPU, disk, and memory utilization over the past week, aggregated daily.
Customize the charge trend display as follows:
Time Period–Select the desired time period to chart charge trends; default is current year
Aggregation–Select how to group charges across the selected time period; default is monthly
Group By–Group charges by either cost center or target type; default is cost center
Cost Center–Display charge trends for all cost centers, a particular cost center, or for unassigned users; default is all
Figure 4-6 displays a charge trend showing last week's charges for the VM Guest target type, aggregated daily.
You can view a target's metrics in graph form or as a time-stamped report of raw metric data. You can export the latter view to an external application such as a spreadsheet. You also can check metric collection status.
Note that you might have to expand the metric data region at the bottom of the Targets tab to expose the subtabs referenced in the instructions below.
From the Enterprise menu, select Chargeback.
Select the Targets tab and then select a target to view.
Select the Chart subtab below the targets list, to view a wave graph of data metrics for the target. Select the metric to display from the drop-down list on the right. The metric selection is target-type dependent. For a shared WebLogic Server, the metrics are per application. For a shared database, the metrics are service-related. For a RAC, metrics are represented as a multiline graph grouped by cluster member, where each line maps to usage by a particular member for the selected service.
Select the Data subtab to view the raw numbers. In this view, you can filter the data and export it as a csv-formatted file. You also can change the focus to another target. For a RAC, the view shows the same service data for all cluster members within the RAC.
Select the Collection Status subtab to glean statistical data such as error count and when metric data was last collected. For a RAC, collection status is for all cluster members within the RAC regardless of service selected.
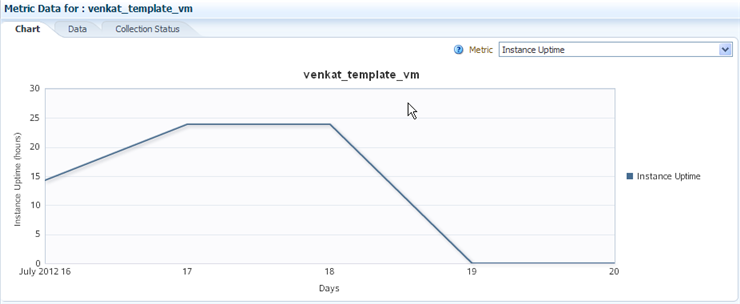
Figure 4-7 shows a chart tracking instance uptime for the selected target over a span of five days.
Note that you can see additional details on the Job Activity page.
From the Enterprise menu, select Job, then select Activity.
Click Advanced Search and specify the following filtering criteria:
Select Chargeback Data Loader as Job Type.
Select Targetless as Target Type.
Select appropriate values for Status and Scheduled Start.
Click Go.
The log output for each job step captures any warnings or errors encountered.
Chargeback reports are a powerful analytical tool for tracking resource usage and charge distributions.
Data collection occurs once a day. The daily data collection job for the current cycle is based on charge plan and cost center assignments. The reporting cycle defines the time period for which to calculate charges. The cycle is for the current month starting on the first day of the month.
Note:
Changes in Chargeback setup are not immediately reflected in reports. For example, if you change a cost center assignment, it may take up to 24 hours (until the next data collection job runs) for reports to show the change. If you have SYSMAN Super Administrator privileges, however, you can initiate data collection on-demand from the Targets tab. To do this, select On-demand data collection from the Action menu.To generate ad hoc reports:
From the Enterprise menu, select Chargeback.
Select the Reports tab.
Design your report from the following options:
Use the current report cycle or customize a date range to report on.
Choose between summary and trend report types. A summary report presents a pie-chart breakdown, while a trend report uses a y-axis multiple bar chart to denote usage trends.
Select specific cost centers or report on all users.
Select specific targets or target types or report on all targets within all target types.
Choose the metric to report on.
Click View Report to see the results.
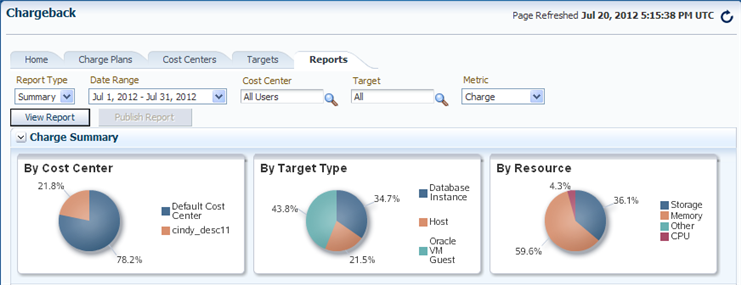
The report displays color-coded graphs summarizing charges by cost center, target type, and resource, with details displayed in the table at the bottom. Click a color box link in the respective graph to recalculate the report contents for the color-coded selection, for example memory in the resource graph.
Figure 4-8 displays a summary report showing charges for the current reporting cycle for all cost centers and target types, with a breakdown by resource.
Filter the details by choosing from the drop-down list; the default is All. Use the query-by-example feature (icon to the right of the action buttons) to search report details. The icon acts as a toggle; clicking it alternately shows or hides text and selection boxes above the table columns. The feature is also available in the View menu. Enter search criteria in various combinations by selecting a date and by typing values in the respective columns. Press Enter to activate the search.
Click the Export button in the details region to export report contents to file.
Click Publish Report to make report contents public. This action integrates with BI Publisher, where you can:
Save reports in a variety of formats (Excel, PowerPoint, HTML, PDF)
Distribute generated reports to e-mail lists (users who do not have access to Enterprise Manager, for example) on a defined schedule
For information on BI Publisher setup, see the "Installing BI Publisher on Enterprise Manager" chapter in the Enterprise Manager Advanced Installation and Configuration Guide.
When you choose to report on the uptime metric, the details display the fractions of hours in a day a target was available over the course of the reporting cycle. Note that reporting uptime does not prorate charges. The prevailing sense is to put in the hands of the customer how best to make adjustments to charges based on the report results. To this end, export the results to a Microsoft Excel html-formatted file for further analysis and consideration.
You can access Chargeback information as it relates to self service applications from the self service portal.
From the Enterprise menu, select Cloud, then select Self Service Portal.
Select the portal type radio button (My Servers, My Databases, or My Middleware).
Click the Chargeback tab to view the following informational breakdown:
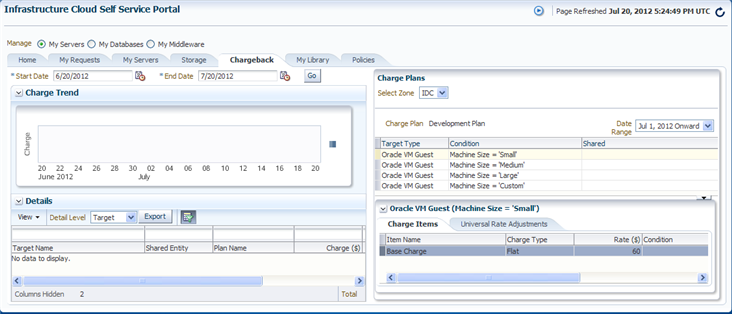
Charge Trend calculates charges across a date range for various metrics. If you hover over a metric, memory for example, the bar graph changes to reflect only that metric. Set a date range and click Go to recalculate charges.
Details below are a reflection of the charges and date range above. You can reorder the data by selecting from the Detail Level drop-down menu. You can also display additional information by exposing more columns.
Charge Plans allows you to select a zone to see the charge plan in effect, in this case, an extended charge plan defined for a specific target type. That target type, Oracle VM Guest for example, has certain charge items that were set as part of the plan definition and are displayed on the Charge Items tab. The charge plan determines the charges displayed in trends and details on the left. The other tab, Universal Rate Adjustments, shows adjustments if any made to the base plan rates (CPU, memory, and storage).
Figure 4-9 shows a sample Chargeback informational breakdown in the self service portal.
Amassed Chargeback data is a valuable commodity that can be made available to other applications. There are several ways to do this:
Export administrative reports (Export button on the Reports tab in Chargeback)
Publish administrative reports via BI Publisher (Publish button on the Reports tab in Chargeback)
Export details of charge trends for self service applications (Export button on the Chargeback tab in the self service portal)
Execute the EM CLI verb get_metering_data to generate comma-separated output on usage and, optionally, charge data. See Chapter 22, "Chargeback and Metering EMCLI Verbs" for more information.
|
Copyright © 2011, 2012, Oracle and/or its affiliates. All rights reserved. Legal Notices |
|