| Oracle® Enterprise Manager Cloud Administration Guide 12c Release 2 (12.1.0.2) Part Number E28814-03 |
|
|
PDF · Mobi · ePub |
| Oracle® Enterprise Manager Cloud Administration Guide 12c Release 2 (12.1.0.2) Part Number E28814-03 |
|
|
PDF · Mobi · ePub |
This chapter describes how to start using the Enterprise Manager Cloud Management solution. It includes the following sections:
A plug-in is an Enterprise Manager Server component (module) that can be plugged into an existing Enterprise Manager Server to extend its managing and monitoring capabilities. The Enterprise Manager Server is the component of Enterprise Manager where the centralized part of the Enterprise Manager application logic executes. This includes the Oracle Management Service (OMS) and the Management Repository. On both the OMS and Management Repository sides, Enterprise Manager Server may be considered as a combination of the platform and a set of plug-ins installed on top of the platform. To extend its capabilities of monitoring and managing, plug-ins are used on both the Management Server and the Management Agent.
Before you start monitoring virtualization targets with Enterprise Manager, the cloud plug-ins must be installed. You can install the cloud plug-ins in two ways:
While installing a new Enterprise Manager system, you can select the plug-ins that need to be installed from the software kit. The plug-ins required to monitor virtualization targets are:
These selected plug-ins are installed as part of the Enterprise Manager installation. For more details, see the Enterprise Manager Basic Installation and Configuration Guide.
If these plug-ins are not selected during Enterprise Manager installation, you can deploy the necessary plug-ins to the Management Service and the Management Agent. See Deploying the Cloud Plug-ins for details.
Plug-ins must first be downloaded to the OMS using Self Update before they can be deployed. To enable monitoring of virtualization targets, you must download the plug-ins and deploy them. The following plug-ins must be deployed on the Management Server:
Enterprise Manager for Oracle Virtualization
Enterprise Manager for Oracle Cloud Application
Enterprise Manager for Chargeback and Capacity Planning
Note:
After these plug-ins have been deployed to the Management Server, the Enterprise Manager for Oracle Virtualization plug-in must be downloaded to the Management Agent.
If you have installed the Enterprise Manager for Oracle Virtualization 12.1.0.2 and the Enterprise Manager for Oracle Cloud Application 12.1.0.2 plug-ins, and need to do an upgrade, you must install the 12.1.0.3 version of both the plug-ins. You cannot upgrade one plug-in without upgrading the other.
To deploy the cloud plug-ins to the Management Server, follow these steps:
Log in to Enterprise Manager as a user with the EM_CLOUD_ADMINISTRATOR role.
Click Deploy and choose Oracle Management Server from the Deploy list.
Be sure that dependent plug-ins are deployed and that all existing Management Agents are compatible with the version of the specified plug-in. Enterprise Manager prompts for credentials if the Management Agent is not available.
Note:
The plug-ins must be deployed on the Management Server (OMS) before they are deployed on the Management Agents. In a multi OMS setup, the plug-ins must be deployed on all the OMSes.Specify the required details on the Deploy Plug-in dialog box.
In the Version of Plug-in to Deploy section, select the Plug-in version from the Plug-in list. The Target Type information appears in the table. Enter the Repository sys Password, then click Continue.
Proceed through the steps in the Deploy Plug-in dialog box.
Click Deploy to deploy the selected plug-in on all Enterprise Manager servers. Enterprise Manager displays a page that allows you to monitor the deployment status. Enterprise Manager deploys the selected plug-in on all Enterprise Manager Servers.
To deploy the Enterprise Manager for Oracle Virtualization plug-in to the Management Agent, follow these steps:
Log in to Enterprise Manager as a user with the EM_CLOUD_ADMINISTRATROR role.
From the Setup menu, select Extensibility, then select Plug-ins to navigate to the Plug-ins page.
Expand the Servers, Storage, and Network folder and select the Enterprise Manager for Oracle Virtualization plug-in.
Click Deploy On and click Management Agent. The Deploy Plug-in On Management Agent: General dialog box appears.
Click Add in the Selected Management Agent section to add the agent on which the plug-in is to be deployed. When you click Add, Enterprise Manager displays the Search and Select dialog box where you can select the agents to add. Click Select to return to the Deploy Plug-in dialog box. Only agents running the operating systems supported by the selected plug-in can be selected.
Click Continue. The Deploy Plug-in On Management Agent: Pre-requisite Checks dialog box appears. Click Next to view the Review page.
Click Deploy to deploy the plug-in on the selected Management Agents. Click Show Status. Enterprise Manager displays a page that monitors the deployment status and begins the deployment process with the Install option. Deployment occurs in parallel on all selected agents.
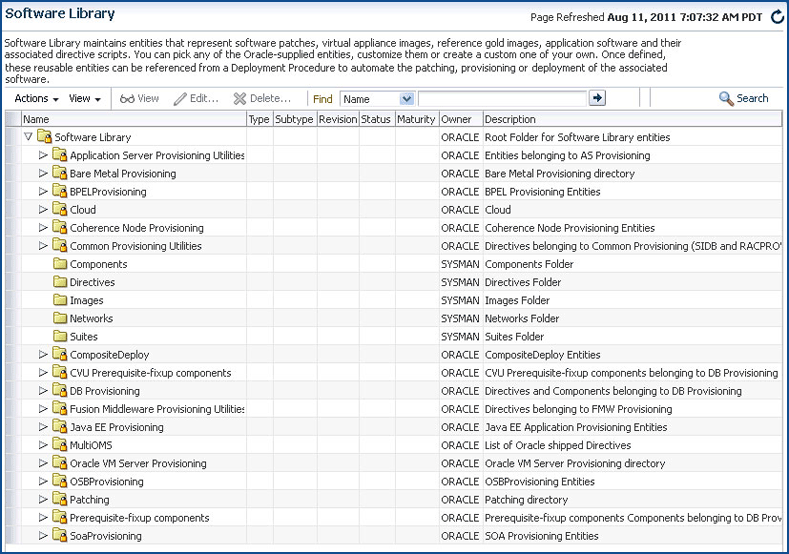
Oracle Software Library (Software Library) is a repository that stores software patches, virtual appliance images, reference gold images, application software and their associated directive scripts. It allows maintaining versions, maturity levels, and states of entities. The software entities can be automatically mass-deployed to provision software, software updates, and servers using Enterprise Manager Cloud Control in a reliable and repeatable manner. These provisioning operations, which are unattended and can be scheduled, lead to substantial cost savings.
Besides acting as a repository for certified software entities, the Software Library is a logical interface between the deployment models and the automation framework required to perform a large number of patching and provisioning tasks. You can pick any of the entities supplied by Oracle, customize them or create a custom one of your own. Once defined, these reusable entities can be referenced from a Deployment Procedure to automate the patching, provisioning or deployment of the associated software.
From the Enterprise menu, click Provisioning and Patching, then select Software Library to access the Software Library page. The following screen appears:
For the Software Library to be usable, at least one upload location must be configured. Upload File locations are locations configured for storing files uploaded by the Software Library as part of creating or updating an entity. To configure an upload file location, follow these steps:
Log in to Enterprise Manager as a user with EM_CLOUD_ADMINISTRATOR role.
From the Actions menu, click Administration. The Software Library: Administration page appears where you can select the storage location. A storage location can be of two types:
Upload File Locations: Upload File Locations are locations configured for storing files uploaded by Software Library as part of creating or updating an entity. Upload File Locations support two storage options:
OMS Shared File System: An OMS Shared File System location is required to be shared (or mounted) across all the Oracle Management Server (OMS) hosts. This option is ideal for UNIX systems.
For single OMS environments, you can configure the Software Library either on the host where the OMS is running or in a shared location, so that it is accessible to all the OMS hosts. For multiple OMS environments, Oracle recommends that you configure the Software Library in a shared location so that the storage is accessible through NFS mount points to all Oracle Management Servers in the environment.
Referenced File Locations: Referenced File Locations are locations that allow you, the end user to leverage your organization's existing IT infrastructure (like file servers, web servers, or storage systems). These location configurations are used by Software Library when there is a need to stage the files to host targets as part of a provisioning or patching activity. Referenced file locations can be HTTP, NFS, and Agent. For more details on configuring the software library storage, see the Configuring Software Library section in the Enterprise Manager Administration Guide.
After the Software Library storage has been configured, you can define virtualization entities such as assemblies, templates, ISO images, and virtual disks. See Creating the Software Library Components for details. For more details, see the Configuring Software Library chapter in the Enterprise Manager Administration Guide.
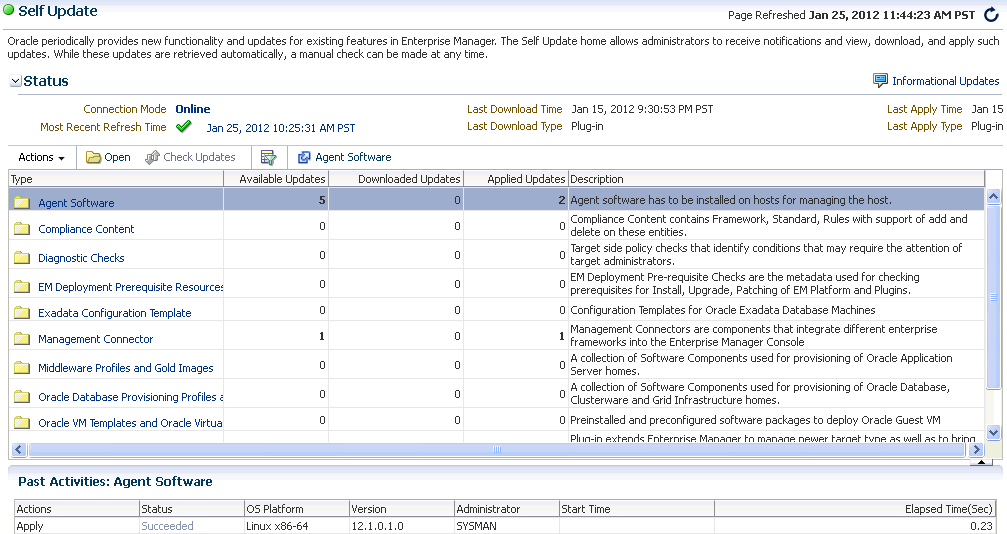
The Self Update feature allows you to expand Enterprise Manager's capabilities by updating Enterprise Manager components whenever new and updated features become available between official releases. Oracle makes functional updates available between releases by publishing them to the Enterprise Manager Store, an external site that is periodically checked by Cloud Control to obtain information about available updates.
Before you use the Self Update feature, the following prerequisites must be met:
My Oracle Support credentials must be configured. This allows you to download entities from the My Oracle Support site.
The Software Library (also known as the local store) must be configured. Updates are downloaded to this local store before being deployed into Cloud Control.
You can download the preconfigured assemblies and templates from the Self Update Console by following these steps:
Log in to Enterprise Manager as a user with the EM_CLOUD_ADMINISTRATOR role.
From the Setup menu, select Extensibility and then select Self Update. The Self Update Console with the list of entity types that can be downloaded appears.
Select the Oracle VM Templates and Oracle Virtual Assemblies folder and click Open. The Oracle VM Templates and Oracle Virtual Assemblies Updates page appears.
Select an update and click Download. The Schedule Download dialog appears.
Specify if the update is to be downloaded immediately or at a later date.
Click Select. An Enterprise Manager job is created to download the update to the Software Library. Enterprise Manager starts downloading the archive from the Oracle Enterprise Manager store. Wait for the download to complete. (When in offline mode the system starts reading from the specified location.) When the download is complete, the status indicates that that update has been downloaded.
Click Apply. A job is submitted to apply the update. The downloaded plug-in is applied and appears on the Oracle VM Templates and Oracle Virtual Assemblies Updates page.
System security is a major concern of any corporation. Giving the same level of access to all systems to all administrators is dangerous, but individually granting access to tens, hundreds, or even thousands of targets to every new member of the group is time consuming. With the Enterprise Manager administrator privileges and roles feature, this task can be performed within seconds, instead of hours.One Super Administrator, SYSMAN, is created by default during the installation of Oracle Enterprise Manager. The SYSMAN Super Administrator then creates other administrator accounts for daily administration work. The SYSMAN account should only be used to perform infrequent systemwide, global configuration tasks.The Super Administrator divides workload among his administrators by filtering target access, or filtering access to management task, or both through the roles, other resource privileges, and Target Privileges he grants them. For example, he can allow some administrators to view any target and to add any target in the enterprise and other administrators to only perform specific operations such as maintaining and cloning on a target for which they are responsible.
To set up a Private Cloud in Enterprise Manager, you need to use the following roles:
EM_INFRASTRUCTURE_ADMINISTRATOR: Users with this role have privileges to manage the Enterprise Manager infrastructure such as managing the plug-in lifecyle, self update feature, and so on.
EM_CLOUD_ADMINISTRATOR: Users with this role are responsible for setting up and managing the cloud infrastructure. This role is responsible for deploying the cloud infrastructure (servers, pools, zones) and infrastructure cloud operations for performance and configuration management. The EM_CLOUD_ADMINISTRATOR must have the following privileges:
View privileges on all the cloud targets.
Operator privileges on the targets (zones, pools) on which the assemblies and templates are being deployed.
These privileges are propagated to the Oracle VM Manager targets and allow the EM_CLOUD_ADMINISTRATOR to deploy assemblies and templates.
EM_SSA_ADMINISTRATOR: Users have the privilege to define the self service role. They can define quotas and constraints for the self service users and grant them access privileges. Users with this role have provisioning designer privileges, can create and view patch plans, and support the plug-in lifecycle on the Management Agent.
EM_SSA_USER: Users with this role can access the Self Service Portal.
In Enterprise Manager, Super Administrators can create, grant, and revoke roles. To create a CLOUD_ADMINISTRATOR, follow these steps:
Log in to Enterprise Manager as a Super Administrator user.
From the Setup menu, select Security, then select Roles.
Click Create in the Roles page to launch the Create Role wizard.
Provide a name and description for the role and click Next.
From the list of Available Roles, select the EM_CLOUD_ADMINISTRATOR role and move to the Selected Roles table. Click Next.
Accept the default target privileges and click Next.
Accept the default resource privileges and click Next.
Skip the Create Role: Administrators step and click Next.
Review the changes and click Finish to create the CLOUD_ADMINISTRATOR role.
Note:
Follow these steps to create roles but ensure that you select the relevant roles during the creation process.To create a user called cloud_admin and grant the CLOUD_ADMINISTRATOR role privileges, follow these steps:
Log into Enterprise Manager as a Super Administrator user.
From the Setup menu, select Security, then select Administrators.
Click Create in the Administrators page to launch the Create Administrator wizard.
Enter the name and password for the role and click Next.
From the list of Available Roles, select the EM_CLOUD_ADMINISTRATOR role and move it to the Selected Roles table. Click Next.
Accept the default target privileges and click Next.
Accept the default resource privileges and click Next.
Review all the changes and click Finish to create the cloud_admin user.
Note:
Follow these steps to create other users. For SSA users, theEM_USER and PUBLIC roles must be removed.Oracle Enterprise Manager provides tools and procedures to help you ensure that you are managing your Oracle environment in a secure manner. Enterprise Manager's authentication framework consists of pluggable authentication schemes that let you use the type of authentication protocol best suited to your environment. The following authentication schemes are available:
Oracle Access Manager (OAM) SSO
Repository-Based Authentication
SSO-Based Authentication
Enterprise User Security Based Authentication
Oracle Internet Directory (OID) Based Authentication
Microsoft Active Directory Based Authentication
Enterprise User Security (EUS) provides automatic authentication to users and roles from the LDAP compliant directory server. For more details, see the Enterprise User Security chapter in the Enterprise Manager Administration Guide.
You can configure Enterprise Manager and provide specific access to SSA users. To configure Enterprise Manager for SSA users, you must set some properties on the OMS and copy the required images to a specified directory. This section describes the following:
To launch a separate SSA login page for all SSA users, you must do the following:
Set the following mandatory property on all OMSes:
$ORACLE_HOME/bin/emctl set property -name oracle.sysman.ssa.logon.ssa_oms -value true
If this property is not set to true, the standard Enterprise Manager login page is displayed.
Set the following optional properties. If these properties are not set, the default Enterprise Manager 12c logo and copyright message is displayed.
$ORACLE_HOME/bin/emctl set property -name oracle.sysman.ssa.logon.show_cloud_provider_brand -value true
$ORACLE_HOME/bin/emctl set property -name oracle.sysman.ssa.logon.show_cloud_tenant_brand -value true
$ORACLE_HOME/bin/emctl set property -name oracle.sysman.ssa.logon.cloud_provider_alt_text -value "Cloud Provider"
$ORACLE_HOME/bin/emctl set property -name oracle.sysman.ssa.logon.cloud_tenant_alt_text -value "Cloud Tenant"
$ORACLE_HOME/bin/emctl set property -name oracle.sysman.ssa.logon.show_disclaimer_text -value true
$ORACLE_HOME/bin/emctl set property -name oracle.sysman.ssa.logon.disclaimer_text -value "Customer Specified Disclaimer Text"
$ORACLE_HOME/bin/emctl set property -name oracle.sysman.ssa.logon.show_em_branding_text -value true
Copy the following images to the $ORACLE_HOME/sysman/config/ directory.
cloud_provider_small_brand.png
cloud_tenant_small_brand.png
If a single image is used, the maximum recommended size is 500 * 20 px. If 2 images are used, the maximum recommended size is 200 * 20 px per image. After login, these images are displayed instead of the Oracle logo, if the OMS properties oracle.sysman.ssa.logon.show_cloud_provider_brand and oracle.sysman.ssa.logon.show_cloud_tenant_brand are set. If the OMS property oracle.sysman.ssa.logon.show_cloud_provider_brand is not set to true, along with the tenant logo, the default Oracle logo appears.
cloud_provider_large_brand.png
cloud_tenant_large_brand.png
If a single image is used, then the maximum recommended size is 525 * 60 px. If 2 images are used, the maximum recommended size is 250 * 50 px per image. These images are displayed on the login page, if the OMS properties oracle.sysman.ssa.logon.show_cloud_provider_brand and oracle.sysman.ssa.logon.show_cloud_tenant_brand are set.
To change the login page back to the Enterprise Manager default login page, set the following property:
$ORACLE_HOME/bin/emctl set property -name oracle.sysman.ssa.logon.ssa_oms -value false
If several SSA users are connecting to the OMS, you can configure the Server Load Balancer (SLB) to redirect all SSA requests to a specific OMS pool. This makes the other OMS pool available for administration usage. To redirect SSA requests, you must set the following SLB configuration:
https://<slb_host_name>:<slb_em_port>/em redirecting to oms for em
https://<slb_host_name>:<slb_ssa_port>/em redirecting to oms for ssa
The SSA and non-SSA OMS pools are differentiated based on the port number. All requests with a particular port number will be redirected to a specific OMS pool (SSA OMS pool) and all the other requests will be redirected to the other pool.
|
Copyright © 2011, 2012, Oracle and/or its affiliates. All rights reserved. Legal Notices |
|