| Oracle® Database 2 Day DBA 11g Release 1 (11.1) Part Number B28301-03 |
|
|
View PDF |
| Oracle® Database 2 Day DBA 11g Release 1 (11.1) Part Number B28301-03 |
|
|
View PDF |
Roles are named groups of related system and object privileges. You create roles and then assign them to users and to other roles.
This section contains the following topics:
See Also:
Oracle Database 2 Day + Security Guide for more information about administering user security, roles, and privileges
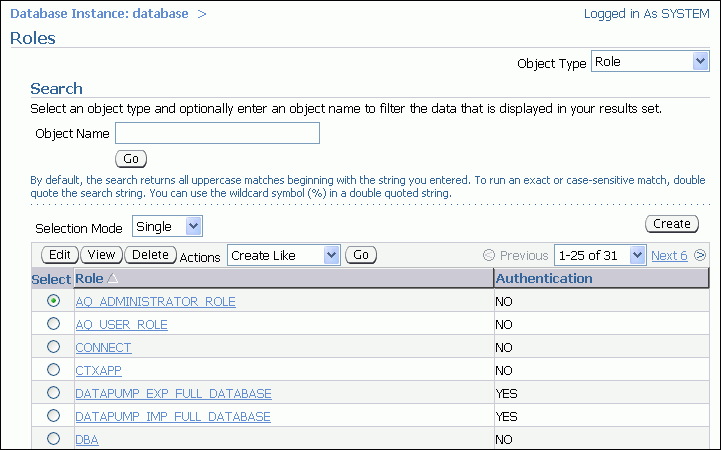
You view roles on the Roles page of Oracle Enterprise Manager Database Control (Database Control).
To view roles:
Go to the Database Home page, logging in with a user account that has privileges to manage roles. An example of such a user account is SYSTEM.
At the top of the page, click Server to view the Server subpage.
In the Security section, click Roles.
The Roles page appears.

If you want to view the details of a particular role, then in the Select column, select the name of the role you want to view, and then click View.
If you do not see the role that you want to view, it may be on another page. In this case, do one of the following:
Just above the list of roles, click Next to view the next page. Continue clicking Next until you see the desired role.
Use the Search area of the page to search for the desired role. In the Object Name field, enter the first few letters of the role, and then click Go.
You can then select the role and click View.
The View Role page appears. In this page, you can see all the privileges and roles granted to the selected role.
Suppose you want to create a role called APPDEV for application developers. Because application developers must be able to create, modify, and delete the schema objects that their applications use, you want the APPDEV role to include the system privileges shown in Table 7-2.
Table 7-2 System Privileges Granted to the APPDEV Role
| Privilege | Description |
|---|---|
|
|
Enables a user to create, modify, and delete tables in his schema. |
|
|
Enables a user to create, modify, and delete views in his schema. |
|
|
Enables a user to create, modify, and delete procedures in his schema. |
|
|
Enables a user to create, modify, and delete triggers in his schema. |
|
|
Enables a user to create, modify, and delete sequences in his schema. |
|
|
Enables a user to create, modify, and delete synonyms in his schema. |
To create the APPDEV role:
Go to the Roles page, as described in "Viewing Roles".
Click Create.
The Create Role page appears.
In the Name field, enter APPDEV.
Click System Privileges to go to the System Privileges subpage.

The table of system privileges for this role contains no rows yet.
Click Edit List.
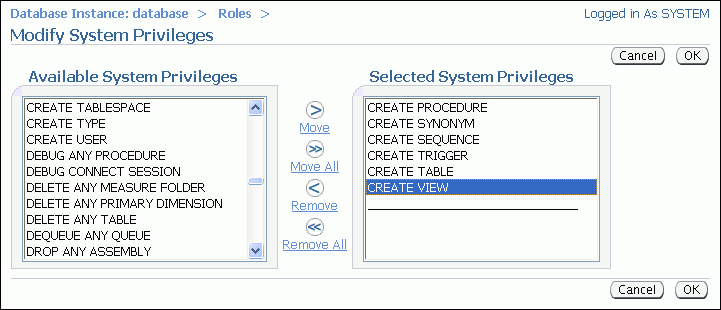
The Modify System Privileges page appears.
In the Available System Privileges list, double-click privileges to add them to the Selected System Privileges list. The privileges to add are listed in table Table 7-2.

Note:
Double-clicking a privilege is a shortcut. You can also select a privilege and then click the Move button. To select multiple privileges, hold down the Shift key while selecting a range of privileges, or press the Ctrl key and select individual privileges, then click Move after you have selected the privileges.Click OK.
The System Privileges subpage returns, showing the system privileges that you selected. At this point, you could click Roles to assign other roles to the APPDEV role, or click Object Privileges to assign object privileges to the APPDEV role.
Click OK to return to the Roles page.
The APPDEV role now appears in the table of database roles.
Suppose your applications make use of Oracle Streams Advanced Queuing, and you determine that developers need to be granted the roles AQ_ADMINISTRATOR_ROLE and AQ_USER_ROLE to develop and test their applications. You must edit the APPDEV role to grant it these two Advanced Queuing roles.
To modify the APPDEV role:
Go to the Roles page, as described in "Viewing Roles".
In the Select column, click APPDEV role, and then click Edit.
The Edit Role page appears.
Click Roles to navigate to the Roles subpage.
Click Edit List.
The Modify Roles page appears.
In the Available Roles list, double-click the roles AQ_ADMINISTRATOR_ROLE and AQ_USER_ROLE to add them to the Selected Roles list.
Click OK.
The Roles subpage returns, showing that the roles that you selected were granted to the APPDEV role.
Click Apply to save your changes.
An update message appears, indicating that the role APPDEV was modified successfully.
You must use caution when deleting a role, because Database Control deletes a role even if that role is currently granted to one or more users. Before deleting a role, you may want to determine if the role has any grantees. Dropping (deleting) a role automatically removes the privileges associated with that role from all users that had been granted the role.
To determine if a role has any grantees:
Go to the Roles page as described in "Viewing Roles".
In the Select column, click the desired role.
If you do not see the desired role, it may be on another page. In this case, do one of the following:
Just above the list of roles, click Next to view the next page. Continue clicking Next until you see the desired role.
Use the Search area of the page to search for the desired role. In the Object Name field, enter the first few letters of the role, and then click Go.
You can then select the role.
In the Actions list, select Show Grantees, and then click Go.
A report appears, listing the users that are granted the selected role.
Click Cancel to return to the Roles page.
To delete a role:
If you are not already there, go to the Roles page, as described in "Viewing Roles".
In the Select column, click the desired role, and then click Delete.
A confirmation page appears.
Click Yes.
A confirmation message indicates that the role has been deleted successfully.