| Oracle® Database 2 Day DBA 11g Release 1 (11.1) Part Number B28301-03 |
|
|
View PDF |
| Oracle® Database 2 Day DBA 11g Release 1 (11.1) Part Number B28301-03 |
|
|
View PDF |
This section discusses setting user preferences for Oracle Enterprise Manager Database Control (Database Control). It contains the following topics:
Oracle Enterprise Manager Database Control (Database Control) enables you to set user preferences in the following areas:
Notification
These settings enable Database Control to e-mail you alerts. Alerts are notifications that the database is in an undesirable state and needs your attention. By default, the Database Home page lists all alerts. However, setup is required for e-mail notification. For more information about alerts and setting up notifications, see "Setting Up Direct Alert Notification".
Blackout Administration
Blackouts suspend the collection of database monitoring data and the sending of alerts by Database Control. This enables you to perform scheduled maintenance on the database without receiving needless alerts and without skewing the monitoring data. For example, you can stop data collections during a database backup or a hardware upgrade. If you continue monitoring during these periods, the collected data will show trends and other monitoring information that are not the result of typical day-to-day operations. To get a more accurate, long-term picture of database performance, you can use blackouts to exclude these special-case situations from data analysis. See "Defining Blackout Periods" for more information.
Preferred Credentials
Database Control can automatically execute many routine administrative tasks, such as backups. This is done using a job scheduling system built into Database Control. To keep your environment secure, setting up tasks for automatic execution in Enterprise Manager requires you to provide login information for the host computer and database. To avoid entering this information every time you create or run a job or task, Database Control enables you to save this information as preferred credentials. Preferred credentials are stored in the database in encrypted mode to protect them from unauthorized use. See "Setting Preferred Credentials".
You can define one or more one-time or repeating blackout periods during which collection of database monitoring information and the sending of alerts are suspended.
To define a blackout period:
On any Database Control page, at the top of the page, click Setup.
The Enterprise Manager Configuration page appears, showing the Overview of Setup page.
In the left-hand pane, click Blackouts.
The Blackouts page appears.
Click Create to start the Create Blackout wizard.
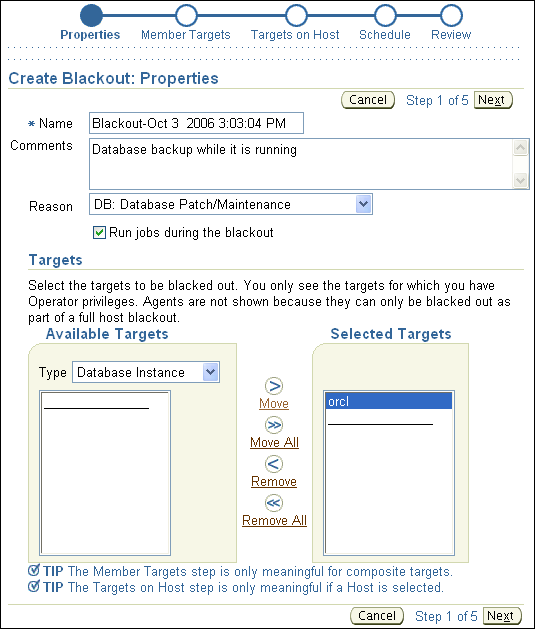
The Create Blackout: Properties page appears.

(Optional) Replace the default blackout name with one of your choosing.
(Optional) In the Comments field, enter text that describes the purpose of the blackout.
In the Reason list, select the blackout reason that is most appropriate.
In the Available Targets section, in the Type list, select Database Instance.
The system identifier (SID) for your database instance appears in the Available Targets list.
In the Available Targets list, select your instance SID, and then click the Move icon.
Note:
You can also double-click the instance SID.The instance SID is moved from the Available Targets list to the Selected Targets list.
Click Next.
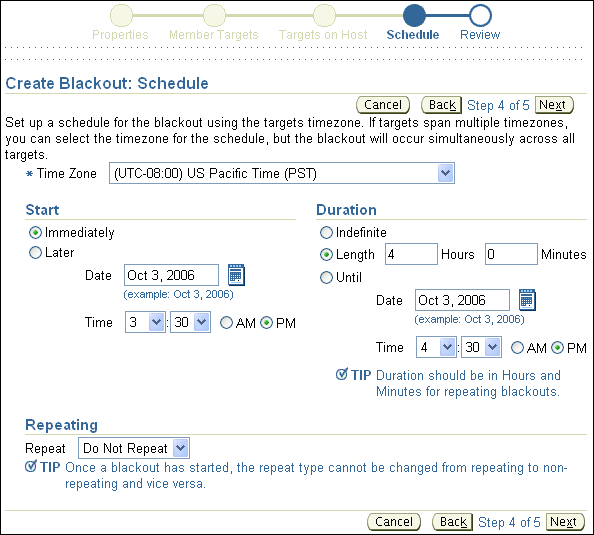
The Create Blackout Schedule page appears.

In the Start section, schedule the blackout either immediately or for a later date and time.
In the Duration section, indicate the duration of the blackout.
To repeat the blackout periodically, in the Repeating section, select a repeat frequency from the Repeat list.
Click Next.
The review page appears.
Review what you have entered. You can click Back to change a setting.
Click Finish.
The Confirmation page appears, with the new blackout period shown in the list.
See Also:
When you set preferred credentials, Database Control automatically fills in host computer and database login credentials for you at times when it usually prompts for these credentials, or when it is about to run a job that requires credentials.
To set preferred credentials for the database:
From any Database Control page, at the top of the page, click Preferences.
The Preferences page appears.
Click Preferred Credentials in the left-hand pane.
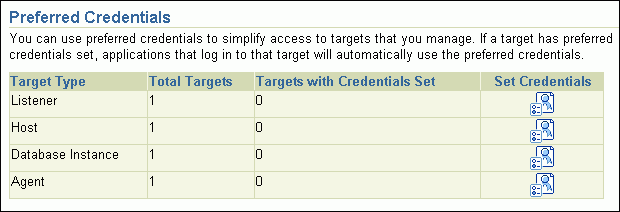
The Preferred Credentials page appears, showing a table of targets.

In the table row for the Database Instance, click the icon under Set Credentials.
The Preferred Credentials page appears.
Enter database credentials for Normal Username/Password and SYSDBA Username/Password, and enter host credentials for Host Username/Password. For example, you might typically connect as the user SYSTEM, use the SYS account for SYSDBA access, and use oracle for the host user name.
Note:
The host user may require certain host privileges to run background jobs such as database backups. For example, on UNIX and Linux, the host user must belong to the OSDBA group (typicallydba), and on Windows, the host user must be a member of the Administrators group and must be granted the Log on as batch job logon right. See your platform documentation for more information.Click Test to test your credentials.
A confirmation message is displayed if your credentials can be verified.
Click Apply to apply the changes.