Under normal circumstances, Workshop builds your files automatically and you can deploy at any time. Before you can deploy your application, you must have a successful build completed.
The following topic explains the basic concepts of deploying and debugging Workshop applications to WebLogic Server running in development mode.
Development Mode
Weblogic Server can be started in one of two modes: development or production mode. (When you start the Workshop server domain using the startup script provided, it runs in development mode.) In development mode, WebLogic Server behaves in ways that make it easier to iteratively develop and test an application: for example, it automatically deploys the current application in an exploded format and certain security restrictions on deployment are relaxed.
What Happens During Deployment
Deployment consists of three steps:
- Assembling (e.g., EJB generation and JWS compilation) if required.
- Publishing the files to the server.
- Running the application.
These three steps are normally done seamlessly. An EAR file is not generated for deployment to a single test server. The table below shows how different applications and application components are deployed both for development and for production.
|
||||||||||||||||||||||||||||||||||
What Gets Deployed
When you deploy, all open projects associated with the server are deployed. You can use the Project > Close Project command to close projects. You can also specify working sets (described in the Eclipse help system in the Workbench User Guide) to control how much gets built and deployed.
However, even though an entire application or group of projects was deployed, only the file/folder that you clicked on (to initiate the deploy) will display its results. For example, if you deploy from a page flow component file, that page flow will run in a new browser tab in the editor area. If you deploy a web service, the test client page for that web service will run in a new tab in the editor area. If the page flow or web service relies on other web services to run correctly, it will still work because all components are actually deployed.
You can also manage the projects that get deployed to the server.
Deploying your Application
There are two commands that deploy your application:
- Click Run As > Run on Server to deploy your application. This command starts the server in normal mode (if it is not already started), does pre-assembly, and runs the application.
- Click Debug As > Debug on Server to deploy your application in debug mode. This command starts the server in debug mode (if it is not already started), does pre-assembly, and runs the application.
If you wish to simply publish your files to the server, you can use the Servers view (described below) to publish only. The Servers view also allows you to un-deploy applications from the server.
Viewing the Results of Deployment
After you deploy your application, the Servers view is displayed automatically and the results of running your application are displayed in the editor area of the workbench.
If you are running a page flow, the initial JSP page will appear in a tab in the editor area. This tab is a test browser that allows you to run your application.
If you are running a web service, the test client appears in a tab in the editor area. This tab allows you to specify the parameters to an operation and make a request to that operation. The response from the operation is displayed in the same tab.
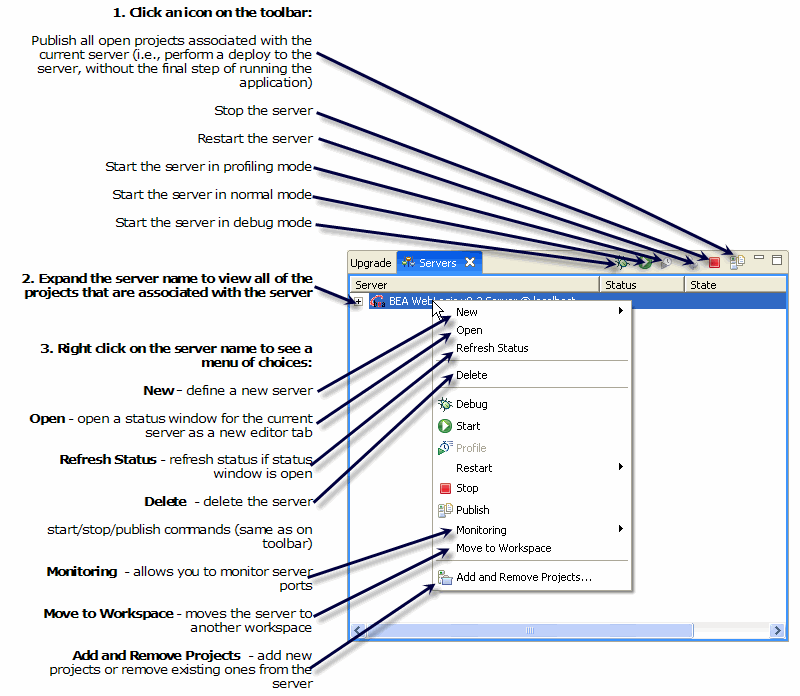
The Servers view opens automatically when you deploy/run your application. You can also open it manually by clicking Window > Show View > Other, expand Server and click Servers. There are many commands available from the Servers view for managing your server(s), as shown in the diagram below.
Deployment to WebLogic Server in Production Mode
The following procedure explains how to deploy Workshop applications to WebLogic Server running in production mode. This task is divided into three steps: