In the event that your JMeter client machine is unable, performance-wise, to simulate
enough users to stress your server, an option exists to control multiple, remote JMeter
engines from a single JMeter GUI client. By running JMeter remotely, you can replicate
a test across many low-end computers and thus simulate a larger load on the server. One
instance of the JMeter GUI client can control any number of remote JMeter instances, and collect
all the data from them. This offers the following features:
-
True performance measurment without network bottlenecks
-
Fast responsive GUI
-
Saving of test samples to a local machine
-
Managment of multiple JMeterEngines from a single machine
Note that while you can indeed execute the JMeterEngine on your application
server, you need to be mindful of the fact that this will be adding processing
overhead on the application server and thus your testing results will be
somewhat tainted. The recommended approach is to have one or more machines on
the same Ethernet segment as your application server that you configure to run
the JMeter Engine. This will minimize the impact of the network on the test
results without impacting the performance of the application serer
itself.
Step 1: Start the servers
To run JMeter in remote node, start the JMeter server component on all machines you wish to run on by running the
JMETER_HOME/bin/jmeter-server
(unix) or
JMETER_HOME/bin/jmeter-server.bat
(windows) script.
Step 2: Add the server IP to your client's Properties File
Edit the properties file
on the controlling JMeter machine
. In /bin/jmeter.properties, find the property named, "remote_hosts", and
add the value of your running JMeter server's IP address. Multiple such servers can be added, comma-delimited.
Note that you can also use the -J
command line option
to specify the remote host(s) to use.
E.g. jmeter -Jremote_hosts=host1,127.0.0.1,host2
Step 3: Start the JMeter Client
Now you are ready to start the controlling JMeter client. For MS-Windows, start the client with the script "bin/jmeter.bat". For UNIX,
use the script "bin/jmeter". You will notice that the Run menu contains two new sub-menus: "Remote Start" and "Remote Stop"
(see figure 1). These menus contain the client that you set in the properties file. Use the remote start and stop instead of the
normal JMeter start and stop menu items.
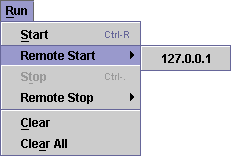
Figure 1 - Run Menu
|
10.1 Doing it Manually
|
In some cases, the jmeter-server script may not work for you (if you are using an OS platform not anticipated by the JMeter developers). Here is how to start the JMeter servers (step 1 above) with a more manual process:
Step 1a: Start the RMI Registry
JMeter uses Remote Method Invocation (RMI) as the remote communication mechanism. Therefore, you need
to run the RMI Registry application (which is named, "rmiregistry") that comes with the JDK and is located in the "bin"
directory. Before running rmiregistry, make sure that the following jars are in your system claspath:
-
JMETER_HOME/lib/ext/ApacheJMeter_core.jar
-
JMETER_HOME/lib/jorphan.jar
-
JMETER_HOME/lib/logkit-1.2.jar
The
rmiregistry application needs access to certain JMeter classes. Run rmiregistry with no parameters. By default the
application listens to port 1099.
Step 1b: Start the JMeter Server
Once the RMI Registry application is running, start the JMeter Server.
Use the "-s" option with the jmeter startup script ("jmeter -s").
Steps 2 and 3 remain the same.
|
|