| Oracle® Fusion Middleware Developer's Guide for Oracle SOA Suite 11g Release 1 (11.1.1.6.0) Part Number E10224-11 |
|
|
PDF · Mobi · ePub |
| Oracle® Fusion Middleware Developer's Guide for Oracle SOA Suite 11g Release 1 (11.1.1.6.0) Part Number E10224-11 |
|
|
PDF · Mobi · ePub |
This chapter describes how to use different Oracle Business Rules declarative components and task flows to develop high-performance, interactive, and multitiered applications that are also easy to maintain. It describes how to use the Oracle Business Rules Editor declarative component and the Oracle Business Rules Dictionary Editor declarative component and task flow. It also describes how to localize the ADF-based web application.
This chapter includes the following sections:
Section 26.1, "Introduction to Declarative Components and Task Flows"
Section 26.2, "Using the Oracle Business Rules Editor Declarative Component"
Section 26.3, "Using the Oracle Business Rules Dictionary Editor Declarative Component"
Section 26.4, "Using the Oracle Business Rules Dictionary Editor Task Flow"
Declarative components are reusable, composite User Interface (UI) components that comprise other existing Application Development Framework (ADF) Faces components. Consider an application that contains multiple JSF pages. On a particular page, a set of specific components is used in multiple parts of that page. In this scenario, if you make any changes to any of the components in the set, you typically must replicate the changes in multiple parts of the page. This approach makes it difficult to maintain the consistency of the structure and layout of the page. However, by defining a declarative component that comprises the given set of components, you can reuse that composite declarative component in multiple places or pages. Declarative components, thereby, save time and ensure integrity across pages, because when you make any changes to the components, the JSF pages using them automatically get updated.
ADF task flows are reusable components that provide a modular and transactional method in specifying the control flow in an application. You can use a set of reusable task flows as an alternative to representing an application as a single large JSF page flow, thereby providing modularity. Each task flow contains a part of the entire navigational plan of the application. The nodes in a task flow are called activities. Apart from navigation, task flow activities can also call methods on managed beans or call another task flow without invoking any particular page. This facilitates reuse because business logic can be invoked independently of the page being displayed.
This section discusses the Oracle Business Rules Editor declarative component. It also provides information on how to create and run an application using the Rules Editor component, and then deploy the application. In addition, this section lists the supported tags and the localization process for the application.
Oracle Business Rules Editor is a declarative component that can be embedded in any ADF-based web application. The component renders the user interface for rules editing and handles all events associated with rules editing. Rules Editor uses the Rules SDK2 API to create and edit rules.
Note:
You should not confuse Rules Editor with Rules Dictionary Editor. Rules Editor is used to edit rules inside a specified ruleset. In fact, Rules Editor is embedded within Rules Dictionary Editor. For more information about Rules Dictionary Editor, see Section 26.3, "Using the Oracle Business Rules Dictionary Editor Declarative Component."Using Rules Editor, you can edit rules and decision tables that are part of a single ruleset. You require to specify a RuleSetModel object, which is a wrapper around the Rules SDK ruleset object, as a parameter to the Rules Editor component. If multiple rulesets are required to be modified, multiple Rules Editor components must be instantiated, one for each ruleset.
The Rules Editor component performs the following functions:
Creates, updates, and deletes:
Rules in a ruleset, as shown in Figure 26-1:
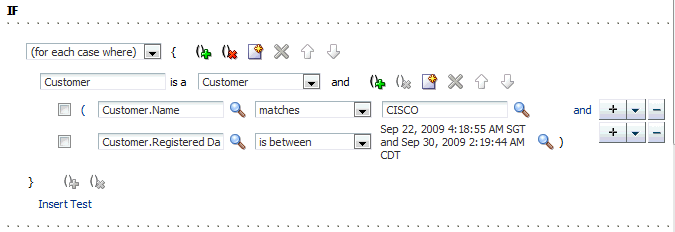
Simple tests or conditions in a rule, as shown in Figure 26-2:
Figure 26-2 Simple Tests or Conditions in a Rule
Actions in a rule, as shown in Figure 26-3.
Decision tables, as shown in Figure 26-4.
Sets effective dates and priorities for rulesets and rules.
Provides support for user-defined operators.
Provides a Condition Browser pop-up to display the left or right value options, as shown in Figure 26-5.
Provides a Date Browser for selecting date types, as shown in Figure 26-6.
Provides a Right Operand browser to handle multiple right-hand side expressions, as shown in Figure 26-7.
Provides support for nested rules, as shown in Figure 26-8.
Provides the Properties browser for editing properties of a rule action, as shown in Figure 26-9.
Provides an Expression Builder window to build custom expressions, as shown in Figure 26-10.
Provides Advanced Mode features for working with patterns and advanced actions, as shown in Figure 26-11.
Provides a Validation panel to manage error messages, as shown in Figure 26-12.
Figure 26-12 Validation Panel to Manage Error Messages

Note:
Once all the edits are done, the component user is responsible for saving the ruleset.This section lists the steps for creating and running a sample application by using the Rules Editor component.
The prerequisite for using the Rules Editor component to create ADF-based web applications is having a running installation of Oracle SOA Suite and Oracle JDeveloper on your computer.
To create a sample application by using the Rules Editor:
The first task is to create a sample application.
The steps are:
Open Oracle JDeveloper.
From the File menu, select New and then Generic Application to create an application.
Enter a name for the application in the Application Name field, for example, useRulesDCApp, and click Next as shown in Figure 26-13.
Figure 26-13 Creating a Generic Application
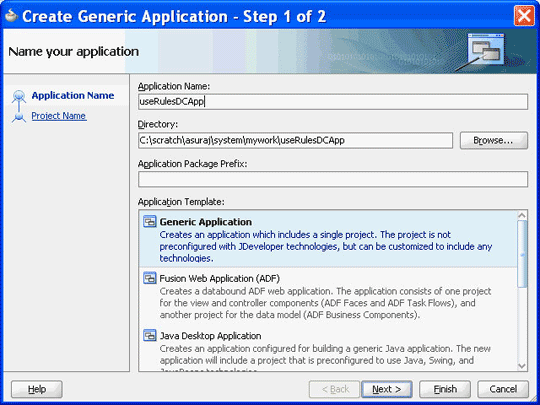
Enter useRulesDC in the Project Name field and ensure that ADF Faces is selected in the Project Technologies tab as shown in Figure 26-14.
Click Finish to create the project.
Right-click the useRulesDC project in the Application Navigator of Oracle JDeveloper, and select Project Properties to display the Project Properties dialog box.
In the Project Properties dialog box:
Click JSP Tag Libraries from the left panel.
Click Add and select ADF Faces Components from the Extension list in the Choose Tag Libraries dialog box, and click OK as shown in Figure 26-15.
Click Libraries and Classpath from the left panel and click the Add Library button to display the Add Library dialog box.
Click Oracle Rules and Oracle Rules Editor Component from the Extension list and then click OK as shown in Figure 26-16.
Figure 26-16 Selecting Oracle Rules and Rules Editor Component
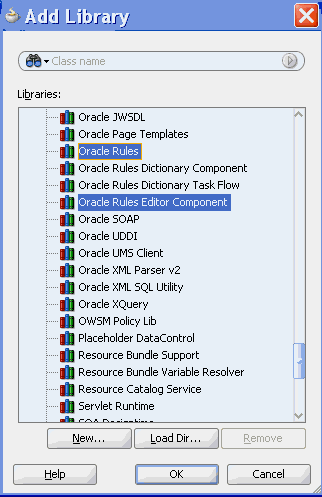
This adds the Rules SDK and the Rules Editor Component tag libraries to the project.
Click OK to close the Project Properties dialog box.
Select Save All from the Oracle JDeveloper File menu to save the project.
You have to ensure that all the required tag libraries are added:
Right-click the useRulesDC project in the Application Navigator of Oracle JDeveloper and select Project Properties to display the Project Properties dialog box.
Click JSP Tag Libraries from the left panel and check if all the tag libraries are added as shown in Figure 26-17.
Figure 26-17 Checking the Required Tag Libraries
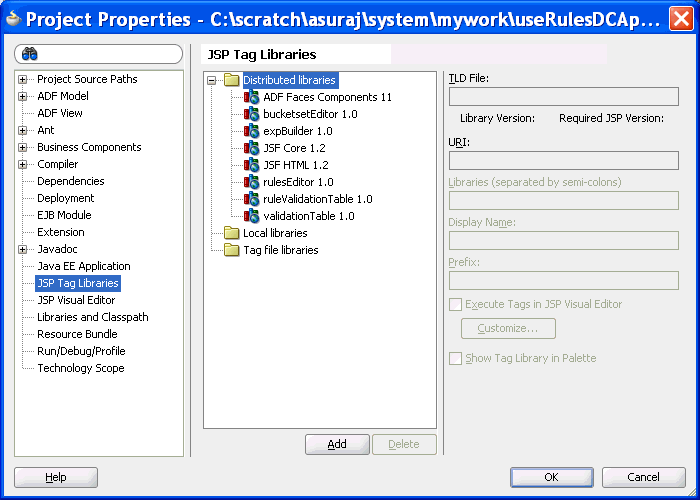
To create the RuleSetModel object:
The Rules Editor component requires a oracle.bpel.rulesdc.model.impl.RuleSetModel object. The component uses this object to read the rules and the decision tables that exist in the ruleset. So, the next task is to create a managed bean called SomeBean.java that creates a RuleSetModel object.
The steps are:
Open Oracle JDeveloper.
From the File menu, select New to display the New Gallery dialog box.
In the New Gallery dialog box, select Java under General from the Categories panel. Ensure that Java Class under Items is selected and click OK to display the Create Java Class dialog box.
Enter the name of the Java class, for example SomeBean.java, and click OK to create the Java class in your project as shown in Figure 26-18.
In SomeBean.java, provide a method that returns the RuleSetModel object. You must specify the location of the rules file here. The following is a sample of the SomeBean.java file:
package userulesdc;

import java.io.File;
import java.io.FileNotFoundException;
import java.io.FileReader;
import java.io.FileWriter;
import java.io.IOException;
import java.io.Reader;

import java.io.Writer;

import java.util.ArrayList;
import java.util.List;

import oracle.bpel.rulesdc.model.impl.RuleSetModel;
import oracle.rules.sdk2.dictionary.RuleDictionary;
import oracle.rules.sdk2.exception.SDKException;
import oracle.rules.sdk2.exception.SDKWarning;
import oracle.rules.sdk2.ruleset.RuleSet;
import oracle.rules.sdk2.ruleset.RuleSetTable;

public class SomeBean {
    private static final String RULES_FILE = "<your rules file here>";
    private RuleSetModel ruleSetModel = null;

    public RuleSetModel getRuleSetModel() {
        if (ruleSetModel != null)
            return ruleSetModel;
            //cache ruleSetModel instead of re-creating it each time

         Reader reader = null;
        try {
            reader =
                    new FileReader(new File(RULES_FILE));
        } catch (FileNotFoundException e) {
            //LOG.severe(e);
            System.err.println(e);
        }

        RuleDictionary dict = null;

        try {
            dict = RuleDictionary.readDictionary(reader, null);
        } catch (SDKException e) {
            System.err.println(e);
        } catch (FileNotFoundException e) {
            System.err.println(e);
        } catch (IOException e) {
            System.err.println(e);
        }
        if (reader != null) {
            try {
                reader.close();
            } catch (IOException ioe) {
            }
        }

        //get the ruleSetTable from the RuleDictionary object
        RuleSetTable ruleSetTable = dict.getRuleSetTable();

        //get the first ruleSet from the ruleSetTable
        RuleSet ruleSet = ruleSetTable.get(0);
        //create a RuleSetModel object and pass this to the rulesDC

        ruleSetModel = new RuleSetModel(ruleSet) ;
        return ruleSetModel;
    }

     //refer to Rules SDK documentation for saving a dictionary also
     //because this code does not take care of saving linked dictionaries
     public static boolean saveDictionary(RuleDictionary dict,
                                         String ruleFileName) {
        Writer writer = null;
        try {
            writer = new FileWriter(new File(ruleFileName));
            dict.writeDictionary(writer);

        } catch (SDKException e) {
            System.err.println(e);
            return false;
        } catch (FileNotFoundException e) {
            System.err.println(e);
            return false;
        } catch (IOException e) {
            System.err.println(e);
            return false;
        } finally {
            if (writer != null) {
                try {
                    writer.close();
                } catch (IOException ioe) {
                    return false;
                }
            }
        }
        return true;
    }

    public static void updateDictionary(RuleDictionary dict) {
        if (dict == null)
            return;

        List<SDKWarning> warnings = new ArrayList<SDKWarning>();
        try {
            dict.update(warnings);
            if (!warnings.isEmpty()) {
                for (int i = 0; i < warnings.size(); i++)
                    System.out.println("warnings: " +
                                       warnings.get(i).getLocalizedMessage());
            }
        } catch (SDKException sdkEx) {
            sdkEx.printStackTrace();
        }
    }

    //You can call this method from your "Save" button
    public void saveDictionary() {

     RuleDictionary dict = this.getRuleSetModel().getRuleSet().getDictionary();
        if (dict != null) {
            //update the dictionary before saving it
            updateDictionary(dict);
            saveDictionary(dict, RULES_FILE);
        }
    }

//call the validation method on the ruleSetModel to update the Validation Panel

    public void validate() {
        if (this.ruleSetModel == null)
            return;

        this.ruleSetModel.validate();
Open the faces-config.xml file in Overview mode and click the + button under Managed Beans to display the Create Managed Bean dialog box. Point to SomeBean.java by providing the Bean Name as someBean and the Scope as session as shown in Figure 26-19.
Figure 26-19 Specifying the Bean Name and Scope
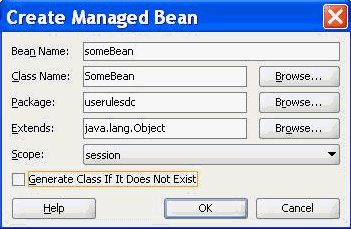
The ADF/JSF framework makes multiple calls to SomeBean.java to render the user interface. For example, someBean.ruleSetModel is called multiple times. So, it is better to create the RuleSetModel object once, cache it, and return it each time instead of re-creating it.
To create the .jspx file for the Rules Editor Component tag:
The next task is to create the .jspx file to include the Rules Editor component tag.
The steps are:
Open Oracle JDeveloper.
From the File menu, select New to display the New Gallery dialog box.
In the New Gallery dialog box, select JSF under Web Tier from the Categories panel.
Select JSF Page under Items and click OK to display the Create JSF Page dialog box.
In the Create JSF Page dialog box, enter useRulesDC.jspx as the file name as shown in Figure 26-20.
RulesCompLib in the component palette of Oracle JDeveloper is displayed as shown in Figure 26-21.
Figure 26-21 Rules Editor Component Library in the Component Palette
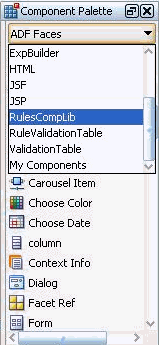
This is because you have added the Rules Editor Component tag library when creating the sample application.
Select RulesCompLib to view the Rulesdc tag. You can drag and drop the Rulesdc tag into the .jspx file. You can also add the Rulesdc tag in the .jspx file manually as shown:
<?xml version='1.0' encoding='UTF-8'?>
<jsp:root xmlns:jsp="http://java.sun.com/JSP/Page" version="2.1"
          xmlns:f="http://java.sun.com/jsf/core"
          xmlns:h="http://java.sun.com/jsf/html"
          xmlns:af="http://xmlns.oracle.com/adf/faces/rich"
          xmlns:rdc="http://xmlns.oracle.com/bpel/rules/editor">
  <jsp:directive.page contentType="text/html;charset=UTF-8"/>
  <f:view>
     <af:document title="Sample Rules Editor App" id="d1">
      <af:form id="f1">
        <af:panelStretchLayout id="psl1" inlineStyle="margin:15px;"
                               partialTriggers="cb1 cb3">
          <f:facet name="center">
            <rdc:rulesdc rulesetModel="#{someBean.ruleSetModel}"
                         viewOnly="false" discloseRules="true"
                         genericAction="true" genericPattern="true"
                         dtColumnPageSize="6" id="r1" dateStyle="yyyy-MM-dd"
                         timeStyle="HH-mm-ss"></rdc:rulesdc>
          </f:facet>
          <f:facet name="top">
            <af:panelGroupLayout id="pgl2" layout="horizontal">
              <af:commandButton text="Save Dictionary"
                                action="#{someBean.saveDictionary}" id="cb1"/>
              <af:spacer width="10" height="10" id="s5"/>
              <af:commandButton text="Validate" id="cb3"
                                action="#{someBean.validate}"
                                partialSubmit="true"/>
            </af:panelGroupLayout>
          </f:facet>
        </af:panelStretchLayout>
      </af:form>
    </af:document>
  </f:view>
</jsp:root>
To refer to the oracle.rules and the oracle.soa.rules_editor_dc.webapp shared libraries:
After creating the .jspx file, you must refer to the oracle.rules and oracle.soa.rules_editor_dc.webapp shared libraries from the weblogic-application.xml file.
The steps are:
In Oracle JDeveloper, open the weblogic-application.xml file by browsing to Application Resources, then Descriptors, and then META-INF.
Add the following lines to refer to the oracle.rules shared library as shown in Figure 26-22.
<library-ref>
<library-name>oracle.rules</library-name>
</library-ref>
Figure 26-22 Referring to the oracle.rules Shared Library
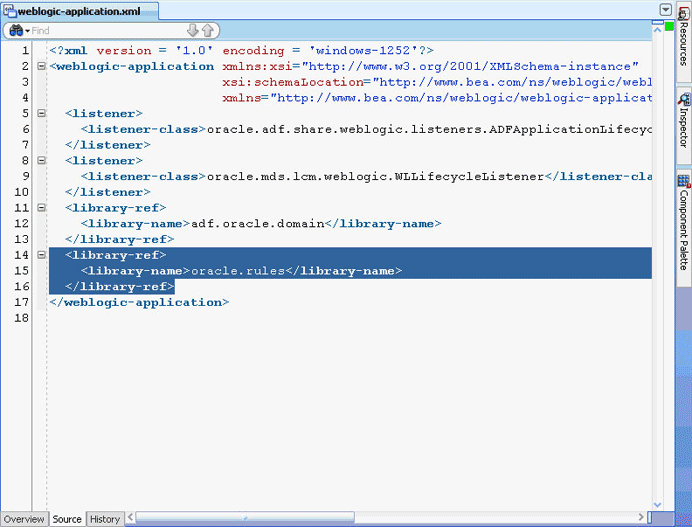
In Oracle JDeveloper,
From the File menu, select New to display the New Gallery dialog box.
In the New Gallery dialog box, select Deployment Descriptors under General from the Categories panel.
Select Weblogic Deployment Descriptor under Items and click OK to display the Create Weblogic Deployment Descriptor dialog box.
Select weblogic.xml from the list and click Finish.
In Oracle JDeveloper, in the Overview mode of weblogic.xml, select Libraries from the left panel and enter oracle.soa.rules_editor_dc.webapp as the library name as shown in Figure 26-23.
Figure 26-23 Adding the Rules Editor Component Library
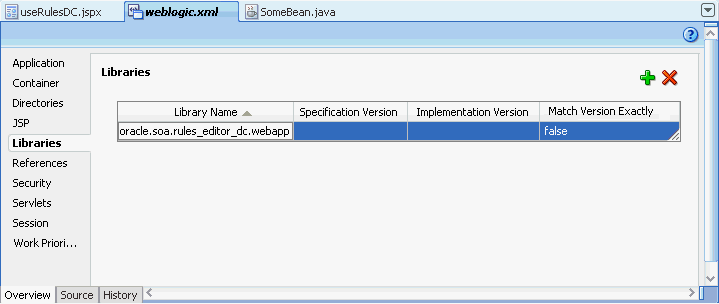
Click Save All.
Deploy the oracle.rules shared library to the embedded Weblogic server:
Launch WLS console (http://host:port/console/login/LoginForm.jsp). Ensure that the Weblogic embedded server on Oracle JDeveloper is running.
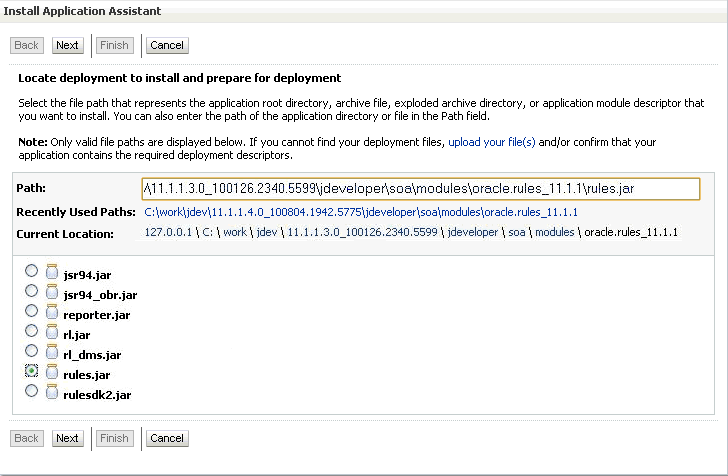
Select Deployments and click Install to display the Install Application Assistant page.
Select <JDEV_INSTALL>/jdeveloper/soa/modules/oracle.rules_11.1.1/rules.jar and click Finish as shown in Figure 26-24.
Figure 26-24 Deploying the oracle.rules Shared Library
Deploy the oracle.soa.rules_editor_dc.webapp shared library to the Weblogic server:
In the Weblogic console, select Deployments and click Install to display the Install Application Assistant page.
Select <JDEV_INSTALL>/jdeveloper/soa/modules/oracle.soa.rules_editor_dc.webapp_11.1.1/oracle.soa.rules_editor_dc.webapp.war and click Next.
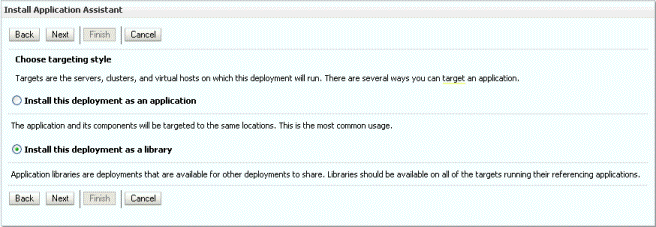
Select Install this deployment as a library and click Finish as shown in Figure 26-25.
Figure 26-25 Deploying oracle.soa.rules_editor_dc.webapp Shared Library
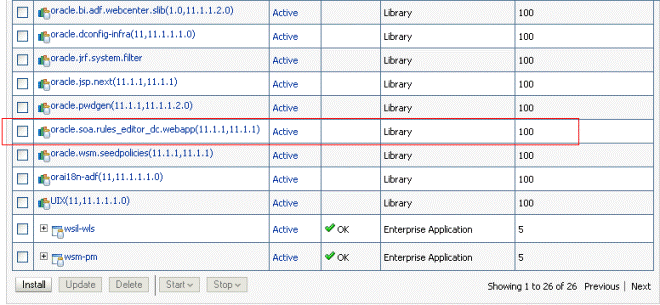
oracle.soa.rules_editor_dc.webapp is added to the list of deployments as shown in Figure 26-26.
Figure 26-26 oracle.soa.rules_editor_dc.webapp Added to the Deployment List
To run the sample Rules Editor application:
The last task is running the sample application.
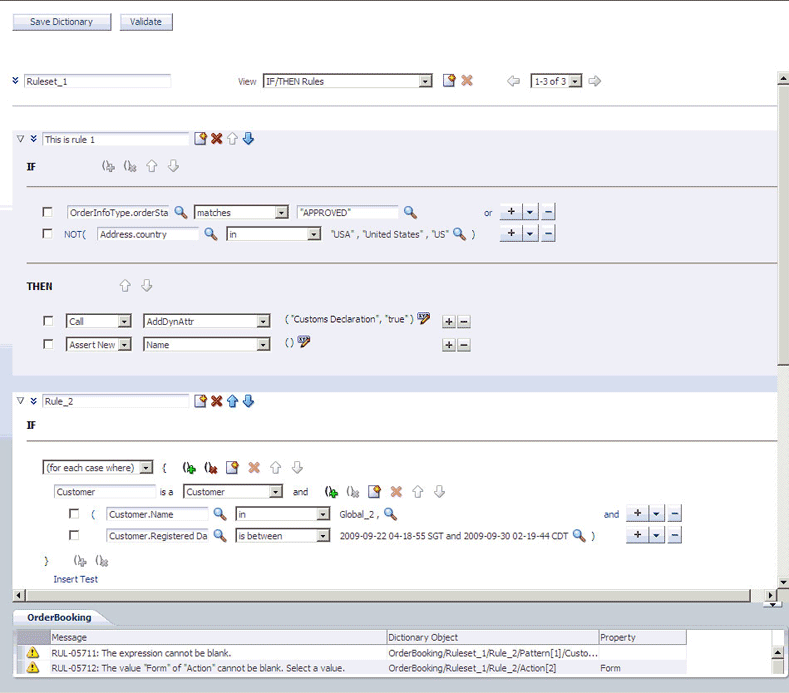
To run the sample application, from Oracle JDeveloper, right-click the useRulesDC.jspx file, and select Run. This starts the sample application on a web browser as shown in Figure 26-27.
Figure 26-27 Running the Sample Application
When you are ready to deploy your application EAR file to the standalone Weblogic server, perform the following:
Launch the Weblogic server console (http://host:port/console/login/LoginForm.jsp) and ensure that oracle.rules is displayed in the deployments list.
Ensure that oracle.soa.rules_editor_dc.webapp is displayed in the deployments list. If this is not displayed, click Install and select the <JDEV_INSTALL>/jdeveloper/soa/modules/oracle.soa.rules_editor_dc.webapp_11.1.1/oracle.soa.rules_editor_dc.webapp.war file.
Open Oracle JDeveloper.
Right-click the project name in the Application Navigator and select Project Properties.
Select Libraries and Classpath from the left panel and click Add Library.
In the Add Library dialog box, select Oracle Rules Editor Component and click OK as shown in Figure 26-28.
Figure 26-28 Adding the Oracle Rules Editor Component
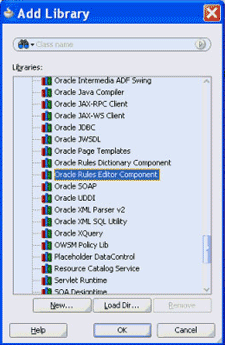
This step enables you to refer to these libraries, but does not deploy these libraries by default. Therefore, the jars are not included in your project WAR file.
In the project that has to be deployed (where you create the EAR file):
Add the following lines to the weblogic-application.xml:
<library-ref>
   <library-name>oracle.rules</library-name>
</library-ref>
Add the following lines to weblogic.xml in the project WAR file:
<library-ref>
   <library-name>oracle.soa.rules_editor_dc.webapp</library-name>
</library-ref>
Deploy the EAR file in the Weblogic server.
For more information about creating an EAR file, see "How to Create an EAR File for Deployment" in Oracle Fusion Middleware Java EE Developer's Guide for Oracle Application Development Framework.
For the role based authorization, Rules DC implements custom JAAS permissions (extending oracle.adf.share.security.authorization.ADFPermission class to ensure that the permission can be used by ADF Security).
If a Rules Editor application supports ADF security, which means there is support for role-based authentication and authorization, then security is enforced by implementing custom JAAS permissions (by extending the oracle.adf.share.security.authorization.ADFPermission class to ensure that the permission can be used by ADF Security). You have to create ADF security policies by granting the following permissions to the user roles based on your application requirement:
oracle.rules.adf.permission.AddRulePermission: Displays Add Rule button; if the permission is not granted, the Add Rule button is not visible to the user.
oracle.rules.adf.permission.DeleteRulePermission: Displays the Delete Rule button; if the permission is not granted, the Delete Rule button is not visible to the user.
oracle.rules.adf.permission.EditRulePermission: Displays the Edit Rule button for rules inside a ruleset; if the permission is not granted, then the rules are "View-Only".
oracle.rules.adf.permission.AddDTPermission: Displays the Add Decision Table button; if the permission is not granted, the Add Decision Table button is not visible to the user.
oracle.rules.adf.permission.DeleteDTPermission: Displays the Delete Decision Table button; if the permission is not granted, the Delete Decision Table button is not visible to the user.
oracle.rules.adf.permission.EditDTPermission: Displays the Edit Decision Table button for decision tables within a ruleset; if the permission is not granted, the decision tables are "View-Only".
oracle.rules.adf.permission.RulesEditorPermission: A global permission that sets all the preceding permissions to "true".
For example, to grant the delete rule permission to a role, specify the following code in the jazn-data.xml file of the application:
<grant>
  <grantee>
     <principals>
      <principal>
       <class>oracle.security.jps.service.policystore.ApplicationRole</class>
       <name>role2</name>
      </principal>
     </principals>
   </grantee>
   <permissions>
    <permission>
      <class>oracle.rules.adf.permission.DeleteRulePermission</class>
      <name>DeleteRulePermission</name>
      <actions>access</actions>
    </permission>
  </permissions>
</grant>
If you do not want to use the individual permissions, such as AddRulePermission or DeleteRulePermission, you can just set the RulesEditorPermission in the jazn-data.xml file to set global permissions.
This section lists the tags and attributes that are supported by the Rules Editor component.
Table 26-1 lists the supported facets.
Table 26-1 Supported Facets of the Rules Editor Component
| Name | Description |
|---|---|
|
|
Used to render specific user interfaces. This facet is used to display the rule condition and pattern (in advanced mode), which is the "IF" portion of the rule. |
|
|
Used to render specific user interfaces. This facet is used to display the rule action, which is the "THEN" portion of the rule. |
Table 26-2 lists the supported attributes.
Table 26-2 Supported Attributes of the Rules Editor Component
| Name | Type | Required | Default Value | Supports EL? | Description |
|---|---|---|---|---|---|
|
|
|
no |
Gets from the locale |
yes |
If specified, the date style is used in all |
|
|
|
no |
Based on Locale |
yes |
Specifies the decimal separators. This is used in Number Formatting. If specified, this attribute overrides the decimal separator based on locale. |
|
|
|
no |
|
yes |
If |
|
|
|
no |
|
yes |
If |
|
|
|
no |
|
yes |
If |
|
|
|
no |
|
yes |
Displays the editable ruleset name by default. You can choose to hide this by setting it to |
|
|
|
no |
5 |
yes |
Specifies the number of columns to be displayed at a time in a decision table. This works only when rules are columnar. |
|
|
|
no |
|
yes |
Number of rows to be displayed at a time in the decision table. A scroll bar is displayed if the number of rows increases over the specified height. |
|
|
j |
no |
|
yes |
If |
|
|
|
no |
|
yes |
If |
|
|
|
no |
Based on Locale |
yes |
Specifies the grouping separators. This is used in Number Formatting. If specified, this attribute overrides the grouping separator based on locale. |
|
|
|
no |
|
yes |
Used for Localization |
|
|
|
no |
|
yes |
Used to customize the default |
|
|
|
yes |
- |
Only EL |
Wrapper around the Rules SDK ruleset object.You can use the |
|
|
j |
no |
|
yes |
Specifies the number of rules to be displayed in a page. It is used in IF/THEN rules pagination. | |
|
|
|
no |
|
yes |
Displays the Add and Delete Decision Table links by default. You can choose to hide this by setting this to |
|
|
j |
no |
|
yes |
Displays the validation panel by default. You can choose to hide this by setting this to |
|
|
|
no |
|
yes |
Used to customize the default |
|
|
|
no |
Gets from the locale |
yes |
If specified, the time style is used in all |
|
|
|
no |
|
yes |
Used for Localization |
|
|
|
no |
|
yes |
If "true", in the "viewOnly" mode, you can view the existing rules in the ruleset. If "false", which is the "edit" mode, you can add new rules and edit existing rules. |
This section discusses the Oracle Business Rules Dictionary Editor declarative component. It also provides information on how to create and run an application using the Rules Dictionary Editor component, and then deploy the application. In addition, this section lists the supported tags and the localization process for the application.
The Oracle Business Rules Dictionary Editor is a composite declarative component that can be embedded in any ADF-based web application. It enables you to edit business rules metadata artifacts, such as Globals, Bucketsets, and Rulesets, by using the Rules SDK2 API.
Note:
You should not confuse Rules Dictionary Editor with Rules Editor. Rules Editor is used to edit rules inside a specified ruleset. In fact, Rules Editor is embedded within Rules Dictionary Editor. For more information about Rules Editor, see Section 26.2, "Using the Oracle Business Rules Editor Declarative Component."The Rules Dictionary Editor Task Flow uses the Rules Dictionary Editor Component to create applications. Typically, you should either use the Rules Dictionary Editor component or the Rules Dictionary Editor task flow, but not both. For more information on Rules Dictionary Editor Task Flow, see Section 26.4, "Using the Oracle Business Rules Dictionary Editor Task Flow."
The Rules Dictionary Editor component performs the following:
Edits Globals or Variables that have the final attribute set to true by using the Globals Editor, as shown in Figure 26-29.
Globals Editor enables you to edit only the Name, Description, and Value of Globals. It does not allow creation or deletion of Globals. However, it supports validation of Globals.
Edits Bucketsets by using the Bucketset Editor as shown in Figure 26-30.
Bucketset Editor enables you to perform CRUD (create, read, update, and delete) operations on Bucketsets and buckets inside a Bucketset. It also supports validation of Bucketsets.
Edits Rulesets, as shown in Figure 26-31.
Rules Dictionary Editor enables you to edit only rules inside a selected ruleset. It does not allow creation or deletion of rulesets.
This section lists the steps for creating and running a sample application by using the Rules Dictionary Editor component.
The prerequisite for using the Rules Dictionary Editor component to create ADF-based web applications is having a running installation of SOA Suite and Oracle JDeveloper on your computer.
To create a sample application by using the Rules Dictionary Editor:
The first task is to create a sample application.
The steps are:
Open Oracle JDeveloper.
From the File menu, select New and then Generic Application to create an application.
Enter a name for the application in the Application Name field, for example, useRuleDictDCApp, and click Next as shown in Figure 26-32.
Figure 26-32 Creating a Generic Application
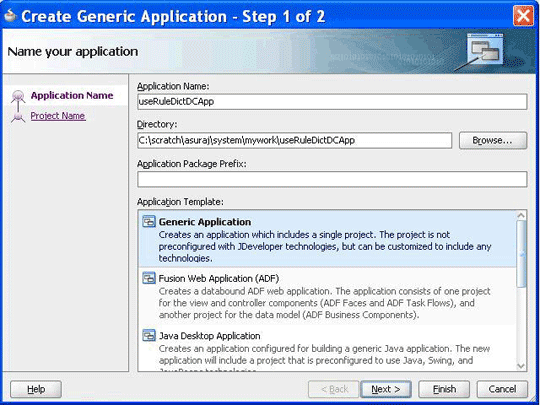
Enter useRuleDictDC in the Project Name field and ensure that ADF Faces is selected in the Project Technologies tab as shown in Figure 26-33.
Click Finish to create the project.
Right-click the useRuleDictDC project in the Application Navigator of Oracle JDeveloper, and select Project Properties to display the Project Properties dialog box.
In the Project Properties dialog box:
Click JSP Tag Libraries from the left panel.
Click Add and select ADF Faces Components from the extension list in the Choose Tag Libraries dialog box, and then click OK as shown in Figure 26-34.
Click Libraries and Classpath from the left panel and click the Add Library button to display the Add Library dialog box.
Click Oracle Rules and Oracle Rules Dictionary Component from the Extension list and then click OK as shown in Figure 26-35.
Figure 26-35 Selecting Oracle Rules and Rules Dictionary Component
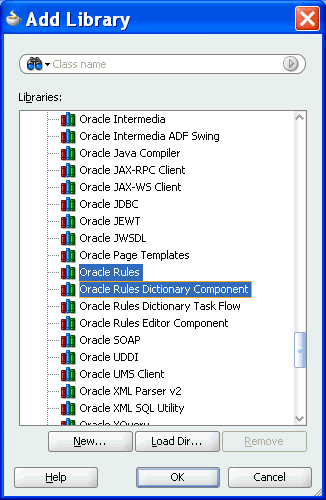
This adds the Rules SDK and the Rules Dictionary Editor tag libraries to the project.
Click OK to close the Project Properties dialog box.
Select Save All from the Oracle JDeveloper File menu to save the project.
You have to ensure that all the required tag libraries are added:
Right-click the useRuleDictDC project in the Application Navigator of Oracle JDeveloper and select Project Properties to display the Project Properties dialog box.
Click JSP Tag Libraries from the left panel and check if all the tag libraries are added as shown in Figure 26-36.
Figure 26-36 Checking the Required Tag Libraries for Rules Dictionary Editor
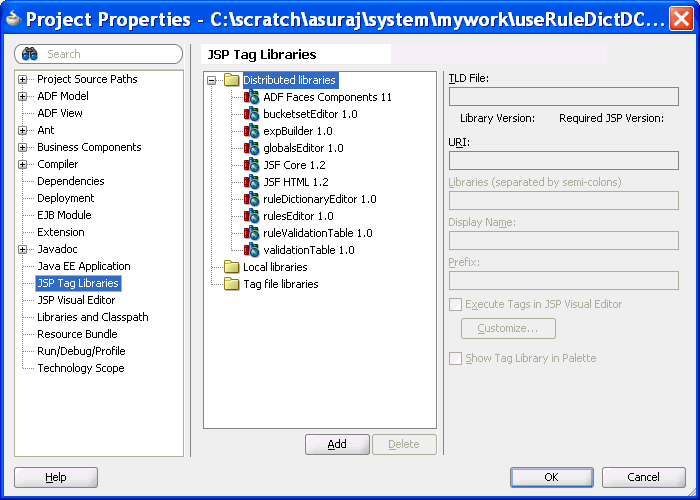
To create the RuleDictionaryModel object:
The Rules Dictionary Editor component requires a oracle.bpel.ruledictionarydc.model.impl.RuleDictionaryModel object. The component uses this object to read Globals, Bucketsets, and Rulesets information from the dictionary. So, the next task is to create a managed bean called SomeBean.java that creates a RuleDictionaryModel object.
The steps are:
Open Oracle JDeveloper.
From the File menu, select New to display the New Gallery dialog box.
In the New Gallery dialog box, select Java under General from the Categories panel. Ensure that Java Class under Items is selected and click OK to display the Create Java Class dialog box.
Enter the name of the Java class, for example SomeBean.java, and click OK to create the Java class in your project as shown in Figure 26-37.
In SomeBean.java, provide a method that returns the RuleDictionaryModel object. You must specify the location of the rules file here. The following is a sample of the SomeBean.java file:
package useruledictdc;

import java.io.File;
import java.io.FileNotFoundException;
import java.io.FileReader;
import java.io.FileWriter;
import java.io.IOException;
import java.io.Reader;

import java.io.Writer;

import java.util.ArrayList;
import java.util.List;

import oracle.bpel.ruledictionarydc.model.impl.RuleDictionaryModel;

import oracle.rules.sdk2.dictionary.DictionaryFinder;
import oracle.rules.sdk2.dictionary.RuleDictionary;
import oracle.rules.sdk2.exception.SDKException;
import oracle.rules.sdk2.exception.SDKWarning;

public class SomeBean {
    private RuleDictionaryModel ruleDictModel;
    private static final String RULES_FILE1 =
        "C:\\scratch\\asuraj\\system\\rules\\OrderBookinRules.rules";

    public SomeBean() {
        super();
    }

    public RuleDictionaryModel getRuleDictModel() {
        if (ruleDictModel != null)
            return ruleDictModel;
              //cache ruleDictModel instead of re-creating it each time

        ruleDictModel = new RuleDictionaryModel(getRuleDictionary());
        return ruleDictModel;
    }

    public RuleDictionary getRuleDictionary() {

        Reader reader = null;
        try {
            reader = new FileReader(new File(RULES_FILE1));
        } catch (FileNotFoundException e) {
            //LOG.severe(e);
            System.err.println(e);
        }
        RuleDictionary dict = openRulesDict(reader, null);
        if (reader != null) {
            try {
                reader.close();
            } catch (IOException ioe) {
            }
        }

        return dict;
    }

    private static RuleDictionary openRulesDict(Reader reader,
                                                DictionaryFinder finder) {
        RuleDictionary dict = null;

        try {
            dict = RuleDictionary.readDictionary(reader, finder);
        } catch (SDKException e) {
            System.err.println(e);
        } catch (FileNotFoundException e) {
            System.err.println(e);
        } catch (IOException e) {
            System.err.println(e);
        }
        catch (IllegalArgumentException e) {
            System.err.println(e);
        } finally {

        }

        return dict;
    }

    //refer to Rules SDK documentation for saving a dictionary also
    //because this code does not take care of saving linked dictionaries

    public static boolean saveDictionary(RuleDictionary dict,
                                         String ruleFileName) {

        if (dict == null || ruleFileName == null)
            return false;

        if (dict.isTransactionInProgress())
            System.out.println("Transaction in progress, cannot save dictionary");

        Writer writer = null;
        try {
            writer = new FileWriter(new File(ruleFileName));
            dict.writeDictionary(writer);

        } catch (SDKException e) {
            System.err.println(e);
            return false;
        } catch (FileNotFoundException e) {
            System.err.println(e);
            return false;
        } catch (IOException e) {
            System.err.println(e);
            return false;
        } finally {
            if (writer != null) {
                try {
                    writer.close();
                } catch (IOException ioe) {
                    return false;
                }
            }
        }
        return true;
    }

    public static void updateDictionary(RuleDictionary dict) {
        if (dict == null)
            return;

        List<SDKWarning> warnings = new ArrayList<SDKWarning>();
        try {
            dict.update(warnings);
            for (SDKWarning warning : warnings)
                System.out.println("warnings: " +
                                   warning.getLocalizedMessage());
        } catch (SDKException sdkEx) {
            sdkEx.printStackTrace();
        }
    }

    //You can call this method from your "Save" button

    public void saveDictionary() {

        RuleDictionary dict = this.getRuleDictModel().getRuleDictionary();

        if (dict != null) {
            if (dict.isModified())
                updateDictionary(dict);
            if (!dict.isTransactionInProgress())
                saveDictionary(dict, RULES_FILE1);
        }
    }
         //call validation method on the ruleDictModel to update Validation Panel

    public void validate() {
        if (this.ruleDictModel == null)
            return;

        this.ruleDictModel.validate();
    }
}
Open the faces-config.xml file in the Overview mode and click the + button under Managed Beans to display the Create Managed Bean dialog box. Point to SomeBean.java by providing the Bean Name as someBean and the Scope as session as shown in Figure 26-38.
Figure 26-38 Specifying the Bean Name and Scope
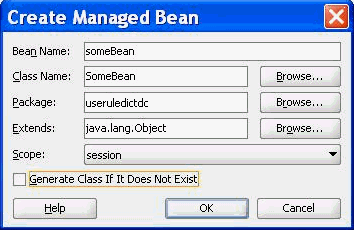
The ADF/JSF framework makes multiple calls to SomeBean.java to render the user interface. For example, someBean.ruleDictModel is called multiple times. So, it is better to create the RuleDictModel object once, cache it, and return it each time instead of re-creating it.
To create the .jspx file for the Rules Dictionary Editor Component tag:
The next task is to create the .jspx file to include the Rules Dictionary Editor Component tag.
The steps are:
Open Oracle JDeveloper.
From the File menu, select New to display the New Gallery dialog box.
In the New Gallery dialog box, select JSF under Web Tier from the Categories panel.
Select JSF Page under Items and click OK to display the Create JSF Page dialog box.
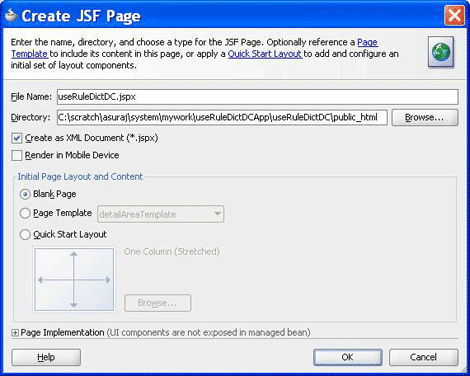
In the Create JSF Page dialog box, enter useRuleDictDC.jspx as the file name as shown in Figure 26-39.
Figure 26-39 Specifying the Name of the JSF Page
RuleDictionaryDC in the component palette of Oracle JDeveloper is displayed as shown in Figure 26-40.
Figure 26-40 Rule Dictionary Editor Library in the Component Palette
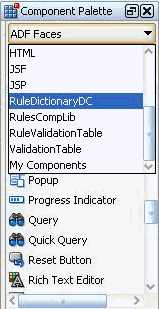
This is because you have added Rules Dictionary Component when creating the sample application.
Select RuleDictionaryDC to view the ruleDictionaryDC tag.You can drag and drop the RuleDictionaryDC tag into the .jspx file. You can also add the RuleDictionaryDC tag in the .jspx file manually as shown:
<?xml version='1.0' encoding='UTF-8'?>
<jsp:root xmlns:jsp="http://java.sun.com/JSP/Page" version="2.1"
          xmlns:f="http://java.sun.com/jsf/core"
          xmlns:h="http://java.sun.com/jsf/html"
          xmlns:af="http://xmlns.oracle.com/adf/faces/rich"
          xmlns:rddc="http://xmlns.oracle.com/bpel/rules/dictionaryEditor">
  <jsp:directive.page contentType="text/html;charset=UTF-8"/>
  <f:view>
       <af:document id="d1" title="Sample Rule Dictionary App">
      <af:form id="f1">
        <af:panelStretchLayout id="psl1" inlineStyle="margin:15px;"
                               partialTriggers="cb2 cb3">
          <f:facet name="center">
            <rddc:ruleDictionaryDC ruleDictModel="#{someBean.ruleDictModel}"
                                   dtColumnPageSize="6" id="rddc1"
                                   viewOnly="false" dateStyle="yyyy-MM-dd"
                                   timeStyle="HH-mm-ss"
                                   discloseRules="true"
                                   showValidationPanel="true"/>
          </f:facet>
          <f:facet name="top">
            <af:panelGroupLayout id="pgl1" layout="horizontal">
              <af:commandButton text="Save Dict" id="cb2"
                                action="#{someBean.saveDictionary}"/>
              <af:spacer width="10" height="10" id="s1"/>
              <af:commandButton text="Validate" id="cb3"
                                action="#{someBean.validate}"/>
            </af:panelGroupLayout>
          </f:facet>
        </af:panelStretchLayout>
      </af:form>
    </af:document>
  </f:view>
</jsp:root>
To refer to the oracle.rules and the oracle.soa.rules_dict_dc.webapp shared libraries:
After creating the .jspx file, you must refer to the oracle.rules and oracle.soa.rules_editor_dc.webapp shared libraries from the weblogic-application.xml file.
The steps are:
In Oracle JDeveloper, open the weblogic-application.xml file by browsing to Application Resources, then Descriptors, and then META-INF.
Add the following lines to refer to the oracle.rules shared library as shown in Figure 26-41.
<library-ref>
<library-name>oracle.rules</library-name>
</library-ref>
Figure 26-41 Referring to the oracle.rules Shared Library

In Oracle JDeveloper,
From the File menu, select New to display the New Gallery dialog box.
In the New Gallery dialog box, select Deployment Descriptors under General from the Categories panel.
Select Weblogic Deployment Descriptor under Items and click OK to display the Create Weblogic Deployment Descriptor dialog box.
Select weblogic.xml from the list and click Finish.
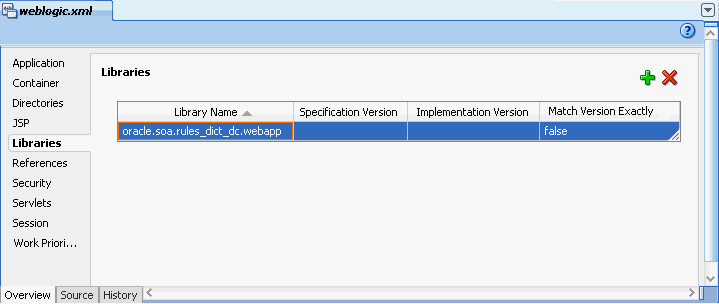
In Oracle JDeveloper, in the Overview mode of weblogic.xml, select Libraries from the left panel and enter oracle.soa.rules_dict_dc.webapp as the library name as shown in Figure 26-42.
Figure 26-42 Adding the Rules Dictionary Component Library
Click Save All.
Deploy the oracle.rules shared library to the embedded Weblogic server:
Launch WLS console (http://host:port/console/login/LoginForm.jsp). Ensure that the Weblogic embedded server on Oracle JDeveloper is running.
Select Deployments and click Install to display the Install Application Assistant page.
Select <JDEV_INSTALL>/jdeveloper/soa/modules/oracle.rules_11.1.1/rules.jar and click Finish.as shown in Figure 26-43.
Figure 26-43 Deploying the oracle.rules Shared Library

Deploy the oracle.soa.rules_dict_dc.webapp shared library to the Weblogic server:
In the Weblogic console, select Deployments and click Install to display the Install Application Assistant page.
Select <JDEV_INSTALL>/jdeveloper/soa/modules/oracle.soa.rules_dict_dc.webapp_11.1.1/oracle.soa.rules_dict_dc.webapp.war and click Next.
Select Install this deployment as a library and click Finish as shown in Figure 26-44.
Figure 26-44 Deploying oracle.soa.rules_editor_dc.webapp Shared Library

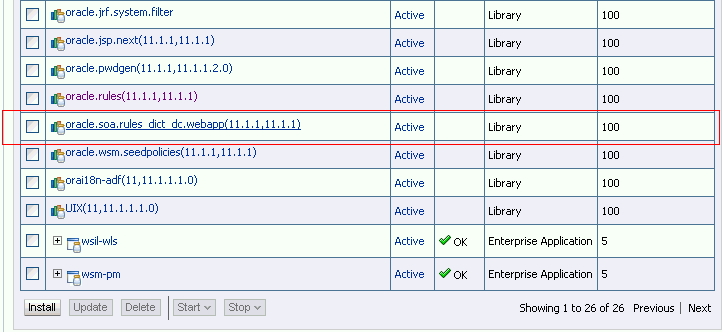
oracle.soa.rules_dict_dc.webapp is added to the list of deployments as shown in Figure 26-45.
Figure 26-45 oracle.soa.rules_dict_dc.webapp Added to the Deployment List
To run the sample Rules Dictionary Editor application:
The last task is running the sample application.
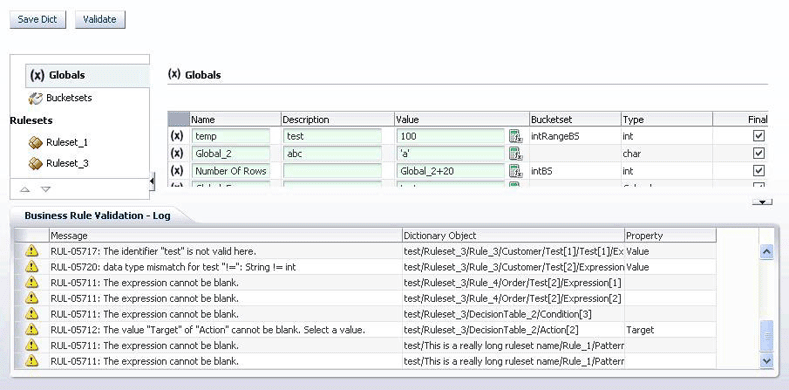
To run the sample application, from Oracle JDeveloper, right-click the useRuleDictDC.jspx file, and select Run. This starts the sample application on a web browser as shown in Figure 26-46.
Figure 26-46 Running the Sample Rules Dictionary Editor Application
When you are ready to deploy your application EAR file to the standalone Weblogic server, perform the following:
Launch the Weblogic server console (http://host:port/console/login/LoginForm.jsp) and ensure that oracle.rules is displayed in the deployments list.
Ensure that oracle.soa.rules_dict_dc.webapp is displayed in the deployments list. If this is not displayed, click Install and select the <JDEV_INSTALL>/jdeveloper/soa/modules/oracle.soa.rules_dict_dc.webapp_11.1.1/oracle.soa.rules_dict_dc.webapp.war file.
Open Oracle JDeveloper.
Right-click the project name in the Application Navigator and select Project Properties.
Select Libraries and Classpath from the left panel and click Add Library.
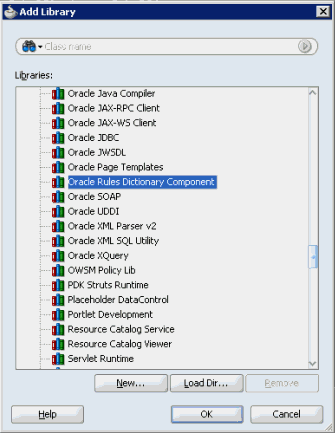
In the Add Library dialog box, select Oracle Rules Dictionary Component and click OK as shown in Figure 26-47.
Figure 26-47 Adding the Oracle Rules Dictionary Component
This step enables you to refer to these libraries, but does not deploy these libraries by default. Therefore, the jar files are not included in your project war file.
In the project that has to be deployed (where you create the EAR file):
Add the following lines to the weblogic-application.xml:
<library-ref>
   <library-name>oracle.rules</library-name>
</library-ref>
Add the following lines to weblogic.xml in the project WAR file:
<library-ref>
   <library-name>oracle.soa.rules_dict_dc.webapp</library-name>
</library-ref>
Deploy the EAR file in the Weblogic server.
This section lists the attributes that are supported by the Rules Dictionary Editor component.
Table 26-3 lists the supported attributes.
Table 26-3 Supported Rules Dictionary Editor Attributes
| Name | Type | Required | Default Value | Supports EL? | Description |
|---|---|---|---|---|---|
|
|
|
no |
Gets it from the locale |
yes |
If specified, the date style is used in all |
|
|
|
no |
Based on Locale |
yes |
Specifies the decimal separators. This is used in Number Formatting. If specified, this attribute overrides the decimal separator based on locale. |
|
|
|
no |
|
yes |
If |
|
|
|
no |
|
yes |
Disables add, edit, and delete operations for the Inputs table in the Decision Function editor window. |
|
|
|
no |
|
yes |
Disables add, edit, and delete operations for the Outputs table in the Decision Function editor window. |
|
|
|
no |
|
yes |
If |
|
|
|
no |
|
yes |
If |
|
|
|
no |
|
yes |
Displays the Add Decision Function button. |
|
|
|
no |
|
yes |
Displays the Delete Decision Function button. |
|
|
|
no |
|
yes |
Displays the editable ruleset name by default. You can choose to hide this by setting this to |
|
|
|
no |
|
yes |
If |
|
|
|
no |
|
yes |
If true, the decision service name is displayed in the Decision Function editor window. Note that the service name is relevant only when Invoke as rule service is selected. |
|
|
|
no |
|
yes |
Number of columns to be displayed at a time in the decision table. This works only when rules are columnar. |
|
|
|
no |
|
yes |
Number of rows to be displayed at a time in the decision table. A scroll bar is displayed if the number of rows increases over the specified height. |
|
|
|
no |
Based on Locale |
yes |
Specifies the grouping separators. This is used in Number Formatting. If specified, this attribute overrides the grouping separator based on locale. |
|
|
|
no |
|
yes |
Used for Localization |
|
|
|
yes |
- |
Only EL |
Wrapper around the Rules SDK Dictionary object.You can use the |
|
|
|
no |
|
yes |
Specifies the number of rules to be displayed in a page. It is used in IF/THEN rules pagination. |
|
|
|
no |
- |
yes |
Switches to the specified tab name (either GLOBALS, BUCKETSETS, DESC_FUNCS or the ruleset name). |
|
|
|
no |
|
yes |
Displays the add and delete Decision Table buttons. |
|
|
|
no |
|
yes |
Displays the validation panel by default. You can choose to hide this by setting this to |
|
|
|
no |
Gets it from the locale |
yes |
If specified, the time style is used in all |
|
|
|
no |
|
yes |
Used for Localization |
|
|
|
no |
|
yes |
If |
This section discusses the Oracle Business Rules Dictionary Editor task flow. It also provides information on how to create and run an application using the Rules Dictionary Editor task flow, and then deploy the application.
The Oracle Rules Dictionary Editor Task Flow is basically a wrapper around the Rules Dictionary Editor declarative component. The task flow is used in ADF-based web applications that require a task flow instead of a declarative component. For more information on Rules Dictionary Editor Component, see Section 26.3, "Using the Oracle Business Rules Dictionary Editor Declarative Component."
This section lists the steps for creating and running a sample application by using the Oracle Rules Dictionary Editor task flow.
The prerequisites for using the Oracle Rules Dictionary Editor task flow to create ADF-based web applications is having a running installation of SOA Suite and Oracle JDeveloper on your computer.
To create a sample application by using the Oracle Rules Dictionary Editor task flow:
The first task is to create a sample application.
The steps are:
Open Oracle JDeveloper.
From the File menu, select New and then Generic Application to create an application.
Enter a name for the application in the Application Name field, for example, useRuleDictTaskFlowApp, and click Next as shown in Figure 26-48.
Figure 26-48 Creating a Generic Task Flow Application
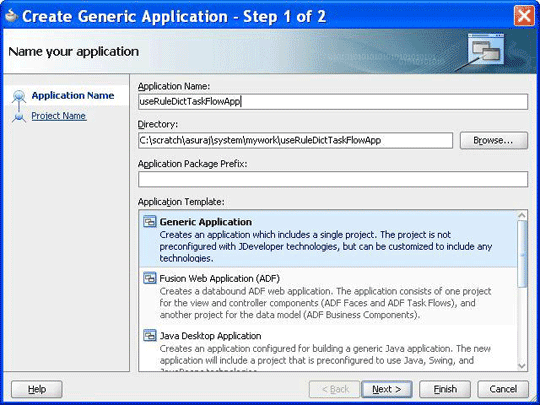
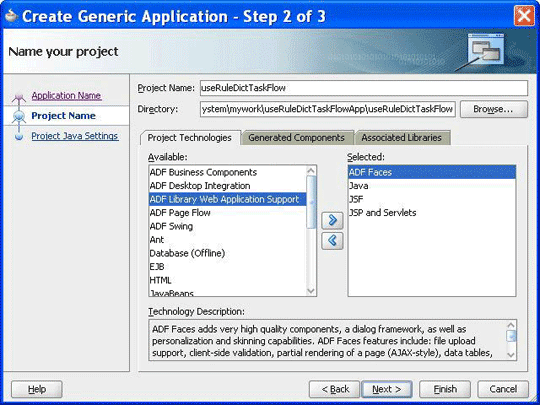
Enter useRuleDictTaskFlow in the Project Name field and ensure that ADF Faces is selected in the Project Technologies tab, as shown in Figure 26-49.
Click Finish to create the project.
Figure 26-49 Creating a Task Flow Project
Right-click the useRuleDictTaskFlow project in the Application Navigator of Oracle JDeveloper, and select Project Properties to display the Project Properties dialog box.
In the Project Properties dialog box:
Select JSP Tag Libraries from the left panel.
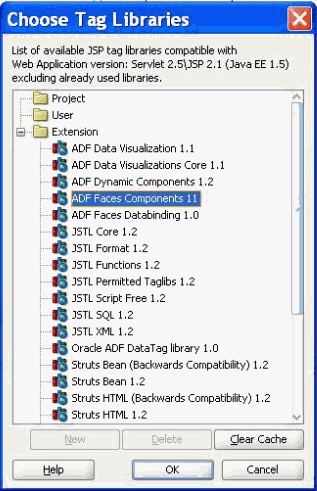
Click Add and select ADF Faces Components from the extension list in the Choose Tag Libraries dialog box, and click OK as shown in Figure 26-50.
Figure 26-50 Choosing Tab Libraries for the Task Flow Application
Select Libraries and Classpath from the left panel and click Add Library to display the Add Library dialog box.
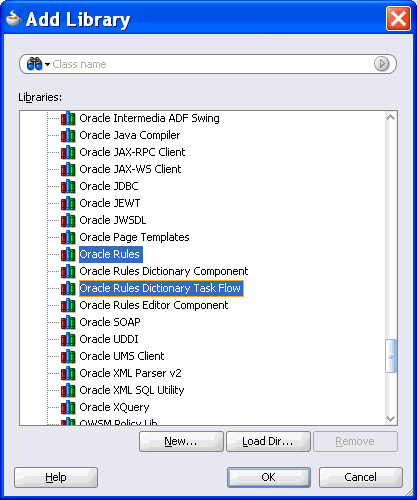
Select Oracle Rules and then Oracle Rules Dictionary Task Flow in the Libraries list and click OK as shown in Figure 26-51. This adds the Rules SDK and the Rules Dictionary Task Flow JARs to the project.
Figure 26-51 Adding the Rules SDK and Rules Dictionary Task Flow
Click OK to close the Project Properties dialog box.
Click Save All from the Oracle JDeveloper File menu to save the project.
Create a Java class that implements the oracle.integration.console.metadata.model.share.MetadataDetails interface, which is defined in soaComposerTemplates.jar. For more information on the MetadataDetails interface, see Section I.1, "The MetadataDetails Interface."
The steps are:
Open Oracle JDeveloper.
From the File menu, select New to display the New Gallery dialog box.
In the New Gallery dialog box, select Java under General from the Categories panel. Ensure that Java Class under Items is selected and click OK to display the Create Java Class dialog box.
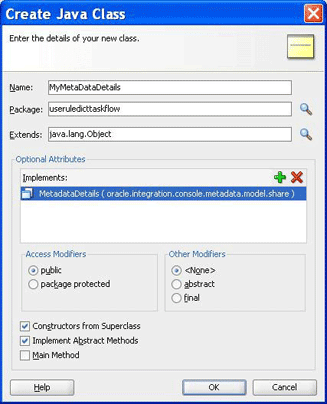
Enter the name of the Java class, for example MyMetaDataDetails, add the MetadataDetails interface in the Implements box under Optional Attributes, and click OK to create the Java class in your project as shown in Figure 26-52.
Figure 26-52 Creating a Java Class That Implements the MetadataDetails Interface
The following is a sample of the content of the MyMetaDataDetails.java file:
package useruledicttaskflow;

import java.io.BufferedReader;
import java.io.FileNotFoundException;
import java.io.FileOutputStream;
import java.io.IOException;
import java.io.InputStream;
import java.io.InputStreamReader;
import java.io.OutputStreamWriter;
import java.io.UnsupportedEncodingException;
import java.io.Writer;

import java.net.MalformedURLException;
import java.net.URL;

import oracle.integration.console.metadata.model.share.MetadataDetails;
import oracle.integration.console.metadata.model.share.RelatedMetadataPath;

public class MyMetaDataDetails implements MetadataDetails {
    public MyMetaDataDetails() {
        super();
    }

    private static final String RULES_FILE1 =
        "file:///<path of Rules file>";

    public String getDocument() {
        URL url = null;
        try {
            url = new URL(RULES_FILE1);
            return readFile(url);
        } catch (IOException e) {
            System.err.println(e);
        }
        return "";
    }

    public void setDocument(String string) {
        URL url = null;

        try {
            url = new URL(RULES_FILE1);
        } catch (MalformedURLException e) {
            System.err.println(e);
            return;
        }
        Writer writer = null;
        try {
            //os = new FileWriter(url.getPath());
            writer =
               new OutputStreamWriter(new FileOutputStream(url.getPath()),
              "UTF-8");
       } catch (FileNotFoundException e) {
            System.err.println(e);
            return;
        } catch (IOException e) {
            System.err.println(e);
            return;
        }
        try {
            writer.write(string);
        } catch (IOException e) {
            System.err.println(e);
        } finally {
            if (writer != null) {
                try {
                    writer.close();
                } catch (IOException ioe) {
                    System.err.println(ioe);
                }
            }
        }
    }

    private String readFile(URL dictURL) {
        InputStream is;
        try {
            is = dictURL.openStream();
        } catch (IOException e) {
            System.err.println(e);
            return "";
        }
        BufferedReader reader;
        try {
           reader = new BufferedReader(new InputStreamReader(is, "UTF-8"));
        } catch (UnsupportedEncodingException e) {
            System.err.println(e);
            return "";
        }
        String line = null;
        StringBuilder stringBuilder = new StringBuilder();
        String ls = System.getProperty("line.separator");
        try {
            while ((line = reader.readLine()) != null) {
                stringBuilder.append(line);
                stringBuilder.append(ls);
            }
        } catch (IOException e) {
            System.err.println(e);
            return "";
        } finally {
            try {
                reader.close();
            } catch (IOException e) {
                System.err.println(e);
            }
        }
        return stringBuilder.toString();
    }

public String getRelatedDocument(RelatedMetadataPath relatedMetadataPath) {
        String currPath =
            RULES_FILE1.substring(0, RULES_FILE1.indexOf("oracle/rules"));
        String relatedDoc =
            currPath + "oracle/rules/" + relatedMetadataPath.getValue();

        URL url = null;
        try {
            url = new URL(relatedDoc);
            return readFile(url);
        } catch (IOException e) {
            System.err.println(e);
        }
        return "";
    }
}
Create a Java class called MyNLSPreferences that implements the oracle.integration.console.metadata.model.share.NLSPreferences interface, which is defined in soaComposerTemplates.jar.
For more information about the NLS Preferences interface, see Section I.2, "The NLSPreferences Interface."
The following is a sample of MyNLSPreferences.java that implements the NLSPreferences interface:
package useruledicttaskflow;

import java.util.Locale;
import java.util.TimeZone;

import oracle.integration.console.metadata.model.share.NLSPreferences;

public class MyNLSPreferences implements NLSPreferences {
    private static final String DATE_STYLE = "yyyy-MM-dd";
    private static final String TIME_STYLE = "HH-mm-ss";

    public MyNLSPreferences() {
        super();
    }

    public Locale getLocale() {
        return Locale.getDefault();
    }

    public TimeZone getTimeZone() {
        return TimeZone.getTimeZone("America/Los_Angeles");
    }

    public String getDateFormat() {
        return DATE_STYLE;
    }

    public String getTimeFormat() {
        return TIME_STYLE;
    }
}
Create a Managed Bean called MyBean.java to return the implementation of MetadataDetails and NLSPreferences. It also returns the oracle.integration.console.metadata.model.share.MetadataDetailsMode object and provides event handlers such as toggleMode(), saveDictionary(), saveNoValidateDictionary(), and validate().
The following is a sample of the MyBean.java file:
package useruledicttaskflow;

import javax.el.ELContext;
import javax.el.ExpressionFactory;
import javax.el.MethodExpression;

import javax.faces.context.FacesContext;
import javax.faces.event.PhaseId;

import oracle.adf.view.rich.component.rich.fragment.RichRegion;

import oracle.integration.console.metadata.model.share.MetadataDetails;
import oracle.integration.console.metadata.model.share.MetadataDetailsMode;
import oracle.integration.console.metadata.model.share.NLSPreferences;

public class MyBean {
    private MyMetaDataDetails details = null;
    private MetadataDetailsMode mode = MetadataDetailsMode.VIEW;
    private RichRegion regionComp;
    private NLSPreferences nlsPrefs;

    public MyBean() {
        super();
    }

    public MetadataDetails getMetaDataDetails() {
        if (details != null)
            return details;

        details = new MyMetaDataDetails();
        return details;
    }

    public MetadataDetailsMode getDetailsMode() {
        return mode;
    }

    public void toggleMode() {
        if (mode.equals(MetadataDetailsMode.EDIT))
            mode = MetadataDetailsMode.VIEW;
        else
            mode = MetadataDetailsMode.EDIT;
    }

    public void saveDictionary() {
        if (regionComp == null)
            return;
        FacesContext fc = FacesContext.getCurrentInstance();
        ExpressionFactory ef = fc.getApplication().getExpressionFactory();
        ELContext elc = fc.getELContext();
        MethodExpression me =
            ef.createMethodExpression(elc, "doMetadataUpdate", String.class,
                                      new Class[] { });
        regionComp.queueActionEventInRegion(me, null, null, false, -1, -1,
                                            PhaseId.ANY_PHASE);
    }

    public void saveNoValidateDictionary() {
        if (regionComp == null)
            return;
        FacesContext fc = FacesContext.getCurrentInstance();
        ExpressionFactory ef = fc.getApplication().getExpressionFactory();
        ELContext elc = fc.getELContext();
        MethodExpression me =
            ef.createMethodExpression(elc, "doNoValidateMetadataUpdate",
                                      String.class, new Class[] { });
        regionComp.queueActionEventInRegion(me, null, null, false, -1, -1,
                                            PhaseId.ANY_PHASE);
    }

    public void validate() {
        if (regionComp == null)
            return;
        FacesContext fc = FacesContext.getCurrentInstance();
        ExpressionFactory ef = fc.getApplication().getExpressionFactory();
        ELContext elc = fc.getELContext();
        MethodExpression me =
            ef.createMethodExpression(elc, "doValidate", String.class,
                                      new Class[] { });
        regionComp.queueActionEventInRegion(me, null, null, false, -1, -1,
                                            PhaseId.ANY_PHASE);
    }

    public void setRegionComp(RichRegion regionComp) {
        this.regionComp = regionComp;
    }
    public RichRegion getRegionComp() {
        return regionComp;
    }

    public NLSPreferences getNlsPrefs() {
        if (nlsPrefs != null)
            return nlsPrefs;

        nlsPrefs = new MyNLSPreferences();
        return nlsPrefs;
    }
}
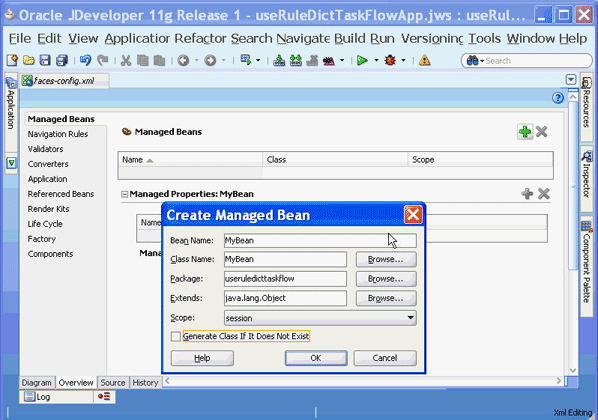
Open the faces-config.xml file in the Overview mode and click the + button under Managed Beans to display the Create Managed Bean dialog box. Point to MyBean.java by providing the Bean Name as MyBean and the Scope as session as shown in Figure 26-53.
Figure 26-53 Specifying the Bean Name and Scope in the Task Flow Application
To add a Rules Dictionary Editor task flow in a .jspx file:
The next task is to create the .jspx file to include the Rules Dictionary Editor component tag.
The steps are:
Open Oracle JDeveloper.
From the File menu, select New to display the New Gallery dialog box.
In the New Gallery dialog box, select JSF under Web Tier from the Categories panel.
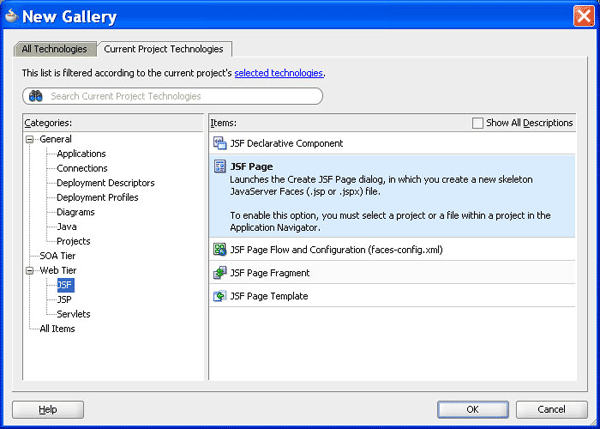
Select JSF Page under Items and click OK to display the Create JSF Page dialog box as shown in Figure 26-54.
Figure 26-54 Creating the JSF Page File to Include the Rules Dictionary Editor Task Flow
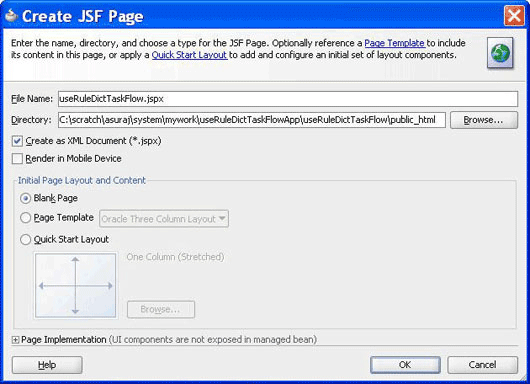
In the Create JSF Page dialog box, enter useRuleDictTaskFlow.jspx as the file name as shown in Figure 26-55.
Figure 26-55 Specifying the Name of the JSF Page for the Task Flow
adflibRuleDictionaryTaskFlow.jar is displayed in the component palette of Oracle JDeveloper as shown in Figure 26-56.
Figure 26-56 Rules Dictionary Task Flow JAR in the Component Palette
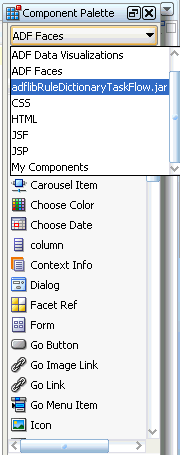
This is because you have added the Oracle Rules Dictionary Task Flow shared library when creating the sample application.
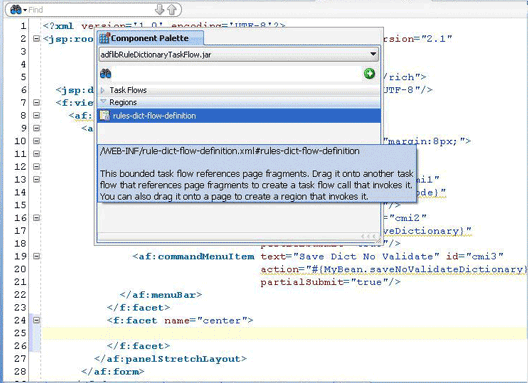
Select adflibRuleDictionaryTaskFlow.jar to make rule-dict-flow-definition to be available under Regions in the component palette. You can drag and drop the rule-dict-flow-definition region into the .jspx file as shown in Figure 26-57, and specify all the required parameters.
Figure 26-57 Dragging and Dropping the Region
The following is a sample of the useRuleDictTaskFlow.jspx file with the task flow added:
<f:view>
    <af:document id="d1">
      <af:form id="f1">
        <af:panelStretchLayout id="psl1" inlineStyle="margin:8px;">
          <f:facet name="top">
            <af:menuBar id="mb1">
              <af:commandMenuItem text="Toggle Mode" id="cmi1"
                                  action="#{MyBean.toggleMode}"
                                  partialSubmit="true"/>
              <af:commandMenuItem text="Save Dict" id="cmi2"
                                  action="#{MyBean.saveDictionary}"
                                  partialSubmit="true"/>
              <af:commandMenuItem text="Save Dict No Validate" id="cmi3"
                                  action="#{MyBean.saveNoValidateDictionary}"
                                  partialSubmit="true"/>
              <af:commandMenuItem text="Validate" id="cmi4"
                                  action="#{MyBean.validate}"
                                  partialSubmit="true"/>
            </af:menuBar>
          </f:facet>
          <f:facet name="center">
            <af:region value="#{bindings.rulesdictflowdefinition1.regionModel}"
                         id="r2" binding="#{MyBean.regionComp}"
                         partialTriggers="::cmi1 ::cmi2 ::cmi3 ::cmi4"/>
          </f:facet>
        </af:panelStretchLayout>
      </af:form>
    </af:document>
  </f:view>
In the preceding sample, you can find code snippets for rendering the following buttons to the page:
Toggle Mode: Enables switching between Read-Only and Editable modes of SOA Composer
Save Dict: Enables saving the dictionary (with or without validation)
To edit the pagedef.xml file:
After you add the task flow to the .jspx file, you must edit the useRuleDictTaskFlowPageDef.xml file. The pagedef.xml file is created when you drop the Rules Dictionary task flow into the .jspx page.
The following is a sample of the pagedef.xml file along with all the parameters that must be passed to the Rules Dictionary task flow:
<?xml version="1.0" encoding="UTF-8" ?>
<pageDefinition xmlns="http://xmlns.oracle.com/adfm/uimodel"
                version="11.1.1.55.99" id="useRuleDictTaskFlowPageDef"
                Package="useruledicttaskflow.pageDefs">
 <parameters/>
  <executables>
    <variableIterator id="variables"/>
    <taskFlow id="rulesdictflowdefinition1"
   taskFlowId= "/WEB-INF/rule-dict-flow-definition.xml#rules-dict-flow-definition"
   activation="deferred"
   xmlns="http://xmlns.oracle.com/adf/controller/binding">
 <parameters>
        <parameter id="details" value="#{MyBean.metaDataDetails}"
                   xmlns="http://xmlns.oracle.com/adfm/uimodel"/>
        <parameter id="mode" value="#{MyBean.detailsMode}"
                   xmlns="http://xmlns.oracle.com/adfm/uimodel"/>
        <parameter id="dtHeight" value="10"
                   xmlns="http://xmlns.oracle.com/adfm/uimodel"/>
        <parameter id="selectedTab" value="Ruleset_1"
                   xmlns="http://xmlns.oracle.com/adfm/uimodel"/>
        <parameter id="dtColumnPageSize" value="6"
                   xmlns="http://xmlns.oracle.com/adfm/uimodel"/>
        <parameter id="nlsPrefs" value="#{MyBean.nlsPrefs}"
                   xmlns="http://xmlns.oracle.com/adfm/uimodel"/>
        <parameter id="discloseRules" value="true"
                   xmlns="http://xmlns.oracle.com/adfm/uimodel"/>
      </parameters>
    </taskFlow>
  </executables>
  <bindings/>
</pageDefinition
To refer to the oracle.rules and the oracle.soa.rules_dict_dc.webapp shared libraries:
The next task is to refer to the oracle.rules and oracle.soa.rules_dict_dc.webapp shared libraries from the weblogic-application.xml file.
For more information on referring to the shared libraries, see Section 26.3.2, "How to Create and Run a Sample Application by Using the Rules Dictionary Editor Component."
To run the sample task flow application:
The last task is running the sample application in the embedded server.
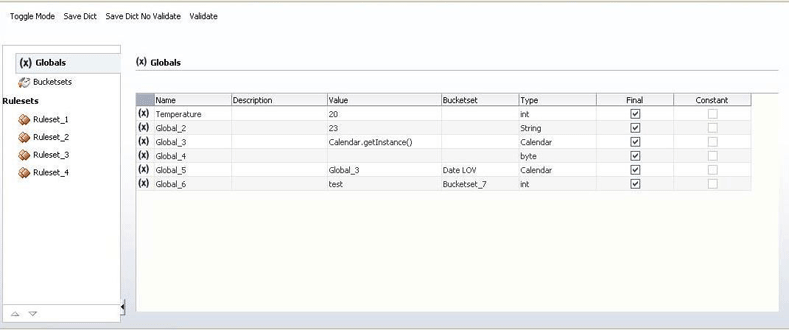
To run the sample application, from Oracle JDeveloper, right-click the useRulesDictTaskFlow.jspx file, and select Run. This starts the sample application on a web browser as shown in Figure 26-46.
Figure 26-58 Running the Sample Rules Dictionary Editor Task Flow Application
When you are ready to deploy your application EAR file to the standalone Weblogic server, perform the following:
Launch the Weblogic server console (http://host:port/console/login/LoginForm.jsp) and ensure that oracle.rules is displayed in the deployments list.
Ensure that oracle.soa.rules_dict_dc.webapp is displayed in the deployments list. If this is not displayed, click Install and select the <JDEV_INSTALL>/jdeveloper/soa/modules/oracle.soa.rules_dict_dc.webapp_11.1.1/oracle.soa.rules_dict_dc.webapp.war file.
In the project that has to be deployed (where you create the EAR file):
Add the following lines to the weblogic-application.xml:
<library-ref>
   <library-name>oracle.rules</library-name>
</library-ref>
Add the following lines to weblogic.xml in the project WAR file:
<library-ref>
   <library-name>oracle.soa.rules_dict_dc.webapp</library-name>
</library-ref>
Deploy the EAR file in the Weblogic server.
You can localize an application that is created using the Rules Editor component, Rules Dictionary Editor component, or Rules Dictionary Editor task flow.
The steps are:
Modify faces-config.xml in the project that uses the Rules Editor component. The faces-config.xml file must have the following code within the <application> tag to support the available resource bundles:
<locale-config>      <default-locale>en</default-locale>
      <supported-locale>en</supported-locale>
      <supported-locale>ar</supported-locale>
      <supported-locale>cs</supported-locale>
      <supported-locale>da</supported-locale>
      <supported-locale>de</supported-locale>
      <supported-locale>el</supported-locale>
      <supported-locale>es</supported-locale>
      <supported-locale>fi</supported-locale>
      <supported-locale>fr</supported-locale>
      <supported-locale>hu</supported-locale>
      <supported-locale>it</supported-locale>
      <supported-locale>iw</supported-locale>
      <supported-locale>ja</supported-locale>
      <supported-locale>ko</supported-locale>
      <supported-locale>nl</supported-locale>
      <supported-locale>no</supported-locale>
      <supported-locale>pl</supported-locale>
      <supported-locale>pt-BR</supported-locale>
      <supported-locale>pt</supported-locale>
      <supported-locale>ro</supported-locale>
      <supported-locale>ru</supported-locale>
      <supported-locale>sk</supported-locale>
      <supported-locale>sv</supported-locale>
      <supported-locale>th</supported-locale>
      <supported-locale>tr</supported-locale>
      <supported-locale>zh-CN</supported-locale>
      <supported-locale>zh-TW</supported-locale>
</locale-config>
Change the browser language to the locale of your choice.
You can override the locale provided by the browser and display the user interface in a specific locale. This is done by passing that locale as an attribute to the component and modifying the f:view tag in the application using the component as shown:
<f:view locale="#{someBean.locale}">
The locale specified here should be the same as the one passed to the component using the locale attribute.