| Oracle® Fusion Middleware Installation Guide for Application Developer 11g Release 1 (11.1.1) Part Number E14827-01 |
|
|
View PDF |
| Oracle® Fusion Middleware Installation Guide for Application Developer 11g Release 1 (11.1.1) Part Number E14827-01 |
|
|
View PDF |
This appendix contains screenshots and descriptions for all of the Application Developer configuration screens:
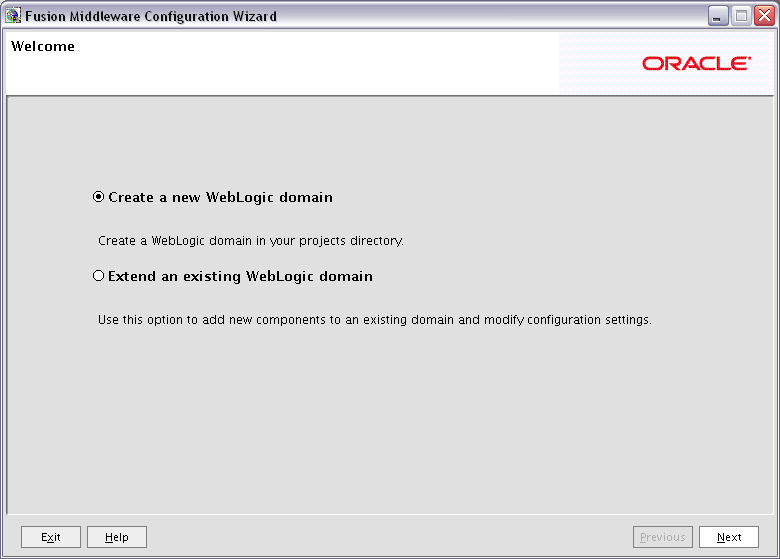
The Welcome screen is displayed each time you start the Oracle Fusion Middleware Configuration Wizard.
Select Create a new WebLogic domain to create a new WebLogic domain in your projects directory.
Select Extend an existing WebLogic domain if you want to add applications and services, or to modify existing configuration settings.
Click Next to continue.
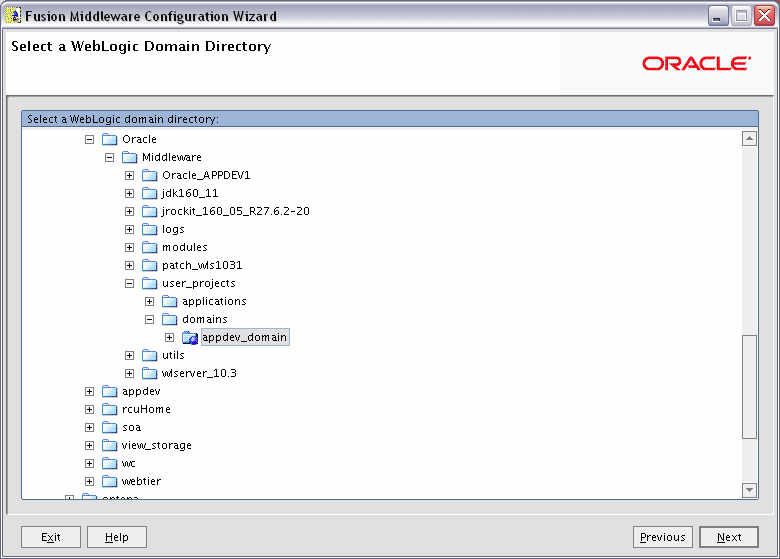
Select the WebLogic directory to which you want to add your applications and services.
Click Next to continue.
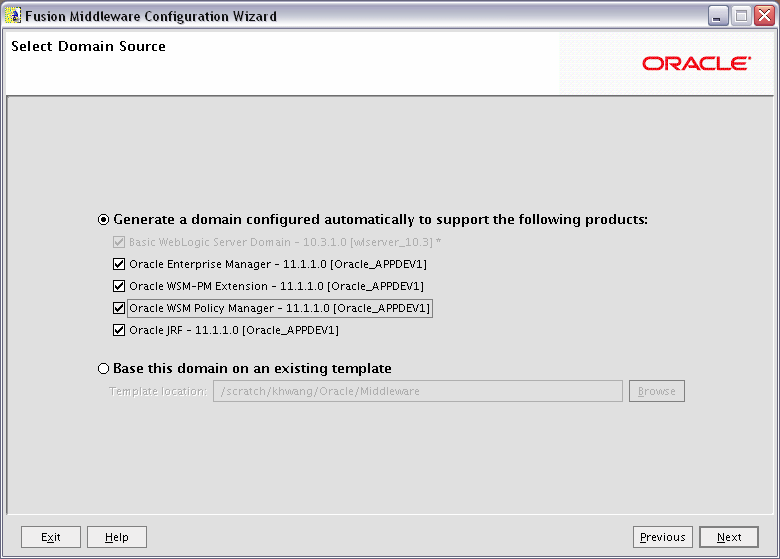
Select the source from which you want to create your new domain.
Select Generate a domain configured automatically to support the following products to create your domain to support selected products. Then, select the products for which you want support.
Select Base this domain on an existing template to create your domain based on an existing domain template. Click Browse to navigate your directories to find an existing template.
Click Next to continue.
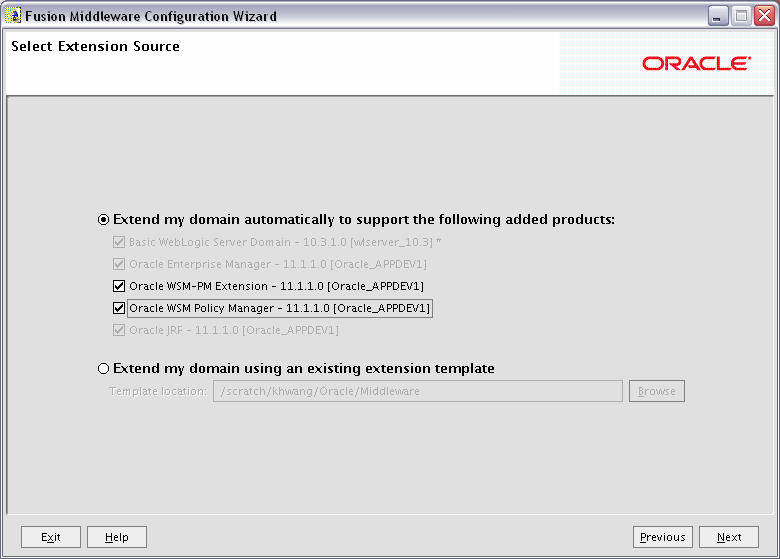
Select the source from which you want to extend your domain.
Select Extend my domain automatically to support the following added products to extend your domain to support selected products. Then, select the products for which you want support.
Select Extend my domain using an existing extension template to extend your domain based on an existing extension template. Click Browse to navigate your directories to find an existing template.
If a conflict with an existing product is detected, you will see the following screen:
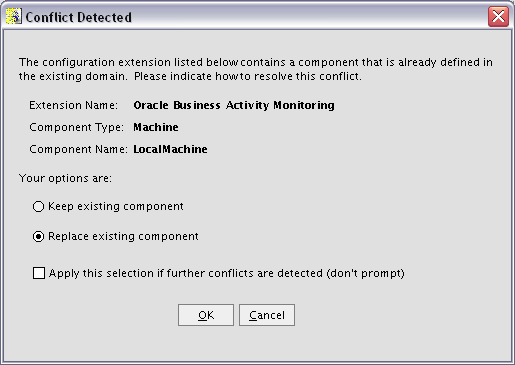
Select the action you want to take to resolve the conflict, then click OK. Select Apply this selection if further conflicts are detected (don't prompt) if this is the action you want to take for all conflicts during domain extension. You will not be prompted again.
Click Next to continue.
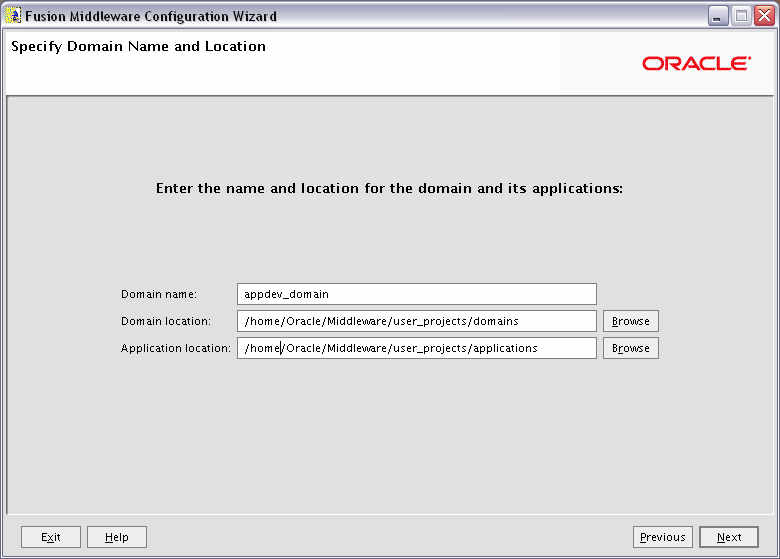
Specify the following information for the domain you are creating:
Domain name
The name of the domain you want to create. The default name is base_domain.
Domain Location
The absolute path to the directory where this domain should be created. The default location is MW_HOME/user_projects/domains (on UNIX) or MW_HOME\user_projects\domains (on Windows), but you can specify any location.
Note:
On Windows systems, be sure to include the drive letter when you specify the domain location.Application Location
The absolute path to the directory where applications created in this domain should reside. The default location is MW_HOME/user_projects/applications (on UNIX) or MW_HOME\user_projects\applications (on Windows).
Note:
On Windows systems, be sure to include the drive letter when you specify the application location.Click Next to continue.
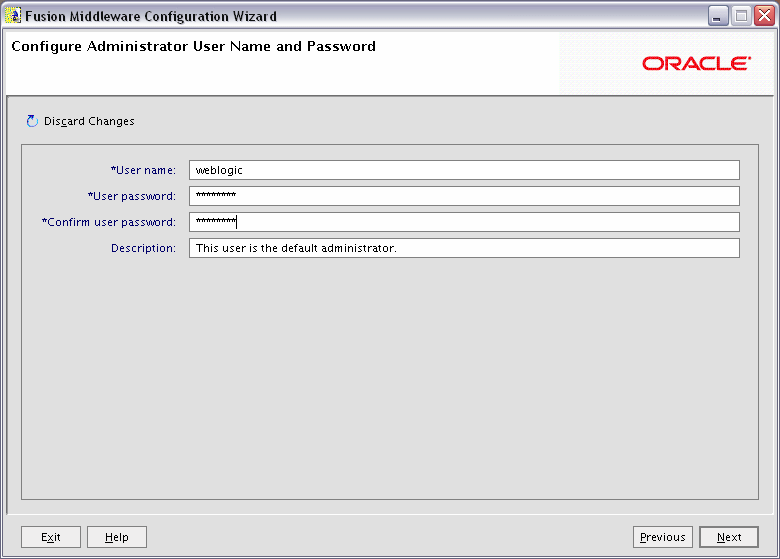
Create a user that will be assigned to the Administrator role. This user is the default administrator used to start development mode servers.
User name
Specify the user name. The default name is weblogic.
User password
Specify the password for the user.
Confirm user password
Re-enter the user password.
Description
Enter a description for the user. This field is optional.
Click Next to continue.
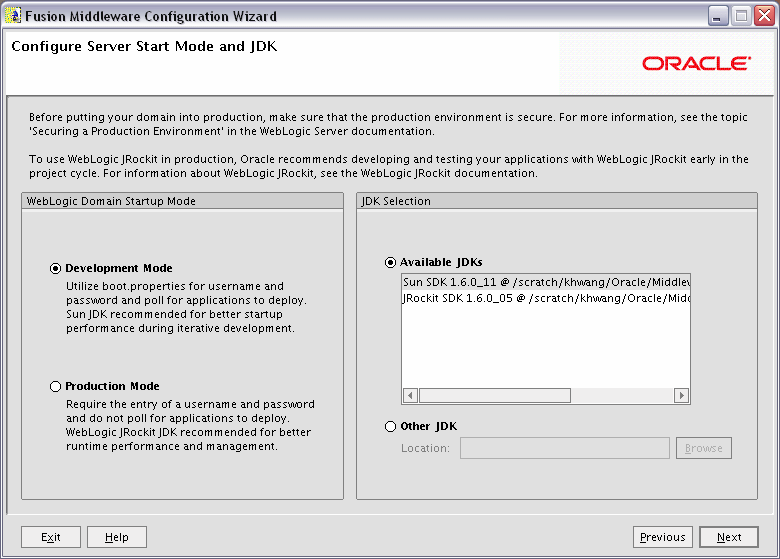
In the WebLogic Domain Startup Mode section, select one of the following startup modes:
Development Mode
Development mode should be used while you are developing your applications. Development mode uses a relaxed security configuration and enables you to auto-deploy applications. In this mode, boot.properties is used for username and passwords and polling is used for application deployment.
Sun JDK is recommended for Development Mode.
Production Mode
Production mode shouldbe used when your application is running in its final form. A production domain uses full security and may use clusters or other advanced features. In this mode, usernames and passwords are required and polling is not used for application deployment.
WebLogic JRockit JDK is recommended for this Production Mode.
In the JDK Selection section, select a JDK from the list of available JDKs, or select Other JDK and click Browse to find another JDK on your system.
Click Next to continue.
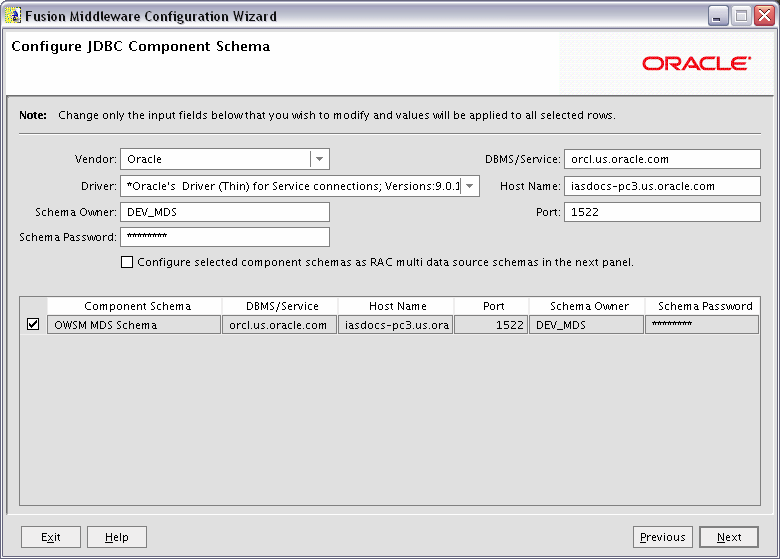
Configure the schema owner and password for each data source listed on this screen. When you make changes to any field on this screen, the changes are applied to all selected data sources. Therefore, if you have multiple data sources, you will have to repeat this procedure if you want a different schema name and password for each data source.
Review the table on this screen and identify which fields you need to modify:
Vendor
Select the vendor for your database from the drop-down list.
Driver
Select the driver type from the drop-down list.
Schema Owner
Specify the schema owner for the schema. This schema owner was assigned when you created the schema using RCU.
Password
Specify the password for the schema. You specified this password when creating the schema using RCU.
DBMS/Service
Specify the service name for your database. This is the database on which the schema resides.
Host Name
Specify the name of the system where your database is running.
Port
Specify the database listen port number.
Click Next to continue.
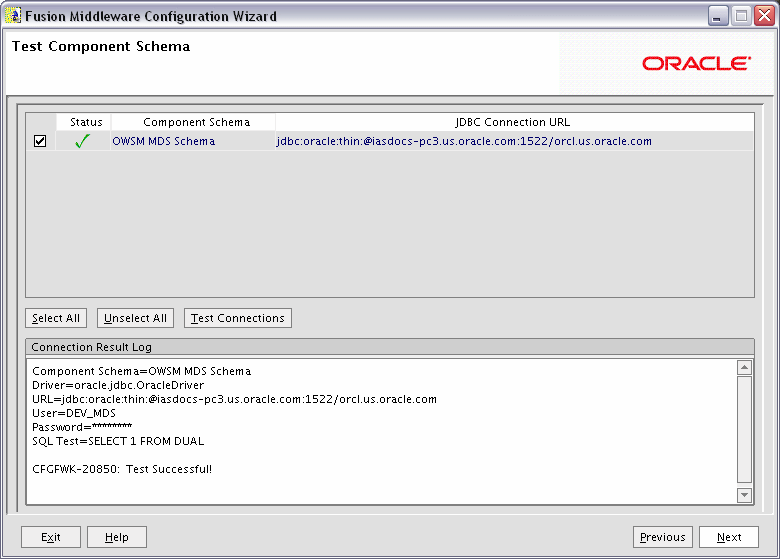
Verify that the connections to your component schema are successful.
Click Next to continue.
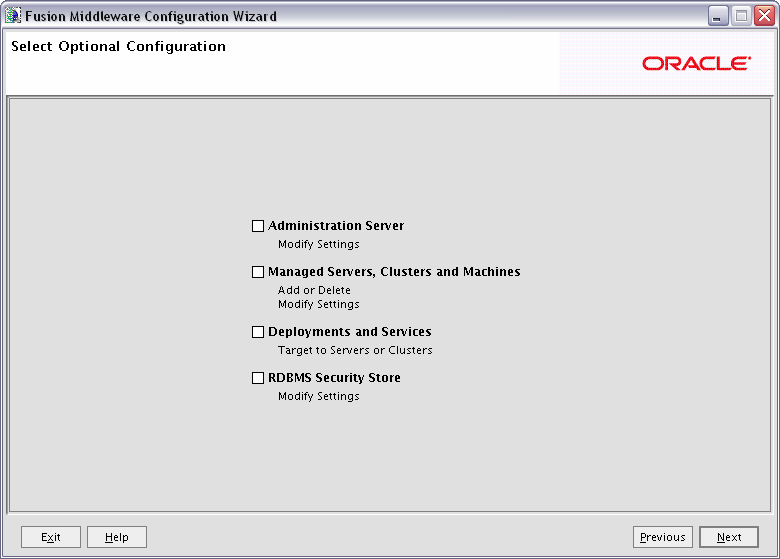
Select any category for which you want to perform custom or advanced configuration:
Administration Server
Select this to edit your Administration Server settings. You will be able to:
Change the name of your Administration Server (default is AdminServer).
Specify custom port numbers.
Configure the Administration Server to accept SSL connections.
Managed Servers, Clusters and Machines
Select this to add or delete managed servers, clusters, and machines. You can also modify the settings of any existing server, cluster, or machine.
Deployments and Services
Select this to customize how deployments and services are targeted to machines and clusters.
RDBMS Security Store
Select this if you want to configure an external relational database management system (RDBMS) as a data store for various security providers.
Click Next to continue.
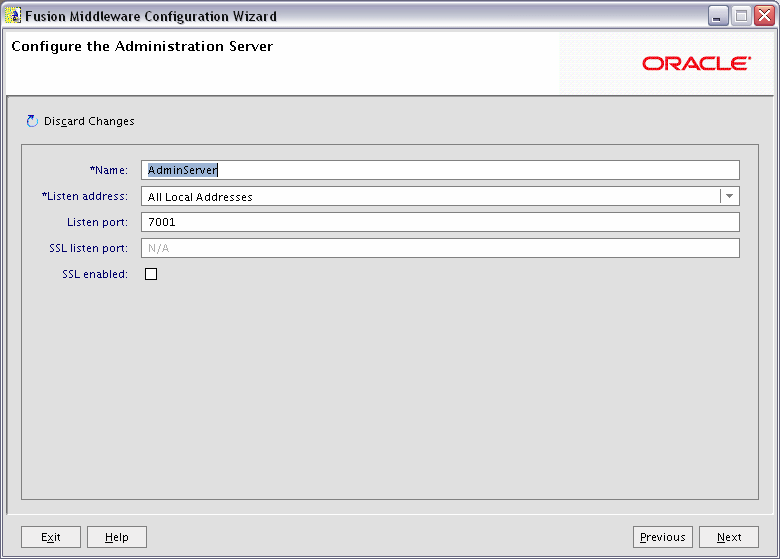
The Administration Server is the primary tool used to manage a WebLogic Server domain.
One WebLogic Server instance in each domain is configured as the Administration Server. If you have multiple WebLogic Server instances, then all the other instances are referred to as Managed Servers. In a domain with only one WebLogic Server instance, that instance functions both as Administration Server and Managed Server.
Name
Specify the name of your Administration Server. The default name is AdminServer.
Listen Address
Use the drop-down list to select an address or range of addresses that the Administration Server will listen to for events. The default selection is All Local Addresses.
Listen Port
Specify the listen port number. The default port number is 7001.
Select SSL enabled if you want your Administration Server to accept SSL connections. Be sure to specify the SSL Listen Port if you select the SSL enabled option.
Click Next to continue.
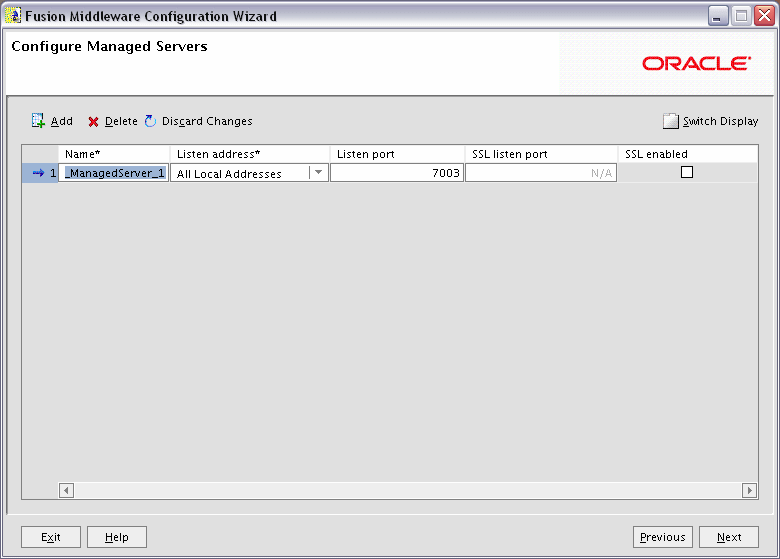
A managed server is an instance of WebLogic Server used to host enterprise applications. A typical production environment has at least one managed server, which is managed by the Administration Server.
Use this screen to add or delete managed servers; click Add to add a managed server. To delete a managed server, select the server name and click Delete.
For each managed server, specify:
Name
Name of the managed server. Each server within the domain must have a unique name. The server name is not used as part of the URL for applications that are deployed on the server. It is for your identification purposes only.
Listen Address
Enter an IP address or DNS name if you want to limit the number of valid addresses for a server instance. Otherwise, URLs to the server can specify any of the host computer's IP address, any DNS name that maps to one of the IP addresses, or the localhost string.
Listen Port
Enter the port number from which you want to access the server instance. If you run multiple server instances on a single computer, each server must use its own listen port.
Note:
Do not set the listen port number to7001; this is the default port for the Administration Server.SSL Listen Port
Enter the port number from which you want to access the server instance for SSL connections - this column is only active if the corresponding SSL enabled checkbox in the same row is selected.
Click Switch Display to see the managed server information in tabs rather than in a table.
Click Next to continue.
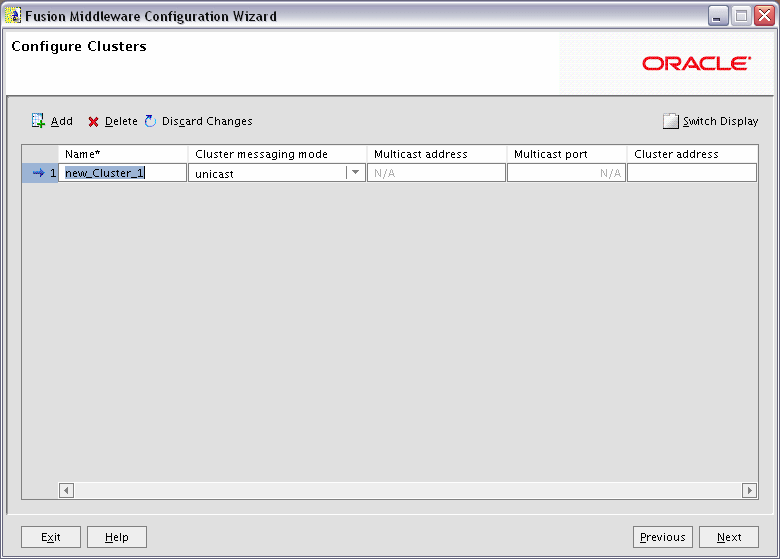
A cluster consists of multiple managed server instances working together to provide increased scalability and reliability.
Use this screen to add or delete clusters; click Add to add a cluster. To delete a cluster, select the cluster name and click Delete.
For each cluster, specify:
Name
Name of the cluster.
Cluster messaging mode
If you are creating a cluster within a new WebLogic Server environment, it is recommended that you use the Unicast messaging type.
If you are creating a cluster within an existing WebLogic Server environment or you need to ensure backward compatibility with older versions of WebLogic Server, you must use the Multicast messaging type. This enables multiple applications to subscribe to a given IP address and port number and listen for messages.
Select "multicast" or "unicast" from the drop-down list. If you select "multicast" you must also provide:
Multicast address
A multicast address is an IP address in the range from 224.0.0.0 to 239.255.255.255. The valid range is from 224.0.0.0 to 239.255.255.255. The default value used by WebLogic Server is 239.192.0.0. You should avoid using multicast addresses in the range x.0.0.1. This address must be unique to this cluster and should not be shared by other applications.
Multicast port
The multicast port is used by cluster members to communicate with each other. Valid values are between 1 and 65535.
Cluster address
Address of the cluster.
Click Switch Display to see the cluster information in tabs rather than in a table.
Click Next to continue.
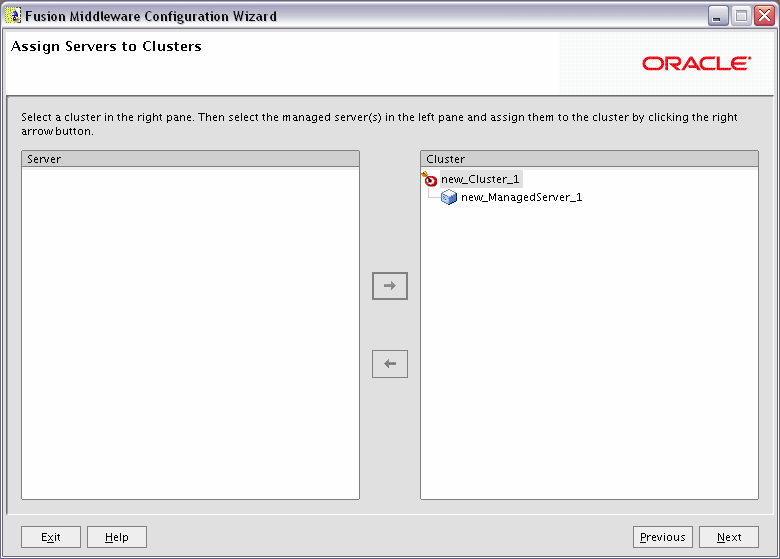
This screen only appears if you created at least one cluster on the Configure Clusters Screen.
Use this screen to assign each managed server in your domain to a cluster.
Click Next to continue.
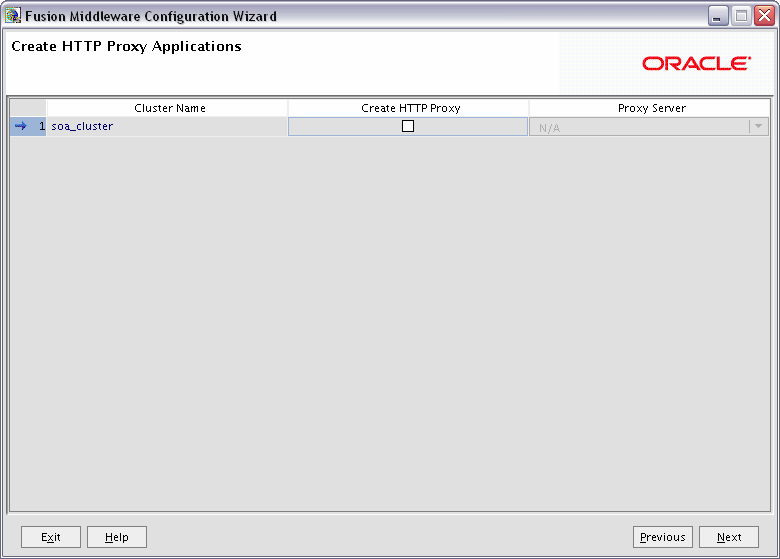
An HTTP proxy server proxies requests from a web server to WebLogic Server instances in a cluster, and provides load balancing and failover for the proxied HTTP requests.
If you want to proxy requests for a cluster, select Create HTTP Proxy next to the cluster name, then select a proxy server from the drop-down list in the "Proxy Server" field.
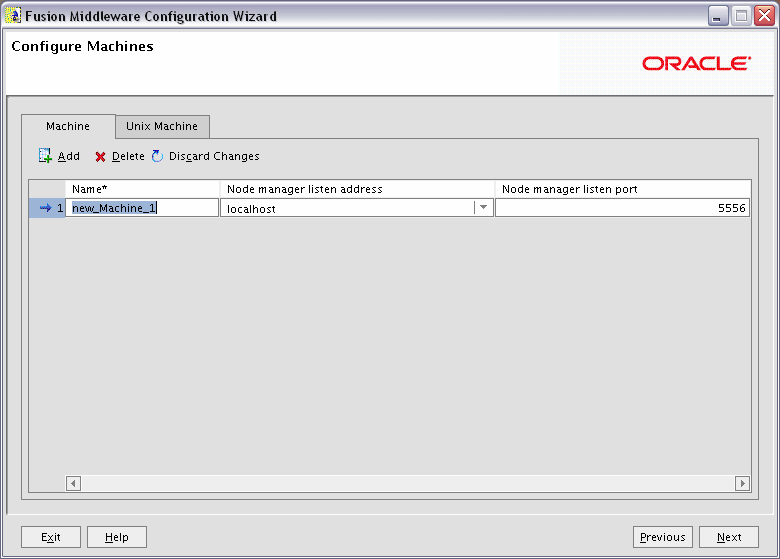
A machine is the logical representation of the computer that hosts one or more WebLogic Server instances. Each Managed Server must be assigned to a machine. The Administration Server and Node Manager are used to manage the machines defined on this screen.
If you are creating a new machine on a non-UNIX operating system, specify the following:
Name
Name of the machine. This name is used to identify the machine within the WebLogic Server domain; it does not have to correspond to the machine's network name.
Node manager listen address
Enter the DNS name or IP address on which the Node Manager listens.
Node manager listen port
Enter the port number on which the Node Manager listens for incoming requests.
For UNIX machine, click the "Unix Machine" tab and specify the following:
Name
Name of the machine. This name is used to identify the machine within the WebLogic Server domain; it does not have to correspond to the machine's network name.
Post bind GID enabled and Post bind GID
Select Post bind GID enabled to specify a non-privileged group account under which the server instance runs, then enter the group in the Post bind GID column. The default group is nobody, which is a standard UNIX group ID that provides the least possible privileges. In a production environment, it is recommended that you create a group account specifically for running instances of WebLogic Server. .
Post bind UID enabled and Post bind UID
Select Post bind UID enabled to specify a non-privileged user account under which the server instance runs, then enter the user in the Post bind UID column. The default user is nobody, which is a standard UNIX account that provides the least possible privileges. In a production environment, it is recommended that you create a user account specifically for running instances of WebLogic Server.
Node manager listen address
Enter the DNS name or IP address on which the Node Manager listens.
Mode manager listen port
Enter the port number on which the Node Manager listens for incoming requests.
Click Next to continue.
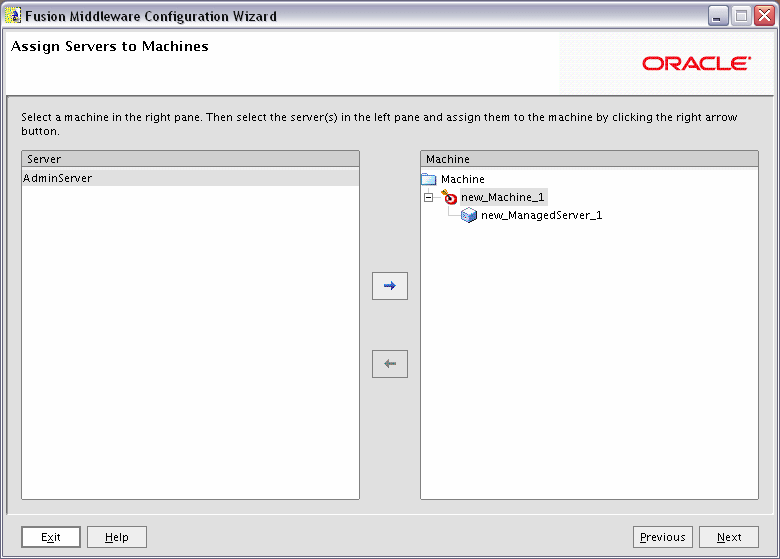
Use this screen to assign each WebLogic Server instance to the corresponding machine on which it runs.
Click Next to continue.
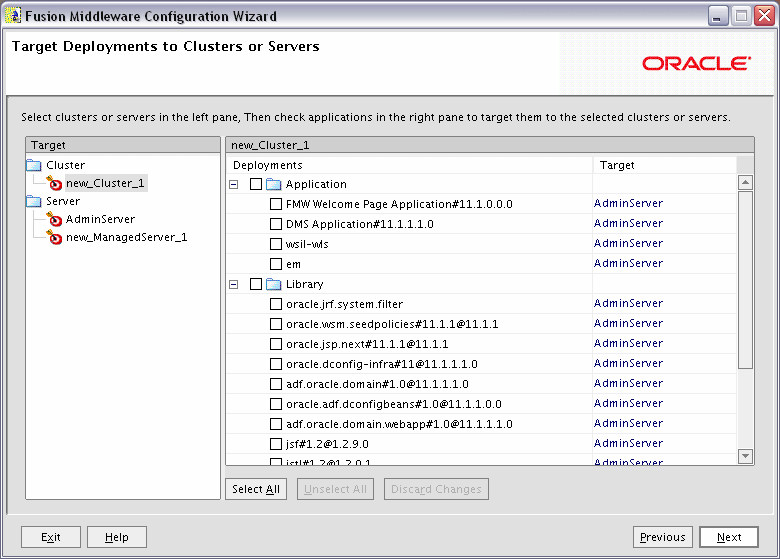
Use this screen to target your deployments to servers or clusters. Doing so enables WebLogic Server to serve the deployment to clients.
The Configuration Wizard automatically takes care of all necessary deployment targeting. You should not have to change anything on this screen unless specifically directed to do so.
In the left pane, select the server or cluster. Then, select the deployment in the right pane that you want to target to the selected server or cluster. The "Target" column in the right pane shows you the servers and clusters to which each deployment is targeted.
Click Next to continue.
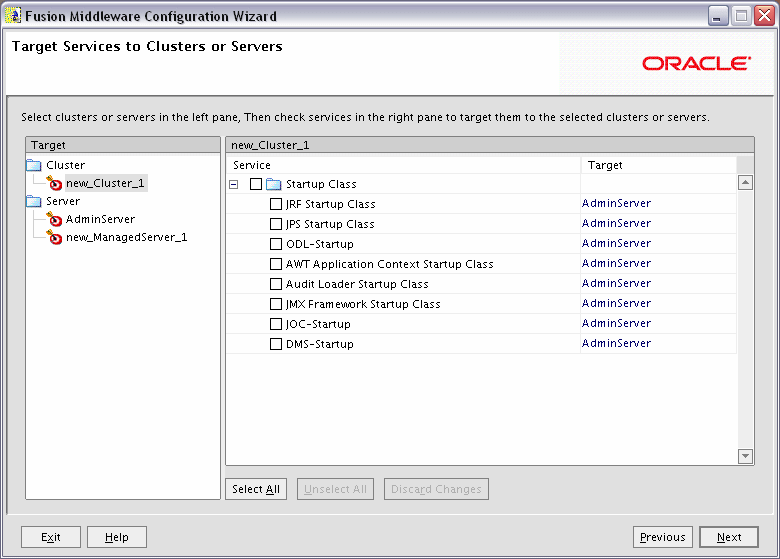
Use this screen to target your deployments to servers or clusters. Doing so enables WebLogic Server to serve the deployment to clients.
The Configuration Wizard automatically takes care of all necessary services targeting. You should not have to change anything on this screen unless specifically directed to do so.
In the left pane, select the server or cluster. Then, select the service in the right pane that you want to target to the selected server or cluster. The "Target" column in the right pane shows you the servers and clusters to which each service is targeted.
Click Next to continue.
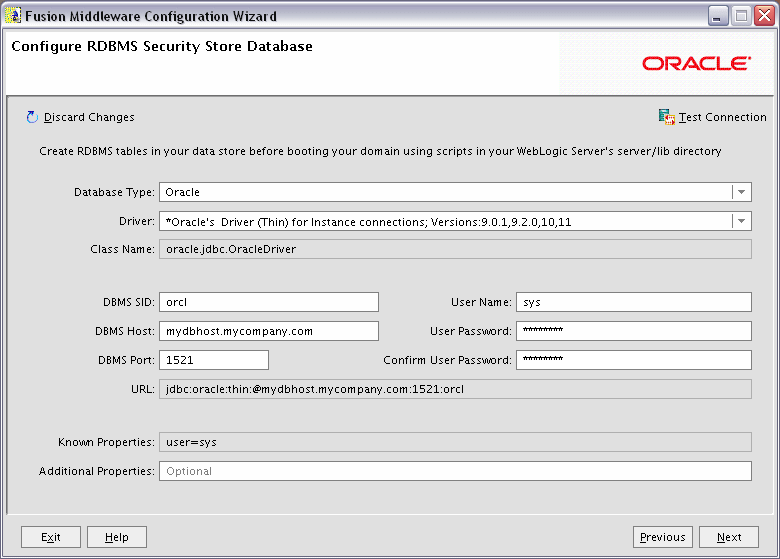
To make changs on this screen, select a database type from the drop-down list in the "Database Type" field. Then, select the appropriate driver in the "Driver" field.
Provide the following credentials for the selected database:
DBMS SID
The service ID of your database; this is usually the same as the global ID.
DBMS Host
The name of the system on which the database is running.
DBMS Port
The listen port number of the database.
User Name
The user name to access the database.
User Password
The password for the database user.
Confirm User Password
Re-enter the password for the database user.
Click Test Connection to make sure that the connection to your database is valid.
Click Next to continue.
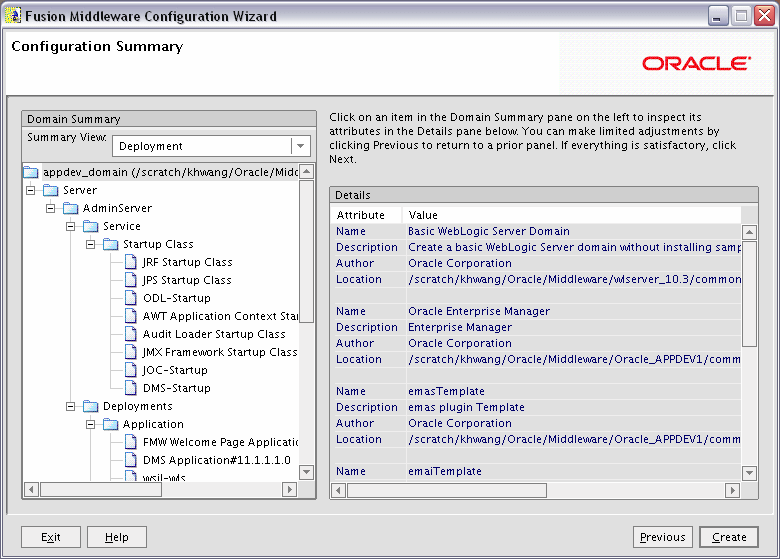
Verify the information on this screen. In the Summary View field, select a category from the drop-down list to view information about that category:
Deployment
Shows the deployments that will be configured in each cluster and server. You can click on the name of a deployment to view detailed information about the selected deployment.
Application
Shows the applications that will be configured in each cluster and server. You can click on the name of an application to view detailed information about the selected application.
Service
Shows the services that will be configured in each cluster and server. You can click on the name of a service to view detailed information about the selected service.
Cluster
Shows the clusters that will be configured in this domain and the servers that will be configured in each cluster. You can click on each server name to view information specific to that server.
Machine
Shows the machines that will be configured in this domain and the servers that will be configured in each machine. You can click on each server name to view information specific to that server.
Use the Previous button if you want to return to a previous screen to alter some portion of the configuration.
If everything is correct, click Create.
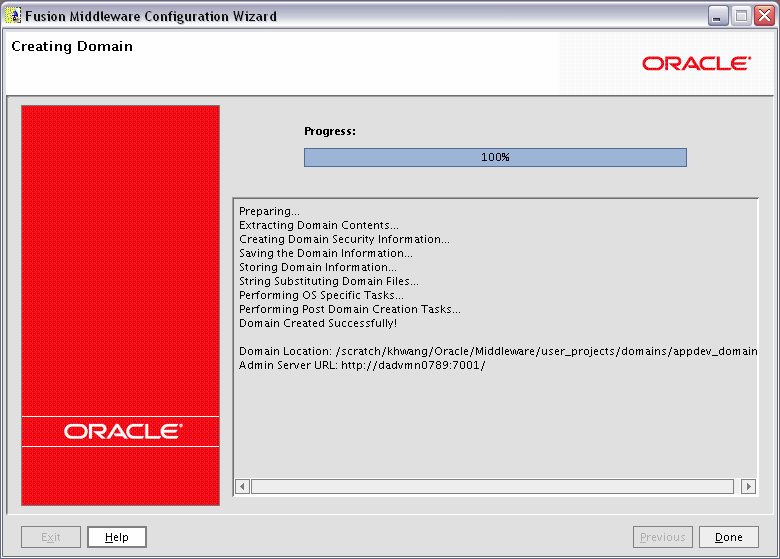
This screen shows the progress of the domain creation.
When it is finished, click Done to dismiss the window.