| Oracle® Fusion Middleware Application Adapters Installation Guide for Oracle WebLogic Server 11g Release 1 (11.1.1) Part Number E17054-01 |
|
|
View PDF |
| Oracle® Fusion Middleware Application Adapters Installation Guide for Oracle WebLogic Server 11g Release 1 (11.1.1) Part Number E17054-01 |
|
|
View PDF |
This chapter describes how to install and configure Oracle Application Adapters for Oracle WebLogic Server 11g. It contains the following topics:
Installing Oracle Application Adapters 11g Release 1 (11.1.1) on Windows
Installing Oracle Application Adapters 11g Release 1 (11.1.1) on UNIX and Linux
Configuring Oracle WebLogic Server Adapter Application Explorer
Uninstalling Oracle Application Adapters 11g Release 1 (11.1.1)
Oracle Application Adapters can be installed with the following:
Oracle WebLogic Server 11g Release 1 (11.1.1)
To install Oracle Application Adapters on a Windows platform, perform the following steps:
Install Java Development Kit (JDK) version 1.6 on the system.
Oracle Application Adapters are certified with JDK version 1.6.
Ensure that the JDK is added to your system PATH or on a predefined path.
If you have multiple JDK versions other than JDK version 1.6 installed on your system, then ensure that JDK version 1.6 is listed first in your system PATH. The installation program should install the adapters only with JDK version 1.6. The adapters should not be installed with any other JDK version.
Ensure that the Oracle SOA Suite 11g PS1 is installed on your system.
In addition, ensure that the ORACLE_HOME variable is set correctly to point the middleware home. For example:
C:\oracle\Middleware\home_0309\Oracle_SOA1
Navigate to the location on your system where the installation executable file is located.
On Windows:
iwora11g.application-adapters.win32.exe
Double-click this file to start the Oracle Application Adapters for Oracle WebLogic Server installation program.
The installation program uses the JDK version that is available in your system PATH or on a predefined paths.
The Welcome screen is displayed.
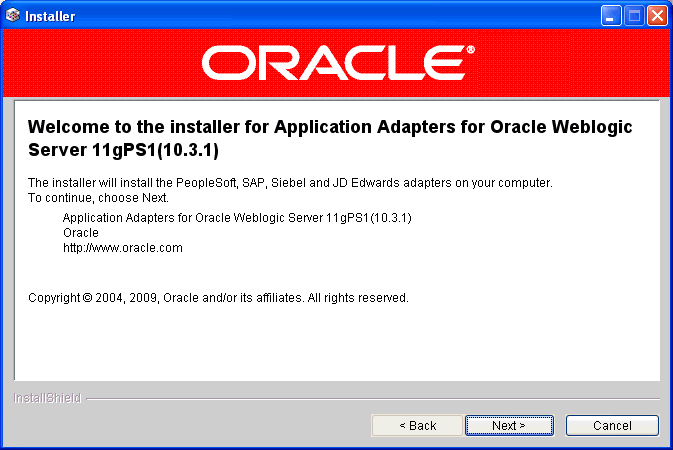
Click Next.
The following screen is displayed.
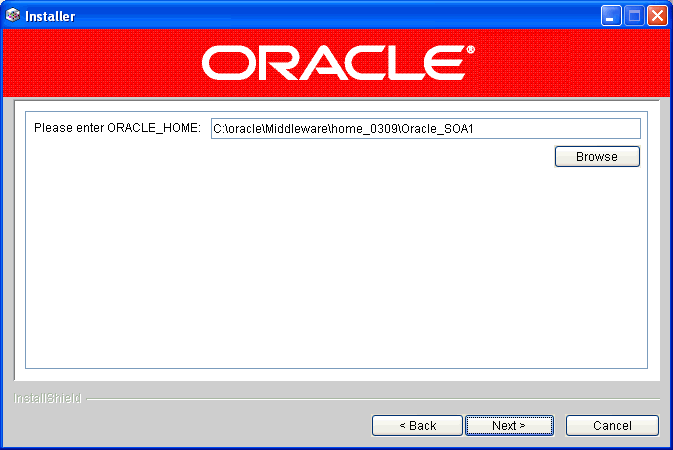
Enter the path where Oracle SOA Suite is installed on your system. For example:
C:\oracle\Middleware\home_0309\Oracle_SOA1
The installation program installs all the application adapters and related files in the following location:
ORACLE_HOME\soa\thirdparty\ApplicationAdapters
In this example, ORACLE_HOME is the location where Oracle SOA Suite is installed.
Click Next.
The Summary screen is displayed.
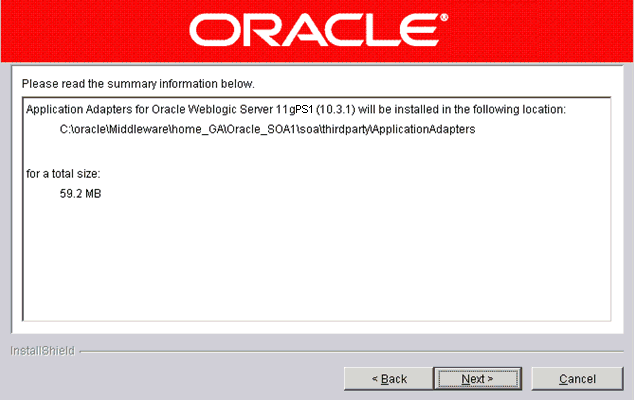
Review specific details on the Summary screen, including the disk requirements to ensure that you have sufficient disk space, and click Next to begin the installation.
A Status screen is displayed.
After the installation is complete, the following installation confirmation screen is displayed.
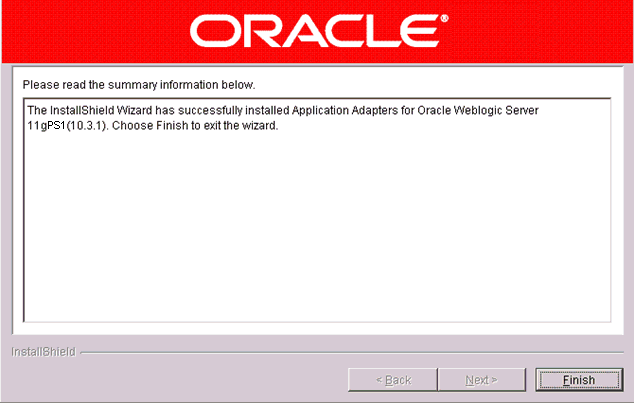
Click Finish.
The Oracle Application Adapters for Oracle WebLogic Server are now installed on your system in the following directory:
C:\oracle\Middleware\home_0309\Oracle_SOA1\soa\thirdparty\ApplicationAdapters
In addition, the following Windows Program Menu listing is created:

Running the Installation Program From a Command Line (All Platforms)
If you want the installation program to use a JDK version in a specific path, you can invoke the installer by performing the following steps:
Navigate to the command prompt for your system.
Enter the following command:
iwora11g.application-adapters.win32.exe -is:javahome c:\myfolder\jdk1.6
In this example, the installation program is executed using JDK version 1.6.
To install Oracle Application Adapters on a UNIX or Linux platform, you can invoke the installer by performing the following steps:
Navigate to the command prompt for your UNIX or Linux platform.
Depending on your UNIX or Linux platform, enter the following command:
For IBM AIX:
$./iwora11g.application-adapters.aix.bin
For HP-UX:
$./iwora11g.application-adapters.hp.bin
For Linux:
$./iwora11g.application-adapters.linux.bin
For Solaris:
$./iwora11g.application-adapters.solaris.bin
After the executable file is invoked, the remaining installation steps for the UNIX and Linux platform are similar to those for the Windows platform.
Before you can use Application Explorer to generate WSDL files, you must create a repository where your configuration details are stored. Each implementation requires you to configure a specific repository before you can explore Enterprise Information System (EIS) metadata. The information in the repository is also referenced at run time.
Business Services Engine (BSE) generates Web services based on enterprise assets that are accessible from adapters regardless of the programming language or the particular operating system being used. In addition, you can use BSE as a standalone Java application running in Oracle WebLogic Server.
The J2CA runs in J2EE Connector Architecture compliant application servers and uses the Common Client Interface (CCI) to provide integration services using Oracle Application Adapters for Oracle WebLogic Server. After you deploy the connector, you can access the adapters.
To create a configuration for Oracle WebLogic Server Adapter Business Services Engine (BSE) using Application Explorer, you must first define a new configuration. This is a prerequisite for deploying BSE as a Web application in Oracle WebLogic Server.
Defining a New Configuration for BSE
To define a new configuration for BSE:
Start Application Explorer by clicking the Windows Start menu, selecting All Programs, Oracle Application Adapters, and clicking Application Explorer.

You can also start Application Explorer by executing the ae.bat file, which is located in the following directory:
C:\oracle\Middleware\home_0309\Oracle_SOA1\soa\thirdparty\ApplicationAdapters\tools\iwae\bin\ae.bat
It is a good practice to create a shortcut for the ae.bat file on your desktop.
If you are using a UNIX or Linux platform you can start Application Explorer by executing the iwae.sh file.
Note:
Before you execute the iwae.sh file on UNIX or Linux platforms, the permissions must be changed. For example:chmod +x iwae.sh
Right-click Configurations and select New.
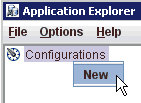
The New Configuration dialog is displayed.
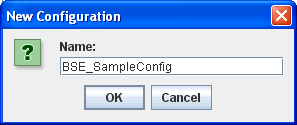
Enter a name for the new configuration, for example, BSE_SampleConfig, and click OK.
Please note that the name of the BSE configuration that is specified here is used during the BSE deployment process.
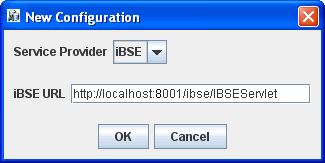
In the iBSE URL field, accept the default URL or replace it with a different URL with the following format:
http://host name:port/ibse/IBSEServlet
Where host name is the system on which Oracle WebLogic Server resides and port is the HTTP port number where Oracle WebLogic Server is listening.
Click OK.
A node representing the new configuration appears beneath the root Configurations node.
To create a configuration for Oracle WebLogic Server Adapter J2EE Connector Architecture (J2CA) using Application Explorer, you must first define a new configuration. This is a prerequisite for deploying J2CA as a Web application in Oracle WebLogic Server.
Defining a New Configuration for J2CA
To define a new configuration for J2CA:
Start Application Explorer by clicking the Windows Start menu, selecting All Programs, Oracle Application Adapters, and clicking Application Explorer.

You can also start Application Explorer by executing the ae.bat file, which is located in the following directory:
C:\oracle\Middleware\home_0309\Oracle_SOA1\soa\thirdparty\ApplicationAdapters\tools\iwae\bin\ae.bat
It is a good practice to create a shortcut for the ae.bat file on your desktop.
If you are using a UNIX or Linux platform you can start Application Explorer by executing the iwae.sh file.
Note:
Before you execute the iwae.sh file on UNIX or Linux platforms, the permissions must be changed. For example:chmod +x iwae.sh
Right-click Configurations and select New.

The New Configuration dialog is displayed.
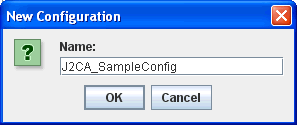
Enter a name for the new configuration, for example, J2CA_SampleConfig, and click OK.
Please note that the name of the J2CA configuration that is specified here is used during the J2CA deployment process.
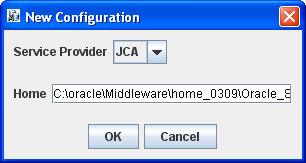
In the Home field, enter a path to your J2CA configuration directory where the repository, schemas, and other information is stored, for example:
C:\oracle\Middleware\home_0309\Oracle_SOA1\soa\thirdparty\ApplicationAdapters
Click OK.
A node representing the new configuration appears beneath the root Configurations node.
This section describes how to configure settings for the J2CA Connector Application and J2CA Installation Verification Program (IVP). After the appropriate settings are configured according to your requirements, you must first deploy the J2CA Connector Application for use with Oracle WebLogic Server using the Oracle WebLogic Server Administration Console. After the J2CA Connector Application is deployed successfully, you can configure and deploy the J2CA Installation Verification Program (IVP).
Configuring Settings for the J2CA Connector Application
To configure settings for the J2CA Connector Application:
Locate the ra.xml file, which is located in the following directory:
C:\Oracle_home\soa\thirdparty\ApplicationAdapters\iwafjca.rar\META-INF\ra.xml
Open the ra.xml file in an editor.
Enter a value for the IWayHome property.
This is the folder where the adapters are installed. For example:
<config-property> <config-property-name>IWayHome</config-property-name> <config-property-type>java.lang.String</config-property-type> <config-property-value>C:\oracle\Middleware\home_0309\Oracle_SOA1\soa\thirdparty\ApplicationAdapters</config-property-value></config-property>
Enter a value for the IWayConfig property.
This is the value that you specified when you created a new J2CA configuration using Application Explorer. For example:
<config-property> <config-property-name>IWayConfig</config-property-name> <config-property-type>java.lang.String</config-property-type> <config-property-value>J2CA_SampleConfig</config-property-value></config-property>
Save the ra.xml file and exit the editor.
Configuring Log File Management for the J2CA Connector Application
Log file management for the J2CA Connector Application is governed by the configuration of the ra.xml file. The properties such as LogLevel, LogSize, and LogCount are the actual parameters that must be configured.
For example:
<config-property> <config-property-name>LogLevel</config-property-name> <config-property-type>java.lang.String</config-property-type> <config-property-value>DEBUG</config-property-value></config-property><config-property> <config-property-name>LogSize</config-property-name> <config-property-type>java.lang.Integer</config-property-type> <config-property-value>100000</config-property-value></config-property><config-property> <config-property-name>LogCount</config-property-name> <config-property-type>java.lang.Integer</config-property-type> <config-property-value>10</config-property-value></config-property>
LogLevel specifies the level of the log to be shown in the log files. Valid values for LogLevel include DEBUG, INFO, ERROR, FATAL, and WARN. For development and test environments, DEBUG is the preferred log level, which displays all of the log details. For production environments, ERROR is the preferred log level.
LogSize is the parameter that controls the size of the log files. The size should be mentioned in bytes.
LogCount is the parameter that controls the number of log files that are required. The value for this parameter must be specified as an integer. The number of log files that are generated do not exceed the number that is specified and a rollover of the log occurs only within the files that have been generated.
The log files would be created under the ORACLE_HOME\soa\thirdparty\ApplicationAdapters\config\xxxxxxx\log folder. Note that xxxxxxx is the name of the J2CA configuration that you created in Application Explorer. Each J2CA configuration in Application Explorer has a corresponding log folder under the named J2CA configuration folder.
Regardless of inbound or outbound processing, all log information is stored in a file that uses the iwafjcaxxxx.log naming convention. Outbound process logs are updated in the format iwafjcaxx.log (for example, iwafjca00.log). Inbound process logs are updated in the format iwafjca15xx.log (for example, iwafjca1500.log).
When an outbound process is executed, all the current logs are updated in the iwafjca00.log file. After this file reaches its maximum log file size, the file is saved as iwafjca10.log and iwafjca00.log continues to log new activity. If iwafjca00.log reaches its maximum log file size for a second time, then this file is saved as iwafjca10.log and the previous log file (iwafjca10.log) is now saved as iwafjca20.log.
All new log files are created in this manner based on the value specified for the LogCount parameter in the ra.xml file. After the log files reaches the maximum log file size (LogSize) and number of log files (LogCount), then the logs are overwritten on the log file that was created first. For example, if you set LogSize to 100000 and LogCount to 5, then five separate files with a maximum size of 100000 are created initially as iwafjca00.log, iwafjca10.log, iwafjca20.log, iwafjca30.log, and iwafjca40.log. When the iwafjca00.log file reaches its maximum size, then the contents of the iwafjca40.log file would be replaced with iwafjca30.log and subsequent replacement with the other log files also occurs. This same behavior is followed with J2CA log file management for inbound processing.
Deploying the J2CA Connector Application Using the Oracle WebLogic Server Administration Console
To deploy the J2CA Connector Application:
Start the Oracle WebLogic Server for the Oracle WebLogic Server domain that you have configured.
Open the Oracle WebLogic Server Administration Console in a Web browser by entering the following URL:
http://host name:port/console
Where host name is the name of the system where Oracle WebLogic Server is running and port is the port for the Oracle WebLogic Server that is running. The default port for the Oracle WebLogic Server is 7001. However, this value can vary between installations.
The Oracle WebLogic Server Administration Console logon page is displayed.
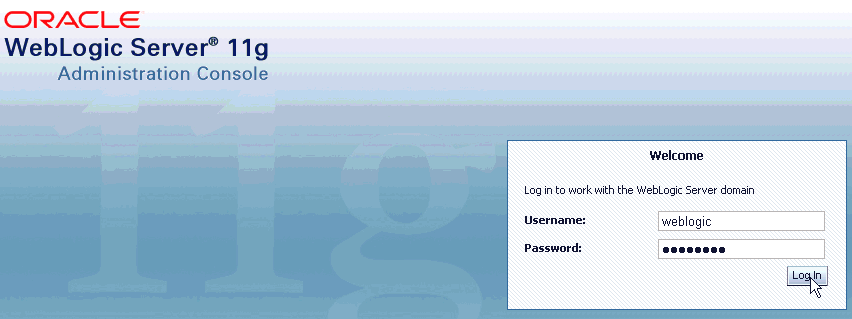
Log on to the Oracle WebLogic Server Administrative Console using an account that has administrator privileges.
The Oracle WebLogic Server Administration Console home page is displayed.
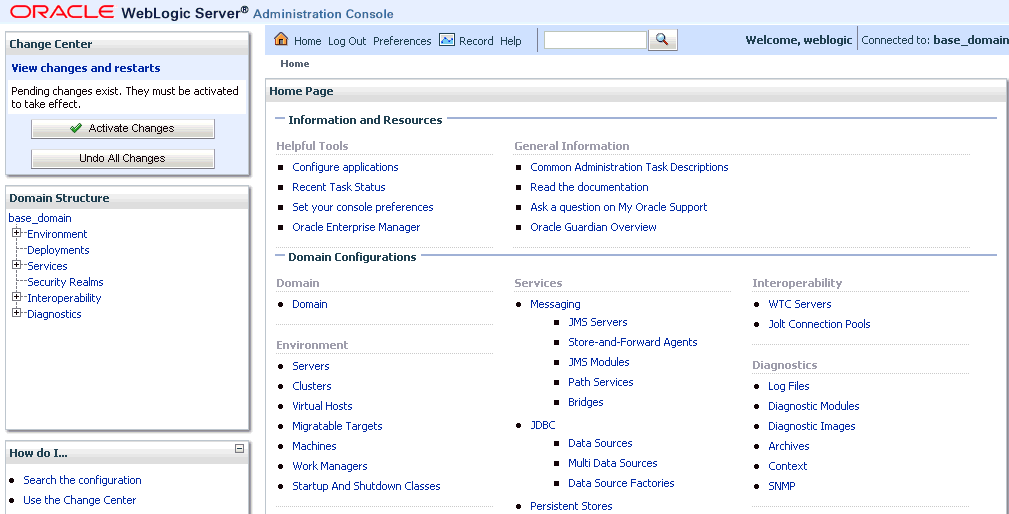
In the Domain Structure section in the left pane, click Deployments
The Deployments page is displayed.

Click Install.
The Install Application Assistant page is displayed.
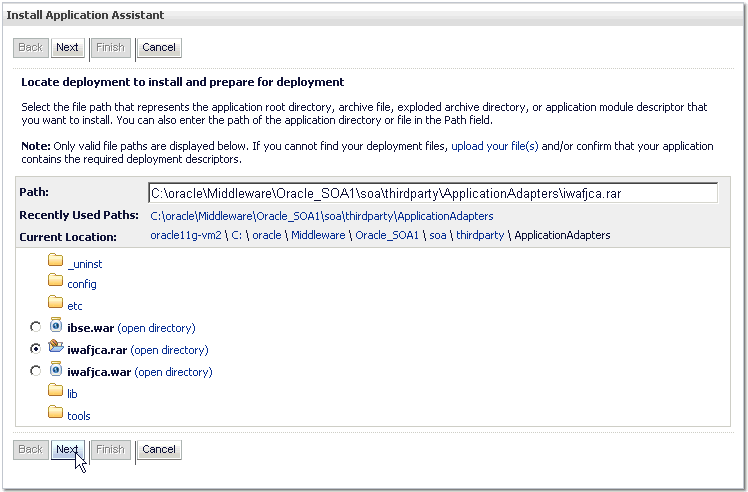
Browse to the following directory:
C:\oracle\Middleware\home_0309\Oracle_SOA1\soa\thirdparty\ApplicationAdapters\iwafjca.rar
Select the option next to iwafjca.rar and click Next.
The Choose Targeting Style page is displayed.
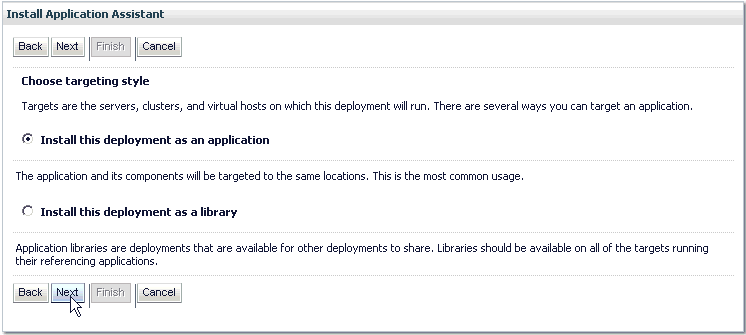
Leave the default Install this deployment as an application selected and click Next.
The Select Deployment Target page is displayed.
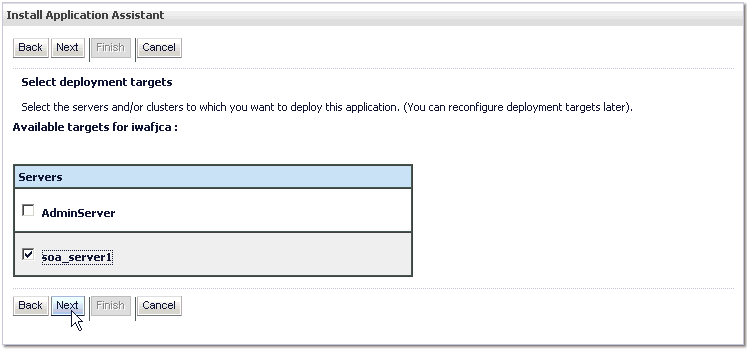
Select soa_server1 and click Next.
The Optional Settings page is displayed.
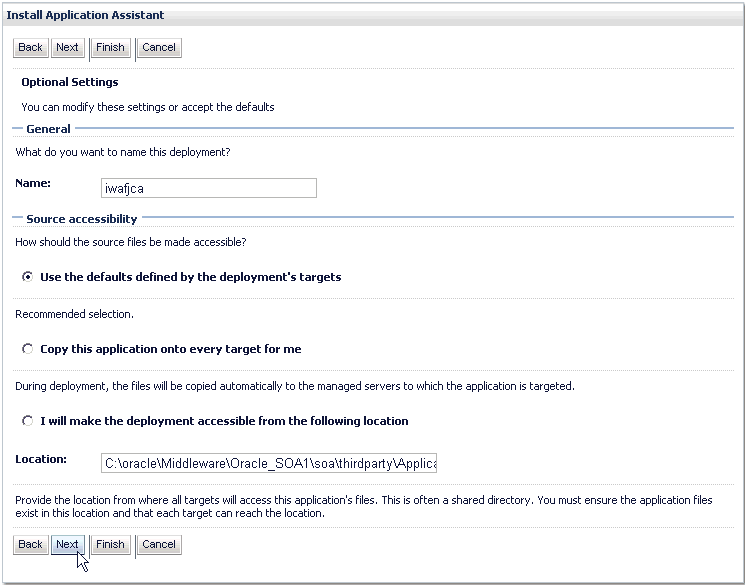
Click Next again leaving the default values.
The Summary page is displayed.

Click Finish.
The Settings page for the J2CA (iwafjca) Connector Application opens.
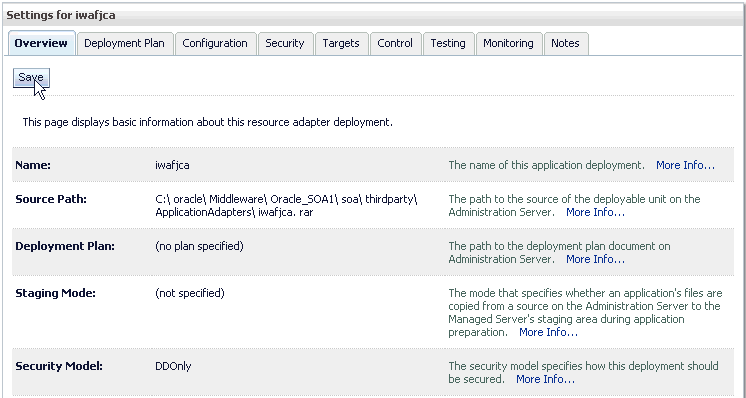
Click Save.
The following message is displayed, which indicate a successful deployment.
In the Domain Structure section in the left pane, click Deployments.
Navigate through the table that lists all the deployed applications until you find the J2CA (iwafjca) Connector Application.
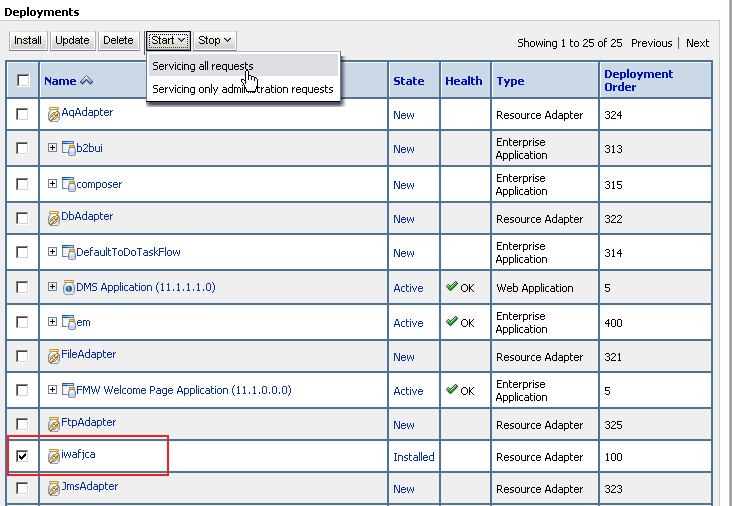
Select the check box next to iwafjca.
Click the Start submenu (down arrow) and select Servicing all requests.
The Start Application Assistant page is displayed.

Click Yes to start the selected deployment.
You are now ready to deploy the J2CA Installation Verification Program (IVP).
Deploying the J2CA Installation Verification Program (IVP) Using the Oracle WebLogic Server Administration Console
The J2CA Installation Verification Program (IVP) must be deployed and started after the J2CA Connector Application. It is better to have the deployment order also changed when deploying the J2CA IVP. For example, if the J2CA Connector Application has a deployment order of 100, then the J2CA IVP can have a deployment order of 101.
To deploy the J2CA IVP:
Start the Oracle WebLogic Server for the Oracle WebLogic Server domain that you have configured.
Open the Oracle WebLogic Server Administration Console in a Web browser by entering the following URL:
http://host name:port/console
Where host name is the name of the system where Oracle WebLogic Server is running and port is the port for the Oracle WebLogic Server that is running. The default port for the Oracle WebLogic Server is 7001. However, this value can vary between installations.
The Oracle WebLogic Server Administration Console logon page is displayed.

Log on to the Oracle WebLogic Server Administrative Console using an account that has administrator privileges.
The Oracle WebLogic Server Administration Console home page is displayed.

In the Domain Structure section in the left pane, click Deployments
The Deployments page is displayed.

Click Install.
The Install Application Assistant page is displayed.
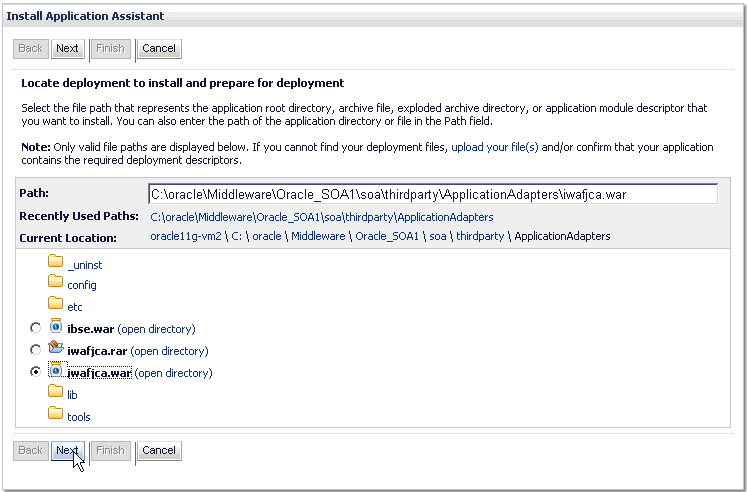
Browse to the following directory:
C:\oracle\Middleware\home_0309\Oracle_SOA1\soa\thirdparty\ApplicationAdapters\iwafjca.war
Select the option next to iwafjca.war and click Next.
The Choose Targeting Style page is displayed.

Leave the default Install this deployment as an application selected and click Next.
The Select Deployment Target page is displayed.

Select soa_server1 and click Next.
The Optional Settings page is displayed.
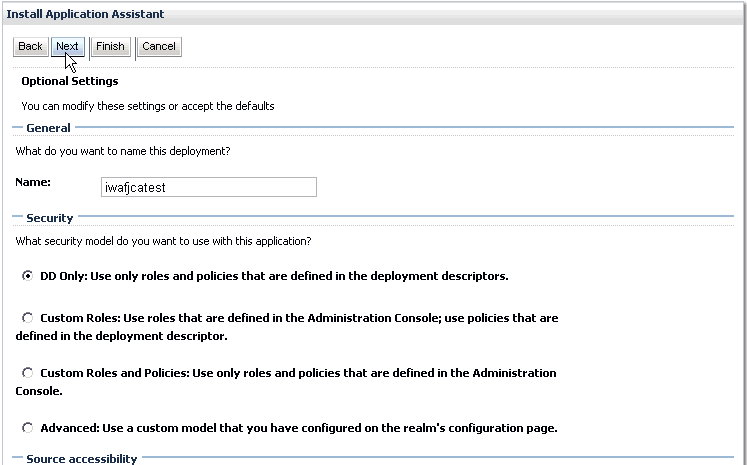
In the Name field, enter the following:
iwafjcatest
Click Next and leave the remaining default values unchanged.
The Summary page is displayed.
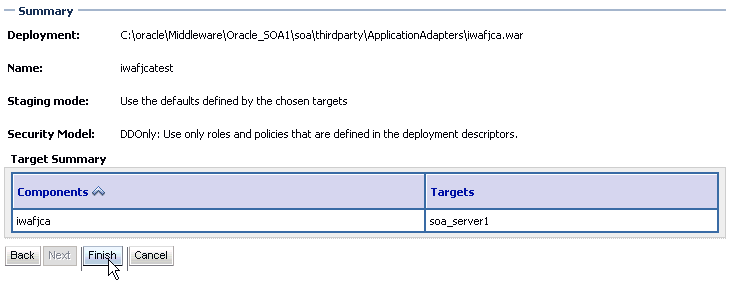
Click Finish.
The Settings page for the J2CA Installation Verification Program (IVP) opens.
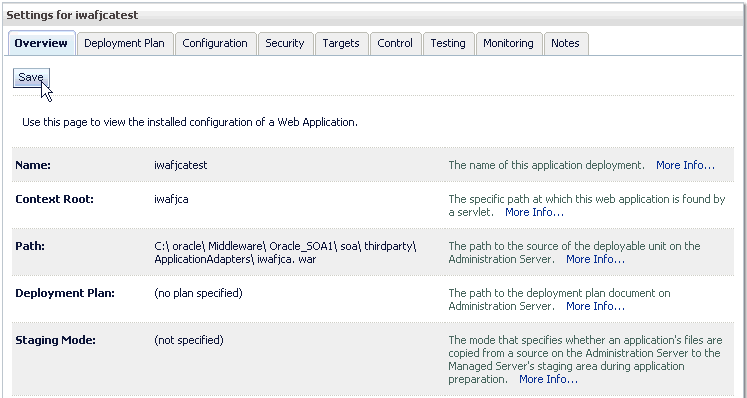
Click Save.
The following message is displayed, which indicate a successful deployment.
In the Domain Structure section in the left pane, click Deployments.
Navigate through the table that lists all the deployed applications until you find the J2CA (iwafjcatest) Installation Verification Program (IVP).
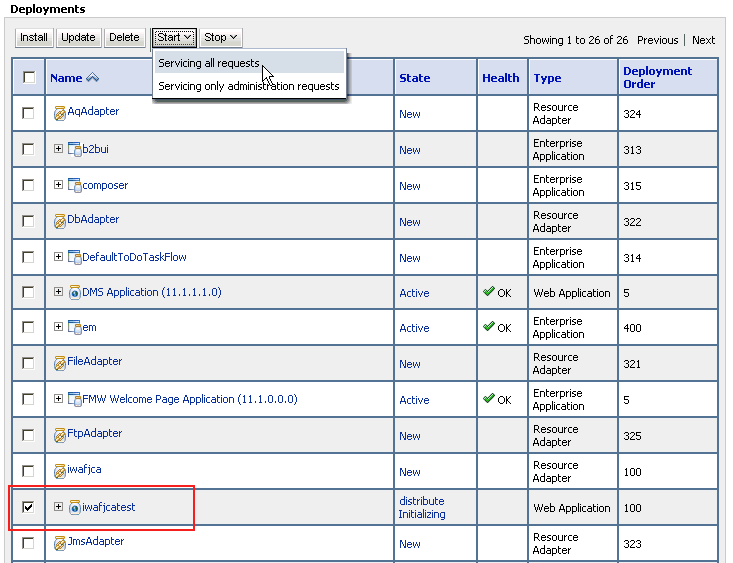
Select the check box next to iwafjcatest.
Click the Start submenu (down arrow) and select Servicing all requests.
The Start Application Assistant page is displayed.

Click Yes to start the selected deployment.
The J2CA (iwafjcatest) Installation Verification Program (IVP) has been deployed successfully to Oracle WebLogic Server.
After the adapter targets are created using Application Explorer, you can select these targets and test outbound connections from the Oracle J2CA Test Servlet. Please note that Oracle WebLogic Server must be restarted after adapter targets are created using Application Explorer.
To connect to a new J2CA configuration:
Right-click the configuration to which you want to connect, for example, J2CA_SampleConfig.
Select Connect.
Nodes appear for Adapters and Events. Please note that you can configure events using a J2CA configuration only.
The following is an example of a J2CA configuration named J2CA_SampleConfig:

Use the Adapters folder to create inbound interaction with an adapter, for example, Siebel. For example, you can use the Siebel node in the Adapters folder to configure a service that updates a Siebel system.
Use the Events folder to configure listeners that listen for events in Siebel.
After completing the postinstallation tasks, you can define new targets for Oracle Application Adapters. For more information about configuring targets, see the corresponding user guide for your adapter.
This section describes how to configure settings for Oracle WebLogic Server Adapter Business Services Engine (BSE). After the appropriate settings are configured according to your requirements, you must deploy BSE for use with Oracle WebLogic Server using the Oracle WebLogic Server Administration Console.
Configuring Settings for Oracle WebLogic Server Adapter Business Services Engine (BSE)
To configure settings for BSE:
Locate the web.xml file, which is located in the following directory:
C:\oracle\Middleware\home_0309\Oracle_SOA1\soa\thirdparty\ApplicationAdapters\ibse.war\WEB-INF\web.xml
Open the web.xml file in an editor.
Enter a value for the ibseroot parameter.
This is the folder where the BSE files are stored in subdirectories for each adapter. For example:
<context-param> <param-name>ibseroot</param-name> <param-value>C:\oracle\Middleware\home_0309\Oracle_SOA1\soa\thirdparty\ApplicationAdapters\ibse.war</param-value> <description>ibse root directory</description></context-param>
Enter a value for the iway.home parameter.
This is the folder where adapters are installed. For example:
<context-param> <param-name>iway.home</param-name> <param-value>C:\oracle\Middleware\home_0309\Oracle_SOA1\soa\thirdparty\ApplicationAdapters</param-value> <description>license file location</description></context-param>
Enter a value for the iway.config parameter.
This is the value that you specified when you created a new BSE configuration using Application Explorer. For example:
<context-param> <param-name>iway.config</param-name> <param-value>BSE_SampleConfig</param-value> <description>Base Configuration</description></context-param>
Save the web.xml file and exit the editor.
Deploying Oracle WebLogic Server Adapter Business Services Engine (BSE) Using the Oracle WebLogic Server Administration Console
To deploy BSE:
Start the Oracle WebLogic Server for the Oracle WebLogic Server domain that you have configured.
Open the Oracle WebLogic Server Administration Console in a Web browser by entering the following URL:
http://host name:port/console
Where host name is the name of the system where Oracle WebLogic Server is running and port is the port for the SOA Server that is running. The default port for the SOA Server is 8001. However, this value can vary between installations.
The Oracle WebLogic Server Administration Console logon page is displayed.

Log on to the Oracle WebLogic Server Administrative Console using an account that has administrator privileges.
The Oracle WebLogic Server Administration Console home page is displayed.

In the Domain Structure section in the left pane, click Deployments
The Deployments page is displayed.

Click Install.
The Install Application Assistant page is displayed.
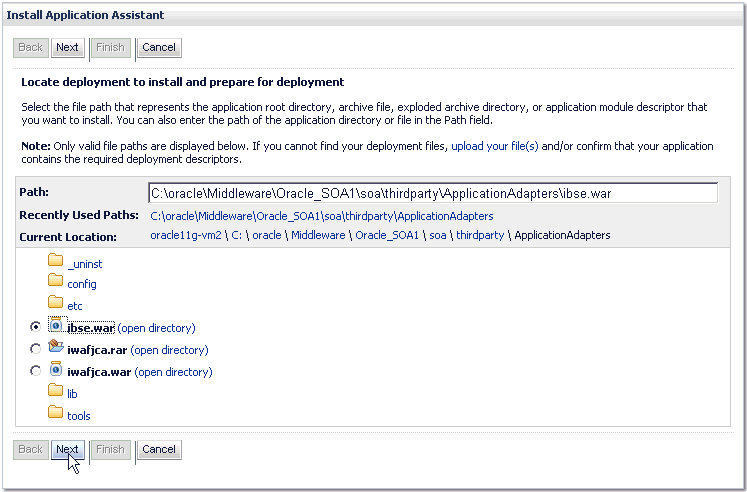
Browse to the following directory:
C:\oracle\Middleware\home_0309\Oracle_SOA1\soa\thirdparty\ApplicationAdapters\ibse.war
Select the option next to ibse.war and click Next.
The Choose Targeting Style page is displayed.

Leave the default Install this deployment as an application selected and click Next.
The Deployment Target page is displayed.

Select soa_server1 and click Next.
The Optional Settings page is displayed.
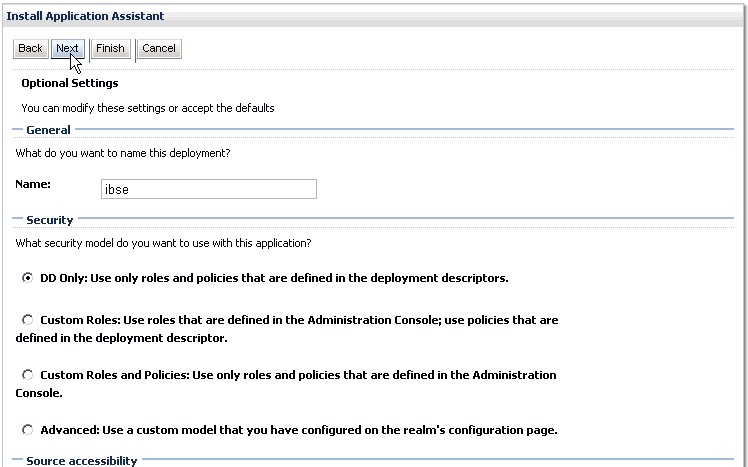
Click Next and leave the remaining default values unchanged.
The Summary page is displayed.
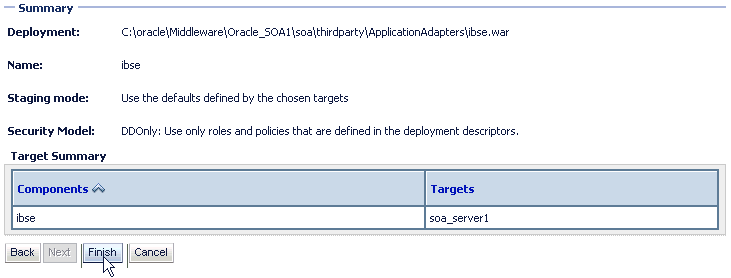
Click Finish.
The Settings page for the BSE (ibse) Application opens.
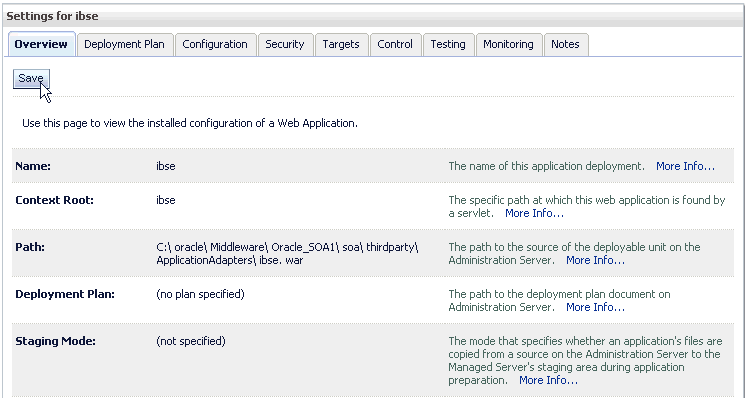
Click Save.
The following messages are displayed, which indicate a successful deployment.
In the Domain Structure section in the left pane, click Deployments.
Navigate through the table that lists all the deployed applications until you find the BSE (ibse) Application.
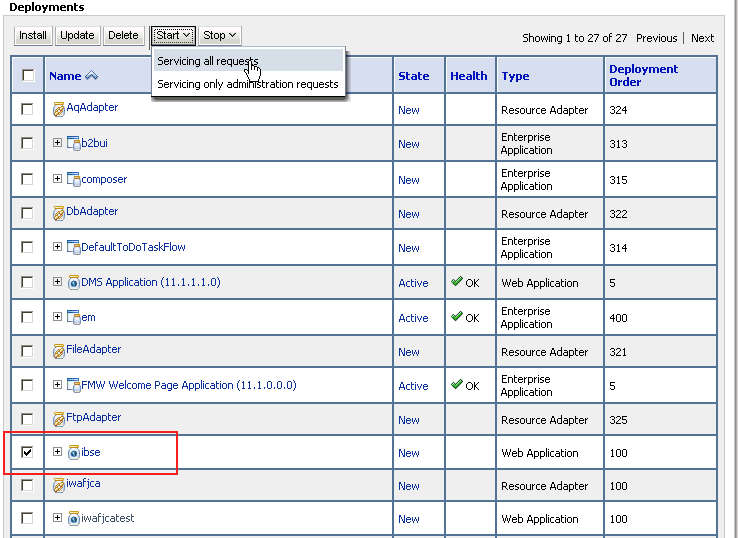
Select the check box next to ibse.
Click the Start submenu (down arrow) and select Servicing all requests.
The Start Application Assistant page is displayed.

Click Yes to start the selected deployment.
The BSE (ibse) Application has been deployed successfully to Oracle WebLogic Server.
To connect to a new BSE configuration:
Right-click the configuration to which you want to connect, for example, BSE_SampleConfig.
Select Connect.
Nodes appear for Adapters, Events, and Business Services (also known as Web services). The Business Services node is only available for BSE configurations.
Events are not applicable when using a BSE configuration. You can configure events using a J2CA configuration only. As a result, you can disregard the Events node that appears for a BSE configuration.
The following is an example of a BSE configuration named BSE_SampleConfig:

Use the Adapters folder to create inbound interaction with an adapter, for example, Siebel. For example, you can use the Siebel node in the Adapters folder to configure a service that updates Siebel.
Do not use the Events folder with a BSE configuration, since events are not supported with BSE. To configure events, you must use a J2CA configuration.
Use the Business Services folder (available for BSE configurations only) to test Web services created in the Adapters folder. You can also control security settings for the Web services by using the security features of the Business Services folder.
After completing the postinstallation tasks, you can define new targets for Oracle Application Adapters. For more information about configuring targets, see the corresponding user guide for your adapter.
Perform the following postinstallation configuration tasks for packaged-application adapters:
If you installed the Oracle WebLogic Server Application Adapter for PeopleSoft, see Appendix A, "Configuring Oracle Application Adapter for PeopleSoft". If you installed the Oracle WebLogic Server Application Adapter for J.D. Edwards OneWorld, see Appendix B, "Configuring Oracle Application Adapter for J.D. Edwards OneWorld".
Note:
The directory paths mentioned in this guide follow Windows conventions. For example, back slashes (\) are used.
If you are using an Oracle WebLogic Server Application Adapter on UNIX, then modify the directory paths as required.
Packaged-application adapters require you to copy library files to directories.
Copy the library files for these adapters into the following directory:
C:\oracle\Middleware\home_0309\Oracle_SOA1\soa\thirdparty\ApplicationAdapters\lib
Copy the library files into the lib directory for your domain. For example:
C:\oracle\Middleware\home_0309\user_projects\domains\base_domain\lib
| Adapter | Library Files |
|---|---|
| Oracle Application Adapter for J.D. Edwards OneWorld | J.D. Edwards OneWorld Java-based ThinNet API
This API is distributed as On the J.D. Edwards OneWorld system, these library files are located in the following folder: \\system\classes For XE (B7333):
For ERP 8.0 (B7334):
For EnterpriseOne 8.9 (B9):
For EnterpriseOne 8.10:
For EnterpriseOne 8.11 (SP1 and Tools Release 8.95):
For EnterpriseOne 8.12 (Tools Release 8.96.2.0):
For EnterpriseOne 9.0 (Tools Release 8.98.1.3):
|
| Oracle Application Adapter for PeopleSoft |
The .jar file for the PeopleSoft Generated JAVA APIs must also be copied to the following directory: ORACLE_HOME\soa\thirdparty\ApplicationAdapters\lib
Refer to Oracle Application Server Adapter for PeopleSoft User's Guide for any additional steps required for PeopleSoft. |
| Oracle Application Adapter for SAP R/3 | For Oracle 11g Release 1 (11.1.1) release, the Oracle Application Adapter for SAP R/3 supports the SAP Java Connector (SAP JCo) Version 2.1.8 and 2.1.9, which is typically named sapjco.jar.
Information on the current set of SAP connectors is available at A valid SAP service ID is required to access this file. Follow the instructions provided on the SAP JCo overview page to download the current version. For more information, contact your SAP BASIS Administrator. Using the archive tool, open the archive containing the SAP JCo and extract the run-time files. The file names can vary by operating system, but typically are contained in the root of the archive. Note: All operating systems: You must place the On Windows, l
On
Other
Alternatively, you may add the path to these files to your environment variable definition using the Application Server Control console. For details on application server administration options, see Oracle Application Server Administrator's Guide. Refer to Oracle Application Server Adapter for SAP User's Guide for any additional steps required for SAP R/3. |
| Oracle Application Adapter for Siebel | For Siebel 6.3.x and later, the Siebel Java Data Bean API, which is distributed as .jar files with the Siebel Thin Client
These libraries vary by Siebel release in both content and name. Therefore, the Siebel Thin Client that comes with the target Siebel system must always be used with the adapter. For example: On the Siebel system, these library files are located in the following folder: <siebel home>\siebsrvr\CLASSES
For Siebel 6.3.x:
For Siebel 7.0.3:
For Siebel 7.5.2:
For Siebel 7.7 - 8.0:
The Siebel COM-based API (Windows only) requires the Siebel Thin Client to be installed and accessible to the Siebel adapter. Note: The following previously listed files are for English language installations:
For non-English installations, the last three letters ( If you are using the MQ Series as a transport, then you must use Refer to Oracle Application Server Adapter for Siebel User's Guide for any additional steps required for Siebel. |
The packaged application adapters are installed into the ApplicationAdapters subdirectory of your Oracle WebLogic Server home directory. Table 2-1 shows the directory structure.
Table 2-1 Packaged Application Adapter Directory Structure
| Subdirectory | Description |
|---|---|
|
|
Contains the uninstallation files |
|
|
Contains the J2CA_SampleConfig subdirectory and the XML-file-based repository for Oracle WebLogic Server Adapter J2CA In addition, the |
|
|
Contains the application, doc, jde, licenses, peoplesoft folders and the |
|
ibse.war |
Contains the BSE application and repository configuration |
|
iwafjca.rar |
Contains the J2CA application and repository configuration |
|
iwafjca.war |
Contains the J2CA Installation Verification Program (IVP) |
|
|
Contains library files and the iWay Adapter Framework files |
|
|
Contains the Application Explorer graphical user interface |
Start Application Explorer by clicking the Windows Start menu, selecting All Programs, Oracle Application Adapters, and clicking Application Explorer.

You can also start Application Explorer by executing the ae.bat file, which is located in the following directory:
C:\oracle\Middleware\home_0309\Oracle_SOA1\soa\thirdparty\ApplicationAdapters\tools\iwae\bin\ae.bat
It is a good practice to create a shortcut for the ae.bat file on your desktop.
If you are using a UNIX or Linux platform you can start Application Explorer by executing the iwae.sh file.
Note:
Before you execute the iwae.sh file on UNIX or Linux platforms, the permissions must be changed. For example:chmod +x iwae.sh
A repository holds information about configuration details, adapter targets, channels and other configuration information. When the adapters are installed, by default, they are installed with a file repository. File repositories are not supported on development, test, or production environments. Users are advised to configure the database repository immediately after the installation.
Execute the iwse.ora SQL script on the system where the database is installed.
Note:
When the iwse.ora script is executed for the first time, database repositories are automatically created for BSE and J2CA configurations. As a result, it is not required to be execute the iwse.ora script twice for each configuration type. If the script is executed multiple times, the BSE and J2CA repositories are re-created and any values that were stored in the original database repositories are deleted.The iwse.ora SQL script is located in the following directory:
C:\oracle\Middleware\home_0309\Oracle_SOA1\soa\thirdparty\ApplicationAdapters\etc
This script creates the required tables that are used to store the adapter configuration information in the database. These tables are used by Application Explorer and by adapters during design time and run time. It is recommended that you use the same credentials to create the database repository and also in the ra.xml file for database user credentials.
C:\oracle\Middleware\home_0309\Oracle_SOA1\soa\thirdparty\ApplicationAdapters\etc>sqlplus SQL*Plus: Release 11.1.1 - ProductionCopyright (c) 1982, 2004, Oracle. All rights reserved. Enter user-name: system Enter password: system1 Connected to: Oracle Database 11g Enterprise Edition Release 11.1.1 - Production With the Partitioning, OLAP and Data Mining options SQL>@ iwse.ora
Create the jcatransport.properties file and save it in the following directory:
C:\oracle\Middleware\home_0309\Oracle_SOA1\soa\thirdparty\ApplicationAdapters\config\J2CA_SampleConfig
Note:
The jcatransport.properties file is required for each J2CA configuration that is created using Application Explorer. The J2CA configuration folder, for example, J2CA_SampleConfig, is named according to the configuration name that is specified in Application Explorer.Enter values for iwafjca.repo.url, iwafjca.repo.user and iwafjca.repo.password fields in the newly created jcatransport.properties file, as shown in the following example:
iwafjca.repo.url=jdbc:oracle:thin:@90.0.0.51:1521:orcl
iwafjca.repo.user=scott
iwafjca.repo.password=scott1
Copy the ojdbc14.jar file to the following directory:
C:\oracle\Middleware\Oracle_SOA1\soa\thirdparty\ApplicationAdapters\lib
The ojdbc14.jar file can be found in the following directory:
C:\oracle\Middleware\Oracle_SOA1\soa\thirdparty\edifecs\XEngine\extensions\Selector\lib\thirdParties\JDBC\ojdbc14.jar
Navigate to the following directory:
C:\oracle\Middleware\home_0309\Oracle_SOA1\soa\thirdparty\ApplicationAdapters\iwafjca.rar\META-INF
Open the ra.xml file in a text editor.
Provide the JDBC connection information as a value for the IWAYRepo_URL property.
Provide a valid user name for the IWAYRepo_User property.
Provide a valid password for the IWAYRepo_Password property.
Save your changes to the ra.xml file.
A repository holds information about configuration details, adapter targets, channels and other configuration information. When the adapters are installed, by default, they are installed with a file repository. File repositories are not supported on development, test, or production environments. Users are advised to configure the database repository immediately after the installation.
Execute the iwse.ora SQL script on the system where the database is installed.
Note:
When the iwse.ora script is executed for the first time, database repositories are automatically created for BSE and J2CA configurations. As a result, it is not required to be execute the iwse.ora script twice for each configuration type. If the script is executed multiple times, the BSE and J2CA repositories are re-created and any values that were stored in the original database repositories are deleted.The iwse.ora SQL script is located in the following directory:
C:\oracle\Middleware\home_0309\Oracle_SOA1\soa\thirdparty\ApplicationAdapters\etc
This script creates the required tables that are used to store the adapter configuration information in the database. These tables are used by Application Explorer and by adapters during design time and run time. It is recommended that you use the same credentials to create the database repository and also in the web.xml file for database user credentials.
C:\oracle\Middleware\home_0309\Oracle_SOA1\soa\thirdparty\ApplicationAdapters\etc>sqlplus SQL*Plus: Release 11.1.1 - ProductionCopyright (c) 1982, 2004, Oracle. All rights reserved. Enter user-name: system Enter password: system1 Connected to: Oracle Database 11g Enterprise Edition Release 11.1.1 - Production With the Partitioning, OLAP and Data Mining options SQL>@ iwse.ora
Copy the ojdbc14.jar file to the following directory:
C:\oracle\Middleware\Oracle_SOA1\soa\thirdparty\ApplicationAdapters\lib
The ojdbc14.jar file can be found in the following directory:
C:\oracle\Middleware\Oracle_SOA1\soa\thirdparty\edifecs\XEngine\extensions\Selector\lib\thirdParties\JDBC\ojdbc14.jar
Display the BSE configuration page in a browser:
http://host name:port/ibse/IBSEConfig
Where host name is the system where BSE is installed and port is the port number on which BSE is listening.
Note:
The server to which BSE is deployed must be running.The BSE settings pane is displayed, as shown in the following figure.
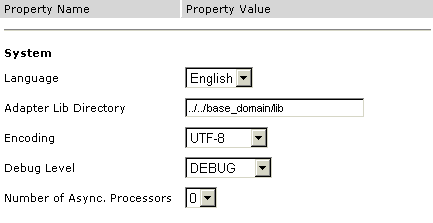
Configure the system settings.
The following table lists the parameters with descriptions of the information to provide.
Configure the repository settings.
The following image shows all fields and check boxes for the Repository pane.
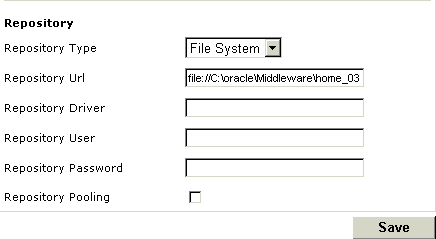
Configure the repository settings.
BSE requires a repository to store transactions and metadata required for the delivery of Web services.
The following table lists the parameters with descriptions of the information to provide.
To uninstall Oracle Application Adapters for Oracle WebLogic Server on a Windows platform, perform the following steps:
Undeploy the Oracle WebLogic Server Adapter J2EE Connector Architecture (J2CA) and J2CA Installation Verification Program (IVP) using the Oracle WebLogic Server Administration Console.
Undeploy Oracle WebLogic Server Adapter Business Services Engine (BSE) using the Oracle WebLogic Server Administration Console.
Stop the Oracle WebLogic Server.
Navigate to the following directory:
C:\oracle\Middleware\home_0309\Oracle_SOA1\soa\thirdparty\ApplicationAdapters\_uninst
Double-click the uninstaller.exe file.
The Application Adapters for Oracle WebLogic Server Uninstallation Welcome screen is displayed.
Click Next.
The Summary screen opens, which indicates the path to the Oracle Application Adapters for Oracle WebLogic Server.
Click Next.
The Oracle Application Adapters for Oracle WebLogic Server are uninstalled.
Click Finish.
To uninstall Oracle Application Adapters for Oracle WebLogic Server on UNIX and Linux platforms, perform the following steps:
Undeploy the J2CA Connector Application and J2CA Installation Verification Program (IVP) using the Oracle WebLogic Server Administration Console.
Undeploy Business Services Engine (BSE) using the Oracle WebLogic Server Administration Console.
Stop the Oracle WebLogic Server.
Navigate to the following directory:
/oracle/Middleware/home_0309/Oracle_SOA1/soa/thirdparty/ApplicationAdapters/_uninst
Enter the following command at the prompt to begin the uninstallation process:
./uninstaller.bin -is:javahome <java_home>
The Application Adapters for Oracle WebLogic Server Uninstallation Welcome screen is displayed.
Click Next.
The Summary screen opens, which indicates the path to the Oracle Application Adapters for Oracle WebLogic Server.
Click Next.
The Oracle Application Adapters for Oracle WebLogic Server are uninstalled.
Click Finish.