| Oracle® Fusion Middleware Administrator's Guide for Oracle SOA Suite 11g Release 1 (11.1.1) Part Number E10226-02 |
|
|
View PDF |
| Oracle® Fusion Middleware Administrator's Guide for Oracle SOA Suite 11g Release 1 (11.1.1) Part Number E10226-02 |
|
|
View PDF |
This chapter describes how to manage SOA composite applications, including initiating a test instance of an application; managing faults, policies, and instance states; and testing SOA composite applications.
This chapter includes the following topics:
Section 8.1, "Initiating a SOA Composite Application Test Instance"
Section 8.2, "Managing the State of Deployed SOA Composite Applications"
Section 8.5, "Recovering from SOA Composite Application Faults at the SOA Infrastructure Level"
Section 8.6, "Recovering from SOA Composite Application Faults in the Application Home Page"
Section 8.7, "Automating the Testing of SOA Composite Applications"
Section 8.10, "Exporting a Running SOA Composite Application"
Note:
The procedures in this guide describe how to access Oracle Enterprise Manager Fusion Middleware Control Console pages from the SOA Infrastructure menu, soa-infra icon in the navigator, and SOA Composite menu. You can also access many pages from the Farm home page. For more information, see Section 2.2.5, "Navigating to the SOA Infrastructure or SOA Composite Application Home Page."This section describes how to initiate a test instance of a deployed SOA composite application.
To initiate a SOA composite application test instance:
Access this page through one of the following options:
| From the SOA Infrastructure Menu... | From the SOA Folder in the Navigator... | From the Composite Menu... |
|---|---|---|
|
|
|
If the composite includes multiple services, the Test button has a drop-down list to select the service to test.
The Test Web Service page for initiating an instance appears.
This page provides many options for initiating an instance. At a minimum, you must specify the XML payload data to use in the Input Arguments section.
The WSDL file and endpoint URL are populated automatically based on the service you selected to test. The endpoint URL is derived from the WSDL and can be overridden to invoke that service at a different location. If the service selected has multiple ports, a drop-down list is displayed. Otherwise, the port of the current service is displayed.
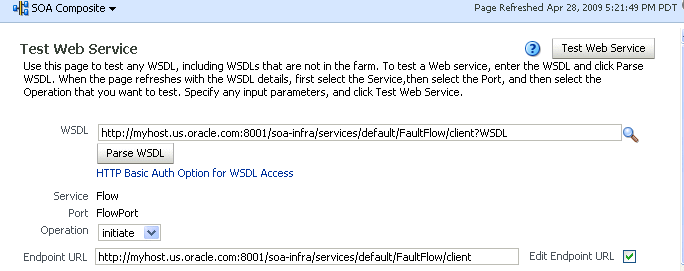
Accept the default values for these fields or provide values appropriate to your test environment.
If you change the WSDL file, click Parse WSDL to reload the WSDL file.
If the WSDL URL does not contain the revision number, it is processed by the default composite application. For example, if there are two revisions of a composite application named HelloWorld, then the following endpoints are exposed by them:
http://host:port/soa-infra/services/default/HelloWorld!1.0/client
http://host:port/soa-infra/services/default/HelloWorld!2.0/client
However, if the WSDL specified for Web service invocation does not contain the revision details (for example, http://host:port/soa-infra/services/default/HelloWorld/client), it is processed by the composite revision that is set as default.
If you want to edit the endpoint URL, click Edit Endpoint URL and make appropriate changes.
The lower part of the Test Web Service page consists of the Request tab. This tab enables you to specify security, quality of service, HTTP transport, stress testing options, and XML input arguments:
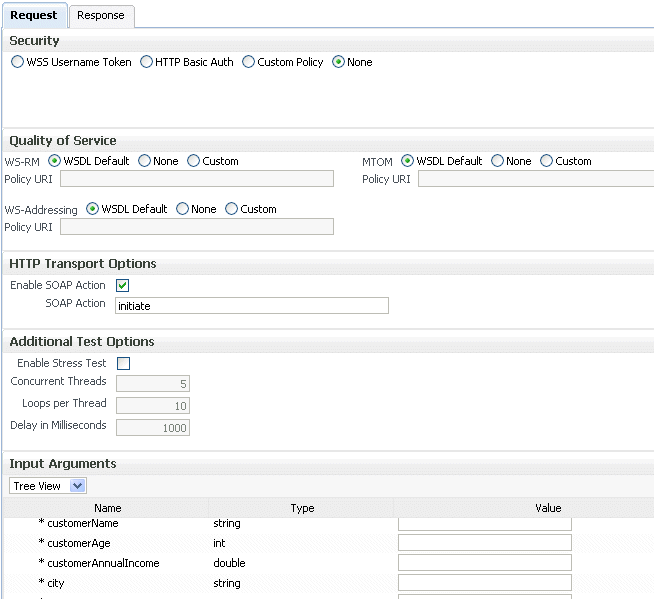
The Security section includes the following fields for passing security properties with messages.
| Field | Description |
|---|---|
| WSS Username Token | Inserts a WS-Security SOAP header. The Username field is required, and the Password field is optional. |
| Http Basic Auth | Inserts the username and password credentials in the HTTP transport header. Both the Username and Password fields are required. |
| Custom Policy | Uses a custom policy to authenticate the user (specifies the URI for the custom policy). The Username and Password fields are optional. |
| None | Select to not specify security credentials. This is the default selection. |
Accept the default values for these fields or provide values appropriate to your test environment.
The Quality of Service section includes the following fields. Oracle Fusion Middleware uses a policy-based model to manage Web services. A policy applies behavior requirements to the delivery of messages. For additional details about using the Test Web Service page, see Oracle Fusion Middleware Security and Administrator's Guide for Web Services.
| Field | Description |
|---|---|
| WS-RM | Select one of the following options for testing WS-Reliable Messaging (RM) protocol policies. Reliable messaging policies support this protocol, which guarantees the end-to-end delivery of messages.
|
| MTOM | Select one of the following options for testing Message Transmission Optimization Mechanism (MTOM) policies. MTOM policies ensure that attachments are in MTOM format, a format for efficiently sending binary data to and from Web services.
|
| WS-Addressing | Select one of the following options for testing WS addressing policies. WS addressing policies verify that SOAP messages include WS-Addressing headers in conformance with the WS-Addressing specification.
|
Accept the default values for these fields or provide values appropriate to your test environment.
The HTTP Transport Options section includes the following fields.
| Field | Description |
|---|---|
| Enable SOAP Action | Specifies whether the WSDL soap:operation has a soapAction attribute. This flag is enabled if a soapAction attribute exists. If you do not want to send a request with the SOAP action HTTP header, then clear the check box. |
| SOAP Action | Displays the soapAction attribute of the WSDL soap:operation, if one exists. You may specify a different SOAP action in this text box. |
Accept the default values for these fields or provide values appropriate to your test environment.
The Additional Test Options section includes the following fields. This section provides a simple stress test that simultaneously invokes multiple instances.
Note:
This is not a real stress test tool. Therefore, do not enter huge values for both concurrent threads and the number of times to invoke the operation. Doing so can result in errors.| Field | Description |
|---|---|
| Enable Stress Test | Click Enable to create a simple stress test. With this enabled, no conversation ID is displayed. |
| Concurrent Threads | Enter the number of concurrent threads on which the invocations should be sent. The default is 5 threads. |
| Loops per Thread | Enter the number of times to invoke the operation. The default is 10 times. |
| Delay in Milliseconds | Specify the delay of milliseconds to wait between operation invocations. The default is 1000 milliseconds (1 second). |
Accept the default values for these fields or provide values appropriate to your test environment.
The Input Arguments section includes the following options for entering XML payload data.
| Field | Description |
|---|---|
| Tree View | Displays a graphical interface of text fields in which to enter information. This option automatically generates the required headers and XML structure. |
| XML View | Displays the XML file format for inserting values. You can paste the raw XML payload of your message into this field. |
Click Test Web Service.
The test results appear in the Response tab upon completion.

Click Launch Message Flow Trace to access the flow trace of the instance.
To return to the composite home page, click the name of the composite that appears at the top of the page or select Home from the composite target menu.
Return to the Dashboard page of the SOA composite application.
The Recent Instances table lists recent SOA composite application instances. Each created instance has its own unique ID.
For more information, see the following sections:
Section 1.2.3, "Understanding SOA Composite Application Instances" for conceptual details about instances
Section 1.3.3.2, "Understanding Policies" for an overview of policies
Oracle Fusion Middleware Security and Administrator's Guide for Web Services for specific details about policies and testing Web services from the Test Web Service page
You can manage the life cycle state of deployed SOA composite applications from either of two pages:
From the Deployed Composites page of the SOA Infrastructure, which lists all SOA composite applications deployed to the SOA Infrastructure
From the application home page of a specific SOA composite application (all tabs)
The management tasks that you can perform are based on the page you are on. Table 8-1 provides details.
Table 8-1 Application State Actions
| Action | Perform in the Deployed Composites Page of the SOA Infrastructure? | Perform on the Application Home Page (All Tabs)? |
|---|---|---|
|
Shut Down and Start Up |
Yes |
Yes |
|
Retire and Activate |
Yes |
Yes |
|
Set as Default |
Yes |
|
|
Deploy |
Yes |
Yes (through the Composite menu by selecting SOA Deployment > Deploy Another Composite) |
|
Undeploy |
Yes |
Yes (through the Composite menu by selecting SOA Deployment > Undeploy) |
|
Redeploy |
Yes |
Yes (through the Composite menu by selecting SOA Deployment > Redeploy) |
|
Test |
No |
Yes |
|
Composite Audit Level |
No |
Yes |
|
Payload Validation |
No |
Yes |
|
Enable/Disable BPEL Sensors |
No |
Yes |
|
Show WSDL and Endpoint URI (icon) |
No |
Yes |
|
Show XML Definition (icon) |
No |
Yes |
See the following section based on the action you want to perform:
Section 8.2.1, "Managing the State of All Applications at the SOA Infrastructure Level"
Section 8.2.2, "Managing the State of an Application from the SOA Composite Application Home Page"
For more information, see Section 1.2.2, "Understanding SOA Composite Applications."
You can manage the state of all SOA composite applications from the Deployed Composites page at the SOA Infrastructure level.
To manage the state of all applications at the SOA Infrastructure level:
Access this page through one of the following options:
| From the SOA Infrastructure Menu... | From the SOA Folder in the Navigator... | From the SOA Composite Menu... |
|---|---|---|
|
|
|
Click the Deployed Composites tab.
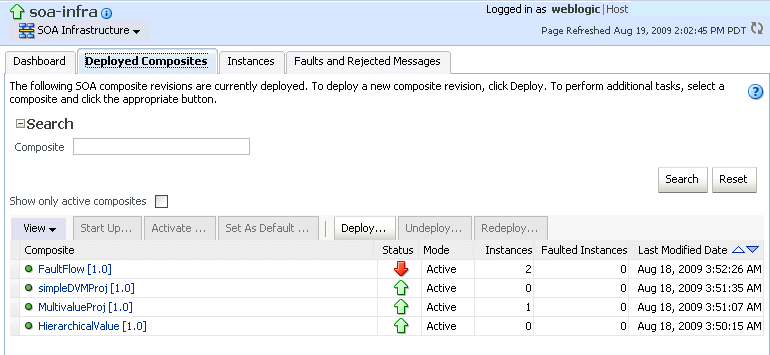
The Deployed Composites page displays the following details:
A utility for searching for a specific SOA composite application by specifying a full or partial composite name and clicking Search.
A list of all SOA composite applications deployed in the SOA Infrastructure, including their current mode (active or retired), number of instances, number of faulted instances, and last modification date (deployment time, redeployment time, or any composite configuration change). The green dot to the left of the name indicates that this is the default revision of the application.
Note:
To always see the latest details about deployed SOA composite applications, click the Refresh icon in the upper right corner or navigate away from this page and return to it.Click Deploy to deploy a new application. For all other options listed above the Composite section, first select the composite application by clicking the column to the left of the name, then select a specific option to perform.
The following table describes the available options.
| Action | Description |
|---|---|
| Shut Down | Shuts down a running SOA composite application revision. Any request (initiating or a callback) to the composite is rejected if the composite is shut down.
Note: The behavior differs based on which binding component is used. For example, if it is a Web service request, it is rejected back to the caller. A JCA adapter binding component may do something else in this case (for example, put the request in a rejected table). This option displays when the composite application has been started. |
| Start Up | Restarts a composite application revision that was shut down. This action enables new requests to be processed (and not be rejected). No recovery of messages occurs.
This option displays when the composite application has been stopped. |
| Retire | Retires the selected composite revision. If the process life cycle is retired, you cannot create a new instance. Existing instances are allowed to complete normally.
An initiating request to the composite application is rejected back to the client. The behavior of different binding components during rejection is as described above for the shut down option. A callback to an initiated composite application instance is delivered properly. This option displays when the composite application is active. |
| Activate | Activates the retired composite application revision. Note the following behavior with this option:
This option displays when the application is retired. |
| Set As Default | Sets the selected composite application revision to be the default. Default revisions are indicated by a green dot in the Composite table. If a new request comes in for a specific composite application revision, that composite application revision is invoked. If a new request comes in without specifying a revision, the default revision is invoked. The default revision does not change when a composite application is retired. The default revision is changed automatically when a default composite application revision is undeployed.
The default composite revision also changes automatically when you redeploy a composite. The newly redeployed revision automatically becomes the default revision, unless at the time of redeployment you specify to keep the previous default revision unchanged. Note that inbound adapters are only activated on the default revision. |
| Deploy | Deploys a revision. Deployment activates the composite application in the SOA Infrastructure. Use this selection when you want to deploy:
If you specify a revision that exists, you receive an error. You must change this revision outside of the Deploy SOA Composite wizard. Note: Deploying multiple SOA composite applications at the same time is supported. For more information, see Section 5.1, "Deploying Applications." |
| Undeploy | Undeploys the selected composite application revision. The consequences of this action are as follows:
Note: Undeploying multiple SOA composite applications at the same time is not supported. For more information, see Section 5.3, "Undeploying Applications." |
| Redeploy | Redeploys an existing revision of a SOA composite application. The consequences of this action are as follows:
For more information, see Section 5.2, "Redeploying Applications." |
For more information, see Section 1.3.3.3, "Understanding the Life Cycle State of SOA Composite Applications."
You can manage the state of an individual SOA composite application from the application's home page.
To manage the state of an application from the SOA composite application home page:
Access this page through one of the following options:
| From the SOA Infrastructure Menu... | From the SOA Folder in the Navigator... |
|---|---|
|
|
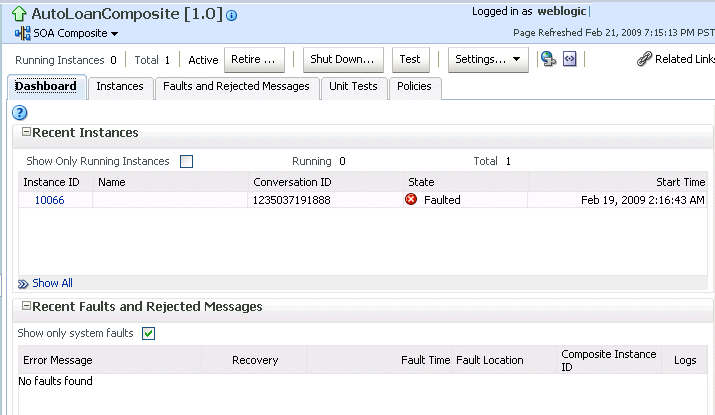
The Dashboard of the selected SOA composite application is displayed (for this example, AutoLoanComposite).
Note:
The Total field of the Recent Instances section sometimes does not display the correct number of total instances despite instances having completed successfully. In these cases, click the Refresh icon in the upper right corner to view the actual number of total instances.From the list of options at the top of the page, select a specific action to perform. These options also display at the top of the Instances, Faults and Rejected Messages, Unit Tests, and Policies pages of the SOA composite application.
| Action | Description |
|---|---|
| Shut Down | See the table under Step 3 for a description of this option. |
| Start Up | See the table under Step 3 for a description of this option. |
| Retire | See the table under Step 3 for a description of this option. |
| Activate | See the table under Step 3 for a description of this option. |
| Test | Enables you to initiate a test instance from the Test Web Service page.
Note: This button is disabled when the SOA composite application is stopped or retired. This is because you cannot create an instance for a stopped or retired application. This button is also disabled when there are no Web services available for the application. Only composites having services with Web service bindings can be tested from this page. For more information, see Section 8.1, "Initiating a SOA Composite Application Test Instance." |
| Settings: Composite Audit Level | Sets the level of audit tracking to perform at the SOA composite application level. This setting can override the audit level defined at the SOA Infrastructure level. By default, the value is Inherit, which does not override the SOA Infrastructure level setting.
If you select to set the audit tracking level, the following options are available:
Setting audit level tracking at the SOA composite application level overrides the same tracking set at the SOA Infrastructure level. By default, the settings are the same at the SOA composite application and SOA Infrastructure levels. SOA composite application settings are automatically changed when the global SOA Infrastructure settings are changed. By choosing any other setting at the SOA composite application level, you are overriding the inherited settings. One form of overriding is when you explicitly select the same local composite value that happens to be the current global value. If the SOA Infrastructure setting is then changed, this specific composite does not inherit the new value. For example, assume the SOA Infrastructure setting is Off. Therefore, all composites have their audit tracking set to Off. Then, you explicitly set composite XYZ to Off. Then, go to the SOA Infrastructure and change the setting to Production. The tracking levels for all composites are now Production; except for XYZ, which is still set to Off. Note the following impact of instance tracking changes on message flows that span several SOA composite applications. For example, a composite invoking another composite through a reference binding component or an event published in one composite and subscribed to in another composite.
|
| Settings: Payload Validation | Validates the XML schema-based payload at the inbound and outbound points of the composite revision. If you enable payload validation and there is an invalid payload (that does not follow the schema), a fault is generated for that message.
The exception to this is the response message of a synchronous service. That message is not validated, even with payload validation enabled. Note that the inbound message is still validated; only the outbound message is not. |
| Settings: Enable/Disable BPEL Monitors and Sensors | Select an option to invoke a confirmation dialog that displays the current status of the sensors. Note that when BPEL sensors are disabled at the service engine level, you cannot enable or disable BPEL sensors at the SOA composite application level.
The Enable/Disable BPEL Sensors selection only displays for composites that have a BPEL service component, regardless of whether that component includes sensors. For more information, see Section 8.10, "Exporting a Running SOA Composite Application." |
| Show WSDL and endpoint URI (icon) | Click to display the endpoint addresses and WSDLs of all external services for this SOA composite application. |
| Show Composite XML Definition (... icon) | Click to show the XML definition of the SOA composite application. |
For more information, see the following sections:
If you start and stop a managed Oracle WebLogic Server on which the SOA Infrastructure is deployed in the middle of BPEL processing in a SOA composite application, note the following issues:
For synchronous BPEL processes
The whole scenario is synchronous and the instances that are in a running state (after server restart) are pending in the BPEL wait activity. Therefore, the flow thread ends with the server (while sleeping in the wait activity). When the server is restarted, the same instance is not restarted because the flow is synchronous. Therefore, these instances always remain in a running state because no processing can happen on these after server restart.
For asynchronous BPEL process
If server shutdown occurred in the middle of a BPEL invoke activity, the messages received by BPEL are not handled. BPEL does not automatically recover these messages during restart; these must be recovered manually using facade API calls.
Section 8.2, "Managing the State of Deployed SOA Composite Applications" describes how to manage the life cycle state of SOA composite applications. You can also monitor and delete specific SOA composite application instances from the Instances page of the application home page.
To monitor and delete SOA composite application instances from the application home page:
Access this page through one of the following options:
| From the SOA Infrastructure Menu... | From the SOA Folder in the Navigator... |
|---|---|
|
|
Click the Instances tab.
The Instances page displays the following details:
A utility for searching for a specific instance by specifying a criteria and clicking Search.
SOA composite application instance ID, name, conversation ID, most recent known state of each instance since the last data refresh of the page (for example, completed successfully, running, unknown, and so on), instance start time, and a log file describing any faults. A unique instance ID is created whenever a new instance of a SOA composite application is initiated either automatically by an external consumer of the application or manually by an administrator from the Test Web Service page.
If a ? icon is displayed, the Capture Composite Instance State check box was not enabled on the SOA Infrastructure Common Properties dialog. Therefore, the instance state was not evaluated. Determining the composite instance state requires evaluating the states of the underlying component, Therefore, this can be disabled to improve performance.
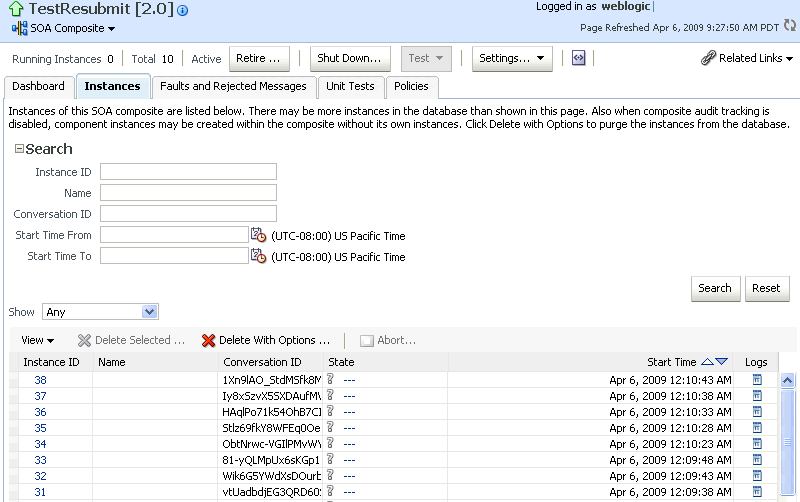
Note:
It is possible to generate orphaned service component instances. These instances are generated without any associated composite application instances. The orphaned component instances are generated under the following circumstances:The SOA Infrastructure audit level is set to Off or the composite audit level is set to Off. Even in such cases, the BPEL process service engine can generate instance data for the service components that are included in the SOA composite application.
The SOA Infrastructure audit level is set to Off. However, the BPEL process or Oracle Mediator service engine audit level is set to a value other than the Off.
All the audit levels are set to Off, but some faults are generated in one of the service engines. In these cases, the component instance gets generated.
To delete orphaned instances or large numbers of instances, use the PL/SQL purge script described in Section 8.9, "Deleting Large Numbers of Instances." Selecting the Delete All Instance options in the Delete with Options dialog also deletes orphaned component instances. However, this method is not recommended for deleting large numbers of instances (for example, thousands), as the operation times out.
If composite sensors are included in your SOA composite application, the Instances tab has the following differences:
The Add Fields button appears next to Search and Reset in the search utility. This button enables you to add sensor values to your search criteria.
A Composite Sensors column appears to the Instances table. Click the sensor icon in that column to display the details of sensor values available in a given instance of the composite.
From the Add Fields list, select composite sensors to add to the search criteria. In this example, four have been selected (CustomerDetails, NameSensor, Datesensor, and Yearsensor).
Input specific values by which each sensor searches. Only the composite instances in which the sensor values match your specified criteria are returned.
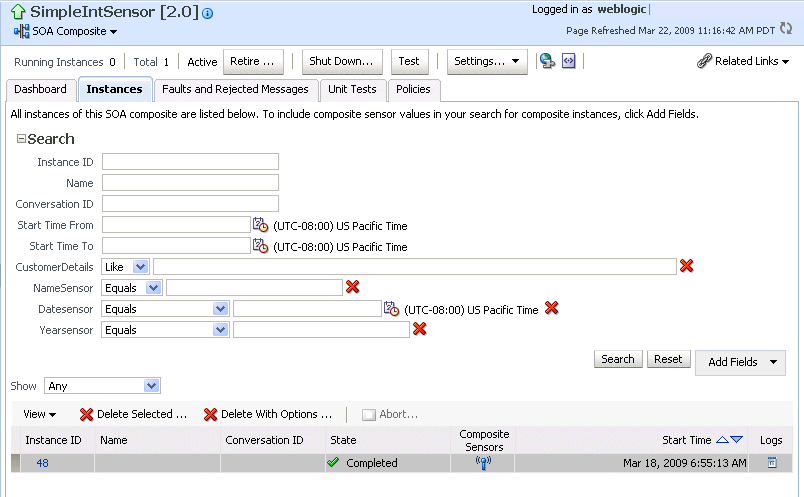
Click Reset to remove all composite sensor fields from the search criteria or click the Remove icon to the right of the field to remove an individual sensor.
Select a specific instance to delete by clicking a row in the Instances table. To select multiple instances, press Ctrl-Click or Shift-Click for the rows you want to select.
Select a specific action to perform.
| Action | Description |
|---|---|
| Delete Selected | Deletes the selected instance.
After deleting an instance, instance details are no longer available for review. |
| Delete with Options | Prompts you to first specify a criteria for deleting the selected instance directly from the database:
Any selections you may have made in the Instances page (such as specifying and executing a search criteria) are ignored for this operation. |
| Abort | Terminates the selected instance. However, instance details are still available for review. |
In the Instances table, perform the following additional tasks:
In the Instance ID column, click a specific instance ID to show the message flow through the various service components and binding components. If an instance ID is listed as unavailable, you can click the Unavailable link for details.
In the State column, if an instance state is marked as Unknown, click it to display more details.
If the Composite Sensors column is available, click a sensor icon to display details about composite sensors included in the instance, such as name, location, and value.
In the Logs column, click a specific log to access the Log Messages page with filtered messages specific to that instance.
Note:
Multiple revisions of a SOA composite application that includes inbound JCA adapters are displayed as running. However, only the most recent revision (the default version) is considered active. All previous revisions are not considered active. This is because for inbound JCA adapters, there can only be one active revision of a SOA composite application at any time. The JCA adapter endpoints in all previous revisions are de-activated.For more information, see the following sections:
Section 1.2.3, "Understanding SOA Composite Application Instances"
Section 1.3.3.3, "Understanding the Life Cycle State of SOA Composite Applications"
Section 8.1, "Initiating a SOA Composite Application Test Instance"
Oracle Fusion Middleware Administrator's Guide for details about viewing and searching log files
The number of SOA composite application instances may not always match the number of service component instances displaying in Oracle Enterprise Manager Fusion Middleware Control Console.
A SOA composite application instance is first created when the composite is invoked. When the service components within the composite receive a subsequent invocation, a corresponding service component instance is created that refers to the composite instance ID previously created.
There can be scenarios under which the composite instance is created, but the underlining service component instance is not created. For example:
The composite instance is created, but the invocation has not yet reached the service component due to a system failure.
The composite instance is created, but the invocation fails payload validation and is rejected. In this case, invocation does not reach the underlining service components.
You can also have orphaned service component instances for which no SOA composite application instance has been created.
You can set the instance name of a SOA composite application during design time in Oracle Mediator and Oracle BPEL Process Manager. The instance name appears as a Name column on the Instances page of a SOA composite application. When you specify a search criteria on the Instances page of a SOA composite application or the SOA Infrastructure, you can specify this name in the Name field.
Set the composite instance name through one of the following options:
Use the setCompositeInstanceTitle(title) XPath expression function as the source and tracking.compositeInstanceTitle as the target property name in the Assign Value dialog.
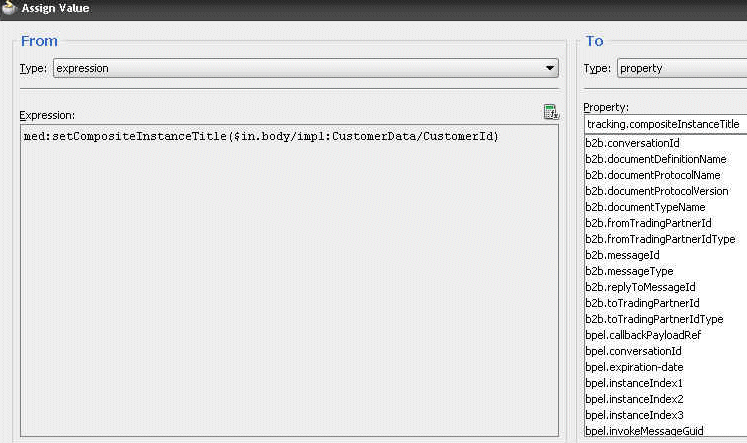
Use the setCompositeInstanceTitle(title) XPath expression function in the XSLT Mapper.
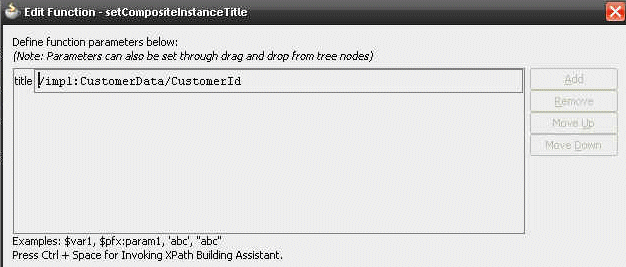
Use the Java BPEL exec extension bpelx:exec. This extension includes the built-in method setCompositeInstanceTitle(String title)for setting the instance name.
For more information, see Oracle Fusion Middleware Developer's Guide for Oracle SOA Suite.
Section 8.2, "Managing the State of Deployed SOA Composite Applications" described how to manage the life cycle state of all instances of a specific SOA composite application. You can also monitor and delete any number of instances across all deployed SOA composite applications from the Instances page of the SOA Infrastructure home page. This page lists all SOA composite application instances deployed to the SOA Infrastructure.
To monitor and delete SOA composite application instances at the SOA infrastructure level:
Access this page through one of the following options:
| From the SOA Infrastructure Menu... | From the SOA Folder in the Navigator... | From the SOA Composite Menu... |
|---|---|---|
|
|
|
Click the Instances tab.
The Instances page displays the following details:
A utility for searching for a specific instance by specifying a criteria and clicking Search.
All SOA composite application instances in the SOA Infrastructure, including instance and conversation IDs, composite name and revision, SOA composite application instance state, and instance start time.
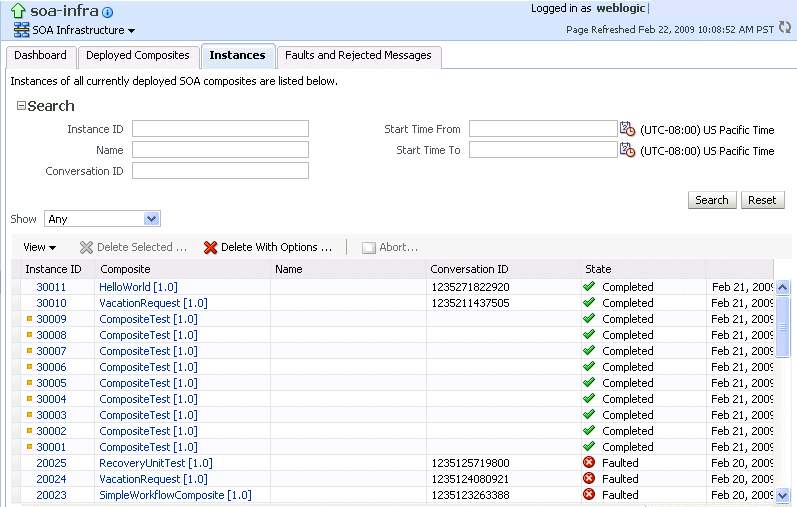
You can also terminate and delete instances from this page.
Select a specific instance by clicking a row in the Instances table. To select multiple instances, press Ctrl-Click or Shift-Click for the rows you want to select.
Select a specific action to perform.
| Action | Description |
|---|---|
| Delete Selected | Deletes the selected instance. |
| Delete with Options | Prompts you to first specify a criteria for deleting the selected instance directly from the database.
Any instance state selections you made at the top of the Instances page are ignored for this operation. Notes:
|
| Abort | Terminates the selected instance. However, instance details are still available for review.
Note: If you delete an instance with faults, those faults no longer display in the Faults and Rejected Messages page. In addition, if a terminated instance (shown as aborted) had a fault, it is not added to the fault count. |
In the Instance ID column, click a specific instance ID to show the message flow through the various service components and binding components. If the instance ID is unavailable, the message flow cannot be accessed. However, you can still click the link for details.
In the Composite column, click a specific SOA composite application to access its home page.
In the Logs column, click a specific log to access the Log Messages page with filtered messages specific to that instance.
You can monitor and perform individual and bulk fault recoveries for BPEL process and Oracle Mediator service components across any number of your SOA composite applications. For BPEL process faults to be identified as recoverable, there must be a fault policy defined that is bound to the fault (through the fault-bindings.xml file) and which triggers the action ora-human-intervention. However, without defining any fault policies, the fault takes its normal course as either a recoverable or nonrecoverable fault. Examples of performing both individual and bulk recovery are provided in this section. Human task service component or human workflow service engine faults are recovered from the Oracle BPM Worklist.
To recover from SOA composite application faults at the SOA Infrastructure level:
Access this page through one of the following options:
| From the SOA Infrastructure Menu... | From the SOA Folder in the Navigator... | From the SOA Composite Menu... |
|---|---|---|
|
|
|
Click the Faults and Rejected Messages tab.
The Faults and Rejected Messages page displays the following details for all SOA composite application faults:
A utility for searching for a specific fault by specifying a criteria and clicking Search. Click the Help icon for details.
Faults and rejected messages, including the error message, whether you can recover from the fault, the time of the fault, if the fault message is classified as a rejected message (if so, a check mark is displayed), the SOA composite application in which the fault occurred, the fault location, and the instance ID.
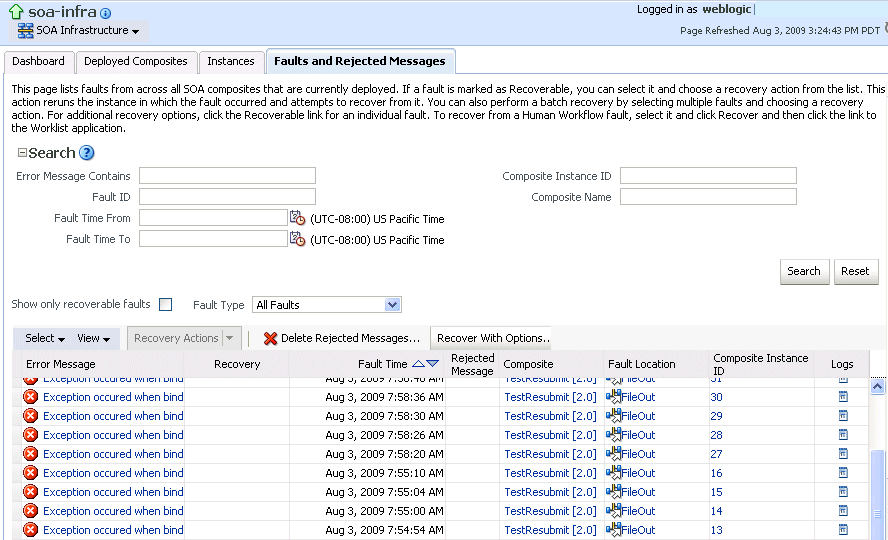
Note:
You cannot search for human workflow error messages by entering details in the Error Message Contains field because these faults are not persisted in the dehydration store.Faults identified as recoverable can be recovered.
Select faults for recovery using one of the following options. Note that fault recovery selection at the SOA Infrastructure level matches the SOA composite application level and BPEL process and Oracle Mediator service component levels.
| For... | Then... |
|---|---|
| Single fault recovery | There are three options from which to choose for single-fault recovery:
|
| Bulk fault recovery | There are two options from which to choose for bulk-fault recovery:
|
| Recovery of all faults |
|
Select an action from the Recovery Action list.
| Action | Description | Action is Available for... |
|---|---|---|
| Retry | Retries the instance directly. An example of a scenario in which to use this recovery action is when the fault occurred because the service provider was not reachable due to a network error. The network error is now resolved. | BPEL process and Oracle Mediator |
| Abort | Terminates the entire instance. | BPEL process and Oracle Mediator |
| Replay | Replays the entire scope again in which the fault occurred. | BPEL process |
| Rethrow | Rethrows the current fault. BPEL fault handlers (catch branches) are used to handle the fault. By default, all exceptions are caught by the fault management framework unless an explicit rethrow fault policy is provided. | BPEL process |
| Continue | Ignores the fault and continues processing (marks the faulting activity as a success). | BPEL process |
If you want to delete rejected messages, click Delete Rejected Messages.
This displays the Delete: Rejected Messages dialog for specifying a criteria for deleting rejected messages of all the composites directly from the database.
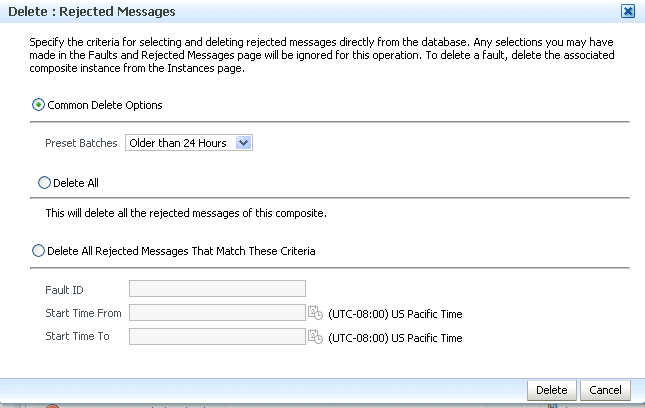
Specify a criteria and click Delete.
If you want to perform a bulk recovery of messages, click Recover with Options.
This displays the Recover with Options dialog for specifying a criteria for recovering BPEL and mediator messages of all composites directly from the database. Human workflow messages can be recovered manually from Oracle BPM Worklist. Business event and business rule messages cannot be recovered.
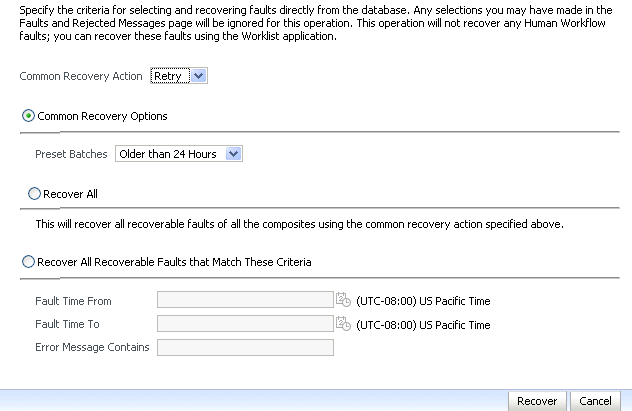
Specify a criteria. Retry and Abort are the only recovery actions permitted.
Note:
For bulk fault recovery at the SOA Infrastructure level, a check of the state of composites cannot be performed. If the state of a composite is set to off, a recovery of its faults cannot be performed. However, no error or warning message is displayed. Upon submission of the bulk fault recovery request, the server checks if the originating composite's state is set to off. That fact is then noted in the log, and the fault is skipped.You are also not notified when a fault has been skipped during recovery for any other reason (for example, an unsupported service engine, an unrecoverable fault, and so on).
Click Recover. Depending upon the number of messages, recovery can take some time.
Perform the following additional tasks from within the faults table:
From the View list, select Columns > Fault ID to display the fault IDs for each error message. The fault ID is automatically generated and uniquely identifies a fault. The fault ID also displays when you click an error message.
In the Composite column, click a specific SOA composite application to access its home page.
In the Fault Location column, click a specific location to access the faults page for the location of the fault. The location can be a service, service component, or reference.
In the Composite Instance ID column, click a specific ID to access the flow trace of the instance.
In the Logs column, click a specific log to access the Log Messages page with filtered messages specific to that instance.
See the following sections for examples of single and bulk fault recovery with BPEL processes and Oracle Mediator.
For more information about concepts and instructions on designing a fault policy, see the following documentation:
This section provides examples of how to define a fault policy that enables human intervention on a BPEL process fault and perform single and bulk fault recovery on a BPEL process service component.
Section 8.5.1.1, "Example: Single Fault Recovery for BPEL Processes"
Section 8.5.1.2, "Example: Bulk Fault Recovery for BPEL Processes"
In this example, you define a fault policy specifying that a fault be manually recovered through human intervention. If an invalid social security number is submitted from a loan broker BPEL process to a credit rating service, the credit rating service returns a negative credit fault. This human intervention action is defined with the ora-human-intervention action in the fault-policies.xml file. Without fault policies, BPEL instances do not generate recoverable faults (instead they are nonrecoverable); the ora-human-intervention action makes the fault recoverable.
<faultPolicies xmlns="http://schemas.oracle.com/bpel/faultpolicy">
<faultPolicy version="2.0.1"
           id="CRM_ServiceFaults"
           xmlns:env="http://schemas.xmlsoap.org/soap/envelope/"
           xmlns:xs="http://www.w3.org/2001/XMLSchema"
           xmlns="http://schemas.oracle.com/bpel/faultpolicy"
           xmlns:xsi="http://www.w3.org/2001/XMLSchema-instance">
            <Conditions>
               <faultName xmlns:credit="http://services.otn.com"
               name="credit:NegativeCredit">
               <!-- we get this fault when SSN starts with 0-->
                  <condition>
                     <test>$fault.payload="Bankruptcy Report"</test>
                     <action ref="ora-human-intervention"/>
                  </condition>
               </faultName>
            </Conditions>
</faultPolicy>
</faultPolicies>
The fault-bindings.xml file associates the fault policies defined in the fault-policies.xml with the CRM_ServiceFaults composite.
<faultPolicyBindings version="2.0.1"
 xmlns="http://schemas.oracle.com/bpel/faultpolicy"
 xmlns:xsi="http://www.w3.org/2001/XMLSchema-instance">
    <composite faultPolicy="CRM_ServiceFaults"/>
</faultPolicyBindings>
Since human intervention is defined as an action, you perform BPEL process fault recovery in Oracle Enterprise Manager Fusion Middleware Control Console.
For more information about creating and designing fault-policies.xml and fault-bindings.xml files, see Oracle Fusion Middleware Developer's Guide for Oracle SOA Suite for specific details.
This example assumes the following:
An instance was initiated on the Test Web Service page shown in Section 8.1, "Initiating a SOA Composite Application Test Instance."
An invalid social security number that begins with 0 was entered.
To perform single fault recovery for BPEL processes:
From the SOA Infrastructure menu, select Home.
Click the Faults and Rejected Messages tab.
In the faults table, locate the fault that has been identified as recoverable. You can use the search utility to locate the specific fault.
In the Recovery column, click Recover. If you first want to see details about the fault, click the error message. Then, click Recover Now.
The Faults page for that BPEL process instance is displayed.
In the Recovery column, click Recoverable.
The page refreshes to display the fault recovery section at the bottom of the page.
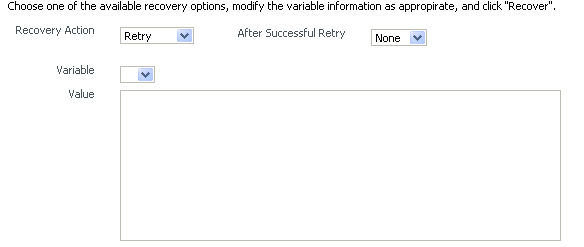
From the Recovery Action list, select Retry.
Select None from the Chain Action Upon Successful Retry list. This list enables you to select Java callout recovery actions. For more information, see Oracle Fusion Middleware Developer's Guide for Oracle SOA Suite.
Select a variable from the Variable list. The content of this variable displays in the Value field. For this example, the variable crInput is selected. This variable is used in an invoke activity and contained an incorrect social security number value.
Enter the correct value in the Value field. For this example, the social security number is edited to begin with 1:
<ssn xmlns="http://service.otn.com">123456789</ssn>
Click Set Value, and click Yes when prompted to continue.
Click Recover to recover from the fault, then click Yes when prompted to continue.
The page refreshes to indicate that no faults occurred.
For the social security number example, selecting Retry is not an option for performing a bulk recovery, since the value for the social security number is incorrect and requires correction. An example of performing a bulk recovery with the Retry option is if the social security number is correct, but the system providing the credit rating service was temporarily unavailable and caused a composite reference fault. This prevents the messages from being delivered. Once the credit rating service is available again, selecting Retry re-attempts the invocation to the credit rating service through the composite reference.
To perform bulk fault recovery for BPEL processes:
Perform Steps 1 through 2 of Section 8.5.1.1, "Example: Single Fault Recovery for BPEL Processes."
In the search utility, enter a criteria based on known fault parameters (for example, the time range, composite name, component type (BPEL process), and so on).
If the search returns too many results, limit it by selecting the Show only recoverable faults check box.
From the Select list, choose Select All Recoverable.
From the Recovery Action list, select Abort.
All selected faults are manually terminated.
This section provides an example of how to perform single and bulk fault recovery on an Oracle Mediator service component.
Section 8.5.2.1, "Example: Single Fault Recovery for Oracle Mediator"
Section 8.5.2.2, "Example: Bulk Fault Recovery for Oracle Mediator"
In this example, an inbound Siebel adapter service binding component submits a payload message to Oracle Mediator for transformation. The processed payload message is then delivered to an outbound file adapter reference binding component. However, the outbound directory into which to write the payload message is not configured with write permissions. This causes a fault to occur. The fault policy defined during design time specifies that the fault be manually recovered through human intervention. Note that three retries are attempted, as defined with the retryCount attribute. The condition and action are defined as follows in the fault-policies.xml file.
Recoverable Oracle Mediator faults do not require a fault policy (though it is one way to make faults recoverable, as described through an ora-human-intervention action). Any parallel routing rule that receives a remote fault from the outbound endpoint also creates a recoverable fault (in this specific example, the fault policy is not required if the Oracle Mediator uses a parallel routing rule to invoke the outbound file adapter).
<faultPolicies xmlns="http://schemas.oracle.com/bpel/faultpolicy">
<faultPolicy version="2.0.1"
           id="ConnectionFaults"
           xmlns:env="http://schemas.xmlsoap.org/soap/envelope/"
           xmlns:xs="http://www.w3.org/2001/XMLSchema"
           xmlns="http://schemas.oracle.com/bpel/faultpolicy"
           xmlns:xsi="http://www.w3.org/2001/XMLSchema-instance">
              <Conditions>
                <faultName xmlns:medns="http://schemas.oracle.com/mediator/faults"
                name="medns:mediatorFault">
                   <condition>
                      <test>contains($fault.mediatorErrorCode, "TYPE_FATAL_
                         MESH")</test>
                      <action ref="ora-retry"/>
                   </condition>
                </faultName>
              </Conditions>
. . .
. . .      <Action id="ora-retry">
        <retry>
          <retryCount>3</retryCount>
          <retryInterval>5</retryInterval>
          <retryFailureAction ref="ora-human-intervention"/>
          <retrySuccessAction ref="ora-terminate"/>
        </retry>
      </Action>
   </Actions>
</faultPolicy>
</faultPolicies>
Note that processing is set to retry 3 times before terminating.
The fault policies are associated with the ConnectionFaults composite in the fault-bindings.xml file:
<faultPolicyBindings version="2.0.1" xmlns="http://schemas.oracle.com/bpel/fault
policy" xmlns:xsi="http://www.w3.org/2001/XMLSchema-instance">
        <composite faultPolicy="ConnectionFaults"/>
</faultPolicyBindings>
For this example, the sap output directory is made read-only. An inbound file adapter retrieves the sender.xml file from the siebel directory and the message is routed through Oracle Mediator to an outbound file adapter reference for placing a file in the sap directory.
To perform single fault recovery for Oracle Mediator:
Change the directory permissions at the operating system command prompt.
chmod 000 sap
cp sender.xml siebel/
From the SOA Infrastructure menu, select Home.
Click the Faults and Rejected Messages tab.
Note that three faults appear, based on three retries being attempted. In this case, you see three retries only because the fault policy on the Oracle Mediator interaction with the outbound file adapter defines three retries. Without the fault policy, there is only one fault (no automated retries).
Click the specific instance ID in the Composite Instance ID column.
The Flow Trace appears. The faults table at the top of the page displays the fault messages. If you want to see where the faulted Oracle Mediator instance is located in the overall message flow, select the fault in the faults table. This highlights the associated instance in the trace table. You can then click the instance to access its audit trail to see more details about the faulted flow.
Locate the Oracle Mediator component instance fault you want to recover in the Faults table and click Recover in the Recovery column.
Select Sender from the Payload Part list.
The payload is automatically displayed in the Payload field. If necessary, payload modifications can be performed in this field. For this example, payload modification is not necessary.
Change the sap directory to be writable at the operating system command prompt.
chmod 777 sap
Return to the Faults tab and click the Refresh icon in the upper right corner of the page.
Click Retry.
Click Yes when prompted to resubmit the selected fault for recovery.
The page refreshes to indicate that no faults occurred.
Click the Audit Trail tab.
The final message indicates that manual recovery was successful and the message payload was written to the sap directory.
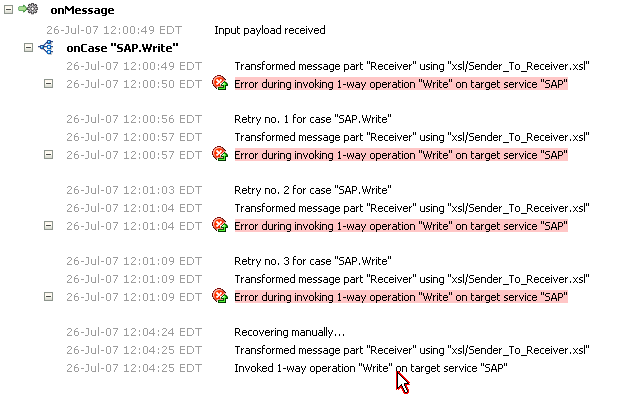
Assume the sap directory to which to write the sender.xml payload message is again configured with read-only permissions at the operating system command prompt. Three copies of the sender.xml file are placed in the siebel directory of the inbound Siebel adapter service binding component. This creates three instances.
chmod 000 sap
cp sender.xml siebel/
cp sender.xml siebel/
cp sender.xml siebel/
To perform bulk fault recovery for Oracle Mediator:
Change the sap directory to be writable.
From the SOA Infrastructure menu, select Home.
Click the Faults and Rejected Messages tab.
In the search utility, enter a criteria based on known fault parameters (for example, the time range, composite name, and so on).
If the search returns too many results, limit it by selecting the Show only recoverable faults check box.
Change the sap directory to be writable at the operating system command prompt.
chmod 777 sap
Select all the faults to be recovered.
Select Retry from the Recovery Action list.
Select Yes when prompted to perform fault recovery.
Click the Audit Trail tab.
The final message indicates that manual recovery was successful and the message payload was successfully written to the sap directory.
You can monitor and perform individual and bulk fault recoveries in your SOA composite application. For BPEL process faults to be identified as recoverable, there must be a fault policy defined that is bound to the fault (through the fault-bindings.xml file) and which triggers the action ora-human-intervention. However, without defining any fault policies, the fault takes its normal course as either a recoverable or nonrecoverable fault. Human workflow faults can also be recovered, but not directly from Oracle Enterprise Manager Fusion Middleware Control Console. Instead, the audit trail provides a link to the Oracle BPM Worklist, from which the fault can be addressed.
To recover from SOA composite application faults in the application home page:
Access this page through one of the following options:
| From the SOA Infrastructure Menu... | From the SOA Folder in the Navigator... |
|---|---|
|
|
Click the Faults and Rejected Messages tab.
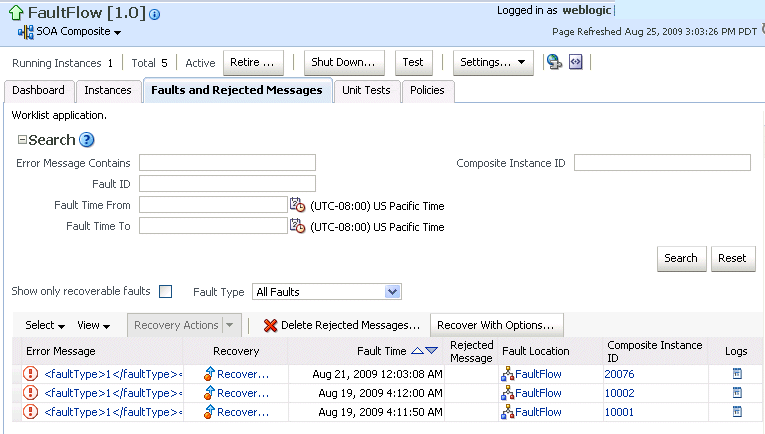
The Faults and Rejected Messages page displays the following details for the selected SOA composite application:
A utility for searching for a specific fault by specifying a criteria and clicking Search. Click the Help icon for details.
Faults and rejected messages in SOA composite application instances, including the error message, whether you can recover from the fault, the time of the fault, if the fault message is classified as a rejected message (if so, a check mark is displayed), the fault location, the composite instance ID, and links to log files that describe the fault.
Note:
You cannot search for human workflow error messages by entering details in the Error Message Contains field because these faults are not persisted in the dehydration store.Faults identified as recoverable can be recovered.
Select faults for recovery. As with fault recovery at the SOA Infrastructure level and BPEL process and Oracle Mediator service component levels, you can perform single fault recovery, bulk fault recovery, and recovery of all faults. See Step 3 of Section 8.5, "Recovering from SOA Composite Application Faults at the SOA Infrastructure Level" for instructions on selecting faults to perform these types of recovery.
Select an action from the Recovery Action list.
| Action | Description | Action is Available for... |
|---|---|---|
| Retry | Retries the instance directly. An example of a scenario in which to use this recovery action is when the fault occurred because the service provider was not reachable due to a network error. The network error is now resolved. | BPEL process and Oracle Mediator |
| Abort | Terminates the entire instance. | BPEL process and Oracle Mediator |
| Replay | Replays the entire scope again in which the fault occurred. | BPEL process |
| Rethrow | Rethrows the current fault. BPEL fault handlers (catch branches) are used to handle the fault. By default, all exceptions are caught by the fault management framework unless an explicit rethrow fault policy is provided. | BPEL process |
| Continue | Ignores the fault and continues processing (marks the faulting activity as a success). | BPEL process |
If you want to delete rejected messages, click Delete Rejected Messages.
This displays the Delete: Rejected Messages dialog for specifying a criteria for deleting rejected messages of the current composite directly from the database.

If you want to perform a bulk recovery of messages, click Recover with Options.
This displays the Recover with Options dialog for specifying a criteria for recovering BPEL and mediator messages of the current composite directly from the database. Human workflow messages can be recovered manually from Oracle BPM Worklist. Business event and business rule messages cannot be recovered.

Specify a criteria. Retry and Abort are the only recovery actions permitted.
Note:
For bulk fault recovery at the SOA composite application level, a check of the state of the composite is performed. If the state of the composite is set to off, a message is displayed warning you that a recovery cannot be performed.You are not notified when a fault has been skipped during recovery for any reason (for example, an unsupported service engine, an unrecoverable fault, and so on).
Click Recover. Depending upon the number of messages, recovery can take some time.
Perform the following additional monitoring tasks from within the faults table:
From the View list, select Columns > Fault ID to display the fault IDs for each error message. The fault ID is automatically generated and uniquely identifies a fault. The fault ID also displays when you click an error message.
In the Fault Location column, click a specific location to access the faults page for the location of the fault. The location can be a service, component, or reference.
In the Component Instance ID column, click a specific service component ID to access task details about the instance (for example, the current state of a task). Note that rejected messages do not have a component instance ID.
In the Logs column, click a specific log to access the Log Messages page with filtered messages specific to that instance.
For more information, see the following sections:
You can create, deploy, and run test cases that automate the testing of SOA composite applications. Test cases enable you to simulate the interaction between a SOA composite application and its Web service partners before deployment in a production environment. This helps to ensure that a process interacts with Web service partners as expected by the time it is ready for deployment to a production environment. You create test cases in Oracle JDeveloper and include them in a SOA composite application that is then deployed and administered from Oracle Enterprise Manager Fusion Middleware Control Console.
To test SOA composite applications:
Note:
Before testing SOA composite applications from Oracle Enterprise Manager Fusion Middleware Control Console, see Oracle Fusion Middleware Developer's Guide for Oracle SOA Suite for instructions on creating test cases.Access this page through one of the following options:
| From the SOA Infrastructure Menu... | From the SOA Folder in the Navigator... | From the SOA Composite Menu... |
|---|---|---|
|
|
|
The test cases that display were designed in Oracle JDeveloper and included in a deployed SOA composite application.
Select the entire test suite or individual tests of a suite to run, and click Execute.
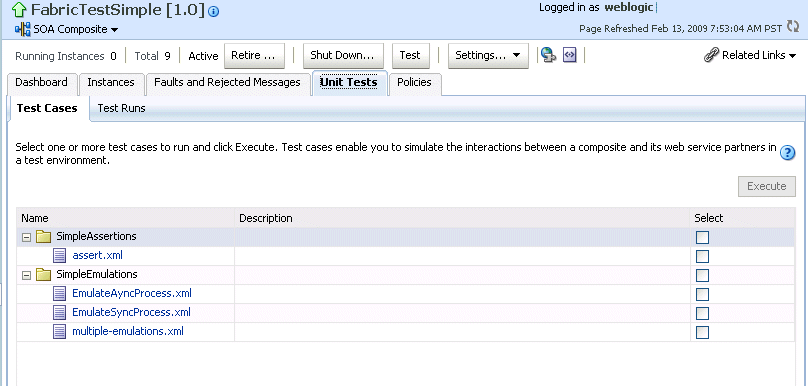
You are prompted to create a test.
Enter the following values, and click OK.
| Field | Description |
|---|---|
| Test Run Name | Enter a name for the test instance. When testing is complete, report details are captured under this name. |
| Timeout | Enter a value in seconds in which to complete this test. If the test does not complete within this time limit, then testing is terminated. |
| Number of Concurrent Test Instances | Enter the number of test instances to create. |
The Test Runs page automatically displays for tracking the running tests.
The Test Runs page enables you to track running test cases and view test results. Test suites consist of a logical collection of one or more test cases. Each test case contains a set of commands to perform as the test instance is executed. The execution of a test suite is known as a test run.
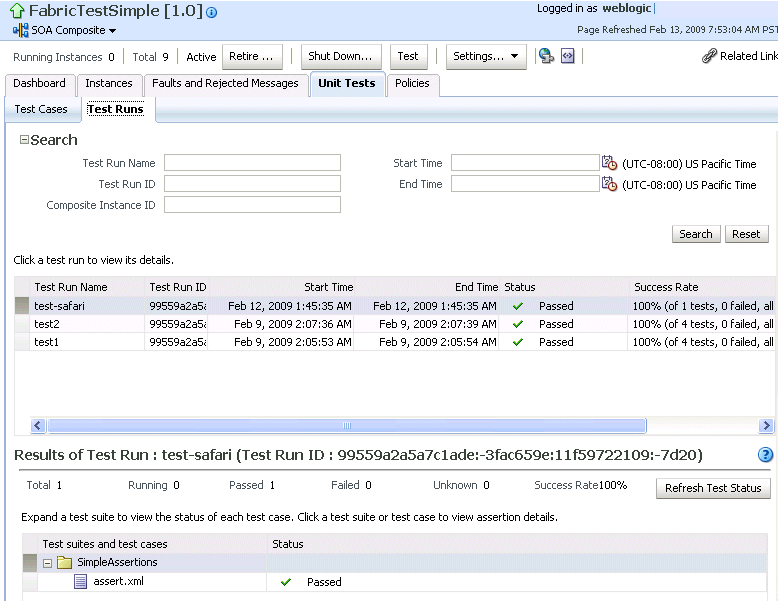
In the Test Run Name column, click a specific test run to display details in the Results of Test Run section. If you want to create more test runs, you can switch back to the Test Cases page at any time.
The Results of Test Run sections displays details about the executed test run, such as a test summary and the success rate. Click the Help icon for additional details.
View assertion details at the bottom of the page. Assertions enable you to verify variable data or process flow.

Click a composite instance number to view specific test details.
The composite instances created by executing unit test runs display with a yellow square next to the instance ID in the Instances page of a SOA composite application and in the Recent Instances tables of the SOA Infrastructure and SOA composite application. This yellow box distinguishes these instances from test instances created on the Test Web Service page or automatically created by external consumers of the application.
For more information, see the following documentation:
Section 1.3.3.4, "Understanding SOA Composite Application Automated Testing"
Oracle Fusion Middleware Developer's Guide for Oracle SOA Suite for instructions on creating test cases in Oracle JDeveloper
You can attach or detach security policies to and from currently deployed SOA composite applications. Policies apply security to the delivery of messages.
Note:
Before attaching policies, see Oracle Fusion Middleware Security and Administrator's Guide for Web Services for definitions of available policies and details about which ones to use in your environment.To manage SOA composite application policies:
Access this page through one of the following options:
| From the SOA Infrastructure Menu... | From the SOA Folder in the Navigator... | From the SOA Composite Menu... |
|---|---|---|
|
|
|
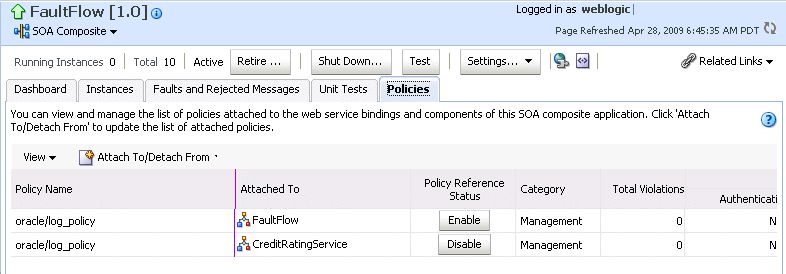
The Policies page enables you to attach and detach policies to and from BPEL process service components. The policies table displays the attached policy name, the component to which the policy is attached, the policy reference status (enabled or disabled) that you can toggle, the category (Management, Reliable Messaging, MTOM Attachment, Security, or WS Addressing), the violations, and the authentication, authorization, confidentiality, and integrity failures since the SOA Infrastructure was last restarted.
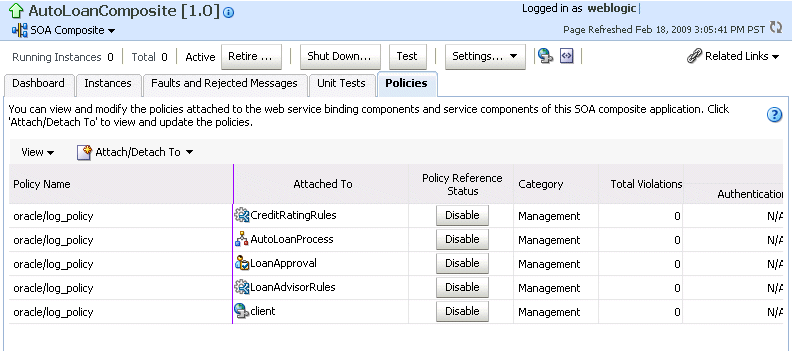
Click Attach/Detach To.
If multiple services or components are available, you are prompted to select the service or component for which to perform the attachment or detachment.
Select the component to which to attach or detach a policy.
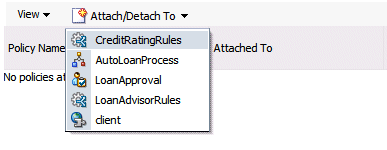
This invokes a dialog for attaching or detaching policies.
Currently attached policies appear in the Attached Policies section. Additional policies available for attachment appear in the Available Policies section.
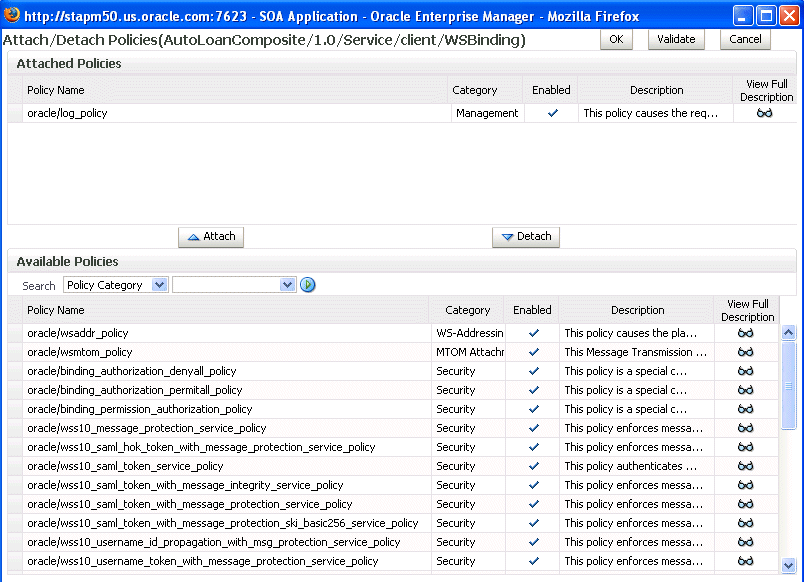
Select policies to attach that are appropriate to your environment.
Click Attach.
The attached policy appears in the Attached Policies section.

Attach additional policies as needed.
When you are finished attaching policies, click Validate.
If an error message appears, make the necessary corrections until you no longer have any validation errors.
Click OK.
The attached policy displays in the policies table.
For more information about policies, see the following documentation:
Oracle Fusion Middleware Security and Administrator's Guide for Web Services for definitions of available policies and details about which ones to use for your environment
Multiple requests from Oracle SOA Suite in a single WS-RM session are not currently supported. Each request is in an individual WS-RM session.
OWSM supports a SOA local optimization feature for composite-to-composite invocations in which the reference of one composite specifies a Web service binding to a second composite. Local optimization enables you to bypass the HTTP stack and SOAP/normalized message conversions during run time. Local optimization is not used if the composites are in different containers. If a policy is attached to the Web service binding, the policy may not be invoked if local optimization is used.
By default, an OWSM security policy includes a local-optimization property that identifies if the policy supports local optimization. You can view the setting for a policy in Oracle Enterprise Manager Fusion Middleware Control Console.
In the application navigator, expand the WebLogic Domain folder.
Right-click WLS_SOAWC, and select Web Services > Policies.
Select a policy and click Export to File.
Open the file with a text editor and search for local-optimization to identify the value. This property supports the following values:
on: Local optimization is used in the attached policy, and the policy is not applied at run time.
off: Local optimization is not used in the attached policy, and the policy is applied at run time.
check-identity: If a JAAS subject exists in the current thread, local optimization is used. Otherwise, local optimization is not used.
For information on the default local optimization settings for security policies, see Oracle Fusion Middleware Security and Administrator's Guide for Web Services.
You can override the local-optimization setting for a policy by adding the oracle.webservices.local.optimization property in the binding section of the composite.xml file. The following values are supported:
true: Local optimization is used, and the policy is not applied.
false: Local optimization is not used, regardless of the default setting for the local-optimization property at the OWSM policy level. This setting forces the policy to be applied.
For example, the following setting of false causes oracle/wss_username_token_client_policy to be applied.
<binding.ws
port="http://xmlns.oracle.com/CalledBPELProcessApp_
jws/CalledBPELProcess/CalledBPELProcess#wsdl.endpoint(calledbpelprocess_client_
ep/CalledBPELProcess_pt)"

location="http://sta00634.us.oracle.com:8001/soa-infra/services/default/CalledBPEL
Process!1.0/calledbpelprocess_client_ep?WSDL">
      <wsp:PolicyReference URI="oracle/wss_username_token_client_policy"
                           orawsp:category="security"
orawsp:status="enabled"/>
      <wsp:PolicyReference URI="oracle/log_policy"
orawsp:category="management"
                           orawsp:status="enabled"/>
                            <property
name="oracle.webservices.local.optimization">false</property>
    </binding.ws>
Deleting thousands of instances with the Delete with Options button on the Instances page of a SOA composite application takes time and may result in a transaction timeout. Instead, use the purge-script.sql PL/SQL script for instance and rejected message deletion.
The following sections provide examples of how to use the PL/SQL procedures that are a part of this script.
Note:
Thepurge-script.sql PL/SQL script cannot be used on a SQL Server database.Use the instance filter to selectively delete instances.
create or replace type instance_filter as object
(
     composite_name          varchar2(200),
     composite_revision      varchar2(20),
     state                   integer,
     min_created_date        timestamp,
     max_created_date        timestamp,

);
composite_name: The name of the SOA composite application, such as OrderBooking.
composite_revision: The revision of the composite, such as 1.0.
state: The state of the instance. The following state values are possible:
STATE_RUNNING constant integer := 0;
STATE_RECOVERY_REQUIRED constant integer := 1;
STATE_COMPLETED_SUCCESSFULLY constant integer := 2;
STATE_FAULTED constant integer := 3;
STATE_TERMINATED_BY_USER constant integer := 4;
STATE_SUSPENDED constant integer := 5;
STATE_STALE constant integer := 6;
STATE_UNKNOWN constant integer := 32;
min_created_date: The minimum date range.
max_created_date: The maximum date range.
This section describes the procedures available for deleting composite instances, rejected messages, and orphaned instances.
This procedure deletes a single composite instance with the given composite instance ID. All dependent records associated with this composite instance are deleted.
FABRIC.DELETE_COMPOSITE_INSTANCE(A_COMPOSITE_INSTANCE_ID IN INTEGER)
The following example deletes the composite instance with the ID of 100.
EXEC FABRIC.DELETE_COMPOSITE_INSTANCE(100);
This procedure deletes all composite instances matching the specified filter criteria.
FABRIC.DELETE_COMPOSITE_INSTANCES(FILTER IN INSTANCE_FILTER,
     MAX_INSTANCES IN INTEGER,
     PURGE_PARTITIONED_DATA IN BOOLEAN DEFAULT TRUE) RETURN INTEGER;
FILTER: The filter for selectively deleting the composite instances.
MAX_INSTANCES: The maximum number of instances to delete per invocation. If the value MAX_INSTANCES is 100 and the total number of instances matching the specified filter is 200, the invocation of this procedure causes only 100 instances to be deleted.
PURGE_PARTITIONED_DATA: Indicates whether the records from the partitioned table must be deleted.
The following example deletes the first 100 composite instances matching the specified filter.
DECLARE
 FILTER INSTANCE_FILTER := INSTANCE_FILTER();

 MAX_INSTANCES NUMBER;
 DELETED_INSTANCES NUMBER;
 PURGE_PARTITIONED_DATA BOOLEAN := TRUE;
BEGIN

 FILTER.COMPOSITE_NAME := 'OrderBookingComposite';
 FILTER.COMPOSITE_REVISION := '1.0';

 FILTER.STATE := fabric.STATE_TERMINATED_BY_USER;

 FILTER.MIN_CREATED_DATE := to_timestamp('2009-07-01','YYYY-MM-DD');
 FILTER.MAX_CREATED_DATE := to_timestamp('2009-08-24','YYYY-MM-DD');
 MAX_INSTANCES := 100;

 DELETED_INSTANCES := FABRIC.DELETE_COMPOSITE_INSTANCES(
   FILTER => FILTER,
   MAX_INSTANCES => MAX_INSTANCES,
   PURGE_PARTITIONED_DATA => PURGE_PARTITIONED_DATA
 );

END;
/
This procedure deletes all rejected messages matching the specified filter criteria.
FABRIC.DELETE_REJECTED_MESSAGES(FILTER IN INSTANCE_FILTER,
     MAX_INSTANCES IN INTEGER,
     PURGE_PARTITIONED_DATA IN BOOLEAN DEFAULT TRUE) RETURN INTEGER;
FILTER: The filter for selectively deleting the rejected messages.
MAX_INSTANCES: The maximum number of instances to be deleted per invocation. If the value MAX_INSTANCES is 100 and the total number of instances matching the specified filter is 200, the invocation of this procedure causes only 100 instances to be deleted.
PURGE_PARTITIONED_DATA: Indicates whether the records from the partitioned table must be deleted.
The following example deletes the first 100 rejected messages matching the specified filter.
DECLARE

 FILTER INSTANCE_FILTER := INSTANCE_FILTER();

 MAX_INSTANCES NUMBER;
 DELETED_INSTANCES NUMBER;
BEGIN

  FILTER.COMPOSITE_NAME := 'OrderBookingComposite';
  FILTER.COMPOSITE_REVISION := '1.0';

  FILTER.MIN_CREATED_DATE := to_timestamp('2009-07-01','YYYY-MM-DD');
  FILTER.MAX_CREATED_DATE := to_timestamp('2009-08-24','YYYY-MM-DD');
  MAX_INSTANCES := 100;

 DELETED_INSTANCES := FABRIC.DELETE_REJECTED_MESSAGES(
   FILTER => NULL,
   MAX_INSTANCES => MAX_INSTANCES
 );

END;
/
This procedure is primarily used to delete the component instances created when global instance tracking is disabled. Orphaned instances are not associated with the composite instance ID.
FABRIC.DELETE_ORPHANED_INSTANCES(FILTER IN INSTANCE_FILTER,
     MAX_INSTANCES IN INTEGER,
     PURGE_PARTITIONED_DATA IN BOOLEAN DEFAULT TRUE) RETURN INTEGER;
FILTER: The filter for selectively deleting the orphaned instances.
MAX_INSTANCES: The maximum number of instances to be deleted per invocation. If the value MAX_INSTANCES is 100 and the total number of instances matching the specified filter is 200, the invocation of this procedure causes only 100 instances to be deleted.
PURGE_PARTITIONED_DATA: Indicates whether the records from the partitioned table must be deleted.
The following example deletes multiple orphaned instances based on the specified filter.
DECLARE

 FILTER INSTANCE_FILTER := INSTANCE_FILTER();
 MAX_INSTANCES NUMBER;
 DELETED_INSTANCES NUMBER;
BEGIN

 FILTER.COMPOSITE_NAME := 'OrderBookingComposite';
 FILTER.COMPOSITE_REVISION := '1.0';

 FILTER.STATE := fabric.STATE_COMPLETED_SUCCESSFULLY;
 FILTER.MIN_CREATED_DATE := to_timestamp('2009-07-01','YYYY-MM-DD');
 FILTER.MAX_CREATED_DATE := to_timestamp('2009-08-24','YYYY-MM-DD');
 MAX_INSTANCES := 100;

 DELETED_INSTANCES := FABRIC.DELETE_ORPHANED_INSTANCES(
   FILTER => FILTER,
   MAX_INSTANCES => MAX_INSTANCES
 );

END;
/
This procedure internally invokes the procedures for deleting composite instances, rejected messages, and orphaned instances. This procedure is convenient for deleting all composite instances, rejected messages, and orphaned instances in a single invocation.
FABRIC.DELETE_ALL(FILTER IN INSTANCE_FILTER,
     MAX_INSTANCES IN INTEGER,
     PURGE_PARTITIONED_DATA IN BOOLEAN DEFAULT TRUE) RETURN INTEGER;
The following example deletes composite instances, rejected messages, and orphaned instances based on the specified filter.
DECLARE
 FILTER INSTANCE_FILTER := INSTANCE_FILTER();
 MAX_INSTANCES NUMBER;
 DELETED_INSTANCES NUMBER;
BEGIN

 FILTER.COMPOSITE_NAME := 'OrderBookingComposite';
 FILTER.COMPOSITE_REVISION := '1.0';

 FILTER.STATE := fabric.STATE_COMPLETED_SUCCESSFULLY;

 FILTER.MIN_CREATED_DATE := to_timestamp('2009-07-01','YYYY-MM-DD');
 FILTER.MAX_CREATED_DATE := to_timestamp('2009-08-24','YYYY-MM-DD');
 MAX_INSTANCES := 100;

 DELETED_INSTANCES := FABRIC.DELETE_ALL(
   FILTER => FILTER,
   MAX_INSTANCES => MAX_INSTANCES
 );

END;
/
You can export the contents of a running SOA composite application to an archive JAR file. The file can include some or all of the following data:
The original design-time composite.
Postdeployment changes in the rules dictionary and domain value maps (DVMs).
Postdeployment property changes such as binding component properties, composite properties such as audit level settings and payload validation status, and policy attachments.
Notes:
SOA composite application exporting is only currently allowed at the individual SOA composite level.
Shared metadata is not exported as part of the composite export SAR (service archive).
To export a running SOA composite application:
Go to the home page of the SOA composite application to export.
From the SOA Composite menu, select Export.
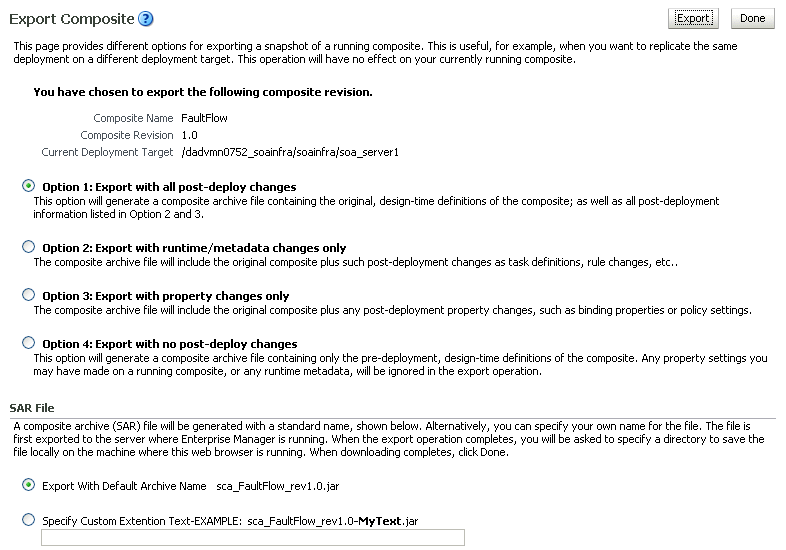
The Export Composite page appears.
Select an option.
Option 1: Generates an archive file containing the original design-time composite and the postdeployment details described in Option 2 and Option 3.
Option 2: Includes the original design-time composite and postdeployment changes in the rules dictionary and DVMs.
Option 3: Includes the original design-time composite and postdeployment property changes such as binding component properties, composite properties such as audit level settings and payload validation status, and policy attachments.
Option 4: Generates an archive file containing only the original design-time composite. Options 2 and 3 are not included.
If you want to append an additional name to the existing file, select Specify Custom Extension Text. For example, entering MyText to a file named sca_OrderBookingComposite_rev1.0.jar names the exported file as sca_OrderBookingComposite_rev1.0-MyText.jar.
Click Export.
The Processing: Export Composite dialog displays the progress of archive file generation. When generation completes, you are prompted to save the file.
Click Save File.
A dialog appears for either opening or saving the file to a directory on your local host.
Note:
It is important that you click the Save File button. Do not simply close this dialog. Although the composite is exported, you cannot retrieve the actual exported file.Specify the local directory in which to save the JAR file.
In the upper right of the Processing: Export Composite dialog, click the x icon to close the dialog.
On the Export Composite page, note that the Cancel button has changed to Done.
Click Done.
The Export Composite is closed and you are returned to the SOA composite application home page.