| Oracle® Fusion Middleware Setup Guide for Universal Records Management 11g Release 1 (11.1.1) Part Number E10640-02 |
|
|
View PDF |
| Oracle® Fusion Middleware Setup Guide for Universal Records Management 11g Release 1 (11.1.1) Part Number E10640-02 |
|
|
View PDF |
This section contains information about the interface used with the software.
Several buttons are common to many pages and are not discussed unless additional information is available:
Submit: submits the changes made to the page
Reset: clears any entries and resets the page to its default
Quick Help: displays the help entry for the screen
Delete: removes the item on the screen
Create: submits the information provided and creates the item
Info: displays the information page for the item
The screens used are divided into the following groupings:
After installation of the software, two screens are available with information that must be configured before setting up retention policies and procedures:
This page is used to determine which components will be enabled for use.
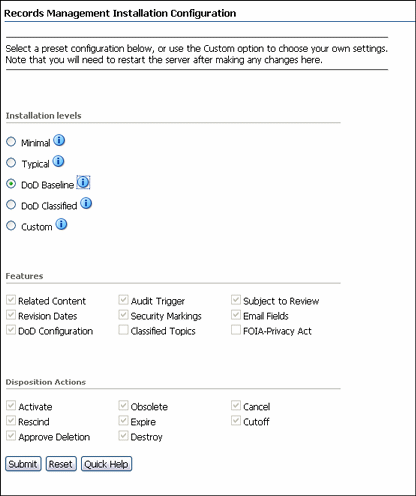
The page depiction here shows all options displayed.
To access this page, click Records then Configure from the Top menu. Click Enabled Features.
After making selections or if configuration options are changed (for example, switching from Baseline to Classified), restart the Content Server and rebuild the Content Server index. See the Oracle Fusion Middleware System Administrator's Guide for Content Server for details.
For details about the components enabled for each option, click the Info icon.
| Element | Description |
|---|---|
| Installation Level | The type of configuration to be enabled. Options are:
|
| Features | This section contains a list of features that can be enabled when using the Custom option. Default features are enabled when installation levels are chosen.
These features include:
|
| Disposition Actions | This section contains the disposition actions which can be used for content. They include:
|
This page is used to set global options for aspects of the retention management system.
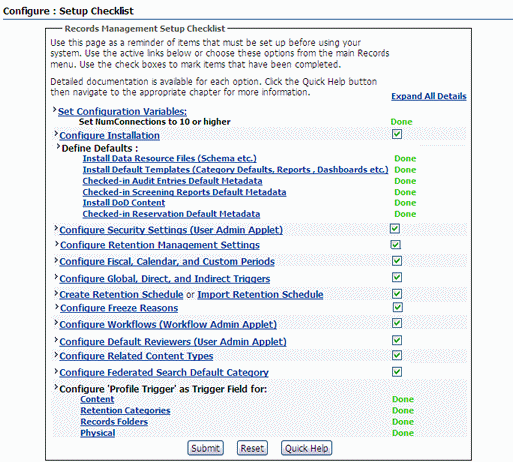
Important:
You must configure all defaults, including any necessary categories, dispositions, and triggers, before checking in content that will use those defaults.To access this screen, click Records then Configure then Setup Checklist from the Top menu.
If the configuration tasks on this page are not completed, a warning message with a link to this page appears on the home page. Click the link to display this page.
The options on this page vary according to the type of installation chosen. The screen depiction shown here may not be the same as that in use at a site. For example, is an Adapter is installed, an additional entry is available to perform the configuration steps necessary for the Adapter.
After making selections or configuration options are changed (for example, switching from Baseline to Classified), restart the Content Server and rebuild the Content Server index. See the Oracle Fusion Middleware System Administrator's Guide for Content Server for details about restarting the system and rebuilding the index from the Repository Manager.
Important:
If File Store Provider is needed to check in templates for Oracle URM, you must set up the File Store Provider first and then check in the templates. See the Oracle Fusion Middleware System Administrator's Guide for Content Server for details about using File Store Provider.Selecting any option in this list displays a detailed explanation of the option's purpose. Other options may be available, depending on the installation being performed.
| Element | Description |
|---|---|
| Set Configuration Variables | Contains directions on how to set essential configuration variables. |
| Define Defaults | Used to define the default checkin information for audit trails, template locations, and metadata for content that is automatically checked in on a periodic basis. Also used to configure the metadata used for Audit Entries and for Screening reports.
Clicking an option brings up a check in page where the fields to be used as defaults can be edited. This is also used to check in report templates, dashboard panels, and category defaults. |
| Configure Installation | Used to configure optional components and metadata fields. Select from preset configurations to choose the features that are needed. |
| Configure Security Settings | Used to define the security settings including roles, rights, and access control list use. This link opens the Admin Applets. Click the User Admin Applet to configure security. |
| Configure Retention Management Settings | Used to configure many retention management options such as supplemental markings, triggers, and reports. Clicking this option displays the Configure Retention Settings Page. |
| Configure Fiscal, Calendar, and Custom Periods | Used to set periods used for disposition processing. Selecting this option displays the Configure Periods Page. |
| Configure Global, Direct, and Indirect Triggers | Used to set up the triggers used for disposition processing. Selecting this option displays the Configure Triggers Page. |
| Create Retention Schedule or Import Retention Schedule | Used to set up retention schedules. Selecting Create Retention Schedule displays the Exploring Retention Schedule Page. Selecting Import Retention Schedule displays the Import/Export Screen. See the Oracle Fusion Middleware Administrator's Guide for Universal Records Management for details about importing and exporting files. |
| Configure Freeze Reasons | Used to set up freezes. Selecting this option displays the Freeze Configuration Page. |
| Configure Workflows | Used to set up workflows to use with offsite storage, reservations, and category disposition processing. These workflows must be set up in order for that functionality to work properly. Click the Workflow Admin Applet to proceed. |
| Configure Default Reviewers | Used to add users who will be default reviewers. Click the User Admin Applet to proceed. |
| Configure Related Content Types | Used to set up links. Selecting this option displays the Configure Links Type Page. Links are discussed in the Oracle Fusion Middleware User's Guide for Universal Records Management. |
| Configure Federated Search Default Category | Used to indicate a default category and default folder to use for Federated searches. Selecting this option displays the Admin Server page where the appropriate configuration variables can be entered:
|
| Configure Profile Triggers | Used to determine the trigger for profiles used in searching and checking in content and physical items. |
Use this page to set many of the configuration options for the system. When initially opened, the options on this page are unexpanded. To expand an option, click the plus sign next to the section name.
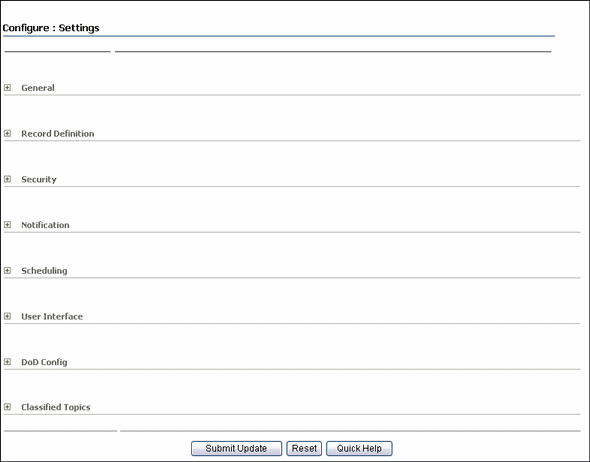
Permissions:
The Admin.RecordManager right is required to use this page. This right is assigned by default to the Records Administrator role. If Run Auto Computation of Declassification Date will be selected, the user must have the highest security classification as well.To access this page, click Records then Configure then Settings from the Top menu.
The following list describes the sections on this page and the options included in each section. Depending on the configuration, not all options may appear. The following table describes all options in more detail.
General
Start of fiscal calendar
Archive Meta Data Format
Log Metadata Changes
Disable Lifecycle Update
Enable Category Dispositions Review
Enable Report Exclude Search Options
Record Definition
Always/Never restrict revisions
Always/Never restrict deletions
Always/Never restrict edits
Display Record Icon
Security
ACL-based security
Default security on Retention Schedule objects
Supplemental Markings
User must match all Supplemental Markings
Custom Security fields
Classified Security
Notification
Do not notify authors
Scheduling
Only allow scheduled screening
User interface
User-friendly disposition
Show Export Date
Use Page Navigation
Paginate Navigation Tree
DoD Config
Enable Custom Script Evaluation
Classified Topics
Maximum years before declassifying
Run Auto Computation of Declassification Date
Permissions:
The Admin.RecordManager right is required to use this page. This right is assigned by default to the Records Administrator role.| Element | Description |
|---|---|
| Start of Fiscal Calendar | The date designation for the fiscal year. Type the day of the month and select the month from the list.
Required for processing fiscal date periods. Initial default: April 1. |
| Archive Meta Data Format | The storage file format for the metadata of items in a disposition bundle (for example, a zipped archive of items affected by a transfer, archive, or accession disposition action created using the Get Content and Folders command):
|
| Log Metadata Changes | Enables tracking item-level metadata changes. Initial default: enabled. |
| Enable Category Dispositions Review | Enable the workflow to review category dispositions. The workflow must be set up prior to enabling. |
| Enable Report Exclude Search Options | Allows the choice to exclude report templates and reports from search results. If this checkbox is checked, options are available for selection on the Configure Reports Settings Page. |
| Disable Lifecycle Update | Prevents life cycle updates |
| Always restrict revisions/Never restrict revisions | Allows or prevents revisioning of content. |
| Always restrict deletions/Never restrict deletions | Allows or prevents deleting of content. |
| Always restrict edits/Never restrict edits | Allows or prevents editing of content. |
| Display record icon | Specifies when a record icon should be displayed next to an object name when listing search results. Enabling the icon allows administrators to use a method to easily highlight items with specific qualities, such as:
|
| ACL-based security | Enables security based on access control lists (ACLs). It enables the Group and User Permissions fields on several pages where access control lists can be created to assign security permissions. Initial default: enabled. |
| Default Content Server security on Retention Schedule objects | Enables default security on retention categories, record folders, and triggers. It enables the standard Security Group and Filer fields on several pages where additional security on retention schedule objects and components can be assigned. Initial default: enabled.
IMPORTANT: If your organization requires a change to this feature after your production environment is running, call Technical Support for assistance. |
| Supplemental Markings | Enables supplemental marking security on content, record folders, and users. This box must be selected to enforce user matching of at least one supplemental marking.
Initial default: enabled. Supplemental markings security is enabled. |
| User must match all Supplemental Markings | Forces a user to match all supplemental markings to access an item. When not selected, a user must match at least one supplemental marking to access an item within a marked record folder.
Initial default: enabled. A user must match one or more markings to access a record folder or content. The Supplemental Markings box must be enabled for this feature to work. |
| Custom Security Fields | Only available if the DoD Baseline configuration is used. Enables the custom security field feature. Clear this box if this feature is not needed. Initial default: not enabled. |
| Classified Security | Enables the classified security feature (required for conformance to the Chapter 4 Classified Records section of DoD 5015.2 specification). Displays the Security Classification Field in the Configure menu. After creating classification levels and assigning them, the order on the hierarchy levels.
Clear this box if not required. Initial default: enabled/disabled, depending if the Classified Enhancements option was selected during configuration. |
| Do Not Notify Authors | Prevents e-mail notifications from being sent for pending events, reviews, and the Notify Authors disposition action. Initial default: not enabled. E-mail notifications are sent. |
| Only allow scheduled screening | Hides the Search button on the screening page to prevent users from starting screenings manually. Useful in cases where the total number of items in the system is so large it is impractical to have users wait for reports. Initial default: not enabled. Manual screening is allowed. |
| User-friendly disposition | Enables user-friendly language for disposition rules. Clear this checkbox for standard DoD 5015 disposition and screening query language.
Initial default: not enabled. Standard disposition and query language is used. |
| Show Export Date | Enables users to export items in the retention schedule that changed since a specific date. Initial default: not enabled. The date field is not displayed. |
| Use Page Navigation | Displays more elaborate page navigation controls on screening results lists and disposition record folder lists. Initial default: enabled. |
| Paginate Navigation Tree | Displays the number of pages and page location on screening results lists and disposition record folder lists. Initial default: enabled. |
| Enable Custom Script Evaluation | Allows the creation of custom scripts. This field is only displayed if classified security features are enabled. See the Oracle Fusion Middleware Administrator's Guide for Universal Records Management for details about custom scripts. Initial default: enabled. |
| Maximum years before declassifying | The number of years after which content is declassified. Initial default: 25 years.
This field is only displayed if classified security features are enabled and the user has the Admin.PrivilegedEnvironment rights. This right is assigned by default to the predefined Records Officer and Records Administrator role. |
| Run Auto Computation of Declassification Date | This field is only displayed if classified security features are enabled and the user has the Admin.PrivilegedEnvironment rights and has the highest security setting (for example, the system default of Top Secret).
When checked, records with a publication date plus the Maximum years before declassifying value that is less than the current date are automatically declassified. NOTE: If this is set to 0 and auto-computation of declassification dates is chosen, any classified items currently in the system are set to declassified. Initial default: disabled. |
Use this page to configure many aspects of PCM.
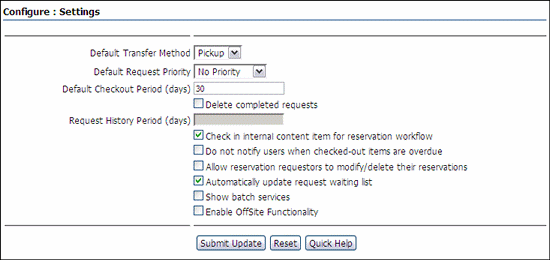
Permissions:
You must have the PCM.Admin.Manager right to access this page. By default, this right is assigned to the predefined PCM Administrator role.To access this page, click Physical then Configure then Settings from the Top menu.
The Batch Services option is only displayed if the corresponding option on the Configure Physical Settings Page is enabled.
The menu items available to users depend on the rights they have been assigned. A content administrator with all access rights (typically assigned the predefined PCM Administrator role) will see all administrator menus. Other users (for example, those assigned the default PCM Requestor role) may see a much smaller subset of the administrator menus, depending on their assigned rights.
The following screens are used to view security settings and to set security for classification.
This page displays the rights assigned to a specific user.
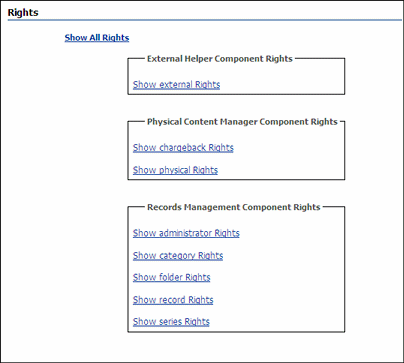
To access this screen, click Records then Rights from the Top menu. Click any highlighted link to expand the list and show details about the assigned rights.
Use this portion of a page to adjust the permissions given to individuals and groups.
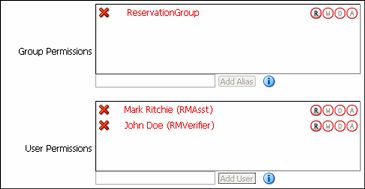
This functionality appears on several different screens such as Create or Edit Trigger Type Page and the Create or Edit Freeze Page.
Use this page to assign management rights to roles.
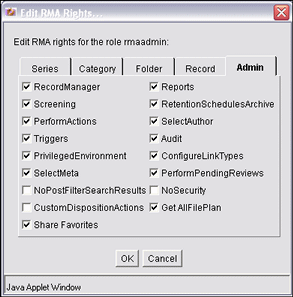
To access this screen, click Admin Applets from the Administration menu. Click the User Admin icon. Choose Security then choose Permissions by Role from the menu. Select a role to view the rights. Highlight any role then click Edit RMA Right or Edit ECM Right.
The following screens are used when managing supplemental markings:
This page is used to view, delete, or add supplemental markings. It is available when the Use Supplemental Markings box is selected in the Configure Retention Settings Page.
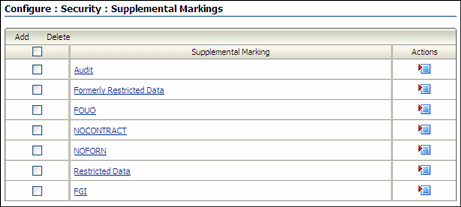
To access the page, click Records then Configure from the Top menu. Click Security then Supplemental Markings.
If a marking is deleted the schema must be republished to remove the marking from option lists where the marking may appear. See the Oracle Fusion Middleware Administrator's Guide for Universal Records Management for details about republishing schema.
This page is used to define or edit supplemental markings.

Permissions:
The Admin.RecordManager right is required to use this page. This right is assigned by default to the Records Administrator role.To access this page, click Add on the Configure Supplemental Markings Page. Use the Edit Page to modify the properties of an existing supplemental marking. To access the Edit Page, choose Edit Marking from the item's Action menu on the Configure Supplemental Markings Page.
| Element | Description |
|---|---|
| Supplemental Marking | A unique name or acronym for the supplemental marking. Maximum characters: 30. This field is view-only on the edit page. Required. |
| Brief Description | A brief description of the marking. Maximum characters: 30. Required. |
| Create button (Create Page only) | Creates the supplemental marking. The supplemental marking does not appear in the Supplemental Marking list until you assign the marking to yourself. |
This page is used to view information about a marking.

Permissions:
Either the Admin.Triggers or Admin.RecordManager right is required to use this page. The Admin.Triggers right is assigned by default to the Records Officer and Records Administrator roles, and the Admin.RecordManager right to the Records Administrator role. With the Admin.Triggers right, you can only view information about supplemental markings. With the Admin.RecordManager right, you can also add, edit, and delete supplemental markings.To access this page, click the name of a marking on the Configure Supplemental Markings Page.
The following screens are used to manage classifications:
Use this page to create security classifications and set the classification hierarchy.
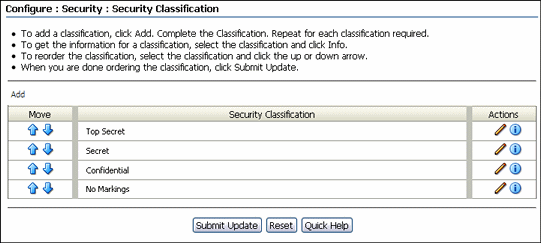
To access this page, click Records then Configure from the Top menu. Click Security then Security Classification.
Permissions:
The Admin.RecordManager and Admin.SecurityClassifications rights are required to use this page. These rights are assigned by default to the Records Administrator role.| Element | Description |
|---|---|
| Up arrow
Down arrow |
Moves a selected security classification upward or downward one step in the hierarchy with each click. |
| Add button | Displays the Create or Edit Security Classification Page, where a security classification can be defined. |
| Info button | Displays the Security Classification Information Page, where information and references for the selected security classification can be viewed. If a user has the appropriate rights, the user can also edit or delete the security classification. |
Use this page to define or change a security classification.

To access the Create page, click Add on the Configure Security Classification Page.
After creating a classification, be sure to indicate its order among the other available security classifications, both built-in and custom. The user must have permissions to that level to view it.
Use the Edit page to modify the properties of an existing security classification. To access this page, click the edit icon (a pencil) for a classification on the Configure Security Classification Page.
Permissions:
The Admin.RecordManager and Admin.SecurityClassifications rights are required to use this page. These rights are assigned by default to the Records Administrator role.| Element | Description |
|---|---|
| Security Classification | A unique name or acronym for the security classification. Maximum characters: 30. This field is view-only on the edit page. Required. |
| Brief Description | A brief description of the security classification. Maximum characters: 30. Required. |
This page displays information about a classification.

To access this page, click the Info icon for a classification on the Configure Security Classification Page.
Permissions:
The Admin.RecordManager and Admin.SecurityClassifications rights are required to use this page. These rights are assigned by default to the Records Administrator role. You must also have the security classification level assigned to you to view or work with it.This page displays references to classifications.
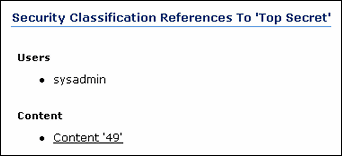
To access this page, click References on the Security Classification Information Page.
Permissions:
The Admin.RecordManager and Admin.SecurityClassifications rights are required to use this page. These rights are assigned by default to the Records Administrator role. You must also have the security classification level assigned to you to view or work with it.The following screens are used in managing custom security:
This page is used to view, delete, or add custom security fields.

To access this page, click Records then Configure from the Top menu. Click Security then Custom Security. Two types of security fields can be created:
Simple fields: These types of custom security fields pair a custom content field with a custom user field to create a new field.
Advanced security fields: These custom fields are applied to fields that use option lists. The security can be applied to individual items in the option list.
Custom security is only available when the Custom Security box is selected on the Configure Retention Settings Page.
These screens are used to add or edit simple custom security fields.
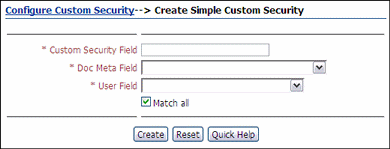
Use the Create Page to define a new simple security field. To access this page, click Add on the Simple Custom Security tab on the Configure Custom Security Page.
Use the Edit Page to modify the properties of an existing custom security field. To access this page, click Edit field from the item's Action menu on the Configure Custom Security Page.
Permissions:
The Admin.RecordManager right is required to use this page. This right is assigned by default to the Records Administrator role.| Element | Description |
|---|---|
| Custom Security Field | A unique name for the field. Maximum characters: 30. This field is view-only on the edit page. Required. |
| Doc Meta Field list | The content field to match against the user field. The list displays all available content fields, custom or otherwise. |
| User Field list | The user field to match against the content field. This field must also be set up in the User Admin utility. Required. |
| "Match all" box | Forces the user to match all content field entries. When cleared, allows access when a user matches at least one content field. |
Use the Custom Security Field Information page to view information about an existing custom security field.

To access this page, click a custom field on the Configure Custom Security Page.
Permissions:
Either the Admin.Triggers or Admin.RecordManager right is required to use this page. The Admin.Triggers right is assigned by default to the Records Officer and Records Administrator roles, and the Admin.RecordManager right to the Records Administrator role. With the Admin.Triggers right, you can only view information about custom security fields. With the Admin.RecordManager right, you can also add, edit, and delete custom security fields. You must also have the security classification level assigned to you to be able to view or work with it.Use this page to select the metadata field to use for security restrictions.
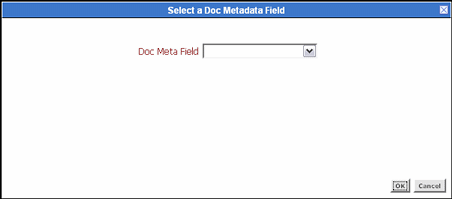
To access this page, click Add in the Advanced section of the Configure Custom Security Page.
Permissions:
The Admin.RecordManager right is required to use this page. This right is assigned by default to the Records Administrator role.| Element | Description |
|---|---|
| Doc Meta field | Select a field from the list. Only those fields which have option lists are available. |
Use this page to set the security on individual options in the option list associated with the metadata field chosen in the Advanced Custom Security Dialog.

This page is displayed when a metadata field is chosen on the Advanced Custom Security Dialog.
Permissions:
The Admin.RecordManager right is required to use this page. This right is assigned by default to the Records Administrator role.| Element | Description |
|---|---|
| Option Value | Select a field from the list. Only those fields which have option lists are shown. |
| Security Group | The security group which can access this option. |
| Assigned Aliases | The alias which can access this option. |
| Assigned Users | The users who can access this option. |
Use this page to select the users, aliases, and security groups who can access the option.
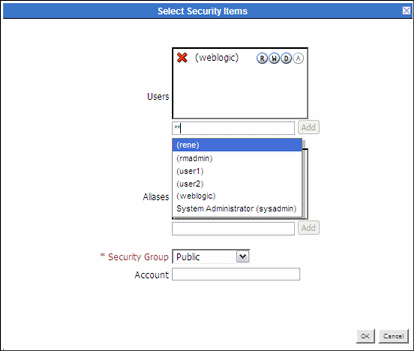
To access this page, click Edit Security from the Actions menu of an option on the Advanced Custom Security Option Page.
Permissions:
The Admin.RecordManager right is required to use this page. This right is assigned by default to the Records Administrator role.| Element | Description |
|---|---|
| Users | Enter the first two letters of a user name in the dialog box to display a list of user names or type two asterisks (**) to display a list of names. Scroll to the name to use and click Add.
To adjust the permissions given to that user, click a circled permission next to the name to add or to remove it. To remove the user, click the X next to the user name. The name appears with a line through it, indicating it is no longer in use. |
| Aliases | Enter the first two letters of an alias name in the dialog box or type two asterisks (**) to display a list of aliases. Scroll to the name to use and click Add.
To adjust the permissions for the alias, click a circled permission next to the name to add or to remove it. To remove the user, click the X next to the user name. The name appears with a line through it, indicating it is no longer in use. |
| Security Group | Select a security group from the list. |
The following screens are used to configure classification guides:
This page is used to start setting up classification guides.

To access this page, click Records then Configure from the Top menu. Click Security then Classification Guide.
Permissions:
The Admin.ClassificationGuide right is required to perform this action. This right is assigned by default to the Records Officer and Records Administrator roles.| Element | Description |
|---|---|
| Guide Name | A list containing all defined classification guides. Use the Info button to view information about the selected classification guide or edit it, and the Delete button to delete it. |
| Add button | Displays the Create or Edit Classification Guide Page, used to create a new classification guide. |
| Info button | Displays the information page for the selected classification guide. See Classification Guide Information Page. |
| Delete button | Deletes the selected classification guide. |
This page is used to add or edit the classification guide.
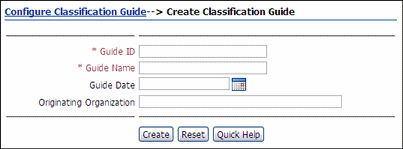
To access this page, click Add on the Configure Classification Guide Page.
Use the Edit Page to modify the name of an existing classification guide. To access this page, click Records then Configure then Security from the Top menu. Click Classification Guides. In the menu list, select the classification guide to edit and click Info. From the Top menu menu, choose Edit.
Permissions:
The Admin.ClassificationGuide right is required to perform this action. This right is assigned by default to the Records Officer and Records Administrator roles.| Element | Description |
|---|---|
| Guide ID field | An identifier for the classification guide. Maximum characters: 80. This field is view-only on the edit page. Required. |
| Guide Name field | A name or description for the classification guide. Maximum characters: 100. Required. |
| Guide Date | The date the guide is activated. |
| Originating Organization | The organization associated with the guide. |
This page displays information about a classification guide.

To access this page, click Records then Configure then Security from the Top menu. Click Classification Guides. In the menu list, select the classification guide to view and click Info.
Permissions:
The Admin.ClassificationGuide right is required to perform this action. This right is assigned by default to the Records Officer and Records Administrator roles.| Element | Description |
|---|---|
| Guide ID field | The identifier of the selected classification guide. This field cannot be edited. |
| Guide Name field | The name of the selected classification guide. This field cannot be edited. |
| Guide Date | The date the guide is activated. |
| Originating Organization | The organization associated with the guide. |
Use this page to set up and configure classification topics.

To access this page, click Records then Configure then Security from the Top menu. Click Classification Guides. In the menu list, select the classification guide to view and click Info. From the Page menu, choose Edit then Configure Topics.
Permissions:
The Admin.ClassificationGuide right is required to perform this action. This right is assigned by default to the Records Officer and Records Administrator roles.| Element | Description |
|---|---|
| Guide Name field | Shows the name of the classification guide the topic is associated with. It cannot be edited. |
| Topic Name field | Contains all defined topics for the current classification guide. |
| Add button | Displays the Create or Edit Classification Topic Page, used to create a new classification topic. |
| Info button | Displays the Classification Topic Information Page. |
| Delete button | Deletes the selected classification topic. |
This page is used to add or modify classification topics.
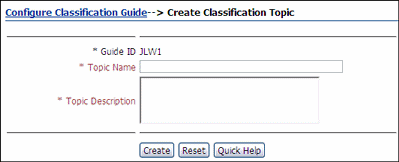
Use the Create Page to define a new classification topic. To access this page, click Add on the Administer Classification Topic Page.
Use the Edit Page to modify the properties of an existing classification topic. To access this page, select a topic then click Info on the Administer Classification Topic Page. From the Page menu, choose Edit then Configure Topics. From the Topic Name list, select the classification topic to edit and click Info. From the Page menu, choose Edit.
To modify the topic settings (that is, the default metadata field values), choose Edit Topic Settings from the Page menu. This displays the Configure Topic Settings Page.
Permissions:
The Admin.ClassificationGuide right is required to perform this action. This right is assigned by default to the Records Officer and Records Administrator roles.| Element | Description |
|---|---|
| Guide ID field | The name of the classification guide with which the topic is associated. It cannot be edited. |
| Topic Name field | A name for the classification topic.
This field is not displayed on the Edit screen. |
| Topic Description field | A description for the classification topic.
|
| Create button (Create Page only) | Creates the new classification topic and displays the Configure Topic Settings Page, where the default metadata field values are specified. |
Use this page to set or modify the default field values of a classification topic.
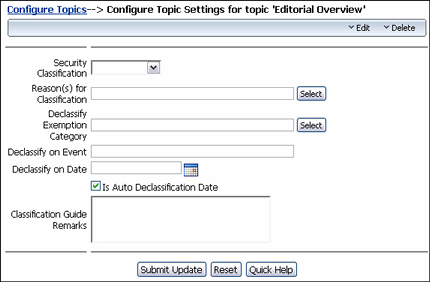
To access this page, click Edit then Edit Topic Settings from the Page menu on the Classification Topic Information Page.
The Reason for Classification, Declassify Exemption Category and Declassify on Event fields contain items defined by the administrator using the Configuration Manager utility.
Permissions:
The Admin.ClassificationGuide right is required to perform this action. This right is assigned by default to the Records Officer and Records Administrator roles.| Element | Description |
|---|---|
| Initial classification | The initial classification assigned to the topic. The list contains all defined classification levels but only displays those the user is entitled to see depending on the user's security level. For example, if your assigned classification level is 'Secret', the list shows 'Secret' and all lower classification levels. Similarly, if no classification level was assigned to you, you see 'No Markings'. |
| Reason(s) for classification | The default reason(s) for classifications assigned to the topic. |
| Declassify exemption category | The default declassification exemption category assigned to the topic. |
| Declassify on event | The default declassification event assigned to the topic. |
| Declassify on date | The default scheduled declassification date assigned to the topic. |
| Classification Guide Remarks | Additional remarks about the classification guide to clarify its usage. |
This page is used to view classification topic information.

To access this page, select a topic then click Info on the Administer Classification Topic Page.
Permissions:
The Admin.ClassificationGuide right is required to perform this action. This right is assigned by default to the Records Officer and Records Administrator roles.The following screens are used to configure PCM.
The following screens are used to configure object, media, and payment types:
Use this page to manage defined object types.
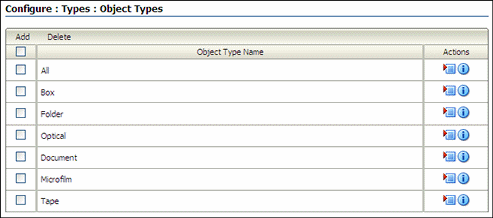
Permissions:
The PCM.Admin.Manager right is needed to perform this action. This right is assigned by default to the PCM Administrator role.To access this page, click Physical then Configure from the Top menu. Click Types then Object Types.
| Element | Description |
|---|---|
| Object Types list | Lists all currently defined object types including the predefined object types and custom object types. |
| Add button | Displays the Create or Edit Object Type Page where a new object type can be defined. |
| Info button | Displays the Object Type Information Page for a selected object type where the properities of the object type can be viewed or edited or deleted. |
Use this page to add or edit an object type.
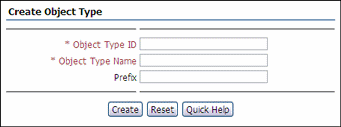
To access this page, click Add on the Configure Object Types Page. To edit a type, click Edit Object Type from the Actions menu for the item.
Permissions:
The PCM.Admin.Manager right is needed to perform this action. This right is assigned by default to the PCM Administrator role.| Element | Description |
|---|---|
| Object Type ID | A unique identifier for the object type. Maximum number of characters: 30. This field is view-only on the Edit Object Type page. Required. |
| Object Type Name | A name for the object type. Displayed in the object type list on the Create Physical Item page. Maximum number of characters: 30. Required. |
| Prefix | A prefix to be used to designate this object type. |
Use this page to edit the relationships between the current object type and other object types. This action defines what object types can be contained within the current object type.
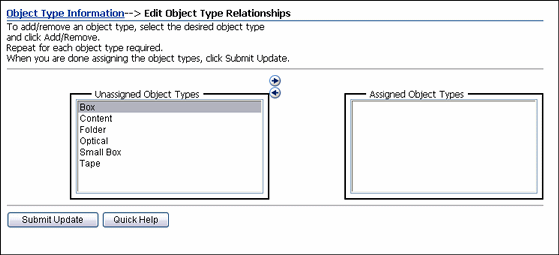
To access this page, click Physical then Configure from the Top menu. Click Types then Object Types. Select an object type from the list and click Edit Object Type Relationships from the object's Action menu.
Permissions:
The PCM.Admin.Manager right is needed to perform this action. This right is assigned by default to the PCM Administrator role.| Element | Description |
|---|---|
| Assigned Object Types list | A list of object types that can be contained within the current object type, used to control what type(s) of physical items can be created within another physical item. |
| Unassigned Object Types list | All object types that cannot be contained in the current object type. |
| Add arrow | Moves an object type from the Unassigned Object Types box to the Assigned object Types box (and make it available for the current object type). |
| Remove arrow | Moves an object type from the Assigned Object Types box to the Unassigned object Types box (and no longer make it available for the current object type). |
Use this page to view the properties of an existing object type.

To access this page, click the Info icon of an object on the Configure Object Types Page.
This page shows the ID and name of the selected object type. In addition, it lists the object types that can be contained within the current object type. Modify this list on the Edit Object Type Relationships Page.
Permissions:
The PCM.Admin.Manager right is needed to perform this action. This right is assigned by default to the PCM Administrator role.Use this page to manage defined media types.
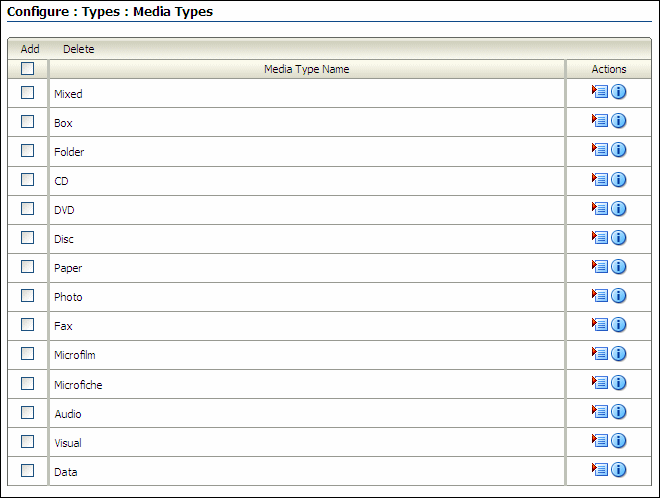
To access this page, click Physical then Configure from the Top menu. Click Types then Media Types.
Permissions:
The PCM.Admin.Manager right is needed to perform this action. This right is assigned by default to the PCM Administrator role.| Element | Description |
|---|---|
| Media Types list | Lists all currently defined media types. It includes the predefined media types and any custom media types. |
| Add button | Displays the Create or Edit Media Type Page, used to define a new media type. |
| Info button | Displays the Media Type Information Page for a selected item used to view or edit the properties of the media type or delete the media type. |
This page is used to create or edit a media type.

To access this page, click Add on the Configure Media Types Page.
Permissions:
The PCM.Admin.Manager right is needed to perform this action. This right is assigned by default to the PCM Administrator role.| Element | Description |
|---|---|
| Media Type ID | A unique identifier for the media type. Maximum number of characters: 30. This field is view-only on the Edit Media Type page. Required. |
| Media Type Name | A name for the media type to be displayed in the media type list on the Create Physical Item page. Maximum number of characters: 30. Required. |
| Object Type | The object type with which the media type is associated. The media type is available only if the object type is selected for the physical item. Only one object type can be associated with the media type. |
This page is used to choose the media type for a selected charge type.
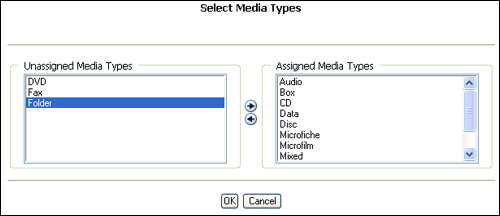
This dialog is displayed when you click Browse next to the Media Type field on the Create or Edit Charge Type Page.
A media type is the material on which the data is being stored. Media types are contained within object types. Object types can be defined to hold any media type, or multiple types of media, including all possible types of media.
Use the arrow keys to move items from the Unassigned to the Assigned Media Type lists.
Use this page to view the properties of an existing media type.

To access this page, click the Info icon of a media type on the Configure Media Types Page.
Permissions:
The PCM.Admin.Manager right is needed to perform this action. This right is assigned by default to the PCM Administrator role.This page shows the ID and name of the selected media type. In addition, it lists the object type associated with the current media type. Modify this on the Create or Edit Media Type Page.
The following screens are used when configuring locations and barcodes:
Use this page to add, edit, delete, or reorder location types.
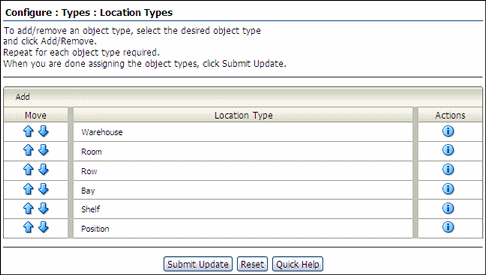
To access this page, click Physical then Configure from the Top menu. Click Types then Location Types.
Permissions:
The PCM.Admin.Manager right and the PCM.Admin.LocationTypes right are needed to perform this action. These rights are assigned by default to the PCM Administrator role.| Element | Description |
|---|---|
| Location types list | Lists all defined location types in their assigned hierarchical order. The higher in the list, the higher the item is in the storage hierarchy. A location type contains all location types below it in the list. The location type at the bottom of the list is the most specific (and smallest) storage location. This may be the only storage location actually holding physical content. All higher-level units are then used for space management purposes. |
| Up Arrow
Down Arrow |
Moves the associated item up or down one level in the storage hierarchy. |
| Add button | Displays the Create or Edit Location Type Page, used to define a new location type. |
| Info button | Displays the Location Type Information Page for a selected item where a user can view or edit the properties of the location type or delete the location type. |
Use the Create Page to define a new location type to be used in the definition of the storage environment. Use the Edit Page to modify an existing location type.
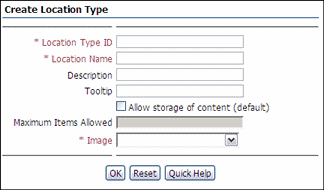
To access this page, click Physical then Configure from the Top menu. Click Types then Location Types.
To edit a type, click Edit Type from the Action menu of the type.
Permissions:
The PCM.Admin.Manager right and the PCM.Admin.LocationTypes right are needed to perform this action. These rights are assigned by default to the PCM Administrator role.| Element | Description |
|---|---|
| Location Type ID | A unique ID for the location type displayed in the location type hierarchy. Maximum number of characters: 30. This field is view-only on the Edit Location Type page. Required. |
| Location Name | The name of the location type. Maximum number of characters: 30. Required. |
| Description | A description for the location type. Maximum number of characters: 30. |
| Tooltip | Tooltip text for the location type. This text appears if the mouse cursor is held over the option in the location type selection list on the Create or Edit Storage Page (only in Netscape, Mozilla, and Firefox web browsers). Maximum number of characters: 30. |
| Allow storage of content (default) | Specifies if the location type can hold content items by default. This can be overridden when defining storage locations. Overriding the default setting may be useful to accommodate abnormal storage locations, or to create a "dummy" storage location enables a user to maintain consistent numbering across parallel objects.
This setting applies to this specific location type level only, not to any location types lower in the hierarchy. Therefore, the box for a location can be disabled if its child location types will contain content. For example, in the default hierarchy shelves have several positions, each of which can hold content items. But no content items can be directly assigned to the shelf level (only to the positions on a shelf). Therefore, the 'Shelf' location type does not allow storage of content, whereas the 'Position' location type does. |
| Maximum Items Allowed | This field is available only if Allow storage of content (default) is selected. It specifies the default maximum number of content items a location type can hold. This can be overridden when defining storage locations in the storage space hierarchy.
This number applies to storage of content on this specific location type level only, not to any location types lower in the storage space hierarchy. |
| Image | Specifies the icon to use for the location type in the Browse Storage tree in the Trays layout. |
This page shows the current properties of the selected location type. Only the fields containing information are displayed. For example, if no tooltip text has been specified for the location type, this field is not shown on the page.
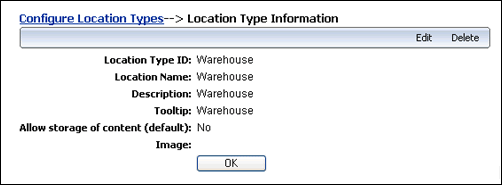
To access this page, click the Info icon of a location type on the Configure Location Types Page.
Permissions:
The PCM.Admin.Manager right and the PCM.Admin.LocationTypes right are needed to perform this action. These rights are assigned by default to the PCM Administrator role.This page is used to set the default metadata values for reservation items checked into the repository. A similar page is used to set default metadata for offsite storage items.
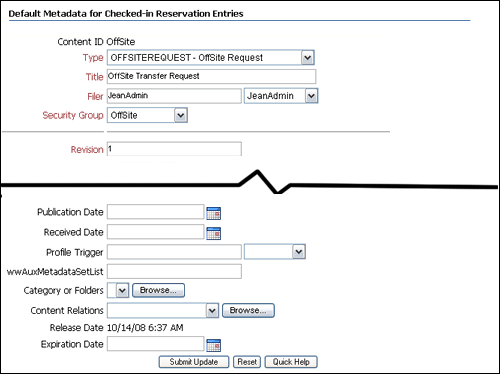
To access this page, click Physical then Configure from the Top menu. Click Offsite Storage then Offsite Default Metadata to access the Offsite Storage page or Configure then Metadata then Reservation Default Metadata to access the reservation page
This page is similar to the a check-in page. Fill in the fields to use for defaults when using reservations.
Permissions:
The PCM.Admin.Manager right is needed to perform this action. This right is assigned by default to the PCM Administrator role.Use this page to create or edit storage locations where physical items can be assigned.
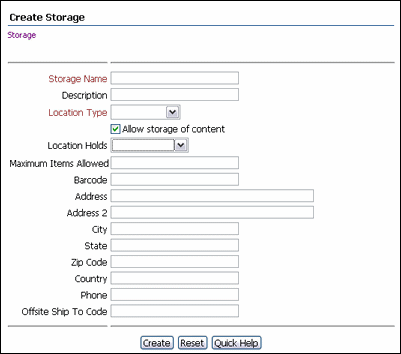
To access this page, click Physical then Storage from the Top menu. Select a location for the new storage item and click Create then Define Storage Location from the Action menu of a location or from the Table menu.
Depending on the location in the hierarchy, a user can create a new storage location or create a physical item in another location.
To edit a location, select an item from the list and click Edit then Edit Storage Location from the Page menu.
Permissions:
The PCM.Storage.Create right and the PCM.Storage.Edit right are needed to perform these actions. These rights are assigned by default to the PCM Administrator role.| Element | Description |
|---|---|
| Storage Name | A unique name for the storage location. Maximum number of characters: 30. Required. |
| Description | A brief description for the storage location. Maximum number of characters: 30. |
| Location Type | The location type of the storage location. This field is view-only on the Edit Storage page. The available location types are defined on the Configure Location Types Page. The available location types depend on where the cursor is located in the storage hierarchy. Required. |
| Allow storage of content | Specifies if the storage location can hold content items. The default is the configured default setting for the selected location type, but it can be overridden if required.
This setting applies to this specific storage location, not to any child storage locations. It controls if items can be stored in it. This box does not have to be enabled if any of the location's child locations will hold content. For example, you may have a storage location of type "Shelf" with several positions, each of which can hold content items. If you do not want any items to be directly assigned at the shelf level but only to the positions on a shelf (stored at a position, not on a shelf), then you set the shelf storage location to not allow storage of content, and the position storage location to allow storage. If you click this box, all fields (except Requestor) below it become available. |
| Status
available for locations that can hold items |
Available for locations that can hold items.
Used to specify the current status of the storage location. The default status is 'Available'. |
| Requestor | Available only if the storage location allows storage of content and the storage status is set to "Reserved."
Used to specify the user who reserved the storage location, either by entering the user manually or by selecting a name from the list of available users. |
| Location Holds | Available only for storage locations that can hold items.
Used to specify what type of physical items are stored in the storage location. Choose from all defined object types. An object type does not need to be specified here. The storage location can then hold any type of content. If an object type is selected and someone attempts to store an inappropriate object type, an error message is displayed and the physical item is not checked in. |
| Maximum Items Allowed | Available only for storage locations that can hold items.
Used to specify the maximum number of items the location can hold. This number is used to track space availability. If not specified, 1 (one) is assumed, which means only a single item can be assigned to the storage location. |
| Barcode | Available only for storage locations that can hold items.
Used to specify a barcode for the location. If not specified, a random 19-digit number is automatically assigned. Maximum number of characters: 30 |
| Address Information | Addressing information for offsite storage. |
| Offsite Ship To Code | Available only for offsite storage.
Used to specify the Ship To code for offsite storage. |
This page is used to set a barcode numbering system.

To access this page, click Physical then Configure then Function Barcodes from the Top menu.
Permissions:
The PCM.Admin.Manager right is needed to perform this action. This right is assigned by default to the PCM Administrator role.| Element | Description |
|---|---|
| Transaction Code | The barcode used for the type of activity or transaction. |
| Transaction Name | The type of transaction or activity associated with the barcode. |
| Is System | An indicator of the type of barcode. System barcodes are default barcodes provided with the software. |
This dialog is used to create a new custom barcode.
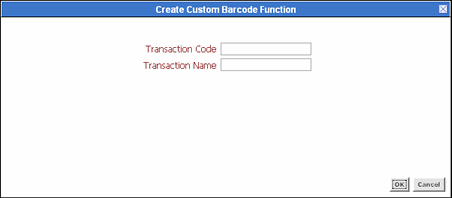
This dialog is displayed after clicking Add on the Configuring Custom Barcode Page.
Permissions:
The PCM.Admin.Manager right is needed to perform this action. This right is assigned by default to the PCM Administrator role.| Element | Description |
|---|---|
| Transaction Code | Enter the code to be associated with the new transaction type. Values must be between 7000 and 9999. Required. |
| Transaction Name | Enter the activity or event associated with the barcode. Required. |
This page is used to define a new storage hierarchy by specifying several creation rules.
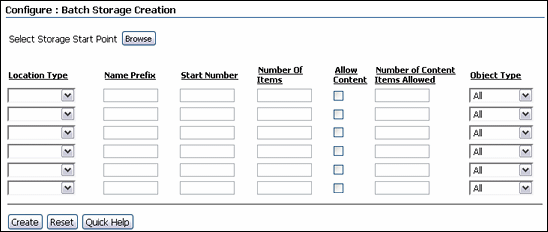
To access this page, click Physical then Configure then Batch Storage Creation from the Top menu.
Permissions:
The PCM.Admin.Manager right is needed to perform this action. This right is assigned by default to the PCM Administrator role.| Element | Description |
|---|---|
| Browse button | Opens the Select Storage Location Dialog where the location in the existing storage space is specified that will hold the new storage hierarchy defined on this page. |
| Location Type | Accesses a list of the location type of each level in the storage hierarchy.
A parent location cannot be added below a child location (for example, a shelf above a row). If you attempt to do this, error messages are displayed when you import the StorageImport.hda storage definition file. |
| Name Prefix | Specifies a prefix for the storage location name. The prefix is included in the name and description of the storage location.
If not specified, the name and description of the storage location contains only numbers (for example, "003"). |
| Start Number | Specifies the starting number for the number sequence. The sequential number is included in the name and description of the storage location. If not specified, 1 (one) is assumed. |
| Number Of Items | Specifies how many instances of the storage location to include in the storage space.
The default number of digits used in the numeric sequences is 3, resulting in names such as "Warehouse_001." The AutoStorageNumberWidth parameter in the storagecreationutility_environment.cfg file can be modified to change this. Restart the Content Server after changing the parameter value. |
| Allow Content | Allows items to be stored directly in the storage location. This applies to this storage location, not to any child locations. It is not necessary to enable this if any of child locations will hold content.
For example, a "Shelf" storage location may have several positions, each of which can hold content items. To allow assigning of items only to the positions and not the shelf, do not check this box and set the position location to allow storage. |
| Number of Content Items Allowed | Available if Allow Content is checked. Used to specify the maximum number of items the storage location can hold. Used to track space in the storage location. If not specified, 1 (one) is assumed (only one item can be assigned to the storage location.) |
| Object Type | Available if Allow Content is checked. Used to select the type of physical content items the storage location can hold from all defined object types.
If not specified, the storage location can hold any type of physical content. If an object type is selected and someone attempts to store an inappropriate object type, an error message is displayed and the physical item is not checked in. |
| Create | Creates a StorageImport.hda file, which can be imported into the existing storage hierarchy. |
Use this dialog to select the location in the current storage environment to hold the new storage hierarchy defined on the Create Batch Storage Import File Page.
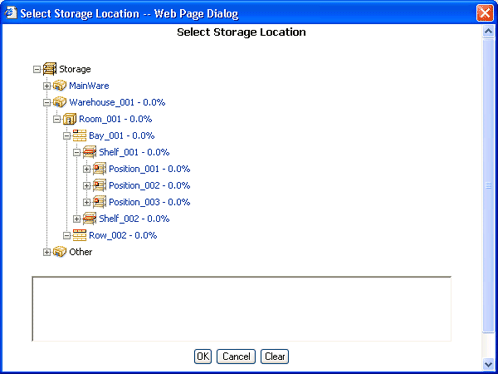
To access this dialog, click the Browse button on the Create Batch Storage Import File Page.
The main box at the top shows the defined storage space environment. After selecting a location in the hierarchy, the box at the bottom shows the full navigation path to the selected location.
Use this page to view all defined storage locations.
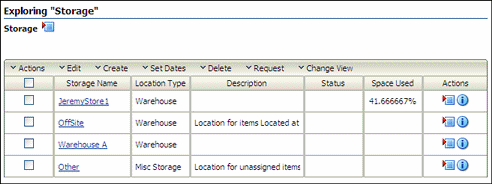
To access this page, click Physical then Storage from the Top menu.
Use the Storage Information Page to view information about an existing storage location.
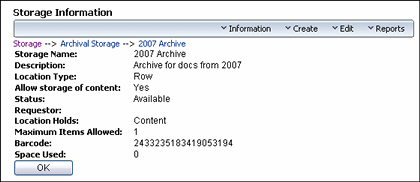
To access this page, click the Info icon for a storage location on theBrowse Storage Page.
Permissions:
The PCM.Storage.Read right is needed to perform this action. This right is assigned by default to the PCM Administrator role.The Page menu is identical to the one on the Edit Storage page.
This page lists physical items contained in a storage location (and its child locations.)

To access this page, click Physical then Storage from the Top menu. Click the name of a storage location on the Browse Storage Page.
The following screens are used to manage Retention Schedules:
See the Oracle Fusion Middleware User's Guide for Universal Records Management for details about icons depicting retention schedule objects.
This page displays all currently defined retention series or categories.
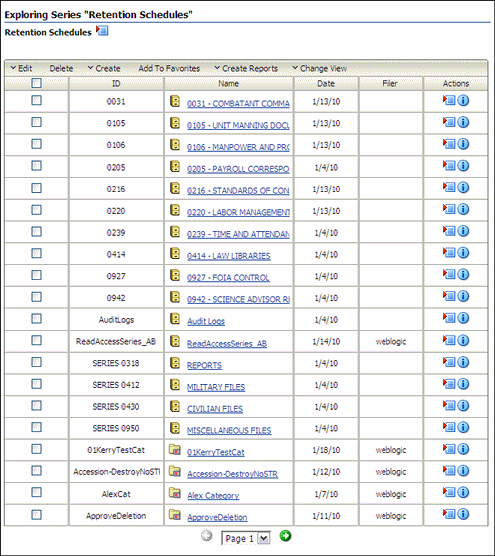
To access this screen, click Browse Content then Retention Schedules from the Main menu.
The following screens are used to manage series:
This page is used to add or modify a series.
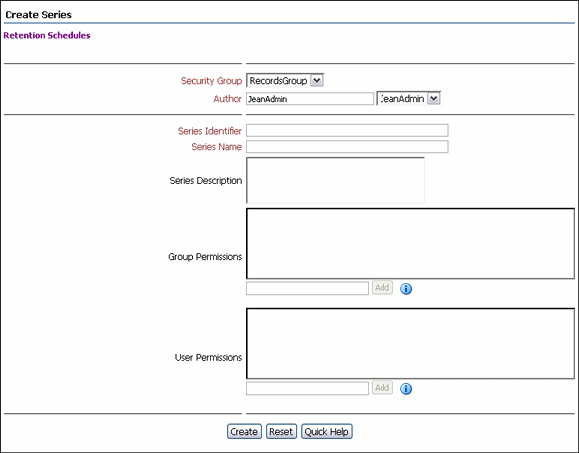
Use the Create Page to create a new series. To access this page, click Create then Create Series from the Table menu on the Exploring Retention Schedule Page.
Use the Edit Series Page to edit the name of an existing series. To access this page, click Edit then Edit Series from the item's Action menu on the Exploring Retention Schedule Page.
Permissions:
The Series.Create right is required to use these pages. This right is assigned by default to the Records Administrator role.| Element | Description |
|---|---|
| Security Group | Select the security group associated with this series. Required. |
| Author | Enter the name of the creator of the series or select a name from the list. Required. |
| Series Identifier | A unique identifier for the series. This field is view-only on the edit page. Maximum characters: 100 |
| Series Name | A name for the series. Maximum characters: 100. Required. |
| Series Description | A description for the series. Maximum characters: 1,000 |
| Group and User Permissions | Select specific groups and users who can access the series. To select a group or user, type two asterisks (**) in the entry line. A list of groups and users is displayed. Select an item from the list and click Add. The name is inserted into the Group Permission or User Permission box.
To further refine permissions, click on a displayed permission to add or remove it from the listed user or group. To remove a group or user, click the X next to the name. The name appears with a line through it, indicating it is no longer in use. |
This page is used to view information about a series. Anyone with the Series.Read right (assigned to all predefined roles) can view this page.
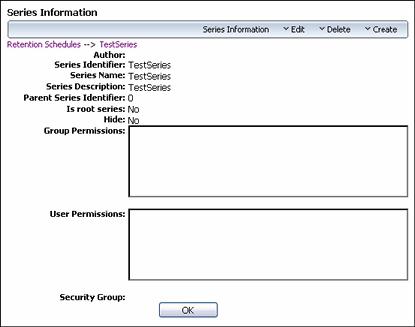
To access this page, click the Info icon for the series on the Exploring Retention Schedule Page.
Depending on a user's assigned rights, the user may also see the Actions Page menu.
This dialog is displayed to select a series, folder or category for moving. Series can be nested within a retention schedule.
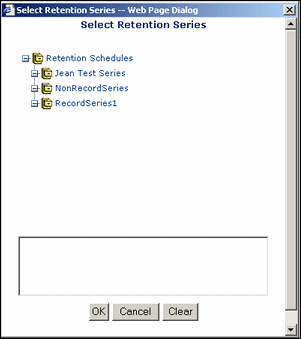
To open the retention schedule, click the plus (+) sign or the icons to open it. Continue to click and expand the tree until reaching the desired location.
Selectable content is indicated in red text.
The locator links for the selected location appears in the box.
When done, click OK.
The following screens are used to manage categories:
Use the Create Retention Category Page to create a new retention category. Use the Edit Page to modify the category.
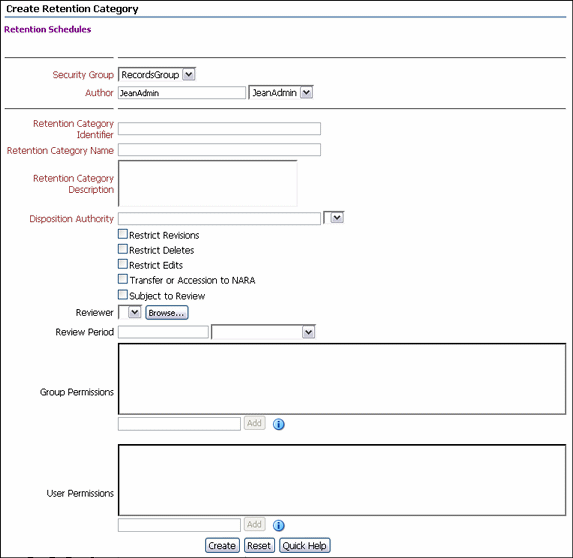
To access this page, click Create then Create Retention Category from the Table menu on the Exploring Retention Schedule Page.
Use the Edit Retention Category Page to edit an existing retention category. To access this page, click Edit then Edit Category from the item's Actions menu on the Exploring Retention Schedule Page.
The information in the following table is applicable in many cases for both folders and for retention categories.
Permissions:
The Category.Create right is required to use the Create Retention Category page. This right is assigned by default to the Records Administrator role. The Category.Edit right is required to use the Edit Retention Category page. This right is assigned by default to the Records Administrator role.| Element | Description |
|---|---|
| Security Group | The security group allowed access to the folder/category. When working with folders, set the security group permissions at the folder level to prevent the folder inheriting security settings from its parent category. Default: RecordsGroup.
This field is only displayed if default security is enabled. Required. |
| Account | An account allowed access to the folder/category. This field is only displayed if accounts are enabled. |
| Filer | The person who initially created the folder/retention category. Select the filer from the options list. This field is only displayed if default security is enabled. Required. |
| Identifier | A unique identifier for the folder/retention category. Maximum characters: 100. This field is view-only on the edit page. Required. |
| Name | A name for the folder/retention category. Maximum characters: 100. Required. |
| Description | A description of the folder/retention category. Maximum characters: 1,000. Required. |
| Disposition Authority | The code of the disposition authority. When using this software for DoD tracking, the disposition authority code represents the legal authority who empowers a United States government agency to dispose of temporary items, or to transfer permanent items to the National Archives and Records Administration (NARA). The disposition authority for permanent items must be obtained from NARA. For certain temporary items, the authority must be obtained from the General Accounting Office (GAO).
|
| Restrict and permanence boxes | Indicates if a retention category will allow revisions, deletions, or edits or if it will contain permanent items. Default: not selected |
| Transfer or Accession to NARA | Indicates if this category will be used to transfer data to the National Archives. |
| Subject to Review box (Create Page only) | Indicates if a retention category contains items subject to review. All child record folders and items inherit the review status. Default: not selected. After this box is selected, the Reviewer and Review Period fields become available. |
| Reviewer (Create Page only) | The person responsible for reviewing content. The user receives an e-mail when a review period for the category indicates a review cycle as determined by the review period for the category.
If a reviewer is not specified at the retention category level, the Notify recipient reviewer receives notifications for review. The system default reviewer is specified on the Configure Retention Settings Page. Reviewers for folders must have the Folder.EditReview.right. Otherwise the person cannot mark the folder as reviewed. |
| Review Period text box and list (Create Page only) | An integer indicating the number of periods to cycle the content. Select a corresponding period to go with the integer value from the Review Period list. Review periods for folders are required if the Subject to Review checkbox is selected. |
| Group and User Permissions | Select specific groups and users who can access the category. To select a group or user, type the first two letters of the name ot display a list of name or type two asterisks (**) in the entry line. A list of groups and users is displayed. Select an item from the list and click Add. The name is inserted into the Group Permission or User Permission box.
To further refine permissions, click on a displayed permission to add or remove it from the listed user or group. To remove a group or user, click the X next to the name. The name appears with a line through it, indicating it is no longer in use. |
Use this page to view information about a retention category. Anyone with the Category.Read right (assigned to all predefined roles) can view this page.
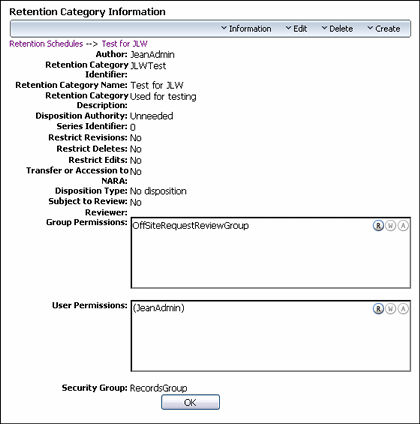
To access this page, click Information then Category Information from an item's Action menu on the Exploring Retention Schedule Page.
The information displayed depends on the configuration of the system and if optional fields were populated.
Use this page to view the metadata history for a retention category (a list of all changes made to the editable category properties).

To access this page, click Information then Metadata History from the item's Action menu on the Exploring Retention Schedule Page.
The following screens are used to manage record folders:
Use the Create Record Folder Page to create a new record folder and the Edit Record Folder Page to modify the folder.
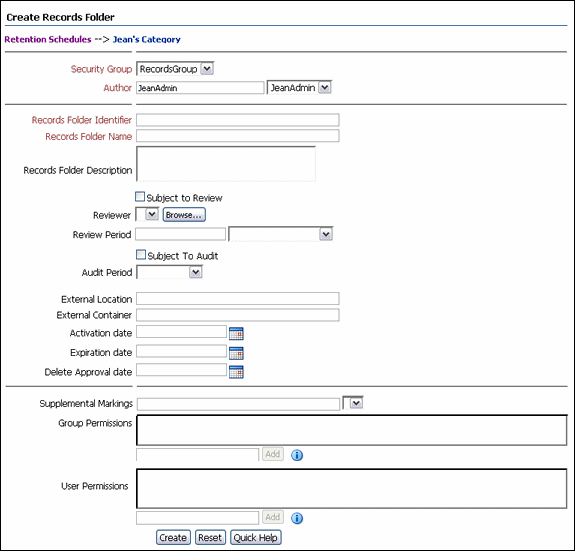
To access this page, navigate to the retention category or record folder location level where the folder will be created. Choose Create then Create Record Folder from the Table menu.
Use the Edit Record Folder Page to modify the properties of an existing record folder. To access this page, navigate to the retention category or record folder containing the record folder to edit. Click Edit then Edit Record Folder from the item's Action menu.
The following fields are described in "Create or Edit Retention Category Page".
Security group
Account
Filer
Identifier
Name
Description
Reviewer
Review period
Group permissions
Select (Group) button
User Permissions
Select (User) button
The information in the following table is applicable to folders only.
Permissions:
The Folder.Create right is required to use the Create Record Folder page. This right is assigned by default to the Records Administrator role. The Folder.Edit right is required to use the Edit Record Folder page. This right is assigned by default to the Records Administrator role.| Element | Description |
|---|---|
| Freeze Reason | Available if a freeze reason was entered when the record folder was frozen. Not applicable when creating a new record folder.
The freeze reason can be updated from this location if editing a record folder. Recommended. Maximum characters: 100. |
| Subject to Review box (Create Page only) | Enables the record folder as subject to review. For the folder to inherit review information from a parent folder or category, clear the box and enter a number and select the period from the list. Default: not selected (not subject to review).
If a parent record folder or category has a review period of shorter duration than the review period for the child folder, the child folder assumes the shorter period. |
| Subject to Audit box | Indicates the record folder is subject to an audit. The Audit Period list becomes available. Clear the box if the record folder is not subject to an audit. |
| Audit Period list | Enabled if the folder is subject to audit. Select an audit period from the list. The records administrator configures the audit periods. |
| Activation Date | Date corresponding to a date in a content item but external to Oracle URM. For example, if an item has to do with a legal contract, the activation date represents the contract start date. The date format depends on user locale and preferences set in system properties.
This field can also be used to treat a record folder and its content as a single piece of content from a disposition standpoint. |
| Expiration Date | A deactivation date corresponding to a content item but external to Oracle URM. For example, if an item has to do with a legal contract, the expiration date represents the date the contract expires.
This date differs from the expiration date for documents in the repository because the content can still be accessed in Oracle URM after deactivation. Content expired in Oracle UCM cannot be accessed after expiration. |
| Delete Approval date | The date the delete action was approved for the record folder. After this date, the record folder can be deleted. |
| Supplemental Markings | Defined supplemental markings to secure the record folder. |
Use the Record Folder Information Page to view information about a record folder.
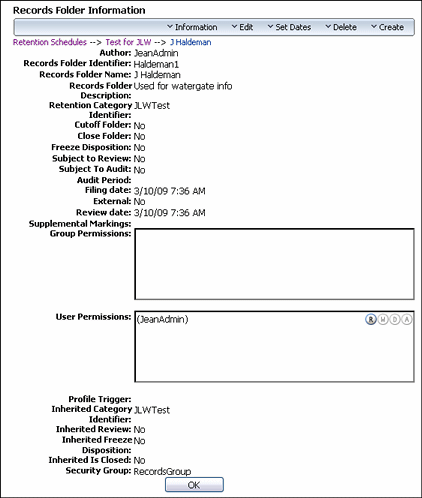
To access this page, click Information then Record Folder Information from the item's Actions menu on the Exploring Retention Schedule Page.
Permissions:
The Folder.Read right is required to use this page. All predefined roles this right.The information displayed depends on the configuration for the software and if optional fields were populated.
Similar pages are used to create Global Triggers, Custom Direct Triggers and Indirect Triggers. This section uses the Custom Direct Trigger interface pages as an example of these interface screens. In the field descriptions an indication is given to where the field is used for specific trigger types.
The following screens are used to manage triggers:
This page is used to select a type of trigger or a trigger for use.
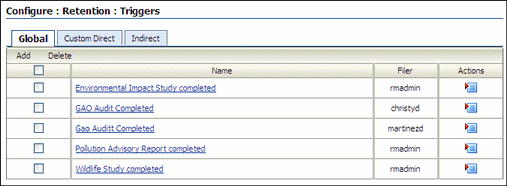
To access this page, click Records then Configure from the Top menu. Click Retention then Triggers.
This page lists the name of the trigger, the person who created it and an Action menu for each trigger.
Use the Create Trigger Type Page to define a new trigger and the Edit Page to modify an existing trigger.
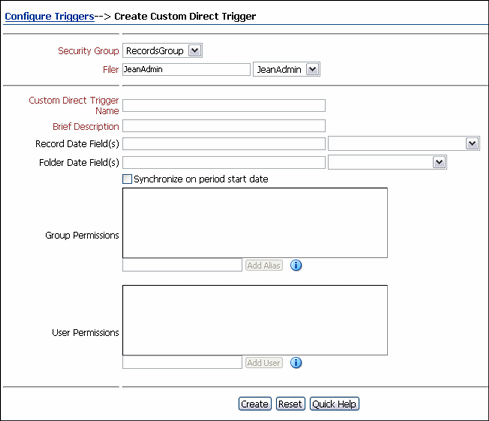
To access this page, select a trigger type and click Add from the Configure Triggers Page.
Use the Edit Trigger Type Page to modify the properties of an existing trigger. To access this page, select a trigger type and click Edit then Edit Trigger from a trigger's item Action menu.
When a date is selected from the list, the Content Date metadata fields are automatically prefixed with an 'x', and the Folder Date metadata fields are prefixed with a 'd'.
| Element | Description |
|---|---|
| Security Group | The security group allowed access to the trigger. Required.
This field is only displayed if default security is enabled on the Configure Retention Settings Page. Default: RecordsGroup |
| Account | An account allowed access to the trigger. This field is only displayed if accounts are enabled. |
| Filer/Author | The author of the trigger. Select the author from the options list if you are not the author. Default: Current user. This field is only displayed if default security is enabled. Required. |
| Trigger Name | A name for the trigger that appears in the Disposition Rule Page. If this is an indirect trigger, the name appears in the Recurring Custom Triggers section. Maximum characters: 100. This field is view-only on the edit page. Required. |
| Brief Description
(Custom direct triggers only) |
A brief description of the trigger. Maximum characters: 100. Required. |
| Content Date Field(s)
(Custom direct triggers only) |
One or more date-related content fields. Maximum characters: 100.
The New Revision Date option in the list is available only if the Enable New Revision Date Trigger Field option was selected during configuration. With this date field selected, whenever a new revision of a content item is checked in, all revisions of the content item, including the latest one, are stamped with the date of the new revision. With this functionality retention rules such as "Delete if not updated in x number of years" can be created. |
| Folder Date Field(s)
(Custom direct triggers only) |
One or more record folder date fields. All folder date fields are available, including any custom date fields. Maximum characters: 100. |
| Enabled box (Global triggers only) | Activates or disarms the trigger. To disable the trigger, clear the box. Default: Enabled. The trigger is active according to the set activation date. |
| Activation Date
(Global triggers only) |
The date when a trigger is activated. If no date is entered, an enabled trigger is delayed indefinitely (it is a dormant trigger). An activation date can be entered at a later time. |
| Synchronize on Period Start Date | When checked, indicates that the start date should be used to synchronize the trigger. This is similar to a cutoff disposition action. For example: if a disposition is "After activate wait 1 month then delete", if a record is activated on 1/15/10, then the system will synchronize to 1/31/10 and add 1 month before deleting. |
| Group and User Permissions | Select specific groups and users who can access the trigger. To select a group or user, type two asterisks (**) in the entry line. A list of groups and users is displayed. Select an item from the list and click Add. The name is inserted into the Group Permission or User Permission box.
To further refine permissions, click on a displayed permission to add or remove it from the listed user or group. To remove a group or user, click the X next to the name. The name appears with a line through it, indicating it is no longer in use. |
This page is used to view information about existing triggers.
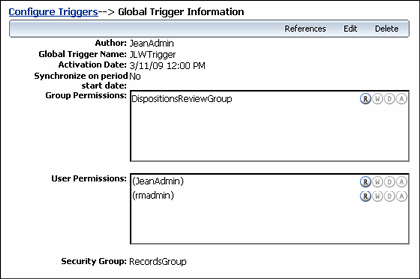
Similar pages are used to view information about Global Triggers, Custom Direct Triggers and Indirect Triggers. This section uses the Custom Direct Trigger interface pages as an example of these interface screens. In the field descriptions an indication is given as to where the field is used for specific trigger types.
Permissions:
Either the Admin.Triggers or Admin.RecordManager right is required to use this page. The Admin.Triggers right is assigned by default to the Records Administrator and Records Officer roles and the Admin.RecordManager right to the Records Administrator role.To access a Trigger information page, click the Info icon for the trigger on the Configure Triggers Page. Depending on the type of trigger viewed, different information will appear.
If you have the Admin.Triggers right, the page includes a menu which provides the following options:
Indirect Trigger Date Information (Indirect Trigger Information Page Only): Used to set recurring dates and periods for the indirect trigger.
Edit: Used to edit the current indirect trigger.
Delete: Used to delete the current indirect.
References: Enables the user to see trigger references.
Note:
You cannot edit or delete the built-in Audit Approval indirect trigger.Use the Indirect Trigger Date Entries Page to create, view information about, edit, and delete date entries for indirect triggers.

To access the page, click Trigger Dates Info in the Actions menu of an indirect trigger on the Configure Triggers Page.
Permissions:
The Admin.Triggers right is required to work with indirect trigger date entries. This right is assigned by default to the Records Administrator and Records Officer roles.| Element | Description |
|---|---|
| Trigger Period | The name of the trigger period. |
| Enabled | Specifies if the trigger date entry is enabled. |
| Trigger Period option list | A list of Trigger Periods from which a user can add, find information for, or delete. |
| Add button | Opens the Create or Edit Indirect Trigger Date Entries Page used to define the periods. |
Note the following considerations:
Click Add to define an indirect trigger date entry.
The Create or Edit Indirect Trigger Date Entries Page is displayed.
If trigger date entries are already defined, select one from the Trigger Period list, and click Info to view the date information.
Use the Create Page to define the trigger period, enable or disable the trigger, and set an activation date for an indirect trigger.
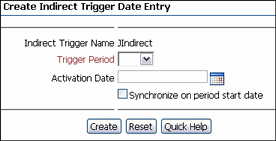
To access this page, click Records then Configure from the Top menu. Click Retention then Triggers. In the Indirect Trigger area, click Add.
Use the Edit Page to modify the properties of an existing indirect trigger date entry. To assess this page, click Edit from a trigger's item Action menu on the Configure Triggers Page.
Permissions:
The Admin.Triggers right is required to use this page. This right is assigned by default to the Records Administrator and the Records Officer roles.| Element | Description |
|---|---|
| Indirect Trigger Name | The name of the indirect trigger for which date are being set. This field is view-only on both the create and the edit pages. |
| Trigger Period | The name of the indirect trigger period for which dates are being set. This field is view-only on the edit page. |
| Activation Date | Activation date for the indirect trigger. |
The following screens are used when managing time periods:
This page is used to select a period for editing or to add a new period.
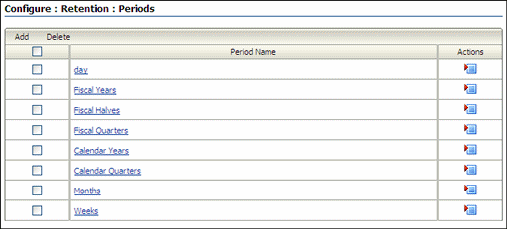
To access this page, click Records then Configure from the Top menu. Click Retention then Periods.
Use the Create Period page to define a new period and the Edit Period page to modify the properties of a time period.
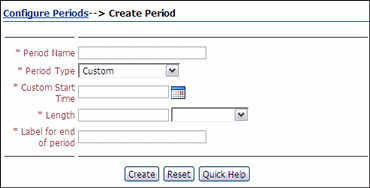
To access this page, click Add from the Configure Periods Page.
Use the Edit Period page to modify the properties of an existing period. To access this page, click Edit Period from the item's Action menu on the Configure Periods Page.
Permissions:
The Admin.RecordManager right is required to use this screen. This right is assigned by default to the Records Administrator role.| Element | Description |
|---|---|
| Period Name | The name appears in the Period options lists, such as the review period lists or retention period lists. Maximum characters: 30. This field is view-only on the edit page. Required. |
| Period Type | Required. The type of period:
|
| Custom Start Time | The start date and time for a custom period. The selected Period Type must be "Custom" to enable this field. Click the calendar icon to choose a date.
The date and time appear in the format according to user locale and system properties. The date and time can be edited within the text box. |
| Length box | Integer value for the length of the period. Required. |
| Length list | Required. The period length. Default: Blank. Available options are:
|
| Label for end of period | Label for the end of the period. The label appears in the Triggering Event ("After") fields in dispositions. Maximum characters: 30. Required. |
Use this page to view information about a period.

Permissions:
Either the Admin.Triggers or Admin.RecordManager right is required to use this page. The Admin.Triggers right is assigned by default to the Records Officer and Records Administrator roles and the Admin.RecordManager right to the Records Administrator role. With the Admin.Triggers right, you can only view information about periods. With the Admin.RecordManager right, you can also add, edit, and delete periods.To access this page, click a period name on the Configure Periods Page.
The Built-in label indicates if a period was a predefined, out-of-the box period. A period created by an administrator always displays "No" for the Built-in label. If a period is a built-in period, the Edit option is not displayed on the page because a user cannot edit a predefined period. The Actions list is not available to any users other than those with the Admin.RecordManager right.
This page is used to view those objects which reference a particular period.
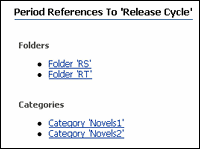
To access this page, click Reference on the Period Information Page.
The following screens are used to set up custom metadata:
This page displays the tables used to store metadata.
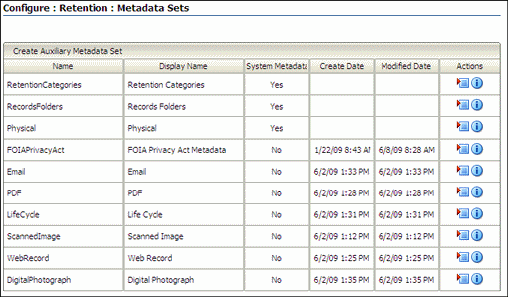
To access this page click Records then Configure from the Top menu. Click Metadata then Metadata Sets.
Click Create Auxiliary Metadata Set to create a new set. To add fields to an existing metadata set, click Update Fields from the Action menu for the set.
| Element | Description |
|---|---|
| Name | The name of existing metadata sets to which a user can add fields. If an auxiliary metadata set has not been created, this page is empty. |
| Table Name | The table in which a user can create new fields. If creating auxiliary metadata fields, this lists the tables previously created. |
| Individual Actions Menu | When creating standard metadata sets, this menu contains two options:
If creating an auxiliary metadata set, a third option is available for existing sets:
|
This page displays any previously created metadata fields and is used to add new fields.

To access this page click Field Information in the Action menu of a set on the Metadata List Page.
See "Create or Edit Auxiliary Metadata Set Page" for details about the information on this screen.
Use this page to create or edit a custom metadata field for a retention category, folder or physical content.
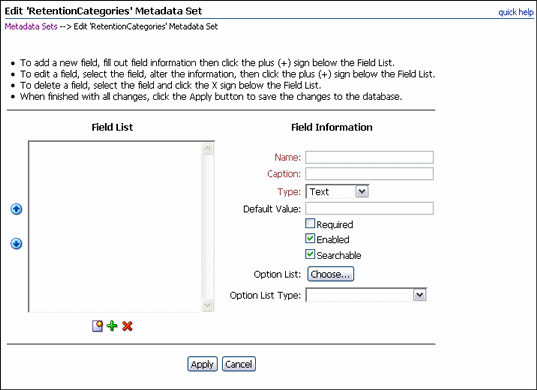
To access this page, click Update Fields in the Action menu of a set on the Metadata List Page.
Permissions:
The Admin.RecordManager right or PCM.Admin.Manager right is required to perform this action. This right is assigned by default to the Records Administrator and PCM Administrator roles. The user must also have administrative privileges.| Element | Description |
|---|---|
| Name | A unique name for the field in the database. Maximum characters: 30. Required.
Restricted characters: spaces, tabs, line feeds, carriage returns, semi-colon (;) caret (^), question mark (?), colon (:), at-sign (@), ampersand (&), plus sign (+), double-quote ("), pound or hash sign (#), percent sign (%), less than sign (<), asterisk (*), tilde (~), pipe (|), or dash (-). |
| Caption | A caption for the field displayed on the user interface. Maximum characters: 30. Required. |
| Type | The data type for the field.
|
| Default Value | Default value for an Option List, Text, or Long Text field. Maximum characters: 30. |
| Required | Specifies if the custom metadata field is required or optional. Select the box to make the field required. |
| Enabled | Specifies if the field is enabled on Oracle UCM pages. Select the box to enable the field. |
| Searchable | Specifies if the field is indexed in the database and searchable by end users. Select the box to make it searchable. |
| Option List Key | Specifies the field used for the option list. Use the Choose button to select a key from the displayed list. An option list must be created and populated before it can be used. |
| Option List Type | The type of option list, selected from the menu. |
| Field List | Displays the captions for fields already created. To create a new field, enter the field information and click the Add button (plus symbol). To delete a field, highlight the field and click the Delete button (an X). |
| Ordering Buttons | Arrows used to change the field order. To change the order, highlight the field and select either the Up or Down arrow. |
Use this page to create or edit auxiliary metadata sets or fields in a previously created set.
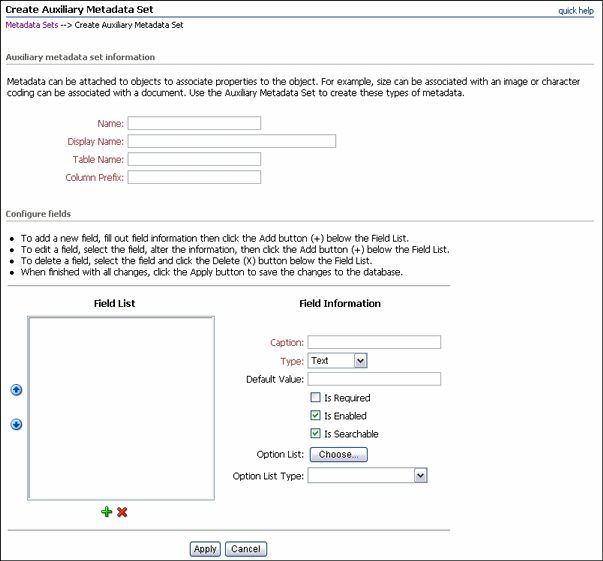
To access this page, click Create Auxiliary Metadata Set from the Metadata List Page. To add fields to a current set, click Update Fields from the Action menu of the metadata set on the Metadata List Page.
Permissions:
The Admin.RecordManager right or PCM.Admin.Manager right is required to perform this action. This right is assigned by default to the Records Administrator and PCM Administrator roles. The user must also have administrative privileges.| Table Information Section | Description |
|---|---|
| Name | A unique name for the metadata set. Maximum characters: 30. Required.
Restricted characters: spaces, tabs, line feeds, carriage returns, semi-colon (;) caret (^), question mark (?), colon (:), at-sign (@), ampersand (&), plus sign (+), double-quote ("), pound or hash sign (#), percent sign (%), less than sign (<), asterisk (*), tilde (~), pipe (|), or dash (-). |
| Description | A caption for the metadata set. Maximum characters: 30. Required. |
| Table Name | The name of the table in the database. Required. |
| Field Information Section | Description |
|---|---|
| Name | A unique name for the field in the database. Maximum characters: 30. Required.
Restricted characters: spaces, tabs, line feeds, carriage returns, semi-colon (;) caret (^), question mark (?), colon (:), at-sign (@), ampersand (&), plus sign (+), double-quote ("), pound or hash sign (#), percent sign (%), less than sign (<), asterisk (*), tilde (~), pipe (|), or dash (-). |
| Caption | A caption for the field displayed on the user interface. Maximum characters: 30. Required. |
| Type | The data type for the field.
|
| Default Value | Default value for an Option List, Text, or Long Text field. Maximum characters: 30. |
| Required | Specifies if the custom metadata field is required or optional. Select the box to make the field required. |
| Enabled | Specifies if the field is enabled on Oracle UCM pages. Select the box to enable the field. |
| Searchable | Specifies if the field is indexed in the database and searchable by end users. Select the box to make it searchable. |
| Option List Key | Specifies the field used for the option list. Use the Choose button to select a key from the displayed list. An option list must be created and populated before it can be used. |
| Option List Type | The type of option list, selected from the menu. |
| Field List | Displays the captions for fields already created. To create a new field, enter the field information and click the Add button (plus symbol). To delete a field, highlight the field and click the Delete button (an X). |
| Ordering Buttons | Arrows used to change the field order. To change the order, highlight the field and select either the Up or Down arrow. |
This page displays information about previously created fields.
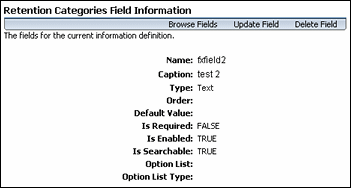
To access this page, click a field name on the Fields for Metadata Page. Use this page to browse all created fields, to update the field, or to delete the field.
The following screens are used when managing dispositions and freezes:
The following screens are used when managing dispositions:
This page is used to access any previously configured dispositions and to add new dispositions.

To access this page, click Records then Configure from the Top menu. Click Disposition Actions then Custom.
Use the Create Page to define a new custom disposition action and the Edit Page to modify an action.
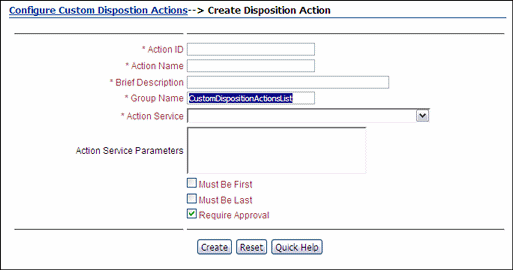
To access this page, click Add from the Configure Dispositions Page.
Use the Edit Page to modify the properties of an existing custom disposition action. To access this page, click Edit Action from the disposition's Item Actions menu on the Configure Dispositions Page.
Permissions:
The Admin.CustomDispositionActions right is required to use this page. This right is not assigned by default to any of the predefined roles, which means you must assign it to a role before this functionality is exposed.| Element | Description |
|---|---|
| Action ID field | A unique name for the custom disposition action. Maximum characters: 30. This field is view-only on the edit page. Required. |
| Action Name field | A name for the custom disposition action. The name is shown in the list of available disposition actions. Required.
Maximum characters: 30. |
| Brief Description field | A description of the custom disposition action. Maximum characters: 100. Required. |
| Group Name field | The heading name where the custom disposition action is grouped in the list of available disposition actions on the Disposition Rule Page. Required.
The default value for this field is wwOptGroupLabelCustomDispositionActionsList in the ww_strings.htm file, which is set to "Custom Actions" by default. To use a different group name than "Custom Actions," modify the string value in the resource file and restart the Content Server. Do not change the suggested default value in the Group Name field. |
| Action Service field | The service to be used for the custom disposition action. Contact Consulting Services for assistance with setting up custom disposition actions. |
| Action Service Parameters field | The parameter(s) to be used for the selected action service. |
| Must Be First box | Specifies that the custom disposition action can only be used as the first action in a disposition instruction. |
| Must Be Last box | Specifies that the custom disposition action can only be used as the last action in a disposition instruction. |
| Require Approval box | If checked, approval is required for the disposition action to be performed.
Default: selected. Approval is required for the disposition action to be performed. |
The Disposition Action Info Page displays the current characteristics of the selected custom disposition action.
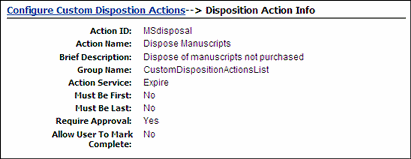
To access this page, click a disposition name on the Configure Dispositions Page.
Use this page to set what dispositions actions are disabled and unavailable for use.
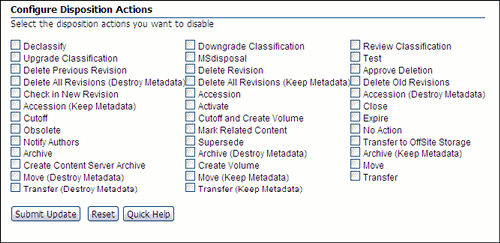
This page lists all dispositions, including custom dispositions. The page depiction here may vary from because available dispositions are dependent on the type of configuration performed (Chapter 2, Chapter 2 and 4, and so on).
To access this page, click Records then Configure from the Top menu. Click Disposition Actions then Disable. This page displays the actions which can be disabled.
The following screens are used when managing freezes;
This page is used to add new freezes or to access previously created freezes for editing or deletion.

To access this page, click Records then Configure from the Top menu. Click Retention then Freezes.
Use the Create Page to define a new freeze and the Edit Page to modify a freeze.
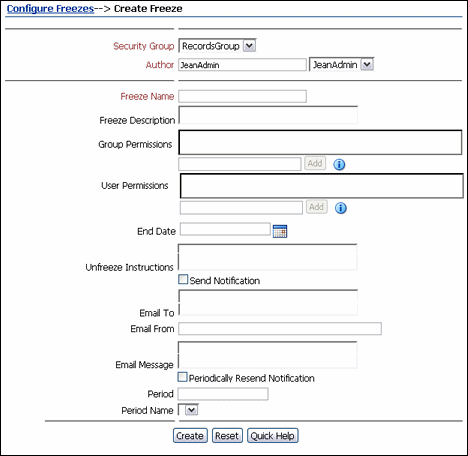
To access this page, click Add on the Freeze Configuration Page.
Use the Edit Page to modify the properties of an existing freeze. To access this page, click Edit then Edit Freeze on a freeze's Item Actions menu on the Freeze Configuration Page.
Permissions:
The Admin.RecordManager right is required to use this page.Security Group list, Filer, Group Permissions, the Select button (Group Permissions), User Permissions, Select button (User Permissions) are only displayed if specific security settings are enabled on the Configure Retention Settings Page.
The Freeze Information Page displays the characteristics of the selected freeze.
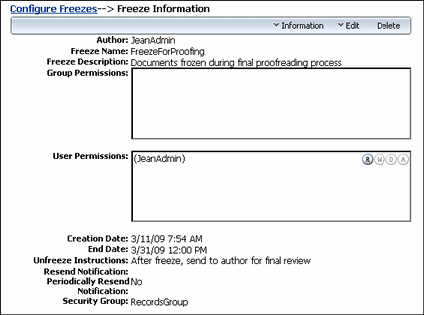
To access this page, click a freeze name on the Freeze Configuration Page.
This page shows the current properties of the selected freeze.
Edit: Used to edit the current freeze, unfreeze the freeze, or alter the notification.
Delete: Used to delete the current freeze.
Important:
You cannot delete a freeze if that freeze is currently applied to any content items. If you try, an error message is displayed.Information: Used to perform the following searches:
Screen Frozen Content: Used to display a list (see Frozen Item Page) of content items frozen with the current freeze. The list does not include any frozen content that inherited its freeze status from the parent record folder.
Screen All Frozen Content: Used to display a list (see Frozen Item Page) of all content items frozen with the current freeze. The list also includes all frozen items that inherited their freeze status from their parent folders.
Screen Frozen Folders: Used to display a list (see Frozen Item Page) of folders frozen with the current freeze. The list does not include any frozen folders that inherited their freeze status from their parent folders.
Screen All Frozen Folders: Used to display a list (see Frozen Item Page) of all folders frozen with the current freeze. The list includes all frozen folders that inherited their freeze status from their parent folders.
Permissions:
The Screen... options are available only if you have the Admin.Screening right.This page displays a list of the content items or folders frozen with the current freeze.

To access this page, click Information then the screening type from a freeze on the Freeze Configuration Page.
Permissions:
The Admin.RecordManager right and Admin.Screening right is required to use this page.If the generated report file is in PDF format, Adobe Acrobat version 6.0 or later is required to view it.
The following screens are used to manage dispositions:
Use the Disposition Instructions Page to add, edit, and delete disposition instructions for a retention category.
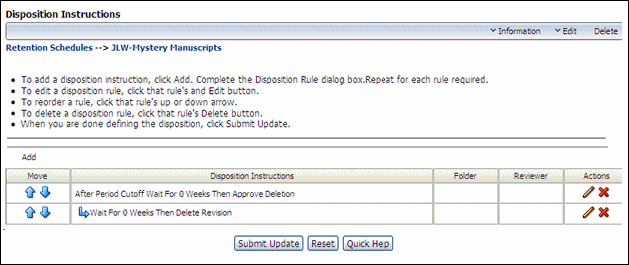
To access this page, browse through content at the series level for the retention category. In the row for the retention category, click Edit then Edit Disposition from the item's Action menu.
This page is also displayed when a retention category is initially created. At the top of the page, there are bulleted instructions to assist the user with its basic use.
| Element | Description |
|---|---|
| Disposition instructions box | Displays any defined disposition instructions for the retention category. |
| Up or Down button | Up arrow or Down arrow. Moves a selected disposition rule upward or downward one row with each click. |
| Add button | Opens the Disposition Rule Page, where a new disposition rule can be defined. |
| Edit icon | Pencil icon (Edit). Opens the Disposition Rule Page for the disposition rule selected within the Disposition Instructions box. |
| Delete icon | Red "X" (Delete). Deletes the disposition rule selected within the Disposition Instructions box. |
| Submit Update button | Submits the updates. |
| Reset button | Resets the page to the initial default settings. If on an editing page, reset returns the original settings. |
Use the Disposition Rule page to define or edit disposition rules for a retention category.
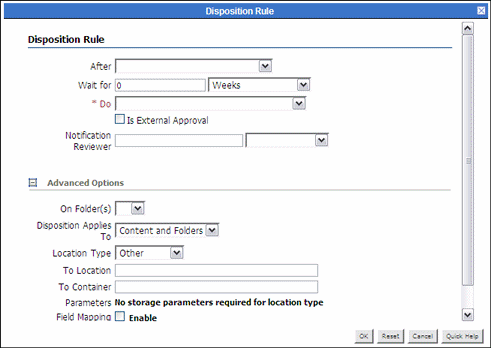
To access this screen, click the Edit icon (a pencil) for the disposition to edit or click Add to create a disposition on the Disposition Instructions Page.
Depending on the captions settings in the Configure Retention Settings Page page, there are two views of this screen: user-friendly captions for ease in reading disposition instructions and standard captions for those organizations accustomed to disposition language.
Tip:
If you want the specified notification reviewer to be the only user who receives e-mail notifications for the events triggered by the disposition rule (and not the category author as well), make sure the records_management_environment.cfg configuration file contains the following line:RmaNotifyDispReviewerAndCatAuthor=false. Restart the Content Server for this setting to take effect.Use this page to view information about disposition instructions for a retention category. The Records Administrator can configure the disposition rules to display standard or user-friendly captions by toggling the captions setting on the Configure Retention Settings Page page.

To view this page, click Browse Content then Retention Schedules. The Exploring Series "Retention Schedule" Page is displayed. Navigate to the appropriate retention category.
Click Information then Disposition Information from the item's Actions menu or click Information then Disposition Information from the Page menu on the Retention Category Information Page.
Permissions:
Anyone with the Category.Read rights can view information disposition information for a retention category. All predefined roles have this role by default. To edit or delete disposition rules, the Category.Edit or Category.Delete rights are required.The following screens are used when configuring and using the UCM Adapter.
This page is used to register the external Adapter source.
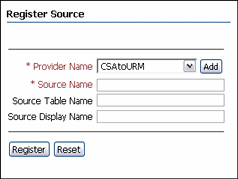
To access this page, click Records then UCM Adapter from the Top menu. Click Configure then Source Registration.
Note:
You can only register one source per Adapter instance. If you need to change the configuration settings of the registered source, you must delete (unregister) the current source and register a new source.| Element | Description |
|---|---|
| Provider Name field | The name of the outgoing provider that was configured for communication between the Adapter server and the Oracle URM server. |
| Source Name field | The name of the Oracle URM source to be created on the Oracle URM server. |
| Source Display Name field | The descriptive name used to identify the Oracle Oracle URM Adapter source. It is displayed on the Search page on the Oracle UCM server. |
| Source Table Name field | The prefix of the database tables that are created for the Oracle URM source. |
| Register button | Registers the Oracle URM Adapter with Oracle URM. Registration ensures that Oracle URM is aware of the Adapter and is ready to manage the stored content in the Adapter server's repository. |
| Reset button | Clears any populated fields on the screen and resets the screen fields to their initial default settings. |
Use this page to define the outgoing provider that enables the Adapter server to connect to the Oracle URM server.
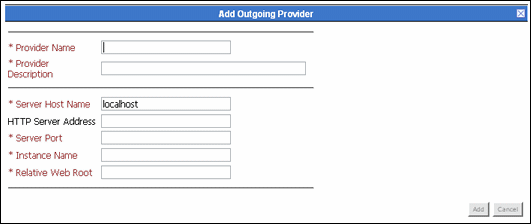
To access this page, click Add on the Register Source Page.
This page is an abbreviated version of the full Outgoing Providers page. See the Oracle Fusion Middleware System Administrator's Guide for Content Server for details about using that page.
Important:
TheIntradocServerPort configuration variable must be set to 4444 (or any other arbitrary number) on Oracle URM in the config.cfg file. This can be done during installation of Oracle URM, but it may be overlooked.| Element | Description |
|---|---|
| Provider Name field | The name of the outgoing provider for the Adapter server.
Do not use special characters or hyphens in the outgoing provider's name. |
| Provider Description | A description of the provider. |
| Server Host Name field | The server host name of the instance on the Oracle URM server. |
| HTTP Server Address | The URL of the instance on the Oracle URM server. |
| Server Port field | The port on which the provider communicates with the instance on the Oracle URM server. |
| Instance Name field | The instance name on the Oracle URM server. |
| Relative Web Root field | The relative web root of the instance on the Oracle URM server |
| Add button | Saves the configuration settings and adds the outgoing provider to the Oracle UCM's Providers table. |
| Reset button | Clears any populated fields on the screen and resets the screen fields to their initial default settings. |
This screen shows the providers that have been configured for the system.
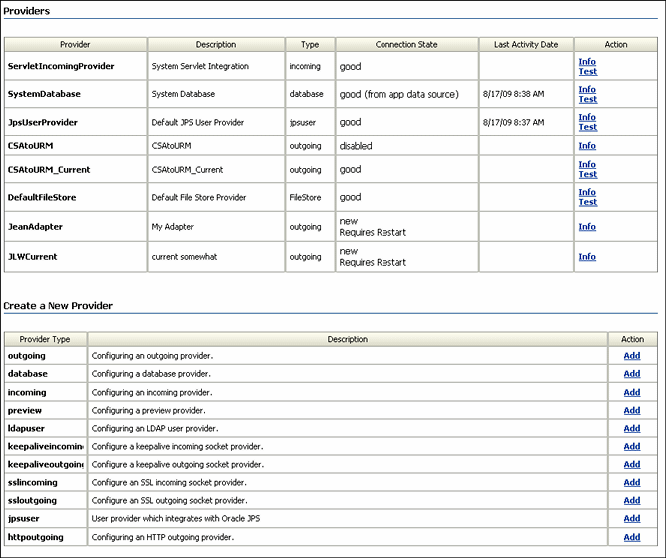
To access this page, click Administration then Providers from the Main menu.
The top half of this page displays the currently configured providers. The bottom half can be used to add a new provider. See the Oracle Fusion Middleware System Administrator's Guide for Content Server for details about using this page.
| Element | Description |
|---|---|
| Provider Name | The name of the outgoing provider for the Adapter server.
Do not use special characters or hyphens in the outgoing provider's name. |
| Provider Description | A description of the provider. |
| Type | The designated type of provider. |
| Connection State | The status of the connection. |
| Last Activity Date | The date of the last activity with that provider. |
| Action | Links to display the information page for the provider or to test the connection. |
This page lists information about an outgoing provider.
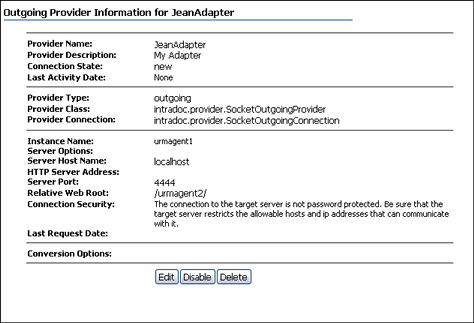
To access this page, click Administration then Providers from the Main menu. Click the Info link next to an outgoing provider.
This page displays information about a registered source.
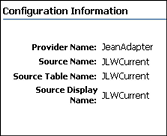
To access this page, click Records then UCM Adapter from the Top menu. Click Configuration Information.
This page is used to create and define custom metadata fields for the Oracle URM source.
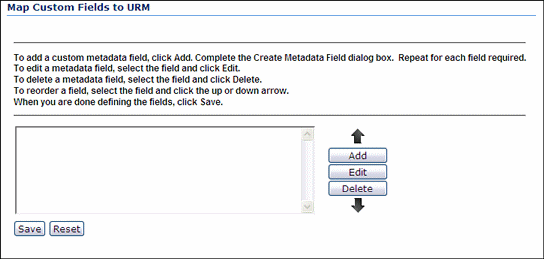
This page is displayed when a souce is first registered. It can also be accessed by clicking Records then UCM Adapter. Click Configure then Custom Fields.
| Element | Description |
|---|---|
| Custom metadata fields pane | Lists the available custom metadata fields that can be edited or deleted, as necessary. |
| Add button | Displays the Map/Edit Custom Field Dialog which is used to create new custom metadata fields. |
| Edit button | Displays the Map/Edit Custom Field Dialog for an existing custom metadata field and enables a user to modify the settings. |
| Up/down arrows | Used to adjust the specific placement order of the selected custom metadata field. The position of each custom field in the list is relevant to its priority on the Item Information page. |
| Save button | Saves the configured settings. |
| Reset button | Clears any populated fields on the screen and resets the screen fields to their initial default settings. |
This dialog is used to add a custom metadata field for use with the UCM Adapter.

This dialog is displayed when a user clicks Add or Edit on the Map Custom Fields Page.
| Elements | Description |
|---|---|
| Internal Name list | Lists the Adapter's available custom metadata fields that can be mapped to Oracle URM custom metadata fields.
A user can either select a metadata field in the list or enter a different name. If entering a new name, the Adapter automatically creates a corresponding custom metadata field for the name. |
| Name field | Enter the name of the custom metadata field to be created. |
| Caption field | The descriptive name of the Oracle URM custom metadata field that is displayed on the Item Information page in Oracle URM. |
| Add button | Saves the settings and adds the new Oracle URM custom metadata field to the list on the Map Custom Fields Page. |
| Cancel button | Clears any populated fields on the screen and resets the screen fields to their initial default settings. |
This page is used to schedule synchronization activities for the Adapter.
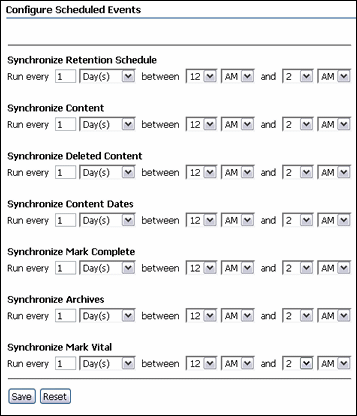
To access this page, click Records then UCM Adapter from the Top menu. Click Configure then Scheduled Events.
| Elements | Description |
|---|---|
| Synchronization choices | Each section of this screen displays items which can be synchronized. |
| Synchronization schedule | Select the time period for the synchronization from the menu list. |
| Synchronization time | Select the time of day for the synchronization. |
This page displays information about synchrnoization activities.

To access this page, click Records then UCM Adapter from the Top menu. Click Logs then the log type. The example displayed here is a log for an Archive operation.
Important:
Revisioning of external items differs from revision of items stored on Content Server. For example, if an item is created on the adapter system and is synchronized to Oracle URM, it appears as a single item. However, if that item is revised on the adapter system then synchronized to Oracle URM, the item now appears in the category as two items, not one item with two revisions. Both items have the same content ID, which is the default behavior for external items.The following screens are used to create and edit custom reports. This functionality is not available by default. It must be enabled by adding the Rma.Admin.Customization right to a user's rights.
Use this page to set up reports for retention items, chargebacks, and other functionality. The settings on this page affect report formatting for internal, record, and physical reports. Note that users can set a report format preference on the user profile page. That preference takes precedence over the format specified here.
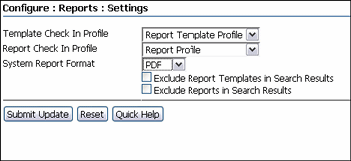
Permissions:
The Admin.RecordManager right is required to use this page. This right is assigned by default to the Records Administrator role.To access this page, click Records then Configure from the Top menu. Click Reports then Settings. Note that this is used to create Records reports as well as Physical Item reports. In previous versions of this software, Physical reports were accessed on a separate menu.
The following options appear on this screen.
| Element | Description |
|---|---|
| Template Check In Profile | Choose a profile to use for the template when it is checked in. |
| Report Check In Profile | Choose a profile to use when the report is checked in. |
| System Report Format | Choose the default format for reports. |
| Exclude Report Templates in Search Results | Check this box to exclude templates from search activities. This box is available for selection only if the Enable Report Exclude Search Options box is checked on the Configure Retention Settings Page. |
| Exclude Reports in Search Results | Check this box to exclude reports from search activities. This box is available for selection only if the Enable Report Exclude Search Options box is checked on the Configure Retention Settings Page. |
This screen is used to configure different aspects of reports, including templates, report data, and so on. The image shown here is that used to choose a type of report to configure.
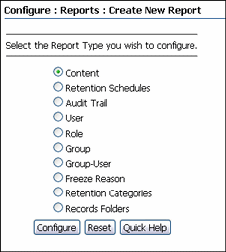
Permissions:
The Rma.Admin.Customization right is required to perform this task. This right is not assigned by default to any of the predefined roles, which means you must assign it to a role before this functionality is exposed.To access this page, click Records then Configure from the Top menu. Click Reports then one of the report options, discussed in the following text.
The screen used for physical content is similar, used to create reports for storage, reservations, invoices, transactions, and so on.
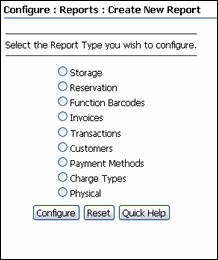
To access this page, click Physical then Configure then Reports from the Top menu. Then choose a report option:
Create New Report: used to start the process of creating a new report. This option displays a Report Checkin Page, used to save the report name and save other detailed report information.
Report Sources: displays the Configure Report Sources Page, used to choose the criteria to gather data for the report.
Templates: displays a search results page listing templates that can be used for reports.
Download BI XML Data: opens a dialog box where a user can choose to open the XML data used for the reports or save the data.
After choosing a report option, the Configure Report Element Page is displayed. Choose the type of report to create.
This page is used to check in a new report and add pertinent information about that report. The screen here shows a portion of the checkin page that pertains to reports.
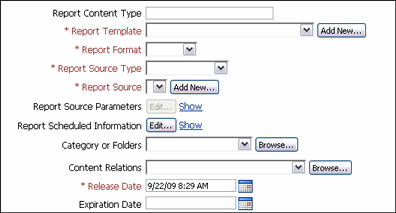
To access this page, click Records then Configure from the Top menu. Click Reports then Create New Report. Choose the type of report to create then click Configure.
| Element | Description |
|---|---|
| Report Template | Choose a template from the dropdown list or click Add New to create a new template. |
| Report Format | Choose a format for the report from the dropdown list. Note that when creating a report for barcodes, the user must choose PDF as the report type. |
| Report Source Type | Choose the type of source to use to gather the data for the report. Options include:
If Services or Query are chosen, the correct service or query must be used to work with the template. A dynamic query will gather the appropriate data for use. |
| Report Source | Choose a source for the data or click Add New to create a new source using the Configure Report Sources Page. |
This page shows templates that can be used for the report or which can be copied and edited for a new template.
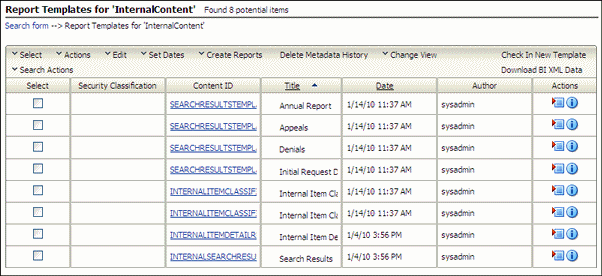
This page shows all current templates. To access this page, click Records then Configure from the Top menu. Click Reports then Templates. Choose a template type then click Configure.
| Element | Description |
|---|---|
| Select | A checkbox used to select a template file for use. |
| Security Classification | Classification associated with a template. |
| Content ID | The content ID of the template file. |
| Title | The template title. |
| Date | The date the template file was created or modified. |
| Author | The author of the file. |
| Actions | Actions which can be taken using the specified template file. These include checking in a similar file, checking out this file, retrieving the native file for use, or viewing the metadata history of the file. |
The Table menu on this page can be used to perform actions for all template files or only selected files. The options shown depend on the configuration of the system nand the permissions of the user accessing the page.
Select: allows the selection of all items or the deselection of items.
Actions: used to add items to a Content Basket or to a folio.
Edit: used to freeze or unfreeze selected items.
Set Dates: used to mark dates associated with items such as review dates, rescind dates, and other action dates.
Create Reports: used to create a report using a specified template.
Delete Metadata History: used to clear the metadata history changes.
Change view: used to change the way search results are displayed.
Search actions: used to save the search under a search name.
This page is used to choose queries and service calls to gather data for the report.
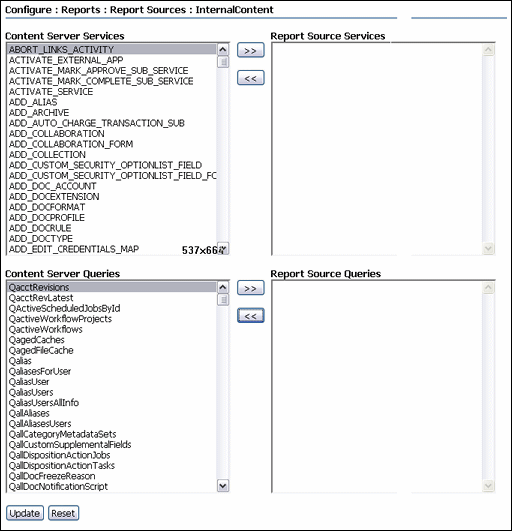
Important:
Creating custom report sources requires in-depth technical knowledge of services and queries. Contact Consulting Services for further assistance if needed.To access this page, click Add New on the Report Checkin Page or click Records then Configure from the Top menu. Click Reports then Report Sources. A user can also access this page by clicking Physical then Configure then Reports then Report Sources from the Top menu.
To use this screen, highlight a query or a service on the left side of the screen. Click the right arrow to move the query or service to the right column for use.
To remove a query or service from use, highlight the name and click the left arrow to move the item to the left column.
Click Update when done.
The XML Data Dialog opens when the user elects to download an XML data file.
This file appears after clicking Configure on the Configure Report Element Page after choosing to download XML data.
To view the file, click Open With and choose a browser type from the pulldown menu. To save the file, click Save File. A window opens with a prompt to save the file. Choose a filename and file location for the data and click OK.
To use one method (save or open) as the default, click the checkbox next to the Do this automatically... prompt.