| Oracle® Fusion Middleware System Administrator's Guide for Content Server 11g Release 1 (11.1.1) Part Number E10792-01 |
|
|
View PDF |
| Oracle® Fusion Middleware System Administrator's Guide for Content Server 11g Release 1 (11.1.1) Part Number E10792-01 |
|
|
View PDF |
This section includes user interface illustrations and reference descriptions for managing security and user access.
The following are the main screens used when managing security:
The User Admin application is an administration application used to set up and manage users, security groups, and accounts. You can run this application by accessing it using the browser interface or in standalone mode.
To access this screen, click Administration, then Admin Applets, then User Admin.
If you run the User Admin application by accessing it in standalone mode, it might cause ADSI authenticated users to lose their credentials.
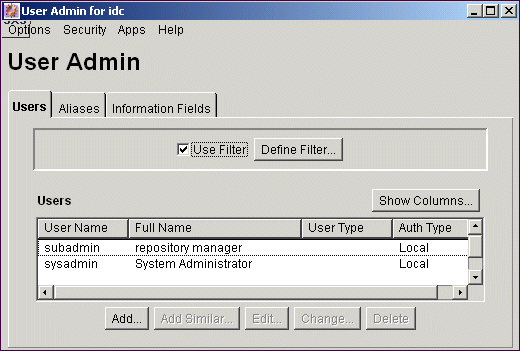
| Element | Description |
|---|---|
| Options menu | Tracing: Opens the Tracing Configuration screen, from which you can perform features related to system-wide tracing.
Exit: Closes the User Admin application. |
| Security menu | Displays options to set:
Permissions by Group: Displays the Permissions By Group Screen. Permissions by Role: Displays the Permissions By Role Screen. Predefined Accounts: Displays the Predefined Accounts Screen. This option is available only if accounts are enabled. |
| Apps menu | Used to open other administration applications. The other applications open in the same mode (applet or standalone) as the current application. |
| Help menu | Contents: Displays the Content Server online help.
About Content Server: Displays version, build, and copyright information for the Content Server. |
| Users tab | Used to add, edit, and delete user logins. See the User Admin Screen: Users Tab. |
| Aliases tab | Used to add, edit, and delete user aliases. See the User Admin Screen: Aliases Tab. |
| Information Fields tab | Used to add, edit, and delete user information fields. See the User Admin Screen: Information Fields Tab. |
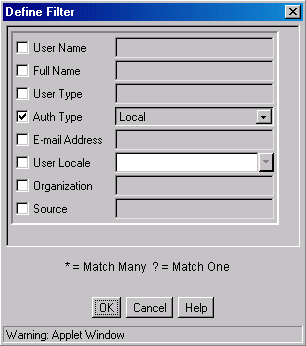
The Define Filter screen is used to narrow the list of information that is displayed on several administration application screens. The Define Filter screen displays a series of fields that are applicable to the administration application screen. Check the box next to the field to activate that field as a filter.
This screen can be accessed from a variety of other administration screens. For example, a Define Filter button is displayed on the Users tab part of the User Admin screen.
| Element | Description |
|---|---|
| Check boxes | Select one or more check boxes to activate the filter fields. |
| Fields | The Users list on the original screen will be filtered based on the criteria entered. The following wildcards can be used in these fields:
|
| User Name field | The user login. |
| Full Name field | The full name that corresponds to the user login. |
| User Type field | An attribute defined by the system administrator as a way to classify users. |
| Auth Type field | User authorization type, either Local, Global or External. |
| E-Mail Address field | The e-mail address associated with the user. This is used for workflow and subscription notifications. |
| User Locale field | The user's locale, which specifies the language of the user interface and date/time format. |
| Organization field | The user's Organization Path value, which can be defined by the system administrator as a way of classifying global users. |
| Source field | The LDAP user provider used to retrieve user information. Also, this field specifies if the user came from an NTLM or ADSI integration with the value: MSN. |
| Custom fields | Any custom user information fields will be available as filter fields. |
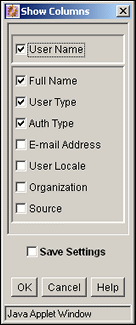
The Show Columns screen is used to specify the columns that are displayed on several administration application screens. The Show Columns screen displays a series of fields that are applicable to the administration application screens. Check the box next to a field to have that field displayed as a column in the administration screens.
This screen can be accessed from a variety of other administration screens. For example, a Show Columns button is displayed on the Users tab part of the User Admin screen.
| Element | Description |
|---|---|
| Check boxes | Selected: The field is displayed in the Users list on the original screen.
Clear: The field is not displayed on the Users list. See the Define Filter Screen for field descriptions. |
| Save Settings check box | Selected: The column settings are applied every time the original screen is displayed.
Clear: The column settings apply only until the original screen is closed.0 |
The following screens are used when creating groups and roles and establishing permissions:
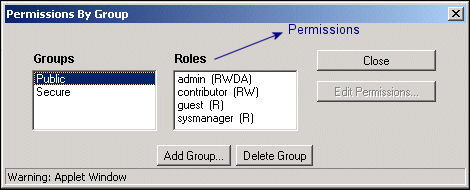
The Permissions By Group screen is used to add security groups, delete security groups, and edit permissions associated with existing security groups. To access this screen, select Security, and then Permissions by Group in the User Admin Screen.
Caution:
Security Group names cannot contain square brackets. This is due to limitations in the search engine technology.| Element | Description |
|---|---|
| Groups list | Lists existing security groups |
| Roles list | Lists the roles associated with existing security groups. |
| Edit Permissions button | Enables you to edit permissions for the security group. |
| Add Group button | Displays the Add New Group Screen. |
| Delete Group button | Enables you to delete an existing security group. (You will not be able to delete a security group if content still exists in that security group.) |
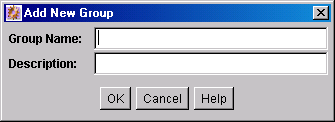
The Add New Group screen is used to define the name and description for a new security group. To access this screen, click Add Group on the Permissions By Group Screen.
| Element | Description |
|---|---|
| Group Name field |
|
| Description field | A brief description of the security group.
|
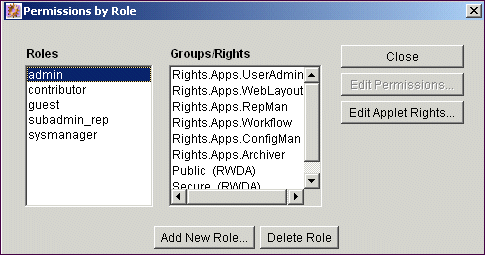
The Permissions By Role screen is used to add roles, delete roles, and edit rights and permissions associated with roles. To access this screen, click Security then Permissions by Role from the main menu on the User Admin Screen.
| Element | Description |
|---|---|
| Roles list | Lists existing roles. |
| Groups/Rights list | Lists the security groups and the rights associated with the selected role. |
| Edit Permissions button | Enables you to edit permissions for a security group and role. This button is available when you select a role and a group/right. |
| Edit Applet Rights button | Enables you to edit rights for the role. This button is available when you select a role. |
| Add New Role button | Displays the Add New Role Screen, on which you can set up a new role for users. Add the role name, and click OK. |
| Delete Role button | Enables you to delete the selected role. (You will not be able to delete a role if any users are assigned to that role.) |
The Add New Role screen is used to define the name of a new role. To access this screen, click Add New Role on the Permissions By Role Screen.

| Element | Description |
|---|---|
| Role Name field |
|
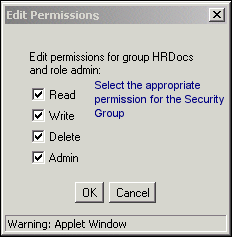
The Edit Permission screen is used to change permissions to a specific security group for a specific role. To access this screen, do one of the following:
In the Permissions By Group Screen, select a security group, select a role, and click Edit Permissions.
In the Permissions By Role Screen, select a role, select a security group, and click Edit Permissions.
The following screens are used when adding accounts.
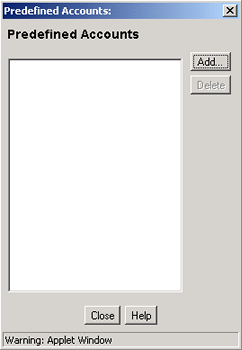
The Predefined Accounts screen is used to add and delete predefined accounts. This screen is available only when Accounts are enabled on the system. To access this screen, select Security, and then Predefined Accounts in the User Admin Screen.
| Element | Description |
|---|---|
| Predefined Accounts list | Shows the predefined accounts. |
| Add button | Displays the Enabling Accounts. |
| Delete button | Deletes the selected account.
You can delete an account even if content with that account still exists. The account value will remain assigned to the content item, but will be considered a user-defined account. |
The Add New Predefined Account screen is used to name a new predefined account. To access this screen, click Add on the Predefined Accounts Screen.

| Element | Description |
|---|---|
| Predefined Account field | Enter the name of the account to be added. Keep the names short and consistent. For example, set up all of your accounts with a three-letter abbreviation by location or department (MSP, NYC, and so no). Account names can be no longer than 30 characters, and the following are not acceptable: spaces, tabs, linefeeds, carriage returns, and the symbols: ; ^ ? : & + " # % < > * ~. |
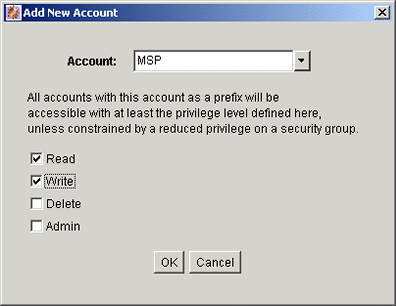
The Add New Account screen/Edit Permissions for Account Screen is used to assign account permissions to users. To access this screen, click Add or Edit on the Add/Edit User Screen: Accounts Tab.
| Element | Description |
|---|---|
| Account list | Select a predefined account from the list, or enter a user-defined account. |
| Permissions check boxes | Set the Predefined Permissions
that the user will have to the account. |
The following screens are used when creating and editing user logins and aliases.
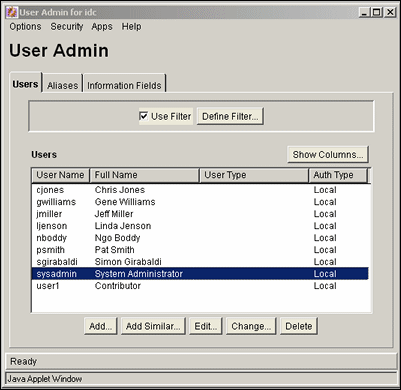
The Users tab of the User Admin screen is used to add, edit, and delete user logins. To access this tab, display the User Admin Screen.
| Element | Description |
|---|---|
| Use Filter check box | Select this check box to narrow the Users list as defined by the Define Filter Screen. |
| Define Filter button | Displays the Define Filter Screen. |
| Show Columns button | Displays the Show Columns Screen. |
| Users list | Shows the users that match the filter settings. Double-clicking a user displays the Add/Edit User Screen for that user. |
| Add button | Displays the Choose/Change the Authorization Type Screen. |
| Add Similar button | If you highlight a user and click Add Similar, the system displays the Add/Edit User Screen with some fields already populated. |
| Edit button | Displays the Add/Edit User Screen for the selected user. |
| Change button | Displays the Choose/Change the Authorization Type Screen for the selected user. |
| Delete button | Enables you to delete a user login. |
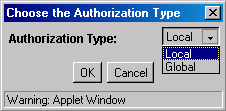
The Choose/Change the Authorization Type screen is used to specify the user authorization type when adding a new user or changing the authorization type for a selected user. To access this screen, either click Add on the User Admin Screen: Users Tab or select a user name in the User Admin screen Users tab and then click Change.
External users are created automatically when they are granted content server access using an external user repository. User passwords for external users granted content server access must be initially set by the administrator.
| Element | Description |
|---|---|
| Authorization Type list | The type of user.
Local: Users defined by an administrator or sub-administrator within the Content Server system. Administrators assign these users one or more roles, which provide the user with access to security groups. Undefined users are assigned the guest role. Global: Lightly-managed users. Both local and global user credentials can extend to multiple content servers. |
| OK button | Displays the Add/Edit User Screen: Info Tab (Local User) or the Add/Edit User Screen: Info Tab (Global User), depending on which Authorization Type is selected. |
The Add/Edit User screen is used to define user information, assign roles, and assign account permissions for a user. To access this screen, do one of the following:
On the User Admin Screen: Users Tab, click Add.
Select a user authorization type and click OK on the Choose/Change the Authorization Type Screen. The Add User screen is displayed.
Select a user and click Edit on the User Admin Screen: Users Tab. The Edit User screen is displayed.
The information that appears on this screen may be different than that on your system if custom metadata fields have been added. The fields shown in this screen shot are the defaults installed with Content Server.
The tabs visible on this screen depend on which type of user is selected and whether accounts are enabled:
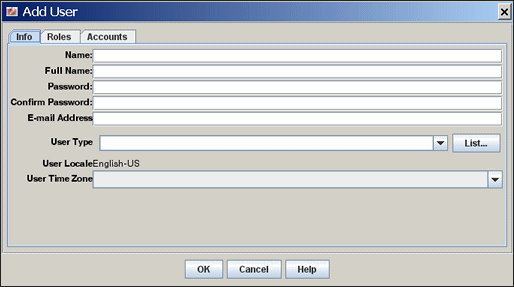
The Info tab of the Add/Edit User screen is used to add a user. To access this tab for a local user, do one of the following:
Select Local and click OK on the Choose/Change the Authorization Type Screen.
Select a local user and click Edit on the User Admin Screen: Users Tab.
| Element | Description |
|---|---|
| Name field | The name of the new user.
|
| Full Name field | The entire name of the new user. This field has a 50-character limit. |
| Password field | The password for the new user login.
|
| Confirm Password field | Reenter the password from the previous field to confirm the spelling. |
| E-mail Address field | The e-mail address associated with the user. This is used for workflow and subscription notifications. |
| User Type list | Select a user type from the list of attributes which can be defined by the system administrator as a way to classify users. |
| List button | Displays the Option List Screen. |
| User Locale field | The user's locale, which specifies the language of the user interface and date/time format. Locale options must be enabled by the system administrator.
If you change the user locale for a user who has the sysmanager role, you must restart the Admin Server service for the Admin Server interface to appear in the user's locale language. |
| User Time Zone field | Select a user time zone from the menu. |
The Info tab of the Add/Edit User screen is used to add a user. To access this tab for a global user, do one of the following:
Select Global and click OK on the Choose/Change the Authorization Type Screen.
Select a global user and click Edit on the User Admin Screen: Users Tab.
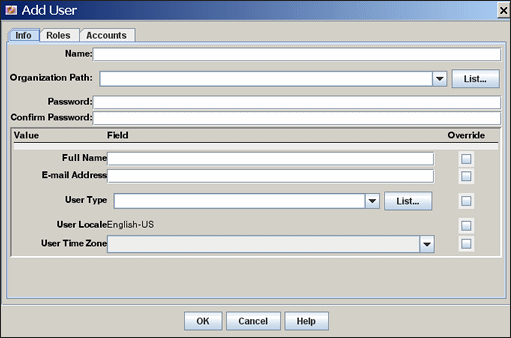
| Element | Description |
|---|---|
| Name field | The name of the new user. This field has a 50-character limit. |
| Organization Path list | A list that can be defined by the system administrator as a way of classifying users. |
| List button | Displays the Option List Screen. |
| Password field | The password for the new user login. This field has a 50-character limit. |
| Confirm Password field | Reenter the password from the previous field to confirm the spelling. The same limit applies. |
| Full Name field | The entire name of the new user. This field has a 50-character limit. |
| E-mail Address field | The e-mail address associated with the user. This is used for workflows and subscriptions. |
| User Type field | A list of attributes that can be defined by the system administrator as a way to classify users. |
| User Locale field | The user's locale, which specifies the language of the user interface and date/time format. Locale options must be enabled by the system administrator.
If you change the user locale for a user who has the sysmanager role, you must restart the Admin Server service for the Admin Server interface to appear in the user's locale language. |
| User Time Zone field | Select a user time zone from the menu. |
| Override check boxes | These settings apply only if the user is changed from a global user to an external user, or if user information is automatically assigned by a custom plug-in to the content server.
Selected: The user information assigned in the Add/Edit User screen overrides any externally assigned user information (such as user attributes from an LDAP server). Clear: The user information assigned in the content server is overridden by any externally assigned user information. |
The Roles tab of the Add/Edit User screen is used to assign roles to a user. To access this tab, click Roles on the Add/Edit User Screen.
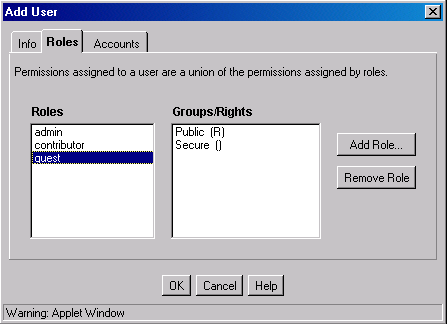
| Element | Description |
|---|---|
| Roles list | These roles are displayed in the Roles field. |
| Groups/Rights list | Lists the security group permissions associated with the selected role. |
| Add Role button | Displays the Add Role Screen, on which you can select a role from a drop-down list. |
| Remove Role button | Removes the selected role from the user login. |
The Add Role screen is used to assign a role to a user. To access this screen, click Add Role on the Add/Edit User Screen: Roles Tab.
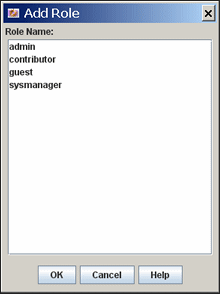
| Element | Description |
|---|---|
| Role Name field | Select a role from the list to assign to the user. |
The Accounts tab of the Add/Edit User screen is used to assign accounts to a user. To access this tab, click Accounts on the Add/Edit User Screen.
This tab is available only if accounts are enabled.
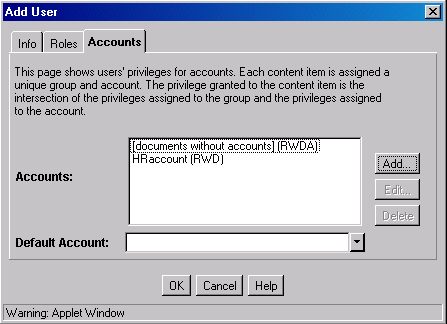
| Element | Description |
|---|---|
| Accounts list | Lists the accounts that are assigned to this user login. By default, all new users are assigned Read, Write, Delete, and Admin permission to documents that are not in an account. |
| Add button | Displays the Add/Edit Account Permissions Screen. |
| Edit button | Displays the Accounts Case Study. |
| Delete button | Enables you to delete a new account. |
| Default Account list | Select the account that will be entered as the default value on the Content Check In Form page for this user. All accounts for which the user has at least RW permission are listed. |
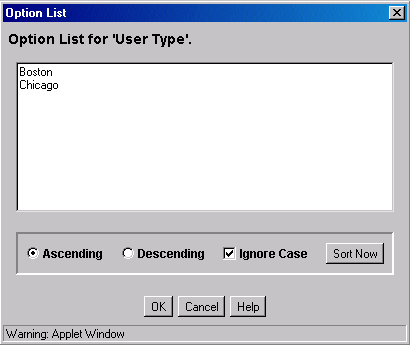
The Option List screen is used to create a list of options that can be used to group users. This screen can be accessed from a variety of interface locations. For grouping users, this screen is accessed by using the User Type menu on the Add/Edit User Screen: Info Tab (Local User) and Add/Edit User Screen: Info Tab (Global User).
These option lists do not have any security functionality in the content server; they are simply a means by which you can group users.
| Element | Description |
|---|---|
| Option list | Enter the values that can be selected for the User Type or Organization Path. Each value must be on a separate line, with a carriage return between values. |
| Ascending option | Sorts the list in alphabetical order. |
| Descending option | Sorts the list in reverse alphabetical order. |
| Ignore Case check box | Selected: Sorts the list in alphabetical order, regardless of case.
Clear: Values that start with uppercase letters are grouped separately from values that start with lowercase letters. |
| Sort Now button | Sorts the list in the manner specified by the Ascending, Descending, and Ignore Case options. |
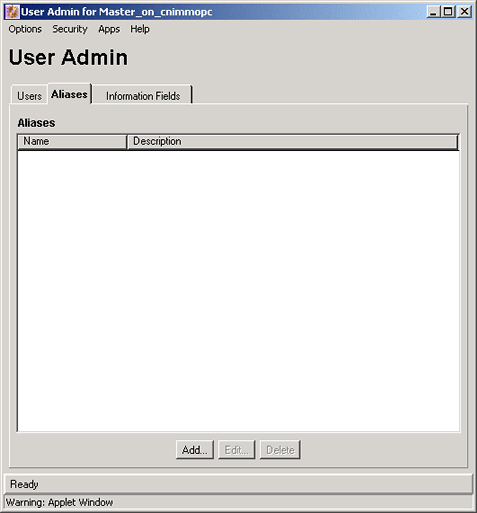
The Aliases tab of the User Admin screen is used to add, edit, and delete aliases. To access this tab, display the User Admin Screen, and click Aliases.
| Element | Description |
|---|---|
| Name column | Lists the alias names. |
| Description column | Description of each alias. |
| Add button | Displays the Add New Alias/Edit Alias Screen. |
| Edit button | Displays the Add New Alias/Edit Alias Screen. |
| Delete button | Enables you to delete the selected alias. |
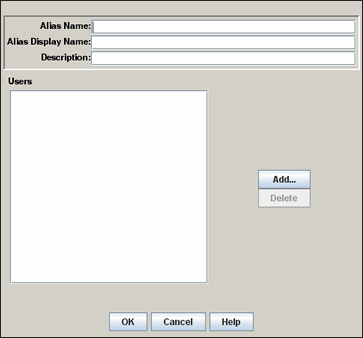
The Add New Alias/Edit Alias screen is used to add, edit, and delete user logins for an alias. To access this screen, click Add or Edit on the User Admin Screen: Aliases Tab.
| Element | Description |
|---|---|
| Alias Name field | The alias name is limited to 30 characters. The following are not allowed: spaces, tabs, line feeds, returns and ; : ^ ? @ & + " # % < * ~ | |
| Alias Display Name field | Name of the alias that appears on a display. |
| Description field | Maximum 80 characters. |
| Users list | Lists the user logins that are included in the alias. |
| Add button | Displays the Select Users Screen. |
| Delete button | Deletes the selected user login from the alias. |
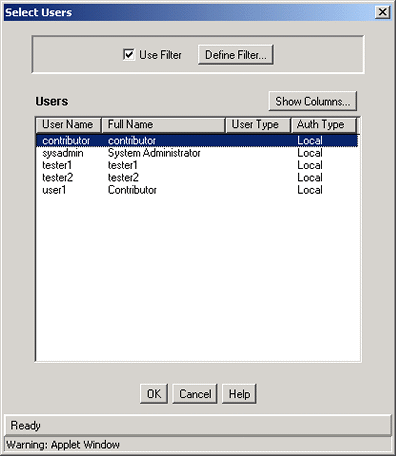
The Select Users screen is used to add user logins to an alias. To access this screen, click Add on the Add New Alias/Edit Alias Screen.
| Element | Description |
|---|---|
| Use Filter check box | Select this check box to narrow the Users list as defined by the Choose/Change the Authorization Type Screen. |
| Define Filter button | Displays the Choose/Change the Authorization Type Screen. |
| Show Columns button | Displays the Show Columns Screen. |
| Users list | Shows the users that match the filter settings. See the Choose/Change the Authorization Type Screen for column descriptions. |
The Edit Rights screen is used to assign sub-administration rights to a role. To access this screen, select a role and click Edit Applet Rights on the Permissions By Role Screen.
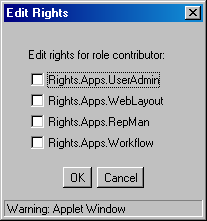
| Element | Description |
|---|---|
| Rights.Apps.UserAdmin check box | Assigns sub-administration rights to the User Admin application. |
| Rights.Apps.WebLayout check box | Assigns sub-administration rights to the Web Layout Editor application. |
| Rights.Apps.RepMan check box | Assigns sub-administration rights to the Repository Manager application. |
| Rights.Apps.Workflow check box | Assigns sub-administration rights to the Workflow Admin application. |
The Information Fields tab of the User Admin screen is used to add, edit, and delete user information fields. To access this tab, display the User Admin Screen and click Information Fields.
When a field is added in the Information Fields tab, it is also added to the user information on the Users tab.
You do not need to rebuild the search index after adding new user fields.
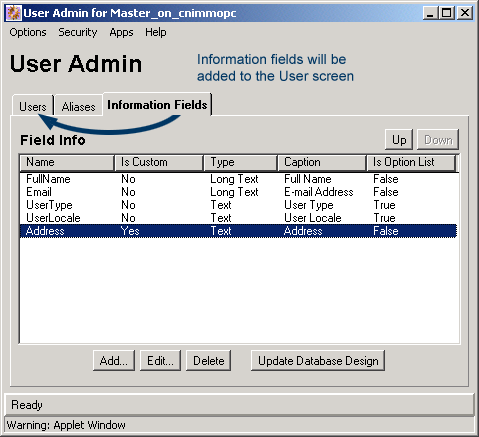
| Element | Description |
|---|---|
| Up button | Moves the selected user information field up in the list. |
| Down button | Moves the selected user information field down in the list. |
| Name column | The name of the user information field. |
| Is Custom column | No: Indicates a system (predefined) user information field. Yes: Indicates a custom user information field. |
| Type column | The type of field:
Text: 30 characters. Long Text: 100 characters. Date: Date format (such as dd/mm/yyyy or dd/mm/yy for the English-US locale). Memo: 255 characters. Integer: -231 to 2 31 (-2 billion to +2 billion). By definition, an integer is a natural number, so decimal values and commas are not permitted. |
| Caption column | The field label that appears on content server pages. |
| Is Option List column | False: The user information field does not have an option list.
True: The user information field has an option list. |
| Add button | Displays the Add Metadata Field Name Screen, on which you can add a new field name. |
| Edit button | Displays the Edit Metadata Field Screen. |
| Delete button | Deletes the selected custom user information field. (System user information fields cannot be deleted.) |
| Update Database Design button | Displays the Update Database Design Screen. |
The Add Metadata Field screen is used to define the name of a custom user information field. To access this screen, click Add on the User Admin Screen: Information Fields Tab.

| Element | Description |
|---|---|
| Field Name field | Duplicate names are not allowed. Maximum field length is 29 characters. The following are not acceptable: spaces, tabs, line feeds, carriage returns and ; ^ ? : @ & + " # % < * ~ |
When you add a custom user information field, the system automatically prefixes the name with a "u" to ensure that it is unique and does not conflict with any reserved names. However, you must be careful not to inadvertently use restricted names for columns in the user logins table because they may conflict with reserved names in databases. For example, if you try to use "ID" to name a new custom user information field, the result will be "UID" when the system adds the prefix. This causes an error because UID is a reserved database name. Similarly, when you define a custom metadata field, the system automatically prefixes the name with an "x" to ensure that it is unique and does not conflict with any reserved names. |
| OK button | Displays the Edit Metadata Field Screen. |
The Edit Metadata Field screen is used to define a user information field. To access this screen, do one of the following:
Enter a field name and click OK on the Add Metadata Field Name Screen
Select a user information field and click Edit on the User Admin Screen: Information Fields Tab.
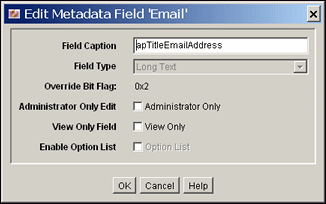
| Element | Description |
|---|---|
| Field Caption field | Label for the field that is displayed on content server pages. |
| Field Type | Text: 30 characters.
Long Text: 100 characters. Date: Date format (such as dd/mm/yyyy or dd/mm/yy for the English-US locale). Memo: 255 characters. Integer: -231 to 231 (-2 billion to +2 billion). By definition, an integer is a natural number, so decimal values and commas are not permitted. |
| Override Bit Flag | For internal use. |
| Administrator Only Edit check box | Selected: The field is not displayed on the User Profile pages. However, the field is visible to an admin user through the User Admin applet.
Clear: The field is displayed on the User Profile page. |
| View Only Field check box | Selected: The field is displayed on the User Profile page, but cannot be edited by the user.
Clear: If the Administrator Only Edit check box is clear, the field can be edited by the user on the User Profile page. |
| Enable Option List check box | If selected, the field has an option list that is defined by the Option List Type and Option List Key. Values shown in the Information Fields tab Is Option List are True or False. |
The Update Database Design screen is used to add or delete user information fields in the content server database. To access this screen, add or delete a user information field and click Update Database Design on the Edit Metadata Field Screen.
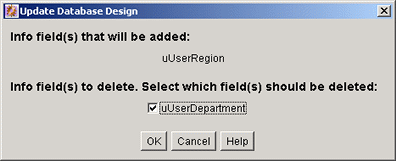
| Element | Description |
|---|---|
| Info field(s) that will be added | Lists the user information fields that were added since the last time the database was updated. |
| Info field(s) to delete check boxes | Lists the user information fields that were deleted since the last time the database was updated.
Selected: The user information field is deleted from the database. Clear: The user information field is not deleted from the database. The field remains hidden on the User Admin screen and User Profile pages, but it still exists in the database. |
The following screens are used when creating proxied connections:
The Credential Maps enables administrators to create credentials for specific users that can be mapped to allow users controlled access between a master content server and a proxy content server. To access the page select Administration in the portal navigation bar, then select Credential Maps.
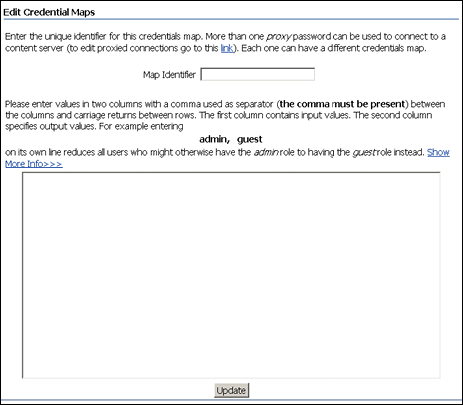
| Element | Description |
|---|---|
| Map Identifier field | Enter the unique identifier for the credentials map. |
| Values field | Enter the credential values in two columns with a comma used as a separator between the columns, and a carriage return between rows. The first column specifies input values. The second column specifies output values. |
| Update button | Inputs the credential values specified in the Credential Maps page. |
This screen enables administrators to create named passwords, which are passwords that are assigned to specific proxied connections by name. To access the page, select the Administration tray in the portal navigation bar, then select Connection Passwords.
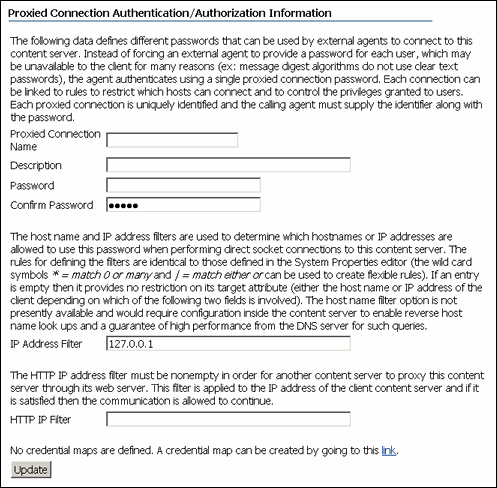
| Element | Description |
|---|---|
| Proxied Connection Name field | Name given to the proxied connection. |
| Description field | Brief description of the proxied connection. |
| Password field | Password assigned to the proxied connection. |
| Confirm Password field | Password assigned to the proxied connection. |
| IP Address Filter field | IP address number of the client content server. |
| HTTP IP Filter field | HTTP IP address filter, applied to the IP address of the client content server. |
| Update button | Updates the page with any modified information. |