| Oracle® Fusion Middleware Administrator's Guide for Oracle IRM Server 11g Release 1 (11.1.1) Part Number E12321-03 |
|
|
View PDF |
| Oracle® Fusion Middleware Administrator's Guide for Oracle IRM Server 11g Release 1 (11.1.1) Part Number E12321-03 |
|
|
View PDF |
The following pages and wizards are used to create, set options and enter data for contexts in Oracle IRM:
Use these controls to create and delete contexts, and to refresh the list of contexts.
Access these controls by clicking the Contexts tab.
Contexts Page: General Controls, Left Panel

| Element | Description |
|---|---|
| New Context (icon) | Select to open the New Context wizard. |
| Gain management rights for all orphaned contexts (icon) | Visible only to domain managers and domain administrators. Select to check whether there are any orphaned contexts and, if there are, to acquire the ability to modify them. Orphaned contexts are those whose context manager has been removed from the identity store. Any orphaned contexts will be shown in the list of contexts, and you will be able to select them for modification. |
| Refresh (icon) | Select to refresh the list of contexts on the left panel. You should do this to ensure that the list is showing any changes made by other users. |
| Delete (icon) | Select to delete the context currently highlighted on the left panel. A dialog will ask you to confirm the deletion. You will not be allowed to delete the context if it still has users with assigned rights. |
| Name (contexts list area) | Lists contexts created by the current user. If the current user is an inspector, also lists contexts created by any user. |
Contexts Page: General Controls, Right Panel

| Element | Description |
|---|---|
| Revert | Select to cancel the changes made on this page. Does not work after the Apply button has been used. |
| Apply | Select to apply the changes made on this page. Once selected, the changes cannot be reverted, except by making and applying new changes. |
| Name | Displays the name of the context currently highlighted in the list in the left panel. You can change the name (and the accompanying description) on the Translations tab. |
| Template | This is the name of the template from which this context was created. It cannot be changed. |
| Allow Inspector | When the Allow Inspector checkbox is checked, users who have been made inspectors will be able to see this context in lists and in reports. |
| Collapse Pane/Restore Pane control | Select to hide or show the header display area. |
Use this tab to create rights (by assigning roles to a user or group), to view the details of existing rights, to edit rights, and to delete rights.
Access this tab from the Contexts page.

| Element | Description |
|---|---|
| Create Right/Assign Role (icon) | Select to open the Create Right/Assign Role wizard. |
| Properties (icon) | Select to view the details of the right currently highlighted in the Rights table. |
| Edit (icon) | Select to edit the right currently highlighted in the Rights table. |
| Remove (icon) | Select if you want to remove the right currently highlighted in the Rights table. A dialog will ask you to confirm the removal. |
| Search | Enter part or all of the name of the right or rights that you want to display in the Rights table. |
| Search Rights (icon) | Select to search for rights with names matching the text in the search box. If there are more than fifty rights matching the search criteria, only the most recent fifty are shown. You will need to refine the search criteria to see the remaining rights.
If the search box contains no text, selecting this icon will list the fifty most recent rights. |
| Type | This column shows a user icon if the right is for a user. It shows a group icon if the right is for a group. A cross icon means that the type is unknown because the user or group cannot be found in the identity store. |
| Name | This column shows name information for the user or group holding the right. The entry "Not found" means that the name cannot be found in the identity store. |
| Role | This column shows the role that was assigned to the user or group to create the right. |
| Assigned Time | This column shows the date and time that the right was created. The list of rights is initially ordered by date and time. |
Use this tab to:
Add names and descriptions of the current context in alternative languages (that is, alternative to the default language).
Edit existing names and descriptions.
Delete alternative names and descriptions that are no longer required.
Access this tab from the Contexts page.

| Element | Description |
|---|---|
| New Translation (icon) | Select to open the New Translation dialog, through which names and descriptions can be added for alternative languages.
This is available only if multiple language support has been set up on the Control Console. |
| Edit (icon) | Select to edit the language details currently highlighted in the Translations table. |
| Remove (icon) | Select to remove the language details currently highlighted in the Translations table. A dialog will ask you to confirm the removal. You cannot remove the default language details. |
| Language | This column identifies the languages for which names and descriptions have been provided. |
| Default language (indicator)
|
This indicator against a language name shows that it is the default language. The default language is set on the Control Console. This is the language that is used in locales for which no alternative has been provided. You cannot remove this language from the Translations table. |
| Name | For each language, this column shows the name provided. |
| Description | For each language, this column shows the description provided. |
Use this tab to assign users as managers of the current context (creates context managers). Also use to view context manager details, and to end a user being the manager of a context.
Access this tab from the Contexts page.

| Element | Description |
|---|---|
| New Manager (icon) | Select to open the New Manager dialog. |
| Properties (icon) | Select to view the details of the user currently highlighted in the Managers table. |
| Remove (icon) | Select to end the user selected in the Managers table being a manager of the current context. A dialog will ask you to confirm the removal. |
| Account Name, First Name, Last Name | These columns identify the users that have been assigned as managers of the current context. |
Use this tab to exclude specific sealed documents from the current context. Also use to end such exclusions.
Access this tab from the Contexts page.
| Element | Description |
|---|---|
| Add Documents | Select this button to open a dialog through which you can find a sealed file that you want to exclude. |
| Remove (icon) | Select if you want to end the exclusion of the file currently highlighted in the table. A dialog will ask you to confirm the removal. |
| Document and Sealed Time | These columns show information for the sealed documents that have been excluded from the current context. |
Use this tab to manage the trusted contexts for the current context. Trusted contexts are contexts to which sealed content can be exported from the current context.
Access this tab from the Contexts page.

| Element | Description |
|---|---|
| New Trusted Context (icon) | Select to open the New Trusted Context dialog. |
| Remove (icon) | Select to end the trusted context status of the context currently selected in the Trusted Contexts table. A dialog will ask you to confirm the removal. |
| Name | This column shows the names of trusted contexts for the current context. |
| Description | This column shows the descriptions of trusted contexts for the current context. |
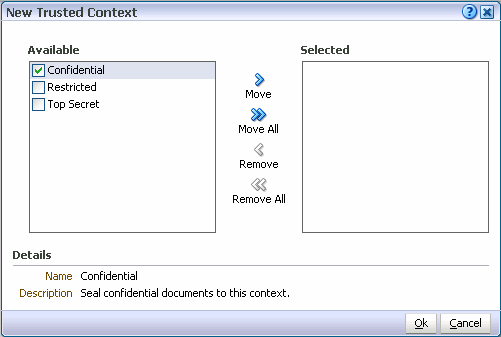
Use this dialog to associate the current context with other existing contexts. This will establish the latter as trusted contexts, which are contexts to which sealed content can be exported.
Open the dialog by clicking the New Trusted Context icon on the Trusted Contexts tab of the Contexts page.
| Element | Description |
|---|---|
| Available | This box shows contexts that can be assigned as trusted contexts for the current context. Highlight the contexts in this box that you want to move to the Selected box. |
| Move, Move All, Remove, Remove All | Use these controls to move context names between the Available and Selected boxes. The Move control and the Remove control will become available only when individual contexts are selected and will affect only those contexts. |
| Selected | All contexts whose names are listed in this box will become trusted contexts when the OK button is clicked. The presence or absence of check marks does not have any effect on this. |
| Details | This display area shows the details of any context individually selected in the Available or Selected boxes. |
Use this wizard to create a new context, based on an existing context template. Domain administrators can create context templates. Domain administrators and domain managers can create contexts.
Open the wizard by clicking the New Context icon on the left panel of the Contexts page.
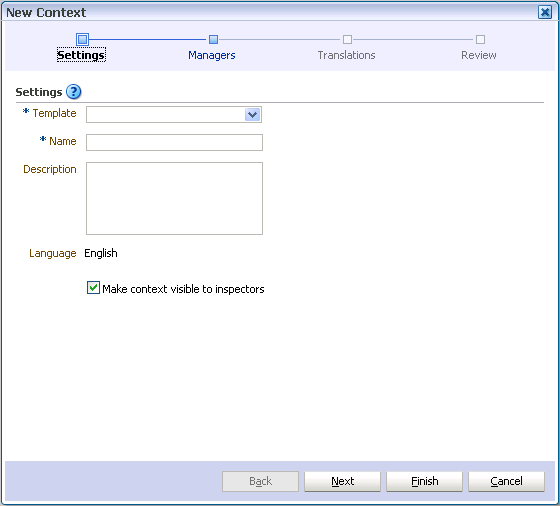
Use this page to name and describe a new context.
This page opens by default as the first page of the New Context wizard. It can also be opened by selecting the General/Settings node in the wizard header.
| Element | Description |
|---|---|
| Template | Choose one of the available context templates from this drop-down list. Only active context templates are shown. You must base the new context on one of the available context templates. (Context templates can be created by domain administrators using the Context Templates page.) |
| Name
Description |
Enter a name and description for the new context.
The name will be seen by users of Oracle IRM Desktop when they seal documents to this context, so the name should reflect the purpose of the context. You should enter the name and description in the default language. The default language is shown against Language on this wizard page. The default language was set up on the Control Console, and is the language that is used in locales for which no specific translation has been provided. You will be able to provide names and descriptions in other languages on the Translations page of this wizard, if multiple language support has been set up on the Control Console. |
| Language | Shows which language has been set on the Control Console as the default language. |
| Make Context Visible To Inspectors | This is normally checked. Contexts should be made visible to inspectors. Domain administrators that are also inspectors (as is recommended) will then be able to see all contexts that have been created, and be able to judge the effects of changing a context template.
You should only consider making the context not visible to inspectors if the context relates to highly sensitive matters. If you make a context not visible to inspectors, there is a danger that alterations to the context template on which it is based will have unintended consequences. |
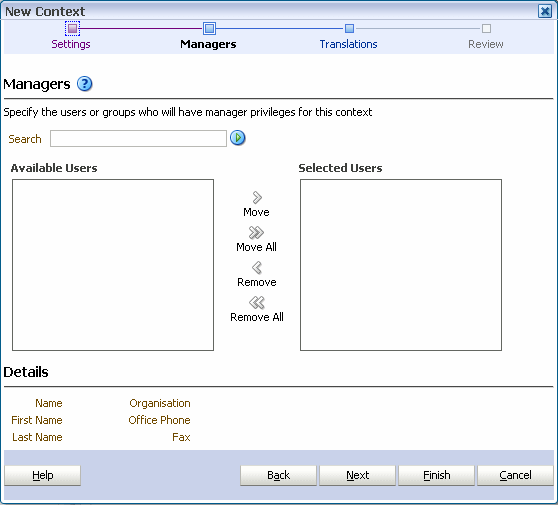
Use this page to assign one or more users to the context, making them context managers of this context. Context managers assign roles to users and are usually business owners.
You do not have to add yourself as a context manager: the user creating the context is automatically made a context manager.
This page opens as the second page of the New Context wizard. It can also be opened by selecting the Managers node in the wizard header.
| Element | Description |
|---|---|
| Search
Search Users (icon) |
Use this box and icon to populate the Available box with users who are candidates to become context managers. To find known users, type a few letters from the user name into the Search box, then click the Search button. To find all users, leave the Search box empty, then click the Search button. |
| Available Users | This box shows users that can be assigned as context managers. If the list is empty, populate it using the Search feature (described above). Highlight the users in this box that you want to move to the Selected Users box. |
| Move, Move All, Remove, Remove All | Use these controls to move user names between the Available Users and the Selected Users boxes. The Move control and the Remove control will affect only those users that have a check mark against them. |
| Selected Users | Users whose names are listed in this box will become context managers for this context when the wizard is completed.
The presence or absence of check marks does not have any effect on this. The user who created the context will become a context manager even if his name is not listed in this box. |
| Details | This display area shows the details of any user individually selected in the Available Users or Selected Users boxes. |
Use this page to provide names and descriptions of the new context in alternative languages (that is, alternative to the default language).
The name and description that you entered for the default language will already be shown on this page.
This page opens as the third page of the New Context wizard. It can also be opened by selecting the Translations node in the wizard header.
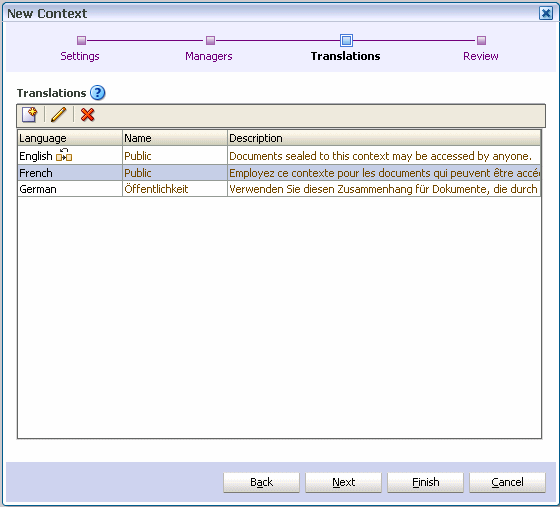
| Element | Description |
|---|---|
| New Translation (icon) | Select to open the New Translation dialog, through which names and descriptions can be added for alternative languages.
This is available only if multiple language support has been set up on the Control Console. |
| Edit (icon) | Select to edit the language details currently highlighted in the Translations table. You cannot change the language associated with an existing name or description. |
| Remove (icon) | Select to remove the language details currently highlighted in the Translations table. A dialog will ask you to confirm the removal. You cannot remove the default language details. |
| Language | This column identifies the languages for which names and descriptions have been provided. |
| Default language (indicator)
|
This indicator against a language name shows that it is the default language. The default language is set on the Control Console. This is the language that is used in locales for which no alternative has been provided. You cannot remove this language from the Translations table. |
| Name | For each language, this column shows the name provided. |
| Description | For each language, this column shows the description provided. |
Use this page to review the choices made and information entered on the previous wizard pages.
This page opens as the final page of the New Context wizard. It can also be opened by selecting the Review node in the wizard header.
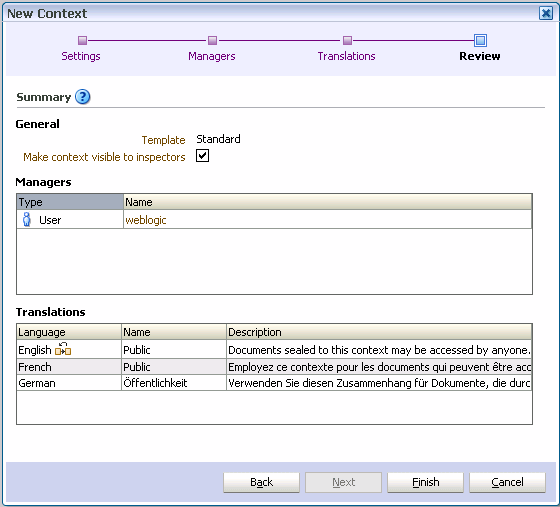
If you are not satisfied with the choices and entries shown on the Review page, use the Back button to return to the wizard pages and make changes.
If you are satisfied with the choices and entries shown on the Review page, create the new context by clicking the Finish button.
Use this wizard to create a new right (that is, assign a role to one or more users or groups). Rights are created by context managers.
Open the wizard by clicking the Assign Role icon in the toolbar of the Rights tab on the Contexts page.
Use this page to specify one or more users or groups that will be granted the new right.
This page opens as the first page of the Assign Role wizard. It can also be opened by selecting the Users/Groups node in the wizard header.
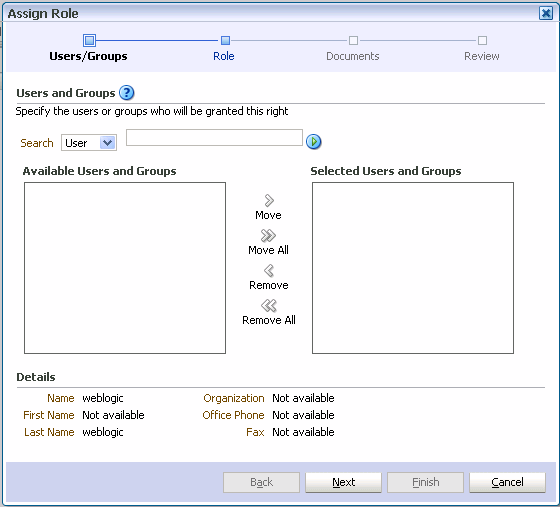
| Element | Description |
|---|---|
| Search
Search Users (icon) |
Use this drop-down list, text box, and icon to populate the Available Users box with users or groups that are candidates to acquire the new right. First select either User or Group from the drop-down list. To find known users/groups, type a few letters from the name into the Search box, then click the Search Users icon. To find all users/groups, leave the Search box empty, then click the Search Users icon. Only users or groups that have not already been assigned a role in this context will be shown. This is because a user or group can have only one directly assigned role per context. |
| Available Users and Groups | This box shows users or groups that can be assigned a role. If the list is empty, populate it using the Search feature (described above). Highlight the users in this box that you want to move to the Selected Users and Groups box. |
| Move, Move All, Remove, Remove All | Use these controls to move user or group names between the Available... and Selected... boxes. The Move control and the Remove control will become available only when individual users or groups have a check mark against them, and will affect only those users and groups. |
| Selected Users and Groups | Users or groups whose names are listed in this box will be assigned a role (specified on the next page of this wizard) for this context when the wizard is completed.
The presence or absence of check marks does not have any effect on this. |
| Details | This display area shows the details of any user or group individually selected in the Available... or Selected... boxes. |
Use this page to specify which role is to be assigned in the creation of the right.
This page opens by default as the second page of the Assign Role wizard. It can also be opened by selecting the Role node in the wizard header.
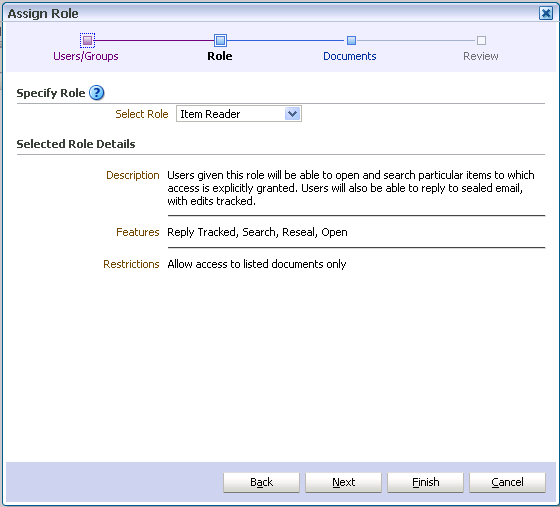
| Element | Description |
|---|---|
| Specify Role | Select Role: Use to select a role for the new right. Roles cannot be created here: they are created by domain administrators using the Roles page. |
| Selected Role Details | Description: Displays the description of the role. The description was written when the role was created.
Features: Displays the sealing features that are associated with the role. These features are part of the role definition and cannot be altered here. ("Features" in Oracle IRM Server equate to "Rights" in Oracle IRM Desktop.) Restrictions: Displays the type of document access that was set up when the role was created. The listed documents referred to here are specified on the next page of this wizard, the Documents page. |
Use this page to list specific sealed documents that users assigned this role can access, or specific sealed documents that users assigned this role cannot access.
This page opens by default as the third page of the Assign Role wizard. It can also be opened by selecting the Documents node in the wizard header.
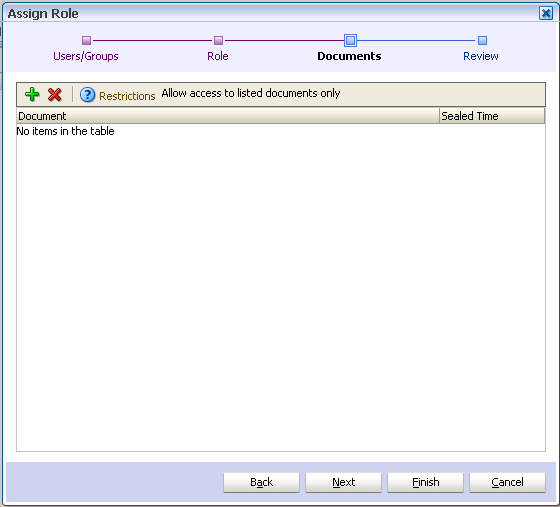
| Element | Description |
|---|---|
| Add (icon) | Select to open a dialog through which you can add a sealed document to the list. Only sealed documents in supported formats can be added: if you attempt to add a document type that is unsealed or not of a supported format, you will see an error message. |
| Delete (icon) | Select to remove the currently highlighted document from the list. |
| Restrictions (display) | Disallow access to listed documents: This means that the user assigned this role will be able to access all sealed documents (subject to context), except any that are listed in the table on this page.
Allow access to listed documents only: This means that the user assigned this role will not be able to access any sealed documents, except the ones listed in the table on this page. If you do not add sealed documents to this table, either now or by editing this role assignment later, the user will not be able to access any documents. |
| Document (column) | Lists the sealed documents associated with this role assignment. |
| Sealed time (column) | For each sealed document listed, shows the time that it was sealed. |
Use this page to review the choices made and information entered on the previous wizard pages.
This page opens as the final page of the Assign Role wizard. It can also be opened by selecting the Review node in the wizard header.
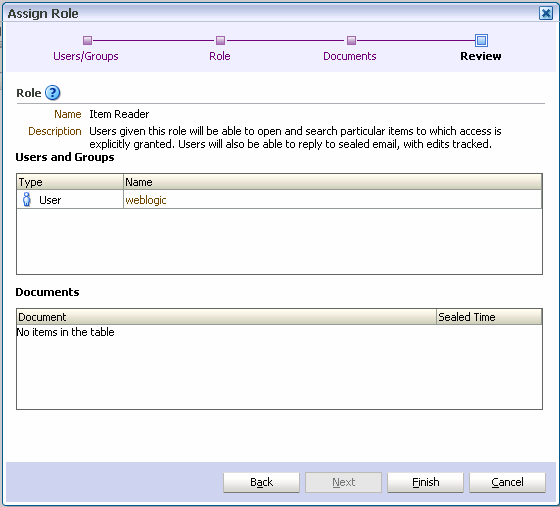
If you are not satisfied with the choices and entries shown on the Summary page, use the Back button to return to the wizard pages and make changes.
If you are satisfied with the choices and entries shown on the Summary page, create the new right by clicking the Finish button.
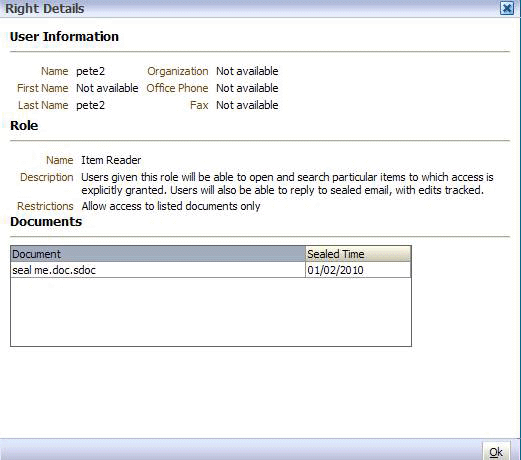
This dialog displays information about the user (or group), and the assigned role, for the right currently highlighted in the Rights table.
Open the dialog by clicking the Properties icon in the toolbar of the Rights tab on the Contexts page.
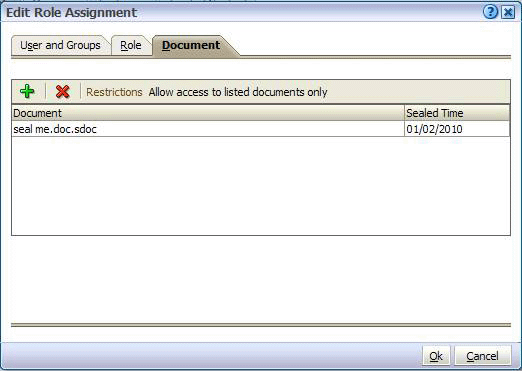
Use this dialog to edit a right (that is, change the assignment of a role to a user or group).
Open the dialog by clicking the Edit icon in the toolbar of the Rights tab on the Contexts page.
Edit Role Assignment: Users and Groups
This tab displays the users or groups that are currently granted the right.
Access this tab from the Edit Role Assignment dialog.
Edit Role Assignment: Role
Use this tab to change the assigned role for this right.
Access this tab from the Edit Role Assignment dialog.
| Element | Description |
|---|---|
| Assigned Role | Use this drop-down list to select a new role for the right. Roles cannot be created here: they are created by domain administrators using the Roles page. For multiple users and groups, if they all have the same role, the drop-down list shows the current role. |
| Role Description | Displays the description of the role. The description was written when the role was created. |
Edit Role Assignment: Documents
Access this tab from the Edit Role Assignment dialog.
This tab displays the specific set of sealed documents associated with the right, if any. You can add documents to the table on this tab using the Add icon. You can remove documents from the table using the Delete icon.
If the Restrictions display area shows Allow access to listed documents only, the table should list the only sealed documents that can be accessed by users assigned this role. In this case, if no documents are listed, users assigned this role cannot access any sealed documents.
If the Restrictions display area shows Disallow access to listed documents, the table may list sealed documents that cannot be accessed by users assigned this role. In this case, if no documents are listed, users assigned this role can access any sealed document (subject to context).
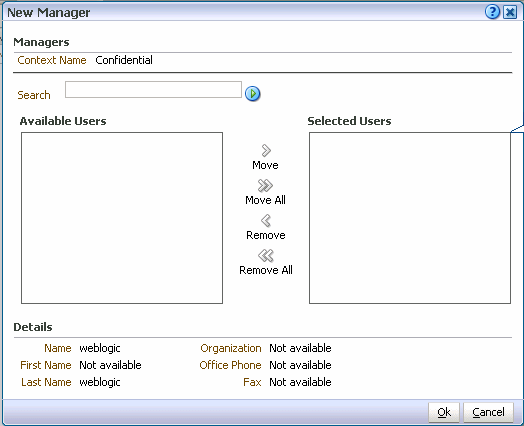
Use this dialog to assign a user as the manager of a context, making that user a context manager.
Open the dialog by clicking the New Manager icon in the toolbar of the Managers tab of the Contexts page.
| Element | Description |
|---|---|
| Search
Search Users (icon) |
Use this text box and icon to populate the Available Users box with users that are candidates to become managers. To find known users, type a few letters from the user name into the Search box, then click the Search Users icon. To find all users, leave the Search box empty, then click the Search Users icon. |
| Available Users | This box shows users that can be assigned as managers. If the list is empty, populate it using the Search feature (described above). Highlight the users in this box that you want to move to the Selected Users box. |
| Move, Move All, Remove, Remove All | Use these controls to move user names between the Available Users and Selected Users boxes. The Move control and the Remove control will become available only when individual users have a check mark against them, and will affect only those users. |
| Selected Users | Users whose names are listed in this box will become managers when the OK button is clicked.
The presence or absence of check marks does not have any effect on this. |
| Details | This display area shows the details of any user individually selected in the Available Users or Selected Users boxes. |
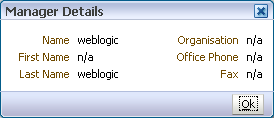
This dialog displays information about the manager (that is, the user assigned as a context manager for the current context) currently highlighted in the Managers table.
Open the dialog by clicking the View Details/Properties icon on the toolbar of the Managers tab on the Contexts page.
