| Oracle® Fusion Middleware Administrator's Guide for Universal Records Management 11g Release 1 (11.1.1) Part Number E10789-01 |
|
|
View PDF |
| Oracle® Fusion Middleware Administrator's Guide for Universal Records Management 11g Release 1 (11.1.1) Part Number E10789-01 |
|
|
View PDF |
This section contains information about the interface used with the product.
The following screens are shown in this chapter:
Several buttons are common to many pages and are not discussed unless additional information is available:
Submit: submits the changes made to the page
Reset: clears any entries and resets the page to its default
Quick Help: displays the help entry for the screen
Delete: removes the item on the screen
Create: submits the information provided and creates the item
Info: displays the information page for the item
Thumbnail View: Displays the page in thumbnail view.
Headline View: Display the page in headline view.
Use this page to set most of the configuration options for the system. When initially opened, the options on this page are unexpanded. Click a link next to an option to expand it.
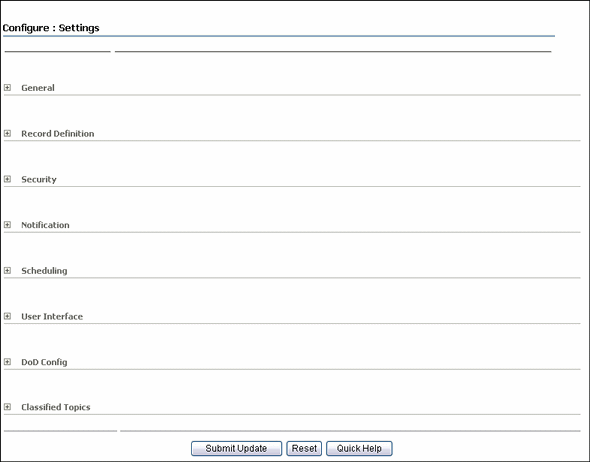
Permissions:
The Admin.RecordManager right is required to use this page. This right is assigned by default to the Records Administrator role.To access this page, click Records then Configure then Settings from the Top menu.
Most configuration tasks are discussed in the Oracle Fusion Middleware Setup Guide for Universal Records Management.
Use this page to configure many aspects of PCM.
The Physical Item Information Page, also discussed in this section, contains information about individual physical items which are managed by PCM.
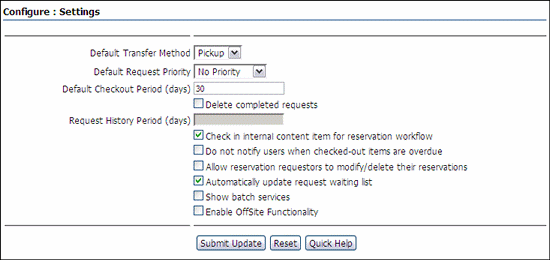
Permissions:
The PCM.Admin.Manager right is required to access the Configure Physical Content Management page. By default, this right is assigned to the predefined PCM Administrator role.To access this page, click Physical then Configure then Settings from the Top menu.
The Batch Services option is only displayed if the corresponding option on the Configure Physical Content Management Page is enabled.
The menu items available to users depend on the rights they have been assigned. A content administrator with all access rights (typically assigned the predefined PCM Administrator role) will see all administrator menus. Other users (for example, those assigned the default 'pcmrequestor' role) may see a much smaller subset of the administrator menus, depending on their assigned rights.
Use this page to view information about an existing physical item.
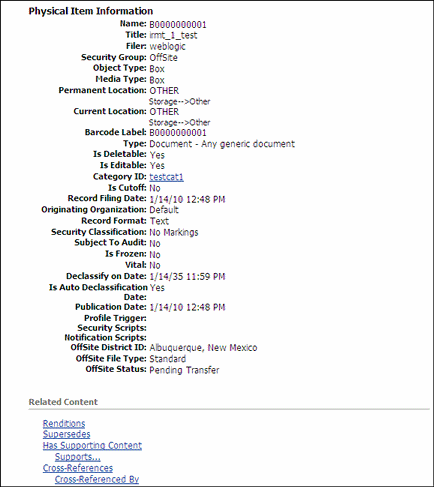
Permissions:
The PCM.Physical.View right is required to use this screen. This right is assigned by default to the PCM Requestor and PCM Administrator roles.To access this page, search for the item. On the search results page click Information then External Item Information in the item's Action menu.
This page shows the current properties of the physical item, including its basic metadata (name, title, filer, and security group), its freeze status, its object and media types, its storage location, and barcode label.
Note the following:
If the repository is set up to auto-generate content IDs (in the System Properties utility), the name of a physical item was generated automatically. It is typically a number, possibly preceded by a prefix (for example, ID_002319).
If the physical item was assigned a life cycle (retention schedule and disposition rules), the information page also includes a Retention Schedule Information section providing disposition processing and security information for the item.
If the physical item is currently checked out, its current location is set to the value of the deliver-to location as specified when the associated reservation request was created. If no location was provided, the current location is set to "OTHER." If a location comment was specified for the associated reservation request, the Current Location Comments field shows this comment. Otherwise it contains the login name of the user who created the reservation request.
If the physical item is contained within another physical item, the current location and/or permanent location field includes a Container Details link, which opens the information page of the parent physical item (the "container").
The following screens are accessed when using the update functionality:
Use this page to define what fields will be updated and what values will be used for updating.
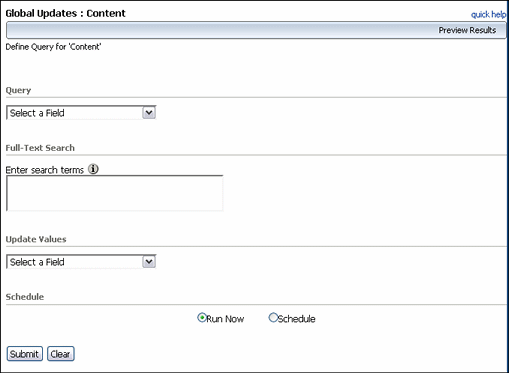
To access this screen, click Records then Global Updates then the type of update from the Top menu.
Frozen content cannot be updated.
The options on this screen are specific to the type of query being created. After an option is selected, additional menus open to help further refine the query. See the Oracle Fusion Middleware User's Guide for Content Server for complete details about using queries.
The Schedule portion of the Define Query Page is used to choose the times when updates will occur.

To access this portion, click the Schedule button on the Define Query Page. Select values from the lists for the update schedule and select Submit when finished.
This screen shows the results of scheduling an update action. It is displayed after scheduling an update or search or by selecting Records then Scheduled then Search and Update Events from the Top menu.

Use the Actions menu for the individual event to change the options for the event. .
| Element | Description |
|---|---|
| Metadata Sets | The type of update which was selected. |
| Scheduled Search and Update Event Name | The event name entered when the update was created. |
| Date Event Created | The date when the scheduled event was created. |
| Actions | A menu with options to be used on the individual events:
|
This screen shows those items which will be changed when an update is done. To access this screen, select Preview Results on the Define Query Page.

The Update icon (a capital W in a circle) indicates that the item is not locked and can be changed. Click the Info icon to view the Information Page for the item.
To return to the Define Query Page, click Continue Defining Search on the Page menu.
The following screens are used when reviewing or altering the classification of items:
The following screen is used to review the classification of content.
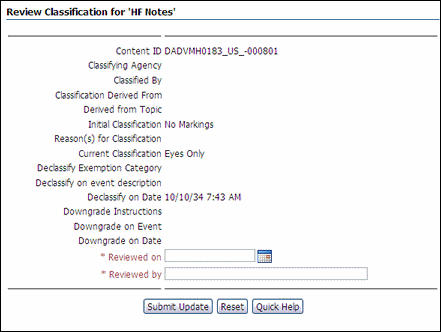
To access this screen, click Information then Review Classification from the Page menu on a Content Information Page.
The following screen is used to change the classification of an item.
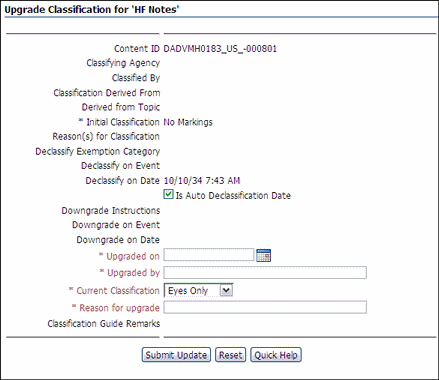
To access this page, click Edit then Upgrade Classification or Downgrade Classification from the Page menu on a Content Information Page.
Barcode processing has the following user interface screens:
This screen is used to upload information to the PCM software or write it to a file.
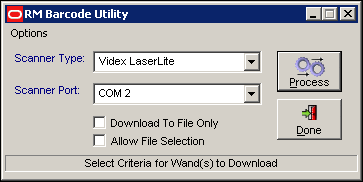
Access this screen by starting the Barcode Utility application.
| Element | Description |
|---|---|
| Options menu | Displays the Program Videx Barcode Wand Screen. |
| Scanner Type | The barcode scanner type. One type is currently supported. |
| Scanner Port | The communication port where the barcode scanner or its base station is connected. Normally this is COM1, a commonly used serial port. |
| Download to File Only | Writes barcode scanner data to a file for later processing. |
| Allow File Selection | Selects a previously stored file for processing. |
| Process button | Starts the upload process. The barcode scanner data will either be directly uploaded to Physical Content Management or, if Allow File Selection was selected, a file selection dialog is displayed, where the file to be uploaded can be selected. |
| Done button | Closes the Barcode Utility application. |
This screen is used to specify the instance where data will be uploaded.
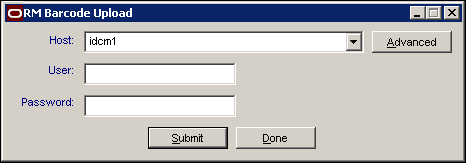
To access this screen, click Allow File Selection on the Main Barcode Utility Screen. Click the Process button.
| Element | Description |
|---|---|
| Host | The name of the instance where the barcode information should be uploaded. This instance should be running the Physical Content Management software. |
| User | The login name of the user who will connect to the instance to upload the barcode data. |
| Password | The login password of the user who will connect to the instance to upload the barcode data. |
| Advanced button | Displays the Configure Host List Screen, where all instances where barcode data can be uploaded are specified. |
This screen is used to specify the instances where barcode data can be uploaded. The defined hosts are included in the Host list on the Barcode Upload Screen.
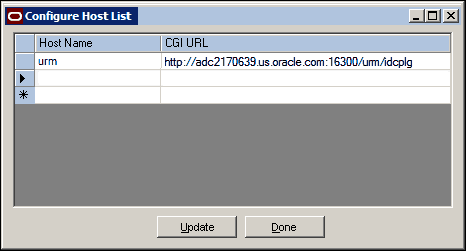
To access this screen, click the Advanced button in the Barcode Upload Screen.
| Element | Description |
|---|---|
| Host Name | The name of a instance where barcode information can be uploaded. This instance should be running Physical Content Management. |
| CGI URL | The URL of the 'idcplg' directory of the instance. This information is required to establish a connection to the instance. |
This screen provides information about what barcodes were processed and also shows the upload results of each item processed (including any error messages).

This screen appears after uploading a stored barcode file.
| Element | Description |
|---|---|
| Error | Indicates if an error occurred during processing of an item. The error message is displayed in the Message column. |
| Date | The date and time the information for the item was scanned by the barcode scanner. |
| Type | The type of action performed for the item. Three actions are possible: Check In, Check Out, and Set Home & Actual. |
| Object Type | The object type of the data item (for example, "Box" or "Folder"). |
| Barcode ID | The barcode value of the item as read by the barcode scanner. For storage items, this is the item's name (as specified when it was created in Physical Content Management). |
| Location Type | The location type of the item (for example, "Box" for items in a box, or "User" for checked in or checked out items). |
| Location | The barcode of the location where the item is assigned (stored in). |
| Message | A message if an error occurred during the transfer. |
This screen is used to program the barcode scanner for use with Physical Content Management.
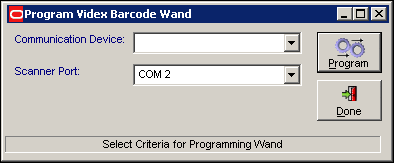
To access this screen, click Options then Program Videx Wand from the Main Barcode Utility Screen.
| Element | Description |
|---|---|
| Communication Device | Selects the device used to connect the barcode scanner to the computer. There are two options:
Jet Eye: An infrared receiver device connected to a COM port on the computer. Point the barcode scanner at the receiver to communicate with the computer. Base Station: A holder for the barcode scanner linked directly to the computer using a cable. |
| Scanner Port | Selects the communication port where the barcode scanner or its base station is connected. Normally this is COM1, which is a commonly used serial port. |
| Program button | Starts the programming cycle of the barcode scanner. |
Use this page to select a barcode file to be processed.

Permissions:
The PCM.Barcode.Process right is required to use this screen. This right is assigned by default to the predefined PCM Administrator role.To access this page, click Physical then Process Barcode File from the Top menu.
| Element | Description |
|---|---|
| Select File to Process | A barcode file to be processed. Enter a name or use the Browse button to select a file. |
| Process File | Starts the analysis and processing of the selected barcode file. |
This page shows information about all the items in the barcode file, the actions performed on them and any status and error messages.

This page is displayed after a barcode file has been selected on the Barcode Processing Page and processed.
| Element | Description |
|---|---|
| Date | The date and time the item was read by the barcode scanner. |
| Action | The action performed on the item in the barcode file (as specified in the barcode file). |
| Object Type | The object type of the item (for example, "Box"). |
| Barcode | The barcode of the item as read by the barcode scanner. |
| Location Type | The location type of the item (for example, "Position"). |
| Location Barcode | The barcode of the location where the item should be assigned. |
| Message | Displays 'Error Occurred' if the action was not completed successfully for an item. Click the info icon to display more specific information about the error message. |
The following screens are used to set up and use the offsite storage functionality:
Use this screen to begin setting up offsite storage.
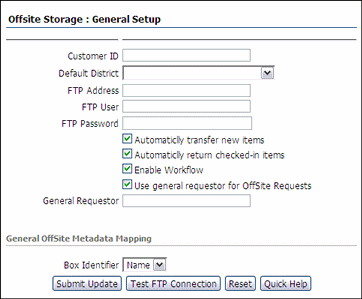
To access this page, click Physical then Offsite Storage then General Setup from the Top menu.
| Element | Description |
|---|---|
| Customer ID | A customer ID for this storage session. |
| Default District | The default district to be used with this customer ID. Several districts are provided. New districts can be also be created. |
| FTP Address | The FTP address associated with this storage location. |
| FTP User | The user associated with the FTP account. |
| FTP Password | The password associated with the FTP account. |
| Transfer boxes | Options associated with the transfer:
|
| General Requestor | Enter a requestor. This field must be 5 characters or less. |
| Box Identifier | A method of identifying boxes used in transfer. Select an item from the list. |
Several similar screens are used to map metadata to districts used when configuring offsite storage. A sample screen is depicted and described here.
Use this screen to select the district for which to map data.
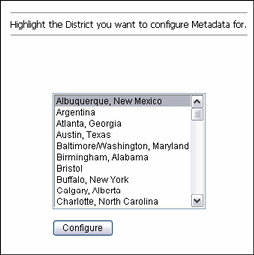
To access this page, click Physical then Offsite Storage from the Top menu. Click Map District Metadata.
Scroll up or down in the list and select a district by highlighting the name. Districts which are already mapped are in bold face type at the top of the list. After highlighting a district, click Configure.
After selecting a district to configure on the Choose District Mapping Page, the next screen in the District Mapping process is displayed.
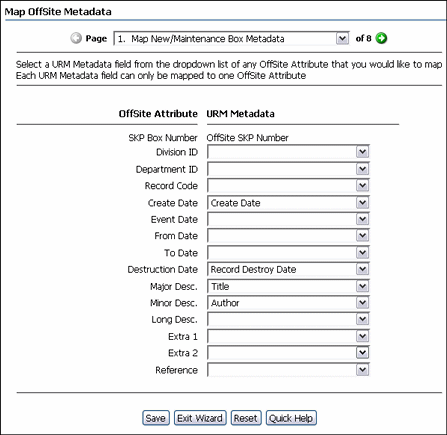
Choose a district to map on the Choose District Mapping Page and click Configure. This screen is displayed.
All screens in this process are similar. The fields and field values in the option lists on these screens are provided by Iron Mountain. For a description of the fields and their values, see the Iron Mountain documentation.
The following screens can be configured. Either configure all screens in sequence or skip to a specific screen by selecting the screen name from the menu list at the top of the screen:
Box metadata
File metadata
Accounting metadata
Insurance1 and Insurance 2 metadata
Law metadata
Loan metadata
Medical metadata
Use this screen to create a request for pickup of boxes and files for offsite storage.
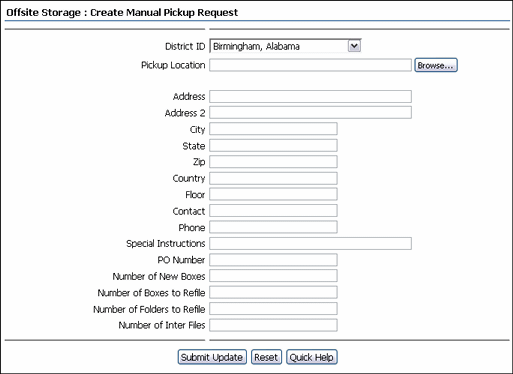
To access this page, click Physical then Offsite Storage then Create Manual Pickup Request from the Top menu.
The fields on this page are determined by Iron Mountain. Consult the Iron Mountain documentation for details.
Use this screen to view a list of all uploaded files and their status.

To access this page, click Physical then Offsite Storage then Uploaded Files List from the Top menu.
| Element | Description |
|---|---|
| Delete | Used to delete a checked item. |
| Resend | Used to resend the checked item. |
The following screen is used to manage review information:
This screen is used to edit information about reviewers for retention categories.
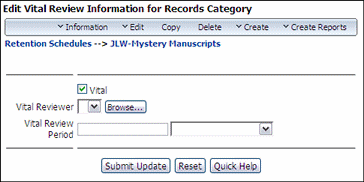
To access this page, find a retention category to edit. Click Edit then Edit Review from the item's Actions menu. User-friendly captions are noted in parentheses in the following table.
| Element | Description |
|---|---|
| Vital (Subject to Review) box | Enables the retention category as a subject to review category. After enabling, enter a reviewer user name in the text box and select the associated period from the list. Default: Not selected. Not a retention category that is subject to review.
If a retention category has a review period of shorter duration than the review period set for its child record folder, the child record folder assumes the shorter review period and ignores its own setting. The shorter review period takes precedence. |
| Vital Reviewer (Reviewer) | A reviewer for the item. Use the system default reviewer as specified on the Configure Retention Settings Page or select one from the list. The selected reviewer receives e-mail notification when it is time to review and cycle content items. |
| Vital Review Period (Review Period) text box and list | The number of review periods. Select the review period from the list. Required if the Subject to Review box is selected. |
The following screens are used for scheduling:
For details about scheduled Federated events, see "Federated Search and Freeze Screens". For details about scheduled update events, see "Update Interface".
This page lists all screening reports scheduled from screening pages.

To access this page, click Records then Scheduled then Screening Reports from the Top menu.
To see a list of reports that have been produced, click the Processed Reports link on the Table menu. A listing is displayed showing those reports that have processed.
After processing, information about the report is available. Click the Info icon to view a report's Information page. If the report did not process properly, the Info icon displays the error message received during processing.
Note that reports that have been scheduled and are not recurring ('one-time' reports) are not displayed after they are executed but do appear on the Processed Reports page.
| Element | Description |
|---|---|
| Job ID | The assigned identifier for the scheduled job. |
| Name | The name of the freeze used for the schedule. |
| Requesting User | The user who initiated the scheduled freeze. |
| Job Type | An indicator of job type. One Time indicates the job is run once. Recurring indicates an action done on a repeating schedule. Note that when a job is processed, it is removed from the display. |
| Start Date | The date the job will be initiated. If the job is a long type, the system checks within one day of the start date to see if the job needs to be run. If it is a short type, the system checks if the needs to be run within the hour of the start date and time.
If the job type is recurring, the job continues executing within a defined interval after the start date. |
| Last Processed Date | The date and time the recurring action was last generated. |
| Status | The current status of the scheduled screening report:
|
| Action menu | Displays a menu containing options relevant to the scheduled screening report. The available options depend on the type and status of the scheduled screening report, and may include:
|
| Info icon | Displays the content information page of the automatically generated report file. Use the Web Location or Native File link to view the file. |
This page shows a list of generated actions. The screen depicted here is for a scheduled screening report. A similar screen is used for scheduled recurring freezes.

To access this page, click View History in the Actions menu for a recurring scheduled screening report.
| Element | Description |
|---|---|
| Name | The name of the screening report as specified in the Scheduled Screening Reports Page. Click the link to display the screening report. The report is in the format specified by the Report Format setting on the Configure Retention Administration Page. |
| Process Date | The date and time the recurring screening report was generated. |
| Status | The status of the scheduled screening report:
|
| Action menu | Displays a menu containing options relevant to the scheduled screening report:
|
| Info icon | Displays the content information page of the automatically generated report file. Use the Web Location or Native File link to view the file. |
This page shows details about a scheduled recurring action. It can also be used to edit certain information about a scheduled job.
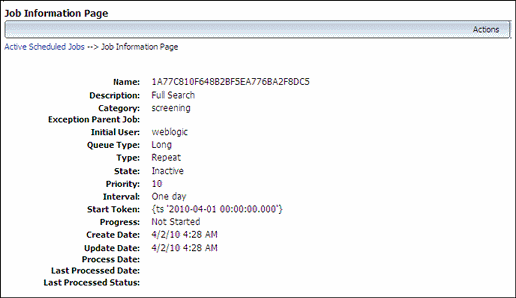
To access this page, click View Report Info from the Actions menu of a scheduled recurring action (for example, Scheduled Recurring Report or Scheduled Recurring Freeze) on the Scheduled Screening Reports Page. You can also access this page by clicking Info from the Action menu of a job on the Scheduled Jobs Listing Page.
The information displayed depends on the type of action in question. The screen depicted here is for a scheduled screening report.
To access the editable version of this page, click Edit from the Action page menu while viewing the job information. You can also access an editable version by clicking Edit in the Action menu of a job on the Scheduled Jobs Listing Page. This screen is also used to schedule jobs for Oracle UCM and can be used to edit schedule job information for Oracle UCM. The following information can be edited when using this screen for Oracle URM.
| Element | Description |
|---|---|
| Description | The description assigned to the job. |
| Category | The type of job (for example, screening or freeze). |
| Initial User | The user who initiated the scheduled freeze. |
| Queue Type | An indicator of job type. Long indicates the job is run in a daily timeframe. Short indicates an action is done in an hourly timeframe. |
| Type | Once indicates the job is run once. Repeat indicates an action done on a repeating schedule. Immediate indicates the job should be processed at once. |
| Start Token | The exact date and time the job will be initiated. |
| Status | The current status of the scheduled screening report:
|
| Action menu (Job Edit screen only) | Displays a menu containing options relevant to the scheduled recurring freeze. The available options depend on the status of the scheduled freeze and may include:
|
This page shows all scheduled recurring freezes.

This page is displayed when a freeze is scheduled. It can also be accessed by clicking Reports then Scheduled then Freezes from the Top menu.
| Element | Description |
|---|---|
| Job ID | The assigned identifier for the scheduled job. |
| Name | The name of the freeze used for the schedule. |
| Requesting User | The user who initiated the scheduled freeze. |
| Job Type | An indicator of job type. One Time indicates the job is run once. Recurring indicates an action is done on a repeating schedule. Note that when a job is processed, it is removed from the display. |
| Start Date | The date the job will be initiated. If the job is a long type, the system checks within one day of the start date to see if the job needs to be run. If it is a short type, the system checks if the needs to be run within the hour of the start date and time.
If the job type is recurring, the job continues executing within a defined interval after the start date. |
| Last Processed Date | The date and time the recurring action was last generated. |
| Status | The current status of the scheduled screening report:
|
| Action menu | Displays a menu containing options relevant to the scheduled recurring freeze. The available options depend on the status of the scheduled freeze and may include:
|
This page is used to modify the scheduling properties of a recurring screening report.
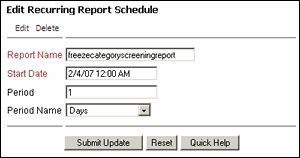
To access this page, click Edit Schedule from the Action menu of a scheduled recurring screening report in the Scheduled Screening Reports Page.
To modify a recurring screening report to become non-recurring (to run once), run the report manually then cancel it.
| Element | Description |
|---|---|
| Report Name field | A new name for the scheduled screening report (if required). |
| Start Date field | The new date the first scheduled screening report should be generated according to the new schedule (if required). All subsequent reports will be generated at the end of each recurring period after this date. |
| Period and Period Name fields | The interval at which the recurring screening report should be created (for example, every 2 weeks). |
This page lists all scheduled recurring jobs.

To access this page, click Active Scheduled Jobs on a Job Information Page/Edit Job Information Page. This page can also be accessed by clicking Administration then Scheduled Job Administration from the Main menu. Click Active Scheduled Jobs.
The icons in the Status column are a summary of information about the item. To see the meaning of an icon, hover the mouse cursor over the icon.
Depending on the type of action and the status, the following information may appear:
Priority: an indication of the priority. For example, High Priority.
Status: the status of the item. For example, Inactive.
Occurrence: whether the item repeats (recurring) or occurs once.
Queue: an indicator of a short or long queue type for this action. A long queue indicates processing in a daily timeframe. A short queue indicates processing in an hourly timeframe.
The following screens are used when processing retention assignments:
This page is used to screen disposition rules for specific types of steps.
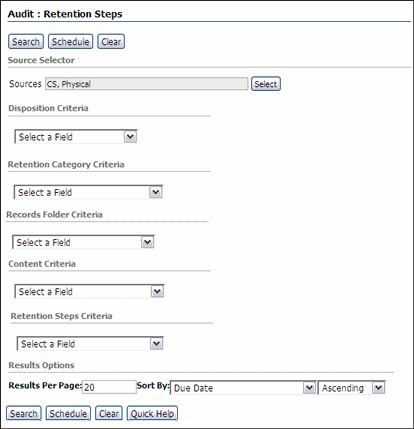
To access this page, click Records then Audit then Retention Steps from the Top menu.
The functionality on this screen is similar to the functionality on a standard search page. See the Oracle Fusion Middleware User's Guide for Universal Records Management for details about performing searches and scheduling searches.
This page displays results from a screening for retention steps.
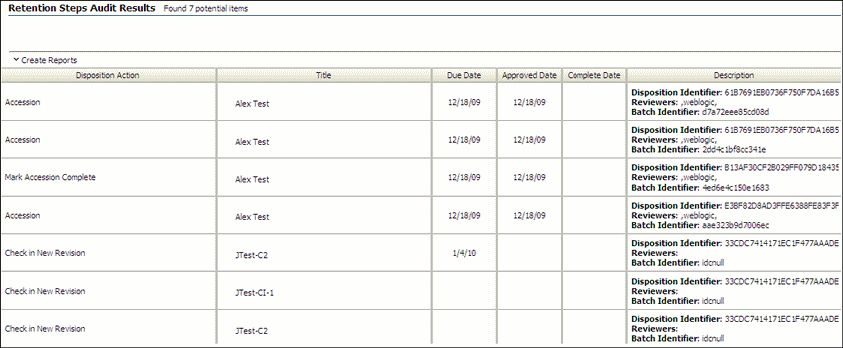
This page is displayed after clicking Search on the Retention Step Search Page.
This page is used to schedule a Retention Step Audit Report.
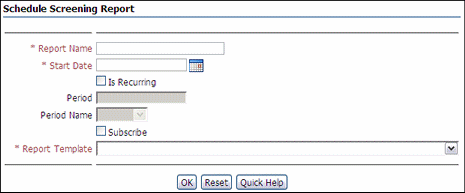
To access this page, click Schedule on the Retention Step Search Page.
This page shows disposition actions which have not processed correctly.

This page is displayed after clicking Records then Audit then Failed Dispositions from the Top menu.
To restart the disposition, select the checkbox for the item and click Retry from the Table menu.
To mark the disposition as complete regardless of whether the action succeeded or not, click the checkbox for the item and click Skip from the Table menu. Use this option with caution because it may have unforeseen consequences when a disposition is skipped.
To create a report of failed dispositions, select the items to include in the report then click Create Reports from the Table menu.
This page shows those actions needing approval. This example shows pending dispositions. A similar page is available for Pending Reviews.

Permissions:
The Admin.PerformActions right is required to use this page. This right is assigned by default to the Records Administrator role. In addition, the user must be designated as the notification recipient when performing actions for others.To access this page, click Records then Approvals then the type of approval from the Top menu.
| Element | Description |
|---|---|
| ID | The category affected by the disposition and the step involved. Note that processing begins with step 0. |
| Name | The disposition action. |
| Filer | The user who initiated the disposition. |
This page shows all reviews that need to be performed.

To access this page, click Records then Approvals from the Top menu. Click Pending Reviews.
Permissions:
The Admin.PerformActions right is required to use this page. This right is assigned by default to the Records Administrator role. In addition, the user must be designated as the notification recipient when performing actions for others.This page shows the actions included in a disposition.
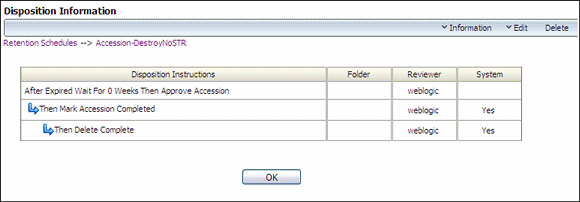
To access this screen click a disposition name on the Pending Dispositions Page or click Disposition Information from the Action menu of a disposition on the Pending Dispositions Page.
This dialog is displayed when a disposition action is marked as approved.

This dialog is displayed when an action is marked for completion on the Pending Dispositions Page. The bottom portion of this dialog is displayed if an action also involves a deletion method.
Use this page to set up reports for retention items, chargebacks, and other functionality.
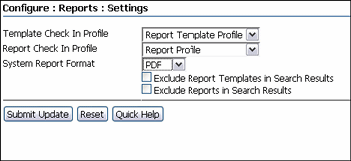
Permissions:
The Admin.RecordManager right is required to use this page. This right is assigned by default to the Records Administrator role.To access this page, click Records then Configure from the Top menu. Click Reports then Settings.
The following options appear on this screen.
| Element | Description |
|---|---|
| Template Check In Profile | Choose a profile to use for the template when it is checked in. |
| Report Check In Profile | Choose a profile to use when the report is checked in. |
| System Report Format | Choose the default format for reports. |
| Exclude Report Templates in Search Results | Check this box to exclude templates from search activities. This box is available for selection only if the Enable Report Exclude Search Options box is checked on the Configure Retention Settings Page. |
| Exclude Reports in Search Results | Check this box to exclude reports from search activities. This box is available for selection only if the Enable Report Exclude Search Options box is checked on the Configure Retention Settings Page. |
These pages are used to add custom scripts, perform performance monitoring, or run audit reports.
Use this page to set up and use performance monitoring.
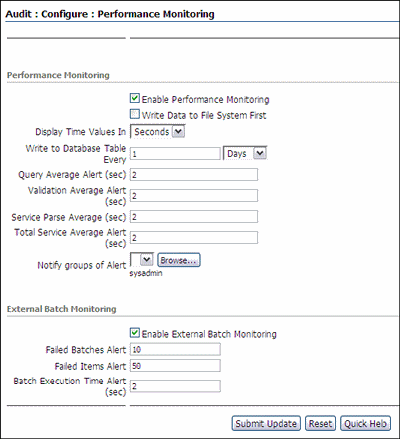
To access this page, click Records then Audit from the Top menu. Click Configure then Performance Monitoring from the Top menu.
| Element | Description |
|---|---|
| Enable Performance Monitoring box | Click this box to enable performance monitoring. |
| Write data to File System First | Enables storage of data before creation of reports. This can speed the process for larger batches of data. If unchecked, the data is not saved temporarily before it is compiled into a log file. |
| Display Time Values In | Determines the format of time value reporting. Options include seconds, minutes, or hours. |
| Write to Database Table Every | Determines the length of time between writing the perfomance information to the database. |
| Query Average Alert (sec) | Determines if queries will be tracked and the average time deemed reasonable for a query. Alerts will be issued if the amount exceeds this number. |
| Validation Average Alert (sec) | Determines if validations will be tracked and the average time deemed reasonable for a validation. Alerts will be issued if the amount exceeds this number. |
| Service Parse Average (sec) | Determines if services will be tracked and the average time deemed reasonable for a service parse action. Alerts will be issued if the amount exceeds this number. |
| Total Service Average Alert (sec) | Determines if services will be tracked and the average time deemed reasonable for a service action. Alerts will be issued if the amount exceeds this number. |
| Notify Groups of Alert | Used to choose a recipient to receive alerts. This list is populated if users and aliases have been added to a My Favorites list. If none are added, click Browse to open a dialog where a user or alias name can be added. |
| Enable External Batch Monitoring | Begins monitoring of external batch processes. |
| Failed Batches Alert | Indicates a minimum number of batches which can fail before an alert is sounded. |
| Failed Items Alert | Indicates a minimum number of items which can fail in processing before an alert is sounded. |
| Elapsed Time Alert (sec) | Indicates the amount of time that can elapse before an alert is sounded. |
Use this page to view the results of performance monitoring.
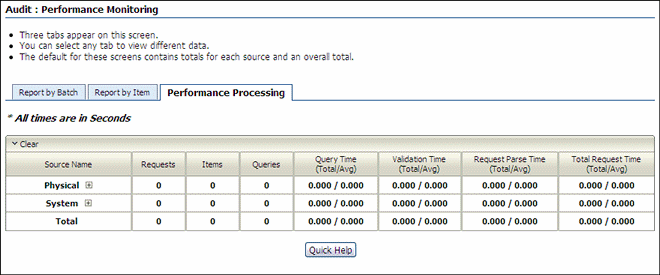
To access this page, click Records then Audit then External Performance Monitoring from the Top menu. This option only appears if performance monitoring has been enabled.
Select any tab to view different data. The default for these screens contains totals for each source and an overall total. If a column is hidden, rest the cursor on the column and the column heading appears in a tooltip.
Performance Processing: this page contains a summary of requests processed, total items processed, total number of queries run, total time to run queries, total time to validate data, total service request parse time and total service request time per each external source. Averages for these are also included.
Report by Batch: this page contains a summary of batches/items pending, processed, and failed with a total for each source. If an item has failed, a batch file is created that can be re-run. Click on any value in a column to display a page showing details about that item.
Report by Item: this page contains the details per batch for a particular source, status or batch type as well as totals. The detail page for the item contains the batch type, start time, completed time, elapsed time, and number of items processed for each batch.
This message appears is performance results exceed the limits set when performance monitoring was configured.

This alert appears automatically and cannot be accessed unless performance limits are reached or exceeded.
This screen displays detailed information about performance results.

A screen of this type is displayed when a link is clicked on the Performance Monitoring Alert Message or (for example) when a batch detail is clicked on the Report by Batch tab on the Performance Processing Results Page.
The specific screen that is displayed depends on the link that is clicked. The screen shown here is one sample of such a screen.
Use this page to configure a security script or a notification script.

To access this page, click Records then Configure from the Top menu. Click Security then Custom Scripts. Use this page to configure notification or security scripts. The two types of security creation pages are similar. Only the notification script screen is depicted in this documentation.
To add a new script, select the script type by clicking on the appropriate tab. Then click Add. To edit an existing script, click the script name or select Edit from the script's Action menu.
Use this page to enter the Idoc Script needed for a notification or security script or to edit the text of an existing script.
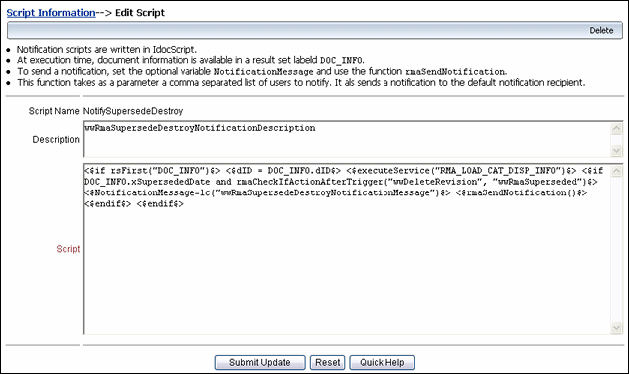
Access this page by clicking Add on the Configure Custom Script Page. To access the Edit version of this page, click Edit on the Action menu of a specific script on that page or use the Delete option on the Edit Page to remove the script.
The custom script information page displays the content of a custom script.
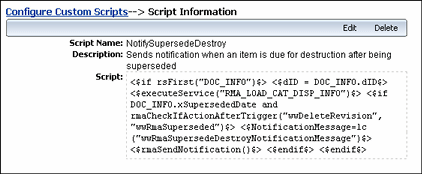
To access this page, click the script name on the Configure Custom Script Page.
This page is used to determine what will appear on the Audit Page. By default, all options are selected when the Configure Audit page is first accessed.
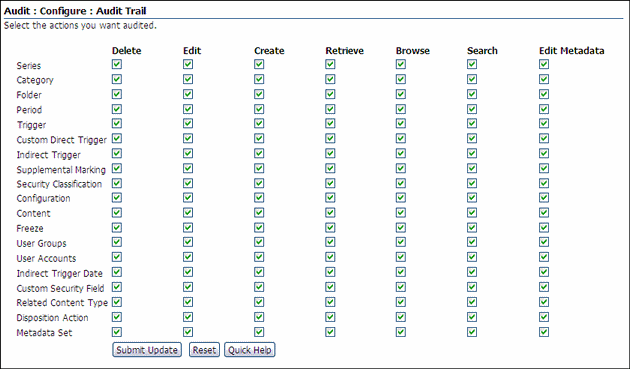
Permissions:
The Admin.Audit right is required to use this screen. This right is assigned by default to the Records Administrator role.To access this page, click Records then Audit from the Top menu. Click Configure then Audit Trails.
Note:
The Edit Metadata column is only visible if the Log Metadata Changes option is enabled on the Configure Retention Administration Page.| Audited Objects and Elements | Actions Recorded |
|---|---|
| Series
Category Folder Period Trigger Custom Direct Trigger Indirect Trigger Supplemental Marking Security Classification Configuration Content Freeze User Groups User Accounts Indirect Trigger Data Custom Security Field Related Content Type Disposition Action Metadata Set |
The actions to be recorded in the current audit trail:
The User Accounts column represents users and is not to be confused with the accounts-based security model within Oracle UCM. The Configure Audit User Accounts option tracks users and not document accounts. The User Groups options tracks users assigned to an alias group. |
Use this page to specify which metadata fields should be included in the audit trail.
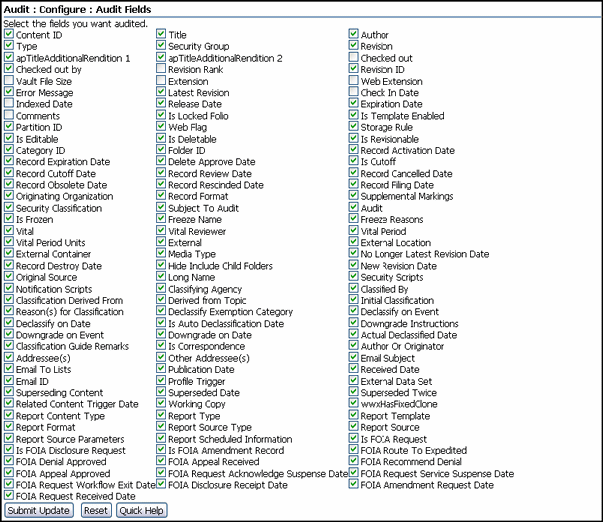
Permissions:
The Admin.SelectMeta and Admin.Audit rights are required to use this page. Audit.SelectMeta is assigned to the Records Administrator role by default.To access this page, click Records then Audit from the Top menu. Click Configure then Audit Fields. To enable an option, select its checkbox then click Submit Update.
Use this page to cut off and check in the audit trail. First set the default metadata for the audit trail when archiving and checking it into the repository. In addition, archived audit trails can be searched from this page.
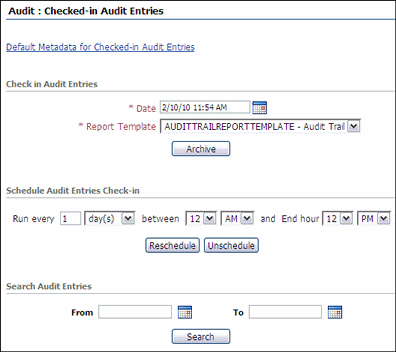
Permissions:
The Admin.Audit and the Admin.RecordsManager right is required to use this page.To access this page, click Records then Audit then Checked-In Audit Entries from the Top menu.
| Search Audit Trail Section | Description |
|---|---|
| Date fields | The date on which to check in the audit log. |
| Template | The template to use for the checked-in audit log. |
| Schedule information | The frequency to schedule a report to be run, if needed. Select the frequency by selecting a range of days from the pulldown list. Select the itime parameters for the report to be run. To change a currently scheduled report, click the Reschedule button. To remove a report from the schedule, click Unschedule. |
| Search information | Choose a beginning date and an ending date for a search of the audit trail. |
Use this page to set the default metadata for checking in archived audit trails.
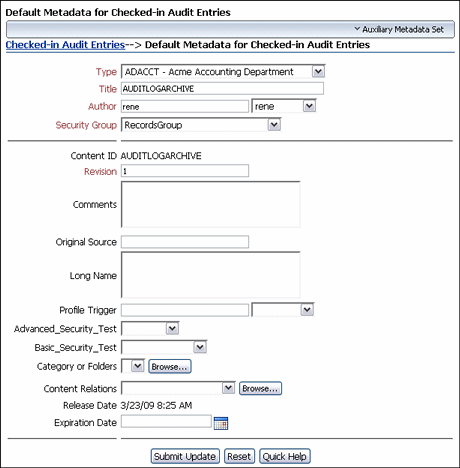
Permissions:
The Admin.Audit right is required to use this page. This right is assigned by default to the Records Administrator role.To access this page, click the Default Metadata for Checked In Audit Entries link on the Checked-in Audit Entries Page.The fields on this page vary according to what is installed at individual sites.
Set the default metadata for audits before archiving audit trails. After the default metadata are set, check in with the same metadata or edit the metadata before check-in. Setting the default metadata saves time when checking in an archive with the same metadata. Defining default metadata enables a user to create a "template" for checking in audit logs with similar metadata. The metadata for the audit logs can be edited at any time.
Use this page to narrow down a search within an audit trail.
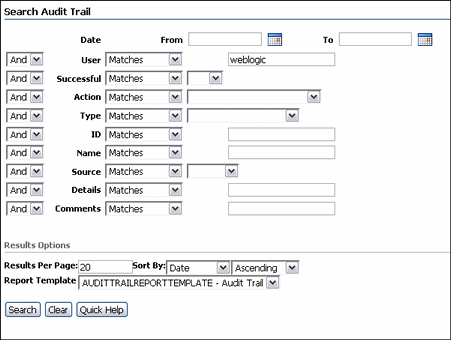
Permissions:
The Admin.Audit right is required to use this page. This right is assigned by default to the Records Administrator role.To access this page, click Records then Audit then Search Audit Trail from the Top menu.
| Search Audit Trail Section | Description |
|---|---|
| Date fields | The date or date range during which to search the audit trail.
Click the icon to the right of each field to choose a date from a calendar. |
| User field | The user name to search for in the audit trail. Any actions by the user name that was entered are retrieved in the search audit report. Default: current user. |
| Successful field | A successful or unsuccessful action by which to search within the current audit trail. Available options are Yes (the attempted action was successful) or No (the attempted action was unsuccessful). |
| Action list | The enabled action by which to search within the current audit trail. These actions are enabled on the Configure Audit Page. |
| Type list | The type by which to search the audit trail. The types displayed are those enabled in the Configure Audit Page. |
| ID field | An identifier for a series, retention category, record folder, or content item to track. You can also enter the identifier of a custom period, custom trigger, supplemental marking, or custom security field. |
| Name field | The name of a series, retention category, record folder, or content item to search for in the audit trail. You can also enter the name of a custom period, custom trigger, supplemental marking, or custom security field. |
| Details field | Keywords that contain details to search for in the audit trail. Details tracked include changes to the software configuration, the document ID, the number of results found when searching a folder, and so on. |
| Comments field | A text string used for searching. |
The following table discusses sorting options for the audit trail.
| Results Options Section | Description |
|---|---|
| Sort By field list | The sorting method (such as by Date or by ID). |
| Sort By order list | The sort order of the search audit results.
|
| Search button | The audit trail items matching the search criteria. The search audit report is generated in the format specified by the Report Format setting on the Configure Retention Administration Page. If no search criteria is entered, the entire search audit trail is displayed.
To return to the Search Audit Trail page, click the browser's Back button, or click a link to which to navigate in the menu area. |
The following screen is used when managing the import/export process:
Use this page to import or export an archive.
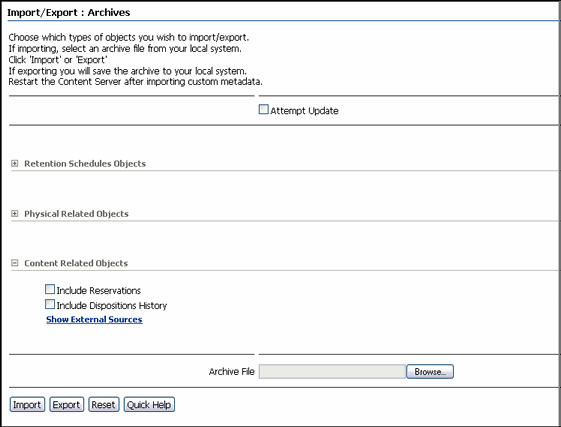
Options on this page are hidden until the plus sign (+) next to the section heading is clicked.
To access this page, click Records then Import/Export then Archives from the Top menu.
Note:
When exporting auxiliary metadata, first include additional tables in the Table list in the Configuration Manager applet. See the detailed task documentation in the Oracle Fusion Middleware Administrator's Guide for Universal Records Management for details about this procedure.| Element | Description |
|---|---|
| Export Date field | Exports only items that changed since a specific date. Enter the start date or select one using the calendar next to the field.
This field is only displayed if the Show Export Date box on the Configure Retention Settings Page has been selected. |
| Retention Schedule Objects boxes | Objects to include or exclude in the archive.
|
| Physical Related Objects boxes | Objects to include or exclude in the archive.
|
| Content Related Objects boxes | Objects to include or exclude in the archive.
If Show External Sources is clicked, any external source systems are displayed. Click the appropriate checkboxes to include metadata from the selected source or to include the disposition history from the selected source. |
| Attempt Update | Check to update information during the import. |
| Archive File | A name for the archive file. Click the Browse button to search for previously created files. |
| Import or Export button | Imports or exports the archive file to a specified location and name. |
If an add-on is installed, there may be more items available for export than the ones shown in the above screenshot (for example, items related to external sources).
This page is used to choose a schema definition for use or to imitate the addition of a new schema.

To access this page, click Records then Import/Export from the Top menu. Click Configure then Import/Export Schema.
| Element | Description |
|---|---|
| Schema Name | The name of the schema to use. |
| Schema File Name | The archive file name. |
| Schema Description | The description given for the schema. |
Use this page to add a new schema for importing or exporting.
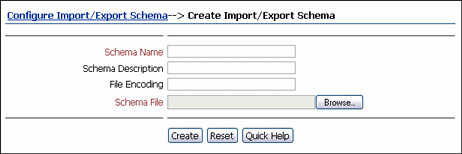
To access this page, click Add on the Configure Import/Export Schema Page.
| Element | Description |
|---|---|
| Schema Name | The name of the schema to use. |
| Schema Description | The description given for the schema. |
| File Encoding | The encoding type used for the schema. |
| Schema File | The file to be used for uploading. |
This page is used to specify nodes for inclusion in the export.
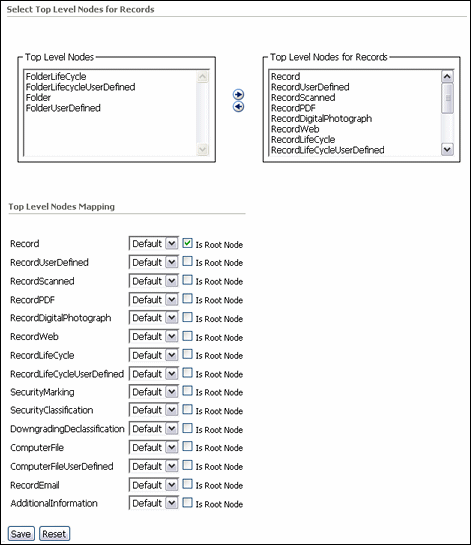
To access this page, click Configure Top Level Nodes in the Action list of an item on the Configure Import/Export Schema Page.
This page is used to map fields for import and export.
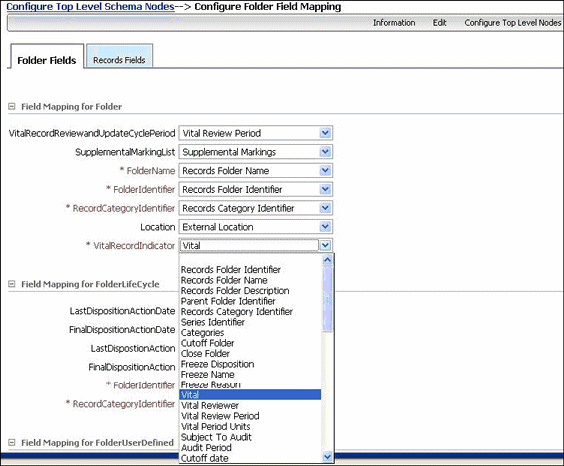
To access this page, click Map Fields on the Page menu on the Configure Top Level Schema Nodes Page.
This page is used to specify a schema archive for importing.
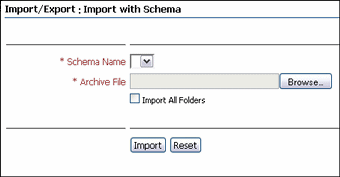
To access this page, click Records then Import/Export then Import with Schema from the Top menu.
| Element | Description |
|---|---|
| Schema Name | The name of the schema to import. |
| Archive File | The archive file to be imported. |
This page is used to specify a schema archive for exporting.
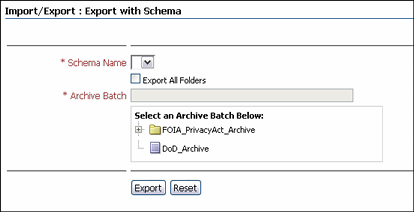
To access this page, click Records then Import/Export then Export with Schema from the Top menu.
| Element | Description |
|---|---|
| Schema Name | The name of the schema to export. |
| Archive Batch | The archive batch file to be exported. |
These pages are used to set up the components needed to process requests for information under the Freedom of Information Act (FOIA) and Privacy Act (PA). This section is divided into two subsections:
"FOIA/PA Processing Screens": these screens are used during the workflow to process a request.
"FOIA/PA Data Screens": these screens depict forms used to provide supporting documentation for the requests.
This section does not include screen depictions of the workflow used to set up the FOIA and PA process. See the Oracle Fusion Middleware Application Administrator's Guide for Content Server for details about workflows.
The following screens are used to process FOIA requests in workflows. The following screens are included:
This screen shows all workflows that are activated. Not all workflows shown here may be in active use.
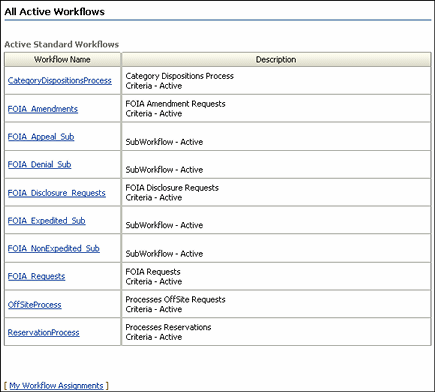
To access this screen, click Content Management then Active Workflows.
| Element | Description |
|---|---|
| Workflow Name | Activated workflows and sub workflows. This does not imply content is being processed in the workflow, only that the workflow is active and ready to process information. |
| Description | A description of the workflow, indicating if it is a primary workflow or a sub-workflow. |
| My Workflow Assignments link | A link to the "Assignments in Queue Screen", listing all current workflow assignments for the logged-in user. |
This screen displays all workflow assignments for the logged-in user.

To access this screen, click Content Management then Active Workflows. Click My Workflow Assignments.
| Element | Description |
|---|---|
| Content ID | The content ID of the item in the queue that is assigned to this user for processing. |
| Title | Title of the item in the queue. |
| Last Action | The last action for the content item, usually the name of a workflow step. |
| Last Action Date | The date and time when the last action was taken. |
| Enter Date | The date the item entered the current workflow step. |
| Actions | The Action menu containing actions that can be taken for the item and the Workflow Review icon, which displays the "Workflow Review Page". |
Use this form to initiate the workflow process for a request for amendment to a record.
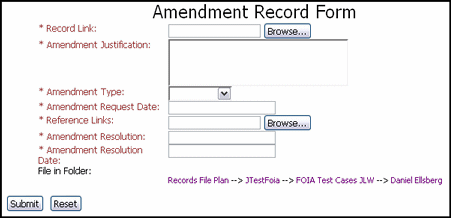
To access this form, click Create then FOIA Requests or Privacy Act Requests from the Action menu of a folder used to store FOIA or PA information. Click Amendment Record Form.
| Element | Description |
|---|---|
| Record Link | Click the Browse button to search for the record to be amended. |
| Amendment Justification | A text description of the justification given for the amendment. |
| Amendment Type | Select the type of amendment:
|
| Amendment Request Date | The date the request was received. |
| Reference Links | Links to record(s) supplied by the requestor as documentary evidence. Click Browse to open a search page to search for the records. |
| Amendment Resolution | A brief statement of how the amendment request was resolved. |
| Amendment Resolution Date | The date the request was resolved. |
Use this form to initiate a workflow for a disclosure request. Note that this is a Disclosure Request Form, not a Disclosure Record Form.
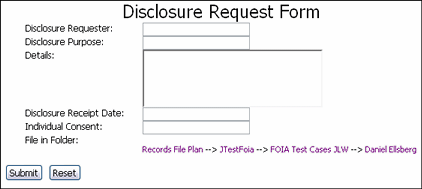
To access this form, click Create then FOIA Requests or Privacy Act Requests from the Action menu of a folder used to store FOIA or PA information. Click Disclosure Request Form.
| Element | Description |
|---|---|
| Disclosure Requestor | Contact information for the authorized agent requesting the disclosure. |
| Disclosure Purpose | The use or purpose to which the disclosed information will be put. |
| Details | Additional details about the requested disclosure. |
| Disclosure Receipt Date | The date the disclosure request was received. |
| Individual Consent | Some disclosures require individual consent forms. |
Use this form to initiate a workflow to process a request for information.
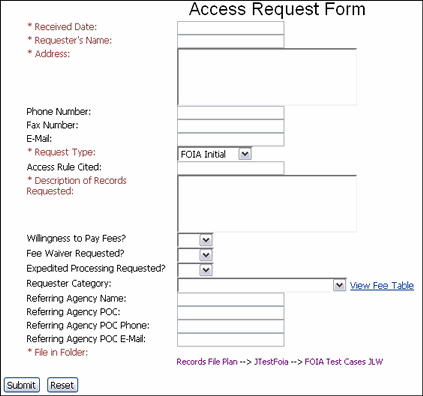
To access this form, click Create then FOIA Requests or Privacy Act Requests from the Action menu of a folder used to store FOIA or PA information. Click Access Request Form.
| Element | Description |
|---|---|
| Received Date | The date the request was received. |
| Requestor's Information | The name, address, phone number, fax number, and email address of the initiator of the request. |
| Request Type | Select the type of request:
If this is a Privacy Act request, the options are:
|
| Access Rule Cited | The title, date, and version of the rule under which the request was made. |
| Fee Questions | Choose Yes or No to indicate if the requestor is willing to pay a processing fee. Required for FOIA requests.
Choose Yes or No to indicate if the requestor is requesting a waiver of fees. Required for FOIA requests. |
| Expedited Processing Requested | Choose Yes or No to indicate if the requestor requests expedited processing. |
| Requestor Category | Required for FOIA requests. Select the category for the requestor. The category chosen will dictate the fee used, as described in the Request Fee Table:
|
| Referring Information | If this is a referral, enter the information about the referring agency, point of contact, point of contact phone number, and point of contact email address. |
| File in Folder | The locator links for the current folder are displayed. |
The fee table indicates the payments associated with the category of requestor on the Access Request Form.
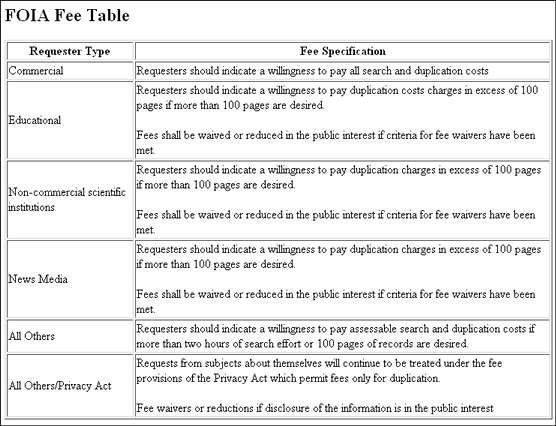
To access this table, click the View Fee Table link next to the Requestor Category on the Access Request Form.
This page displays items in workflows as well as the stage of the workflow where the item is currently processing.

To access this page, click Content Management then Active Workflows from the Main menu. This page is also displayed whenever an action is taken on the Workflow Review Page.
The Step Name column indicates the stage of the workflow. Note that "ExpeditedDecision" does not imply that an expedited decision has been requested. It is the name of the stage of the workflow.
This page displays the current item in the workflow as well as the Review Workflow Pane, where actions can be taken.
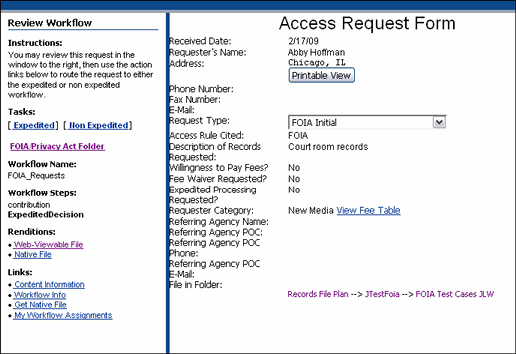
To access this page, click the Workflow Review icon next to an item on the Workflow Content Page. The content of this page varies with the type of request and the stage of the workflow when this page was accessed.
Click the Printable View link on this page to display a popup message showing the address information for the request. Use this to create a mailing label for acknowledgments and other correspondence.
Links in the Review Workflow pane on the left of the screen can be used to initiate actions for the requests. The following links are also available:
The Content Information Page for the request item.
The Workflow Information page.
Get Native File, to retrieve the original request.
My Workflow Assignments, which displays the Workflow Assignment Page.
This form is used to initiate a denial of information to a requestor.
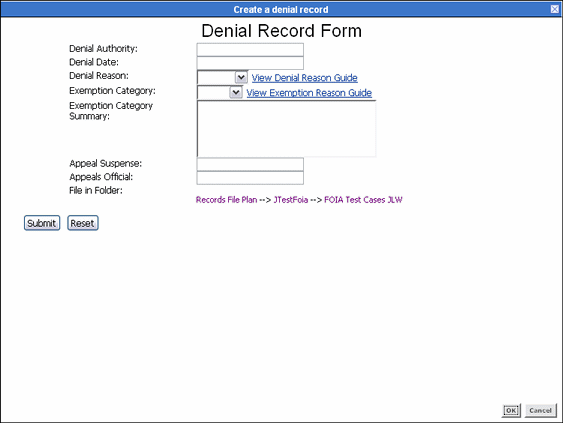
To access this form, click Recommend Denial - Existing Record or Recommend Denial - New Form on the Workflow Review Pane on the Workflow Review Page.
| Element | Description |
|---|---|
| Denial Authority | The name, title, position, signature or electronic signature of the designated denial authority. |
| Denial Date | The date the denial was initiated. |
| Denial Reason | Select the reason for denial from the list. Click View Denial Reason Guide for a list of denial reasons and descriptions. |
| Exemption Category | If an exemption is warranted, choose the category from the list. Click View Exemption Reason Guide for a list of exemptions and descriptions. |
| Exemption Category Summary | If needed, enter a summary of the exemption decision. |
| Appeal Suspense | The suspense duration for the denial. Currently set at 60 calendar days according to DoD 5015.2 specifications. |
| Appeals Officer | Name, title, position, signature, or electronic signature of the designated authority. |
| File in Folder | The locator links for the current folder are displayed. |
This form is used to start an appeal when a FOIA or PA request is denied.
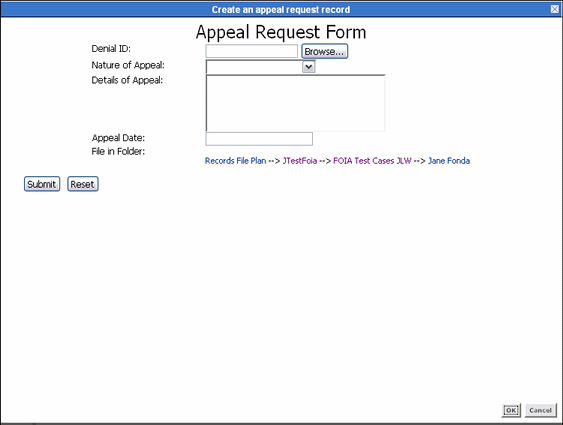
To access this form, click Appeal Received - New Form in the Review Workflow pane on the Workflow Review Page. Appeals are always linked to denials.
| Element | Description |
|---|---|
| Denial ID | Click Browse to search for and link to the denial record being appealed. The ID of the request is inserted and this appeal will then be associated with it. |
| Nature of Appeal | Choose from the following options:
|
| Details of Appeal | Further details about the appeal. |
| Appeal Date | The date the appeal was received. |
This dialog is used to collect request processing information for reports.

This dialog is displayed when a request workflow completes, either after the request is serviced or if the request for information is denied.
| Element | Description |
|---|---|
| Final Result | Choose a result from the list. Options include:
|
| Fees Collected | Enter a decimal amount, excluding the dollar sign. |
| Staff Allocated | Enter an integer indicating the number of people who were allocated to service the request. |
| Amount Spent Servicing | Enter the total amount spent to service the request. |
These screens are used to provide details about the requests processed in Oracle URM. Depending on the type of request, a variety of forms are used. For complete details about these forms and when they are used, see the DoD 5015.2 specification.
The following forms are described here:
Use this form to document the collection of records for an access request.
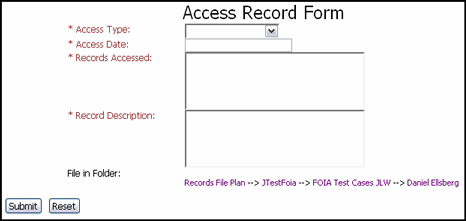
To access this form, click Create then FOIA Requests or Privacy Acts Requests from the Action menu of a folder used to store FOIA or PA information. Click Other then click Access Record Form.
| Element | Description |
|---|---|
| Access Type | Choose from the following options that describe how the records are gathered for the request:
|
| Access Date | The date the records were accessed:
|
| Records Accessed | A listing of records accessed by or provided to the individual. |
| Record Description | A summary of the record state (original, redacted, summary, etc.) |
| File in Folder | The locator links for the current folder are displayed. |
Use this form to track disclosures of information from the System of Records (SOR). This form is linked to disclosures in review.

To access this form, click Create then FOIA Requests or Privacy Act Requests from the Action menu of a folder used to store FOIA or PA information. Click Other then click Accounting Record Form.
| Element | Description |
|---|---|
| Accounting Review Date | The date the disclosure was reviewed. |
| Accounting Reviewed By | The name and contact information for the person conducting the review. |
| Disclosure ID | Enter the disclosure ID or click Browse. A search screen is displayed. Enter the metadata for searching or click Search to return all items. Click the checkbox of the item to use for linking then click OK. |
| Accounting Release Date | The date accounting was released to the individuals involved. |
| Access Request | Click Browse to link to the original access request. A search screen is displayed. Enter the metadata for searching or click Search to return all items. Click the checkbox of the item to use for linking then click OK. |
| File in Folder | The locator links for the current folder are displayed. |
Use this form to create a record of disclosure.
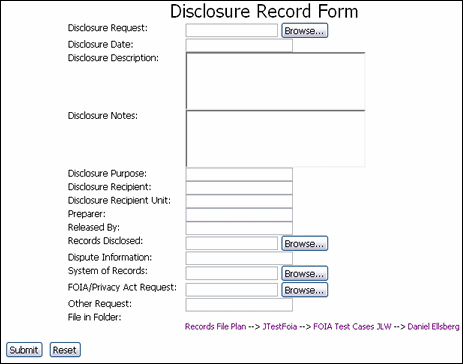
To access this form, click Create then FOIA Requests then Disclosure Record Form from the Action menu of a folder used to store FOIA or PA information. Click Other then click Disclosure Record Form.
| Element | Description |
|---|---|
| Disclosure Request | Enter the disclosure ID or NARA transfer identifier or click Browse. A search screen is displayed. Enter the metadata for searching or click Search to return all items. Click the checkbox of the item to use for linking then click OK. |
| Disclosure Date | The name, address, phone number, fax number, and email address of the initiator of the request. |
| Disclosure Description | A description of the information released. This may also include links to the actual records disclosed. |
| Disclosure Purpose | The reason for the disclosure. |
| Disclosure Recipient | The name of the recipient of the disclosed records. |
| Disclosure Recipient Unit | The organization receiving the disclosed records. |
| Disclosure Notes | A discussion of deletions or changes to the disclosed records. This may include other information that is pertinent to the disclosure. |
| Preparer | The identification of the person responsible for preparing the disclosure. |
| Released By | The identification of the person responsible for releasing the disclosure. |
| Records Disclosed | A link to the records disclosed. Click Browse. A search screen is displayed. Enter the metadata for searching or click Search to return all items. Click the checkbox of the item to use for linking then click OK. |
| Dispute Information | Indicate if the disclosed information has been corrected or disputed. |
| Request Type | If linked to a FOIA request or Privacy Act request, click Browse. A search screen is displayed. Enter the metadata for searching or click Search to return all items. Click the checkbox of the item to use for linking then click OK.
If used for another type of request (such as court order, subpoena, and so on) indicate that type in the Other Request field. |
Use this form to add details about disputed records.
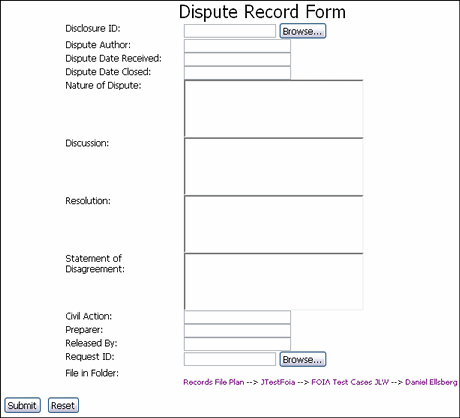
To access this form, click Create then FOIA Requests or Privacy Act Requests from the Action menu of a folder used to store FOIA or PA information. Click Other then Dispute Record Form.
| Element | Description |
|---|---|
| Disclosure ID | A link to the disclosure record. Click Browse. A search screen is displayed. Enter the metadata for searching or click Search to return all items. Click the checkbox of the item to use for linking then click OK. |
| Dispute Author | The name of the person initializing the dispute. |
| Dispute Date Received | The date the organization received the dispute. |
| Dispute Date Closed | The date of the final action on the dispute. |
| Nature of Dispute | A summary of the dispute allegations. |
| Discussion | A discussion of the dispute allegations. |
| Resolution | A discussion of the final resolution of the dispute. |
| Statement of Disagreement | This is required if the dispute author provides a statement. |
| Civil Action | This is required if a civil action arises from the dispute. |
| Preparer | The identification of the person preparing the disclosure or the individual access response that led to the dispute. Required if the dispute is related to a disclosure. |
| Released By | The identification of the person approving the disclosure or the individual access response. Required if the dispute is related to a disclosure. |
| Request ID | A link to the original access request. This is required if the dispute is related to a disclosure or individual access response. Click Browse. A search screen is displayed. Enter the metadata for searching or click Search to return all items. Click the checkbox of the item to use for linking then click OK. |
| File in Folder | The locator links for the current folder are displayed. |
Use this form to detail information about an exemption request.
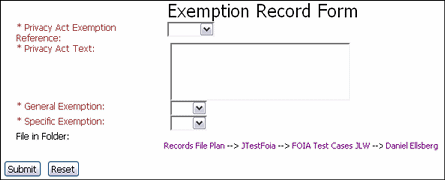
To access this form, click Create then FOIA Requests or Privacy Act Requests from the Action menu of a folder used to store FOIA or PA information. Click Other then Exemption Record Form.
| Element | Description |
|---|---|
| Privacy Act Exemption Reference | Choose the reference in the Privacy Act that allows the exemption. |
| Privacy Act Text | The text which matches the chosen reference is inserted. Optional text can be added. |
| General Exemption | Select Yes or No to indicate if this is a general exemption. |
| Specific Exemption | Select Yes or No to indicate if this is a specific exemption. |
| File in Folder | The locator links for the current folder are displayed. |
Use this form to add information about records that will be cross-matched.
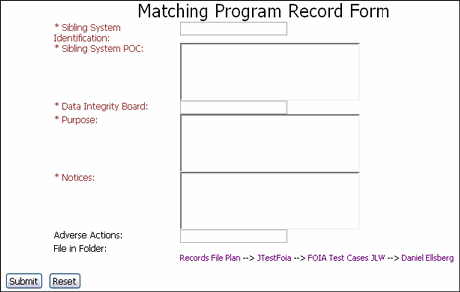
To access this form, click Create then FOIA Requests or Privacy Act Requests from the Action menu of a folder used to store FOIA or PA information. Click Other then Matching Program Record Form. See the DoD 5015.2 specification for details about this form.
| Element | Description |
|---|---|
| Sibling System Identification | The system name or identifier of systems with which the information will be cross-matched. |
| Sibling System POC | The point of contact for the matching system. |
| Data Integrity Board | The name of the board verifying the match. |
| Purpose | The purpose of the matching program. |
| Notices | Any notices associated with this form. |
| Adverse Actions | Any adverse actions associated with this form. |
| File in Folder | The locator links for the current folder are displayed. |
Use this form to create a privacy act case file.

To access this form, click Create then FOIA Requests then Access Request Form from the Action menu of a folder used to store FOIA or PA information. Click Other then Privacy Act File. See the DoD 5015.2 specification for details about this form.
| Element | Description |
|---|---|
| File ID | The privacy act file ID. Enter a maximum of 21 alphanumeric characters. |
| File Name | The file name. Enter a maximum of 55 alphanumeric characters. |
| File in Folder | The locator links for the current folder are displayed. |
This screen is used to prepare the systems of record (SOR) components.
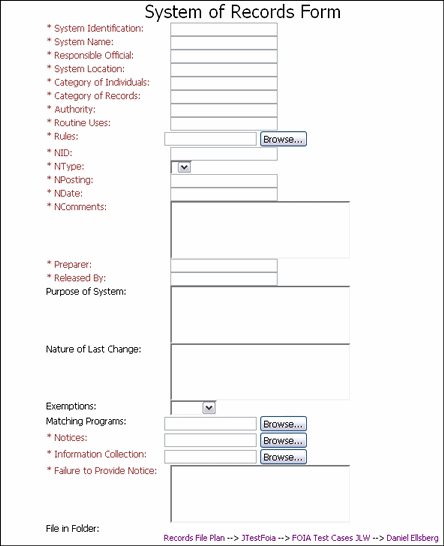
To access this form, click Create then FOIA Requests or Privacy Act Requests from the Action menu of a folder used to store FOIA or PA information. Click Other then System of Records Form. See the DoD 5015.2 specification for details about the sections of the specification pertaining to this form.
| Element | Description |
|---|---|
| System Identification | The system identified. Enter a maximum of 21 alphanumeric characters. |
| System Name | The name of the system used. Enter a maximum of 55 alphanumeric characters. |
| Responsible Official | The title and business address of the responsible agency official. |
| System Location | The addresses of each location where the system or segment of the system is maintained. Classified addresses are not listed but the classification of a system should be noted. |
| Category of Individuals | A description of the specific categories of individuals to whom the records pertain. |
| Category of Records | Clear descriptions of the types of records maintained in the system. |
| Authority | Links to authority records. |
| Routine Uses | A description about how the information will be used. Examples include Law Enforcement, Taxing Authorities, or Congressional Inquiry. See the DoD 5015.2 specification for more details. |
| Rules | The name of the documentation providing the access rules. Click Browse. A search screen is displayed. Enter metadata to search for the document then click Search. A list of search results is displayed. Click the checkbox of the item to use and click OK. |
| NID | The notice identifier. |
| NType | Choose the type from the list Options include New, Alteration, Amendment or Deletion. |
| NPosting | The date and volume of the Federal Register. |
| NDate | The date the notice was published in the Federal Register. |
| NComments | Any comments about unique circumstances of this notice. |
| Preparer | The author or preparer of the System of Record Notification (SORN). |
| Released By | The name of the person responsible for ensuring the publication of the SORN. |
| Purpose of System | A brief discussion of the system purpose. This is required for new systems. |
| Nature of Last Change | A discussion of changes to the purpose or use of the system. This includes deletions. This is required for altered systems. |
| Exemptions | Choose the section reference of the exemption. Required if exemptions apply. See the DoD 5015.2 specification for details about exemptions regarding classifications. |
| Matching Programs | Links to matching program records or descriptions. This is required if SOR participates in one or more matching programs. Click Browse. A search screen is displayed. Enter metadata to search for the document then click Search. A list of search results is displayed. Click the checkbox of the item to use and click OK. |
| Notices | Links to or from notices about this SOR. Click Browse. A search screen is displayed. Enter metadata to search for the document then click Search. A list of search results is displayed. Click the checkbox of the item to use and click OK. |
| Information Collection | Identify or links to form(s) used to collect the personal information stored in the system. |
| Failure to Provide Notice | A description of the reason for a failure to provide notice. |
| File in Folder | The locator links for the current folder are displayed. |
The following screens are used when performing Federated searches and freezes.
The following pages are used to schedule Federated searches.
This screen is used to build a query for a Federated search.
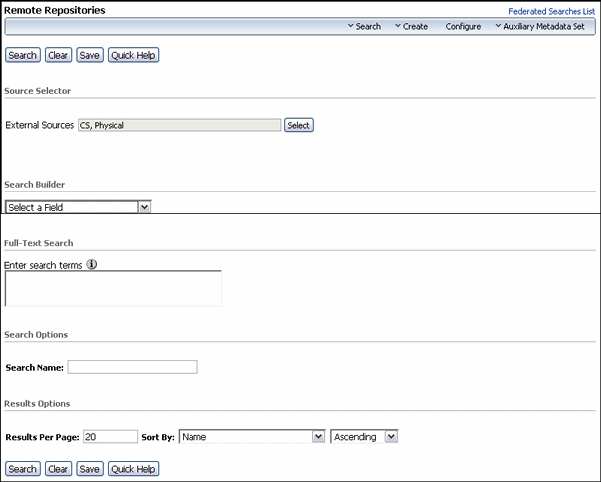
To access this screen, click Search then Global Search from the Top menu. Choose the type of search to perform. A similar screen is used for all three types of searches: Central Catalog, Remote Repository, and SES Search.
When using a Remote Repositiory search, an Include Content checkbox is available, used to retrieve copies of the content that match the search criteria. Do not click this box unless search results are certain. Returning a copy of the data takes long and uses space. Fine tune the query first and verify what items will be returned before actually retrieving the content.
Click the Federated Searches List link to see a list of a previously scheduled searches.
| Element | Description |
|---|---|
| External Sources | The repositories to be used in the search.
Searches are not performed immediately. If an external repository has been chosen, the adapter will schedule the search using its previously established configuration parameters. If local repositories on the Oracle URM server are chosen in this field, they will be searched during regularly scheduled search batches, scheduled by default for midnight. |
| Search Builder | A pull-down menu containing all fields available for searching. The fields displayed are those in use on the Oracle URM server. These fields should be mapped to those on remote repositories in order to assure correct retrieval.
When a field is selected, additional search options appear, allowing a user to match the field to a specific value. See the Oracle Fusion Middleware User's Guide for Content Server for details about using the Query Builder tool. |
| Full-text Search | Area used to enter terms for searching. Not all remote repositories will be configured for full-text searching. If using this option, make sure the repositories selected for searching allow this type of search. |
| Search Name | A name for the search. Federated Searches are performed by adapters and thus conform to an adapter schedule. A meaningful search name will help track the progress of the search. |
| Results section | Selects the number of results per page. Default: 20. |
| Sort By attribute list | Selects one or more attributes by which to sort the results. The list contains all of the screening criteria options. |
| Sort order list | Specifies the sort order of the screening results:
|
| Save button | Prompts the user to save the query under a query name. Once saved, the query is available in the My Saved Query section of the My Content Server menu. |
This page displays a list of all scheduled searches and their progress.

To access this page, click Federated Searches List from the Federated Query Builder Page or by clicking Records then Scheduled then Federated Searches.
| Element | Description |
|---|---|
| Search Task ID | An assigned ID for the scheduled search. |
| Search Task Name | The name given to the search on the Federated Query Builder Page. |
| Sources | The number of sources chosen for the search. |
This page shows the details of a scheduled search.

To access this page, click Show Search Details from the Action menu of a search on the Federated Searches List Page.
This page shows the results of a search.
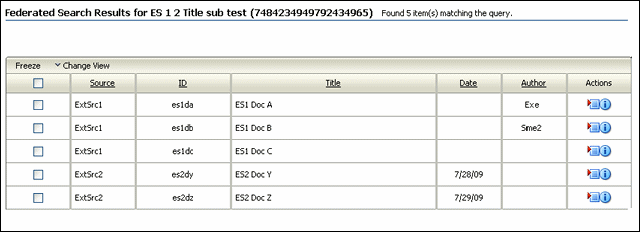
To access this page, click Show Search Results from the Action menu of a search on the Federated Searches List Page