| Oracle® Fusion Middleware Configuration Guide for Oracle Enterprise Repository 11g Release 1 (11.1.1.4.0) Part Number E16580-05 |
|
|
View PDF |
| Oracle® Fusion Middleware Configuration Guide for Oracle Enterprise Repository 11g Release 1 (11.1.1.4.0) Part Number E16580-05 |
|
|
View PDF |
This chapter provides an overview of compliance templates, and their role in prescriptive reuse.
Oracle Enterprise Repository serves as a communication mechanism between stakeholders involved in project evaluation and developers who are involved in a project's implementation. Business Analysts or architects are responsible for reviewing a project's requirements. During this process, they might identify existing services or capabilities that will fulfill the functional and non-functional requirements of the project.
Oracle Enterprise Repository allows these stakeholders to construct a Compliance Template that includes a list of existing assets that might be relevant to the project. This process is called prescriptive reuse, and it is extremely valuable in contracting organizations. A contracting organization may specify or bid a project several months prior to the bid being accepted by the customer. Compliance templates become a way for these organizations to capture the assumptions that were made when the project bid was created. When the bid is accepted, the team executing the work has visibility into the assets that were assumed to be reusable.
This chapter contains the following sections:
The term Compliance Template describes a particular family of Oracle Enterprise Repository artifacts. Examples of specific compliance template types include:
Compliance Templates are used to communicate asset requirements or asset solution sets to internal or outsourced project teams. Project Profiles are usually created for individual projects, whereas Architecture Blueprints are reusable solution sets that can be leveraged by multiple projects.
Compliance Templates are typically generated by individuals or teams responsible for asset and project portfolios:
Project Planners might generate a Project Profile for each project in the portfolio, outlining the planning and estimating assumptions.
Project Architects might generate a Project Profile to identify assets that fulfill a project's business requirements.
Enterprise Architects might generate an Architecture Blueprint that specifies the standard frameworks and servers that are to be used by new projects.
Those responsible for Service Oriented Architectures might generate an Architecture Blueprint to identify the services that orchestrate a particular business function.
Product Line Architects might generate an Architecture Blueprint that specifies the assets that are to be used on a specific product line.
If upgrading from earlier product versions, compliance templates and examples may be obtained by installing the examples in the Base datapack using the Import/Export Tool. For more information about the Import/Export tool, see "Import Export Tool" in Oracle Fusion Middleware User Guide for Oracle Enterprise Repository.
This procedure is performed in the Type Manager. This example illustrates the creation of a Project Profile compliance template type.
Caution:
Adding a compliance template constitutes a permanent change to the Oracle Enterprise Repository system.In order to preserve database integrity, only Compliance Templates to which no assets are currently associated may be deleted.
If a Compliance Template Type is available in the Type Manager:
Select New in the File menu. The Create New Type dialog is displayed, as shown in Figure 11-1.
Enter the appropriate information in the Type Name text box.
In the Type for Defaults list, select a Compliance Template Type from the list.
Click OK. The new Type is displayed in the tree in the Type Manager sidebar, as shown in Figure 11-2.
If no Compliance Template Type is available in the Type Manager:
Compliance templates and examples may be obtained from the Oracle Enterprise Repository Base datapack using the Import/Export Tool.
If an alternative method is preferred, a new Compliance Template Type may be manually generated:
Select New in the File menu. The Create New Type dialog is displayed.
Enter the appropriate information in the Type Name text box.
In the Type for Defaults list, select any Type from the list.
Click OK. The new Type is displayed in the tree in the Type Manager sidebar.
Open the new compliance template type in the Type Manager.
Click the Editor tab of new compliance template type.
Select Compliance Template Type in the Archetype list in the General section of the Editor tab, as shown in Figure 11-3.
Click Save in the File menu.
Select one of the of the tabs listed in the Tabs section, as show in Figure 11-4.
The elements assigned to that tab appear in the list in the Elements section.
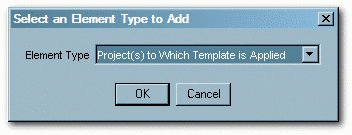
Click the Add button in the Elements section. The Select an Element Type to Add dialog is displayed, as shown in Figure 11-5.
Figure 11-5 Select an Element Type to Add Dialog

Select Project(s) to Which Template is Applied from the list in the Select an Element Type to Add dialog.
Click OK. The Select an Element Type to Add closes.
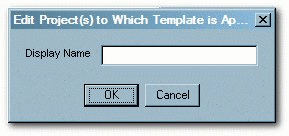
Follow the prompt to enter a label for the new element, as shown in Figure 11-6.
Figure 11-6 Edit Project(s) to Which Template is Applied Dialog

Click OK. The new elements is displayed in the list in the Elements section.
Click Save in the File menu.
Click the Viewer tab of new compliance template type.
Locate and select the new element in the list of Hidden Elements, as shown in Figure 11-7.
Click the Display in Group button. The Move Element dialog is displayed, as shown in Figure 11-8.
Use the list in the Move Element dialog to select a location for the new element.
Click OK. The new element is displayed in the list in the Elements section of the Viewer tab.
Click Save in the File menu.
This procedure is performed in the Asset Editor, and is very similar to Advanced Asset Submission, as described in the "Advanced Asset Submission" section in Oracle Fusion Middleware User Guide for Oracle Enterprise Repository.
Select New in the File menu. The Create a New Asset dialog is displayed, as shown in Figure 11-10.
Enter the appropriate information in the Name and Version text boxes.
Select the appropriate Type template from the list.
Click OK. The new compliance template is displayed in the Asset Editor, as shown in Figure 11-11.
Click the Taxonomy tab, and under Relationships section, click Add to add relationships.
Select the assets that are required to be used by the project.
Assign the appropriate relationships: Prescribed Assets, Prescibed Processes, and Prescribed Environments, as appropriate.
Click Save in the File menu in the Asset Editor.
The asset is submitted for review and registration.
For more information, see the Registration Process section in Oracle Fusion Middleware User Guide for Oracle Enterprise Repository.
Follow this procedure to create Project Profiles, Architecture Blueprints, or other variations of the Compliance Template.
This procedure begins on the Oracle Enterprise Repository Assets screen.
Use Search or other means to locate the compliance template to be applied to the project. (Select the desired compliance template in the Type list in the Search section to filter search results.)
Click Apply to Projects. The Apply to Projects dialog is displayed, as shown in Figure 11-12.
Click List All Projects or use Search to locate the project to which the profile is applied. A list is displayed in the Available Projects column.
Select the project to which the profile is applied.
Click the right arrow button to move the project from the Available Projects column to the Projects Applied to column. The project moves from Available Projects to Projects Applied to.
Click Save. A confirmation dialog is displayed, as shown in Figure 11-13.
Figure 11-13 Apply to Projects Confirmation Dialog

Click Close.
Click the Projects link in the Oracle Enterprise Repository menu bar. The Projects screen is displayed.
Use Search or other means to locate the project to which the project profile was applied.
Click the Compliance Templates tab in the Project Detail. The applied compliance template is listed in the Compliance Templates tab.
Note:
If the enterprise repository plugin for Eclipse or .Net is installed, the assets identified in the compliance templates will also appear in the project's development environment.A Compliance Template may be used to prescribe specific assets for use in any projects to which the compliance template is applied. This section outlines the process for consuming prescribed assets.
This procedure begins on the Oracle Enterprise Repository Projects screen.
Use Search or other means, as shown in Figure 11-14, to locate the project.
Any compliance templates applied to the project is listed in the Compliance Templates section of the project detail, as shown in Figure 11-15.
Click Use Assets to the right of the name of the listed compliance template. The Use / Download dialog is displayed, as shown in Figure 11-16.
Note:
The Use Assets button will appear only to users who are assigned to the project.Use the options in the Use column to select the assets to be downloaded.
Click the Next button. The Use / Download dialog confirms the asset selections, as shown in Figure 11-17.
Click the down arrow button to download the payloads for the selected assets.
Click Close when finished. The downloaded assets are listed on the Consumed Assets section of the project detail, as shown in Figure 11-18.
Prescribed assets can also be consumed from VS .Net and Eclipse environments. For more information about the process, see the VS .Net and Eclipse sections in Oracle Fusion Middleware Integration Guide for Oracle Enterprise Repository.
Project Compliance reports provide the means for verifying project adherence to the assets prescribed for use in compliance templates.
This procedure is performed on the Oracle Enterprise Repository Reports screen.
Click the Project Compliance link in the Reports sidebar, as shown in Figure 11-19.
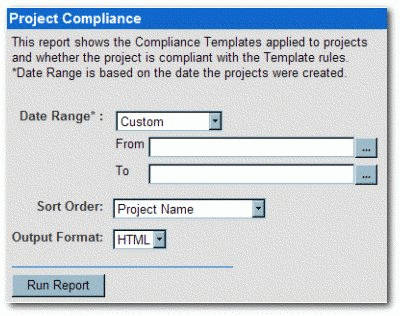
The Project Compliance report form opens in the main pane, as shown in Figure 11-20.
Figure 11-20 Project Compliance Report Form

Use the Date Range, Sort Order, and Output Format lists to set the report parameters.
Note:
Date Range is based on the project creation date.Click the Run Report button. The report is displayed in the selected format, listing each project, and indicating compliance templates in use, prescribed assets, usage status of prescribed assets, and any additional assets consumed by the project, as shown in Figure 11-21.