| Oracle® Fusion Middleware Developer's Guide for Oracle WebCenter 11g Release 1 (11.1.1) Part Number E10148-09 |
|
|
View PDF |
| Oracle® Fusion Middleware Developer's Guide for Oracle WebCenter 11g Release 1 (11.1.1) Part Number E10148-09 |
|
|
View PDF |
This chapter discusses techniques for manually configuring and extending a WebCenter application. This chapter includes the following sections:
Section 6.1, "Manually Configuring a WebCenter Application With Technology Scopes"
Section 6.2, "Extending Non-WebCenter Applications to Include WebCenter Capabilities"
This section discusses how to manually configure a WebCenter application by adding or removing technology scopes.
Section 6.1.3, "What Are the Default Technology Scopes for a Portal Application?"
Section 6.1.4, "Which Technology Scopes Are Portal Application-Specific?"
Section 6.1.6, "Migrating a WebCenter PS2 or Earlier Application to a WebCenter Portal Application"
WebCenter applications are comprised of a collection of project technologies and features or technology scopes. Each scope has associated libraries that provide specific features to the application. You can manually add or remove technology scopes to manually configure your application. For example, you may wish to remove some components from your portal application that you know you will never use.
You can add or remove technology scopes (and their associated libraries) in the following ways.
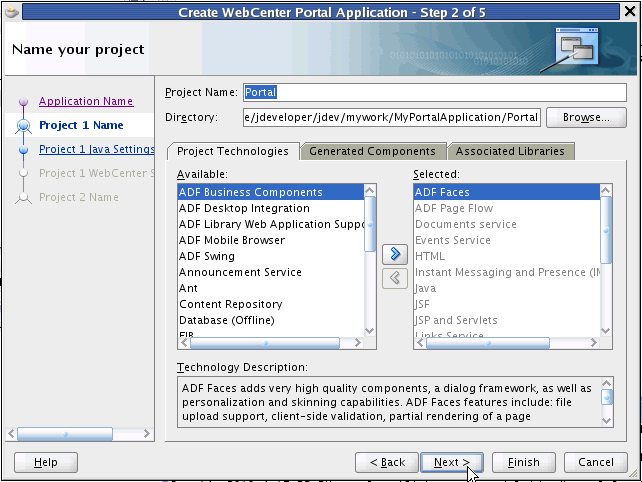
First, you can modify the defaults when you create a new application. Figure 6-1 shows the list of available and selected technology scopes presented in the Portal Application creation wizard. The scopes in the Selected column indicate the default set of technology scopes that comprise a portal application. For more information on this wizard, see Section 5.2, "Creating a WebCenter Portal Application and Adding Pages."
Figure 6-1 Create WebCenter Portal Application Wizard Step 2 of 4

You can also adjust technology scopes in the Project Properties dialog. Select Project Properties from the Application menu. Then, select Technology Scope from the tree. The dialog lets you move project technologies in and out of the project, as shown in Figure 6-2.
Tip:
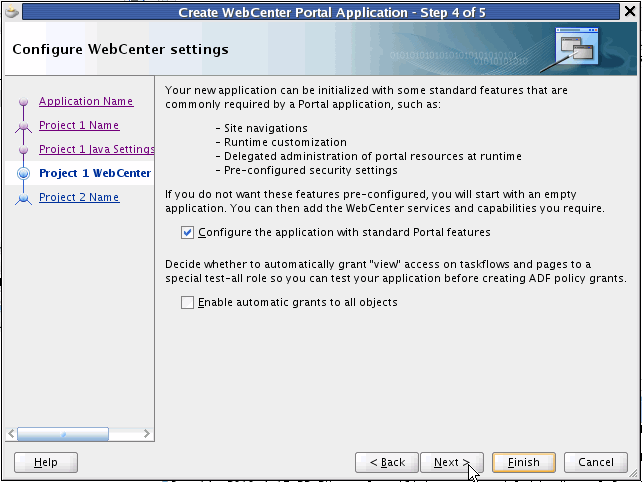
Click on a scope in the dialog to display a short description at the bottom of the dialog.When you create a portal application using the Application Creation wizard, you have one other opportunity to determine the default configuration of the application that is created, and its technology scopes. The final screen of the wizard includes a checkbox labeled Configure the application with standard Portal features, shown in Figure 6-3.
Figure 6-3 Create WebCenter Portal Application Wizard Step 4 of 4

Checked by default, this option tells the wizard to add the Portal Framework features, like navigations, page hierarchies, delegated administration, and so on, to the application. If you uncheck this box, your application will not include these features. Essentially, you will create an application that is functionally equivalent to a WebCenter PS2 (WebCenter 11g Release 1 11.1.1.2.0) application.
Table 6-1 lists the default technology scopes and libraries that are included with applications created with the WebCenter Portal Application template. The Portal Framework technology scope is the only scope that is portal-application specific. This scope provides navigations, page hierarchies, delegated administration, and the rest of the portal features described in Chapter 8, "Understanding WebCenter Portal Applications."
Note:
The Portal Framework technology scope is added by default to an application created with the Portal Application template. The Portal Application creation wizard gives you a chance to omit this technology scope if you unselect the Configure the application with standard Portal features checkbox in the Portal Application creation wizard (Figure 6-3). In this case, you will create an application that is functionally equivalent to a WebCenter PS2 (WebCenter 11g Release 1 11.1.1.2.0) application.Table 6-1 Default Technology Scopes and Associated Libraries
| Default Technology Scopes | Associated Libraries |
|---|---|
|
ADF Faces ADF Page Flow Documents Service Events Service HTML Instant Messaging and Presence (IMP) Service Java JSF JSP and Servlets Links Service Oracle Composer Portal Framework Portlet Bridge Service Portlet View Smart Tag Tags Service WebCenter Customizable Components WebCenter Web 2.0 Services XML |
JSF Core JSF HTML ADF Faces Runtime 11 ADF Common Runtime ADF Web Runtime MDS Runtime MDS Runtime Dependencies Commons Beanutils 1.6.1 Commons Logging 1.0.3 Commons Collections 2.1 ADF Page Flow Runtime ADF Controller Runtime JSP Runtime |
When the Configure the application with standard Portal features checkbox is selected in the Portal Application creation wizard (Figure 6-3), the Portal Framework technology scope is added to the application in addition to the rest of the application technology scopes. If you were to unselect this checkbox, the Portal Framework technology scope would not be added.
This case is not supported. If you want to create a WebCenter Portal application, you must start with the WebCenter Portal Application template. For details, see Section 5, "Creating WebCenter Applications."
One possible solution is to create a new WebCenter Portal application, then turn your existing WebCenter Application into an ADF Library. Then, include the ADF Library in the WebCenter Portal Application.
The recommended best practice for migration is to create a new (PS3) WebCenter Portal application using the WebCenter Portal Application template and then manually migrate the content, configurations, and logic from your old PS2 application to the new portal application. If it is not possible to follow this recommended practice, then follow the procedures described in Appendix H, "Manually Migrating a WebCenter Portal Application."
Tip:
Another possible solution is to create a new WebCenter Portal application, and then turn your existing WebCenter Application into an ADF Library. Then, include the ADF Library in the WebCenter Portal application.If your business requirement is to create a non-WebCenter application, say a Fusion web application, but you want to also include WebCenter capabilities in that application, you can do so by adding the required technology scopes and libraries. For example, you could add features like web services, task flows, and search to the application.
Note:
You cannot create a WebCenter Portal application simply by adding the Portal Framework technology scope to a non-portal application. This use case is not supported, as explained in Section 6.1.5, "Can I Create a Portal Application by Adding the Portal Framework Technology Scope Later?."The technology scopes limit user interface options to those appropriate to the type of application project you are building. The libraries provide the components and elements useful in constructing application content. You can extend an existing application to integrate content from various repositories, create portlets, or consume portlets and WebCenter services. You can extend ADF applications from the current release or from a 10.1.x.x release.
While extending your application, you may decide to create projects that are optimized for specific WebCenter capabilities. This section steps you through the process of manually creating projects like those provided with the WebCenter templates and adding the required technology scopes and libraries to projects.
To enable WebCenter capabilities in an application:
Open your application.
Click Yes if you are prompted to migrate your application settings.
Note:
If you migrated a 10.1.3.x WebCenter application, then the application continues to have the Model, ViewController, and Portlets projects.Optionally, create new projects for defining the application data model, consuming content, or creating portlets:
In the Application Navigator, right-click the application and select New Project from the context menu.
In the New Gallery, expand General, select Projects, then Generic Project, and click OK.
In the Create Generic Project wizard, in the Project Name field, enter a name for the project.
For example View.
In the Directory field, specify the directory path for storing the project or accept the default path.
Click Finish to create the new project.
Right-click a project and select Project Properties.
In the left side of the dialog, select Technology Scope.
In the Project Technologies part of the dialog, add the required technologies and libraries depending on which WebCenter-related capabilities you want to enable in the selected project. See Table 6-1 for a complete list.
Save your work.
Follow this procedure if you have an existing WAR file you want to import into your application environment through JDeveloper. Once the project is imported, you can configure it with WebCenter Portal features manually, as described in Section 6.1, "Manually Configuring a WebCenter Application With Technology Scopes."
Note:
Connection information is stored in the application-level EAR file and is not automatically imported with a project-level WAR file. Therefore, when you import a project-level WAR file, you must reconfigure any connections upon which the application relies.To import a WAR file into JDeveloper:
Right-click your application in the Application Navigator, and choose New Project from the context menu.
In the New Gallery, expand General, select Projects, then Project from War File, and click OK.
Follow the wizard instructions to complete creating the project.
Right-click the newly created project in the Application Navigator, and select Project Properties from the context menu.
Add the required technology scopes and libraries depending on which WebCenter-related capabilities you want to enable in the selected project. For more information, see Section 6.1, "Manually Configuring a WebCenter Application With Technology Scopes."
Click OK to close the Project Properties dialog.