Release 11g (11.1.1)
Part Number E13880-02
Contents
Previous
Next
| Oracle Fusion Middleware Administrator's Guide for Oracle Business Intelligence Publisher Release 11g (11.1.1) Part Number E13880-02 | Contents | Previous | Next |
| View PDF |
This chapter covers the following topics:
This chapter describes security concepts and options for a standalone implementation of Oracle BI Publisher, that is, not installed as part of the Oracle Business Intelligence Enterprise Edition. Please note the following:
If you have installed the Oracle BI Enterprise Edition, see the Oracle Fusion Middleware Security Guide for Oracle Business Intelligence Enterprise Edition for information about security.
If you have installed BI Publisher on its own and you plan to use Oracle Fusion Middleware Security, see Configuring Oracle Fusion Middleware Security Model. The following topics will be of interest in this chapter:
To configure BI Publisher with these other Oracle security models:
Oracle BI Server security
Oracle E-Business Suite security
Oracle Database security
Siebel CRM security
Use the information in this chapter to configure the following:
BI Publisher (native) Security
Integration with an external LDAP provider
Note: Any identity store provider supported by Oracle WebLogic Server can be configured to be used with BI Publisher. Configuring BI Publisher to use an alternative external identity store is performed using the Oracle WebLogic Server Administration Console. For this configuration, see Customizing the Default Security Configuration.
Integration with a Single Sign-On provider
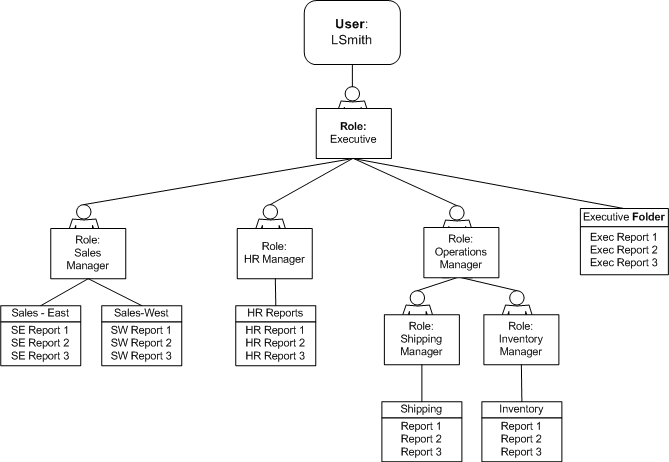
A user is assigned one or multiple Roles. A Role can grant any or all of the following:
privileges to use functionality
permissions to perform actions on catalog objects
access to data sources
You can create a hierarchy of roles by assigning roles to other roles. In this way the privileges and permissions of multiple roles can roll up to higher level roles. The following graphic shows an example of the hierarchy structure of User, Role, and Folder:
There are three options for setting up users and roles:
Set up users and roles in the BI Publisher Security Center
For this option, follow the instructions in this section.
Configure BI Publisher with an existing LDAP server
For this option, see Configuring BI Publisher to Use an External LDAP Provider.
Set up users and roles in a supported Oracle security model. For this option see Integrating with Other Oracle Security Models.
BI Publisher provides a set of functional roles to grant access to specific functionality within the application. Assign these roles to users based on their need to perform the associated tasks. These roles cannot be updated or deleted.
The following table shows the privileges granted to each functional role:
| Role | Privileges |
|---|---|
| BI Publisher Excel Analyzer | View Export History (public reports only) Grants access to the Excel Analyzer |
| BI Publisher Online Analyzer | View Export History (public reports only) Grants access to the Online Analyzer |
| BI Publisher Scheduler | View Export History Schedule |
| BI Publisher Template Designer | View Export History (public reports only) Enables access to Layout Editor Enables log on from Template Builder |
| BI Publisher Developer | View Export Schedule History Edit Report Enables access to Layout Editor Enables log on from the Template Builder Enables access to the Data Model Editor |
| BI Publisher Administrator | Enables the privileges of all other roles Grants access to the Administration page and all administration tasks |
Roles assigned these privileges cannot perform any actions on objects in the catalog until they are also granted permissions on the catalog objects.
To perform the actions allowed by the functional roles above, a role must also be granted permissions to access the objects in the catalog.
Note that each of these permissions can be granted at the folder level to enable the operations on all items within a folder.
| Permission | Description |
|---|---|
| Read | Enables a role to display an object in the catalog. If the object resides within a folder, a role must be granted the Read permission on the object and its parent Folder. |
| Write | Enables a role to edit an object. A role must be granted Write permissions on a folder to save objects to the folder or edit objects within the folder. A role must also be granted one of the following roles to enable editing of the specified object:
|
| Delete | Enables a role to delete an object. |
| Run Report Online | Enables a role to run a report and view it in the report viewer. |
| Schedule Report | Enables a role to schedule a report. |
| View Report Output | Enables a role to access the Report Job History for a report. |
It is important to note that for a report consumer to successfully run a report, his role must have read access to every object that is referenced by the report.
For example, a report consumer must run a report in a folder named Reports. The data model for this report, resides in a folder named Data Models. This report references a Sub Template stored in a folder named Sub Templates, and also references a Style Template stored in a folder named Style Templates. The report consumer's role must be granted Read access to all of these folders and the appropriate objects within.
It is important to understand the following rules regarding the behavior of privileges and permissions:
A role assigned a functional privilege cannot perform any actions in the catalog until catalog permissions are also assigned
A role can be assigned a set of permissions on catalog objects without being assigned any functional privileges
If a role is already assigned a functional privilege, when catalog permissions are assigned, some permissions will be inherited
A role assigned a functional role cannot perform any actions in the catalog until catalog permissions are granted. Note that the functional roles themselves (BI Publisher Developer, BI Publisher Scheduler, and so on) cannot be directly assigned permissions in the catalog. The functional roles must first be assigned to a custom role and then the custom role is available in the catalog permissions table.
The permissions available directly in the catalog enable running reports, scheduling reports, and viewing report output. Therefore if your enterprise includes report consumers who will have no other reason to access BI Publisher except to run and view reports, the roles for these users will consist of catalog permissions only.
If a role is already assigned one of the functional roles, when that role is granted permissions on a particular folder in the catalog, some permissions will be granted automatically based on the functional role.
For example, assume you create a role called Financial Report Developer. You assign this role the BI Publisher Developer role. In order for this role to create reports in the Financial Reports folder in the catalog, you must grant this role Read, Write, and Delete permissions on the folder. Because the BI Publisher Developer role includes run report, schedule report, and view report history privileges, these permissions will be automatically granted on any folder to which a role assigned the BI Publisher Developer role is granted Read access.
A role must be granted access to a data source to view reports that run against the data source or to build and edit data models that use the data source. Add access to data sources in the Roles and Permissions page. See Granting Data Access.
To create a new role in BI Publisher:
Navigate to the BI Publisher Administration page.
Under Security Center, click Roles and Permissions.
Click Create Role.
Enter a Name for the role and optionally, enter a Description.
Click Apply.
Click Assign Roles to assign roles to the user.
Use the shuttle buttons to move Available Roles to Assigned Roles. Click Apply.
To add a role to a role, click Add Roles.
Use the shuttle buttons to move Available Roles to Included Roles. Click Apply.
To add data sources to a role, see Granting Data Access.
To create a new user in BI Publisher:
Navigate to the BI Publisher Administration page.
Under Security Center, click Users.
Click Create User.
Add the User Name and Password for the user.
Click Apply.
Click Assign Roles to assign roles to the user.
Use the shuttle buttons to move Available Roles to Assigned Roles. Click Apply.
For a role to access an object in the catalog, the role must be granted Read permissions on both the object and the folder in which the object resides. Permissions can be granted at the folder level and applied to all the objects and subfolders it contains, or applied to individual objects.
To grant catalog permissions to a role:
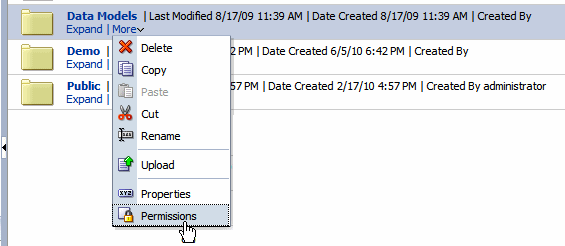
Navigate to the Catalog.
Locate the folder or object on which you wish to grant permissions and click More. From the menu, select Permissions. Alternatively, you can select the folder and click Permissions in the Tasks region.
Note: Permissions cannot be granted on the root Shared folder.
On the Permissions dialog, click Create.

On the Add Roles dialog, enter a search string to find a role, or simply click Search to display all roles. Use the shuttle buttons to move roles from the Available Roles list to the Selected Roles list.
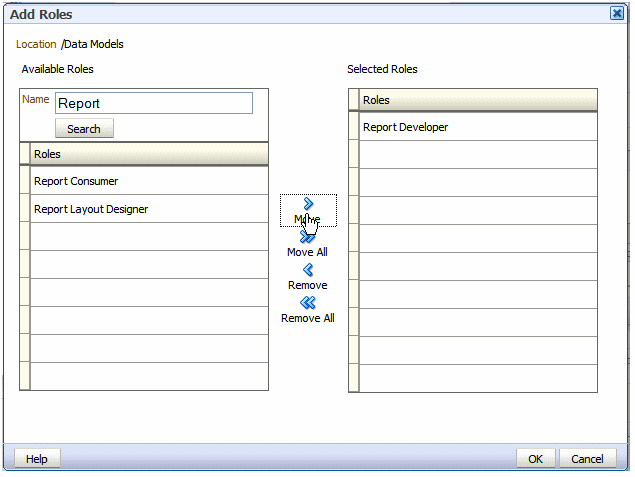
When finished, click OK to return to the Permissions dialog.
On the Permissions dialog, configure the permissions required by the role.
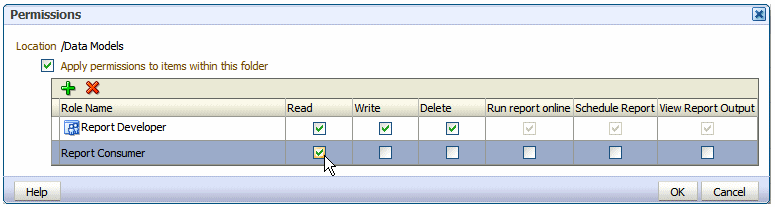
Note the following:
The icon next to the Report Developer role indicates that this role is assigned one of the BI Publisher functional roles (in this case, the BI Publisher Developer role).
Once the Report Developer role is assigned access to this folder, the following permissions are automatically granted based on the privileges that make up the BI Publisher Developer Role: Run report online, Scheduler Report, View Report Output.
If you are granting permissions on a Folder, select Apply permissions to items within this folder, if the permissions should apply to all objects.
A role must be granted access to a data source if the role must:
Run or schedule a report built on a data model that retrieves data from the data source
Create or edit a data model that retrieves data from the data source
To grant a role access to a data source:
Navigate to the BI Publisher Administration page.
Under Security Center, click Roles and Permissions.
On the Roles and Permissions page, locate the role, then click Add Data Sources.
On the Add Data Sources page you will see a region for each of the following types of data sources:
Database Connections
File Directories
LDAP Connections
OLAP Connections
Use the shuttle buttons to move the required data sources from the Available Data Sources list to the Allowed Data Sources list.
When finished, click Apply.
Because permissions are granted in the catalog, it is very important to be aware of this design when creating roles for your organization and when structuring the catalog.
For example, assume your organization requires the following roles:
| Role | Required Permissions |
|---|---|
| Sales Report Consumer | Needs to view and schedule Sales department reports. |
| Financial Report Consumer | Needs to view and schedule Financial department reports. Needs access to the Excel Analyzer. |
| Executive Report Consumer | Needs to consume both Sales and Financial reports as well as executive level reports. |
| Sales Report Developer | Needs to create data models and reports for Sales department only. |
| Financials Report Developer | Needs to create data models and reports for Financials department only. Will need to create some reports using the Excel Analyzer. |
| Layout Designer | Needs to design report layouts for all reports. |
You may consider setting up the catalog as follows:
| Folder | Contents |
|---|---|
| Sales Reports | All reports for Sales Report Consumer. Also contains any Sub Templates and Style Templates associated with Sales reports. |
| Sales Data Models | All data models for Sales reports. |
| Financials Reports | All reports for Financials Report Consumer. Also contains any Sub Templates and Style Templates associated with Financials reports. |
| Financials Data Models | All data models for Financials reports |
| Executive Reports | All executive-level reports and data models. |
Set up the roles as follows:
Example Role Configuration
Sales Report Consumer:
Grant catalog permissions:
To the Sales Reports folder add the Sales Report Consumer and grant:
Read
Schedule Report
Run Report Online
View Report Online
Select Apply permissions to items within this folder
To the Sales Data Models folder add the Sales Report Consumer and grant:
Read
Grant Data Access:
On the Roles page, locate the role, then click Add Data Sources. Add all data sources used by Sales reports.
Financials Report Consumer
Assign Roles:
On the Roles tab assign the Financials Report Consumer the BI Publisher Excel Analyzer role.
Grant catalog permissions:
To the Financials Reports folder add the Financials Report Consumer and grant:
Read
Schedule Report
Run Report Online
View Report Online
Select Apply permissions to items within this folder
To the Financials Data Models folder add the Financials Report Consumer and grant:
Read
Grant Data Access:
On the Roles page, locate the role, then click Add Data Sources. Add all data sources used by Financials reports.
Executive Report Consumer
Assign Roles:
On the Roles tab, assign the Executive Report Consumer the Sales Report Consumer and the Financials Report Consumer roles.
Grant catalog permissions:
To the Executive Reports folder add the Executive Report Consumer and grant:
Read
Schedule Report
Run Report Online
View Report Online
Select Apply permissions to items within this folder
Grant Data Access:
On the Roles tab, locate the role, then click Add Data Sources. Add all data sources used by Executive reports.
Sales Report Developer
Assign Roles:
On the Roles tab, assign the Sales Report Developer the BI Publisher Developer Role and the BI Publisher Template Designer Role.
Grant Data Access:
On the Roles tab, locate the Sales Report Developer and click Add Data Sources. Add all data sources from which Sales data models will be built.
Grant Catalog Permissions:
In the catalog, to the Sales Data Models folder add the Sales Report Developer and grant:
Read, Write, Delete
To the Sales Reports folder, add the Sales Report Developer and grant:
Read, Write, Delete
Financials Report Developer
Assign Roles:
On the Roles tab, assign the Financials Report Developer the BI Publisher Developer Role, the BI Publisher Excel Analyzer Role, and the BI Publisher Template Designer Role.
Grant Data Access:
On the Roles tab, locate the Financials Report Developer and click Add Data Sources. Add all data sources from which Financials data models will be built.
Grant Catalog Permissions:
In the catalog, to the Financials Data Models folder add the Financials Report Developer and grant:
Read, Write, Delete
To the Financials Reports folder, add the Financials Report Developer and grant:
Read, Write, Delete
Layout Designer
Assign Roles:
On the Roles tab, assign the Layout Designer the BI Publisher Template Designer Role and the BI Publisher Developer Role.
Grant Catalog Permissions:
In the catalog, to the Financials Data Models and the Sales Data Models folders add the Layout Designer Role and grant:
Read
To the Financials Reports and Sales Reports folders, add the Layout Designer and grant:
Read, Write, Delete
BI Publisher can be integrated with your LDAP provider to manage users and report access. Create the users and roles within your LDAP server, then configure the BI Publisher server to access your LDAP server.
In the BI Publisher security center module, assign folders to those roles. When a user logs into the server they will have access to those folders and reports assigned to the LDAP roles.
Integrating the BI Publisher server with Oracle LDAP consists of three main tasks:
Set up users and roles in your LDAP provider
Configure BI Publisher to recognize your LDAP server
Assign catalog permissions and data access to roles
For information on supported LDAP servers, see System Requirements and Certification for the most up-to-date information on supported hardware and software.
The following steps must be performed in your LDAP provider. See the documentation for your provider for details on how to perform these tasks.
In the Domain root node of your LDAP provider, create the following roles to integrate with BI Publisher. See Understanding Users and Roles for full descriptions of the required functional roles.
| BI Publisher System Group | Description |
|---|---|
| XMLP_ADMIN | The administrator role for the BI Publisher server. You must assign the Administrator account used to access your LDAP server the XMLP_ADMIN group. |
| XMLP_DEVELOPER | Allows users to create and edit reports and data models. |
| XMLP_SCHEDULER | Allows users to schedule reports. |
| XMLP_ANALYZER_EXCEL | Allows users to use the Excel Analyzer feature. |
| XMLP_ANALYZER_ONLINE | Allows users to use the online analysis feature (online analyzer). |
| XMLP_TEMPLATE_BUILDER | Allows users to connect to the BI Publisher server from the Template Builder for Word and to upload and download templates. Allows users to design layouts using the BI Publisher Layout Editor. |
Create other functional roles as required by your implementation (for example: HR Manager, Warehouse Clerk, or Sales Manager), and assign the appropriate BI Publisher functional roles.
Assign roles to users.
Important: Ensure to assign the Administrator account the XMLP_ADMIN role.
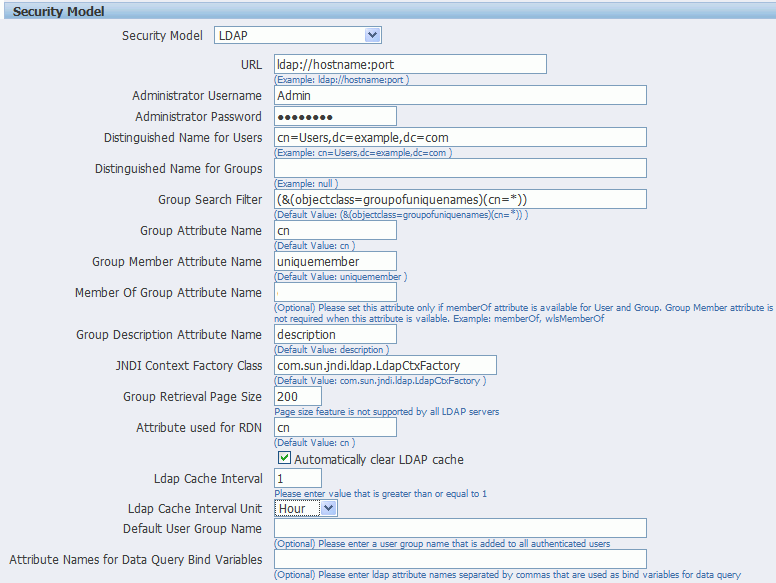
To configure the BI Publisher server to recognize your LDAP server, update the Security properties in the BI Publisher Administration page as follows:
On the Administration page, under Security Center click Security Configuration.
Create a Local Superuser.
Enter a Superuser Name and Password and select Enable Local Superuser check box. Enabling a local superuser will ensure that you can access the Administration page of BI Publisher in case of security model configuration errors.
Scroll down to the Security Model region. Select LDAP for the Security Model.
Enter the following:
URL
For example: ldap://example.com:389/
Important: If your are using LDAP over SSL note the following:
the protocol is "ldaps"
the default port is 636
An example URL would be: ldaps://example.com:636/
Administrator Username
For example: orcladmin
Administrator Password
For example: welcome
Distinguished Name for Users
For example: cn=Users,dc=example,dc=com
Important: The distinguished name values are case-sensitive and must match the settings in your LDAP server.
Distinguished Name for Groups
For example: cn=Groups,dc=us,dc=oracle,dc=com
The default value is cn=OracleDefaultDomain,cn=OracleDBSecurity,cn=Products,cn=OracleContext,dc=example,dc=com
Group Search Filter
The default values is (&(objectclass=groupofuniquenames)(cn=*))
Group Attribute Name
The default value is cn
Group Member Attribute Name
The default value is uniquemember
Member of Group Attribute Name
(Optional) Set this attribute only if memberOf attribute is available for User and Group. Group Member Attribute is not required when this attribute is available. Example: memberOf or wlsMemberOf
Group Description Attribute Name
The default value is description
JNDI Context Factory Class
The default value is com.sun.jndi.ldap.LdapCtxFactory
Group Retrieval Page Size
Setting this values enables support of the LDAPv3 control extension for simple paging of search results. By default, pagination is not used. This value determines the number of results to return on a page (for example, 200). Your LDAP server must support control type 1.2.840.113556.1.4.319 to support this feature, such as OID 10.1.4. See your LDAP server documentation for information on support of this control type.
For more information about LDAP pagination and the required control type, see the article: RFC 2696 - LDAP Control Extension for Simple Paged Results Manipulation (http://www.faqs.org/rfcs/rfc2696.html) .
Attribute used for Login Username
Enter the attribute that supplies the value for the Login user name. This is also known as the Relative Distinguished Name (RDN). This value defaults to cn.
Automatically clear LDAP cache - to schedule the automatic refresh of the LDAP cache the LDAP cache per a designated interval, select this box. After you select this box the following additional fields become enabled:
Enter an integer for Ldap Cache Interval. For example, to clear the LDAP cache once a day, enter 1.
Select the appropriate Ldap Cache Interval Unit: Day, Hour, or Minute.
Default User Group Name
(Optional) Use this option if your site has the requirement to allow all authenticated users access to a set of folders, reports, or other catalog objects. The user group name that you enter here is added to all authenticated users. Any catalog or data source permissions that you assign to this default user group will be granted to all users.
Attribute Names for Data Query Bind Variables
(Optional) Use this property to set attribute values to be used as bind variables in a data query. Enter LDAP attribute names separated by a commas for example: memberOf, primaryGroupID,mail
See Creating Bind Variables from LDAP User Attributes, Oracle Fusion Middleware Data Modeling Guide for Oracle Business Intelligence Publisher.
Restart the BI Publisher server.
The following figure shows a sample of the LDAP security model entry fields from the Security Configuration page:
Note that if you are configuring BI Publisher to use LDAP over SSL, you must also configure Java keystore to add the server certificate to JVM. For more information, see Configuring BI Publisher for Secure Socket Layer (SSL) Communication.
Log in to BI Publisher as a user assigned the XMLP_ADMIN role in your LDAP provider.
On the Administration page click Roles and Permissions.
You will see the roles you created in your LDAP provider to which you assigned the XMLP_ roles. Note the following:
The XMLP_X roles are not shown because these are controlled through the LDAP interface.
The Users tab is no longer available under the Security Center because users are now managed through your LDAP interface.
Roles are not updateable in the BI Publisher interface, with the exception of adding data sources.
Click Add Data Sources to add BI Publisher data sources to the role. A role must be assigned access to a data source to run reports from that data source or to build data models from the data source. For more information see Granting Data Access.
Grant catalog permissions to roles. See About Catalog Permissions and Granting Catalog Permissions for details on granting catalog permissions to roles.
Users can now log in using their LDAP username/password.
Microsoft Active Directory supports the LDAP interface and therefore can be configured with BI Publisher using LDAP Security.
Add users that will need access to BI Publisher.
Add the users under "Users" or any other organization unit in the Domain Root.
Add the BI Publisher system groups. The Scope of the groups must be Domain Local.
The following must be added as BI Publisher system groups:
| BI Publisher System Group | Description |
|---|---|
| XMLP_ADMIN | The administrator role for the BI Publisher server. You must assign the Administrator account used to access your LDAP server the XMLP_ADMIN group. |
| XMLP_DEVELOPER | Allows users to create and edit reports and data models. |
| XMLP_SCHEDULER | Allows users to schedule reports. |
| XMLP_ANALYZER_EXCEL | Allows users to use the Excel Analyzer feature. |
| XMLP_ANALYZER_ONLINE | Allows users to use the online analysis feature (online analyzer). |
| XMLP_TEMPLATE_BUILDER | Allows users to connect to the BI Publisher server from the Template Builder for Word and to upload and download templates. Allows users to design layouts using the BI Publisher Layout Editor. |
Grant BI Publisher system groups to global groups or users.
You can grant BI Publisher system groups directly to users or through global groups.
Example 1: Grant Users the BI Publisher Administrator Role
Under the Active Directory User and Computers, open the XMLP_ADMIN group and click the Members tab.
Click Add to add users who need to BI Publisher Administrator privileges.
Example 2: Grant Users Access to Scheduling Reports
The "HR Manager" global group is defined under "Users".
All users in this group need to schedule reports.
To achieve this, add "HR Manager" as a Member of the XMLP_SCHEDULER group.
On the Administration page, click Security Configuration.
Set up a Local Superuser if one has not already been configured. This is very important in case the security configuration fails, you will still be able to log in to BI Publisher using the Superuser credentials.
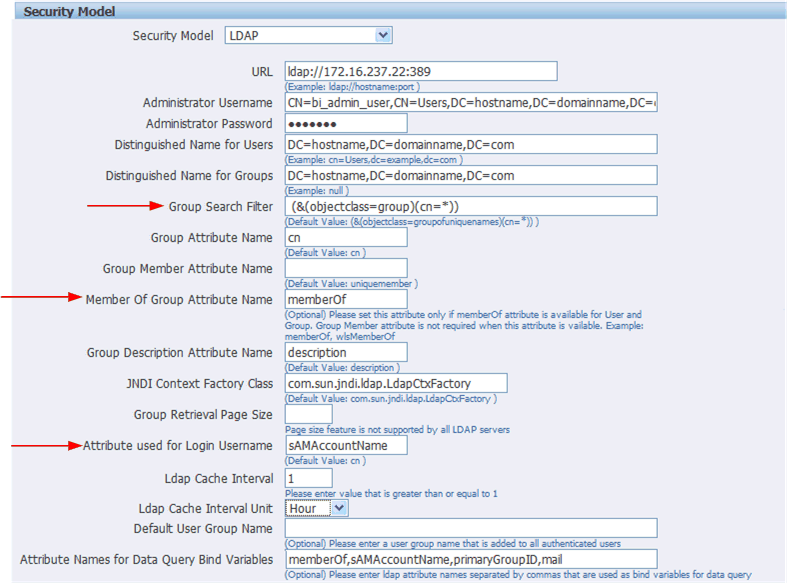
In the Security Model region of the page, select LDAP from the Security Model list.
Enter the details for the Active Directory server, as described in the preceding section Configuring BI Publisher to Use an LDAP Provider, noting the following specific information for Active Directory:
Set Group Search Filter objectclass to "group"
Set Member of Group Member Attribute Name to "memberOf" (Group Member Attribute Name can be left blank).
Set Attribute used for Login Username to "sAMAccountName".
If your are using LDAP over SSL note the following:
the protocol is "ldaps"
the default port is 636
An example URL would be: ldaps://example.com:636/
The following figure shows an example configuration highlighting the recommendations stated above:
Restart the BI Publisher application.
Note that if you are configuring BI Publisher to use LDAP over SSL, you must also configure Java keystore to add the server certificate to JVM. For more information, see Configuring BI Publisher for Secure Socket Layer (SSL) Communication.
The User login name defined in Active Directory Users and Computers >User Properties >Account is used for the BI Publisher login name. Add the Domain to the user name to log in to BI Publisher. For example: "scott_tiger@domainname.com".
Note the following:
The Attribute used for Login Username can be sAMAccountName instead of userPrincipalName.
You must use sAMAccountName for the Attribute used for Login Username when the "User logon name (pre-Windows 2000)" is required to use for the BI Publisher login username.
User names must be unique across all organization units.
Log in to BI Publisher as a user assigned the XMLP_ADMIN role Active Directory.
On the Administration page click Roles and Permissions.
You will see the roles you created in Active Directory to which you assigned the XMLP_ roles. Note the following:
The XMLP_X roles are not shown because these are controlled through the Active Directory interface.
The Users tab is no longer available under the Security Center because users are now managed through Active Directory.
Roles are not updateable in the BI Publisher interface, with the exception of adding data sources.
Click Add Data Sources to add BI Publisher data sources to the role. A role must be assigned access to a data source to run reports from that data source or to build data models from the data source. For more information see Granting Data Access.
Grant catalog permissions to roles. See About Catalog Permissions and Granting Catalog Permissions for details on granting catalog permissions to roles.
Integrating a single sign-on (SSO) solution enables a user to log on (sign-on) and be authenticated once per browser session. Thereafter, the authenticated user is given access to system components or resources according to the permissions and privileges granted to that user. Oracle BI Publisher can be configured to trust incoming HTTP requests already authenticated by a SSO solution that is configured for use with Oracle Fusion Middleware and Oracle WebLogic Server.
When BI Publisher is configured to use SSO authentication, it accepts authenticated users from whatever SSO solution Oracle Fusion Middleware is configured to use. If SSO is not enabled, then BI Publisher challenges each user for authentication credentials. When BI Publisher is configured to use SSO, a user is first redirected to the SSO solution's login page for authentication.
Configuring BI Publisher to work with SSO authentication requires minimally that the following be done:
Oracle Fusion Middleware and Oracle WebLogic Server are configured to accept SSO authentication. Oracle Access Manager is recommended in production environments.
The HTTP header information required for identity propagation with SSO configurations (namely, user identity and SSO cookie) is specified and configured.
BI Publisher is configured to trust incoming messages.
See "Configuring Single Sign-On in Oracle Fusion Middleware" in Oracle Fusion Middleware Applications Security Guide.
Once you have configured your Single-Sign-On provider to protect Oracle BI Publisher, configure BI Publisher to trust incoming messages.
On the Administration page, under Security Center, click Security Configuration.
In the Single Sign-On region, select the User Single Sign-On check box.
Enter the fields appropriate for you your SSO provider.
BI Publisher can be configured to use Oracle Access Manager as your SSO provider.
Required components:
Oracle Fusion Middleware is configured with Oracle WebLogic Server's embedded LDAP server as the default authenticator (DefaultAuthenticator)
Oracle Access Manager 10.1.4.x is configured with Oracle Internet Directory as the default LDAP server
Oracle HTTP is configured to be a Web proxy to access the application server, namely Oracle WebLogic Server
Oracle Access Manager SSO is configured to be the authentication provider for Oracle Fusion Middleware
Oracle BI Publisher is installed and has been configured to use Oracle Internet Directory (see Configure the BI Publisher Server to Recognize Your LDAP Server).
Directly after BI Publisher is installed, the embedded LDAP server in Oracle WebLogic Server is the default authentication source (identity store). The BI WebLogic domain must be configured to the new identity store, Oracle Internet Directory, as the main authentication source.
For more information about creating a new default authenticator in Oracle WebLogic Server, see the following Oracle Fusion Middleware guides:
Oracle Fusion Middleware Oracle WebLogic Server Administration Console Online Help
Oracle Fusion Middleware Understanding Security for Oracle WebLogic Server 11g
Oracle Fusion Middleware Application Security Guide 11g
After Oracle WebLogic Server has been configured, perform the following in BI Publisher:
Note: The is procedure assumes that you have the Single Sign-Off URL. If you do not know the Single-Sign-Off URL, consult the Oracle Access Manager administrator at your site.
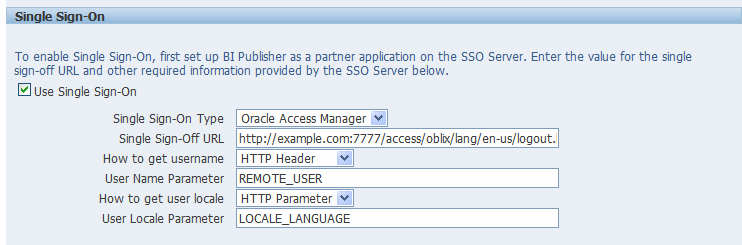
On the Administration page, under Security Center, click Security Configuration.
If you have not already done so, set up a Local Superuser. The Superuser credentials will enable you to log in to the BI Publisher Administration page in case of errors in the security configuration.
In the Single Sign-On region, select the User Single Sign-On check box.
Enter the following:
On the Single Sign-On Type list select Oracle Access Manager.
Enter the Single Sign-Off URL.
Select the method for How to get Username.
Enter the User Name Parameter, for example: REMOTE_USER.
Select How to get user locale, for example: HTTP Parameter.
Enter the User Locale Parameter, for example: LOCALE_LANGUAGE.
A sample configuration is shown in the following figure:
To set up Oracle Single Sign-On, first configure WebLogic Server using the instructions in the chapter, "Configuring Single Sign-On in Oracle Fusion Middleware" in the Oracle Fusion Middleware Application Security Guide 11g. BI Publisher must be configured to use Oracle Internet Directory as the default LDAP server
IMPORTANT: When using Oracle SSO, BI Publisher assumes that a login username can be derived from Osso-User-Dn, which is HTTP Header value. For example, if your Osso-User-Dn on HTTP Header looks like this:
cn=admin,cn=users, dc=us,dc=oracle,dc=com
Then BI Publisher assumes the value of first cn= is the login username (that is, "admin" in this case).
Therefore if your Osso-User-Dn does not contain a login username as the first cn value, then select "Other SSO Type" to configure your settings (even if you use Oracle SSO).
Modify the application server configuration file to protect the xmlpserver. See the topic "Configuring mod_osso to Protect Web Resources" in the Oracle Fusion Middleware Application Security Guide 11g
In the mod_osso.conf add a new "Location" directive as follows:
<!-- Protect xmlpserver -->
<Location /xmlpserver>
      require valid-user
      AuthType Basic
</Location>
To allow Web service communication between BI Publisher and its client components (the Template Builder and the Excel Analyzer) you must make additional modifications to the mod_osso.conf file. To open up the xmlpserver to allow these Web services, enter the following directives:
<Location /xmlpserver/services/>
  require valid-user
     AuthType Basic
     Allow from All
     Satisfy any
</Location>

<Location /xmlpserver/report_service/>
  require valid-user
     AuthType Basic
     Allow from All
     Satisfy any
</Location>

Location /xmlpserver/ReportTemplateService.xls/>
  require valid-user
     AuthType Basic
     Allow from All
     Satisfy any
</Location>
For integration with Oracle BI Presentation Services, you must disable SSO for Web services between the BI Presentation Services server and the BI Publisher server. If you made this entry when performing the previous step, you do not need to repeat this setup.
To open up the xmlpserver to allow the Web service, enter the following directive in the mod_osso.conf file:
<Location /xmlpserver/services/>
 require valid-user
     AuthType Basic
     Allow from All
     Satisfy any
</Location>
A sample mod_osso.conf file with the entries discussed in this section is shown below:
LoadModule osso_module libexec/mod_osso.so

 <IfModule mod_osso.c>
     OssoIpCheck off
     OssoIdleTimeout off
     OssoConfigFile /home/as1013/ohome/Apache/Apache/conf/osso/osso.conf

   <Location /xmlpserver>
     require valid-user
     AuthType Basic
   </Location>


<Location /xmlpserver/services/>
  require valid-user
     AuthType Basic
     Allow from All
     Satisfy any
</Location>

<Location /xmlpserver/report_service/>
  require valid-user
     AuthType Basic
     Allow from All
     Satisfy any
</Location>

Location /xmlpserver/ReportTemplateService.xls/>
  require valid-user
     AuthType Basic
     Allow from All
     Satisfy any
</Location>

<Location /xmlpserver/Guest/>
 require valid-user
     AuthType Basic
     Allow from All
     Satisfy any
</Location>
 #
 # Insert Protected Resources: (see Notes below for how to protect resources)
 #


 #______-
 #
 # Notes
 #
 #______-
 #
 # 1. Here's what you need to add to protect a resource,
 #    e.g. <ApacheServerRoot>/htdocs/private:
 #
 #      <Location /private>
 #      require valid-user
 #      AuthType Basic
 #      </Location>
 #
 </IfModule>

 #
 # If you would like to have short hostnames redirected to
 # fully qualified hostnames to allow clients that need
 # authentication via mod_osso to be able to enter short
 # hostnames into their browsers uncomment out the following
 # lines
 #
 #PerlModule Apache::ShortHostnameRedirect
 #PerlHeaderParserHandler Apache::ShortHostnameRedirect
Restart the HTTP server.
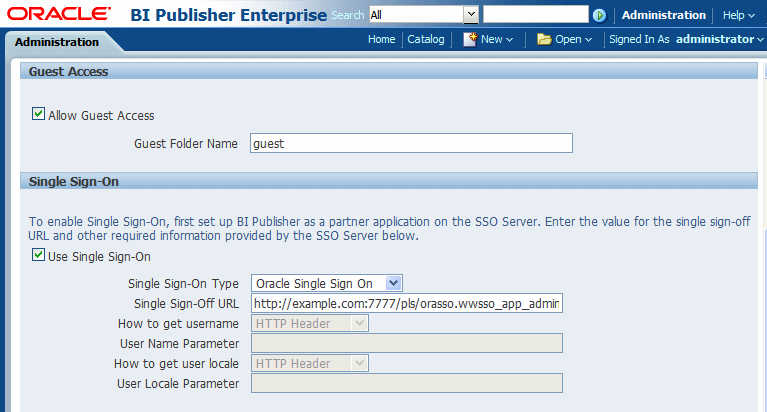
In the BI Publisher: Set up the Single Sign-Off URL on the BI Publisher Security Configuration page.
From the Administration page, click Security Configuration. Enter the following in the Oracle Single Sign-On region:
Select Use Oracle Single Sign-On
Enter the Single Sign-Off URL with the value you wrote down in the preceding step. The remaining fields are not applicable to Oracle SSO.
A sample BI Publisher Security Configuration page is shown in the following figure:
Create a BI Publisher Local Superuser to ensure access to BI Publisher regardless of your selected security configuration. See Enabling a Local Superuser for more information.
Restart the application through the Oracle Fusion Middleware Control page.
Enter the URL to access the BI Publisher Enterprise application, and you will be redirected to the SSO login page.
![]()
Copyright © 2010, 2011, Oracle and/or its affiliates. All rights reserved.