| Oracle® Fusion Middleware Tutorial for Oracle WebCenter Developers 11g Release 1 (11.1.1.4.0) Part Number E10273-07 |
|
|
View PDF |
| Oracle® Fusion Middleware Tutorial for Oracle WebCenter Developers 11g Release 1 (11.1.1.4.0) Part Number E10273-07 |
|
|
View PDF |
In this lesson, you will create a content repository connection that is owned and deployed by your WebCenter Portal application. In this case, the connection will be to the Universal Content Management (UCM) repository with access provided to the Oracle Content Server. You will set UCM as your primary connection and navigate to the Contributions directory, where HTML content files for your application, like About Us, Contact Us, Home and Menu, are stored in UCM sub folders.
You will then work with these files and the Documents - Content Presenter service to create task flow bindings for the application. For example, in the home.jspx file, you will drag and drop the home.html file as your Content Presenter. By enabling a connection to UCM, you will be able to manage more efficiently the content you need while optimizing the development of your application.
The other tasks described in this lesson include learning how to add a content item to the default navigation model, as well as how to take advantage of Iterative Development, which allows you to make changes to your application while it is still running on the Integrated WebLogic Server and immediately see the effects of those changes when you refresh the pages in your web browser. You will also learn how to add a new Content Query that will fetch all the documents you need in your portal application that are based on specified metadata field tags in UCM.
At the end of this lesson, the page you created in the previous lesson will look like Figure 6-1.
Figure 6-1 The MyPortalApplication in a Web Browser with Menu Items Selected
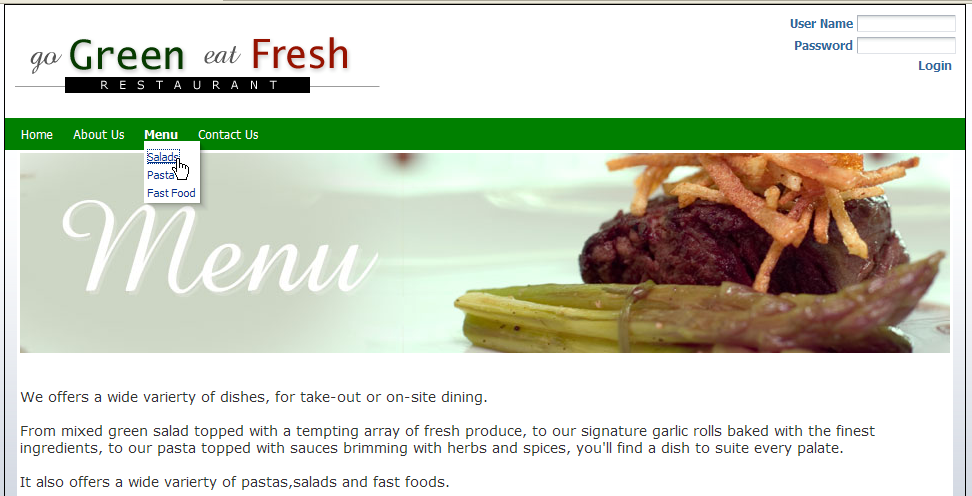
For more information about adding content items to the navigation model and new content queries, see Building a Navigation Model for Your Portal in Oracle Fusion Middleware Developer's Guide for Oracle WebCenter. For more information about managing content repositories and UCM, see Oracle Fusion Middleware Administrator's Guide for Oracle WebCenter.
This lesson contains the following steps:
Before you begin the steps in this lesson, ensure you have followed the steps up to this point in the Tutorial.
Oracle JDeveloper enables you to manage and handle document content stored on the Oracle Content Server by creating a connection to the content repository, in this case to UCM. This connection is then owned and deployed by your portal application. You create this connection in Application Resources, as described in the following steps.
To connect to the content repository:
In Application Navigator, navigate down to Application Resources and right-click the Connections folder.
Choose New Connection and the Content Repository item. The Create Content Repository Connection dialog appears, as shown in Figure 6-2.
Figure 6-2 The Create Content Repository Connection Dialog to Connect to UCM
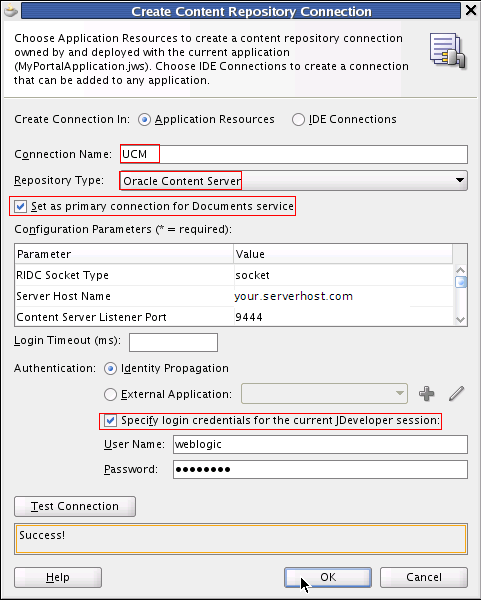
In the Connection Name field, enter UCM. Ensure that you enter UCM in all caps. Note that you should not use any other designation for the UCM connection, like myUCM, for example. The UCM content for the Tutorial relies on this specific connection name. Ensure that the connection name is UCM.
From the Repository Type field, select Oracle Content Server. Ensure that you check Set as primary connection for Documents service.
In the Configuration Parameters pane (Figure 6-2), enter the parameters and values shown in Table 6-1. The Server Host Name should be your server host, that is, the host name of the system where your Oracle Content Server is running. The Content Server Listener Port is the port of your Oracle Server.
Ensure that you check Specify login credentials for the current JDeveloper session (Figure 6-2).
In the User Name field, enter weblogic and in the Password field, enter weblogic1.
Click Test Connection, and if successful, click OK.
In Application Resources, expand the Connections folder, as shown in Figure 6-3. Note that you are now connected to the UCM repository.
Figure 6-3 The Connection Established to the Content Repository
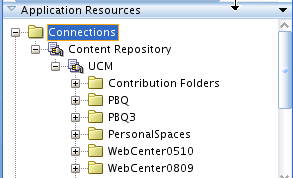
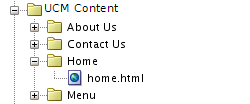
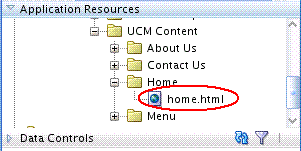
Under your UCM connection, expand the Contributions folder and navigate to the UCM Content folder, where your uploaded content is stored. Now open the Home folder with the home.html file shown in Figure 6-4.
Figure 6-4 The Home Folder Opened with the home.html file Shown in the UCM Contents Directory
Return to your portal project directory, navigate up to the pages folder. Open the home.jspx file, then view it in Source view by clicking the Source tab. The home.jspx file appears in Source view, as shown in Figure 6-5.
Figure 6-5 The home.jspx File in Source View
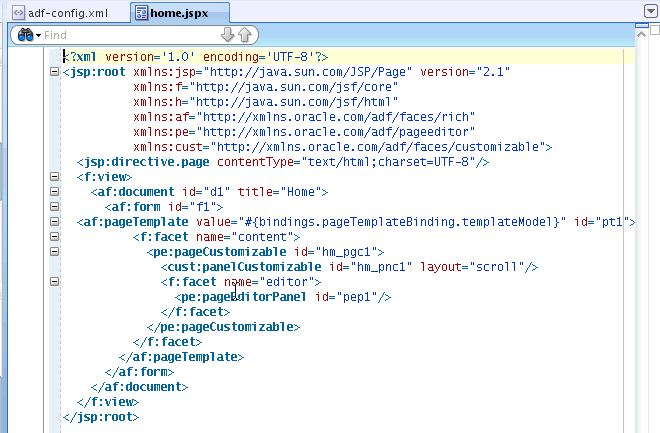
Select the XML code snippet <cust:panelCustomizable id="hmpnc1" layout="scroll"/> at the center of the file, as shown in Figure 6-6. You will add another line of code after the selected snippet.
Figure 6-6 The Customizable Panel XML Code Snippet

In the UCM Contents folder, open the Home folder and select the home.html file, shown in Figure 6-7.
Figure 6-7 The home.html File in the UCM Contents Folder
In JDeveloper, return to the Source view of the home.jspx file. Select the XML code snippet <cust:panelCustomizable id="hmpnc1" layout="scroll"/> shown in Figure 6-6, and drag and drop the home.html from the UCM connection on to the panelCustomizable.
Choose the Create menu item, then scroll down the sub menu list to select the Documents - Content Presenter item, as shown in Figure 6-8, and click the item.
Figure 6-8 The Create Documents - Content Presenter Menu Item Selected

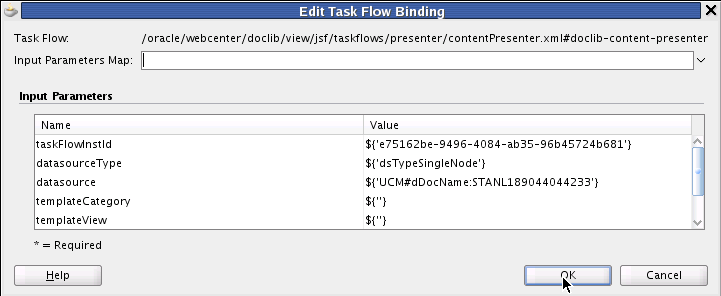
The Edit Task Flow Binding dialog now appears, shown in Figure 6-9. The task flow input parameters are automatically assigned specific values. Click OK.
Figure 6-9 The Edit Task Flow Binding Dialog with Specific Values Assigned
It's important to understand that in the last two steps, you have added a Content Presenter task flow and set the task flow parameters to read the values from the navigation link parameters. When you run your portal application, the Home node will automatically appear in the navigation menu because the home.jspx file has already been added to the page hierarchy and the page hierarchy has been added to the default navigation model.
Save your changes.
Refresh the web browser.
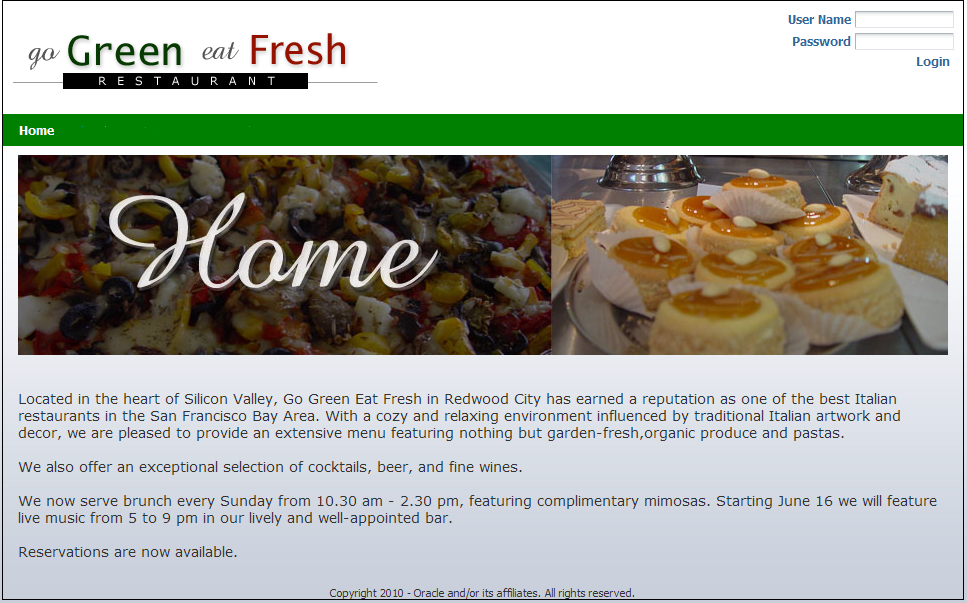
The new Home link appears in the navigation, with the text for document content at the center of the Home page, as shown in Figure 6-10.
Figure 6-10 The MyPortalApplication in a Web Browser with the Home Page and Home Content Defined
In this sequence of steps, you have learned how you can take advantage of the Content Presenter task flow in order to display and render documents under a UCM folder as a tab.
Using the Content Presenter task flow, you are able to drag and drop a task flow onto a panel component as a region in the XML code for purposes of binding the task flow to that region. You can then set task flow parameters to read the values from the navigation link parameters.
Up to this point, you have created and built a page that can be used as a template, if you choose, onto which you can add multiple navigational links.
Now that you have successfully created a connection to the UCM content repository for your WebCenter Portal application and performed the necessary steps to drag and drop the home.html file as your Content Presenter, we will create a user in the portal application who will have privileges to edit UCM content stored in your repository.
There are two steps involved to accomplish this particular task:
create a user (in this case, named contentadmin) in the application
create a user with the same name (contentadmin) in the Embedded LDAP WebLogic Server and add that user as a part of the Administrators group
When you run the application after completing these steps and log in as contentadmin, the identity of this user is propagated to the Embedded LDAP of Oracle WebLogic Server.
Since the UCM instance uses the same Embedded LDAP as an identity store, and since all the users who are a part of the Administrators users group have by default Read, Write, Delete and Administration privileges, the user you've added -- contentadmin -- will be able to edit UCM content.
To create a user in the portal application with privileges to edit UCM content:
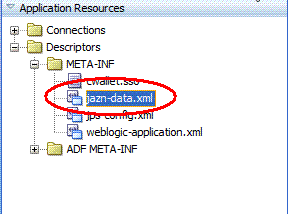
In Application Navigator, navigate down to Application Resources, expand the META-INF folder and open the jazn-data.xml file, shown in Figure 6-11.
Figure 6-11 The jazn-data.xml File Selected in the META-INF Folder
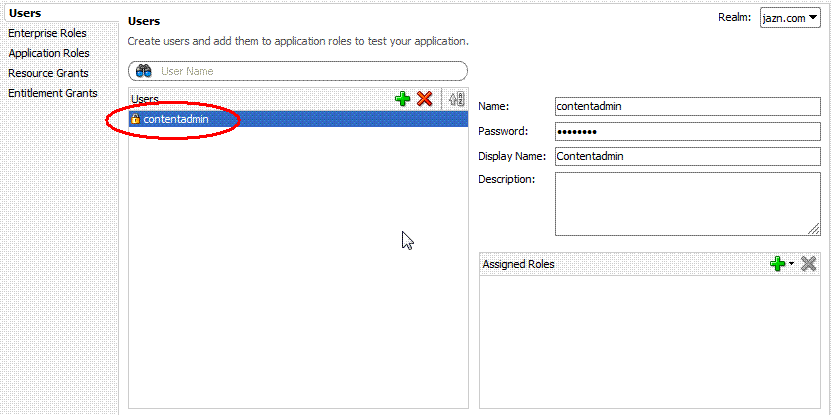
Create a user named contentadmin in your portal application (Figure 6-12).
Once you have created a user in the application, you will create a user on the embedded LDAP of Oracle WebLogic Server.
Figure 6-12 The contentadmin Created as a User In UCM with Name and Password
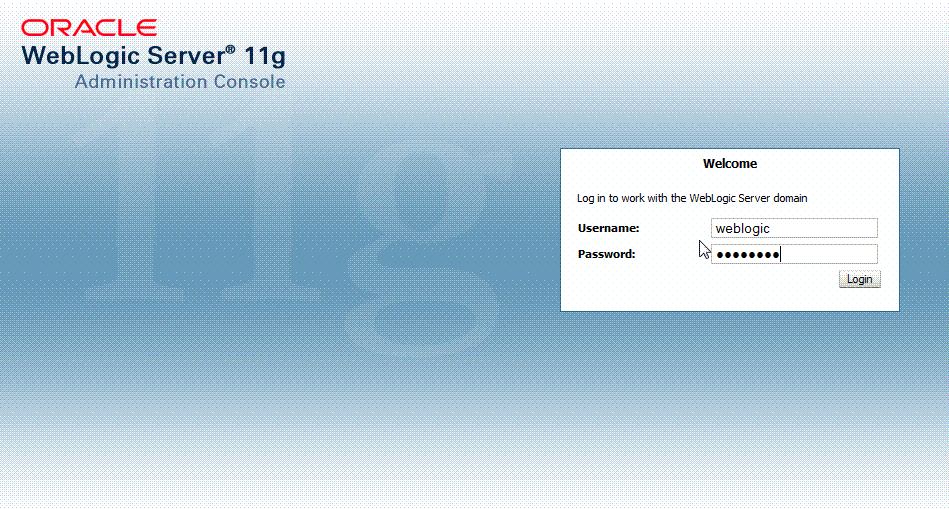
Log in to the Oracle WebLogic Server Administration Console where the UCM server is installed and enter contentadmin as the user name and the password you used when installing the product (Figure 6-13). Note the Display Name is Contentadmin.
Figure 6-13 Logging in to the Administration Console for Oracle WebLogic Server
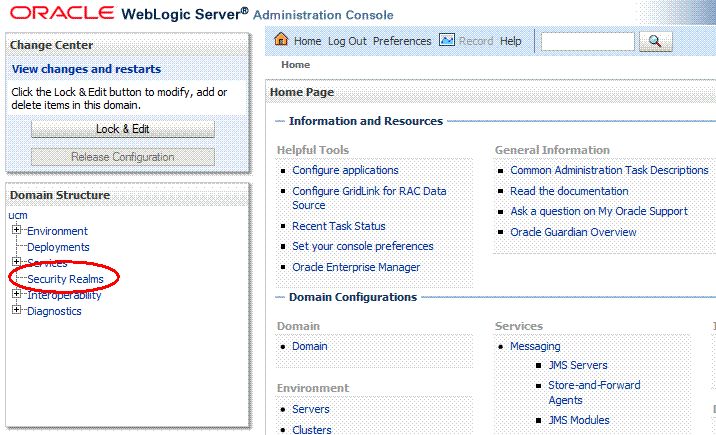
Select the Security Realms item in the UCM Domain Structure pane (Figure 6-14) and click it.
Figure 6-14 The Security Realms Item in UCM
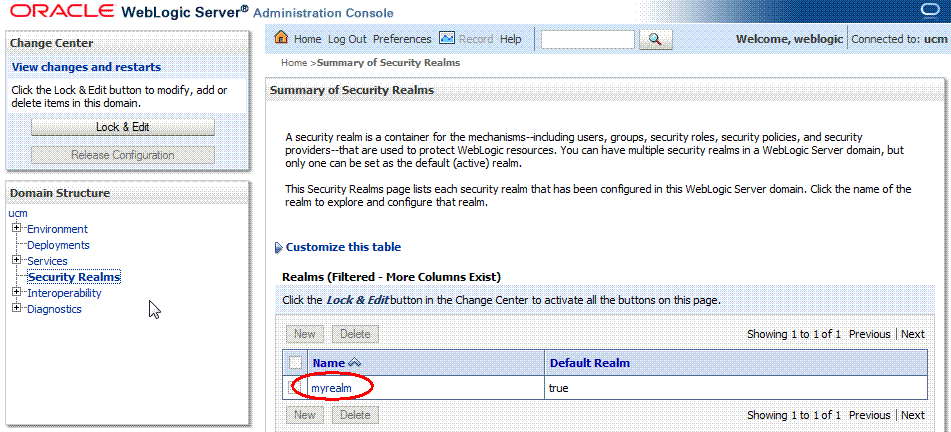
Now select the myrealm name in the Realms table (Figure 6-15) and click it.
Figure 6-15 The Name myrealm Selected in the Realms Table
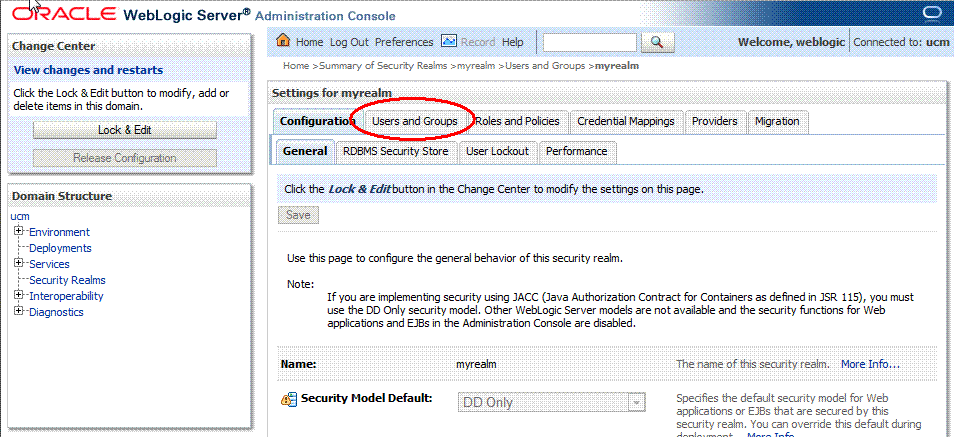
In the Settings for myrealm pane (Figure 6-16), select and then click the Users and Groups tab.
Figure 6-16 Users and Groups Selected in the Settings for myrealm Pane
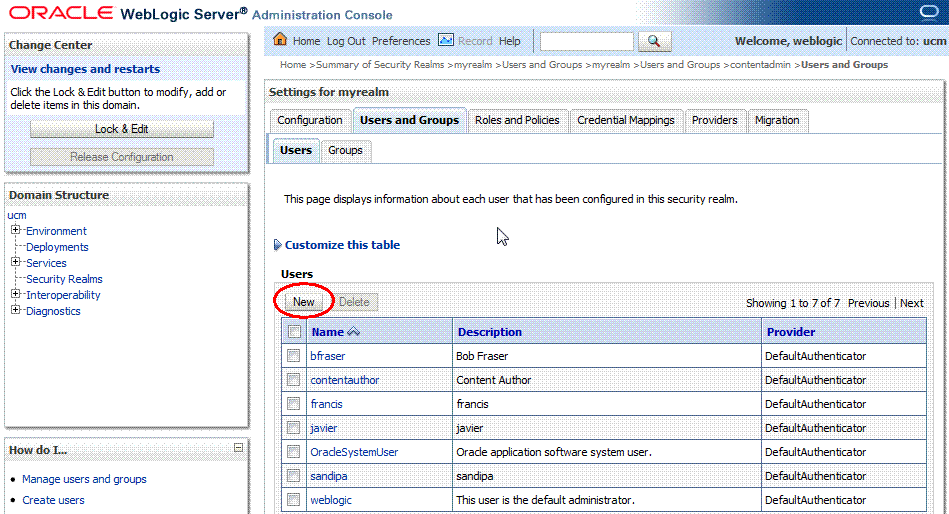
In the Users table, click the New button (Figure 6-17).
Figure 6-17 The New User Button Selected in the Users and Groups Pane
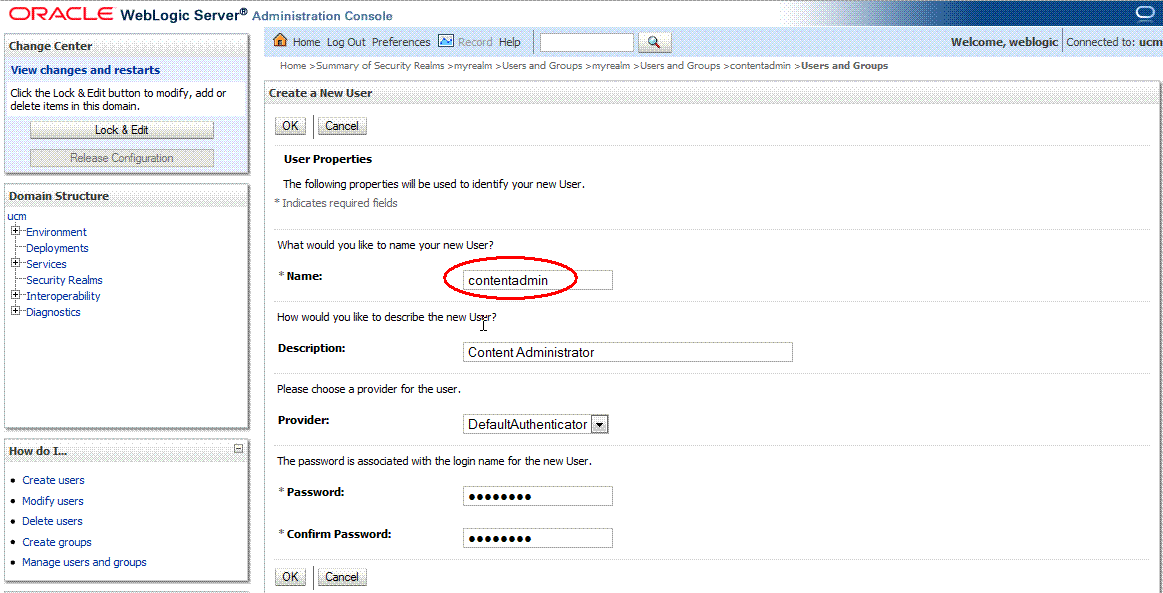
Now create a user named contentadmin when asked what you would like to name your new user (Figure 6-18). Specify this new user as a Content Administrator when asked how you would like to describe this new user.
Figure 6-18 The User contentadmin Created as New User
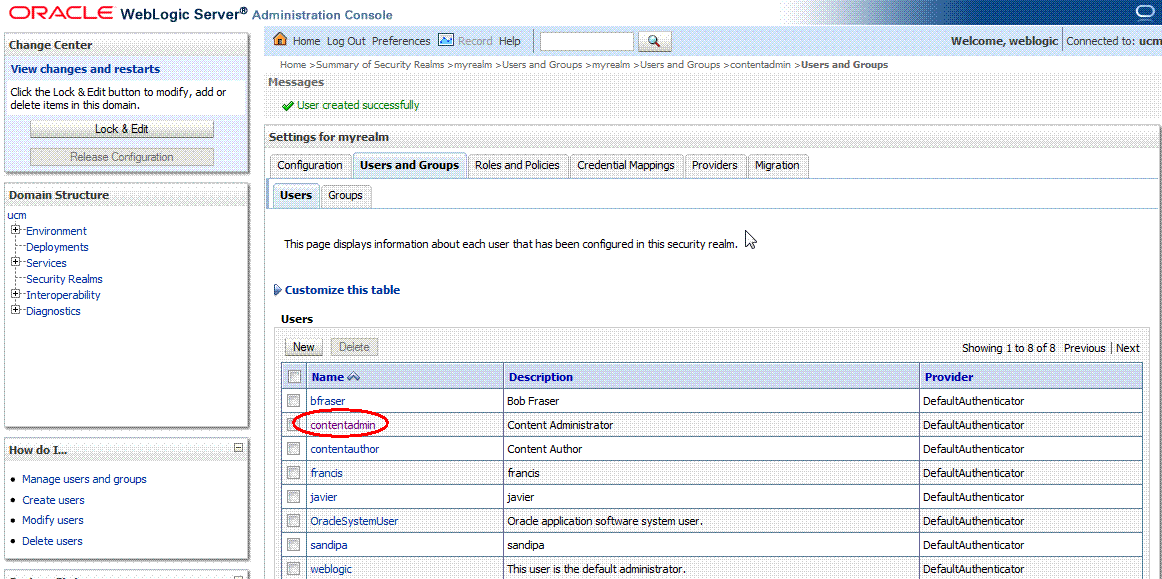
Select and then click the newly created user in the Users table (Figure 6-19). Content Administrator appears in the Description field of the table. Note that the page displays information about each user that has been configured in this security realm.
Figure 6-19 The Newly Created User contentadmin in the Users Table
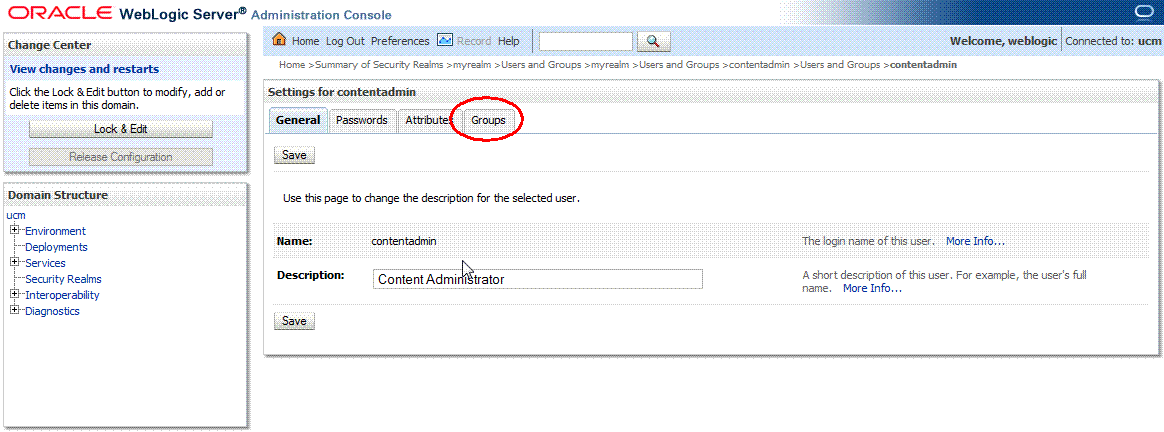
Select and click the Groups tab in the Settings for contentadmin pane (Figure 6-20).
Figure 6-20 Groups Tab Selected in the Settings for contentadmin Pane
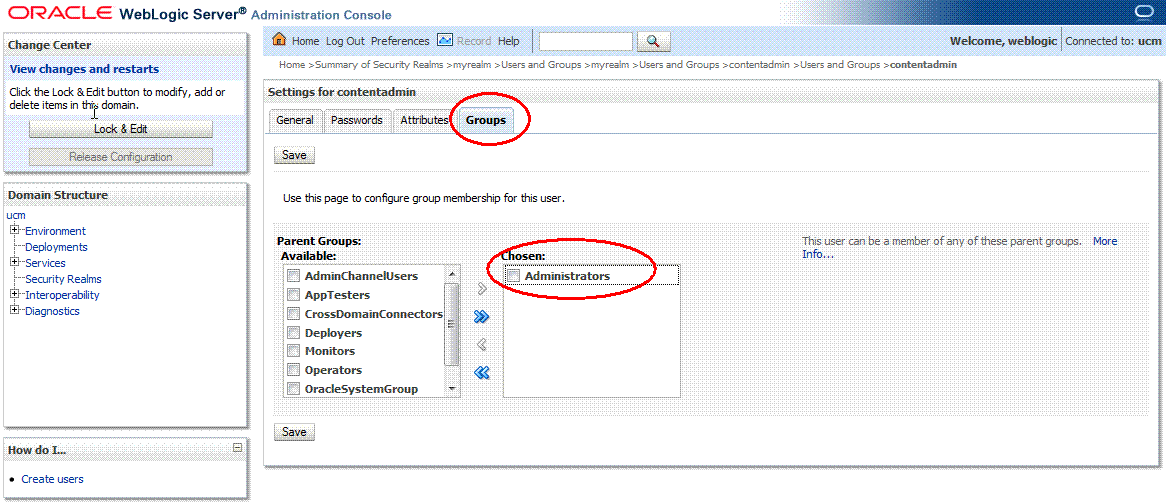
Select the Groups tab and choose the Administrators group from the Parent Groups: Available list and add it to Groups (Figure 6-20). Note that you can use this page to configure group membership for a particular user.
Figure 6-21 Administrators in Available Parent Groups Added to Groups
Click Save.
Once you've completed these steps, the user you've added -- contentadmin -- will now be able to edit the UCM content in the content repository.
In this next sequence of steps, we move ahead to add a content item to the default navigation model XML file for the application.
To add a content item to the default navigation model:
In the Application Navigator of your portal application project, go to the navigations folder (/oracle/webcenter/portalapp/navigations). Right-click default-navigation-model.xml, and choose Open.
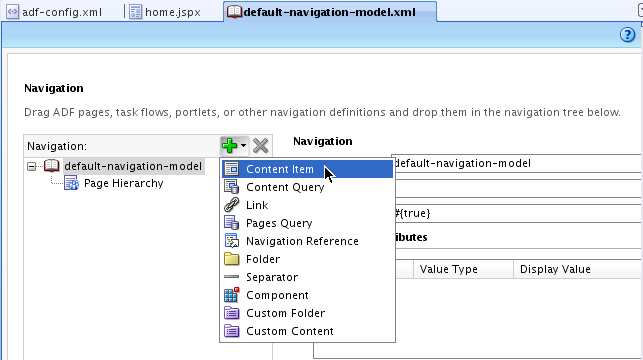
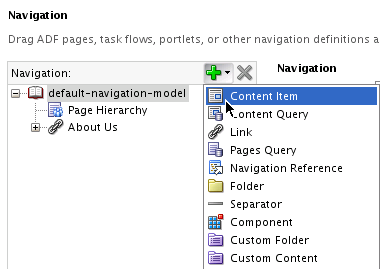
In the Design view for the navigation model, in the Navigation column on the left side, click the Add new node icon (the plus icon) and choose the Content Item, shown in Figure 6-22.
Figure 6-22 Adding a Content Item to the Default Navigation Model
Tip:
When you first create a WebCenter Portal application, the seeded navigation model,default-navigation-model.xml, is set as the default navigation model. The default navigation model provides a convenient way to select a navigation model that can be used by default by your application. Page template designers, for example, can then reference this default navigation model without having to know its actual name.
You can set the default navigation model for your application, if you want to create your own model, by editing the oracle.webcenter.portalapp.navigation.model preference in the adf-config.xml file.
The navigation window for the default-navigation-model.xml file appears with a link specified as contentItem and with the Id specified also as contentItem. You will need to change these entries, as shown in Figure 6-23. Note that the Type field is set as Content.
Select the About Us file, enter in the Link Id field: aboutus. In the URL Attributes pane, enter the Display Value as About Us.
Figure 6-23 Id and Display Value Specified for Content Item
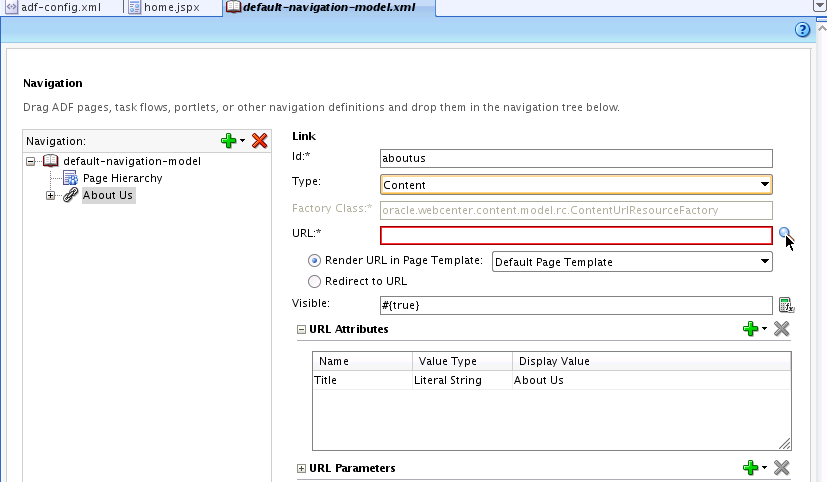
Click the Browse icon (in the shape of a magnifying glass) next to the URL field to browse the contents.
In the Choose a Resource dialog, open and expand the UCM sub folders, then navigate to the UCM Content folder and select the aboutus.html file shown in Figure 6-24.
Figure 6-24 The aboutus.html file Selected in the Choose a Resource Dialog
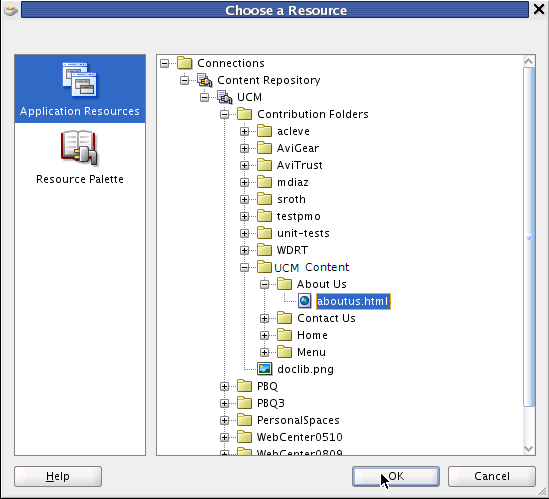
Click OK. The URL of the selected resource appears in the URL field.
Note that you can also simply drag and drop the file from the content connection into the navigation and it will create the content item for you.
Save your files.
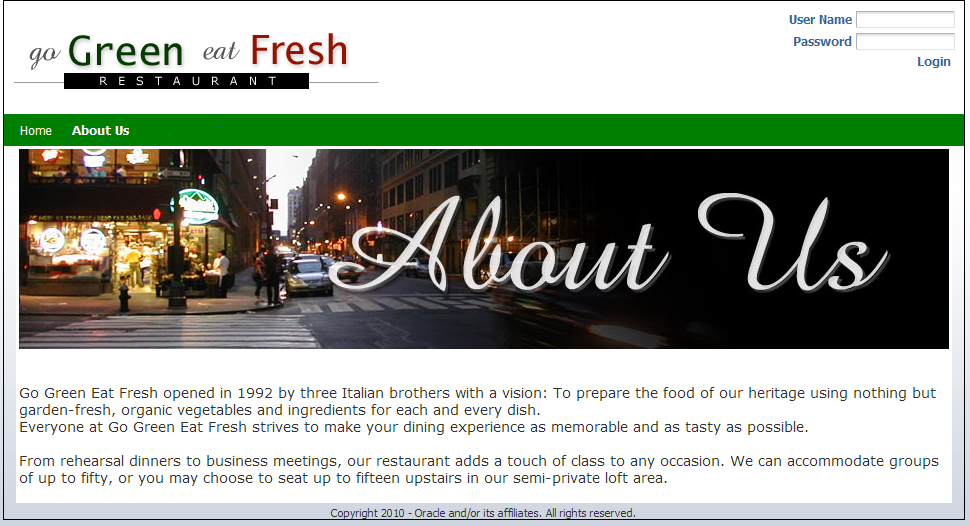
Now return to your web browser, reload the browser page and log in as the weblogic user. The About Us link appears in the navigation model next to Home, as shown in Figure 6-25.
Figure 6-25 The About Us Link in the Web Browser of Your Portal Application
The Iterative Development option is enabled by default in your WebCenter Portal application. There are several advantages to this option.
For one thing, iterative development lets you speed up your development process by allowing you to make changes to your application while it is still running on the Integrated WebLogic Server and then immediately see the effects of those changes when you refresh the current pages in your web browser.
Tip:
On a browser refresh, you will see changes almost instantly to page definitions and page hierarchy, existing JSPX files and the navigation model, page templates, the resource catalog and task flows or portlets you may have added to pages. For example, you can add a task flow to a page and simply refresh the browser or you can change the values in task flows and right away see the results.Other operations are not supported by iterative development, however, and require you to re-run the application if you create any new file explicitly (for example, a new page definition or page hierarchy), or implicitly. For instance, when you add a sub-page to a node in the page hierarchy, a new *pages.xml file is created, or if you edit any configuration file, like web.xml or adfc-config.xml.
Basically, iterative development works by disabling certain optimization features. Note that iterative development only applies when running from JDeveloper using the built-in server. This option has no effect once your portal application is deployed to a staging or production server.
In the previous step Step 3: Add a Content Item to the Navigation Model, you added a new content link to your application, which appeared in the navigation hierarchy when you refreshed the contents of your web browser.
With Iterative Development enabled in your application, you will add a new link in JDeveloper of type Content in the default navigation model under Root, and then choose the menu.html document for that link. As you save the changes to your application and refresh the browser page, you will see the Menu node on the navigation menu. Clicking it will enable you to see the content of the Menu.
To add a new link in the default navigation model in your application:
In Application Navigator, select the default-navigation-model.xml file. Right-click the Application Properties menu item.
In the Application Properties dialog, select WebCenter in the Run node and ensure that Enable Iterative Development is checked. (Note that this is checked by default.)
Click OK.
In the Navigation pane with the default-navigation-model.xml file selected, click the plus icon to add a Content Item in the navigation, as shown in Figure 6-26.
Figure 6-26 The Content Item To Be Added to the Default Navigation Model XML File
The contentItem appears as a node in the default-navigation-model.xml navigation and in the Id field as contentItem. Change the Id to menu and the Display Value to Menu, as shown in Figure 6-27.
Figure 6-27 The contentItem Changed to menu with a New Display Value
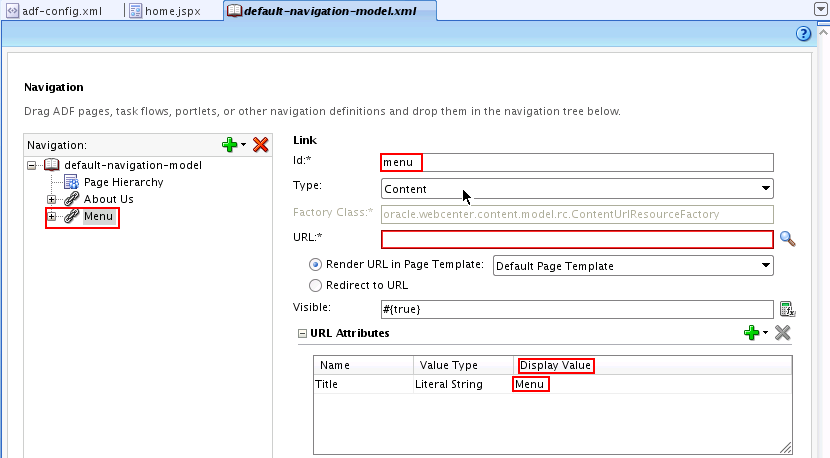
Click the Browse icon next to the URL field.
Navigate to the Menu folder in your UCM connection and select the menu.html file, as shown in Figure 6-28.
Figure 6-28 The Choose a Resource Dialog with menu.html Selected
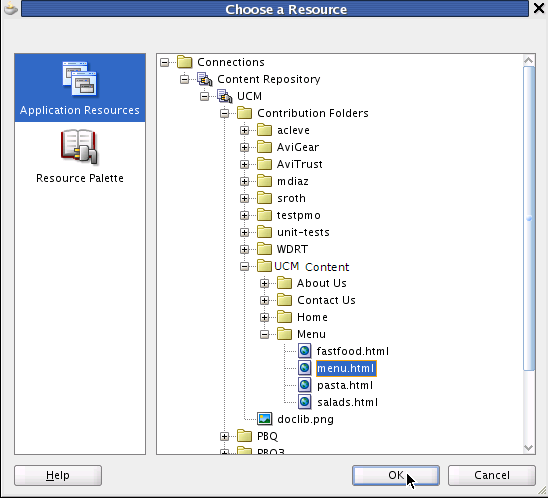
Click OK.
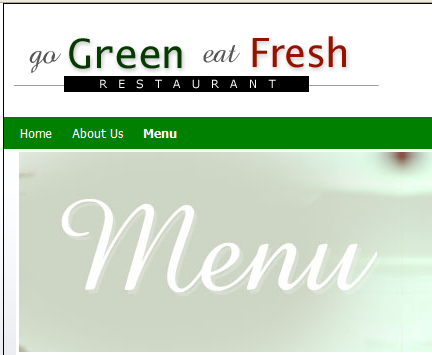
Refresh the Home page in your web browser and note that the Menu link appears in the navigation of the Home page, as shown in a partial view in Figure 6-29. This is the result of enabling the Iterative Development feature in your portal application.
Figure 6-29 The Refreshed Web Browser Page with the Menu Link Added in the Navigation Model
In this next step, you will add a new content query to your portal application. This query will fetch all the documents that are based on metadata field tags in UCM.
To add a new content query:
Return to your portal application in JDeveloper and open the default-navigation-model.xml file.
Add the new node icon by clicking the plus button.
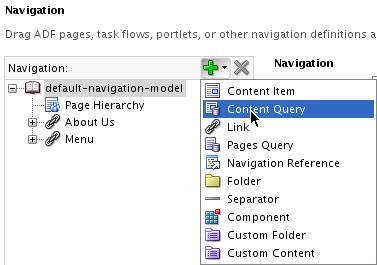
Select the Content Query menu item in the list, as shown in Figure 6-30.
Figure 6-30 Adding a New Content Query to the Default Navigation Model
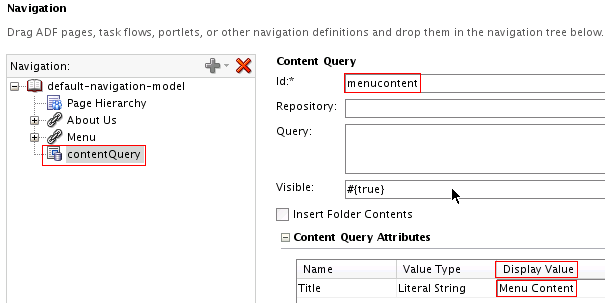
In the Content Query pane, enter in the Id field menucontent. In the Content Query Attributes pane, enter as the Display Value Menu Content (Figure 6-31).
Figure 6-31 The Content Query Pane with Id and Display Value Changed
Select Menu in the navigation node, and click the Browse icon in the URL field. The Choose a Resource dialog now appears.
In the Choose a Resource dialog, expand Connections, and select UCM, then click OK. Note that your connection named UCM appears in the Repository field, shown in Figure 6-32.
Figure 6-32 The Repository Field with UCM Entered

Drag and drop the Menu Content item, which is a content query, on the Menu item. This query, based on a metadata field tag in UCM, will fetch all the documents that match the specified criteria for the query in UCM, as shown in Figure 6-33.
Enter the Content Query text in the Query field: SELECT cmis:name FROM ora:t:IDC:GlobalProfile WHERE ora:p:xWCTags LIKE 'menu%'. Note that documents have to be tagged with the keyword: "menu" for the content query to work properly.
Figure 6-33 The Menu Contact Content Query Text Entered
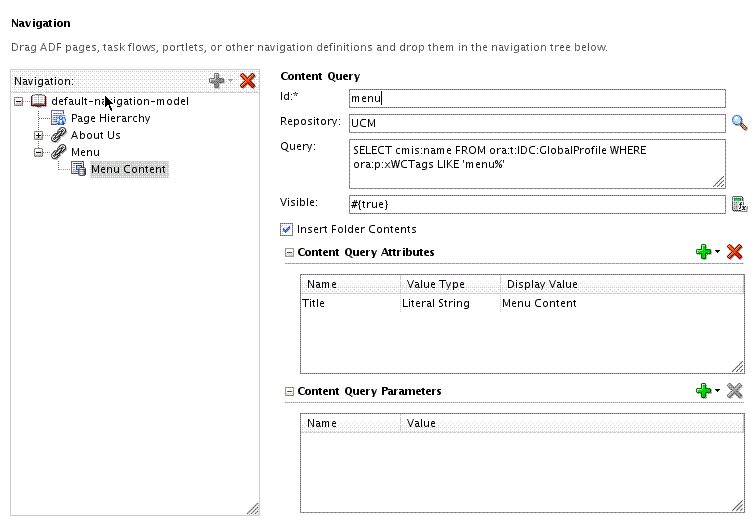
Ensure that you check Insert Folder Contents.
Tip:
You need to perform this step, which is necessary and required in this case, to ensure that the result of the menu content query is published under the menu node because the menu content query is a child of the menu node. The step is not required in all use cases, however.To ensure that your Content Query executes properly and returns the correct set of results, you need to set its metadata on the content.
As shown in Step 8, the Content Management Interoperability Services (CMIS) query looks like this:
SELECT cmis:name FROM ora:t:IDC:GlobalProfile WHERE ora:p:xWCTags LIKE 'menu%'
Note that UCM relies on the concept of a “display” name and an “internal” name for each metadata field. For example, in this CMIS query xWCtags is the internal name for the metadata field while Tags is the display name for the same field. When you build a CMIS query, you need to use the UCM internal name for the field.
Tip:
The CMIS query used in this example fetches all the documents based on the metadata fieldTags. For the content query to work properly, you must enter the metadata next to the Tags field in the UCM Administration Console for Oracle Content Server. In this example, the Tags field is set to a value specified as menu.
Keep in mind that the Tags field described here is strictly one of the metadata fields in UCM, and not related to any other Oracle WebCenter Tags service or tagging capability.
For more information on how to view UCM content metadata -- in particular, the Tags field -- see the section “Viewing Content Information” in the Chapter “Working with Files” in Oracle Fusion Middleware User's Guide for Content Server.
For more information on how to update UCM content metadata, see the section “Content Item Metadata” in the Chapter “Working with Files” in Oracle Fusion Middleware User's Guide for Content Server.
The following steps will enable you to set the correct values on the Tags field.
Log into the UCM instance with Administrator privileges enabled, as shown in Figure 6-34.
Figure 6-34 Login With Administrator Privileges
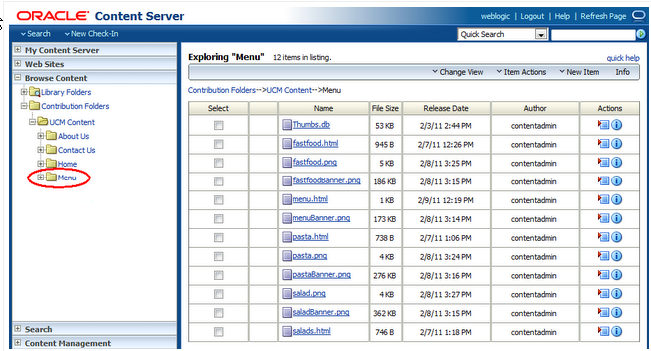
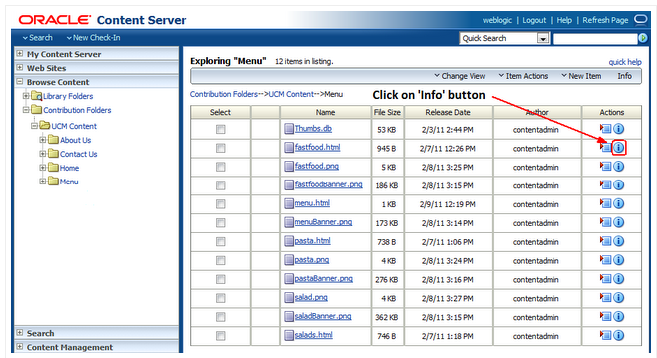
Navigate to the Menu folder in the Contribution Folders directory in the UCM repository, as shown in Figure 6-35.
Figure 6-35 The Menu Folder For Oracle Content Server in UCM
Click the Info button under the Actions menu item for the fastfood.htmlfile, shown in Figure 6-36. This action takes you to the Content Information page in Oracle Content Server (Figure 6-37).
Figure 6-36 Clicking The Info Button for the fastfood.html File
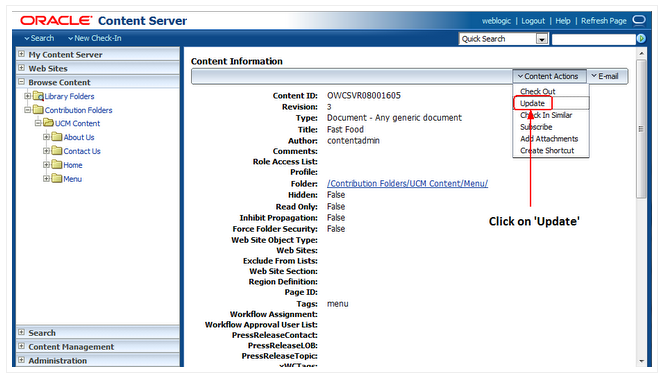
On the Content Information page (Figure 6-37), choose the Content Actions menu, and click the Update menu item. In so doing, you will land on the Info Update Form for the fastfood.html page (Figure 6-38).
Figure 6-37 Content Actions Menu With Click On Update Selected
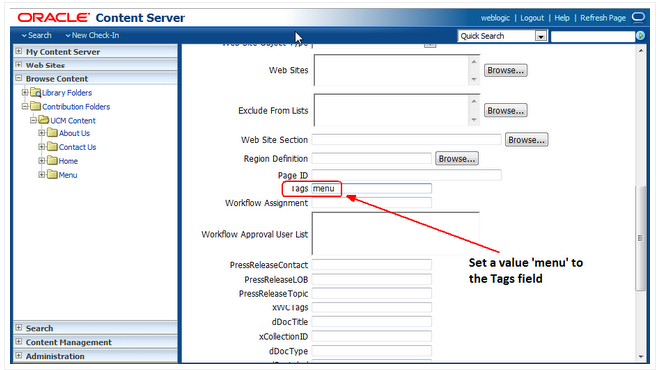
In the Info Update Form, now set a value defined as menu in the Tags field, as shown in Figure 6-38.
Figure 6-38 Setting the Value menu in the Tags Field
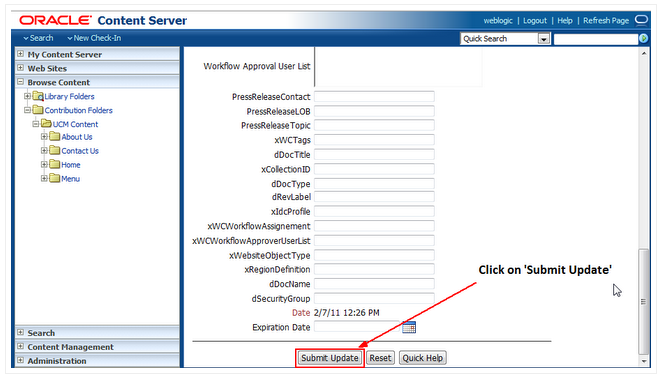
Click the Submit Update button at the bottom of the form (Figure 6-39). In so doing, you will set the metadata for the content query.
Figure 6-39 Clicking Submit Update to Set the Metadata For The Content Query
Now save your changes, return to your portal application and refresh the home page in your web browser. The Fast Food link appears under the Menu node in the navigation bar (Figure 6-40).
Figure 6-40 The Fast Food Link Displayed Under the Menu Node

Repeat steps 14-18 for other HTML files, like salad.html and pasta.html, which reside in the Menu folder in your UCM repository. Once you set the metadata on the Tags field for all the HTML files, the results of each CMIS query will appear under the Menu node when you refresh your web browser.
In this lesson, you've learned the importance of working with and managing your document contents in the Universal Content Management (UCM) repository. In so doing, you can optimize your development efforts, enable Iterative Development and add new content to your navigation model. You can also take advantage of adding content queries to your navigation model, which enable you to query and fetch documents based on specific metadata tags that are used in UCM.
In the next lesson, you will move ahead to extend your portal development skills by learning how to customize portal pages and add them to your page hierarchy, setting permissions on user access. In addition, you'll learn how you can easily edit HTML content in-context at runtime in your portal application.