| Oracle® Fusion Middleware Tutorial for Oracle WebCenter Developers 11g Release 1 (11.1.1.4.0) Part Number E10273-07 |
|
|
View PDF |
| Oracle® Fusion Middleware Tutorial for Oracle WebCenter Developers 11g Release 1 (11.1.1.4.0) Part Number E10273-07 |
|
|
View PDF |
In this lesson, as a developer at design time, you will customize a specific page in the page hierarchy of your WebCenter Portal application, adding that page to the hierarchy so you can set permissions for user access and editing, or modification of document content.
You will also drag and drop documents in HTML format from your UCM repository on to a consignable panel component in a new.jspx page and render that page as a Content Presenter task flow. The Content Presenter task flow lets you add content to your portal application, in this case, using the Documents service to display that document content stored in your content repository. The Documents service provides a user-friendly interface to manage, display, and search documents at runtime.
In the last step, you will enable authenticated users to edit the content of those HTML pages in-context at runtime. A pop-up window will open an editing session for adding or modifying content stored in your UCM repository.
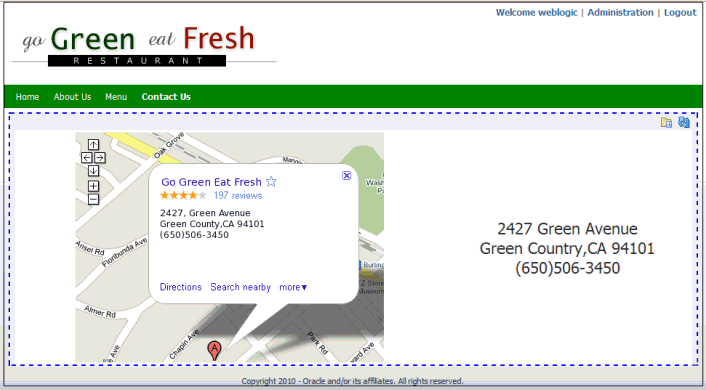
At the end of this lesson, the home page you created in the previous lesson will look like Figure 7-1 when in-context editing of HTML content is enabled on the Contact Us page at runtime.
Figure 7-1 The Portal Application Contact Us Page Enabled for Editing at Runtime
This lesson contains the following steps:
Before you begin the steps in this lesson, ensure you have followed the steps up to this point in the Tutorial.
Building on the steps of the previous lesson (Chapter 6), we can now move ahead to customize specific pages in our WebCenter Portal application, thus setting page permissions and user access.
To accomplish this task, we first need to create a new.jspx page, in this case, contacts.jspx, and then add that page to the Page Hierarchy. By adding the page to the hierarchy, we can set page permissions, and in so doing, we can specify user access to those pages for security purposes.
To customize pages and set page permissions in our portal application:
In JDeveloper, navigate to the pages folder in Application Navigator.
Right-click New, expand Web Tier, select JSF and select the JSF Page, which launches the Create JSF Page dialog, as shown in Figure 7-2.
Enter contacts.jspx in the File Name field and ensure that the checkbox Create as XML Document (*.jspx) is checked.
Figure 7-2 The Create JSF Page Dialog with the Globe Page Template Selected
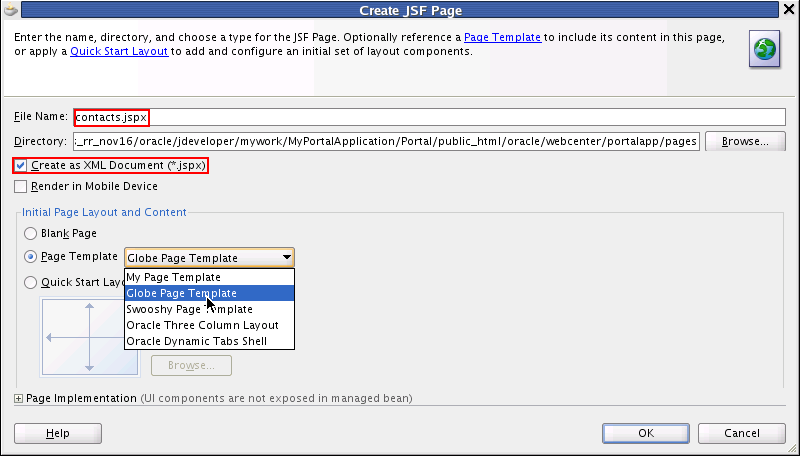
Select Globe Page Template from the list of available templates as the Page Template.
Click OK.
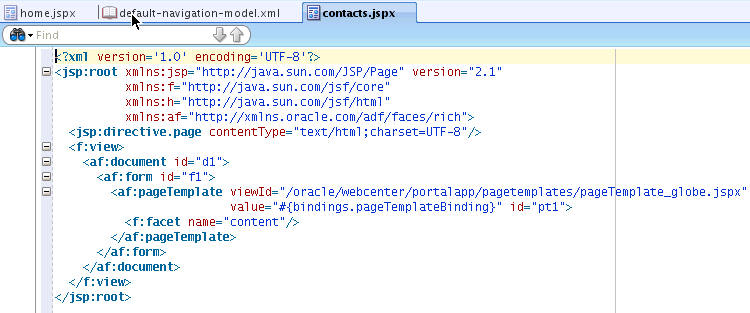
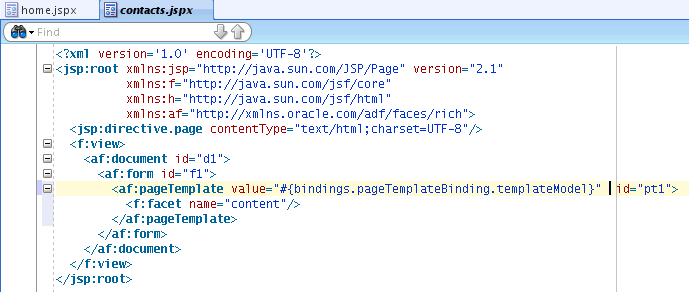
Select contacts.jspx and open it in Source view (Figure 7-3).
Figure 7-3 The contacts.jspx File Shown in Source View
Now in Application Navigator, select the home.jspx file, which resides in the pages folder, open it in Source view and select the code line, which specifies the value attribute, shown in Figure 7-4. Note that this is needed so the page picks up the template changes that occur at runtime.
Figure 7-4 The value Attribute Selected in the home.jspx File in Source View
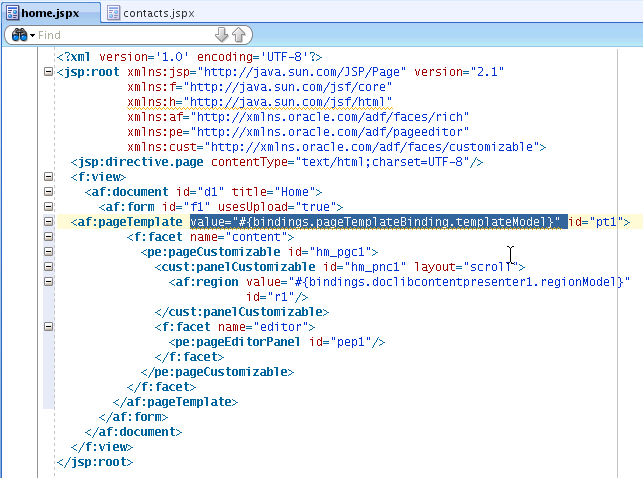
Now copy the code line highlighted in Figure 7-4, which displays the value attribute that specifies the page template bindings, and paste this code line into the contacts.jspx file where the value attribute is located, as shown in Figure 7-5.
Figure 7-5 The value Attribute Pasted into the contacts.jspx File
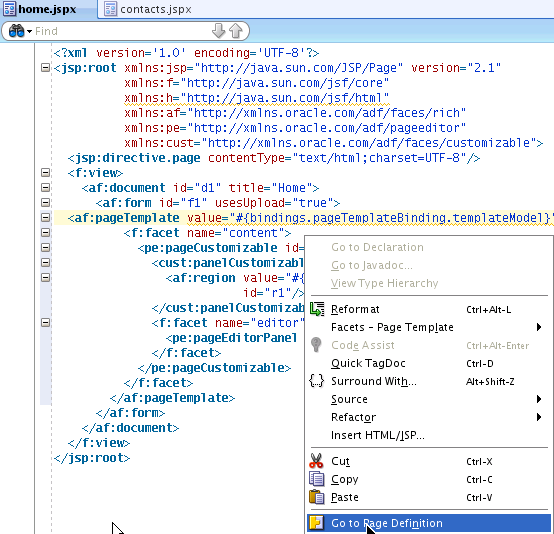
Select the home.jspx file, right-click the file, and choose the Go to Page Definition menu item, shown in Figure 7-6. This opens the homePageDef.xml file.
Figure 7-6 Specifying the Page Definition in the home.jspx File in Source View
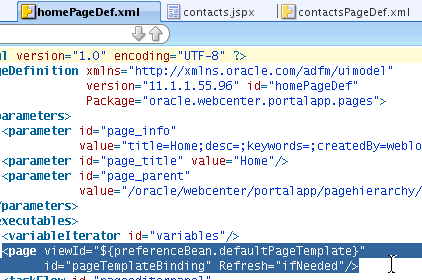
In the homePageDef.xml file in Source view, select and copy the code snippet specifying the viewID attribute for the page template and the id for the page template binding, as shown in Figure 7-7 and in Example 7-1.
Figure 7-7 The homePageDef.xml File in Source View with the viewID Attribute Selected
Select the contacts.jspx file, right-click the file, and choose the Go to Page Definition menu item, as shown in Figure 7-6, when you opened the homePageDef.xml file.
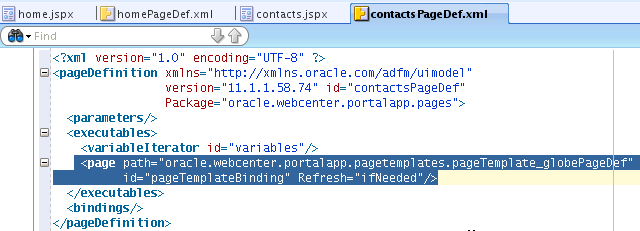
Now open the contactsPageDef.xml file in Source view and paste the code snippet you copied from the previous step, replacing the code lines shown in Figure 7-8. These code lines specify the path and id attributes for the contacts page definition file.
Figure 7-8 The path and id Attributes Selected in contactsPageDef.xml
Now choose the contacts.jspx file and open it in Source view. Then in JDeveloper, navigate to the Component Palette, which resides in the right-hand column of the application, and select Oracle Composer.
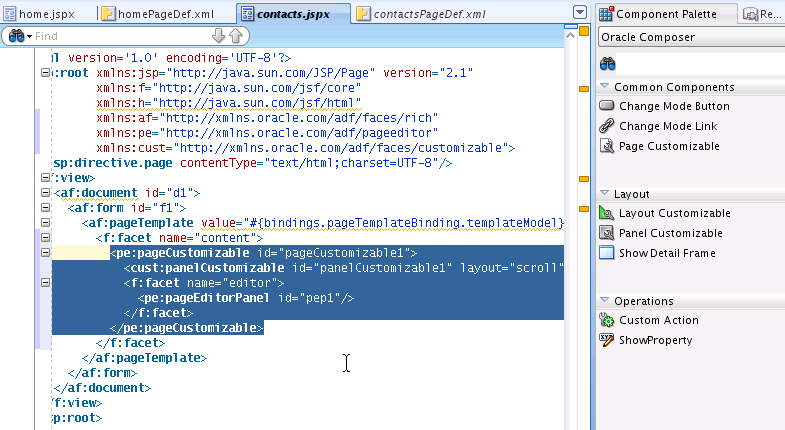
In Oracle Composer, navigate down the items in the list to the Page Customizable component and drag and drop that component on to the contacts.jspx file in the space between the code lines <f:facet name="content"> and </f:facet>, as shown in Figure 7-9.
Tip:
ThePage Customizable component denotes the customizable part of a page and appears in the Oracle Composer toolbar in Edit mode at runtime. Components enclosed within a Page Customizable component can be customized and edited.Figure 7-9 The Code Snippet for Panel Customizable Added to contacts.jspx
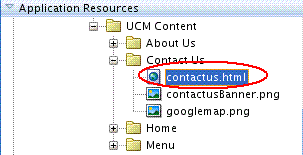
Now expand the UCM connection in JDeveloper, as shown in Figure 7-10, and drag and drop the contactus.html file on to the panelCustomizable component.
Figure 7-10 The contactus.html File Selected in the Contact Us Folder
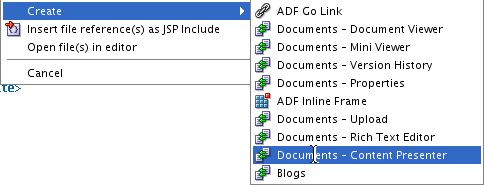
When the pop-up menu appears, choose the Create menu item and navigate to the Documents - Content Presenter task flow sub menu item shown in Figure 7-11 to render the HTML content.
Tip:
The Content Presenter task flow lets you conveniently add content to your portal application. You can select a single item of content, multiple content items, or query for content, and then select a template to render that content on a page in your application. In so doing, Content Presenter enables you to precisely customize the selection and presentation of your content in your WebCenter Portal application.Note that the Content Presenter task flow is available only when the connected content repository is Oracle Content Server and your WebCenter administrator has completed the prerequisite configuration. For more information about managing content repositories and UCM, see Oracle Fusion Middleware Administrator's Guide for Oracle WebCenter
The Documents service enables you to display content from a content server or file system directly within your application. End users can then view and manage documents, as well as other types of content stored in content repositories.
Figure 7-11 The Documents - Content Presenter Task Flow Selected for Creation
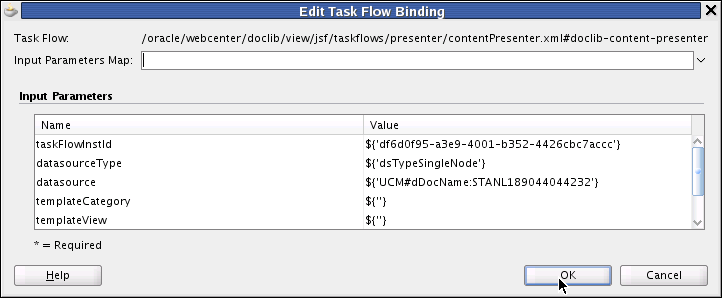
The Edit Task Flow Binding dialog appears, as shown in Figure 7-12. Note that in the Input Parameters section, there is a UCM value for the datasource field.
Figure 7-12 The Edit Task Flow Binding Dialog with a Data Source Value as a UCM Document Name
Click OK.
Return to the portal application and navigate to the pagehierarchy folder. Now open the pages.xml file, shown in Figure 7-13.
Figure 7-13 The Page Hierarchy Root Node For the page.xml File

When the pages.xml Page Hierarchy pane opens, drag and drop the contacts.jspx file into the Root node (Figure 7-14).
Figure 7-14 The pages.xml Page Hierarchy with contacts Selected in the Root Node
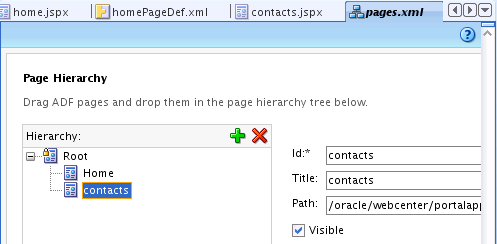
Select contacts in the Root node and in the Page Hierarchy pane, uncheck the Visible checkbox, which is shown as checked in Figure 7-14.
Now navigate to the default-navigation-model.xml file in the navigations folder and open it in Design view, as shown in Figure 7-15.
Figure 7-15 The default-navigation-model.xml File Pane in Design View

Navigate to the pages folder, select the contacts.jspx file and drag it to the default-navigation-model node (Figure 7-16),
Figure 7-16 The Contacts Link Added in the Navigation Model
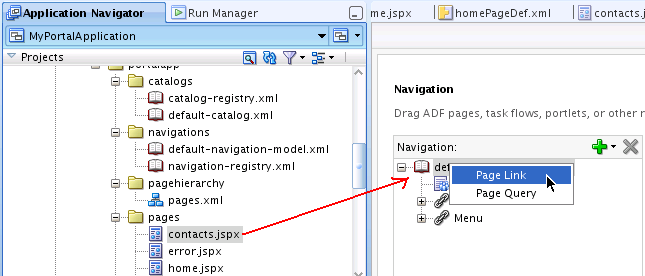
Choose the Page Link item and select the Add new node icon to add a link to the navigation model.
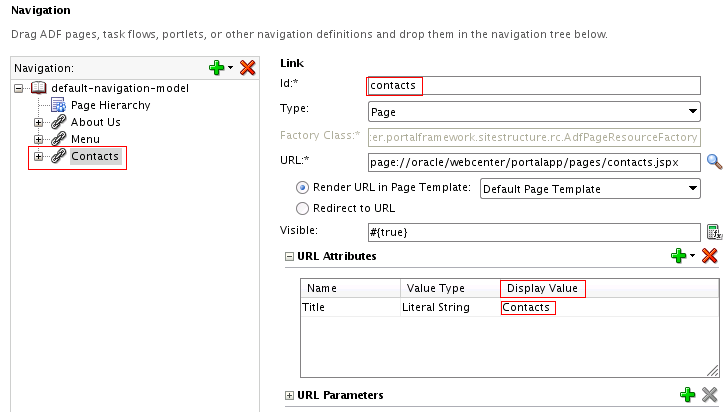
The navigation dialog opens, as shown in Figure 7-17, with contacts entered in the Id field. In the URL Attributes pane, enter the Display Value as Contacts.
Figure 7-17 The Navigation Pane with the Id for Contacts and the Display Value Specified as Contacts
Return to Application Navigator, select the Portal project and right-click Run to launch the application in a web browser.
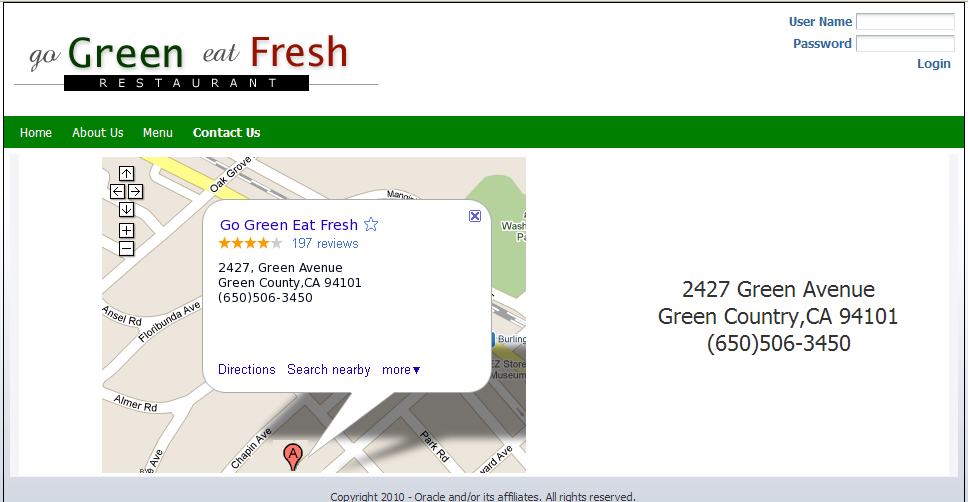
The application opens in a web browser with Contact Us as part of the navigation model, as shown in Figure 7-18. The page will be populated with content using Oracle Composer, shown in Figure 7-19.
For more information about creating and adding Content Presenter task flows and display templates, see Chapter 28, in Oracle Fusion Middleware Developer's Guide for Oracle WebCenter.
Figure 7-18 The MyPortalApplication shown in a Web Browser with the Contact Us Link Added to Navigation

Now that we have customized our Contacts Page in our application, dragging and dropping the contacts.html document from our UCM repository on to the panelCustomizable component in contacts.jspx and rendering it as a Content Presenter task flow, we can move on to the task of enabling in-context HTML editing capability to our documents.
In-context document editing offers authenticated users easier access and control over document content. This feature is only available at runtime, however.
In Application Navigator, select the Portal project and right-click Run to launch the application in a web browser.
Once the application opens in a web browser with Contact Us as part of the navigation model, click the Contact Us link in the banner to the right of the Menu link. The Contact Us page displays the page on which you can enter document content, as shown in Figure 7-19.
Figure 7-19 The Contact Us Page For Users to Enter Document Content
Log in to the Home page as contentadmin with the password you entered when installing the product (Figure 7-20).
Figure 7-20 Logging into the Home Web Page

Once you have successfully logged in, click the content of the page and press CTRL + SHIFT + C on your keyboard. The Home page in the web browser appears at the center with a hash-marked outline and an edit icon below the navigation bar in the upper right corner, indicating that the outlined portion of the Home page can be edited for document content, as shown in Figure 7-21.
Tip:
By entering theCTRL + SHIFT + C keys, you will enable the content contributions mode, which allows you to edit in-context HTML content stored in the UCM content repository. You won't need to edit the page using Oracle Composer.
Note that editing or customizing pages requires using a different set of tools and procedures, which enable you to add taskflows and portlets, for example, or to otherwise modify the page itself, and not just the document content on the page at runtime.
Figure 7-21 The MyPortalApplication in a Web Browser with Content Editing Enabled

Navigate in the outlined portion of the browser page to the edit icon and click the icon to enable editing, as shown in Figure 7-22.
Figure 7-22 The Edit Icon Selected to Enable Editing of Home Page Document Content
An Edit window pops up at the center of the page where authenticated users can add content to the home.html page and edit that content using a rich text editor, as shown in Figure 7-23. Note that the document content is stored in the UCM content repository for easy access and retrieval.
Figure 7-23 The Edit Window for In-context Editing of HTML Content
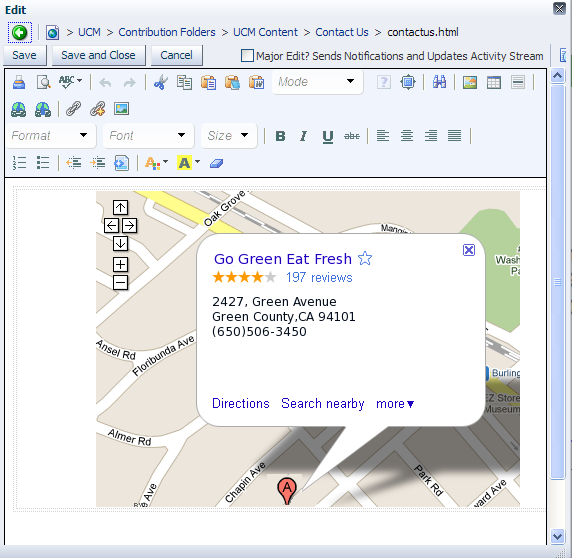
Users can then save their edits by clicking the Save button in the upper left corner of the window (Figure 7-24).
Figure 7-24 The Edit-Save Window for Saving of In-context HTML Document Content

In this lesson, you have learned how to customize specific pages in the page hierarchy of your WebCenter Portal application and how to add those pages to the hierarchy so you can set permissions for user access. You have also learned how easy it is to enable runtime HTML editing of your document content stored in the UCM repository by adding new content to the page and making it editable at runtime.