|
Oracle® Application Server 10g Installation Guide
10g (9.0.4) for hp HP-UX PA-RISC (64-bit) and Linux x86 Part No. B10842-03 |
|
|
|
|
|
Oracle® Application Server 10g Installation Guide
10g (9.0.4) for hp HP-UX PA-RISC (64-bit) and Linux x86 Part No. B10842-03 |
|
|
|
|
Table 7-1 Contents of This Chapter
When you install an Oracle Application Server middle tier, you select which type of middle tier you want. Oracle Application Server has three types of middle tiers (in order from minimal core components to the complete set of components):
J2EE and Web Cache
Portal and Wireless
Business Intelligence and Forms
Middle tiers provide components for deploying and running applications. The different types of middle tiers provide different components (see Section 7.2, "Components in the Middle Tier").
The Portal and Wireless and the Business Intelligence and Forms types require an OracleAS Infrastructure 10g, because components in these middle tier types need to access their schemas in the OracleAS Metadata Repository.
The J2EE and Web Cache type requires some infrastructure components only if you are using the OracleAS Database-Based Cluster and/or the Identity Management Access option. If you are not using these options in the J2EE and Web Cache middle tier, then you do not need an OracleAS Infrastructure 10g. See Section 7.4, "Configuration Options for the J2EE and Web Cache Middle Tier" for details.
Table 7-2 shows the components that are installed for each type of middle tier.
Note that the components in the smaller middle tier types are a subset of the larger middle tier types: the bigger types contain all the components from the smaller types:
The J2EE and Web Cache type is the smallest type.
The Portal and Wireless type contains all the components in the J2EE and Web Cache type plus components specific to the Portal and Wireless type.
The Business Intelligence and Forms type contains all middle tier components.
Table 7-2 Components in the Middle Tier
You deploy your applications on middle tier instances. The middle tier must provide components used by your applications.
If you know what components you will be using in your applications, you can choose the appropriate middle tier type. For example, if you need portal functionality, then you would install the Portal and Wireless type; you can also install the Business Intelligence and Forms type, because it includes the OracleAS Portal component.
If you do not know what you want, but you have the disk space, you can install the Business Intelligence and Forms type. This ensures that you have all the components. If you do not have the disk space, you can install a smaller middle tier type, and later expand it to a larger type if necessary. For example, you can expand a J2EE and Web Cache to a Business Intelligence and Forms. See Section 7.14, "Expanding a MiddleTier"
Table 7-3 lists some features and appropriate middle tier types:
Table 7-3 Mapping Features to Components
| If You Need this Feature: | Select a Middle Tier Type that Provides this Component: |
|---|---|
| J2EE (for developing JavaServer Pages (JSP), servlets, and Enterprise JavaBeans (EJB) applications) | Oracle Application Server Containers for J2EE (OC4J) |
| Web services | OC4J |
| UDDI | OracleAS Portal
UDDI requires the Portal and Wireless (or the Business Intelligence and Forms) middle tier type because UDDI depends on OC4J for application deployment, OracleAS Metadata Repository for storing various UDDI data structures, and Oracle Internet Directory for user and group management. The J2EE and Web Cache installation type does not require a OracleAS Metadata Repository or Oracle Internet Directory. |
| Oracle Ultra Search
|
OracleAS Portal
|
| OracleAS Syndication Services
|
OracleAS Portal
|
| Portals | OracleAS Portal
|
| Reports and Discoverer providers (which you can use with OracleAS Portal) | OracleAS Reports Services, OracleAS Discoverer |
| PL/SQL applications | Oracle HTTP Server
|
| Delivery to mobile devices such as cell phones and PDAs | OracleAS Wireless
|
| Data mining | OracleAS Personalization
|
| Business Intelligence applications | OracleAS Reports Services, OracleAS Discoverer |
| Reports | OracleAS Reports Services
|
| Forms | OracleAS Forms Services
|
If you select to install the J2EE and Web Cache middle tier, the Select Configuration Options screen displays these options:
OracleAS Web Cache
OracleAS Database-Based Cluster
OracleAS File-Based Cluster
Identity Management Access
Table 7-4 describes these options, and which OracleAS Infrastructure 10g components they require. You need to install the required infrastructure components before you can install the J2EE and Web Cache middle tier with these options. If you do not select any of these options, you do not need the OracleAS Infrastructure 10g.
Table 7-4 Options in J2EE and Web Cache That Require an Infrastructure
| Option | Description | Requires |
|---|---|---|
| OracleAS File-Based Cluster | Managed OracleAS Clusters enable you to group multiple J2EE and Web Cache instances. Any instance in a cluster can handle requests directed to any cluster member. All the instances in a cluster have the same configuration.
There are two types of managed OracleAS Cluster: file-based and database-based. In OracleAS file-based clusters, Oracle Application Server stores the configuration data in the file system. Select OracleAS File-Based Cluster if you want this type of cluster. For details about OracleAS Clusters, see the Oracle Application Server 10g High Availability Guide. |
No previously installed components are required. |
| OracleAS Database-Based Cluster | For this type of managed OracleAS Cluster, Oracle Application Server stores the configuration data in the metadata repository database. Select OracleAS Database-Based Cluster if you want this type of cluster. | OracleAS Metadata Repository
The metadata repository does not need to be registered with Oracle Internet Directory. Oracle Internet Directory is not required for this option. This option does not require any Identity Management components. |
| Identity Management Access | This option enables your applications to use Identity Management services such as OracleAS Single Sign-On and Oracle Internet Directory. | Oracle Internet Directory, OracleAS Single Sign-On, and OracleAS Metadata Repository Additionally, the OracleAS Metadata Repository must be registered with the Oracle Internet Directory. See Section 6.10, "Registration of OracleAS Metadata Repository in Oracle Internet Directory and Password Randomization". |
| OracleAS Web Cache | This option configures OracleAS Web Cache. | No previously installed components are required. |
If you install the J2EE and Web Cache middle tier with the OracleAS Database-Based Cluster option, but without the Identity Management Access option, the installer prompts you to enter the password for the DCM schema in the OracleAS Metadata Repository.
You can try logging into the OracleAS Metadata Repository database as the "dcm" user, using "dcm" as the password. You can do this using SQL*Plus:
prompt> $ORACLE_HOME/bin/sqlplus
Enter user-name: dcm
Enter password: dcm
If this does not work, then the installer generated a random password for the DCM schema. Whether or not the installer randomizes the DCM password depends on whether or not it registers the OracleAS Metadata Repository with Oracle Internet Directory. See Section 6.10, "Registration of OracleAS Metadata Repository in Oracle Internet Directory and Password Randomization".
You can change the random password to a known value. You must use the Application Server Control to do this because it needs to update the password in other places. See the Oracle Application Server 10g Administrator's Guide for details.
|
Note: This procedure can only be performed by the Oracle Internet Directory superuser (cn=orcladmin).
|
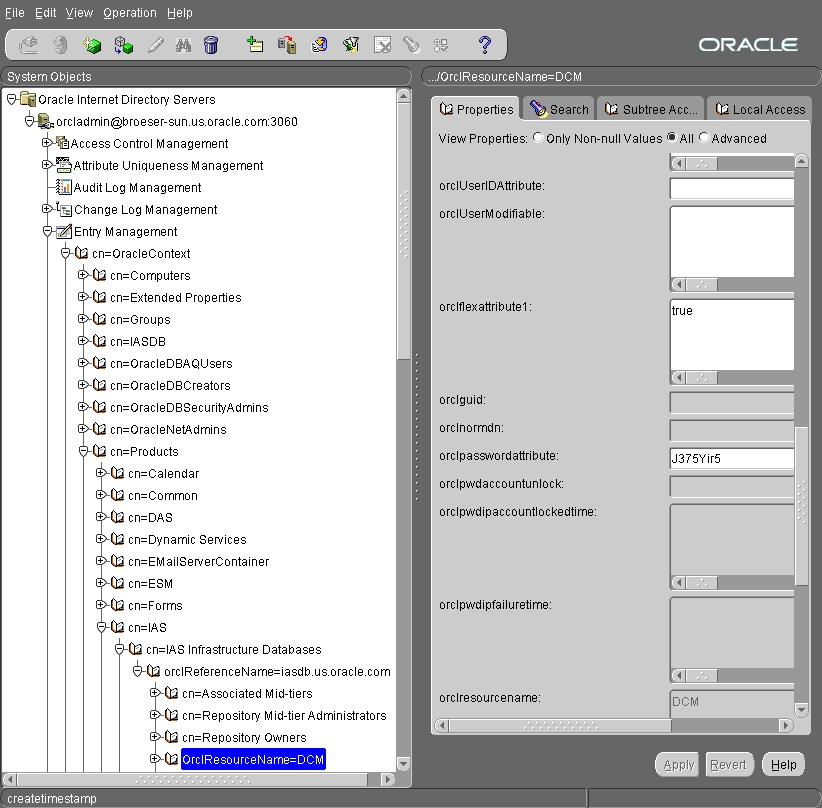
If you did register the OracleAS Metadata Repository with an Oracle Internet Directory, you can use the Oracle Directory Manager to determine the random password.
However, if you do have an Oracle Internet Directory and the OracleAS Metadata Repository is registered with it, it might make more sense to select both OracleAS Database-Based Cluster and Identity Management Access in the Select Configuration Options screen. If you select both, the installer does not prompt you to enter the DCM password.
To determine the random password in Oracle Internet Directory:
Start up Oracle Directory Manager.
prompt> $ORACLE_HOME/bin/oidadmin
Log in to Oracle Internet Directory as the cn=orcladmin superuser.
Expand the structure as shown in Figure 7-1. On the left side, select OrclResourceName=DCM, as shown. The password for the DCM schema is shown in the orclpasswordattribute field on the right side.
Figure 7-1 Viewing the DCM Schema’s Password in Oracle Internet Directory
During installation, you might need to know port numbers used by certain components. For example, when you install Oracle Application Server middle tiers, the installer prompts for the Oracle Internet Directory port.
You can get a list of port numbers in the following ways:
Use Oracle Enterprise Manager Application Server Control.
Click the Ports link on the Enterprise Manager home page. This takes you to a page that lists all ports in use and the suggested port ranges for different components.
Look in the ORACLE_HOME/install/portlist.ini file. ORACLE_HOME refers to the directory containing the Oracle Application Server installation.
Note that if you change a component’s port number after installation, the portlist.ini file is not updated. The portlist.ini file is not updated after installation.
If you plan to install middle tiers against an Oracle Internet Directory that was upgraded from version 9.2.0.x to 10g (9.0.4), make sure you followed the steps on upgrading Oracle Internet Directory 9.2.0.x to 10g (9.0.4) as documented in the Oracle Application Server 10g Upgrading to 10g (9.0.4) guide. The instructions are in the "Upgrading the Identity Management Services" chapter.
Perform this procedure to install a J2EE and Web Cache instance that does not require an infrastructure.
Table 7-5 Steps for Installing J2EE and Web Cache
|
|
Screen | Action |
|---|---|---|
| 1. | -- | Start up the installer and complete the first few screens. See Section 7.16, "Install Fragment: The First Few Screens for Installing Middle Tiers" for details.
Note:
Click Next. |
| 2. | Select Configuration Options | Select OracleAS Web Cache.
Do not select Identity Management Access because this option requires Oracle Internet Directory and OracleAS Single Sign-On. Do not select OracleAS Database-Based Cluster because this option requires OracleAS Metadata Repository. Do not select OracleAS File-Based Cluster. Click Next. |
| 3. | Specify OracleAS Instance Name and ias_admin Password | Instance Name: Enter a name for this instance. Instance names can contain the $ and _ (underscore) characters in addition to any alphanumeric characters. If you have more than one Oracle Application Server instance on a computer, the instance names must be unique.
Example: ias_admin Password and Confirm Password: Set the password for the ias_admin user. This is the administrative user for the instance. See Section 5.8, "The ias_admin User and Restrictions on its Password" for restrictions on the password. Example: Click Next. |
| 4. | -- | Finish the installation. See Section 7.17, "Install Fragment: The Last Few Screens of the Installation". |
Perform this procedure to install a J2EE and Web Cache middle tier with OracleAS Cluster managed using database repository and Identity Management Access.
Prerequisite: OracleAS Infrastructure 10g
Table 7-6 Steps for Installing J2EE and Web Cache with OracleAS Database-Based Cluster and Identity Management Access
|
|
Screen | Action |
|---|---|---|
| 1. | -- | Start up the installer and complete the first few screens. See Section 7.16, "Install Fragment: The First Few Screens for Installing Middle Tiers" for details.
Note:
|
| 2. | Select Configuration Options | Select OracleAS Web Cache.
Select Identity Management Access. Select OracleAS Database-Based Cluster. Deselect OracleAS File-Based Cluster. Click Next. |
| 3. | Register with Oracle Internet Directory | Hostname: Enter the name of the computer where Oracle Internet Directory is running.
Port: Enter the port at which Oracle Internet Directory is listening. If you do not know the port number, see Section 7.6, "How to Determine Port Numbers Used by Components". Use Only SSL Connections with this Oracle Internet Directory: Select this option if you want Oracle Application Server components to use only SSL to connect to Oracle Internet Directory. Click Next. |
| 4. | Specify Login for Oracle Internet Directory | Username: Enter the username to log in to Oracle Internet Directory.
Password: Enter the password for the username. Realm: Enter the realm against which to validate the username. This field appears only if your Oracle Internet Directory has multiple realms. Click Next. |
| 5. | Select Metadata Repository for OracleAS Cluster | Select the OracleAS Metadata Repository from the dropdown list.
Click Next. |
| 6. | Specify OracleAS Instance Name and ias_admin Password | Instance Name: Enter a name for this instance. Instance names can contain the $ and _ (underscore) characters in addition to any alphanumeric characters. If you have more than one Oracle Application Server instance on a computer, the instance names must be unique.
Example: ias_admin Password and Confirm Password: Set the password for the ias_admin user. This is the administrative user for the instance. See Section 5.8, "The ias_admin User and Restrictions on its Password" for restrictions on the password. Example: Click Next. |
| 7. | -- | Finish the installation. See Section 7.17, "Install Fragment: The Last Few Screens of the Installation". |
Perform this procedure to install a J2EE and Web Cache middle tier with OracleAS Cluster managed using database repository, but without Identity Management access.
Prerequisite: OracleAS Metadata Repository
Table 7-7 Steps for Installing J2EE and Web Cache with OracleAS Database-Based Cluster and No Identity Management Access
|
|
Screen | Action |
|---|---|---|
| 1. | -- | Start up the installer and complete the first few screens. See Section 7.16, "Install Fragment: The First Few Screens for Installing Middle Tiers" for details.
Note:
|
| 2. | Select Configuration Options | Select OracleAS Web Cache.
Select OracleAS Database-Based Cluster. Deselect OracleAS File-Based Cluster. Do not select Identity Management Access. Click Next. |
| 3. | Specify Metadata Repository for OracleAS Cluster | Password: Enter the password for the DCM schema. The initial password for the schema is dcm.
Hostname and Port: Enter the name of the computer where the database is running, and the port number at which it is listening. Use the format: Service Name: Enter the service name of the database. Note that the service name must include the database domain name. Example: Click Next. |
| 4. | Specify OracleAS Instance Name and ias_admin Password | Instance Name: Enter a name for this instance. Instance names can contain the $ and _ (underscore) characters in addition to any alphanumeric characters. If you have more than one Oracle Application Server instance on a computer, the instance names must be unique.
Example: ias_admin Password and Confirm Password: Set the password for the ias_admin user. This is the administrative user for the instance. See Section 5.8, "The ias_admin User and Restrictions on its Password" for restrictions on the password. Example: Click Next. |
| 5. | -- | Finish the installation. See Section 7.17, "Install Fragment: The Last Few Screens of the Installation". |
Perform this procedure to install a J2EE and Web Cache middle tier with OracleAS Cluster managed using file-based repository and no Identity Management access.
Table 7-8 Steps for Installing J2EE and Web Cache with OracleAS File-Based Cluster and No Identity Management Access
|
|
Screen | Action |
|---|---|---|
| 1. | -- | Start up the installer and complete the first few screens. See Section 7.16, "Install Fragment: The First Few Screens for Installing Middle Tiers" for details.
Note:
Click Next. |
| 2. | Select Configuration Options |
Click Next. |
| 4. | Warning | This warning dialog reminds you that you have to perform additional steps after installation to set up file-based clustering. The text in this dialog is also stored in the ORACLE_HOME/install/setupinfo.txt. Click OK.
|
| 5. | Specify OracleAS Instance Name and ias_admin Password | Instance Name: Enter a name for this instance. Instance names can contain the $ and _ (underscore) characters in addition to any alphanumeric characters. If you have more than one Oracle Application Server instance on a computer, the instance names must be unique.
Example: ias_admin Password and Confirm Password: Set the password for the ias_admin user. This is the administrative user for the instance. See Section 5.8, "The ias_admin User and Restrictions on its Password" for restrictions on the password. Example: Click Next. |
| 6. | -- | Finish the installation. See Section 7.17, "Install Fragment: The Last Few Screens of the Installation". |
Perform this procedure to install a J2EE and Web Cache middle tier with OracleAS Cluster managed using file-based repository and Identity Management access.
Prerequisite: Oracle Internet Directory
Table 7-9 Steps for Installing J2EE and Web Cache with OracleAS File-Based Cluster and Identity Management Access
|
|
Screen | Action |
|---|---|---|
| 1. | -- | Start up the installer and complete the first few screens. See Section 7.16, "Install Fragment: The First Few Screens for Installing Middle Tiers" for details.
Note:
Click Next. |
| 2. | Select Configuration Options |
Click Next. |
| 4. | Warning | This warning dialog reminds you that you have to perform additional steps after installation to set up file-based clustering. The text in this dialog is also stored in the ORACLE_HOME/install/setupinfo.txt. Click OK.
|
| 5. | Register with Oracle Internet Directory | Hostname: Enter the name of the computer where Oracle Internet Directory is running.
Port: Enter the port at which Oracle Internet Directory is listening. If you do not know the port number, see Section 7.6, "How to Determine Port Numbers Used by Components". Use Only SSL Connections with this Oracle Internet Directory: Select this option if you want Oracle Application Server components to use only SSL to connect to Oracle Internet Directory. Click Next. |
| 6. | Specify Login for Oracle Internet Directory | Username: Enter the username to log in to Oracle Internet Directory.
Password: Enter the password for the username. Realm: Enter the realm against which to validate the username. This field appears only if your Oracle Internet Directory has multiple realms. Click Next. |
| 7. | Specify OracleAS Instance Name and ias_admin Password | Instance Name: Enter a name for this instance. Instance names can contain the $ and _ (underscore) characters in addition to any alphanumeric characters. If you have more than one Oracle Application Server instance on a computer, the instance names must be unique.
Example: ias_admin Password and Confirm Password: Set the password for the ias_admin user. This is the administrative user for the instance. See Section 5.8, "The ias_admin User and Restrictions on its Password" for restrictions on the password. Example: Click Next. |
| 8. | -- | Finish the installation. See Section 7.17, "Install Fragment: The Last Few Screens of the Installation". |
Perform this procedure to install a Portal and Wireless or a Business Intelligence and Forms middle tier.
Prerequisite: OracleAS Infrastructure 10g
Table 7-10 Steps for Installing Portal and Wireless or Business Intelligence and Forms
|
|
Screen | Action |
|---|---|---|
| 1. | -- | Start up the installer and complete the first few screens. See Section 7.16, "Install Fragment: The First Few Screens for Installing Middle Tiers" for details.
Note:
|
| 2. | Select Configuration Options | Select the components that you will be using, and click Next. You do not have to select all the components.
For Portal and Wireless, the options are:
For Business Intelligence and Forms, the options are:
|
| 3. | Register with Oracle Internet Directory | Hostname: Enter the name of the computer where Oracle Internet Directory is running.
Port: Enter the port number at which Oracle Internet Directory is listening. If you do not know the port number, see Section 7.6, "How to Determine Port Numbers Used by Components". Use Only SSL Connections with this Oracle Internet Directory: Select this option if you want Oracle Application Server components to use only SSL to connect to Oracle Internet Directory. Click Next. |
| 4. | Specify Login for Oracle Internet Directory | Username: Enter the username to use to log in to Oracle Internet Directory.
Password: Enter the user’s password. Realm: Enter the realm against which to validate the user. This field appears only if your Oracle Internet Directory contains more than one realm. If the Oracle Internet Directory contains only one realm, then the installer validates the user against that realm. Click Next. |
| 5. | Select OracleAS Metadata Repository | Repository: Select the OracleAS Metadata Repository that you want to use for this middle tier instance. The installer will register this instance with the selected OracleAS Metadata Repository. Click Next. |
| 6. | Provide Outgoing Mail Server Information | This screen appears only if you selected OracleAS Reports Services in the Select Configuration Options screen.
Enter the name of the outgoing mail (SMTP) server for use by OracleAS Reports Services. You can leave it blank and configure it later. Click Next. |
| 7. | Specify OracleAS Instance Name and ias_admin Password | Instance Name: Enter a name for this instance. Instance names can contain the $ and _ (underscore) characters in addition to any alphanumeric characters. If you have more than one Oracle Application Server instance on a computer, the instance names must be unique.
Example 1: Example 2: ias_admin Password and Confirm Password: Set the password for the ias_admin user. This is the administrative user for the instance. See Section 5.8, "The ias_admin User and Restrictions on its Password" for restrictions on the password. Example: Click Next. |
| 8. | -- | Finish the installation. See Section 7.17, "Install Fragment: The Last Few Screens of the Installation". |
After installing a middle tier and using it, you may decide that you need a component that is in a larger middle tier. For example, you installed a J2EE and Web Cache middle tier, and you realize you need OracleAS Portal.
What you can do is to install the Portal and Wireless type (or the Business Intelligence and Forms type) in the same Oracle home as the J2EE and Web Cache instance. The installer installs and configures the additional components in the larger middle tier without changing the configuration of existing components.
You can expand middle tiers in the following ways:
J2EE and Web Cache to Portal and Wireless
J2EE and Web Cache to Business Intelligence and Forms
Portal and Wireless to Business Intelligence and Forms
Expanding a middle tier is the same as installing a new one, with these differences:
In the Specify File Locations screen, you enter the Oracle home directory of the middle tier you want to expand.
You need the password of the ias_admin user of the middle tier you want to expand.
Instead of the Specify OracleAS Instance Name and ias_admin Password screen, the installer displays the Specify ias_admin Password screen. In this screen, you enter the existing password for the ias_admin user.
The instance name remains the same.
Remember that the Portal and Wireless and the Business Intelligence and Forms types require an infrastructure.
You cannot "shrink" a middle tier: you cannot go from a larger middle tier to a smaller middle tier.
Note that you cannot expand an infrastructure.
Perform the following procedure to expand a middle tier:
Table 7-11 Steps for Expanding a MIddle Tier
|
|
Screen | Action |
|---|---|---|
| 1. | -- | Stop all processes associated with the middle tier that you want to expand. If you need help on how to stop the processes, see the Oracle Application Server 10g Administrator's Guide. |
| 2. | -- | Start up the installer and complete the first few screens. See Section 7.16, "Install Fragment: The First Few Screens for Installing Middle Tiers" for details.
Notes:
|
| 3. | Select Configuration Options | Select the components that you will be using.
Click Next. For Portal and Wireless, the options are:
For Business Intelligence and Forms, the options are:
|
| 4. | Register with Oracle Internet Directory | Hostname: Enter the name of the computer where Oracle Internet Directory is running.
Port: Enter the port number at which Oracle Internet Directory is listening. If you do not know the port number, see Section 7.6, "How to Determine Port Numbers Used by Components". Use Only SSL Connections with this Oracle Internet Directory: Select this option if you want Oracle Application Server components to use only SSL to connect to Oracle Internet Directory. Click Next. |
| 5. | Specify Login for Oracle Internet Directory | Username: Enter the username to use to log in to Oracle Internet Directory.
Password: Enter the user’s password. Realm: Enter the realm against which to validate the user. This field appears only if your Oracle Internet Directory contains more than one realm. If the Oracle Internet Directory contains only one realm, then the installer validates the user against that realm. Click Next. |
| 6. | Select OracleAS Metadata Repository | Repository: Select the OracleAS Metadata Repository that you want to use for this middle tier instance. The installer will register this instance with the selected OracleAS Metadata Repository. Click Next. |
| 7. | Provide Outgoing Mail Server Information | This screen appears only if you selected OracleAS Reports Services in the Select Configuration Options screen.
Enter the name of the outgoing mail (SMTP) server for use by OracleAS Reports Services. You can leave it blank and configure it later. Click Next. |
| 8. | Specify ias_admin Password | ias_admin Password: Enter the password for the ias_admin user of the middle tier you are expanding. Click Next. |
| 9. | -- | Finish the installation. See Section 7.17, "Install Fragment: The Last Few Screens of the Installation". |
If you have a middle tier from the 9.0.2 release and you want to upgrade it to a 10g (9.0.4) middle tier of the same type (for example, J2EE and Web Cache 9.0.2 middle tier to J2EE and Web Cache 10g (9.0.4) middle tier), follow the instructions in Oracle Application Server 10g Upgrading to 10g (9.0.4).
If you want to upgrade a middle tier and expand it at the same time (for example, going from J2EE and Web Cache 9.0.2 to Portal and Wireless 10g (9.0.4)), you have to perform two procedures:
Upgrade the middle tier to the same type middle tier in 10g (9.0.4). This procedure is documented in Oracle Application Server 10g Upgrading to 10g (9.0.4).
Expand the middle tier in the 10g (9.0.4) Oracle home. The previous section, Section 7.14, "Expanding a MiddleTier", has details.
The first few screens of the installer are described here because they are the same for all installations. Most installation procedures in this chapter refer to this section as their starting point.
Table 7-12 First Few Screens of the Middle Tier Installation
|
|
Screen | Action |
|---|---|---|
| 1. | -- | Start the installer. See Section 5.15, "Starting the Oracle Universal Installer". |
| 2. | Welcome | Click Next. |
| 3. | Specify Inventory Directory | This screen appears only if this is the first installation of any Oracle product on this computer.
Enter the full path for the inventory directory: Enter a full path to a directory for the installer’s files. Enter a directory that is different from the Oracle home directory for the product files. Example: Click OK. |
| 4. | UNIX Group Name | This screen appears only if this is the first installation of any Oracle product on this computer.
Enter the name of the operating system group to have write permission for the inventory directory. Example: Click Next. |
| 5. | Run orainstRoot.sh
|
This screen appears only if this is the first installation of any Oracle product on this computer.
Run the Click OK. |
| 6. | Specify File Locations | Name: Enter a name to identify this Oracle home. The name cannot contain spaces, and has a maximum length of 16 characters.
Example: Destination Path: Enter the full path to the destination directory. This is the Oracle home. If the directory does not exist, the installer creates it. If you want to create the directory beforehand, create it as the Example: Click Next. |
| 7. | Specify Hardware Cluster Installation Mode | This screen appears only if the computer is part of a hardware cluster.
When you are installing a middle tier, select Local Installation because hardware cluster is not supported for middle tiers. Click Next. |
| 8. | Select a Product to Install | Select Oracle Application Server to install a middle tier.
If you need to install additional languages, click Product Languages. See Section 5.6, "Installing Additional Languages" for details. Click Next. |
| 9. | Select Installation Type | The options displayed on this screen depend on what you selected in the Select a Product to Install screen.
If you selected Oracle Application Server (which refers to the Oracle Application Server middle tier), the screen displays:
Click Next. |
| 10. | Preview of Steps for Middle Tier Installation | This screen lists the screens that the installer will display. Click Next. |
| 11. | Confirm Pre-Installation Requirements | Verify that you meet all the requirements listed on the screen. Click Next. |
Figure 7-2 summarizes the screen sequence.
Figure 7-2 Sequence for the First Few Screens in the Installation
The last few screens of the installer are described in this section because they are the same for all installations. Most installation procedures in this chapter refer to this section as their end point.
Table 7-13 Last Few Screens in the Installation
|
|
Screen | Action |
|---|---|---|
| 1. | Choose JDK Home Directory (HP-UX only) | Enter JDK Home: Enter the full path to the HP Java 2 SDK 1.4.1.05 (or higher) for PA-RISC installation.
Click Next. |
| 2. | Summary | Verify your selections and click Install. |
| 3. | Install Progress | This screen shows the progress of the installation. |
| 4. | Run root.sh
|
Note: Do not run the script until prompted.
|
| 5. | Configuration Assistants | This screen shows the progress of the configuration assistants. Configuration assistants configure components. |
| 6. | End of Installation | Click Exit to quit the installer. |
