|
Oracle® Application Server 10g Upgrading to 10g (9.0.4)
10g (9.0.4) for UNIX Part No. B10429-01 |
|
|
|
|
|
Oracle® Application Server 10g Upgrading to 10g (9.0.4)
10g (9.0.4) for UNIX Part No. B10429-01 |
|
|
|
|
This chapter explains how to upgrade the metadata repository, including schemas in customer databases and the OracleAS Portal repository. It is divided into these major sections:
Section 4.1, "Understanding the Metadata Repository Upgrade Process"
Section 4.2, "Preparing to Upgrade the Metadata Repository"
Section 4.3, "Performing the Metadata Repository Upgrade"
Section 4.4, "Executing Metadata Repository Upgrade Scripts"
Section 4.5, "Upgrading the OracleAS Portal Repository"
Section 4.6, "Upgrading Schemas in Customer Databases "
Section 4.7, "Activating 10g (9.0.4) Functionality for UDDI Applications"
|
Note: As a convention in this chapter,<Infra_OH> will be used to reference the active infrastructure Oracle home. This should be set to the Release 2 (9.0.2) Oracle home if the Metadata Repository upgrade is being performed on the infrastructure instance before an Identity Management upgrade is being performed. It should be set to the 10g (9.0.4) Oracle home if the Identity Management upgrade has already been performed on the infrastructure instance.
Specifically, |
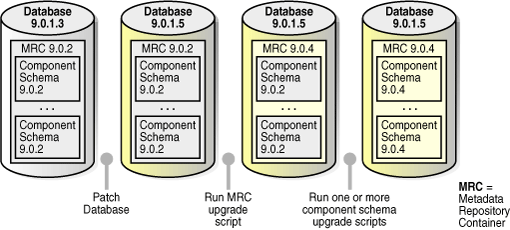
Component schemas are contained in the Metadata Repository, along with the Identity Management schemas. However, the upgrade process for the component schemas is different from the upgrade process for the Identity Management schemas. Component schemas are upgraded by individual scripts, as shown in Figure 4-1, "Metadata Repository Upgrade". The Identity Management schemas are upgraded by the Oracle Universal Installer.
The Metadata Repository upgrade consists of these steps:
The Metadata Repository Container Upgrade script is run.
One or more component upgrade scripts are run. The component upgrade scripts that are run will depend on the components configured. See Section 4.3, "Performing the Metadata Repository Upgrade" for a suggested approach for your installation type.
Before you begin any other Metadata Repository upgrade tasks, perform these steps in the Infrastructure Oracle home.
Stop all processes.
Back up the database.
Install the RDBMS 9.0.1.5 patch set against the Infrastructure Oracle home (if it has not already been installed as part of an Identity Management upgrade).
Ensure that there are no invalid objects in the database.
Start the database server and listener.
Upgrade the Metadata Repository Container.
Ensure that there are no invalid objects in the database.
In order to execute most steps in the Metadata Repository upgrade, it is necessary to set your environment to point to the infrastructure Oracle home. This means setting the ORACLE_HOME environment variable to <Infra_OH> and setting the ORACLE_SID environment variable to the instance name for the Infrastructure database. The easiest way to accomplish this is to execute one of the environment scripts, coraenv or oraenv. coraenv can be used to set the environment for csh shells. oraenv can be used for other shells.
Before you can upgrade to the 10g (9.0.4) Infrastructure, you must load a PL/SQL package called DBMS_IAS_UPGRADE. This package allows the schema upgrade scripts to grant permissions when they are run as user SYS.
Follow these steps to load the package:
Ensure that the database and listener are running.
Ensure that the ORACLE_HOME environment variable is set to <Infra_OH> and the ORACLE_SID environment variable is set to the Infrastructure database SID. If they are not, follow the instructions in Section 4.2.1, "Setting the Environment for Upgrading the Metadata Repository".
Change directories to <repCA_CD>/repCA/rdbms/admin.
Connect to SQL*Plus as user SYS.
Issue these commands:
@dbmsiasu.sql
@prvtiasu.plb
The following messages appear:
Package created.
Package body created.
The PL/SQL package SYS.DBMS_IAS_UPGRADE is installed.
The Metadata Repository Container upgrade process (the mrc.pl script) performs two functions:
Creates new tablespaces and schemas in the metadata repository (ias_meta, wcrsys_ts, ocats, ip_dt, ip_rt, ip_idx, ip_lob OLTS_SVRMGSTORE, oltsbattrstore) tablespaces and wcrsys, oca, oraoca_public, ip, wk_test and internet_appserver_registry schemas).
Updates the Oracle Internet Directory entry for the repository to accommodate the 10g (9.0.4) security architecture
Because the metadata repository and Oracle Internet Directory may reside on different computers, and require different access rights, the script is designed to perform only one of the functions, or both, depending on the credentials given when starting the script.
The Metadata Repository Creation script must be executed before any other schema upgrade scripts are executed, because the new schemas depend on the modifications made by mrc.pl.
Depending on the configuration to be upgraded, you will perform one of the following procedures:
If you have DBA credentials for the metadata repository database, follow the instructions in Section 4.2.3.1, "Executing mrc.pl for New Schema Creation".
If you have administrative credentials for the Oracle Internet Directory, follow the instructions in Section 4.2.3.2, "Executing mrc.pl for Oracle Internet Directory Entry Update".
If you have DBA credentials for the metadata repository database and administrative credentials for the Oracle Internet Directory, and want to perform both upgrade functions, follow the instructions in Section 4.2.3.3, "Executing mrc.pl for New Schema Creation and Oracle Internet Directory Entry Update".
Follow these steps to create support for new schemas in the metadata repository:
Ensure that the database and listener are running.
Ensure that the ORACLE_HOME environment variable is set to <Infra_OH> and the ORACLE_SID environment variable is set to the Infrastructure database SID. If they are not, follow the instructions in Section 4.2.1, "Setting the Environment for Upgrading the Metadata Repository".
Change directories to <repCA_CD>/repCA/mrc/upgrade.
Ensure that there is an existing directory with write permission enabled in which to create new database files for the new tablespaces. (You will specify this directory as part of the command to start the script.)
Issue this command:
<Infra_OH>/perl/bin/perl mrc.pl d -dbpwd <SYS user password> -connstring <conn string> -dspace <dir>
where:
<SYS user password> is the dba password
<conn string> is the database connect string in the format host:port:SID
<dir> is the directory in which you want to create the new database files that contain the new tablespaces
for example:
<Infra_OH>/perl/bin/perl mrc.pl d -dbpwd "change_on_install" -connstring mycompany.com:1521:iasdb2 -dspace /private1/mydir/ORA_IAS_902
You need not specify all of the above parameters on the command line. The script will prompt you to enter any parameters for which a default value is not available. For example, you may prefer not to type the password on the command line, but enter it only when prompted, so it is not displayed on the screen in clear text.
If creation of new schemas was successful, the following message appears:
Creation of new schemas was successful
Follow these steps to update the Oracle Internet Directory entry:
Ensure that mrc.pl has been run to create new schemas, as described in Section 4.2.3.1, "Executing mrc.pl for New Schema Creation".
Ensure that the database, listener, and Oracle Internet Directory are running.
Ensure that the ORACLE_HOME environment variable is set to <Infra_OH> and the ORACLE_SID environment variable is set to the Infrastructure database SID. If they are not, follow the instructions in Section 4.2.1, "Setting the Environment for Upgrading the Metadata Repository".
Change directories to <repCA_CD>/repCA/mrc/upgrade
Issue this command:
<Infra_OH>/perl/bin/perl mrc.pl u -ousr <oid admin user name> -opwd <oid admin password> -connstring <conn string>
where:
<oid admin user name> is the Oracle Internet Directory administrative user name
<oid admin password> is the Oracle Internet Directory administrative user password
<conn string> is the database connect string in the format host:port:SID
for example:
<Infra_OH>/perl/bin/perl mrc.pl u -ousr cn=orcladmin -opwd welcome1 -connstring "slocum.us.oracle.com:1521:iasdb2"
If creation of OID entries and update of randomized passwords was successful, the following message appears:
"Update of new OID entries successful"
This method of executing mrc.pl combines the d and u options in one procedure. You should not perform this combined procedure if you have run mrc.pl with either the d option or the u option (as described in Section 4.2.3.1 and Section 4.2.3.2). Follow these steps to create new schemas in the metadata repository and update the Oracle Internet Directory entry:
Ensure that the database, listener, and Oracle Internet Directory server are running.
Ensure that the ORACLE_HOME environment variable is set to <Infra_OH> and the ORACLE_SID environment variable is set to the Infrastructure database SID. If they are not, follow the instructions in Section 4.2.1, "Setting the Environment for Upgrading the Metadata Repository".
Change directories to <repCA_CD>/repCA/mrc/upgrade.
Ensure that there is an existing directory with write permission enabled in which to create new database files for the new tablespaces. (You will specify this directory as part of the command to start the script.)
Issue this command:
<Infra_OH>/perl/bin/perl mrc.pl du -dbpwd <SYS user password> -dspace <tablespace directory> -ousr <oid admin user name> -opwd <oid admin user password> -connstring <database connect string>
where:
<SYS user password> is the dba password
<tablespace directory> is an existing directory in which you want the files that contain the new tablespaces to be created
<oid admin user name> is the Oracle Internet Directory administrative user name
<oid admin password> is the Oracle Internet Directory administrative user password
<conn string> is the database connect string in the format host:port:SID
Errors may occur during the upgrade process. Common errors returned by the upgrade script and their resolution are listed below.
After you have performed all of the preparatory steps for upgrading the Metadata Repository, as described in Section 4.2, "Preparing to Upgrade the Metadata Repository", you can proceed with executing the scripts to upgrade the schemas in the Metadata Repository for the components that you plan to use in Oracle Application Server 10g (9.0.4). Note that:
You may elect to upgrade one component’s schema, test that upgrade, and then upgrade another component’s schema and test its upgrade, and so on, until the upgrade is complete. Alternatively, you may elect to upgrade the components’ schemas in succession, and then test the entire upgrade at once.
You may upgrade a subset of all components in the Metadata Repository, as best suits your needs, but the Metadata Repository is not considered to be at version 10g (9.0.4) until all component schemas have been upgraded.
Follow these steps to execute the component upgrade script(s) of your choice:
Stop all of the middle tiers that are using the Infrastructure in which the Metadata Repository resides, using these steps:
Stop the Oracle Enterprise Manager Application Server Control with this command:
<destination_MT_OH>/bin/emctl stop iasconsole
Stop OPMN and the processes managed by it with this command:
<destination_MT_OH>/opmn/bin/opmnctl stopall
Stop all other running processes in the destination middle tier Oracle home.
Follow the instructions in the relevant sections to upgrade the component schemas of of your choice:
Section 4.4.1, "Executing the Process Connect Schema Upgrade Script"
Section 4.4.2, "Executing the Oracle Application Server Certificate Authority Schema Upgrade Script"
Section 4.4.3, "Executing the Oracle Ultra Search Schema Upgrade Script"
Section 4.4.5, "Executing the Oracle Application Server Syndication Server Upgrade Script"
Section 4.4.7, "Executing the Web Clipping Schema Upgrade Script"
Start the middle tier application server components by issuing these commands:
Start OPMN and the processes managed by it with this command:
<destination_MT_OH>/opmn/bin/opmnctl startall
Oracle Process Management and Notification and all of the processes it manages are started (i.e., Distributed Configuration Management, Oracle HTTP Server, OC4J instances, OracleAS Web Cache, Oracle Application Server Forms Services, and Oracle Application Server Reports Services).
Start the Oracle Enterprise Manager Application Server Control by issuing this command:
<destination_MT_OH>/bin/emctl start iasconsole
This section contains procedures for executing each component upgrade script provided on the Repository Creation Assistant CD-ROM to upgrade schemas in the Metadata Repository. It applies only to configurations that use the Infrastructure database, and have these components configured.
One or more of these procedures are intended to be followed as Step 2 of the procedure outlined in Section 4.3, "Performing the Metadata Repository Upgrade".
|
Note: Each of the configured components has a set of verification steps to determine whether the upgrade of the component was successful. Ensure that you perform all verification steps for each component that you upgrade to 10g (9.0.4). |
The following topics are included:
Section 4.4.1, "Executing the Process Connect Schema Upgrade Script"
Section 4.4.2, "Executing the Oracle Application Server Certificate Authority Schema Upgrade Script"
Section 4.4.3, "Executing the Oracle Ultra Search Schema Upgrade Script"
Section 4.4.5, "Executing the Oracle Application Server Syndication Server Upgrade Script"
Section 4.4.7, "Executing the Web Clipping Schema Upgrade Script"
Follow the steps below to upgrade the Process Connect schema:
Create the directory <Infra_OH>/ip/admin.
Change directories to <repCA_CD>/repCA/ip/admin.
Ensure that the ORACLE_HOME environment variable is set to <Infra_OH> and the ORACLE_SID environment variable is set to the Infrastructure database SID. If they are not, follow the instructions in Section 4.2.1, "Setting the Environment for Upgrading the Metadata Repository".
Ensure that the PATH environment variable includes <Infra_OH>/bin.
Set the REPCA_ORACLE_HOME environment variable to point to <repCA_CD>/repCA, which is the path to the Oracle Application Server 10g (9.0.4) Repository Creation Assistant CD-ROM.
Start the upgrade script with the command below:
upgradeInfra.sh
A prompt for the SYS password appears.
Provide the SYS password.
The script writes all output to the screen and to the <Infra_OH>/ip/admin/ipupgrade.log file. The process takes a few minutes to complete. When it is finished, the following message appears:
PL/SQL procedure successfully completed.
The log file should contain no error messages. If the upgrade was unsuccessful, the file will contain one or more of the messages described below.
Follow these steps to verify the upgrade results:
Log in to SQL*Plus as sysdba.
Issue the following commands:
SET SERVEROUTPUT ON
execute ip.validate_components
One of the following messages appears:
SUCCESSFUL upgrade of schema: IP
FAILED upgrade of schema: IP
ORA-20000: VERIFICATION FAILED
Other messages may appear, identifying missing columns or tables.
Follow the steps below to upgrade the Oracle Application Server Certificate Authority schema. Before you start the script, ensure that the open_cursors setting in <destination_Infra_OH>/dbs/init<sid>.ora has a value of 300 or more.
Ensure that the ORACLE_HOME environment variable is set to <Infra_OH> and the ORACLE_SID environment variable is set to the Infrastructure database SID. If they are not, follow the instructions in Section 4.2.1, "Setting the Environment for Upgrading the Metadata Repository".
Ensure that the database and the listener are running.
Change directories to <repCA_CD>/repCA/oca/sql/.
Start the upgrade script with the command below:
sqlplus "system/<your system password as sysdba>" @ug_ocadocat.sql
where <your system password as sysdba> is the password of the sytem user.
Follow these steps to verify that the upgrade was successful:
Issue this command:
sqlplus "system/<your system password as sysdba>"
where <your system password as sysdba> is the password of the system user.
Issue this command:
select table_name, owner from all_tables where owner=’OCA’;
If the upgrade was successful, the following appears:
Example 4-1 Verification of Oracle Application Server Certificate Authority Schema Upgrade Results
TABLE_NAME                                           OWNER
------------------------------------------------------------
OCA_CONFIG                                           OCA
OCA_PARAMETER_CONFIG                                 OCA
OCA_TASKS                                            OCA
OCA_TASKS_EXECUTION                                  OCA
OCM_CERTIFICATE                                      OCA
OCM_CERTIFICATE_META                                 OCA
OCM_CERTIFICATE_REQUEST                              OCA
OCM_CERTIFICATE_REQUEST_META                         OCA
OCM_CERTIFICATE_SERIAL                               OCA
OCM_ERROR_LOG                                        OCA
OCM_JAZN                                             OCA
11 rows selected.
A detailed description of the processing performed by this script is included in Appendix A, "The Oracle Application Server Certificate Authority Upgrade Process ".
This section explains how to upgrade the Oracle Ultra Search schema in the metadata repository.
Before you upgrade the schema, prepare the system by performing the steps below.
|
See Also: Oracle Ultra Search User's Guide for instructions on using the Oracle Ultra Search Administration Tool. |
Start the middle tier, if necessary, by following step 3 in Section 4.3, "Performing the Metadata Repository Upgrade".
Disable all Oracle Ultra Search synchronization schedules.
Log in to the Oracle Enterprise Manager Application Server Control.
In the Standalone Instances section, select the desired middle tier instance.
The system components of the instance are displayed.
In the System Components section, select OC4J_Portal and click the Start button to start the OC4J instance.
Navigate from the Portal Instance to Ultra Search instance using Oracle Enterprise Manager Application Server Control. Alternatively, you can log in to the Oracle Ultra Search Administration tool by accessing this URL:
http://<host>:<port>/ultrasearch/admin
In the Schedules tab, stop and disable all crawler synchronization schedules in all Oracle Ultra Search instances.
Back up the Oracle Ultra Search metadata in WKSYS and the user instance schemas. If unrecoverable errors occur during the upgrade, you will then be able to restore Oracle Ultra Search to the previous version.
Stop the middle tier by following Step 1 in Section 4.3, "Performing the Metadata Repository Upgrade".
The schema upgrade process consists of running the the following scripts:
upgradeInfra.sh — the script that upgrades the schema
usca.sh — the post-upgrade configuration script
Follow these steps to run the Oracle Ultra Search schema upgrade script:
Ensure that the ORACLE_HOME environment variable is set to <Infra_OH> and the ORACLE_SID environment variable is set to the Infrastructure database SID. If they are not, follow the instructions in Section 4.2.1, "Setting the Environment for Upgrading the Metadata Repository".
Set the REPCA_ORACLE_HOME environment variable to point to <repCA_CD>/repCA, which is the path to the Oracle Application Server 10g (9.0.4) Repository Creation Assistant CD-ROM.
Ensure that the PATH environment variable includes <Infra_OH>/bin.
Change directories to <repCA_CD>/repCA/ultrasearch/setup.
Ensure that the upgradeInfra.sh script is executable. Start the script with the command:
./upgradeInfra.sh
or
./upgradeInfra.sh -l <log file path>.log
where <log file path> is the path and filename to which the script will write log entries. For example:
./upgradeInfra.sh -l /tmp/log/upgradeInfra.log
If you do not specify the absolute path, providing only a file name (e.g., ./upgradeinfra.sh -l upgradeInfra.log), then the log file upgradeInfra.log will be placed in the <Infra_OH> directory.
If you do not provide a file name, then the log file is written to <Infra_OH>/ultrasearch/setup/upgrade.log.
A password prompt appears.
Provide the password.
A verification prompt appears.
Answer the prompt.
The script echoes and prompts you to verify your answers. When the process finishes, this message appears:
End of Upgrade - Ultra Search
|
Note: If you do not answer the verification prompts, the script will continue by default. You can entern to stop the script at any point, and then start the script again if you have entered an incorrect answer.
|
Log in to the 10g (9.0.4) middle tier computer and set the environment variables as indicated below. These are required by the usca.sh script.
|
Note: If you have multiple middle tiers, you need only perform this step and the remaining steps on one of them. |
Set ORACLE_HOME to <destination_MT_OH>.
Set the library path variable to include the path <destination_MT_OH>/lib.
Change directories to <destination_MT_OH>/ultrasearch/setup.
Ensure that the usca.sh script is executable. Start the script with the command:
./usca.sh -action backend_upgrade -user cn=orcladmin -password <password of the OID user ’orcladmin’>
Answer the prompts.
The script echoes and prompts you to verify each answer.
Configuring the schema metadata to use the Oracle Application Server 10g (9.0.4) Infrastructure Oracle home may require one, or both, of the procedures in this section, depending on which part of the Infrastructure is upgraded first:
If you upgrade the Metadata Repository first, you need only perform the steps in Section 4.4.3.3.1, "Installing the Java Runtime Environment (JRE) 1.4 and Configuring Oracle Ultra Search to Use JRE 1.4".
If you upgrade the Identity Management services first, and the Metadata Repository is using the Oracle Application Server 10g (9.0.4) Infrastructure OracleHome, then you need only perform the steps in Section 4.4.3.3.2, "Executing the Schema Configuration Script" to configure Ultra Search to use the Oracle Application Server 10g (9.0.4) Infrastructure Oracle home. If the Metadata Repository is still using the Oracle9iAS Release 2 (9.0.2) Infrastructure Oracle home, then you need only perform the steps in Section 4.4.3.3.1, "Installing the Java Runtime Environment (JRE) 1.4 and Configuring Oracle Ultra Search to Use JRE 1.4".
Follow these steps to install the Java Runtime Environment (JRE) 1.4 and configure Oracle Ultra Search to use it.
Navigate to the directory <repCA_CD>/repCA/ultrasearch/jre_upgrade.
Start the Oracle Universal Installer with the following command:
./runInstaller
The Welcome screen appears.
Click Next.
The Specify File Locations screen appears.
Enter a new Oracle home name in the Name field and a full path in the Path field. (You cannot install JRE 1.4 into the Infrastructure Oracle home location.)
Click Next.
The Summary screen appears.
Click Install.
The installation begins. The progress bar and a message indicate when it is complete; then the End of Installation screen appears.
Click Exit.
Log in to the database as SYSDBA.
Issue the following commands:
alter session set current_schema = wksys;
update wksys.wk$crawler_config_default set ccd_pvalue ='<new java execution path>' where ccd_pname = 'CC_JAVA_EXEC_PATH';
exec wk_util.populate_crawler_config;
commit;
where:
<new java execution path> is:
<JRE 1.4 directory>/jre/1.4.1/bin/java -ms16m -mx256m -Djava.library.path=<destination_Infra_OH>/lib
Example 4-2 JRE Installation and Oracle Ultra Search Configuration Command
update wksys.wk$crawler_config_default set ccd_pvalue = '/private/jre_home/jre/1.4.1/bin/java -ms16m -mx256m -Djava.library.path=/private/infra_home/lib' where ccd_pname = 'CC_JAVA_EXEC_PATH';
|
Note: Completing this procedure resets the crawler cache directory and crawler log directory to the default values. You can use the Oracle Ultra Search Administration tool to update these values. |
Follow these steps to configure Ultra Search to use the Oracle Application Server 10g (9.0.4) Infrastructure OracleHome.
Set the ORACLE_HOME environment variable to the <destination_Infra_OH>.
Set the ORACLE_SID environment variable to the Oracle Application Server 10g (9.0.4) Infrastructure database.
Change directories to <destination_Infra_OH>/ultrasearch/admin>.
Issue this command:
sqlplus "sys/<SYS user password> as sysdba"
Issue this command:
@wk0config.sql <WKSYSPW> <JDBC_CONNSTR> <LAUNCH_ANYWHERE> ""
where:
<WKSYSPW> is the password for the WKSYS schema. If you don’t know the password, then you can click the Change Schema Password link on the Infrastructure page of the Oracle Enterprise Manager Application Server Control.
<JDBC_CONNSTR> is the JDBC connection string, in net description (TNS keyword-value) format, for example:
(DESCRIPTION=(ADDRESS=(PROTOCOL=tcp) (HOST=...) (PORT=1521)...))
<LAUNCH_ANYWHERE> is the mode of the Metadata Repository. Setting it to TRUE indicates that the Metadata Repository is in Real Application cluster mode. For this procedure, you should set it to FALSE.
|
Note: Completing this procedure resets the crawler cache directory and crawler log directory to the default values. You can use the Oracle Ultra Search Administration tool to update these values. |
All errors are captured in the log file <Infra_OH>/ultrasearch/setup/log file name.log. If there are no errors, you can verify the upgrade results by starting Oracle Ultra Search. Follow the steps below:
Start the middle tier, if necessary, by following Step 3 in Section 4.3, "Performing the Metadata Repository Upgrade".
Access the URL below to start the Oracle Ultra Search administration software:
http://host:port/ultrasearch/admin/index.jsp
Use the 10g (9.0.4) features described in the Ultra Search User’s Guide.
Use the Oracle Ultra Search sample search application:
http://host:port/ultrasearch/query/search.jsp
Enable and resume the crawler synchronization schedules in all Oracle Ultra Search instances.
Errors may occur during the upgrade process. Common errors returned by the upgrade script and their resolution are listed below.
A detailed description of the processing performed by these scripts is included in Appendix A, "The Oracle Ultra Search Schema Upgrade Process".
If you have multiple database instances of version 9.0.1 or 9.2 in the same Oracle home, and then install the Oracle Application Server 10g (9.0.4) Metadata Repository on one of the database instances, the Repostiory Configuration Assistant will overwrite the Oracle home with the Oracle Application Server 10g (9.0.4) Oracle Ultra Search files. If another database instance is still hosting the Oracle Ultra Search version 9.0.1 or 9.2, then the Oracle Ultra Search running on that database instance will not function.
You can resolve this problem by upgrading the 9.0.1 or 9.2 Oracle Ultra Search to Oracle Application Server 10g (9.0.4). Follow these steps:
Mount the Repository Creation Assistant CD-ROM on the database computer.
Change directories to <repCA_CD>/repCA/ultrasearch/admin
Set the ORACLE_SID environment variable to the 9.0.1 or 9.2 database instance (not the 10g (9.0.4) Metadata Repository).
Use SQL*Plus to log in to the database as user SYSDBA.
Issue this command:
@wkdbmig.sql
Install an Oracle Application Server 10g (9.0.4) middle tier of the Portal and Wireless installation type. When prompted for an Infrastructure to use, select the instance that was overwritten by the Repository Configuration Assistant (not a 9.0.1 or 9.2 instance).
Update the data-sources.xml and ultrasearch.properties files to connect to the database instance that hosts the upgraded Oracle Ultra Search.
|
See Also: Oracle Ultra Search User's Guide, Section 3.4.4, "Installing the Middle Tier with the Oracle Application Server Release" for instructions on updating the data-sources.xml and ultrasearch.properties files. |
|
Note: The upgraded Oracle Ultra Search does not support Oracle Application Server Single Sign-On. The Ultra Search administrators can only be database users. |
Follow the steps below to upgrade the Oracle Application Server Syndication Server schema.
Ensure that the ORACLE_HOME environment variable is set to <Infra_OH> and the ORACLE_SID environment variable is set to the Infrastructure database SID. If they are not, follow the instructions in Section 4.2.1, "Setting the Environment for Upgrading the Metadata Repository".
Determine whether the Oracle Application Server Syndication Server schema requires upgrade:
Change directories to <repCA_CD>/repCA/syndication/admin
Issue the command:
sqlplus "sys as sysdba" @ossupg902chk.sql
If the schema version is current, a message explains that the script can only upgrade from 9.0.2 to 9.0.4.
Ensure that the middle tier Syndication Services is stopped.
Start the upgrade script with the commands below:
cd <repCA_CD>/repCA/syndication/admin
sqlplus "sys as sysdba" @ossupg902.sql
If the processing was successful, messages such as ‘SUCCESSFUL install/upgrade of schema: DSGATEWAY’ will appear on the screen. Otherwise, the message reads ‘FAILED install/upgrade of schema: DSGATEWAY’. For all errors, a message is printed with the error code (e.g. ORA-XXXX) and the line number.
A detailed description of the processing performed by these scripts is included in Appendix A, "The Oracle Application Server Syndication Server Schema Upgrade Process".
This section explains how to upgrade the Oracle Application Server Web Services UDDI Registry schema in the metadata repository.
There are two possible UDDI schema upgrade scenarios:
Oracle Application Server Release 2 (9.0.2). Upgrade from this version is performed with the wuru9020.sql script.
Oracle Application Server Release 2 (9.0.2), with the UDDI 9.0.2.3 patch number 2440287 (available on MetaLink) applied. Upgrade from this version is performed with the wuru9023.sql script.
This upgrade script performs the following tasks:
Destroys the contents of the UDDI schema (tables, PL/SQL packages, and so on)
Invokes the 10g (9.0.4) installation script, which installs the 10g (9.0.4) schema
|
Note: This upgrade destroys all existing data. To preserve existing data, use the UDDIget_<xx> API to get the existing entries, and then use uddiadmin.jar to import them after the upgrade.
|
This upgrade script performs the following tasks:
Performs all initial structural changes required for the upgrade, such as creating and dropping tables, columns, and indexes.
Performs all upgrades to the UDDI server properties and related configuration tables, such as inserting new rows and updating existing rows.
A detailed description of the processing performed by these scripts is included in Appendix A, "The Oracle Application Server Web Services UDDI Registry Schema Upgrade Process".
Follow the steps below to upgrade the UDDI schema:
Ensure that the UDDI database is backed up. There are several ways to do this; one example is provided below. Consult a database administrator or refer to Oracle documentation for more information.
Ensure that the ORACLE_HOME environment variable is set to <Infra_OH> and the ORACLE_SID environment variable is set to the Infrastructure database SID. If they are not, follow the instructions in Section 4.2.1, "Setting the Environment for Upgrading the Metadata Repository".
Set the SRC_HOME environment variable to point to <repCA_CD>, which is the path to the Oracle Application Server 10g (9.0.4) Repository Creation Assistant CD-ROM.
Determine the UDDI schema version with these commands:
cd <repCA_CD>/repCA/uddi/admin
sqlplus "sys as sysdba" @wurup.sql
If the version is 9.0.2.1, use the wuru9020.sql script in Step 6.
If the version is 9.0.2.3, use the wuru9023.sql script in Step 6.
Ensure that the middle tier UDDI is stopped.
Start the upgrade script with the commands below:
cd <repCA_CD>/repCA/uddi/admin
sqlplus "sys/<password> as sysdba"
spool <directory>/<log file name>.log
|
Note: You must specify a directory for the log file other than the current directory, that for the CD-ROM, since the CD-ROM is read only. |
(If schema version is 9.0.2.1) @wuru9020.sql
(If schema version is 9.0.2.3) @wuru9023.sql
quit
The script writes all output to the <directory>/<log file name>.log file.
If you upgraded from schema version 9.0.2.1, perform these steps:
Determine the character set used in the database with this command:
sqlplus "sys/<password> as sysdba"
select VALUE from NLS_DATABASE_PARAMETERS where PARAMETER = ’NLS_CHARACTERSET’;
quit
Load taxonomy data with the commands below:
cd <repCA_CD>/repCA/uddi/admin
sqlldr userid=sys control=naics-97.ctl log=<directory>/<naics-logfilename>.log bad=<bad file name>.log
sqlldr userid=sys control=unspsc-73.ctl log=<directory>/<unspsc-logfilename>.log bad=<bad file name>.log
|
Note: You must specify a directory for the log file other than the current directory (that for the CD-ROM), because the CD-ROM is read only. |
A password prompt appears.
Type the SYS password followed by ’ as sysdba’.
Issue one of the following commands:
If the character set is UTF-8:
sqlldr userid=sys control=iso3166-99.ctl log=<iso3166-logfilename>.log bad=<bad file name>.log
If the character set is other than UTF-8:
sqlldr userid=sys control=iso3166-99-ascii.ctl log=<iso3166-logfilename>.log bad=<bad file name>.log
All errors are captured in the log file you specified. The log file should contain no errors. The log file should contain the message:
The following error message may appear in the log file:
SYS user privileges.
Optionally, you can gather statistics on the UDDISYS database schema, if you had been gathering them before the upgrade.
To verify the success of the Oracle Application Server Web Services UDDI schema upgrade:
Start the middle tier by following Step 3 in Section 4.3, "Performing the Metadata Repository Upgrade".
In a browser, access the UDDI main page at:
http://<host>:<port>/uddi/
Click the links in the page to verify the inquiry and publishing endpoints.
Follow the steps below to execute the Web Clipping schema. Because Web Clipping is a new component, the upgrade consists of adding tables and the necessary functions.
Ensure that the ORACLE_HOME environment variable is set to <Infra_OH> and the ORACLE_SID environment variable is set to the Infrastructure database SID. If they are not, follow the instructions in Section 4.2.1, "Setting the Environment for Upgrading the Metadata Repository".
Change directories to <repCA_CD>/repCA/wcs/admin
Connect to SQL*Plus with the command:
sqlplus "sys as sysdba"
Change the current schema to WCRSYS with the command:
ALTER SESSION SET CURRENT_SCHEMA = WCRSYS;
Start the script with the command:
@wcpinst.sql
Connect to SQL*Plus with SYS as SYSDBA and issue this command:
SELECT * from WCRSYS.WWWCP_OBFUSCATION$;
If the seeded key is present, then the script completed successfully.
A detailed description of the processing performed by this script is included in Section A.2.9, "The Web Clipping Upgrade Process ".
The Oracle Application Server Wireless schema in the metadata repository is automatically upgraded during installation of the first Oracle Application Server Portal and Wireless or Business Intelligence and Forms middle tier, so there are no Infrastructure upgrade tasks for Oracle Application Server Wireless.
This section explains the steps involved in upgrading the OracleAS Portal Repository. It discusses the following topics:
Section 4.5.1, "Upgrading the Oracle9iAS Single Sign-On Server"
Section 4.5.2, "Creating a Backup"
Section 4.5.3, "Downloading the OracleAS Portal Repository Upgrade Patch"
Section 4.5.5, "Assess Whether External Application ID Remapping is Necessary"
Section 4.5.6, "Executing the OracleAS Portal Repository Upgrade Script"
Section 4.5.7, "Examining the Log File"
Section 4.5.8, "Completing the OracleAS Portal Repository Upgrade"
Section 4.5.9, "Accessing the Upgraded OracleAS Portal"
Omit this step if the Oracle Application Server Single Sign-On server has already been upgraded to either 9.0.2.5 or 9.0.4. Execute this step only if you intend to run OracleAS Portal 10g (9.0.4) with Oracle9iAS 9.0.2.x and the update has not already been performed.
Log in to Oracle MetaLink at:
Locate Patch 2995671 for your operating system.
Follow the instructions in the patch Readme file and in the Oracle9iAS Single Sign-On Migration Guide (docs/sso_patch_902.html file). These documents are included in the patch. The patch is applied to the Oracle9iAS Single Sign-On Server schema in the Oracle9iAS Release 2 (9.0.2) Infrastructure.
Back up the database and middle tiers before and after each major step of the upgrade process. Verify you have backed up the Portal you are upgrading. The OracleAS Portal specific schemas (depending on how it was installed) are:
Portal Schema (e.g. PORTAL)
Demo Schema (e.g. PORTAL_DEMO)
Portal Public Schema (e.g. PORTAL_PUBLIC)
Portal JSP Access (e.g. PORTAL_APP)
Application Components (Database Providers) are generated into their own schemas. Verify you have backed up all the affected databases.
There are several ways to do a backup. Consult an experienced Database Administrator or refer to the Oracle documentation for further information on the back up and recovery procedures of the database.
|
Note: You can use the export utility provided with your Oracle9i database to transfer the contents to a file. Refer to the Oracle9i Database Utilities Guide for more information. |
|
Note: During the upgrade, all existing content on the Portal Builder page is completely removed, and replaced by new content. If the Portal Builder page was customized, then those customizations are lost. Before the upgrade, identify and record all customizations to the Builder Page so that they can be re-applied after the upgrade. |
Log into Oracle MetaLink at:
Locate patch 2778342.
Download the ZIP file onto a temporary directory in your computer and extract its contents. The file contains the following:
Disk1 - a directory containing the scripts used to run the Portal middle tier updates and the repository upgrade
readme.html - A readme file
Examine the readme.html file for any changes that could affect the remaining procedures.
Log in to the computer on which OracleAS 10g (9.0.4) middle tier is installed.
Set the ORACLE_HOME environment variable to <destination_MT_OH> , which is a 10g (9.0.4) middle-tier home, upgraded as described in Chapter 3, " Upgrading the Middle Tier ".
Verify that your DISPLAY environment variable is set correctly. The installer brings up the user interface that requires this setting.
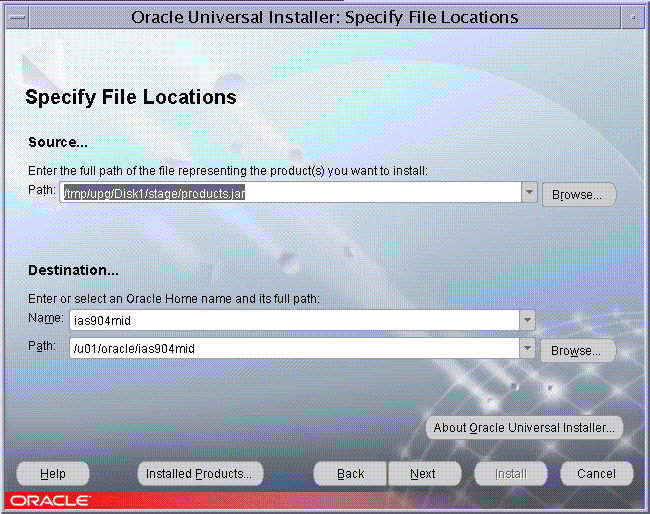
Run the Oracle Universal Installer to copy the Portal upgrade scripts to the middle tier Oracle Home using this command:
<destination_MT_OH>/oui/bin/runInstaller
The following steps will guide you through the sequence of screens:
Click Next on the Welcome screen to proceed to the File Locations screen.
In the source path field on the File Locations screen, specify the products.jar file that was included in the download. For example, if you unzipped the downloaded file into your /tmp/upg directory, you would specify /tmp/upg/Disk1/stage/products.jar as the file.
Verify the destination Oracle Home name and path.
Click Next.
The Summary screen appears.
Click Install.
The process of copying the files to the Oracle Home can be from 15 to 30 minutes long. For the first few minutes, there is no activity on the screen, but the progress bar will soon become active.
The End of Installation screen appears.
Click Exit.
The directory portal/upg/plsql is created in the Oracle home. It contains the code required to upgrade your repository.
If you are consolidating version 9.0.2 Oracle9iAS Single Sign-On servers that contain external applications, the external application identifiers must be unique. Every 9.0.2 Oracle9iAS Single Sign-On server is assigned a unique identifier that is used to derive the long form of the external application identifier. Oracle9iAS Portal also contains references to these external application identifiers.
The Oracle9iAS Portal repository references to these external application identifiers are updated automatically when you upgrade Oracle9iAS Portal 9.0.2 to OracleAS Portal10g (9.0.4). As part of the Oracle9iAS Single Sign-On server upgrade, you were instructed to apply an Oracle9iAS Portal version-specific patch to the Oracle9iAS Portal schema to convert the external application identifier references to the long format. If the script has been run before the upgrade, the upgrade code detects that it has been run and will not try to repeat the execution.
There is an exception that arises if, after upgrading the Oracle9iAS Single Sign-On server to version 9.0.2.5, you then associate an Oracle9iAS Portal 9.0.2 instance with the server that was not previously associcated with it, and the portal uses an External Applications portlet. In this case, you must omit the remapping of the identifiers when the portal is upgraded, since it is already storing the long external application identifiers in its customizations.
To omit the remapping, run the script <destination_MT_OH>/portal/upg/plsql/upg/9025-9026/wwc/upfappno.sql in the Oracle9iAS Portal schema before you start the upgrade. The text below appears in the upgrade log file when an Oracle9iAS Portal schema is upgraded after this script has been run:
The External Application IDs have already been converted prior to the upgrade. The SSO ID used for this purpose was NO_CONVERSION. No conversion will be performed now.
|
See Also: Oracle9iAS Single Sign-On Migration Guide, included with the Oracle9iAS Single Sign-On Server patch referred to in Section 4.5.1, "Upgrading the Oracle9iAS Single Sign-On Server". |
The Portal repository upgrade is performed by running the upgrade.pl script. Follow these steps to perform the upgrade:
Ensure that you have downloaded and installed the most recent available version of the OracleAS Portal Repository Upgrade Patch. (New versions may be released periodically.)
Log in to Oracle MetaLink at:
Locate Patch 2778342.
Note the date the patch was last updated.
If the patch was updated after you executed the steps in Section 4.5.3, "Downloading the OracleAS Portal Repository Upgrade Patch", then download the patch and repeat the steps in that section.
Ensure that the environment is set to refer to <destination_MT_OH>.
Stop all middle tier services in <destination_MT_OH>.
Change directories to the root of the Portal source code. This is in the middle tier Oracle Home under portal/upg/plsql.
This directory was created in the previous steps when the installer was run and the upgrade patch contents were extracted.
|
Note: If the fileupgrade.pl is not located in the portal/upg/plsql directory under your middle tier Oracle Home, verify that the steps for running the Oracle Universal Installer in Section 4.5.4, "Using Oracle Universal Installer to Copy OracleAS Portal Upgrade Scripts to the Middle Tier Oracle Home" have been followed accurately.
|
Run the upgrade script in precheck mode until there are no errors found.
<destination_MT_OH>/perl/bin/perl upgrade.pl -precheck [-l <log file>] [-t <tmp directory>] [-ssoid <sso id>]
Run the upgrade script in normal mode and designate the parameters:
<destination_MT_OH>/perl/bin/perl upgrade.pl [-l <log file>] [-t <tmp directory>] [-ssoid <sso id>]
Table 4-1 upgrade.pl Script Parameters
| Parameters | Description |
|---|---|
-precheck
|
If precheck is specified, then only the prechecks are done and the upgrade stops. In this mode, the upgrade is not immediately stopped if a precheck fails. Instead, the errors for all prechecks are consolidated in the upgrade log.
Review the log to see a list of checks that failed. Refer to the Oracle Application Server Portal Error Messages Guide for solutions to errors. Run this mode until all of the prechecks succeed. In this mode, the schema is not altered, so restoring from the backup is not necessary between executions of the script. |
-l <log file>
|
The log file name.
Default: |
-t <tmp directory>
|
The temporary directory name. It must be empty and writeable. In this document, it is also referred to as <upgrade tmp dir>.
Default: |
-ssoid <sso id>
|
The identifier of the Single Sign-on server with which the Portal is associated before the Portal schema is upgraded. This is a 15 character value that must match the identifier used when patching the Single Sign-on server.
This value is only required if either the Single Sign-on server identifier can not be generated automatically, or if the Single Sign-on server was patched earlier, but the Single Sign-on server identifier that was used needs to be changed. Typically, you do not have to pass this value, as the system generates it automatically. Refer to Section 4.5.1, "Upgrading the Oracle9iAS Single Sign-On Server" for patch details. |
The following examples assume that you have the appropriate middle tier Oracle Home perl executable accessible from your path:
perl upgrade.pl -precheck -l precheck.log -t prechecktmp
perl upgrade.pl -l myupgrade.log -t upgtmp
perl upgrade.pl -l myupgrade.log
perl upgrade.pl -t upgtmp
perl upgrade.pl
perl upgrade.pl -l myupgrade.log -t upgtmp -ssoid B63875271239654
The script prompts for the system setup information. Your answers are echoed back for verification at the end of the script. If you discover that you have entered incorrect information before the end of the script, you can exit before any changes are committed by answering no (n) to the last question.
The following are the questions from the script. Default answers to the questions are given in brackets.
Have you backed up your database (y|n)? [y]:
If you have not backed up the database, answer no (n), then back up the database and restart the script. If you have, answer yes (y).
The following prompt appears:
Enter the name of the schema you would like to upgrade [portal]:
Enter the schema name, if different from the a standard Oracle9iAS 9.0.2 infrastructure installation schema name of portal.
The following prompt appears:
Enter the password of the schema you would like to upgrade [portal]:
Change the default value entered for the schema name, if appropriate.
If needed, use the Oracle Directory Manager to obtain the randomized Oracle9iAS Portal schema password. Navigate to:
Entry Management
cn=OracleContext
cn=Products
cn=IAS
cn=Infrastructure Databases
OrclReferenceName=Infrastructure Database (for example: iasdb.server.domain.com)
OrclResourceName=PORTAL
Click on the above entry.
Look for the orclpasswordattribute value on the right panel. This is the schema password.
|
See Also: Oracle Application Server 10g Administrator's Guide |
The following prompt appears:
Enter the password for the SYS user of your database [change_on_install]:
Enter the TNS connect string to connect to the database [orcl]:
Provide the TNS connect string (found in the tnsnames.ora file). Test your access to the database by using the Portal schema, schema password, and connect string.
The following message appears:
At this point, no changes have been made to the database. Please review all the details displayed above. If you choose to stop the upgrade at this point, you will be able to start it again without restoring from a backup. If you continue and a problem occurs, you will have to retrieve your backup and start over. Is it OK to continue with the upgrade? (y|n) [y]:
Verify that the answers are correct, and answer the question:
Enter y to proceed with the upgrade.
Enter n to stop the upgrade. If necessary, you can execute the upgrade script again, correcting answers as needed.
|
Important: Refrain from using the computer for other work during the upgrade. It will take several hours to upgrade the OracleAS Portal repository. The length of the upgrade varies, depending on the size of the repository, the computer work load, and other factors. |
Any errors that occurred during the upgrade are captured in the upgrade.log file. You should examine this file to ensure that the upgrade was successful.
Locate the log file. The default name for the log is upgrade.log. The default location is <destination_MT_OH>/portal/upg/plsql/upgrade.log.
If the upgrade runs to completion, the errors in the log are sent to standard output, and are also included in a separate section at the end of the log file. Use the line numbers in the section at the end of the log file to search for the errors when they occurred earlier in the file.
Research all errors and warnings in the Oracle Application Server Portal Error Messages Guide.
Resolve any errors and warnings that have documented actions. Most errors require that you restore the repository from backup, resolve the problem, and perform the upgrade again.
|
Note: Oracle Corporation does not support portals used after an upgrade that was not clean. A clean upgrade has either zero errors or only benign errors. Benign errors are identified in the Oracle Application Server Portal Error Messages Guide. |
Contact Oracle Support for any errors that are not documented.
Continue this process until all errors are resolved.
The following is an example of the end of the log file after a successful upgrade (note the Upgrade completed successfully message and the lack of error messages):
### PHASE III STEP 18: Show Errors and Warnings
Upgrade step started at Thu Jun 26 09:05:36 PDT 2003
...
### Upgrade completed successfully
Upgrade Ended at Thu Jun 26 09:05:36 PDT 2003
The following are examples of the bottom portions of log files in cases of unsuccessful upgrades:
Example 1: Premature termination and no error/warning section:
### ERROR: Patch Failed with status code: 1.
###
### Upgrade aborted at Tue Jul 15 15:09:33 EDT 2003.
Example 2: Normal termination but at least one error found (notice the line numbers preceding each error line):
###
### PHASE III STEP 18: Show errors and warnings
###
Upgrade step started at Fri June 6 20:32:02 2003
###
### WARNING: ### Upgrade completed with the following warnings
###			               ...
###
###	 ERROR: ### Upgrade completed with the following errors
###      2803:ERROR at line 1:
###      2804:ORA-01418: specified index does not exist
The following are locations and contents of various generated files. Note that <upgrade_tmp_dir> refers to the temporary directory that was used when running upgrade.pl. By default, this directory is named tmp and is a subdirectory of <destination_MT_OH>/portal/upg/plsql.
Table 4-2 Generated Files
| Name of file | Location of file | Contents and Purpose |
|---|---|---|
upgrade.in
|
<upgrade_tmp_directory>/ upgrade.in
|
Contains the inputs to the upgrade script (answers to the questions contained in Section 4.5.6, "Executing the OracleAS Portal Repository Upgrade Script"). Passwords are not filled in for security reasons.
This file can be copied to a different location so that it is not overwritten in subsequent upgrades. The passwords can be included, and the new file used as standard input on all subsequent upgrades. |
<upgrade_log>
|
<upgrade_directory>/ upgrade.log
|
Contains all the logged information, including errors, warnings, and details. Errors are summarized at the end of the log file. |
upgrade.err
|
<upgrade_tmp_dir>/ upgrade.err
|
Contains the summary of the error messages from the end of the <upgrade_log>.
|
upgrade.wrn
|
<upgrade_tmp_dir>/ upgrade.wrn
|
Contains the summary of the warning messages from the end of the <upgrade_log>.
|
This section provides instructions for completing the OracleAS Portal upgrade, and summarizes the changes introduced in the upgraded product. It contains these topics:
Section 4.5.8.2, "Reconfiguring the OracleAS Portal for the Oracle Internet Directory"
Section 4.5.8.3, "Starting all Middle Tiers That Use The Upgraded Portal Instance"
Section 4.5.8.4, "Rebuilding the Oracle Text (formerly InterMedia Text) Indexes"
Section 4.5.8.5, "Turning On Session Store Look-Up in Oracle9iAS Portal 9.0.2.6 Upgrades"
Section 4.5.8.6, "Understanding OracleAS Portal Usage Changes"
Section 4.5.8.7, "Understanding Changes to the Portlet Repository"
Due to dependencies, the OracleAS Portal repository upgrade may have caused objects in the database to become invalid. You can execute the utlrp.sql script to recompile all invalid objects in the database. The instructions are provided in Section 5.6.1, "Executing the utlrp.sql Utility".
You must reconfigure the upgraded OracleAS Portal 10g (9.0.4) instance for the Oracle Internet Directory, using the following steps:
Set the ORACLE_HOME environment variable to <destination_MT_OH>.
Change directories to the assistants/opca directory under <destination_MT_OH>.
Execute the ptlasst script by issuing this command:
ptlasst.cshbat -mode MIDTIER [-i <install type>] -type DIPUNREG [-s <portal schema>] [–sp <schema password>] [-c <connect string>] [-ldap_h <OID server host>] [-ldap_p <OID server port>] [-ldap_d <installer DN>] -ldap_w <installer password> [-ldaps]
where:
-i <install type> can be set to typical or custom.
When this parameter is set to typical, the repository access APIs are used to get the details of Oracle Internet Directory server and the OracleAS Portal schema in the configured OracleAS Metadata Repository.
When it is set to custom, the input provided on the command line is used for the configuration. The default value of this parameter is typical.
-s <portal schema> is the OracleAS Portal schema name. The schema name ÒportalÓ is used if none is specified.
-sp <schema password> is the OracleAS Portal schema password.
-c <connect string> is the connect string to the OracleAS Portal database. The format is HostName:PortNumber:ServiceName.
-ldap_h <OID server host> is the host name of the Oracle Internet Directory server.
-ldap_p <OID server port> is the port number of the Oracle Internet Directory server.
-ldap_d <installer DN> is the Distinguished Name of the user who is executing the script. If this parameter is not specified, then the default value of cn=orcladmin is used. If the Oracle Internet Directory server version is 9.0.2, then only the cn=orcladmin user has the required privileges. For Oracle Internet Directory in Oracle Application Server 10g (9.0.4), this user must be the super user cn=orcladmin, or the user must be a member of all of the following groups:
cn=Trusted Applications Admins, cn=Groups,cn=OracleContext
cn=iASAdmins, cn=Groups,cn=OracleContext
cn=IAS & User Mgmt Application Admins, cn=Groups,cn=OracleContext
-ldap_w <installer password> is the password of the user who is executing the script.
-ldaps is the flag that indicates that Oracle Internet Directory is SSL- enabled. If this parameter is specified, then the Oracle Internet Directory server port specified using the –ldap_p parameter must be SSL-enabled.
Below is an example of this command:
ptlasst.csh -mode MIDTIER -i custom -type DIPUNREG -s portal –sp password1 -c dbserver.domain.com:1521:iasdb -ldap_h oidserver.domain.com -ldap_p 3060 -ldap_d Òcn=installer,cn=users,dc=mycompany,dc=comÓ -ldap_w secret1
After the script completes processing, examine the <portal schema>.log file in the current directory. All errors are captured in the <portal schema>.log file. If there are no errors, the script was successful. Common error messages and their resolution are described in Section 4.5.8.2.1, "Resolving ptlasst Script Errors for -type DIPUNREG".
Execute the ptlasst script to reassociate the OracleAS Portal instance with the Oracle Internet Directory server by issuing this command:
ptlasst.cshbat -mode MIDTIER [-i <install type>] -type OID [-s <portal schema>] [–sp <schema password>] [-c <connect string>] [-ldap_h <OID server host>] [-ldap_p <OID server port>] [-ldap_d <installer DN>] -ldap_w <installer password> [-pwd <initial password>] [-ldaps]
where:
-i <install type> can be set to typical or custom.
When this parameter is set to typical, the repository access APIs are used to get the details of Oracle Internet Directory server and the OracleAS Portal schema in the configured OracleAS Metadata Repository.
When it is set to custom, the input provided on the command line is used for the configuration. The default value of this parameter is typical.
-s <portal schema> is the OracleAS Portal schema name. The schema name ÒportalÓ is used if none is specified.
-sp <schema password> is the OracleAS Portal schema password.
-c <connect string> is the connect string to the OracleAS Portal database. The format is HostName:PortNumber:ServiceName.
-ldap_h <OID server host> is the host name of the Oracle Internet Directory server.
-ldap_p <OID server port> is the port number of the Oracle Internet Directory server.
-ldap_d <installer DN> is the Distinguished Name of the user who is executing the script. If this parameter is not specified, then the default value of cn=orcladmin is used. If the Oracle Internet Directory server version is 9.0.2, then only the cn=orcladmin user has the required privileges. For Oracle Internet Directory in Oracle Application Server 10g (9.0.4), this user must be the super user cn=orcladmin, or the user must be a member of all of the following groups:
cn=Trusted Applications Admins, cn=Groups,cn=OracleContext
cn=iASAdmins, cn=Groups,cn=OracleContext
cn=IAS & User Mgmt Application Admins, cn=Groups,cn=OracleContext
-ldap_w <installer password> is the password of the user who is executing the script.
-pwd <initial password> is the initial password for the OracleAS Portal seeded users (PORTAL and PORTAL_ADMIN) in Oracle Internet Directory. This password is used if the seeded user entries do not already exist in Oracle Internet Directory. If the user entries are already present in the Oracle Internet Directory server, then the existing passwords are not modified.
-ldaps is the flag that indicates that Oracle Internet Directory is SSL- enabled. If this parameter is specified, then the Oracle Internet Directory server port specified using the –ldap_p parameter must be SSL-enabled.
Below is an example of this command:
ptlasst.csh -mode MIDTIER -i custom -type OID -s portal –sp password1 -c dbserver.domain.com:1521:iasdb -ldap_h oidserver.domain.com -ldap_p 3060 -ldap_d Òcn=installer,cn=users,dc=mycompany,dc=comÓ -ldap_w secret1 -pwd welcome1
After the script completes processing, examine the <portal schema>.log file in the current directory. If an error occurs, and the Oracle Internet Directory association fails, then the following error message is written into the log file:
ERROR: creating lightweight users and groups in OID ... exiting
Common error messages and their resolution are described in Section 4.5.8.2.2, "Resolving ptlasst Script Errors for -type OID".
If the OracleAS Portal is associated with an Oracle Application Server 10g (9.0.4) Oracle Internet Directory, server, then the command in Step 5 adds the application entry as a member of the group Òcn=Common Group Attributes,cn=Groups,cn=OracleContextÓ.
If the OracleAS Portal is not using an Oracle Application Server 10g (9.0.4) Oracle Internet Directory server, then skip Steps a, b and c below and continue with Step 8.
Locate the application name in the log file created by executing ptlasst. The file is typically named as <portal schema>.log and is located in the <destination_MT_OH>/assistants/opca directory. The application name is present in the the log file following the string Portal Application Name:
Check the Oracle Internet Directory privileges of the application name by issuing the following command:
ldapsearch –h <OID host> -p <OID port> -D <Privileged user DN> -w <Privileged user password> [-U <SSL auth mode>] -b Òcn=Groups,cn=OracleContextÓ –s sub Òuniquemember=orclapplicationcommonname=<application name>,cn=Portal,cn=Products,cn=OracleContextÓ dn
where:
<OID host> is the host name of the OID server.
<OID port> is the port number of the OID server. If this port is SSL- enabled then the –U parameter must be specified.
<Privileged user DN> is the Distinguished Name of the user who is running the script. This user must be the super user cn=orcladmin, or it must be a member of all of the following groups:
cn=Trusted Applications Admins, cn=Groups,cn=OracleContext
cn=iASAdmins, cn=Groups,cn=OracleContext
cn=IAS & User Mgmt Application Admins, cn=Groups,cn=OracleContext
<Privileged user password> is the password of the user who is running the script.
<SSL auth mode> is the SSL authentication mode. This parameter should be provided only if the port specified through the –p parameter is SSL- enabled. Valid values for this parameter are: 1 = no authentication required, 2 = one-way authentication required, 3 = two-way authentication required
Below is an example of this command:
ldapsearch –h oidserver.domain.com -p 3060 -D Òcn=installer,cn=users,dc=mycompany,dc=comÓ -w secret1 -b Òcn=Groups,cn=OracleContextÓ –s sub Òuniquemember=orclapplicationcommonname=portal. 030908.1810,cn=Portal,cn=Products,cn=OracleContextÓ dn
Verify that the group Òcn=Common Group Attributes,cn=Groups,cn=OracleContextÓ appears in the list returned.
Examine the log file created by executing ptlasst. The file is typically named as <portal schema>.log and is located in the <destination_MT_OH>/assistants/opca directory. Verify that the provisioning profile was created successfully; look for a message similar to the following:
orclODIPProfileName=C815C7285F9E241CE0340800208A8B00_C817B7D771034368E0340800208A8B00, cn=Provisioning Profiles, cn=Changelog Subscriber, cn=Oracle Internet Directory
.
.
.
The Provisioning Profile for the Application has been created.
Profile Name: c815c7285f9e241ce0340800208a8b00_c817b7d771034368e0340800208a8b00
If the profile creation was unsuccessful, a message similar to the following is generated:
ERROR: The Provisioning Profile for the Application could not be created.
This error can occur if a provisioning profile already exists in the Oracle Internet Directory server.
Verify whether the provisioning profile already exists by performing the following steps:
Log in to the OracleAS Portal with a user account that is a member of the PORTAL_ADMINISTRATORS or the DBA group in the PORTAL.
Click the Administer tab.
Click the Global Settings link on the Services Portlet.
Click the SSO/OID tab.
Ensure that the Directory Synchronization section is displayed at the bottom of the page and the checkbox for Enable directory synchronization is checked. If the checkbox is checked, then no further action is necessary.
If the checkbox is not checked, diagnose the error on the Oracle Internet Directory server.
The following error messages may appear in the log file after you execute the script:
–ldap_h and –ldap_p parameters. Also ensure that the OID server is running and is reachable from the middle tier environment.
–ldap_d and –ldap_w parameters are correct.
cn=Trusted Applications Admins, cn=Groups,cn=OracleContext
cn=iASAdmins, cn=Groups,cn=OracleContext
cn=IAS & User Mgmt Application Admins, cn=Groups,cn=OracleContext
ptlasst script to reassociate the OracleAS Portal instance with the Oracle Internet Directory, as specified in Step 5 of Section 4.5.8.2, "Reconfiguring the OracleAS Portal for the Oracle Internet Directory". This procedure populates the Distinguished Name of the application entry in the Portal schema, and attempts to create the provisioning profile.
The following error messages may appear in the log file after you execute the script:
–ldap_h and –ldap_p parameters. Also ensure that the Oracle Internet Directory server is running and is reachable from the middle tier environment.
–ldap_d and –ldap_w parameters are correct.
–ldap_d parameter, or, if you have an Oracle Application Server 10g (9.0.4) Oracle Internet Directory server, then ensure that the user is a member of all of the following groups in the OID server:
cn=Trusted Applications Admins, cn=Groups,cn=OracleContext
cn=iASAdmins, cn=Groups,cn=OracleContext
cn=IAS & User Mgmt Application Admins, cn=Groups,cn=OracleContext
–pwd parameter should conform to the password policy defined in the Oracle Internet Directory server.
ptlasst -mode MIDTIER -type DIPUNREG as described in Step 3 of Section 4.5.8.2, "Reconfiguring the OracleAS Portal for the Oracle Internet Directory", and then execute ptlasst -mode MIDTIER -type DIPREG as described in Section 4.5.8.2.3, "Optional: Creating an OracleAS Portal Provisioning Profile in the Oracle Internet Directory".
If the error described in Section 4.5.8.2.2, "Resolving ptlasst Script Errors for -type OID", occurs, you should perform this procedure to create a provisioning profile for the upgraded OracleAS Portal 10g (9.0.4) instance.
Set the ORACLE_HOME environment variable to <destination_MT_OH>.
Change directories to the assistants/opca directory under <destination_MT_OH>.
Execute the ptlasst script by issuing this command:
ptlasst.cshbat -mode MIDTIER [-i <install type>] -type DIPREG [-s <portal schema>] [–sp <schema password>] [-c <connect string>] [-ldap_h <OID server host>] [-ldap_p <OID server port>] [-ldap_d <installer DN>] -ldap_w <installer password> [-ldaps]
|
Note: The-mode MIDTIER –type and DIPREG parameters create a provisioning profile for the OracleAS Portal in the Oracle Internet Directory server of the associated Infrastructure.
|
where:
-i <install type> can be set to typical or custom.
When this parameter is set to typical, the repository access APIs are used to get the details of Oracle Internet Directory server and the OracleAS Portal schema in the configured OracleAS Metadata Repository.
When it is set to custom, the input provided on the command line is used for the configuration. The default value of this parameter is typical.
-s <portal schema> is the OracleAS Portal schema name. The schema name ÒportalÓ is used if none is specified.
-sp <schema password> is the OracleAS Portal schema password.
-c <connect string> is the connect string to the OracleAS Portal database. The format is HostName:PortNumber:ServiceName.
-ldap_h <OID server host> is the host name of the Oracle Internet Directory server.
-ldap_p <OID server port> is the port number of the Oracle Internet Directory server.
-ldap_d <installer DN> is the Distinguished Name of the user who is executing the script. If this parameter is not specified, then the default value of cn=orcladmin is used. If the Oracle Internet Directory server version is 9.0.2, then only the cn=orcladmin user has the required privileges. For Oracle Internet Directory in Oracle Application Server 10g (9.0.4), this user must be the super user cn=orcladmin, or the user must be a member of all of the following groups:
cn=Trusted Applications Admins, cn=Groups,cn=OracleContext
cn=iASAdmins, cn=Groups,cn=OracleContext
cn=IAS & User Mgmt Application Admins, cn=Groups,cn=OracleContext
-ldap_w <installer password> is the password of the user who is executing the script.
-ldaps is the flag that indicates that Oracle Internet Directory is SSL- enabled. If this parameter is specified, then the Oracle Internet Directory server port specified using the –ldap_p parameter must be SSL-enabled.
Below is an example of this command:
ptlasst.csh -mode MIDTIER -i custom -type DIPREG -s portal –sp password1 -c dbserver.domain.com:1521:iasdb -ldap_h oidserver.domain.com -ldap_p 3060 -ldap_d Òcn=installer,cn=users,dc=mycompany,dc=comÓ -ldap_w secret1
After the script completes processing, examine the <portal schema>.log file in the current directory. All errors are captured in the <portal schema>.log file. Verify that the provisioning profile was created successfully; look for a message similar to the following:
orclODIPProfileName=C815C7285F9E241CE0340800208A8B00_C817B7D771034368E0340800208A8B00, cn=Provisioning Profiles, cn=Changelog Subscriber, cn=Oracle Internet Directory
.
.
.
The Provisioning Profile for the Application has been created.
Profile Name: c815c7285f9e241ce0340800208a8b00_c817b7d771034368e0340800208a8b00
If the profile creation was unsuccessful, a message similar to the following is generated:
ERROR: The Provisioning Profile for the Application could not be created.
This error can occur if a provisioning profile already exists in the Oracle Internet Directory server.
Verify whether the provisioning profile already exists by performing the following steps:
Log in to the OracleAS Portal with a user account that is a member of the PORTAL_ADMINISTRATORS or the DBA group in the PORTAL.
Click the Administer tab.
Click the Global Settings link on the Services Portlet.
Click on the SSO/OID tab.
Ensure that the ÒDirectory Synchronization" section is displayed at the bottom of the page and the checkbox for ÒEnable directory synchronizationÓ is checked.If the checkbox is checked, then execute ptlasst using -type MIDTIER and -mode DIPUNREG as described in Section 4.5.8.2, "Reconfiguring the OracleAS Portal for the Oracle Internet Directory", and then execute ptlasst again, using -type MIDTIER and -mode DIPREG as described in this section.
If the checkbox is not checked, diagnose the error on the Oracle Internet Directory server.
After the script has executed successfully, start each middle tier that is using the upgraded Portal instance by performing these steps:
Start OPMN and the processes managed by it with this command:
<destination_MT_OH>/opmn/bin/opmnctl startall
Oracle Process Management and Notification and all of the processes it manages are started (i.e., Distributed Configuration Management, Oracle HTTP Server, OC4J instances, OracleAS Web Cache, Oracle Application Server Forms Services, and Oracle Application Server Reports Services).
Start the Oracle Enterprise Manager Application Server Control by issuing this command:
<destination_MT_OH>/bin/emctl start iasconsole
This step is required since the upgrade script drops the Oracle Text indexes and does not re-create them for OracleAS Portal 10g (9.0.4). If you want to use the Oracle Text features in the upgraded instance, you must re-create the indexes with the provided script. Run the <destination_MT_OH>/portal/upg/plsql/wws/ctxcrind.sql script using SQL*Plus from the Portal schema. If necessary, this script is rerunnable.
This process is the same for creating the Text indexes in any Portal build. For more information, refer to the Oracle Application Server Portal Configuration Guide.
|
Note: This process can take several hours, depending on the size of the repository and the speed of the computer. |
If you are upgrading from an Oracle9iAS Portal of version 9.0.2.6 to which a fix for page portlet sub-page items not displaying was applied (Bug 2904052), you must re-run a script with the parameter set to TRUE to restore the fix after the upgrade.
Connect to the OracleAS Portal schema SQL*Plus as the schema owner.
Execute the script:
<destination_MT_OH>/portal/upg/plsql/wws/ptlinvsw.sql TRUE
This section details the differences between OracleAS Portal 10g (9.0.4) and Oracle9iAS Portal 9.0.2, and discusses issues you may encounter after upgrade.
During the upgrade, all existing content on the Portal Builder page is completely removed, and replaced by new content. If the Portal Builder page was customized, then those customizations are lost. Before the upgrade, identify and record all customizations to the Builder Page so that they can be re-applied after the upgrade.
In Oracle9iAS Portal 9.0.2 each category and perspective had a page with two tabs. Each tab had an autoquery portlet on it, one tab displayed the items belonging to that category or perspective, and the other tab displayed the pages belonging to the category or perspective. Also, in Oracle9iAS Portal 9.0.2 users might have customized the category or perspective pages or the portlets on these pages.
In OracleAS Portal 10g (9.0.4), these pages are based on a category or perspective template which belongs to the page group. Therefore:
Each page group that contains either a category or a perspective will on upgrade be populated with both a category template and a perspective template.
All categories created in that page group after the upgrade will have category pages based on the category template. Similarly, perspectives created after the upgrade will have pages based on the perspective template.
If a Oracle9iAS Portal 9.0.2 page group had neither categories nor perspectives, no templates will be created for this page group during the upgrade. Subsequently, if a new category is added to the page group, a category template will be created and the category page will be based on that template.
Scripts are provided that can be run after the upgrade that will:
delete the Oracle9iAS Portal 9.0.2 category and perspective pages
create new category and perspective pages based on the template for the Oracle9iAS Portal 9.0.2 categories
The scripts are located in <destination_MT_OH>/portal/upg/plsql/upg/902-9025/wws and are:
pstdefin.sql
pstpgshw.sql
pstundef.sql
pstpgcre.sql
pstprcpg.sql
After upgrading from Oracle9iAS Portal 9.0.2 to OracleAS Portal 10g (9.0.4), you can delete existing category and perspective pages and re-create them based on the category and perspective templates that were created during the upgrade. You can apply this fix to a Oracle9iAS Portal 9.0.2 instance that has been upgraded to OracleAS Portal 10g (9.0.4). Copy all the above files into a temporary directory and make that directory the current working directory.
Connect to the Portal using SQL*Plus as the Portal schema user. For example: sqlplus portal/portal@iasdb
Configure the pstdefin.sql file with information about the page groups and whether you wish to re-create category pages only, perspective pages only or both. The descriptions of all the settings are in the pstdefin.sql file.
If necessary, use the pstpgshw.sql script to retrieve information from the Portal to configure the pstdefin.sql file.
Run the pstpgcre.sql script to apply the changes. For example:
SQL> @pstpgcre.sql
In OracleAS Portal 10g (9.0.4), the date format used when searching Portal content is DD-MON-YYYY, or the equivalent date format for other languages. The appropriate date format for your language is displayed as hint text on the search form in which you enter dates. If you upgrade a Saved Searches portlet that used a different format, such as DD-MON-YY, no search results are returned in the ugpraded portlet. You must re-create the saved search with the correct date format.
The following display items and characteristics are changed in OracleAS Portal 10g (9.0.4):
Only the primary file associated with a Portal item is displayed (i.e., image files are not displayed).
Only the current version of a file is shown.
File and Folder names are case-sensitive, and the real name is displayed (not the internal name, as was the case in Oracle9iAS Portal 9.0.2, or the display name).
Only the SHARED, CORPORATE and user-created page groups are shown.
Versioning is exposed in OracleAS Portal 10g (9.0.4), but any upgraded checked out item will not appear to be locked (i.e. checked out from a WebDAV client).
In Oracle9iAS Portal 9.0.2, links to sub-pages could be displayed on a page by adding the Sub-Page Display item to the page. In OracleAS Portal 10g (9.0.4), the Sub-Page Display item has been replaced with the Sub-Page Links region.
If a 9.0.2 page included a Sub-Page Display item in its own region, after upgrade, the item will be replaced by a Sub-Page Links region. If the Sub-Page Display item appeared in a region that contained other items, the other items will be upgraded within that region, but the Sub-Page Display item cannot be upgraded to a Sub-Page Links region and will be deleted. A warning message will be recorded in the upgrade log stating that the Sub-Page Display item was not upgraded. In this case, the page designer will need to manually add the Sub-Page Links region to the upgraded page.
With 9.0.2 Sub-Page Display items, you could specify the sort order in which the sub-page links were listed. If there is a single Sub-Page Display item on a 9.0.2 page, after upgrade, the corresponding Sub-Page Links region will use the same order. However, if the 9.0.2 page included more than one Sub-Page Display item, and those items used different sort orders, there is no way to determine which sort order to use. Therefore, the links in the upgraded Sub-Page Links region will be sorted alphabetically.
The location of the main list of personal pages has been moved so that it is now the root page of the Shared Objects page group. In Oracle9iAS Portal 9.0.2, this list was a sub-page of the Shared Objects page group.
Consequently, after upgrade, you will find that any Page Link items that previously pointed to this sub-page will no longer work. To fix this, you must edit the item to point to the new location.
Similarly, you will also need to edit any lists of objects that include the Personal Pages page to point to the new location.
In Oracle9iAS Portal 9.0.2, although it was not recommended, you could grant the View privilege to the PUBLIC user to make the page visible to users who were not logged on. In OracleAS Portal 10g (9.0.4), the user interface no longer allows you to do this. Instead, you must select the Display Page to Public Users check box. After upgrade, any pages with access control lists that assigned the View privilege to the PUBLIC user will have this privilege removed and the Display Page to Public Users check box selected instead.
The internal name of the Corporate Pages page group has been changed from SAMPLEPAGEGROUP to CORPORATEPAGES to more accurately reflect its content. If you have any links to this page group that use the internal name in the URL, then you will need to change them to reflect the name change.
During upgrade, all export/import objects (tables, packages, etc.) are dropped and re-created. Any data stored in the export/import tables is deleted. Consequently, all transport sets are removed during upgrade.
This ensures that users do not inadvertently try to import a transport set from a previous version after upgrade (export/import does not work across versions of the product).
In OracleAS Portal 10g (9.0.4), a new manifest screen has been added to the export and import screens. A manifest screen displays the list of objects in the transport set, provides granular control over the modes of import for the various objects found in the transport set, and indicates how the objects are related.
|
See Also: Oracle Application Server Portal Configuration Guide |
In Oracle9iAS Portal 9.0.2, all providers were in a single list in the Providers Navigator. If you had a lot of providers, it could be quite difficult to locate it within this list. In OracleAS Portal 10g (9.0.4), the Providers Navigator is divided into three areas: Locally Built Providers, Registered Providers, and Provider Groups. To find a provider, you must first drill down into the appropriate area.
Some portlets in the Portlet Repository will no longer have a preview link, because:
In Oracle9iAS Portal 9.0.2, if a portlet did not support the preview mode, the Portlet Repository still included a preview link next to that portlet. When the preview link was clicked, a screen displayed a message that no preview was available. In OracleAS Portal 10g (9.0.4), if a portlet does not support the preview mode, the Portlet Repository does not display a preview link next to that portlet.
Some portlets that did support the preview mode in Oracle9iAS Portal 9.0.2 no longer support it in OracleAS Portal 10g (9.0.4). In this case, the preview link will no longer appear next to the portlet in the Portlet Repository.
Instead of preview links, you may see underscore characters in the portlet titles. These look very similar to hypertext links. To prevent these underscore characters from displaying you need to edit the style applied to the page or region and change the Font Decoration for the Display Name and Image Link style element to <None>.
The help system has a new URL:
http://host:port/portalHelp/en/
If you have URL items pointing to the previous help URL, you must update those URLs to point to this new URL.
In OracleAS Portal 10g (9.0.4), this feature is enabled by default. Therefore, after upgrade, parameters and events are enabled for all page groups. To disable this feature, click the Properties link for the page group, then click the Configure tab. In the Parameters and Events section, click the Edit link and de-select the Enable Parameters and Events.
Portlet Builder portlets, e.g., forms, reports, and charts (previously known as components) that are mobile capable may show the following error when added to a mobile page:
Error: The XML parser encountered an Error, and could not complete the conversion for portlet id=9,41924, it returned the following message: (1)
As a workaround, navigate to the portlet from the Portal Navigator, and edit the portlet. Go to the Display Options tab. At the bottom, under Mobile Display Options, make sure that at least one column is selected in the Columns to Display list. Click OK to update the portlet’s attributes. The portlet will now operate correctly on the mobile page.
In OracleAS Portal 10g (9.0.4), the titles of several seeded portlet repository pages are different from those in the previous release:
Administration was changed to Administration Portlets
Portal Tools was changed to Portlet Builders
Shared Instances was changed to Shared Portlets
Content was changed to Portal Content Tools
Oracle9iAS Portal Community was changed to Portal Community News
User Content was changed to Published Portal Content
New was changed to Portlet Staging Area
Figure 4-3 Oracle9iAS Release 2 (9.0.2) Portlet Repository

Figure 4-4 Oracle Application Server 10g (9.0.4) Portlet Repository
However, the pages are not automatically renamed when you upgrade from Oracle9iAS Portal 9.0.2. For example, if you had a page called Shared Instances in the portlet repository, it will not be renamed to Shared Portlets during the upgrade. To use the new titles, you must change the display names of the portlet repository pages.
|
See Also: Oracle Application Server Portal User's Guide |
The upgrade creates pages in certain circumstances. The Portlet Staging Area page is created if the Oracle9iAS Portal does not have the New page. The Published Portal Content page is created if he Oracle9iAS Portal does not have the User Content page.
After upgrading, if you create a new page group, the provider page that represents the new page group is created under the Published Portal Content page, and will be visible to all users.
If you create or register a provider directly, the provider page will be created under the Portlet Staging Area page, and will be visible to the Portal Administrator and the user who created or registered the provider.
By default, the portlet repository is upgraded in-place from Oracle9iAS Portal 9.0.2 to OracleAS Portal 10g (9.0.4). The existing pages, templates, items, etc. in the portlet repository are upgraded, and the new portlets are added into the repository. Since the Release 2 (9.0.2) settings are preserved, the 10g (9.0.4) pages look very similar to the Release 2 (9.0.2) pages.
|
Note: If you had rendered the Portlet Repository in Release 2 (9.0.2) as grouped by Provider names, then after the upgrade the folders in the repository will be grouped by category, because the Group by Provider Name option has been deprecated in 10g (9.0.4). To create a similar organization, assign the portlet names to categories representing the Provider names. |
If you want the repository to have the appearance of the OracleAS Portal 10g (9.0.4) installation, a script is available to re-create the upgraded portlet repository. The script removes the existing upgraded portlet repository and re-creates it. Use the script only if you do not wish to preserve customizations, settings, styles, banners, and so on in the portlet repository.
To re-create the repository, follow these steps:
Perform a backup of the database, since the script overwrites the repository and is not reversible.
Navigate to <destination_MT_OH>/portal/upg/plsql/upg/309-903/wws/.
Execute the prrplc.plprrplc.pl script by issuing this command:
<destination_MT_OH>/perl/bin/perl prrplc.pl -t <portal tns name> [-s <portal schema>] [-w <portal schema password>]
where:
<portal tns name> is the TNS connect string for the database in which the OracleAS Portal repository resides.
<portal schema> is the name of the Portal schema being modified.
<portal schema password> is the password for the schema.
For example:
<destination_MT_OH>/perl/bin/perl prrplc.plpl -t iasdb1 -s myportal -w wh7HeT23
The OmniPortlet and WebClipping providers are new in OracleAS Portal 10g (9.0.4). Consequently, these providers must be refreshed in the repository after the middle tier has been started. Repeat these steps for each OracleAS Portal instance that references these providers:
Log in to OracleAS Portal as an administrator.
Click the Navigator link.
The Portal Navigator page appears.
Click the Providers tab.
Click Locally Built Providers.
A sorted list of locally built providers appears.
Locate the OmniPortlet provider, using the Next and Previous links, if necessary.
Click the Refresh link for the OmniPortlet provider.
Locate the Web Clipping provider, using the Next and Previous links, if necessary.
Click the Refresh link for the Web Clipping provider.
If there were no errors, you can access your upgraded Portal. Open a browser and access:
http://<host>:<port>/pls/<dad>
Table 4-3 Access URL Parameters
| Parameters | Description |
|---|---|
<host>
|
The computer on which the OracleAS 10g (9.0.4) HTTP Server is running. |
<port>
|
The port on which the Oracle9AS 10g (9.0.4) HTTP Server is listening. |
<dad>
|
The Portal DAD name of the upgraded Portal. This is the same DAD name you used before the upgrade. |
Typically, schemas are contained in the Metadata Repository, but the schema for some components (for example, Oracle Application Server Discoverer and OracleAS Portal) might reside outside of the Infrastructure database. This section provides information on upgrading these components’ schemas in customer databases.
|
See Also: Oracle Application Server 10g Administrator's Guide |
If you have been using Oracle Application Server Discoverer version 9.0.2.52 or earlier, you must upgrade the End User Layer before you can use Oracle Application Server Discoverer 9.0.4 in 10g (9.0.4).
To upgrade the Oracle Application Server Discoverer End User Layer schema, you use Oracle Discoverer Administrator, shipped with the Oracle Developer Suite 10g (9.0.4).
|
See Also: Oracle Discoverer Administrator Administration Guide in the Oracle Developer Suite documentation library. |
The procedure for upgrading the Portal schemas in the customer database is the same as that for upgrading the schemas in the Infrastructure, as long as the starting version is 9.0.2 or later. The steps are as follows:
Ensure that the OracleAS Portal repository database is a version that is supported by the upgrade process:
9.0.1.5 is the minimum 9.0 version that is supported
9.2.0.4 is the minimum 9.2 version that is supported
Follow the instructions provided in Section 4.5, "Upgrading the OracleAS Portal Repository".
|
Note: In any instructions that refer to the Infrastructure Oracle home or the Infrastructure database, use the Oracle home and database of the instance in which the OracleAS Portal schema resides. |
General information on upgrading to OracleAS Portal 10g (9.0.4), as well as instructions for upgrading from other versions, is provided at:
http://portalcenter.oracle.com/upgrades
Select 9.0.4 from the list of upgrade targets on the page.
Because the Oracle Application Server upgrade was designed to support component operation with a Release 2 (9.0.2) Infrastructure, the UDDI sub-component of Oracle Application Server Web Services has a mode of operation for each version of the Infrastructure.
If the database schema in the repository was not upgraded, the UDDI sub-component will run in 9.0.2.3 compatibility mode after the upgrade.
To run in 10g (9.0.4) mode:
Upgrade the database schema in the metadata repository.
Restart the UDDI applications.
|
 Copyright © 2003 Oracle Corporation All rights reserved |
|