|
Oracle® Application Server 10g Upgrading to 10g (9.0.4)
10g (9.0.4) for UNIX Part No. B10429-01 |
|
|
|
|
|
Oracle® Application Server 10g Upgrading to 10g (9.0.4)
10g (9.0.4) for UNIX Part No. B10429-01 |
|
|
|
|
This chapter explains how to upgrade the middle tier of your Oracle Application Server installation. It includes instructions on how to prepare your system for a successful upgrade, and how to start and use the Oracle Application Server Upgrade Assistant. It also details the manual tasks you may have to perform on individual components after the OracleAS Upgrade Assistant has finished processing. Complete manual upgrade procedures are included for components, or parts of components, that are not upgraded by the OracleAS Upgrade Assistant. All of these steps must be performed for each middle tier in the installation.
|
See Also: Section 1.2, "The Middle Tier Upgrade Process" for a general overview of the middle tier upgrade process. |
The chapter is divided into the following major sections:
Section 3.1, "Preparing to Upgrade: Common Requirements for All Components"
Section 3.2, "Preparing to Upgrade: Requirements for Specific Components"
Section 3.3, "Upgrading a Standalone OC4J Instance"
Section 3.4, "Upgrading a Standalone OracleAS Web Cache Instance"
Section 3.5, "Using the OracleAS Upgrade Assistant"
Section 3.6, "Resolving Errors"
Section 3.7, "Restarting the OracleAS Upgrade Assistant"
Section 3.8, "Completing the Upgrade"
Section 3.9, "Upgrading Oracle Application Server InterConnect"
Section 3.10, "Port Values and the portlist.ini File After Upgrade"
Section 3.11, "Upgrading Application Server Clusters"
Section 3.12, "Starting the Upgraded Middle Tier Instance"
Section 3.14, "Considerations for the Source Oracle Home After Upgrade"
This section provides the steps you must take to prepare the 10g (9.0.4) middle tier installation for upgrade.
Section 3.1.1, "Requirements for Installing an Oracle Application Server 10g (9.0.4) Middle Tier"
Section 3.1.2, "Stopping Oracle Application Server Instances"
Section 3.1.3, "Preparing to Upgrade a Middle Tier that Uses an Infrastructure"
If you are upgrading a middle tier that uses an Infrastructure, certain pre-installation requirements exist. You must ensure that these are met before you install an Oracle Application Server 10g (9.0.4) middle tier. Otherwise, the 10g (9.0.4) installation will not function with a Release 2 (9.0.2) Infrastructure. Specifically, before you can use the Release 2 (9.0.2) Infrastructure, you must update an entry in the Release 2 (9.0.2) Oracle Internet Directory.
|
See Also: Oracle Application Server 10g Installation Guide, "Update an Entry in the 9.0.2 Oracle Internet Directory". |
Install Oracle Application Server 10g (9.0.4) middle tier, adhering to the following requirements:
The Oracle Application Server 10g (9.0.4) middle tier must be on the same computer as the Oracle9iAS Release 2 (9.0.2) or (9.0.3) middle tier.
The Oracle Application Server 10g (9.0.4) middle tier must be installed by the same operating system user that installed the Oracle9iAS Release 2 (9.0.2) or (9.0.3) middle tier.
The Oracle Application Server 10g (9.0.4) middle tier must be in a separate Oracle home from the Oracle9iAS Release 2 (9.0.2) or (9.0.3) middle tier.
The Oracle Application Server 10g (9.0.4) middle tier must be of the same installation type as the Oracle9iAS Release 2 (9.0.2) or (9.0.3) middle tier. (The exception is that an Oracle Application Server 10g (9.0.4) Business Intelligence and Forms installation type must be installed to upgrade an Oracle9iAS Release 2 (9.0.2) Unified Messaging installation type.)
If Identity Management is used, the Oracle Application Server 10g (9.0.4) middle tier must use the same Identity Management as the Oracle9iAS Release 2 (9.0.2) or (9.0.3) middle tier.
The Oracle Application Server 10g (9.0.4) middle tier must use the same Metadata Repository as the Oracle9iAS Release 2 (9.0.2) or (9.0.3) middle tier. (The Metadata Repository will always be Oracle9iAS Release 2 (9.0.2)).
Only components that are configured in both the source and the destination Oracle homes will be upgraded. The exception to this is that OracleAS Portal will be upgraded if it is configured in the destination instance. Note that the OracleAS Portal component will not be fully configured in the Oracle Application Server 10g (9.0.4) instance until after the OracleAS Upgrade Assistant is run. This means that the Oracle9iAS Portal must only be accessed using the Release 2 (9.0.2) middle tier until after the middle tier upgrade process is complete.
For information on compatibility with other software and related installation requirements:
Stop all processes in the source and destination Oracle homes with these commands shown below.
In the source Oracle home:
Stop the Oracle Enterprise Manager Application Server Control:
<source_MT_OH>/bin/emctl stop
Stop OPMN and processes managed by it with this command:
<source_MT_OH>/opmn/bin/opmnctl stopall
Stop OracleAS Web Cache with this command:
<source_MT_OH>/bin/webcachectl stop
Stop all other running processes in the source Oracle home.
In the destination Oracle home:
Stop the Oracle Enterprise Manager Application Server Control with this command:
<destination_MT_OH>/bin/emctl stop iasconsole
Stop OPMN and processes managed by it with this command:
<destination_MT_OH>/opmn/bin/opmnctl stopall
Stop all other running processes in the destination middle tier Oracle home.
Before you upgrade any middle tier that uses an Infrastructure, the Infrastructure must be started and accessible. If the Infrastructure is stopped, certain upgrade processes will fail (Oracle Application Server Containers for J2EE, OracleAS Portal, and Oracle Application Server Wireless).
This section outlines pre-upgrade steps you need to perform for specific components of the middle tier.
Section 3.2.1, "Preparing to Upgrade Oracle Application Server Wireless Middle Tiers"
Section 3.2.2, "Optional: Increasing JVM Memory for Large OC4J Upgrades"
If you are upgrading one or more Oracle Application Server Wireless middle tiers, you must perform the steps below before starting the OracleAS Upgrade Assistant:
Stop all Oracle Application Server Wireless middle tiers in the farm, including any Oracle Collaboration Suite middle tiers that are configured to run Oracle Application Server Wireless.
If you will be operating Release 2 (9.0.2) Oracle Application Server Wireless middle tiers in combination with 10g (9.0.4) middle tiers, obtain the Oracle Application Server Wireless 9.0.2.8.0 patch set from MetaLink and apply the patch to all of the Release 2 (9.0.2) Oracle Application Server Wireless middle tiers.
Create a backup of the Oracle9iAS Wireless Release 2 (9.0.2) schema in the Infrastructure. The backup is needed because this schema is upgraded during the installation of the Oracle Application Server 10g (9.0.4) Wireless middle tier.
If you are upgrading a large number of applications or a large number of OC4J instances, it might be helpful to increase the memory for the extract phase of the OC4J upgrade. The extract phase of the upgrade process starts a new Java process (that is, it has a new JVM), and you can configure its minimum and maximum memory. To do this, you configure the JavaVM property in the <destination_MT_OH>/ias/upgrade/Oc4jPlugin.cfg file.
Example 3-1 JavaVM Property in Oc4jPlugin.cfg File
<JavaVM>
    <JVMproperties property="Xms256m"/>
    <JVMproperties property="Xmx512m"/>
</JavaVM>
The default values of 256MB minimum and 512MB maximum are shown in Example 3-1; however, 1024MB is a plausible upper limit for upgrading several OC4J instances and many large applications.
Upgrading a standalone OC4J instance (for example, an instance created with the OC4J that is available for download from Oracle Technology Network in zip format) in Oracle9iAS Release 2 (9.0.2) or Release 2 (9.0.3) is a manual process. The OracleAS Upgrade Assistant does not upgrade such instances. You must re-deploy the applications in the Oracle Application Server 10g (9.0.4) Oracle home.
Create an OC4J instance to host the applications in the 10g (9.0.4) Oracle home, using the Oracle Enterprise Manager Application Server Control.
Configure the OC4J instance with any system properties or environment variables that are unique to the standalone instance.
Identify all command-line arguments from the java -jar command line in the standalone instance. In Oracle Application Server, the Oracle Process Management and Notification subsystem is responsible for starting and stopping OC4J.
Move all command-line arguments to <destination_MT_OH>opmn/conf/opmn.xml.
Move any properties specified in properties files in the standalone instance to <destination_MT_OH>opmn/conf/opmn.xml.
Re-deploy the Release 2 (9.0.2) or Release 2 (9.0.3) standalone applications (EARfiles) in the Oracle Application Server 10g (9.0.4) Oracle home.
You can upgrade a standalone instance of OracleAS Web Cache Release 2 (9.0.2 or 9.0.3) to Oracle Application Server 10g (9.0.4) using the OracleAS Upgrade Assistant. (A standalone instance is one installed from a kit that included only this product; it was not installed as part of an Oracle Application Server installation.)
However, you must perform the following steps before running the OracleAS Upgrade Assistant:
Edit the OracleAS Upgrade Assistant configuration file (iasua.xml), which is located at:
<destination_MT_OH>/upgrade/iasua.xml
In the configuration file, delete the <Plugin> entries that apply to other Oracle Application Server components. Do not delete the OracleAS Web Cache <Plugin> entry, shown in the following example:
<Plugin DisplayName="OracleAS Web Cache"
        ShortName="WebCache"
        Class="oracle.ias.upgrade.config.webcache.WebcacheConfigUpgrade">
<Install Id="oracle.calypso"/>
</Plugin>
Save the modified configuration file.
Use the OracleAS Upgrade Assistant as described in Section 3.5.4, "Performing an Upgrade with the OracleAS Upgrade Assistant (Graphical User Interface (GUI) Version)" or Section 3.5.5, "Performing an Upgrade with the OracleAS Upgrade Assistant (Command-line Version) ".
This section provides instructions for using the graphical user interface or the command-line version to perform an upgrade, and describes properties you can configure to specify logging behaviors for the OracleAS Upgrade Assistant. These topics are included:
Section 3.5.1, "Specifying Logging Behaviors for the OracleAS Upgrade Assistant"
Section 3.5.2, "Starting the Infrastructure"
Section 3.5.5, "Performing an Upgrade with the OracleAS Upgrade Assistant (Command-line Version) "
You can configure the logging behavior of the OracleAS Upgrade Assistant by setting properties in the <destination_MT_OH>/upgrade/iasua.properties file. The logging properties and their uses are:
log.level — Use this property to specify the level of logging for the OracleAS Upgrade Assistant and all component plug-ins. For example, log.level=NOTIFICATION would set the logging level for all components upgraded by the OracleAS Upgrade Assistant to NOTIFICATION.
<plug-in name>.log.level — Use this property to specify the level of logging for a specific component plug-in, used to override the log.level property for a given component upgrade. For example, OC4J.log.level=TRACE would set the logging level for the Oracle Application Server Containers for J2EE upgrade to TRACE, even if the log level for the OracleAS Upgrade Assistant was set to NOTIFICATION.
log.append — Use this property to specify whether to append log entries to the existing log file or create a new log file. For example, log.append=TRUE would append log entries to the existing log file. (TRUE is the default.)
|
Note: Property names are case sensitive. Property values are case insensitive. |
Table 3-1 Logging Properties for the OracleAS Upgrade Assistant
| Property Name | Description | Valid Values |
|---|---|---|
| log.level | Level of logging for the OracleAS Upgrade Assistant and all component plug-ins | WARNING
NOTIFICATION ERROR TRACE DEBUG OFF INTERNAL_ERROR |
| <plug-in name>.log.level | Level of logging for a specific component plug-in, used to override the log.level property for a given component upgrade. | OPMN
InstanceConfig OHS OC4J WebCache modplsql EM UDDI UltraSearch Portal Wireless Forms Discoverer Reports |
| log.append | Specifies whether to append log entries to the existing log file or create a new log file. | TRUE
FALSE |
If an Infrastructure is in use, it must be started in order for the OracleAS Upgrade Assistant to operate correctly.
|
See Also: Oracle Application Server 10g Administrator's Guide, Chapter 3, "Starting an Infrastructure". |
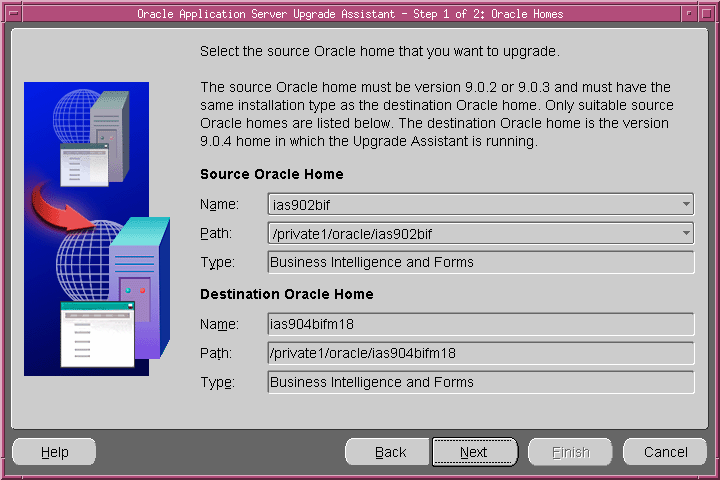
The Oracle Universal Installer creates an inventory file, /var/opt/oracle/oraInst.loc, when it installs Oracle products. This file contains the location (full path) of the Oracle Application Server instance, and the group name of the user who installed it. The OracleAS Upgrade Assistant populates its source Oracle home drop-down list (shown in Figure 3-2, "OracleAS Upgrade Assistant Oracle Homes Screen") with the information from this file, the default inventory file. Additional inventory files are sometimes created after installation for the purpose of managing Oracle homes independently (thereby circumventing the Oracle Universal Installer features that track all Oracle homes in a single inventory).
If there are multiple inventory location files on the computer on which you are performing an upgrade, and you want to be able to select a non-default inventory location, you must start the OracleAS Upgrade Assistant with the -invptrloc argument, specifying the inventory location file(s) for the Oracle homes involved in the upgrade. The syntax for starting the OracleAS Upgrade Assistant for multiple inventory locations is provided below.
iasua.sh [[-invptrloc <Oracle Universal Installer inventory pointer file>]...]
iasua.sh -sourcehome <9.0.2 or 9.0.3 Oracle home path> [[-invptrloc <Oracle Universal Installer inventory pointer file>]...] [-verbose] [-noprompt]
This section provides step-by step instructions for using the OracleAS Upgrade Assistant GUI version to perform an upgrade.
Start the OracleAS Upgrade Assistant with the command:
<destination_MT_OH>/upgrade/iasua.sh
|
Note: Use the-invptrloc argument, described in Section 3.5.3, "Starting the OracleAS Upgrade Assistant To Use Multiple Oracle Universal Installer Inventory Locations" if there are multiple inventories involved in the upgrade.
|
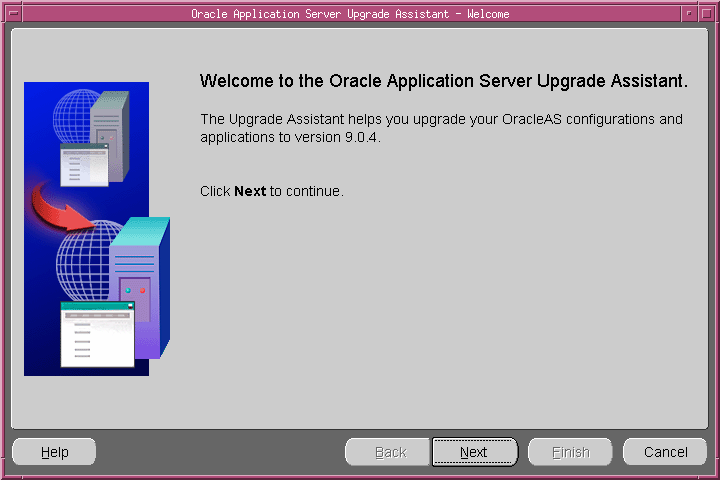
The Welcome screen appears as shown in . Click Next.
The Oracle Homes screen appears as shown in Figure 3–2. The Source Oracle Home drop-down list contains the names of Release 2 (9.0.2) and Release 2 (9.0.3) Oracle homes found in the inventory of Oracle products on the current computer. The destination Oracle home is the 10g (9.0.4) Oracle home in which the OracleAS Upgrade Assistant is running.
Select the source Oracle home from the drop-down list. Then click Next.
Figure 3-2 OracleAS Upgrade Assistant Oracle Homes Screen
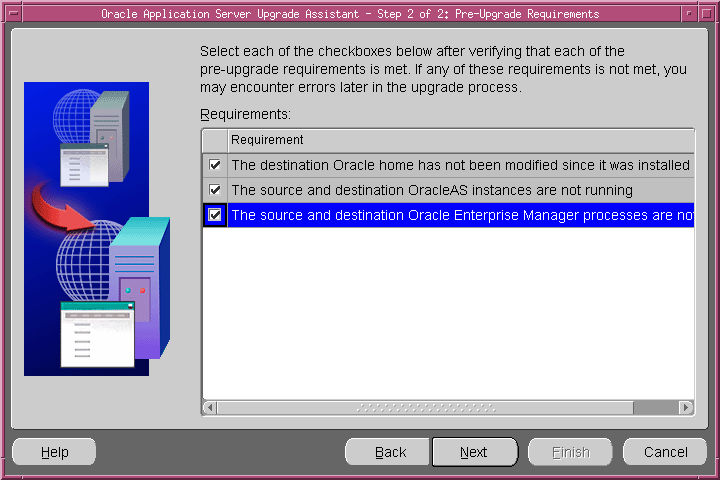
The Pre-Upgrade Requirements screen appears as shown in Figure 3–3. Ensure that all requirements are fulfilled, and check the box for each. The Next button is active only when all boxes are checked.
Figure 3-3 OracleAS Upgrade Assistant Requirements Screen
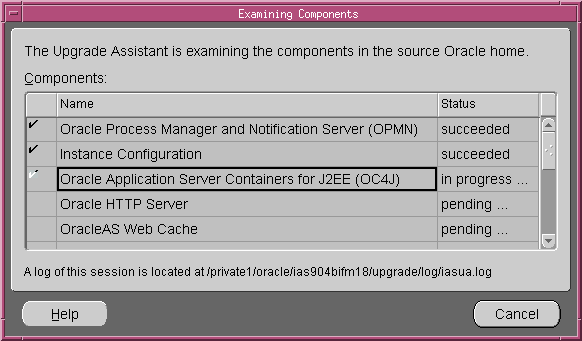
Click Next. The Examining Components dialog box appears as shown in Figure 3–4. The OracleAS Upgrade Assistant examines each component in the source Oracle home to determine whether it needs to be upgraded. The Status column for each component contains one of the following:
Table 3-2 OracleAS Upgrade Assistant Component Examination Status
| Status | Meaning |
|---|---|
| in progress... | The OracleAS Upgrade Assistant is examining the component’s upgrade items. |
| pending... | The component will be examined when the OracleAS Upgrade Assistant finishes examining the current component. |
| succeeded | All of the component’s upgrade items are valid for upgrade. |
| failed | The component has upgrade items that are missing or did not meet upgrade criteria. The OracleAS Upgrade Assistant cannot upgrade the component. |
Figure 3-4 OracleAS Upgrade Assistant Examining Components Dialog Box
If one or more components failed, the Examination Failure Warning dialog box appears as shown in Figure 3–5. Continue with Step 7.
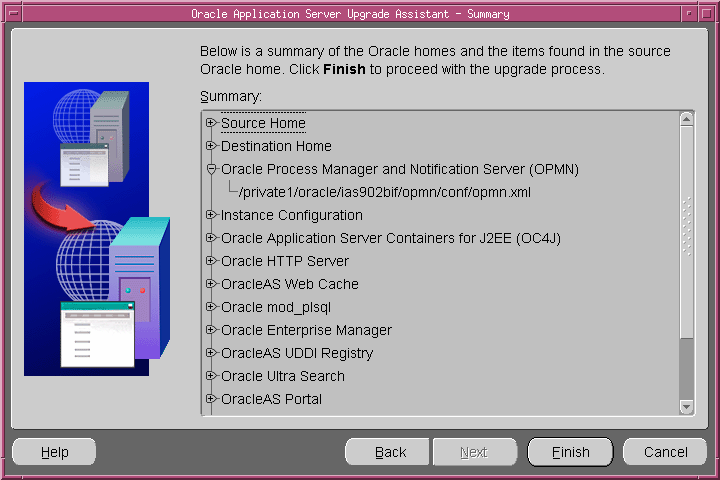
If all components succeeded, the Summary screen appears as shown in . Continue with Step 8.
Figure 3-5 OracleAS Upgrade Assistant Examination Failure Warning Dialog Box
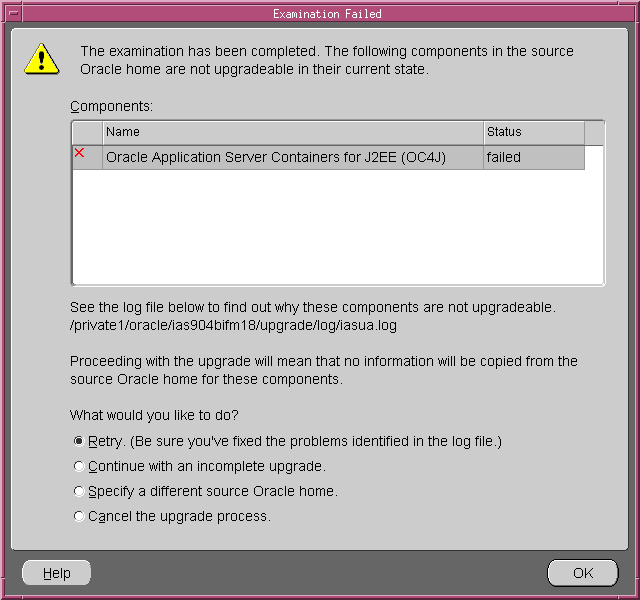
Do one of the following:
Remedy all conditions that caused the examination to fail, using the instructions in Section 3.6, "Resolving Errors". Then, select the Retry option and click OK.
Select the Continue with an incomplete upgrade option and click OK.
Select the Specify a different source Oracle home option, click OK, then return to Step 3.
Select the Cancel the upgrade process option and click OK. The OracleAS Upgrade Assistant stops.
If the examination was successful, or you chose to continue with an incomplete upgrade, the Summary screen appears as shown in .
The OracleAS Upgrade Assistant Summary screen appears. You can scroll to view the components, clicking the plus symbol (+) to expand a component’s upgrade items. Review the components, then click Finish.
|
Note: The Summary screen is the last screen before upgrade processing begins. Before you click Finish, verify that the choices on previous screens are correct and the upgrade items listed are ready to upgrade. See Section 3.1, "Preparing to Upgrade: Common Requirements for All Components" on page 3-2 for more information. |
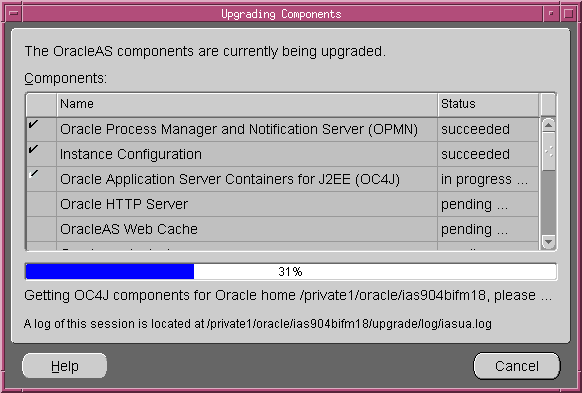
The Upgrading screen appears as shown in Figure 3–7. The Status column for each component contains one of the following:
Table 3-3 OracleAS Upgrade Assistant Upgrading Status
| Status | Meaning |
|---|---|
| in progress... | The OracleAS Upgrade Assistant is upgrading the component’s upgrade items. |
| pending... | The component will be upgraded when the OracleAS Upgrade Assistant finishes upgrading the current component. |
| succeeded | The component was upgraded successfully. |
| failed | The OracleAS Upgrade Assistant could not upgrade the component. |
Figure 3-7 OracleAS Upgrade Assistant Upgrading Screen
After the upgrade completes, the Upgrade Failed or Upgrade Succeeded screen (Figure 3–8) appears. Do one of the following.
Click OK to close the Upgrade Failure screen and remedy the conditions that prevented the components from being upgraded. Start the OracleAS Upgrade Assistant again.
Click OK to close the Upgrade Succeeded screen.
Figure 3-8 OracleAS Upgrade Assistant Upgrade Succeeded Screen
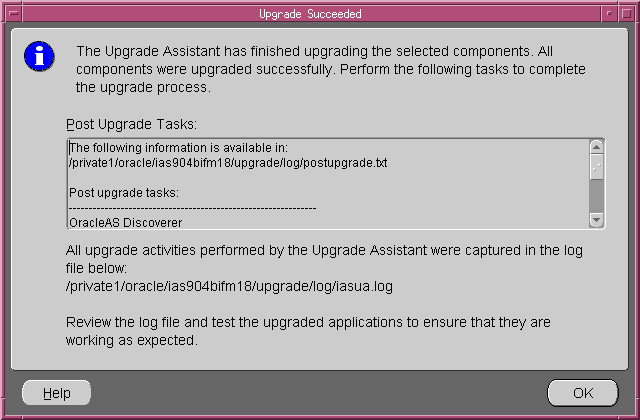
The Upgrade Succeeded screen specifies the location of the upgrade log file and lists the post-upgrade tasks to be performed for various components.
This section explains how to start and use the OracleAS Upgrade Assistant command-line version to perform an upgrade.
|
Note: The OracleAS Upgrade Assistant examines components differently in the command-line version and the GUI version.If the examination of a component fails in the command line version, then the upgrade is not performed. If the examination of a component fails in the GUI version, the following choices are provided: retry, continue with an incomplete upgrade, specify another Oracle home, or cancel the upgrade. |
Start the OracleAS Upgrade Assistant with the command:
<destination_MT_OH>/upgrade/iasua.sh -sourcehome <source_MT_OH>
|
Note: Use the-invptrloc argument, described in Section 3.5.3, "Starting the OracleAS Upgrade Assistant To Use Multiple Oracle Universal Installer Inventory Locations" if there are multiple inventories involved in the upgrade.
|
A prompt appears listing all the pre-upgrade requirements and asking you to verify that they have been met.
Validating Oracle homes
Validating component plug-ins
Initializing component plug-ins
Pre-upgrade requirements:
The destination Oracle home has not been modified since it was installed
The source and destination OracleAS instances are not runningThe source and destination Oracle Enterprise Manager processes are not running
Verify that each of the pre-upgrade requirements above have been met.
Have the pre-upgrade requirements been met?[No]Yes
Ensure that all the listed requirements are met. Then answer the prompt [Y] Yes to continue.
Messages similar to the following appear (The messages vary according to components found in the Oracle home):
Examining component "Oracle Process Manager and Notification Server (OPMN)"
Examining component "Instance Configuration"
Examining component "Oracle Application Server Containers for J2EE (OC4J)"
Examining component "Oracle HTTP Server"
Examining component "OracleAS Web Cache"
Examining component "Oracle mod_plsql"
Examining component "Oracle Enterprise Manager"
Upgrading component "Oracle Process Manager and Notification Server (OPMN)"
Upgrading component "Instance Configuration"
Upgrading component "Oracle Application Server Containers for J2EE (OC4J)"
Upgrading component "Oracle HTTP Server"
Upgrading component "OracleAS Web Cache"
Upgrading component "Oracle mod_plsql"
Upgrading component "Oracle Enterprise Manager"
The command completed successfully
If any error messages are displayed in Step 2, correct the errors as explained in Section 3.6, "Resolving Errors". Then restart the Upgrade Assistant and perform the upgrade process again.
If errors occur at either stage of the upgrade process, you must correct the conditions that caused them before you try the upgrade again.
Under certain conditions, the OracleAS Upgrade Assistant cannot perform an upgrade. Among these are that the starting configuration is unsupported, processes are running in the Oracle homes, the Infrastructure services are unavailable, or there is insuffcient memory for a large-scale OC4J application upgrade.
This section identifies each condition and its cause(s), and explains how to resolve it.
If the source Oracle home does not appear as expected in the drop-down list of the Oracle Homes screen when you execute the OracleAS Upgrade Assistant, suspect one of these conditions: wrong installation type, Oracle homes are on different computers, or the Oracle home is not identified in the default inventory. The solution for each of these is detailed below.
The source Oracle home will not appear if the source middle tier instance is not of the same installation type as the destination middle tier instance. If this is the case, you must do one of the following:
Expand the installation type, as described in "Expanding the Middle Tier Installation Type".
Reinstall the destination middle tier with the same installation type as the source middle tier.
Another case in which the source middle tier will not appear as a selection is that the source middle tier instance is installed on a different computer from the destination middle tier instance. If this is the case, you must install the destination middle tier instance on the same computer as the source instance to be upgraded.
The OracleAS Upgrade Assistant uses the default inventory location to populate the drop-down list in the Oracle Homes screen. If the source Oracle home is not listed in the default Oracle Universal Installer inventory, then you need to provide the inventory file location to the OracleAS Upgrade Assistant. Start the OracleAS Upgrade Assistant with the -invptrloc option, described in Section 3.5.3, "Starting the OracleAS Upgrade Assistant To Use Multiple Oracle Universal Installer Inventory Locations" to specify the inventory location.
If the upgrade fails during the OPMN, OC4J or Oracle HTTP Server upgrade, it is probably because OPMN is still running in one or both instances (source and destination). You must stop OPMN before starting the OracleAS Upgrade Assistant. Follow the instructions in Section 3.1.2, "Stopping Oracle Application Server Instances".
If the upgrade fails during the OC4J examination phase, or another phase, it is probably because the Infrastructure is unavailable. The OracleAS Upgrade Assistant needs the Infrastructure services for certain operations, so the Infrastructure must be started before you start the OracleAS Upgrade Assistant. Follow the instructions in Section 3.5.2, "Starting the Infrastructure".
If the upgrade fails while attempting to upgrade many OC4J applications, or large OC4J applications, suspect a memory shortage. You can configure a memory increase for the upgrade operation. Follow the instructions in Section 3.2.2, "Optional: Increasing JVM Memory for Large OC4J Upgrades".
You can examine the <destination_MT_OH>/upgrade/log/iasua.log file and Table 3–4, "OracleAS Upgrade Assistant Error Messages" to determine the cause of examination and upgrade failures.
|
Note: By default, the OracleAS Upgrade Assistant logging function appends, so you should always look for the last instance of a message in the file. You can setlog.append=FALSE in <destination_MT_OH>/upgrade/iasua.properties to overwrite entries instead of appending them.
|
To determine the cause of an examination failure:
Note the name of the failed component in the OracleAS Upgrade Assistant dialog or command-line output.
Search for the message Starting to examine component_name.
Investigate the messages between the Starting... message and the message Finished examining component_name with status: Failure.
To determine the cause of an upgrade failure:
Note the name of the failed component in the OracleAS Upgrade Assistant dialog or command-line output.
Open <destination_MT_OH>/upgrade/log/iasua.log.
Search for the message Starting to upgrade component_name.
Investigate the messages between the Starting... message and the message Finished upgrading component_name with status: Failure.
Table 3-4 OracleAS Upgrade Assistant Error Messages
| Component | Message | Possible Cause and Solution |
|---|---|---|
| All | Unable to upgrade file filename.
|
The file was not found in the source Oracle home, or you do not have sufficient permissions to copy the file. Determine the permissions for the file in the source Oracle home and the destination Oracle home, and adjust them as necessary. |
| Instance Configuration | INVALID_XML_CONFIG_FILE
|
The iasschema.xml file is corrupted. Provide an uncorrupted version of the file.
|
| Instance Configuration | IOException
|
The iasschema.xml file could not be accessed in the source or destination Oracle home. Ensure that the file is accessible in both locations.
|
| Oracle Application Server Containers for J2EE
|
J2eeDeploymentException
|
An application EAR file is not 100% J2EE compliant.
Use the |
| Oracle Application Server Forms Services
|
Save files operation failed.
|
The copy operation failed. Some files are copied "as is" from <source_MT_OH> (i.e., registry.dat and ftrace.cfg). Verify that all of these files exist and that permissions and disk space are sufficient for a copy operation.
|
| Oracle Application Server Forms Services
|
Invalid section in the <formsweb.cfg> <default.env> file.
|
There is an invalid entry in the named file in <source_MT_OH>. Examine the file, and locate and correct any errors.
|
| Oracle Application Server Forms Services
|
Invalid or missing configuration file.
|
There is an invalid configuration file in <source_MT_OH>. Examine the file, and locate and correct any errors.
|
| Oracle Application Server Forms Services
|
Invalid or missing Forms configuration file <file name>.
|
The Upgrade Assistant is unable to locate the configuration files specified in the formsweb.cfg file (*htm and *env files), or the user-defined FormsServlet configuration file specified in oc4j_bi_forms.properties. Ensure that all files specified in the entries are valid and exist in the specified location.
|
| Oracle Application Server Forms Services
|
Forms is not configured in the Source Oracle Home <version number>, Forms upgrade cannot proceed.
|
If Forms services are not configured in the source Oracle Application Server middle tier installation, then the Upgrade Assistant will not upgrade Oracle Application Server Forms Services. Ignore this message; if Oracle Application Server Forms Services is not configured in the source Oracle home, then upgrade is unnecessary. |
| Oracle Application Server Forms Services
|
Forms is not configured in the Destination Oracle Home <version number>, Forms upgrade cannot proceed.
|
If Forms services are not configured in the destination middle tier installation, then the Upgrade Assistant will not upgrade Oracle Application Server Forms Services. Configure Oracle Application Server Forms Services in the destination Oracle home. |
| Oracle HTTP Server (mod_plsql) | java.io.FileNotFoundException...Apache/modplsql/conf/dads.conf
or
|
The file was not found. Provide a file at the location specified. |
| Oracle Application Server Web Services UDDI Registry | iAS/Upgrade/UddiPlugin Destination configuration file is not found at: path Look for backup at pathUnable to upgrade file
or
|
There is no uddiserver.config file or uddiserver.config.backup file in the 10g (9.0.4) Oracle home.
Place a copy of the shipped 10g (9.0.4) |
| Oracle Application Server Web Services UDDI Registry | iAS/Upgrade/UddiPlugin Missing URL prefix definition for UDDI.
|
The uddiserver.config file does not contain a definition for the property oracle.uddi.server.db.urlPrefix
Define the |
| Oracle Application Server Wireless | Could not copy file. or Could not create directory.
|
The disk is full, or you do not have sufficient permissions to copy the file. Determine the available disk space and permissions for the directory <destination_MT_OH>/wireless/ server/classes and adjust these as necessary.
|
This section discusses reasons for which an Oracle Application Server Containers for J2EE upgrade may fail.
If a configuration does not perform as expected after an upgrade, it might be because configuration changes were made to OC4J application files by means other than the Oracle Enterprise Manager Application Server Control. Only the changes made by the Oracle Enterprise Manager Application Server Control will be included in the OC4J upgrade performed by the OracleAS Upgrade Assistant. Manually edited files may not be in the scope of the managed configuration, and the edits may not be preserved in an upgrade.
If you use Distributed Configuration Management’s dcmctl utility to perform configuration changes, see the Distributed Configuration Management Reference Guide for instructions and a complete discussion on the correct usage of the commands.
OC4J deployment enforces J2EE compliance rules, so the OracleAS Upgrade Assistant may not upgrade applications that are not fully J2EE compliant. The OracleAS Upgrade Assistant simply reads the files in the source Oracle home and attempts to deploy them to the destination Oracle home; if deployment fails, it could be because an application is not J2EE compliant. If the OracleAS Upgrade Assistant cannot deploy an application for any reason, it logs the exception in the <destination_MT_OH>/upgrade/log/iasua.log. The exception may not be explicitly described as a J2EE compliance issue, but that may be the reason for the failure. Knowledge of the J2EE and EJB specifications, and the EJB features used in applications will be helpful in preventing and troubleshooting deployment failures (10g (9.0.4) supports a higher version of the EJB specification than Release 2 (9.0.2)).
While the development of J2EE applications is standardized and portable, the XML configuration files are not. Multiple XML files may need to be configured for an OC4J application to be deployed, and the required configuration varies according to the services the application uses. For example, if the application uses a database, the DataSource object in the data-sources.xml file must be configured.
The dcmctl utility provides a J2EE compliance validation command. It takes one input, the name of an EAR file, and then lists non-compliant characteristics of that file. The syntax is:
<destination_MT_OH>/dcm/bin/dcmctl validateEarFile -f <full path and filename for ear file>
You must provide the full path to the EAR file.
If you connect to the Internet using a proxy server, you must configure proxy settings so that the validation routine can access DTDs (for example, on the Sun Microsystems site). To do this, you define an environment variable called ORACLE_DCM_JVM_ARGS, which specifies a hostname and port for the proxy. For example, using tcsh, the command is:
setenv ORACLE_DCM_JVM_ARGS "-DhttpProxy.host=www-proxy.hostname.com -DhttpProxy.port=9999"
where hostname is the host name and 9999 is the port number. The method of defining this environment variable depends on the platform, so refer to system documentation for instructions on defining this variable.
If there is no firewall to connect to an external network, use the -noproxy flag with the command. For example:
<destination_MT_OH>/dcm/bin/dcmctl validateEarFile -f <full path and filename for ear file> -noproxy
Example 3-2 validateEarFile Command and Output for J2EE-Compliant Application
dcmctl validateEarFile -v -f simple.ear
No J2EE XML/DTD validation errors were found
Example 3-3 validateEarFile Command and Output for non-J2EE-Compliant Application
dcmctl validateEarFile -v -f petstore.ear
Warning: J2EE/DTD validation errors were found
ADMN-906001   {0}   Base Exception:   oracle.ias.sysmgmt.deployment.j2ee.exception.J2eeDeploymentException:Cannot get xml   document by parsing /var/tmp/jar50152.tmp: Invalid element 'servlet' in content of 'web-app',   expected elements '[servlet-mapping, session-config, mime-mapping, welcome-file-list,   error-page, taglib, resource-ref, security-constraint, login-config, security-role, env-entry,   ejb-ref]'.
It is a good idea to review all applications for overall J2EE compliance before upgrading them, since there are cases in which an application is deployable, but delivers unpredictable or undesirable server behavior. For example, ensure that each application has a unique context root defined in application.xml.
You can restart the OracleAS Upgrade Assistant after it has partially or completely processed an Oracle home. Follow these steps:
Start the OracleAS Upgrade Assistant GUI version as described in Section 3.5.4, or the command-line version as described in Section 3.5.5.
The OracleAS Upgrade Assistant displays one of the following messages, depending on the outcome of the previous upgrade:
If the previous upgrade was unsuccessful, then the message is:
The OracleAS Upgrade Assistant has already processed this destination Oracle home directory, it didn’t complete successfully.
If the previous upgrade was successful, then the message is:
The OracleAS Upgrade Assistant has already successfully processed this destination Oracle home directory.
Close the dialog and continue with the upgrade.
This section explains how to perform the manual tasks that may be necessary to make the newly upgraded 10g (9.0.4) instance functional after the OracleAS Upgrade Assistant has finished executing.
This section contains the following topics:
Section 3.8.1, "Completing the Oracle HTTP Server Upgrade"
Section 3.8.2, "Completing the Oracle Application Server Containers for J2EE (OC4J) Upgrade"
Section 3.8.3, "Completing the OracleAS Web Cache Upgrade"
Section 3.8.4, "Completing the OracleAS Portal Middle Tier Upgrade"
Section 3.8.5, "Completing the Oracle Application Server Discoverer Viewer Upgrade"
Section 3.8.6, "Completing the Oracle Application Server Reports Services Upgrade"
Section 3.8.7, "Completing the Oracle Application Server Wireless Upgrade"
Section 3.8.8, "Completing the Oracle Application Server Forms Services Upgrade"
This section describes post-upgrade tasks for the Oracle HTTP Server.
The OracleAS Upgrade Assistant upgrades the standard settings for the Oracle HTTP Server. If you have configuration files or documents that are in non-standard locations or referenced in non-standard ways, you must upgrade these manually. These, and other specific cases for manual upgrade, are detailed below.
If you want the Oracle HTTP Server to listen on a port numbered lower than 1024: The HTTP server executable apachectl must have root user privileges to bind to ports numbered lower than 1024. Follow these steps to grant root privileges to the executable:
Log in to the root account.
Navigate to <destination_MT_OH>/Apache/Apache/bin and issue these commands:
chown root .apachectl
chmod 6750 .apachectl
Exit the root account.
If mod_osso was configured: If mod_osso was configured, after upgrade, the osso.conf file continues to use the Release 2 (9.0.2) partner entry in the Single Sign-On server. The 10g (9.0.4) partner entry in the Single Sign-On server is not being used, and will cause a broken link (invalid URL) when the application logs out. You should remove the 10g (9.0.4) partner entry. In addition, if the name of the entry in use is obsolete (in that it refers in some way to the source Oracle home), you may wish to rename it.
If there are configuration files in non-default locations: If httpd.conf, mod_oc4j.conf, mod_osso.conf and moddav.conf files are not in the default location, you must upgrade them manually by applying the customizations in the files in the source Oracle home to the files in the destination Oracle home.
If there are custom files and directories referenced by Oracle HTTP Server configuration files: Because the OracleAS Upgrade Assistant only upgrades the items listed in Section A.1.4.1, "OHS Upgrade Items", there could be files or directories referred to by directives such as Alias, mod_rewrite, and log directives, such as ErrorLog, that are not present after the upgrade. Ensure that all such items are upgraded manually and exist in the locations expected by the directives. If these files or directives are missing after the upgrade, the Oracle HTTP Server may not start. You can identify errors by starting the Oracle HTTP Server individually after the upgrade, and examining the <destination_MT_OH>/Apache/Apache/logs/error_log for errors associated with these items.
If there are Dynamic Monitoring Service (DMS) configuration elements in the httpd.conf and mod_oc4j.conf files: You must relocate these configuration elements into the dms.conf file.
If Oracle Application Server Web Cache is the first listener: If OracleAS Web Cache is configured as the first listener, ensure that the Oracle HTTP Server directives listed in Table 3-5 have the same values as the corresponding OracleAS Web Cache elements. In particular, note that the Oracle HTTP Server Port directive specifies the port number of a front-end load balancer or reverse proxy. Thus, if Oracle Application Server Web Cache is used, then the Oracle HTTP Server Port directive should have the value of the port on which OracleAS Web Cache is listening.
If you have static documents in the default DocumentRoot directory that you want to upgrade: The OracleAS Upgrade Assistant locates static document files and directories for upgrade in the location specified in the DocumentRoot directive. The DocumentRoot directive defines the location for static documents and related directories. The base server has a document root location, and each virtual host has one. The OracleAS Upgrade Assistant copies files under these directories to the destination Oracle home. The default DocumentRoot directory <source_MT_OH>/Apache/Apache/htdocs contains demonstration programs and release notes placed there by the installer, so the OracleAS Upgrade Assistant does not upgrade this directory. You must upgrade this directory manually.
The OracleAS Upgrade Assistant performs many of the Oracle Application Server Containers for J2EE (OC4J) upgrade tasks. However, some components of OC4J may require manual adjustments, or may have characteristics of which you should be aware before using Oracle Application Server 10g (9.0.4).
This section details upgrade considerations for some sub-components of OC4J. If you use Oracle JMS, Oracle JDBC, the XML Parser for JAXP/XDK, or Oracle JSP pages, some or all of the topics in this section may be useful to you.
The OracleAS Upgrade Assistant does not upgrade the JAZN settings (the orion-application.xml file). Therefore, if you upgraded OC4J applications that use the JAZN LDAP User Manager for security, to complete the upgrade, you must perform the following steps:
Using the Oracle Enterprise Manager Application Server Control, in the General Properties section of the OC4J application, under User Manager, select the JAZN LDAP User Manager.
In the Security Settings section of the OC4J application, under Security Roles, map Users/Groups to the same role defined in the source Oracle home.
In Oracle Application Server 10g (9.0.4), the jazn.jar file has been split into two JAR files: jazn.jar and jazncore.jar. For this reason, after upgrading OC4J applications that use JAZN, both JAR file names must have library path entries in the application.xml file.
Ensure that the application.xml file contains both of the entries below:
<library path="904 J2EE HOME/jazn.jar"/>
<library path="904 J2EE HOME/jazncore.jar"/>
where
<904 J2EE HOME> = <destination_MT_OH>/j2ee/home
Customizations that were made to OC4J instances in the opmn.xml file must be upgraded manually. This includes the instances created by the installer (home, OC4J_WIRELESS, OC4J_DEMOS, OC4J_PORTAL OC4J_BI_FORMS). The OracleAS Upgrade Assistant upgrades customizations to OC4J instances that were created by the user.
If you have customized entries in the application.xml file, such as library paths, Java options, and OC4J options, you must upgrade them manually.
The jms.xml file is not automatically upgraded from earlier versions. All queues, topics, and connection factories defined in the jms.xml file in the source Oracle home must be added to the jms.xml file in the destination Oracle home.
In Oracle Application Server 10g (9.0.4), OC4J by default complies with the J2EE 1.3 specification. In some cases, this results in behavior that differs from that seen with previous OC4J implementations. To allow for backward compatibility, OC4J supports a CTS compliance flag that you can set to false to revert to previous OC4J behavior in the following components:
Oracle JMS
Oracle JDBC
Oracle XML parser for JAXP/XDK
The compliance behavior of OC4J is determined by the flag oracle.cts.useCtsFlags, with a default value of true. If any of the upgrade issues are critical in a particular application, you can disable CTS compliance and revert to old behavior for an OC4J instance by setting the flag value to false in an OC4J properties file, and providing the location of the properties file to OC4J.
For example, the file <destination_MT_OH>/j2ee/home/config/oc4j.properties might contain the flag:
oracle.cts.useCtsFlags=false
Supply the name and location of a properties file to OC4J through an <oc4j-option> element in the <destination_MT_OH>/opmn/conf/opmn.xml file, as in the following example:
Example 3-4 oc4j-option Element in opmn.xml File
<oc4j>
...
 <oc4j-option value="-p <destination_MT_OH>/j2ee/home/config/oc4j.properties"/>
...
</oc4j>
This is equivalent to starting OC4J as follows in standalone mode (where % is a system prompt):
Example 3-5 Starting OC4J in Standalone Mode
% java -jar oc4j.jar -p <destination_MT_OH>/j2ee/home/config/oc4j.properties
In the Oracle Application Server 10g (9.0.4) implementation of Oracle JMS (OJMS), which complies with J2EE 1.3, some behavior differs from OJMS behavior in Oracle9iAS Release 1 (1.0.2.2). (There are no such upgrade considerations between Oracle9iAS releases 9.0.2 and 9.0.3.) The differences are as follows:
JMSExpiration—In the OJMS 10g (9.0.4) J2EE 1.3-compliant implementation, the JMSExpiration header value in a dequeued message is the sum of the JMS timestamp when the message was enqueued, and the time-to-live. This value is expressed in milliseconds from midnight, January 1, 1970 to the current Greenwich Mean Time. If a message never expires, the value is 0.
In the OJMS 1.0.2.2 implementation, the JMSExpiration header value in a dequeued message is the duration until expiration of the message, in milliseconds. If a message never expires, the value is -1.
JMSPriority—In the OJMS Release 2 (9.0.4) 1.3-compliant implementation, 9 is the highest priority, 0 is the lowest priority, and 4 is the default priority.
In the OJMS 1.0.2.2 implementation, java.lang.Integer.MIN_VALUE is the highest priority, Integer.MAX_VALUE is the lowest priority, and 1 is the default priority.
Durable subscribers—In the OJMS 10g (9.0.4) J2EE 1.3-compliant implementation, durable Topic Subscribers with the same name are not allowed under any circumstances.
In the OJMS 1.0.2.2 implementation, durable Topic Subscribers with the same name are allowed if they are subscribed to different topics.
Strongly typed JMS selectors—In accordance with the JMS 1.02b specification and J2EE 1.3 compliance requirements, the OJMS 10g (9.0.4) implementation uses only a certain subset of SQL92 syntax for selector expression syntax, with the following mandated restrictions:
Selector expressions are strongly typed, meaning operators and operands in arithmetic comparisons must be of the same type. Automatic type conversions for the purpose of comparison, such as converting the string "1" to the integer 1, are prohibited.
String and boolean comparisons are restricted to "=", "<", and ">". Two strings are equal only if they contain the exact same sequence of characters.
The OJMS 1.0.2.2 implementation is not subject to these restrictions or to the limited subset of SQL92 syntax for selector expression syntax.
In the Oracle Application Server 10g (9.0.4) implementation of Oracle JDBC, which complies with J2EE 1.3, some behavior differs from JDBC behavior in Oracle9iAS Release 2 (9.0.2) and prior. The differences are as follows:
Java types for NUMBER columns—In 10g (9.0.4), the getObject() method of a result set (java.sql.ResultSet instance) returns a java.lang.Double value for a NUMBER column with precision, or a java.math.BigDecimal value for a NUMBER column without precision.
In Release 2 (9.0.2) and prior releases, getObject() returns a BigDecimal value for any NUMBER column.
Metadata for NUMBER columns—In 10g (9.0.4), the getColumnTypeName() method of a result set metadata object (java.sql.ResultSetMetaData instance) returns "FLOAT" for a NUMBER column with precision, or "NUMBER" for a NUMBER column without precision. The getColumnType() method returns java.sql.Types.FLOAT for a NUMBER column with precision, or Types.NUMBER for a NUMBER column without precision.
In Release 2 (9.0.2) and prior releases, getColumnTypeName() returns "NUMBER" for any NUMBER column, and getColumnType() returns Types.NUMBER for any NUMBER column.
Java types for DATE and TIMESTAMP columns—In 10g (9.0.4), the getObject() method of a result set returns a java.sql.Date value for a DATE column, and a java.sql.Timestamp value for a TIMESTAMP column.
In Release 2 (9.0.2) and prior releases, getObject() returns a java.sql.Timestamp value for a DATE column. (TIMESTAMP columns were not supported.)
Exceptions for inappropriate SQL statements—In 10g (9.0.4), if an executeQuery() call in a statement object contains anything but a SELECT statement (such as if it instead contains an INSERT or UPDATE statement), the JDBC driver properly throws an exception. Similarly, if an executeUpdate() call contains a SELECT statement, the driver properly throws an exception. (An UPDATE, INSERT, or DELETE statement is expected.)
In Release 2 (9.0.2) and prior releases, these situations did not result in exceptions.
In the Oracle Application Server 10g (9.0.4) implementation of the XML parser for JAXP/XDK, which complies with J2EE 1.3, some behavior differs from XML parser behavior in Oracle9iAS Release 2 (9.0.2) and prior. The differences are as follows:
getNamespaceURI() null return values—In 10g (9.0.4), the getNamespaceURI() method returns 'null' if the namespace is not defined for an element or attribute.
In Release 2 (9.0.2) and prior releases, the getNamespaceURI() method returns '""' in these circumstances.
getLocalName() null return values—In 10g (9.0.4), the getLocalName() method returns 'null' if the element or attribute was created using a DOM level 1 API call to createElement() or createAttribute().
In Release 2 (9.0.2) and prior releases, the getLocalName() method returns '"Transfer interrupted!"' in these circumstances.
getPrefix() null return values—In 10g (9.0.4), the getPrefix() method returns 'null' if the element or attribute was created using a DOM level 1 API call to createElement() or createAttribute().
In Release 2 (9.0.2) and prior releases, the getPrefix() method returns '""' in these circumstances.
|
Note: ThegetNamespaceURI(), getLocalName(), and getPrefix() methods exist with the above changes in the XMLElement and XMLAttr classes of the oracle.xml.parser.v2 package.
|
SAX exceptions—In 10g (9.0.4), registered error handlers throw a SAXException or SAXParseException in error conditions.
In Release 2 (9.0.2) and prior releases, error handlers throw an XMLParseException in error conditions.
I/O exceptions—In 10g (9.0.4), an IOException is thrown as is in I/O error conditions.
In Release 2 (9.0.2) and prior releases, an IOException is wrapped in an XMLParseException.
Beginning with Oracle9iAS Release 2 (9.0.3), Oracle Application Server Containers for J2EE complies with the J2EE 1.3 specification and implements the Enterprise Java Beans (EJB) 2.0 specification in entirety. Therefore, if you are upgrading from Release 2 (9.0.2) to 10g (9.0.4), applications using EJB features in the areas of container-managed persistence and container-managed relationships will require modification.
|
See Also: Oracle Application Server Containers for J2EE Enterprise JavaBeans Developer's Guide, Appendix C. |
This section describes JSP settings that are affected by the upgrade.
Beginning with Oracle9iAS Release 2 (9.0.3), the OC4J JSP container by default imports the packages listed below into any JSP page, in accordance with the JSP specification. No page directive import settings are required.
javax.servlet.*
javax.servlet.http.*
javax.servlet.jsp.*
In previous releases, the following packages were also imported by default:
java.io.*
java.util.*
java.lang.reflect.*
java.beans.*
For backward compatibility, you can use the JSP extra_imports configuration parameter as a workaround. Alternatively, you can add desired imports through page directives or global includes. See the Oracle Application Server Containers for J2EE Support for JavaServer Pages Developer's Guide for information about these topics.
When upgrading to Oracle Application Server 10g (9.0.4) and using JSP pages, use appropriate settings for the following important JSP configuration parameters.
check_page_scope
forgive_dup_dir_attr
These are set as initialization parameters for the JSP front-end servlet, either in the global-web-application.xml file or in the application orion-web.xml file. Here is an example:
Example 3-6 JSP Configuration Parameters for Upgrading to 10g (9.0.4)
<servlet>
   <servlet-name>jsp</servlet-name>
   <servlet-class>oracle.jsp.runtimev2.JspServlet</servlet-class>
   <init-param>
      <param-name>check_page_scope</param-name>
      <param-value>true</param-value>
   </init-param>
   ...
</servlet>
See the Oracle Application Server Containers for J2EE Support for JavaServer Pages Developer's Guide for more information about JSP configuration parameters.
check_page_scope (boolean; default: false): This parameter was introduced in Oracle9iAS Release 2 (9.0.3). For OC4J environments, set it to true to enable Oracle-specific page-scope checking by the JspScopeListener utility.
This parameter is not relevant for non-OC4J environments. For JServ, Oracle-specific page-scope checking is always enabled. For other environments, the Oracle-specific implementation is not used and you must use the checkPageScope custom tag for JspScopeListener page-scope functionality. See the Oracle Application Server Containers for J2EE JSP Tag Libraries and Utilities Reference for information about JspScopeListener.
forgive_dup_dir_attr (boolean; default: false): This parameter was introduced in Oracle9iAS Release 2 (9.0.3). Set it to true to avoid translation errors in a JSP 1.2 environment such as OC4J if you have duplicate settings for the same directive attribute within a single JSP translation unit (a JSP page plus anything it includes through include directives).
The JSP 1.2 specification directs that a JSP container must verify that directive attributes, with the exception of the page directive import attribute, are not set more than once each within a single JSP translation unit.
The JSP 1.1 specification did not specify such a limitation. OC4J offers the forgive_dup_dir_attr parameter for backward compatibility.
Among the migration considerations in moving to a Sun Microsystems JDK 1.4 environment, which is the environment that is shipped with Oracle Application Server 10g (9.0.4), there is one of particular importance to servlet and JSP developers.
As stated by Sun Microsystems, "The compiler now rejects import statements that import a type from the unnamed namespace." (This was to address security concerns and ambiguities with previous JDK versions.) Essentially, this means that you cannot invoke a class (a method of a class) that is not within a package. Any attempt to do so will result in a fatal error at compilation time.
This especially affects JSP developers who invoke JavaBeans from their JSP pages, as such beans are often outside of any package (although the JSP 2.0 specification now requires beans to be within packages, in order to satisfy the new compiler requirements). Where JavaBeans outside of packages are invoked, JSP applications that were built and executed in an OC4J 9.0.3 / JDK 1.3.1 or prior environment will no longer work in an OC4J 9.0.4 / JDK 1.4 environment.
Until you update your application so that all JavaBeans and other invoked classes are within packages, you have the alternative of reverting back to a JDK 1.3.1 environment to avoid this issue.
For more information about the "classes not in packages" issue and other JDK 1.4 compatibility issues, refer to the following Web site:
http://java.sun.com/j2se/1.4/compatibility.html
In particular, click the link "Incompatibilities Between Java 2 Platform, Standard Edition, v1.4.0 and v1.3".
When upgrading to Oracle Application Server 10g (9.0.4) and using servlets, consider the following changes in servlet APIs and behavior:
Changes relating to getRequestURI()
Changes regarding filtering of servlets that are forward or include targets
In previous Oracle9iAS releases, whenever Oracle HTTP Server received a request, it would unencode the URI before passing it to OC4J. Therefore, servlets making computations based on the response of getRequestURI() (a method on the request object) were implicitly getting a value that had been unencoded one time. As of the OC4J 9.0.4 implementation, Oracle HTTP Server will send OC4J an unaltered version of the URI, which in turn is used by OC4J as the return value of getRequestURI().
If the mod_rewrite module is being used in conjunction with mod_oc4j in communications between Oracle HTTP Server and OC4J, the rewritten URI that is sent to mod_oc4j is the same as what is sent to OC4J, and the return value of getRequestURI() will have had mod_rewrite rules applied to it.
The mod_rewrite and mod_oc4j modules are discussed in the Oracle HTTP Server Administrator's Guide. Further details about mod_rewrite are available in the Apache Server documentation.
In previous Oracle Application Server releases, if a filtered servlet forwards to or includes another servlet, the target servlet, by default, is also filtered. In Oracle Application Server 10g (9.0.4), this is no longer the default behavior. Having the target servlet not filtered by default matches the intention of the servlet specification.
This behavior is configurable: in the OC4J 9.0.4 implementation, it is according to the oracle.j2ee.filter.on.dispatch environment flag (false by default); in future implementations, it will be according to web.xml configuration as set forth in the servlet 2.4 specification.
This section outlines tasks you may need to perform to complete the OracleAS Web Cache upgrade after the OracleAS Upgrade Assistant has finished processing. These tasks include enabling the use of privileged ports, and upgrading a cluster.
OracleAS Web Cache will not start after upgrade if the port settings of 80 and 443 were upgraded from the Oracle9iAS Release 2 (9.0.2) Web Cache to the Oracle Application Server 10g (9.0.4) Web Cache.
Because port numbers under 1024 are reserved for privileged processes in UNIX, the webcached executable in 10g (9.0.4) must run as root in order to start the cache server process and bind to these ports.
A script is provided that enables the webcached executable to run as the root user:
<destination_MT_OH>/webcache/bin/webcache_setuser.sh
Log in to the system as the root user and run the script.
|
See Also: Oracle Application Server Web Cache Administrator's Guide |
If you have a OracleAS Web Cache cluster, you can upgrade one cache cluster member at a time. The caches will continue to function, but because the other cluster members have a different version of the configuration, the caches will not forward requests to cache cluster members operating with a different version.
For example, if you upgrade Cache_A to the current version, but have not yet upgraded Cache_B and Cache_C, Cache_A will not forward requests to the cache cluster members Cache_B and Cache_C.
In this situation, the Operations page in Web Cache Manager indicates that the Operation Needed is Incompatible software version.
|
Note: When the cache cluster members are not running the same version of OracleAS Web Cache, you can still invalidate documents and you can propagate the invalidation to other cluster members, but the invalidation request must originate with the cache that is operating with the earlier version, such as 9.0.2 or 9.0.3, of OracleAS Web Cache. |
After you upgrade the cache cluster members, you must perform the following additional steps to synchronize the configuration for the members of the cluster:
If the caches have not been started, for each upgraded cache, start OracleAS Web Cache and OracleAS Web Cache Manager. On the command line, enter:
opmnctl startproc ias-component=WebCache
This command starts the OracleAS Web Cache cache server process and admin server process.
In a browser, enter the URL for the OracleAS Web Cache Manager for one of the upgraded caches, and, when prompted, enter the username and password for the ias_admin or administrator user.
In the navigator frame, select Administration > Operations.
The Operations page appears.
In the Operations page, click Retrieve.
Web Cache retrieves the cache-specific configuration information from the remote cache cluster members. Then, Web Cache Manager indicates that the Operation Needed is Propagate Configuration.
To propagate the configuration to all cache cluster members, select All caches and an Interval of Immediate. Then, click Propagate.
Restart the caches by selecting All caches and an Interval. Then, click Restart. (Note that you can perform this operation as you upgrade each cache, or you can perform this operation after all of the cache cluster members have been upgraded.)
A Release 2 (9.0.2.x) cache cannot accept invalidation messages from a 10g (9.0.4) cache. In a configuration that uses a OracleAS Web Cache cluster with a mixture of Release 2 (9.0.2.x) and 10g (9.0.4) cluster members, you must configure the Load Balancer to send invalidation messages only to the Release 2 (9.0.2.x) members.
When upgrading a cache cluster from Release 2 (9.0.2.x) to 10g (9.0.4), remove cluster members one at a time from the invalidation pool for the Load Balancer prior and upgrade them. Once all the cluster members are upgraded, add them back to the invalidation pool. As an example, assume a configuration with a Load Balancer in front of a cache cluster that is comprised of four members, webche1-host, webche2-host, webche3-host, and webche4-host, all running Release 2 (9.0.2.x). To upgrade this cache cluster:
In the Load Balancer configuration, remove webche1-host from the pool that is responsible for invalidation.
Upgrade webche1-host from Release 2 (9.0.2.x) to 10g (9.0.4).
In the Load Balancer configuration, remove webche2-host from the pool that is responsible for invalidation.
Upgrade webche2-host from Release 2 (9.0.2.x) to 10g (9.0.4).
In the Load Balancer configuration, remove webche3-host from the pool that is responsible for invalidation.
Upgrade webche3-host from Release 2 (9.0.2.x) to 10g (9.0.4).
Upgrade webche4-host from Release 2 (9.0.2.x) to 10g (9.0.4). As this is the last cache member in the Load Balancer configuration, it is not necessary to remove it from the invalidation pool.
In the Load Balancer configuration, add webche1-host, webche2-host, and webche3-host back into the pool that is responsible for invalidation.
This section explains how to perform the manual procedures required to complete the Portal upgrade after the OracleAS Upgrade Assistant has finished processing. It discusses the following topics:
Section 3.8.4.1, "Enabling OracleAS Portal for the Secure Sockets Layer (SSL) Protocol"
Section 3.8.4.2, "Verifying Database Access Descriptor (DAD) Locations After Upgrade"
Section 3.8.4.3, "Upgrading the Parallel Page Engine"
Section 3.8.4.4, "Upgrading Portal Development Kit Services for Java (JPDK) Web Providers"
Section 3.8.4.5, "Completing the mod_plsql Upgrade"
Enabling OracleAS Portal for SSL is a manual process that involves setting a property in a configuration file, and running a script. Follow these steps to SSL-enable Portal applications:
Edit the <destination_MT_OH>/portal/conf/iasconfig.xml file.
Modify the SSL property as follows:
SSLEnabled="true"
Change directories to <destination_MT_OH>/portal/conf.
Execute the OracleAS Portal configuration by issuing this command:
ptlconfig -dad <DAD name> -site
where <DAD name> is the name of the Database Access Descriptor (DAD) that points to the Portal repository in use by the Release 2 (9.0.2) Oracle home. Typically, the name is "portal".
The script uses the iasconfig.xml file to update the Oracle Application Server Web Cache, Oracle Application Server Single Sign-On, and Oracle Internet Directory settings in OracleAS Portal.
The Release 2 (9.0.2) instance can have a DAD with the same location as a DAD in the destination location. If this is the case, the OracleAS Upgrade Assistant renames the DAD in the destination instance, since it is illegal for two DADs in the same installation to have the same location. For example, if there is a DAD in Release 2 (9.0.2) with the location:
<Location /pls/portal>
and the same name is found in the 10g (9.0.4) installation, the location in 10g (9.0.4) is changed to:
After upgrade, ensure that all DADs are connecting to the intended resources.
If the Portal Parallel Page Engine in the source Oracle home has customized initialization arguments, you must manually upgrade these after the OracleAS Upgrade Assistant has finished processing.
The Parallel Page Engine initialization arguments are defined in the <source_MT_OH>/j2ee/OC4J_Portal/applications/portal/portal/WEB-INF/web.xml file.
Locate all customized arguments (arguments added to the file and default arguments whose value has been changed) in the source Oracle home web.xml file.
Copy the customized arguments from <source_MT_OH>/j2ee/OC4J_Portal/applications/portal/portal/WEB-INF/web.xml to <destination_MT_OH>/j2ee/OC4J_Portal/applications/portal/portal/WEB-INF/web.xml.
The cacheDir parameter in the web.xml file may need to be reset manually after the upgrade, because its default behavior is different in 10g (9.0.4). In 10g (9.0.4), the cacheDir parameter value is an absolute path. In Release 2 (9.0.2), the path value was the relative path to the <source_MT_OH>/Apache/modplsql/cache directory.
If cacheDir was set to the default location <source_MT_OH>/Apache/modplsql/cache, then you can remove the cacheDir parameter entirely, since in 10g (9.0.4), it will default to this location if it is not configured.
If cacheDir was set to a non-default location, then you must manually set it to the absolute path for the non-default location in the destination Oracle home.
If cacheDir was set to the default location but expressed as a relative path, then you must either remove the parameter so that the default (<destination_MT_OH>/Apache/modplsql/cache) will be in effect, or provide the absolute path instead of the relative path.
The steps in this section are required if the source Oracle home has any of the following characteristics:
Extra user JPDK web provider applications are deployed in the OC4J_Portal instance
Provider Groups, Providers, and URL Portlets have been built using the OracleAS Portal user interface
Configuration changes, customizations, or extensions have been made to web provider applications in the OC4J_Portal instance.
The upgrade process for Portal Development Kit Services for Java (JPDK) Web Providers consists of these steps.
Deploy user JPDK web provider applications in the destination Oracle home.
|
Note: This step applies only to user applications. Applications such asjpdk and portalTools will already have been deployed in the destination Oracle home.
|
Identify the customized settings in the source Oracle home.
Apply the customizations to the destination Oracle home.
Update each OracleAS Portal instance that uses the provider with the new URL of the provider. After starting the instance as described in Section 3.12, perform the steps in Section 3.12.3, "Updating the OracleAS Portal Provider Information".
Refresh the Event/Parameter Passing Samples Provider. After starting the instance as described in Section 3.12, perform the steps in Section 3.12.4, "Refresh the Event/Parameter Passing Samples Provider".
The following sections describe the areas in which customizations are made, providing instructions on how to upgrade each area and register the upgraded web provider with its respective portal.
Extra Providers, Portlets and Provider Groups may have been added to the "jpdk" or "portalTools/ providerBuilder" web applications, manually or through the Oracle AS Portal user interface. Follow the steps below to upgrade these providers and provider groups:
Locate all extra deployment properties files in the source Oracle home that are not present in the destination Oracle home, and copy them to the destination Oracle home. Compare the following directories to locate the properties files:
<source_MT_OH>/j2ee/OC4J_Portal/applications/jpdk/jpdk/WEB-INF/deployment/
with
<destination_MT_OH>/j2ee/OC4J_Portal/applications/jpdk/jpdk/WEB-INF/deployment/
and
<source_MT_OH>/j2ee/OC4J_Portal/applications/portalTools/providerBuilder/WEB-INF/deployment/
with
<destination_MT_OH>/j2ee/OC4J_Portal/applications/portalTools/providerBuilder/WEB-INF/deployment/
Open each deployment properties file copied in the above step and locate the line that defines the definition property. The definition property specifies the location of an XML provider definition file, relative to the parent WEB-INF directory. Copy this file to the same relative location in the destination Oracle home.
For example, if:
<source_MT_OH>/j2ee/OC4J_Portal/applications/jpdk/jpdk/WEB-INF/deployment/myservice.properties
specified the following:
definition=providers/mydir/provider.xml
then you would copy
<source_MT_OH>/j2ee/OC4J_Portal/applications/jpdk/jpdk/WEB-INF/providers/mydir/provider.xml
to
<destination_MT_OH>/j2ee/OC4J_Portal/applications/jpdk/jpdk/WEB-INF/providers/mydir/provider.xml
Copy the provider.xml file for the Portlet Building Tools provider (to which URL portlets may have been added through the Portal UI) from
<source_MT_OH>/j2ee/OC4J_Portal/applications/jpdk/jpdk/WEB-INF/PORTLETBLDGTOOLS/provider.xml
to
<destination_MT_OH>/j2ee/OC4J_Portal/applications/jpdk/jpdk/WEB-INF/PORTLETBLDGTOOLS/provider.xml
Open the Provider Groups registry in <source_MT_OH>/portal/pdkjava/providerGroups/iasProviders.xml.
Append the entries for all user-created providerGroups (generally, those whose name does not have an "oracle" prefix) to <destination_MT_OH>/portal/pdkjava/providerGroups/iasProviders.xml.
For example, the entry for a user-created provider group might resemble the following:
<providerGroup name="my.providergroup" baseLanguage="en">
  <displayName language="en" translation="User Provider Group"/>
  <provider name="my.providers " baseLanguage="en">
    <displayName language="en" translation="User Provider"/>
    <timeout>60</timeout>
    <timeoutMessage language="en" translation="User Provider Timed Out"/>
    <loginFrequency>Once Per Session</loginFrequency>
    <httpURL>http://my.machine.com:7777/jpdk/providers</httpURL>
    <serviceId>urn:myservice</serviceId>
    <httpAppType>PORTAL</httpAppType>
    <cookieDomain>my.machine.com:7777</cookieDomain>
  </provider>
</providerGroup>
If any deployment properties were added or changed from default values, you must apply them manually to the destination Oracle home. The location of the properties varies among web providers, and is indicated by the service identifier of the web provider. The service identifier identifies a provider within an application. The deployment property files are named according to the following convention:
<source_MT_OH>/j2ee/OC4J_Portal/applications/<application name>/<web application name>/ WEB-INF/deployment/serviceidentifier.properties
For example, the deployment properties for the JPDK sample web provider, whose identifier is sample, reside in:
<source_MT_OH>/j2ee/OC4J_Portal/applications/jpdk/jpdk WEB-INF/deployment/sample.properties
Locate all customized properties (properties added to the file and default properties whose value has been changed) in the source Oracle home.
Copy the customized properties from the source Oracle home to the destination Oracle home.
If any JNDI environment variables in the source Oracle home were added or changed from default values, you must apply them manually to the destination Oracle home. The location of the variables varies among web providers. The variables for the sample JPDK web provider are in:
<source_MT_OH>/j2ee/OC4J_Portal/application-deployments/jpdk/jpdk/orion-web.xml
Locate all customized variables (variables added to the file and default properties whose value has been changed) in the source Oracle home.
Copy the customized variables from the source Oracle home to the destination Oracle home.
A file-based personalization manager my be used in the source Oracle home to personalize portlets. Upgrades to the personalization data will only function if the source and destination Oracle homes use the same Portal schema.
Copy the personalization data from the source Oracle home to the destination Oracle home.
The personalization data resides in a directory structure whose top level is in the same directory as the web provider’s definition file, provider.xml. Ensure that all subdirectories at this location are copied to the destination Oracle home. The sample JPDK web provider is in:
<source_MT_OH>/j2ee/OC4J_Portal/applications/jpdk/jpdk/ WEB-INF/providers/sample
|
Note: You can change the location of personalization data by declaring a preference store<rootDirectory> tag. The location of the personalization data is specified in the provider.xml file.
|
A database-based personalization manager may be used in the source Oracle home to personalize portlets. You can upgrade the personalization data only if the same Portal schema will be used after the upgrade. Personalization data cannot be copied from one Portal schema to another.
Database-based personalization managers use a data source to connect to the database schema that contains the personalization data. The data source is identified in the file:
<source_MT_OH>/j2ee/OC4J_Portal/config/data-sources.xml
Copy the personalization data from the source Oracle home to the destination Oracle home.
The personalization data resides in:
<source_MT_OH>/j2ee/OC4J_Portal/config/data-sources.xml
If the oracle.http.configfile property is present, you must upgrade it, and then upgrade the cache.xml file (the location of which is specified by the oracle.http.configfile property). Follow these steps to upgrade the property and the file.
Upgrade the oracle.http.configfile property.
The property resides in:
<source_MT_OH>/j2ee/properties/oc4j_portal.properties
or
<source_MT_OH>/opmn/conf/opmn.xml
If the oc4j_portal.properties file contains the oracle.http.configfile property, then copy the file from the source Oracle home to the destination Oracle home.
If the opmn.xml file contains the oracle.http.configfile property, then copy the value from the opmn.xml file in the source Oracle home to the opmn.xml file in the destination Oracle home.
|
Note: The location of thecache.xml file, which you will upgrade in the next step, is specified by the oracle.http.configfile property.
|
Copy the cache.xml file from the source Oracle home to the destination Oracle home.
If any security settings were added to, or changed from, default values, then you must apply them manually to the destination Oracle home. The provider UI security file is located at:
<source_MT_OH>/j2ee/OC4J_Portal/applications/jpdk/jpdk/ WEB-INF/deployment_providerui/provideruiacls.xml
and
<source_MT_OH>/j2ee/OC4J_Portal/applications/portalTools/providerBuilder/WEB-INF/deployment_providerui/provideruiacls.xml Follow these steps to upgrade the provideruiacls.xml file:
Locate all changed security settings (settings added to the file, and default security settings whose value has been changed) in the source Oracle home.
Copy the changed security settings from the file in the source Oracle home to the file in the destination Oracle home.
If the mod_plsql configuration has customized settings (properties whose value has been changed from the default) in <source_MT_OH>/Apache/modplsql/conf/plsql.conf, then you must manually upgrade these after the OracleAS Upgrade Assistant has finished processing.
Locate all customized property values in <source_MT_OH>/Apache/modplsql/conf/plsql.conf.
Copy the customized values to <destination_MT_OH>/Apache/modplsql/conf/plsql.conf.
|
Note: The default values for all configuration parameters inplsql.conf are listed in Chapter 8 of the Oracle HTTP Server Administrator's Guide.
|
If an Oracle Application Server middle tier uses a Release 2 (9.0.2) Oracle9iAS Portal Repository, you must execute a script to enable the monitoring component in the Application Server Control to access the OracleAS Portal version, and the OracleAS Portal Metadata Repository database version and start time. If the monitoring component cannot get this information, missing package errors (WWC_MONITORING) will occur (these are recorded in the Oracle HTTP Server logs).
Follow the steps below to enable monitoring:
Connect to SYS in SQL*Plus.
Execute the script:
<destination_MT_OH>/portal/admin/plsql/wwc/cfgvr902.sql <Oracle9iAS portal schema name>
If the script was successful, the following text appears:
If there were no errors, run the following grant in SQL*Plus when connected to the Portal schema:
grant execute on WWC_MONITORING to PUBLIC
Connect to the OracleAS Portal schema in SQL*Plus. If needed, use the Oracle Directory Manager to obtain the randomized Oracle9iAS Portal schema password. Navigate to:
Entry Management
cn=OracleContext
cn=Products
cn=IAS
cn=Infrastructure Databases
OrclReferenceName=Infrastructure Database (for example: iasdb.server.domain.com)
OrclResourceName=PORTAL
Click on the above entry.
Look for the orclpasswordattribute value on the right panel. This is the schema password.
Execute the grant with this command:
grant execute on WWC_MONITORING to PUBLIC;
Perform the steps in this section if:
The Portal Tools application from the Portal Development Kit (PDK) November 2002 (9.0.2.4.0) or PDK July 2003 (9.0.2.6.2) is installed on the Release 2 (9.0.2) middle tier, and
You now want to migrate the Portal Tools application to the 10g (9.0.4) middle tier.
Since the OracleAS Portal Middle Tier Upgrade process deploys a new Portal Tools application, you must restore the old providers settings into the new providers. This section explains how to restore them. These steps are necessary only for those providers which you were using and had configured before the upgrade process. If the PDK version is not specified, you need to perform the step for all versions. The OracleAS Portal Tools application contains:
Follow these steps to restore the Web Clipping Provider settings:
If Web Clipping was configured to use a proxy: copy the <proxyInfo> tag information from <source_MT_OH>/j2ee/OC4J_Portal/applications/portalTools/webClipping/WEB-INF/providers/webClipping/provider.xml to the destination Oracle home.
The <proxyInfo> tag is a child of the <provider> tag and appears in the file following the <preferenceStore>...</preferenceStore> tag. The <proxyInfo> tag is shown in the example below.
<proxyInfo class="oracle.portal.provider.v2.ProxyInformation">
   <httpProxyHost>www-proxy.mycompany.com</httpProxyHost>
   <httpProxyPort>80</httpProxyPort>
</proxyInfo>
Copy the <repositoryInfo> tag information from <source_MT_OH>/j2ee/OC4J_Portal/applications/portalTools/webClipping/WEB-INF/providers/webClipping/provider.xml to the destination Oracle home.
The <repositoryInfo> tag is a child of the <provider> tag and appears in the file following the <preferenceStore>...</preferenceStore> tag. The <repositoryInfo> tag is shown in the example below.
<repositoryInfo class="oracle.portal.wcs.provider.info.DatabaseInformation">
   <useRAA>false</useRAA>
   <databaseHost>mycompany.dbhost.com</databaseHost>
   <databasePort>1521</databasePort>
   <databaseSid>iasdb</databaseSid>
   <databaseUsername>webclip_user</databaseUsername>
   <databasePassword>AX3tR</databasePassword>
   <useASO>false</useASO>
</repositoryInfo>
For PDK 9.0.2.4.0 only: After starting the instance as described in Section 3.12, perform the steps in Section 3.12.1, "Accessing the Web Clipping Test Provider Page (PDK 9.0.2.4.0 Only)".
Follow these steps to restore the OmniPortlet Provider settings:
For PDK 9.0.2.4.0 only: Copy the <useHashing> tag and value within the <preferenceStore> tag information from <source_MT_OH>/j2ee/OC4J_Portal/applications/portalTools/omniPortlet/WEB-INF/providers/omniPortlet/provider.xml to the destination Oracle home. If there is no <useHashing> tag in the source Oracle home, then omit it in the destination Oracle home as well.
The <preferenceStore> tag is a child of the <provider> tag and appears in the file following the <session>...</session> tag. The <preferenceStore> tag is shown in the example below.
<preferenceStore class="oracle.portal.provider.v2.preference.FilePreferenceStore">
   <name>omniPortletprefStore</name>
</preferenceStore>
If OmniPortlet was configured to use a proxy: Copy the <proxyInfo> tag information from <source_MT_OH>/j2ee/OC4J_Portal/applications/portalTools/omniPortlet/WEB-INF/providers/omniPortlet/provider.xml to the destination Oracle home.
The <proxyInfo> tag is a child of the <provider> tag and appears in the file following the <preferenceStore>...</preferenceStore> tag. The <proxyInfo> tag is shown in the example below.
<proxyInfo class="oracle.portal.provider.v2.ProxyInformation">
   <httpProxyHost>www-proxy.mycompany.com</httpProxyHost>
   <httpProxyPort>80</httpProxyPort>
</proxyInfo>
Copy all directories under <source_MT_OH>/j2ee/OC4J_Portal/applications/portalTools/omniPortlet/WEB-INF/providers/omniPortlet/ to the destination Oracle home. This restores the customizations to the portlets you are using in OracleAS Portal from this provider.
If you had manually added any portlet definitions to OmniPortlet Provider’s provider.xml file before upgrading, copy them to the destination Oracle home.
Configure the Secured data Repository. Ensure that you have copied the repositoryInfo tag information from the source Web Clipping provider.xml file to the destination Web Clipping provider.xml file.
For PDK 9.0.2.4.0 only: After starting the instance as described in Section 3.12, perform the steps in Section 3.12.2, "Accessing the OmniPortlet Test Provider Page (PDK 9.0.2.4.0 Only)".
For PDK 9.0.2.6.2 only, if the OmniPortlet Secured Data Repository was configured: Copy the <vaultId> tag information from <source_MT_OH>/j2ee/OC4J_Portal/applications/portalTools/omniPortlet/WEB-INF/providers/omniPortlet/provider.xml to the destination Oracle home.
The <vaultId> tag is a child of the <provider> tag and appears in the file following the <provider> tag. The <vaultId> tag resembles the following: <vaultId>2</vaultId>
The OracleAS Upgrade Assistant performs most of the Oracle Application Server Discoverer upgrade. The only exceptions are the style sheets used to customize the appearance of Discoverer Viewer, and entries in the tnsnames.ora file. This section explains how to perform these tasks to complete the Oracle Application Server Discoverer upgrade.
If you are upgrading from Oracle9iAS Discoverer version 9.0.2.52 or earlier, you must upgrade the End User Layer before you can use Oracle Application Server Discoverer 9.0.4 in 10g (9.0.4). See Section 4.6.1, "Upgrading the Oracle Application Server Discoverer End User Layer Schema", for instructions.
If you have changed style sheets in the Release 2 (9.0.2) installation, and you want these changes to be in effect in the 10g (9.0.4) installation, then you must re-apply the changes manually to the 10g (9.0.4) installation. Style sheet files that may require manual upgrade are listed below.
The following files in <source_MT_OH>/j2ee/OC4J_BI_Forms/ applications/discoverer/web/common/xsl may require manual upgrade:
about.xsl
add_connection_eul.xsl
add_connection_main.xsl
add_connection_responsibility.xsl
blaf.xsl
change_password.xsl
delete_connection.xsl
discoverer.xsl
edit_connection_eul.xsl
edit_connection_main.xsl
edit_connection_responsibility.xsl
errors.xsl
functions.xsl
gui_components.xsl
list_of_connections.xsl
render_table.xsl
scripts.xsl
The following files in <source_MT_OH>/j2ee/OC4J_BI_Forms/applications/discoverer/web/viewer_files/xsl may require manual upgrade:
page_layouts.xsl
sorting.xsl
style.xsl
The <source_MT_OH>/network/admin/tnsnames.ora file defines database instances referenced by Oracle Application Server Discoverer connections created in Oracle9iAS Discoverer Release 2 (9.0.2). The same database instances must appear in the <destination_MT_OH>/network/admin/tnsnames.ora file in order for connections upgraded to Oracle Application Server Discoverer 10g (9.0.4) to function. This file may require upgrade.
The OracleAS Upgrade Assistant performs most of the Oracle Application Server Reports Services upgrade. However, it does not process the script files <source_MT_OH>/bin/rw*.sh and the configuration file <source_MT_OH>/reports/ conf/jdbcpds.conf. If you have customized any of these files, you must apply the customizations to the corresponding files in the destination Oracle home.
|
Note: To apply the customizations, you must copy the customized entries from the source Release 2 (9.0.2) instance to the destination 10g (9.0.4) instance. It is not safe to replace the 10g (9.0.4) file with the Release 2 (9.0.2) file, because the files are different. |
In addition, you may want to perform the following optional manual steps:
To preserve the cache files and the cache directory from Release 2 (9.0.2), copy the reports server cache directory from the source Oracle home to the destination Oracle home.
To monitor additional reports server instances with the Oracle Process Manager and Notification Server (OPMN), define the reports server instances in <destination_MT_OH>/opmn/conf/opmn.xml.
|
See Also: Oracle Application Server Reports Services Publishing Reports to the Web, section entitled "Configuring Reports Server with Oracle Process Manager and Notification Server and Oracle Enterprise Manager" |
To manage additional reports server instances with the Oracle Enterprise Manager Application Server Control, define the reports server instances in <destination_MT_OH>/sysman/emd/targets.xml.
|
See Also: Oracle Application Server Reports Services Publishing Reports to the Web, section entitled "Configuring Reports Server with Oracle Process Manager and Notification Server and Oracle Enterprise Manager" |
The OracleAS Upgrade Assistant upgrades the Oracle9iAS Release 2 (9.0.2) Business Intelligence & Forms configuration to the Oracle Application Server 10g (9.0.4) Business Intelligence & Forms configuration. It is not aware of OC4J instances outside of these configurations that may contain deployed reports, or of customizations made to those instances in order to enable the deployed reports to run.
Therefore, if you are using OC4J instances other than the standard Business Intelligence and Forms OC4J instance, you must apply any manual deployment steps that you performed on those instances in Oracle9iAS Release 2 (9.0.2) to the equivalent instances in Oracle Application Server 10g (9.0.4).
You must also add the Java option below to the java-options tag in <destination_MT_OH>/opmn/conf/opmn.xml to these OC4J instances before you can use them for Oracle Application Server Reports Services.
-Xbootclasspath^/p:<destination_MT_OH>/vbroker4/lib/vbjboot.jar
This section provides information on upgrading the Oracle Application Server Wireless Middle Tier from Release 2 (9.0.2) to 10g (9.0.4).
|
See Also: Oracle Application Server Wireless Developer's Guide |
This section explains how to upgrade notifications created by the Oracle Application Server Wireless Notification Engine in the Oracle Application Server Wireless System Manager. The architecture and functionality of the Notification Engine are not described here.
You can upgrade notifications from Release 2 (9.0.2) to 10g (9.0.4) with the migrateNotifications.sh script. To execute the script:
Navigate to <destination_MT_OH>/wireless/bin.
Set the ORACLE_HOME environment variable to the 10g (9.0.4) Oracle home.
Issue one of the commands below:
migrateNotifications.sh -name deprecated master alert name(s) -owner owner user name
migrateNotifications.sh -oid deprecated master alert oid -owner owner user name
The script does the following:
Creates a new master alert service named old master alert name_New. (This process involves converting the message template to a valid mobile xml, if necessary.)
Creates the folder /master/notifications, if it does not exist.
Creates the master service old master alert name_MS.
Creates a mapping for the new master alert and the new master service based on the message template for the old master alert.
Creates the folder /Users Home/username/notifications, if it does not exist.
Discovers all associated 9.0.2.x AlertService objects and converts them to link objects. (The top-level authorization is flattened to link level authorization during this process.)
Transforms all subscriptions for alert services converted.
The following command upgrades all 9.0.2.x master alert services whose name starts with StockAlert (e.g., StockAlertNews, StockAlertWarning, etc.). All new objects will be owned by the orcladmin user.
Example 3-10 Oracle Application Server Wireless Notification Service Upgrade script command with wildcard name (UNIX)
migrateNotifications.sh -name StockAlert% -owner orcladmin
The following command upgrades the 9.0.2.x master alert service with the name StockAlert, and assigns all new objects to the systemadmin user.
Example 3-11 Oracle Application Server Wireless Notification Service Upgrade script command with specific name (UNIX)
migrateNotifications.sh -name StockAlert -owner systemadmin
The following command upgrades the 9.0.2.x master alert service with the object ID 1973, and assigns all new objects to the systemadmin user.
You can operate an environment with Oracle9iAS Wireless Release 2 (9.0.2) and Oracle Application Server Wireless 10g (9.0.4) middle tiers using the same Infrastructure services. However, this configuration is subject to some restrictions, as described below.
J2ME download and XHTML/XForms based applications should not be used in a mixed environment. These features are new in Oracle Application Server Wireless 10g (9.0.4), and would cause errors when attempting to access them from any of the Oracle9iAS Wireless Release 2 (9.0.2) middle tiers. If you wish to use these features, then it is necessary to upgrade all middle tiers to Oracle Application Server Wireless 10g (9.0.4).
The Notification Engine cannot be used in a mixed environment. Instead, you should use the Alert Engine.
Service access point (service-level address) should be created through an Oracle Application Server Wireless 10g (9.0.4) middle tier, in order for them to be visible to both the Oracle Application Server Wireless 10g (9.0.4) middle tiers and Oracle9iAS Wireless Release 2 (9.0.2) middle tiers.
Oracle Application Server Wireless 10g (9.0.4) supports user name case sensitivity. However, this requires that you upgrade the Oracle Internet Directory to Oracle Application Server 10g (9.0.4).
Changing (adding, deleting, or updating) a 10g (9.0.4) ASK Access point will not be reflected on the Release 2 (9.0.2) Enterprise Manager until the Release 2 (9.0.2) Enterprise Manager is restarted. The Release 2 (9.0.2) OC4J must also be bounced in order for ASK to pick up the changes. A driver account (for example, an e-mail account for an e-mail driver) which is removed from an instance and subsequently added to another instance of different release (for example, from Release 2 (9.0.2) to 10g (9.0.4)) may cause messages to be lost. To resolve this, restart the OC4J for the instance from which the account is removed.
The Notification Engine introduced in Oracle Application Server Wireless 10g (9.0.4) replaces the Alert Engine, which was part of Oracle9iAS Wireless Release 2 (9.0.2). Although the Alert Engine is still available in Oracle Application Server Wireless 10g (9.0.4), Oracle Corporation recommends that after all middle tiers have been upgraded to Oracle Application Server Wireless 10g (9.0.4), you switch to the Notification Engine, as the Alert Engine may not be available in future versions of Oracle Application Server Wireless. Upgrade scripts are available to help you with this task. See the Oracle Application Server Wireless Developer's Guide for details. The Oracle9iAS Wireless Release 2 (9.0.2) Alert APIs have been deprecated, and you must upgrade your applications to use the Oracle Application Server Wireless 10g (9.0.4) APIs instead.
In a mixed mode environment, Oracle9iAS Wireless Release 2 (9.0.2) and Oracle Application Server Wireless 10g (9.0.4) may have transport drivers configured to receive incoming messages. The two sets of entry points, Oracle9iAS Wireless Release 2 (9.0.2) and Oracle Application Server Wireless 10g (9.0.4), should not be exposed to a device at the same time. A user issuing a request to the Release 2 (9.0.2) instance should not subsequently send another request, within an 3 hour period, to the entry point defined in the transport driver of the Oracle Application Server Wireless 10g (9.0.4) instance. The same user may not receive any response for requests addressed to the latter entry point, if it is violated.
Since the driver configuration is different in Release 2 (9.0.2) and 10g (9.0.4), when a Oracle9iAS Wireless Release 2 (9.0.2) instance is upgraded to Oracle Application Server Wireless 10g (9.0.4), the transport drivers must be managed such that requests are processed as expected.
In 10g (9.0.4), a site level driver can be enabled or disabled. By default, it is enabled. If a driver is disabled, it is not recognized by the routing algorithm, and therefore is not used by the messaging system. However, in Release 2 (9.0.2), all site level drivers are recognized by the routing algorithm.
If a Release 2 (9.0.2) instance has two middle tiers, after one of the middle tiers and the Infrastructure are upgraded to 10g (9.0.4), the upgraded middle tier may enable or disable a site level driver. However, middle tiers that are not yet upgraded recognize all drivers as enabled. For this reason, it is prudent to remove, rather than disable, a driver in this type of environment.
InRelease 2 (9.0.2), the transport mechanism can route a message to only one driver, and it does not matter whether there is an instance configured for it. This means that a message will not be delivered if it is indeed routed to a driver that has no instance configured. For this reason, the best practice is to remove all drivers that do not have an instance configured in any Release 2 (9.0.2) environment, including a Release 2 (9.0.2) and 10g (9.0.4) mixed environment.
The OracleAS Upgrade Assistant moves most of the Oracle Application Server Forms Services configuration data from the source to the destination Oracle home. However, there may be manual tasks remaining after the upgrade. This section explains how to perform these tasks.
Entries may have been added to, or changed in, the tnsnames.ora file between the installation of Oracle9iAS Release 2 (9.0.2) and upgrade to 10g (9.0.4). If so, you must upgrade this file manually so that any added or changed entries are available in 10g (9.0.4).
If an error occurs after upgrade, it may be because the tnsnames.ora file was overwritten by another component upgrade. A missing or incorrect entry yields the following error:
If you have deployed these files within the source Oracle home, you must manually copy them to the same location in the destination Oracle home. If the *.fmx files are not under the Oracle home on the file system, then no action is needed, as the FORMS90_PATH will be upgraded by the OracleAS Upgrade Assistant, and it will be valid after the upgrade.
If you defined any aliases for the OracleAS Forms Services servlets in:
<source_MT_OH>/j2ee/OC4J_BI_FORMS/applications/forms90app/forms90web/WEB-INF/web.xml, then you must manually copy these entries to:
<destination_MT_OH>/j2ee/OC4J_BI_FORMS/applications/forms90app/forms90web/WEB-INF/web.xml.
The forms90app.ear file is deployed by default into the OC4J_BI_Forms OC4J instance. Note that the Upgrade Assistant upgrades all user-defined OC4J instances and the applications deployed under these instances to the destination Oracle home.
Thus, if you have deployed the forms90app.ear file into one of the user-defined OC4J instances in the source Oracle home, the Upgrade Assistant will upgrade this deployment into the corresponding OC4J instance in the destination Oracle home.
As a result, the source Oracle home Release 2 (9.0.2) forms90app.ear file is deployed into the destination Oracle home. This causes the configuration of OracleAS Forms Services 10g (9.0.4) to be incorrect, because it requires the 10g (9.0.4) EAR file in order to function properly.
Therefore, you must undeploy the forms90app.ear file from these upgraded OC4J instances in the destination Oracle home, and then deploy forms90app.ear in the destination Oracle home again.
The Oracle Application Server Forms Services 10g (9.0.4) forms90app.ear file is located in: <destination_MT_OH>/forms90/j2ee.
The Oracle Application Server Single Sign-On and Oracle Internet Directory configuration for Oracle Application Server Forms Services is disabled by default. If the configuration was enabled in Release 2 (9.0.2), the OracleAS Upgrade Assistant does not automatically enable it in 10g (9.0.4).
You can enable the configuration by setting the ssoMode entry value to true in the file:
<destination_MT_OH>/forms90/server/formsweb.cfg
In Release 2 (9.0.2), a servlet alias could be set up in the forms90.conf file in order to run Oracle9iAS Forms Services using Single Sign-On. In 10g (9.0.4), Single Sign-On can be configured on a per-application basis in the formsweb.cfg file. You can configure it for all applications as described above, by setting the ssoMode entry value to true in the default section of the file. To configure it for a specific application, set it to true in that application’s configuration section of the file.
The <source_MT_OH>/network/admin/tnsnames.ora file contains connection information for various databases. It is shared among Oracle Application Server components.
You should examine this file to determine whether it contains any entries that will be needed to operate a component in the 10g (9.0.4) installation, but which do not exist in the <destination_MT_OH>/network/admin/tnsnames.ora file. For example, entries might have been added since the Oracle9iAS Release 2 (9.0.2) installation to provide access to additional databases, or the entry for the Infrastructure Services repository might have been changed in some way.
If new or changed entries exist, you have two choices for upgrading: append individual entries, or copy the entire file.
Copy all new and changed entries to the <destination_MT_OH>/network/ admin/tnsnames.ora file.
If you are certain that doing so will not eliminate entries added or changed by other components, you can copy the entire tnsnames.ora file from the source to the destination Oracle home, restoring the EXTPROC_CONNECTION_DATA.US.ORACLE.COM entry (which is introduced in 10g (9.0.4)).
To upgrade by copying the entire file, follow the steps below:
Create a backup of <source_MT_OH>/network/admin/tnsnames.ora and <destination_MT_OH>/network/admin/tnsnames.ora.
Copy the entire tnsnames.ora file from the source to the destination Oracle home.
Copy the EXTPROC_CONNECTION_DATA.US.ORACLE.COM entry (used for executing external procedures in the database) from the 10g (9.0.4) backup file created in step 1 to the Oracle9iAS Release 2 (9.0.2) file.
This section explains how to upgrade Oracle9iAS InterConnect.
Since Oracle Application Server InterConnect is not distributed on the Oracle Application Server CD-ROM, and thus may not yet be installed, this section includes installation as a first step to upgrading. Installation instructions for each adapter are provided in the Oracle Application Server InterConnect documentation in the Oracle Application Server documentation library.
In Oracle9iAS Release 2 (9.0.2) topologies, Oracle Application Server InterConnect components reside in the Infrastructure or middle tier Oracle home, or a different Oracle home. In 10g (9.0.4), these components do not reside in the Infrastructure or middle tier Oracle home. You must install them in a different Oracle home.
The upgrade process consists of the following tasks:
Section 3.9.1, "Installing and Upgrading Hub Components, Adapters, and Development Kit"
Section 3.9.2, "Upgrading Metadata"
Section 3.9.3, "Upgrading Management"
Section 3.9.4, "Upgrading Oracle Workflow"
Follow the installation instructions in Oracle Application Server InterConnect components to install the Hub, Adapters, and Development Kits. The information provided in the installation procedure should reflect the configuration of the Release 2 (9.0.2) components. Ensure that the architecture described in the 10g (9.0.4) installation is the same as the Release 2 (9.0.2) architecture unless you intend to change the architecture.
Follow these steps to upgrade metadata:
Install the most recent Release 2 (9.0.2) Oracle Application Server InterConnect patch set.
Run the oaiexport script provided with the Release 2 (9.0.2) installation. Supply values for repository name, file name, system password, and connect string with the following command:
<source_InterConnect_OH>/oai/9.0.2/repository/oaiexport <file name> system/<system password> <connect string>
The metadata is exported to a file in the current directory.
Run the oaiimport script provided with the 10g (9.0.4) installation. Supply values for repository name, file name, from user (the user ID of the user whose metadata is being imported), system password, oaihub904 schema password, and connect string with the following command:
<destination_InterConnect_OH>/oai/9.0.4/repository/oaiimport <file name> <from user> system/<system password> <oaihub904 schema password> <connect string>
The file is imported into the 10g (9.0.4) Hub database.
Create the tables in the hub schema database by executing this command in the hub schema:
CREATE TABLE emdcomments (emdid NUMBER(10)CONSTRAINT fk_emdcomments_emdidREFERENCES emd(id)ON DELETE CASCADE CONSTRAINT nn_emdcomments_emdid NOT NULL, name VARCHAR2(4000) CONSTRAINT nn_emdcomments_name NOT NULL, comments LONG);
Follow the instructions in the 10g (9.0.4) Oracle Application Server InterConnect installation documentation. The Oracle Application Server InterConnect Management architecture has changed significantly since Release 2 (9.0.2). The upgraded Oracle Enterprise Manager Application Server Control cannot be used to manage Oracle Application Server InterConnect components. See the Oracle Application Server InterConnect Installation Guide for more information.
Follow these steps to upgrade Oracle Workflow:
Install Oracle Workflow with 10g (9.0.4), including all pre- and post- installation steps as described in the Oracle Application Server InterConnect Installation Guide.
The installation updates the Oracle Workflow server version in the database. See the Oracle Application Server InterConnect Installation Guide for detailed information.
Perform all Workflow setup steps for your 10g (9.0.4) installation as described in the "Setting Up Oracle Workflow" chapter of the Oracle Workflow Administrator’s Guide. In particular, ensure that you:
Set your global Workflow preferences appropriately
Set up a directory service for Oracle Workflow
Configure the Workflow Notification Mailer using the Workflow Manager component of Application Server Control.
Copy all customized files from the source Oracle home to the destination Oracle home. Customized files may include:
Workflow process definition files (.wft files located in <destination_MT_OH>/wf/res/lang)
Business Event System definition files (.wfx files located in <destination_MT_OH>/wf/res/lang)
SQL scripts (.sql files located in <destination_MT_OH>/wf/sql)
Custom help files (.htm files located in <destination_MT_OH>/wf/doc/lang/wfcust or .hlp files located in <destination_MT_OH>/wf/res/lang)
After you upgrade a middle tier to Oracle Application Server 10g (9.0.4), the upgraded instance is using the same ports that the Oracle9iAS Release 2 (9.0.2) instance used. For this reason, after upgrade, you cannot start the source and destination middle tier instances at the same time, because of port conflicts.
The <destination_MT_OH>/install/portlist.ini file does not reflect the upgraded port settings; it lists the port values assigned by the installer before the upgrade. Table 3-6 lists pre- and post-upgrade values for Oracle HTTP Server, Oracle Enterprise Manager Application Server Control, and Oracle Application Server Web Cache.
Table 3-6 Port Values Before and After Upgrade
| Component | Port in Source Oracle Home | Port Value in Destination Oracle Home Assigned by Installer and Recorded in portlist.ini File | Post-Upgrade Port Value |
|---|---|---|---|
| Oracle HTTP Server
|
Port: 7777
Listen: 7778 |
Port: 7783
Listen: 7784 |
Port: 7777
Listen: 7778 |
| Oracle Enterprise Manager Application Server Control
|
1810 | 1812 | 1812 |
| Oracle Application Server Web Cache
|
Administration: 4000
Invalidation: 4001 Statistics: 4002 |
Administration: 4003
Invalidation: 4004 Statistics: 4005 |
Administration: 4000
Invalidation: 4001 Statistics: 4002 |
Upgrading an application server cluster is a two-stage process. First, you must upgrade the configuration of one of the instances in the cluster from the source Oracle home to the newly installed 10g (9.0.4) middle tier instance in the destination Oracle home. Then, you reconstruct the cluster by installing and clustering additional instances in new destination Oracle homes.
Follow these steps to upgrade an application server cluster:
Determine the instance name of the instance to upgrade with the command:
<source_MT_OH>/dcm/bin/dcmctl listinstances
Stop all processes in the source instance with the command:
<source_MT_OH>/dcm/bin/dcmctl shutdown
Stop all processes in the destination instance with the command:
<destination_MT_OH>/dcm/bin/dcmctl shutdown
Follow the instructions in Section 3.5, "Using the OracleAS Upgrade Assistant".
Follow the instructions that apply to the upgraded configuration in Section 3.8, "Completing the Upgrade".
Start the Oracle Enterprise Manager Application Server Control with the command:
<destination_MT_OH>/bin/emctl start iasconsole
Display the Oracle Application Server Instance Home Page.
Start the upgraded instance by following the instructions in Section 3.12, "Starting the Upgraded Middle Tier Instance".
Create a cluster with the command:
<destination_MT_OH>/dcm/bin/dcmctl createcluster <name of cluster>
Join the upgraded instance to the cluster with the command:
<destination_MT_OH>/dcm/bin/dcmctl joincluster -cl <name of cluster>
Join each additional instance to the cluster with the command:
<destination_MT_OH>/dcm/bin/dcmctl joincluster -cl <name of cluster>
If the upgraded configuration used mod_oc4j.conf for request routing, do the following:
View the <destination_MT_OH>/Apache/Apache/conf/mod_oc4j.conf file in one of the instances, noting the instance and cluster names in the Oc4jMount directives.
Change the instance (and, if necessary) cluster names to the instance name of the upgraded instance.
Copy the Oc4jMount directives to the mod_oc4.conf file in each instance in the new cluster.
Verify that requests that match the URL patterns in the Oc4jMount directives are routed to the correct instances.
After the OracleAS Upgrade Assistant has finished processing, and you have completed all of the applicable manual upgrade tasks, start the upgraded middle tier instance. If the middle tier instance uses an Infrastructure, ensure that the Infrastructure is running. (Since the OracleAS Upgrade Assistant requires that the Infrastructure is running, this should already be the case, if not, follow the instructions in Section 3.5.2, "Starting the Infrastructure".)
Follow these instructions to start the middle tier instance:
Start the application server components by issuing this command:
<destination_MT_OH>/opmn/bin/opmnctl startall
Oracle Process Management and Notification and all of the processes it manages are started (i.e., Distributed Configuration Management, Oracle HTTP Server, OC4J instances, OracleAS Web Cache, Oracle Application Server Forms Services, and Oracle Application Server Reports Services).
Start the Application Server Control by issuing this command:
<destination_MT_OH>/bin/emctl start iasconsole
If you restored the Web Clipping provider as described in Section 3.8.4.7, "Restoring Portal Tools (OmniPortlet and Web Clipping) Providers", follow these steps to access the Web Clipping Provider Test Page:
Access the following URL:
http://<host>:<port>/portalTools/webClipping/providers/webClipping
where <host> and <port> are the OracleAS Portal middle tier host name and port.
The Web Clipping Provider Test page appears. If you have specified the same database for the Repository Target as that previously used for a PDK 9.0.2.4.0 installation, a Repository upgrade is also necessary. In this case, the Web Clipping Provider Test Page provides an Upgrade (from 9.0.2.4.0) link that you can click to perform installation of new tables and migration of existing Clipping Definitions to the latest versions.
|
Note: If you perform the upgrade, the Clipping Definitions stored in the Web Clipping Repository will no longer work with PDK 9.0.2.4.0. |
Click the Upgrade (from 9.0.2.4.0) link.
Tables are added to the database schema hosting the Web Clipping repository, and all Definitions are upgraded.
If you restored the OmniPortlet provider as described in Section 3.8.4.7.2, "Restoring the OmniPortlet Provider Settings", follow these steps to access the OmniPortlet Provider Test Page:
Access the following URL:
http://<host>:<port>/portalTools/omniPortlet/providers/omniPortlet
where <host> and <port> are the OracleAS Portal middle tier host name and port.
The OmniPortlet Provider Test page appears.
Click the Edit link adjacent to the status of the Secured Data Repository. In the Repository Settings section of the Edit Provider: webClipping page, the database connection information for Web Clipping Repository is shown.
Click OK to save the settings.
The OmniPortlet's provider.xml file is updated with the correct <vaultId> tag to save secured data into the repository.
Portal instances access web providers via a URL. The process of specifying this URL is referred to as provider registration. If the destination Oracle home will be accessed using a hostname and/or port number different from that of the source Oracle home, or the web providers have been deployed to a different URL path, then you need to update the URLs used to access the upgraded web providers. Web providers can be referenced by multiple portal instances; all of these must be updated.
Follow these steps to update the web provider URL:
Log on to OracleAS Portal as an administrator.
Click the Navigator link.
The Portal Navigator page appears.
Click the Providers tab.
Click Registered Providers.
A sorted list of registered providers appears.
Locate the provider to update, using the Next and Previous links if necessary.
Click the Edit Registration link for the provider to update.
The Edit Provider page appears.
Click the Connection tab.
Update the URL to reflect the new location of the provider.
Click OK or Apply to save the changes.
The Event/Parameter Passing Samples Provider definition has changed since Release 2 (9.0.2). Consequently, the provider must be refreshed in the OracleAS Portal repository. Repeat these steps for each OracleAS Portal instance that references this provider.
Follow these steps to update the web provider URL:
Log on to OracleAS Portal as an administrator.
Click the Navigator link.
The Portal Navigator page appears.
Click the Providers tab.
Click Registered Providers.
A sorted list of registered providers appears.
Locate the JPDK V2 Sample Event Web Provider, using the Next and Previous links, if necessary.
Click the Refresh link for the JPDK V2 Sample Event Web Provider.
If the upgrade succeeds, but components that use the Oracle Call Interface do not function properly, it may be that the tnsnames.ora file was not upgraded, or was upgraded incorrectly. Review the instructions and upgrade strategies presented in Section 3.8.9, "Upgrading the tnsnames.ora File" and verify that the file contains all necessary entries for the components that use it.
This section describes tasks you should perform after the middle tier upgrade to validate that the upgrade was successful.
Follow these steps to verify that the middle tier components that were upgraded are started:
In a browser, access the Oracle Enterprise Manager Application Server Control in the 10g (9.0.4) middle tier Oracle home by entering its URL. Ensure that you provide the correct host name and port number. For example:
http://midtierhost.mycompany.com:1812
The Oracle Enterprise Manager page appears. A link for the middle tier instance appears in the Standalone Instances section.
Click the link.
The System Components page appears.
Verify that the components are running.
Verify that the configuration information for the components in use is reflected in the 10g (9.0.4) Oracle home.
Follow these steps to verify that you can access the Oracle HTTP Server and application URLs:
Verify that you can access the Oracle HTTP Server on the same host and port that you did in the previous release by entering the URL. Ensure that you provide the correct host name and port number. For example:
http://midtierhost.mycompany.com:7777
Verify that you can access the URLs for the applications you operated in the previous release, and ensure that the applications are functioning as they did in the previous release.
The upgrade process leaves the source Oracle home unchanged. Depending on the type of installation you have, and your future needs, you may elect to remove the source Oracle home, or to retain it for specific reasons. This section discusses decommissioning the source Oracle home, as well as reasons for retaining it, including the steps you must perform to revert to using it.
|
Note: If you retain the source Oracle home, you cannot operate it simulataneously with the destination Oracle home, because certain components have the same port values after upgraded. See Section 3.10, "Port Values and the portlist.ini File After Upgrade". |
When you are certain that the upgrade was successful, you have all of the necessary backups, and have no plans to revert to the source Oracle home, you may elect to remove the files from the source Oracle home. Use the Oracle Universal Installer to deinstall the instance.
|
See Also: Oracle9i Application Server Installation Guide in the Release 2 (9.0.2) or (9.0.3) documentation library |
Deinstalling a Release 2 (9.0.2) or (9.0.3) instance when there is also a 10g (9.0.4) instance on the computer requires a patch, and there are issues associated with this deinstallation that may apply to your configuration.
If there are application files or log files in the source Oracle home that are being referenced or used by the destination Oracle home, you should move them to another location before you decommission the source Oracle home, and, in the destination Oracle home, change any references to the files to the new location.
If you continue to operate an Oracle9iAS Release 2 (9.0.2) Portal repository, you should not decommission the Oracle9iAS Release 2 (9.0.2) Oracle home if there is a possibility that you might later want to load additional languages into the Oracle9iAS Release 2 (9.0.2) Portal repository. The utilities for loading languages in Oracle Application Server 10g (9.0.4) are not compatible with Oracle9iAS Portal in Release 2 (9.0.2).
If you decide to use a Oracle9iAS Release 2 (9.0.2) middle tier again after the upgrade, then you will need to reset the Portal Service Monitoring link in the Services portlet on the Portal Builder page. The monseed.sql script is provided in the source Oracle home to accomplish this. Follow the steps below to run the monseed.sql script:
Set the ORACLE_HOME environment variable to the Oracle9iAS Release 2 (9.0.2) middle tier Oracle home.
Navigate to the <source_MT_OH>/portal/admin/plsql/wwc/ directory.
Using SQL*Plus, connect to the Portal schema.
Issue this command:
@monseed.sql <EM host> <EM port> <Portal DAD> <middle tier host> <middle tier port> <iAS instance name>
where
<EM host> is the hostname of Release 2 (9.0.2) Oracle Enterprise Manager
<EM port> is the port of Release 2 (9.0.2) Oracle Enterprise Manager
<Portal DAD> is the name of the Portal DAD (default is portal)
<middle tier host> is the hostname of Release 2 (9.0.2) middle tier
<middle tier port> is the ort of Release 2 (9.0.2) middle tier
<iAS instance name> is the instance name given to the Release 2 (9.0.2) middle tier at installation time. This name is found in the <source_MT_OH>/ sysman/emd/targets.xml file, in the Composite Membership segment of the HTTP Server target that is running the Oracle9iAS Portal middle tier. Determine the HTTP Server target by finding the HTTP Server target with the ORACLE_HOME property matching the home of the HTTP Server servicing the Oracle9iAS Portal middle tier.
|
 Copyright © 2003 Oracle Corporation All rights reserved |
|