|
Oracle® Application Server 10g High Availability Guide
10g (9.0.4) Part No. B10495-02 |
|
|
|
|
|
Oracle® Application Server 10g High Availability Guide
10g (9.0.4) Part No. B10495-02 |
|
|
|
|
This chapter describes how to perform configuration changes and on-going maintenance of OracleAS Clusters. Because managing individual nodes involves some complexity, an OracleAS Cluster provides the ability to manage the nodes as a single entity, thereby reducing the management complexity. Instructions are provided for managing and configuring OracleAS Clusters using Oracle Enterprise Manager - Application Server Console (Application Server Console) and where required, using the dcmctl command line utility.
This chapter covers the following topics:
Managing and Configuring OracleAS Clusters
Oracle Application Server supports different clustering configuration options to support high availability in the Oracle Application Server middle tier. OracleAS Clusters provide distributed configuration information and let multiple Oracle Application Server instances work together and behave as a single system to external clients. When configured to use redundant components throughout, OracleAS Clusters support a highly available system in which to deploy and run applications with no single point of failure.
|
Note: Only OracleAS instances of the J2EE and Web Cache installation type can be clustered as an OracleAS Cluster. |
This section covers the following topics:
Configuration Overview OracleAS Clusters Managed Using a Repository
Manually Configured OracleAS Clusters Configuration Overview
When administering an OracleAS Cluster that is managed using a repository, an administrator uses either Application Server Console or dcmctl commands to manage and configure common configuration information. The Oracle Application Server manageability components then replicate the common configuration information across all Oracle Application Server instances within the cluster. Using OracleAS Clusters, the common configuration information for the cluster is called the cluster-wide configuration.
|
Note: There is configuration information that can be configured individually, per Oracle Application Server instance within a cluster (these configuration options are also called instance-specific parameters). |
Each application server instance in a OracleAS Cluster has the same base configuration. The base configuration contains the cluster-wide configuration and excludes instance-specific parameters.
This section covers the following:
Oracle Application Server Clusters Managed Using Database Repository
Oracle Application Server Clusters Managed Using File-Based Repository
Oracle Application Server Clusters managed using a database repository utilize Oracle9i database to store configuration information and metadata, including both cluster-wide configuration information and instance-specific parameters.
Using a database repository protects configuration information by storing the information in the database. Using the database, combined with Oracle Application Server high availability solutions both protects configuration information and allows you to continue operations after system failures.
Oracle Application Server Clusters managed using a file-based repository use the file system to store configuration information, including both cluster-wide configuration information and instance-specific parameters. Using Oracle Application Server Clusters managed using a file-based repository does not present a single point of failure; remaining Oracle Application Server instances within a cluster are available to service client requests when one or more Oracle Application Server instances is down.
Configuring and managing Oracle Application Server Clusters managed using a file-based repository requires that the administrator set up a farm and perform certain configuration tasks using the dcmctl command line utility.
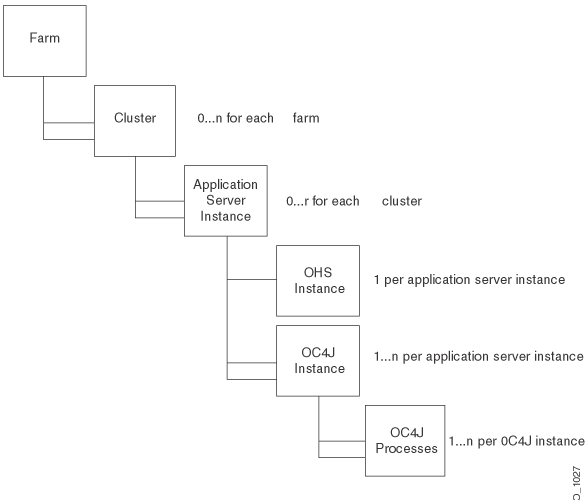
Figure 4-1 shows the cluster configuration hierarchy, starting with an Oracle Application Server top-level farm for an OracleAS Cluster. This figure applies to both types of OracleAS Clusters: those managed using a file-based repository and those managed using a database repository.
Figure 4-1 shows the OracleAS Clusters configuration hierarchy, including the following:
Clusters that contain Oracle Application Server instances
Oracle Application Server instances containing a single Oracle HTTP Server and one or more OC4J instances
OC4J instances containing the following:
One or more OC4J islands
One or more OC4J processes within OC4J islands
Deployed applications
Figure 4-1 Application Server Console Cluster Configuration Tree
Manually configured OracleAS Clusters store configuration information in local configuration files and do not use either a database repository or a file-based repository. In a manually configured cluster, it is the administrator’s responsibility to synchronize the configuration of the Oracle Application Server instances that are part of the cluster.
In an OracleAS Web Cache cluster, multiple instances of OracleAS Web Cache operate as one logical cache to provide high availability. Each OracleAS Web Cache in the cluster is called a cache cluster member. A cache cluster can consist of two or more members. The cache cluster members communicate with one another to request cacheable content that is cached by another cache cluster member and to detect when a cache cluster member fails. When a cache cluster member detects the failure of another cluster member, the remaining cache cluster members automatically take over ownership of the content of the failing member. When the cache cluster member can be reached again, OracleAS Web Cache again reassigns the ownership of the content.
|
See Also: Oracle Application Server Web Cache Administrator's Guide for information on OracleAS Web Cache clustering and configuring a OracleAS Web Cache cluster. |
This section describes how to create and use an OracleAS Cluster. The information in this section applies both to Oracle Application Server Clusters managed using a database repository and to those managed using a file-based repository.
This section covers the following topics:
Managing Application Server Instances in an OracleAS Cluster
|
Note: As an alternative to using Application Server Console, you can create an OracleAS Cluster, add application server instances to the cluster, and manage the cluster usingdcmctl commands.
|
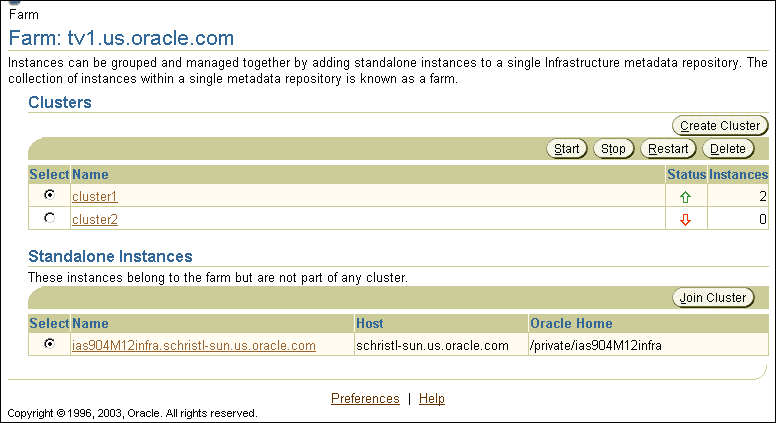
The collection of Oracle Application Server instances within a single repository, either a database repository or a file-based repository is known as a farm. When an Oracle Application Server instance is part of a farm, you can view a list of all application server instances that are part of the farm when you start Application Server Console. The application server instances shown in the Standalone Instances area on the Application Server Console Farm Home Page are available to be added to a cluster.
This section covers the following:
If you have not already done so during the Oracle Application Server installation process, you can associate an application server instance with a farm using one of the following techniques:
Associating an Instance to be Managed Using a Database Repository
Associating an Instance to be Managed Using a File-Based Repository
For a farm that uses a database repository, do the following to add an application server instance to the farm:
Navigate to the Oracle Application Server Instance Home Page.
In the Home area, select the Infrastructure link and follow the instructions for associating an application server instance with an Oracle Application Server Infrastructure.
You create a new OracleAS Cluster using the Application Server Console Farm Home Page. Application Server Console only shows the Farm Home Page when an Oracle Application Server instance is part of a farm.
From the Farm Home page, create a new OracleAS Cluster as follows:
Navigate to the Farm Home Page.
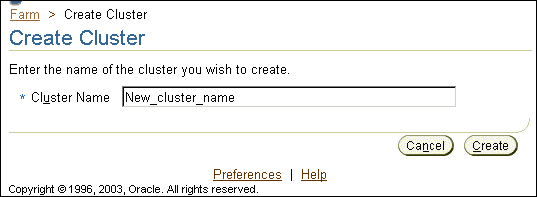
Select the Create Cluster button.
Application Server Console displays the Create Cluster page.
Figure 4-2 shows the Create Cluster page.
Enter a name for the new cluster and click Create. Each new cluster name within the farm must be unique.
A confirmation page appears.
Click OK to return to the Farm Home Page.
After creating a new OracleAS Cluster, the Farm Home page shows the cluster in the Clusters area. After creating a new cluster, the cluster is empty and does not include any application server instances. Use the Join Cluster button on the Farm Home page to add application server instances to the cluster.
Figure 4-3 shows the Application Server Console Farm Home Page, including two clusters, cluster1 and cluster2.
Table 4–1 lists the cluster control options available on the Farm Home Page.
Table 4-1 Oracle Application Server Farm Page Options
| If you want to... | Then... |
|---|---|
| Start all application server instances in an OracleAS Cluster | Select the radio button next to the cluster and click Start |
| Restart all application server instances in an OracleAS Cluster | Select the radio button next to the cluster and click Restart |
| Stop all application server instances in an OracleAS Cluster | Select the radio button next to the cluster and click Stop |
| Delete an OracleAS Cluster, including any application server instances still included in the cluster. | Select the radio button next to the cluster and click Delete |
Oracle Application Server replicates cluster-wide configuration within an OracleAS Cluster. This applies whether the cluster contains only one application server instance or many application server instances. To provide high availability for the Oracle Application Server middle tier using an OracleAS Cluster, a cluster needs to contain at least two application server instances.
This section covers the following topics:
Adding an Application Server Instance to an OracleAS Cluster
Removing an Application Server Instance from an OracleAS Cluster
|
See Also:
|
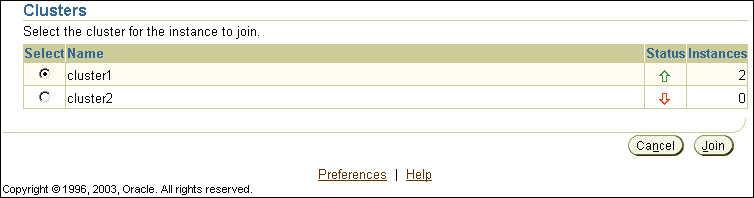
To add an application server instance to a cluster:
Navigate to the Farm Home Page.
Select the radio button for the application server instance that you want to add to a cluster from the Standalone Instances section.
Click Join Cluster.
Figure 4-4 shows the Join Cluster page.
Select the radio button of the cluster that you want the application server instance to join.
Click Join. OracleAS adds the application server instance to the selected cluster and then displays a confirmation page.
Click OK to return to the Farm Home Page.
Repeat these steps for each additional standalone application server instance you want to join the cluster.
Note the following when adding application server instances to an OracleAS Cluster:
When adding application server instances to an OracleAS Cluster, the order that you add instances to the cluster is significant. The first application server instance that joins the cluster is used as the base configuration for all additional application server instances that join the cluster. The base configuration includes all cluster-wide configuration information. It does not include instance-specific parameters.
After the first application server instance joins the cluster, the base configuration overwrites existing cluster-wide configuration information for subsequent application server instances that join the cluster. Each additional application server instance, after the first, that joins the cluster inherits the base configuration specified for the first application server instance that joins the cluster.
Before an application server instance joins a cluster, Application Server Console stops the instance. You can restart the application server instance by selecting the cluster link, selecting the appropriate instance from within the cluster, and then selecting the Start button.
An application server instance is removed from the Standalone Instances area when the instance joins a cluster.
To add multiple standalone application server instances to a cluster in a single operation, use the dcmctl joinCluster command.
When an application server instance contains certain Oracle Application Server components, it is not clusterable. Use the dcmctl isClusterable command to test if an application server instance is clusterable. If the application server instance is not clusterable, then Application Server Console returns an error when you attempt to add the instance to a cluster.
To be clusterable, all application server instances that are to be members of an OracleAS Cluster must be installed on the same operating system (this includes the same variant of UNIX).
To remove an application server instance from a cluster, do the following:
Select the cluster in which you are interested on the Farm Home Page. This brings you to the cluster page.
Select the radio button of the application server instance to remove from the cluster and click Remove.
To remove multiple standalone application server instances, you need to repeat these steps multiple times.
Note the following when removing application server instances from an OracleAS Cluster:
Before an application server instance leaves a cluster, Application Server Console stops the instance. After the operation completes, you restart the application server instance from the Standalone Instances area of the Farm Home Page.
The dcmctl leaveCluster command removes one application server instance from the cluster at each invocation.
When the last application server instance leaves a cluster, cluster-wide configuration information associated with the cluster is removed. The cluster is now empty and the base configuration is not set. Subsequently, Oracle Application Server uses the first application server instance that joins the cluster as the base configuration for all additional application server instances that join the cluster.
You can remove an application server instance from the cluster at any time. The first instance to join a cluster does not have special properties. The base configuration is created from the first instance to join the cluster, but this instance can be removed from the cluster in the same manner as the other instances.
You can create OracleAS Clusters that do not depend on the database to store cluster-wide configuration and management information. Using a file-based repository, cluster-wide configuration information and related metadata is stored on the file system of an Oracle Application Server instance that is the repository host (host). Oracle Application Server instances that are part of a farm that uses a file-based repository depend on the repository host to store cluster-wide configuration information. After creating a farm that includes Oracle Application Server instances managed using a file-based repository, you can create OracleAS Clusters.
This section covers the following topics:
Initializing File-Based Repository Host and Adding Instances to a Farm
Managing Instances in a Farm That Uses a File-Based Repository
This section describes how to create a farm that uses a file-based repository and covers the following:
After a farm is created that includes Oracle Application Server instances managed using a file-based repository, you can create OracleAS Clusters using either Application Server Console or dcmctl commands.
whichFarm and Leaving a Farm
To create a file-based repository you need to start with a standalone application server instance. A standalone application server instance is an instance that is not associated with a farm. To verify that the Oracle Application Server instance that you want to use as the repository host for a file-based repository is a Standalone Instance, issue the following command:
% dcmctl whichFarm
This command returns the following when an instance is not associated with any farm:
Standalone OracleAS instance
|
Note: ThewhichFarm command returns detailed output when dcmctl runs with the verbose setting on. When verbose is off, whichFarm returns less output. Use the dcmctl set -v off to set the verbose mode off. Likewise, use dcmctl set -v on to set the verbose mode on.
|
Table 4–2 shows sample output from whichFarm. When an instance is not a standalone instance whichFarm returns information showing that the instance is part of a farm.
Table 4-2 Dcmctl whichFarm Command Verbose Output
When the instance that you want to use with a file-based repository is part of an existing farm, you need to first leave the farm before you can initialize a file-based repository.
|
Note: Using theleaveFarm command on an instance stops all the Oracle Application Server components running on the instance.
|
Use the leavefarm command to leave the farm as follows:
% dcmctl leaveFarm
After you leave the farm, whichFarm returns the following:
% dcmctl whichFarm
Standalone OracleAS instance
There are restrictions on leaving a farm using dcmctl leaveFarm, including the following:
If you attempt to use dcmctl leaveFarm on an Oracle Application Server Infrastructure system, dcmctl reports an error unless the Infrastructure system is the only Oracle Application Server instance that is part of the farm.
Running the dcmctl leaveFarm command stops all the Oracle Application Server components running on the Oracle Application Server instance.
You cannot use leaveFarm on an Oracle Application Server Infrastructure system that serves as the repository for any Oracle Application Server instances other than itself. To run leavefarm on the Oracle Application Server Infrastructure, you must first go the Oracle Application Server instances and run leaveFarm on those instances.
After selecting the Oracle Application Server instance to be the repository host for the file-based repository, do the following to create a farm and initialize the file-based repository on the repository host instance:
Issue the following command on the Oracle Application Server instance that is to be the repository host instance for the file-based repository:
dcmctl getRepositoryid
Using the repository ID that you obtain, issue the command:
dcmctl joinFarm -r <repositoryID>
Where repositoryID is the value returned from the previous step. The dcmctl joinFarm command sets up the repository host instance and initializes the farm managed using a file-based repository; Oracle Application Server stores the farm’s configuration information in a file-based repository on the repository host instance.
|
Note: If you create a farm using thedcmctl command and you are using Application Server Console to view the changes, you need to restart Application Server Console for the changes to be shown. Use the emctl start and stop commands to restart Application Server Console.
|
After selecting the repository host instance for the file-based repository and initializing the file-based repository, do the following to add additional application server instances to the farm:
Obtain the repository ID on the repository host instance. To do this, issue the following command:
dcmctl getRepositoryId
To obtain the repository ID for the repository host instance, you can issue the getRepositoryid command on any system which is part of the farm you want to join (that is, if another instance uses the same repository host instance, you can use the dcmctl getRepositoryid command on that system).
On the application server instance that you want to add to the farm, do the following:
dcmctl joinFarm -r <repositoryID>
Where the repositoryID you specify is the value returned in step 1.
This section covers the following topics:
Managing Oracle Application Server Instances and Clusters With a File-Based Repository
Availability Issues for OracleAS Clusters With a File-Based Repository
Exporting and Importing Configuration Information With a File-Based Repository
Enabling SSL For Communication Between Instances That are Using a File-Based Repository
Once a farm is set up that is managed using a file-based repository, you can use the Application Server Console or dcmctl commands to create and manage OracleAS Cluster within the farm, and you can configure standalone instances within the farm to join a cluster.
|
Note: For Oracle Application Server Clusters using a file-based repository, Oracle recommends a size of four or less OracleAS instances per cluster. |
|
See Also:
|
An important consideration for using OracleAS Clusters with a file-based repository is determining which Oracle Application Server instance is the repository host.
Consider the following when selecting the repository host for a file-based repository:
When the repository host instance is temporarily unavailable, an OracleAS Cluster that uses a file-based repository is still able to run normally, but it cannot update any configuration information.
Since the Oracle Application Server instance that is the repository host instance stores and manages the cluster related configuration information in its file system, the repository host instance should use mirrored or RAID disks. If the repository host instance uses disk mirroring, this improves the availability of the OracleAS Clusters.
When the repository host instance is not available, read-only configuration operations are not affected on any Oracle Application Server instances that are running (the farm’s cluster-wide configuration information is distributed and managed through local Oracle Application Server Java Object Cache),
When the repository host instance is not available, operations that attempt to change configuration information in the file-based repository will generate an error. These operations must be delayed until the repository host instance is available, or until the repository host instance is relocated to another application server instance within the farm.
Oracle Application Server provides commands to save a file-based repository and prevent it from being permanently lost, when the repository host instance goes down or its file system is damaged. Using the exportRepository command you can save the entire file-based repository. After saving the configuration information using the exportRepository command, using importRepository, you can restore the saved configuration information to the repository host instance, or to a different instance in the farm.
To export the repository from the repository host instance, do the following:
dcmctl exportRepository -file <file_name>
To import a saved file-based repository, on the system that is to be the repository host instance for the farm, do the following:
dcmctl importRepository -file <file_name>
The file_name is a previously saved file that was created using the dcmctl exportRepository command. When the file-based repository is restored to a different Oracle Application Server instance, the instance where the importRepository command runs becomes the new repository host instance.
To specify that the Oracle Application Server instance that was the old repository host instance for a file-based repository is no longer the repository host instance, issue the following command:
dcmctl repositoryRelocated
If you have an Oracle Application Server instance joined to a farm that uses a file-based repository, you can move that instance to another repository whether it is a file-based or database-based repository. The steps to move to another repository type involve the steps to leave a farm and join another farm.
When an OracleAS instance leaves a farm, it essentially becomes a standalone instance. The instance’s DCM-managed configuration metadata in the repository is moved to the instance. Any archives for the instance are also deleted. However, connections to the Infrastructure database that may exist for other components (Oracle Application Server Single Sign-On, JAAS, and Oracle Internet Directory) are not removed.
To leave a farm, execute the following command at the OracleAS instance:
dcmctl leaveFarm
|
Note: After executing thedcmctl leaveFarm command, it is recommended that you create a new baseline archive for the instance that just left the farm. Refer to the Distributed Configuration Management Reference Guide for archiving instructions.
|
The following sections provide instructions to move an OracleAS instance from a file-based repository to other repositories:
When moving an OracleAS instance from a file-based repository to a database-based repository, you must first disassociate the instance from its current repository by leaving the repository’s farm. The instance then becomes a standalone instance at which point you can join it to the farm of a database-based repository. The following instructions tell you how to perform these tasks:
Determine if the instance is still part of a farm using the following command:
dcmctl whichFarm
If the command returns a farm name, the OracleAS instance is still part of a farm, and hence, still associated with an existing repository. Use the dcmctl leaveFarm command to bring the instance to a standalone state.
If the instance is joining the farm of the database-based repository for the first time, its configuration metadata is not in the repository. Use the Application Server Console to join the farm of the repository. Instructions to do this are in the Oracle Application Server 10g Administrator's Guide.
If the instance is joining a farm of the database-based repository, and the instance was a member of that farm earlier, use the following command to rejoin the farm:
dcmctl joinFarm
To join the instance to another farm that is using a file-based repository, use the dcmctl command together with the file-based repository’s ID. At the command line of the OracleAS instance:
Run the following command:
dcmctl whichFarm
If the command returns a farm name, the OracleAS instance is still part of a farm, and hence, still associated with an existing repository. Use the dcmctl leaveFarm command to bring the instance to a standalone state.
After ensuring that the instance is not part of a farm, run the following command at one of the instances that is joined to the farm of the repository that you want to join. This command gets the repository ID of the file-based repository. If you want to establish and join a new file-based repository using the host where the standalone instance is as the repository host, run the following command at the standalone instance.
dcmctl getRepositoryId
A repository identifier in the format "hostname:port" is returned.
Join the farm of the desired repository using the following command:
dcmctl joinFarm -r <repository_ID>
|
Note: if you are using Application Server Console to view the changes after executing thedcmctl joinFarm command, you need to restart Application Server Console for the changes to appear. Use the emctl start and stop commands to restart Application Server Console.
|
When instances in a farm use a file-based repository, you can configure DCM so that configuration information that is sent between instances uses SSL. This feature provides for the security of messages sent between all instances in the farm and prevents unauthorized instances from joining the farm.
This section describes the steps required to setup SSL and certificate-based security for instances that use a file-based repository. The overall steps are:
Shutdown Oracle Application Server Processes on Each Instance
Set Up the Keystore Information File on Each Instance in the Farm
Use the JDK keytool command to generate a certificate and set up the keystore, as documented in:
http://java.sun.com/j2se/1.4.1/docs/tooldocs/solaris/keytool.html
If you have already generated the key pair and obtained the certificate for OC4J, then you can use the same keystore you previously obtained.
To use SSL certificate-based security, a Java keystore must be setup on each instance in the farm. This keystore may be the same as that used by other Java applications or it can be unique for DCM file-based repository configuration. Note the path to each keystore location for each instance in the farm.
At each instance of the farm, execute the following commands to shut down Oracle Application Server processes:
in UNIX:
$ORACLE_HOME/bin/emctl stop iasconsole
$ORACLE_HOME/dcm/bin/dcmctl stopproc
in Windows:
%ORACLE_HOME%\bin\emctl stop iasconsole
%ORACLE_HOME%\dcm\bin\dcmctl shutdown
After obtaining the keystore and certificate information, on each Oracle Application Server instance in the farm, you need to use the dcmctl configRepositorySSL command to create the file that holds keystore information.
|
Important: The keystore information file must be set up for the repository host instance of the file-based repository before any other instance in the farm. To find the respository host and host instance, execute the following:dcmctl getrepositoryid |
To set up the keystore information file, execute the following instructions beginning with the repository host instance of the file-based repository (after that, the instructions can be performed in no particular sequence for the remaining instances):
Copy the keystore file that you generated in the first step, "Generating the Keystore," to a location in the local host.
Use the configRepositorySSL as follows on each instance to create the keystore information file:
dcmctl configRepositorySSL -keystore <path_to_keystore> -storepass <password>
The generated file, .ssl.conf, is stored in <ORACLE_HOME>/dcm/config.
Modify the dcmCache.xml cache configuration <useSSL> attribute as shown in Table 4–3 to enable or disable the use of SSL.
Optionally, you can specify the location of the file that was generated using configRepositorySSL by modifying the value of the <sslConfigFile> element. If you modify this value, you need to copy the .ssl.conf file that configRepositorySSL generated to the new file that you specify using <sslConfigFile>.
The dcmCache.xml file is in $ORACLE_HOME/dcm/config directory in Unix, and in %ORACLE_HOME%\dcm\config directory in Windows.
Table 4-3 Elements for Enabling SSL in a Farm Using a File-Based Repository
Ensure that the configuration changes are effected by executing the following command on each instance in the farm beginning with the repository host instance:
dcmctl getstate
The synchronization state of the local instance with the file-based repository is shown.
After the security configuration is consistent across all the instances in the farm, restart each instance, beginning with the repository host instance, using the following command:
in UNIX:
$ORACLE_HOME/opmn/bin/opmnctl startall
$ORACLE_HOME/bin/emctl start iasconsole
in Windows:
%ORACLE_HOME%\opmn\bin\opmnctl startall
%ORACLE_HOME%\bin\emctl start iasconsole
You can add a standalone instance to a farm that is using SSL. On the standalone machine:
Copy the keystore file that you generated in the first step, "Generating the Keystore," to a location in the local host.
Use the configRepositorySSL as follows on each instance to create the keystore information file:
dcmctl configRepositorySSL -keystore <path_to_keystore> -storepass <password>
The generated file, .ssl.conf, is stored in <ORACLE_HOME>/dcm/config.
Follow the instructions in the section Joining a Farm Managed Using a File-Based Repository to join the instance to the farm.
This section describes OC4J configuration for OC4J Instances and processes that are part of OracleAS Clusters that are managed using repositories.
This section covers the following:
Overview of OracleAS Cluster Configuration for OC4J Instances
Cluster-Wide Configuration Changes and Modifying OC4J Instances
Configuring OC4J Instance-Specific Parameters
|
See Also: Oracle Application Server Containers for J2EE User's Guide for detailed information on configuring OC4J Instances |
After application server instances join OracleAS Clusters, the application server instances, and the OC4J instances that run on the application server instances have the following properties:
Each application server instance has the same cluster-wide configuration. When you use Application Server Console or dcmctl to modify any cluster-wide OC4J parameters, the modifications are propagated to all application server instances in the cluster. To make cluster-wide OC4J configuration changes you need to change the configuration parameters on a single application server instance; the Oracle Application Server distributed configuration management system then propagates the modifications to all the other application server instances within the cluster.
When you modify any instance-specific parameters, on an OC4J instance that is part of a cluster, the change is not propagated across the cluster. Changes to instance-specific parameters are only applicable to the specific application server instance where the change is made. Since different hosts running application server instances in the cluster could each have different capabilities, such as total system memory, it may be appropriate for the OC4J processes within an OC4J instance to run with different configuration options.
Table 4–4 provides a summary of the OC4J instance-specific parameters. Other OC4J parameters are cluster-wide parameters and are replicated across OracleAS Clusters.
Table 4-4 OC4J Instance-Specific Parameters Summary for OracleAS Clusters that are managed using repositories
This section covers the following topics:
Configuring Web Application State Replication for OracleAS Clusters
Configuring EJB Application State Replication for OracleAS Clusters
Configuring Stateful Session Bean Replication for OracleAS Clusters
|
See Also: Oracle Application Server Containers for J2EE User's Guide for complete information OC4J configuration and application deployment |
You can create a new OC4J instance on any application server instance within managed OracleAS Clusters and the OC4J instance will be propagated to all application server instances across the cluster.
To create an OC4J instance, do the following:
Navigate to any application server instance within the cluster.
Select the Create OC4J Instance button. This brings up the page that requests a name for the new instance. Provide a name in the field.
Click create.
The Oracle Application Server distributed configuration management system propagates the new OC4J instance across the cluster.
A new OC4J instance is created with the name you provided. This OC4J instance shows up on each application server instance page across the cluster, in the System Components section.
To delete an OC4J instance, select the radio button next to the OC4J instance you wish to delete, then click Delete. The Oracle Application Server Distributed Configuration Management system propagates the OC4J removal across the cluster.
Using OracleAS Clusters, when you deploy an application to one application server instance, the application is propagated to all application server instances across the cluster.
To deploy an application across a cluster, do the following:
Select the cluster you want to deploy the application to.
Select any application server instance from within the cluster.
Select an OC4J instance on the application server instance where you want to deploy the application.
Deploy the application to the OC4J instance using either Application Server Console or dcmctl commands.
The Oracle Application Server Distributed Configuration Management system then propagates the application across the cluster.
|
See Also: Oracle Application Server Containers for J2EE User's Guide for complete information on deploying applications to an OC4J instance. |
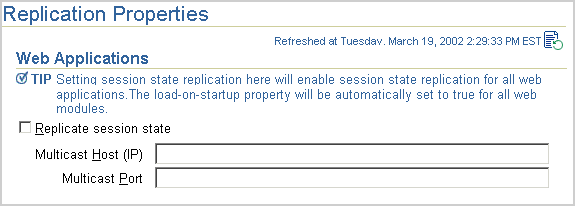
To assure that Oracle Application Server maintains, across OracleAS Clusters, the state of stateful Web applications you need to configure state replication for the Web applications.
To configure state replication for stateful Web applications, do the following:
Select the Administration link on the OC4J Home Page.
Select Replication Properties in the Instance Properties column.
Scroll down to the Web Applications section. Figure 4-5 shows this section.
Select the Replicate session state checkbox.
Optionally, you can provide the multicast host IP address and port number. If you do not provide the host and port for the multicast address, it defaults to host IP address 230.0.0.1 and port number 9127. The host IP address must be between 224.0.0.2 through 239.255.255.255. Do not use the same multicast address for both HTTP and EJB multicast addresses.
|
Note: When choosing a multicast address, ensure that the address does not collide with the addresses listed inhttp://www.iana.org/assignments/multicast-addresses Also, if the low order 23 bits of an address is the same as the local network control block, 224.0.0.0 – 224.0.0.255, then a collision may occur. To avoid this provide an address that does not have the same bits in the lower 23 bits of the address as the addresses in this range. |
Add the <distributable/> tag to all web.xml files in all Web applications. If the Web application is serializable, you must add this tag to the web.xml file.
The following shows an example of this tag added to web.xml:
<web-app>
  <distributable/>
  <servlet>
  ...
  </servlet>
</web-app>
To create an EJB cluster, you specify the OC4J instances that are to be involved in the cluster, configure each of them with the same multicast address, username, and password, and deploy the EJB, which is to be clustered, to each of the nodes in the cluster.
Unlike HTTP clustering, EJBs involved in a cluster cannot be sub-grouped in an island. Instead, all EJBs within the cluster are in one group. Also, only session beans are clustered.
The state of all beans is replicated at the end of every method call to all nodes in the cluster using a multicast topic. Each node included in the EJB cluster is configured to use the same multicast address.
The concepts for understanding how EJB object state is replicated within a cluster are described in the Oracle Application Server Containers for J2EE Enterprise JavaBeans Developer's Guide.
To configure EJB replication, you must do the following:
Select the Administration link on the OC4J Home Page.
Select Replication Properties in the Instance Properties column.
In the EJB Applications section, select the Replicate State checkbox.
Figure 4-6 shows this section.
Provide the username and password, which is used to authenticate itself to other hosts in the cluster. If the username and password are different for other hosts in the cluster, they will fail to communicate. You can have multiple username and password combinations within a multicast address. Those with the same username/password combinations will be considered a unique cluster.
Optionally, you can provide the multicast host IP address and port number. If you do not provide the host and port for the multicast address, it defaults to host IP address 230.0.0.1 and port number 9127. The host IP address must be between 224.0.0.2 through 239.255.255.255. Do not use the same multicast address for both HTTP and EJB multicast addresses.
|
Note: When choosing a multicast address, ensure that the address does not collide with the addresses listed inhttp://www.iana.org/assignments/multicast-addresses Also, if the low order 23 bits of an address is the same as the local network control block, 224.0.0.0 – 224.0.0.255, then a collision may occur. To avoid this provide an address that does not have the same bits in the lower 23 bits of the address as the addresses in this range. |
Configure the type of EJB replication within the orion-ejb-jar.xml file within the JAR file. See "Configuring Stateful Session Bean Replication for OracleAS Clusters" for full details. You can configure these within the orion-ejb-jar.xml file before deployment or add this through the Application Server Console screens after deployment. To add this after deployment, drill down to the JAR file from the application page.
For stateful session beans, you may have you modify the orion-ejb-jar.xml file to add the state replication configuration. Since you configure the replication type for the stateful session bean within the bean deployment descriptor, each bean can use a different type of replication.
Stateful session beans require state to be replicated among nodes. In fact, stateful session beans must send all their state between the nodes, which can have a noticeable effect on performance. Thus, the following replication modes are available to you to decide on how to manage the performance cost of replication:
The state of the stateful session bean is replicated to all nodes in the cluster, with the same multicast address, at the end of each EJB method call. If a node loses power, then the state has already been replicated.
To use end of call replication, set the replication attribute of the <session-deployment> tag in the orion-ejb-jar.xml file to "endOfCall".
For example,
<session-deployment replication="EndOfCall" .../>
The state of the stateful session bean is replicated to only one other node in the cluster, with the same multicast address, when the JVM is terminating. This is the most performant option, because the state is replicated only once. However, it is not very reliable for the following reasons:
The state is not replicated if the power is shut off unexpectedly. The JVM termination replication mode does not guarantee state replication in the case of lost power.
The state of the bean exists only on a single node at any time; the depth of failure is equal to one node.
To use JVM termination replication, set the replication attribute of the <session-deployment> tag in the orion-ejb-jar.xml file to "VMTermination".
For example,
<session-deployment replication="VMTermination" .../>
This section covers the instance-specific parameters that are not replicated across OracleAS Clusters that are managed using repositories.
This section covers the following:
Configuring Port Numbers and Command Line Options
|
See Also: Oracle Application Server Containers for J2EE User's Guide for complete information OC4J configuration and application deployment |
To provide a redundant environment and to support high availability using OracleAS Clusters, you need to configure multiple OC4J processes within each OC4J instance.
Using OracleAS Clusters, state is replicated in OC4J islands with the same name within OC4J instances with the same name across the cluster. To assure high availability, with stateful applications, OC4J island names within an OC4J instance must be the same in corresponding OC4J instances across the cluster. It is the administrator’s responsibility to make sure that island names match where session state replication is needed in a cluster.
The number of OC4J processes on an OC4J instance within a cluster is an instance-specific parameter since different hosts running application server instances in the cluster could each have different capabilities, such as total system memory. Thus, it could be appropriate for cluster to contain application server instances that each run different numbers of OC4J processes within an OC4J instance.
To modify OC4J islands and the number of processes each OC4J island contains, do the following:
Select the Administration link on the OC4J Home Page of the application server instance of interest in the cluster.
Select Server Properties in the Instance Properties area.
Scroll down to the Multiple VM Configuration section. This section defines the islands and the number of OC4J processes that should be started on this application server instance in each island.
Figure 4-7 displays the Multiple VM Configuration Islands section.
Figure 4-7 OC4J instance Island and Number of Processes Configuration
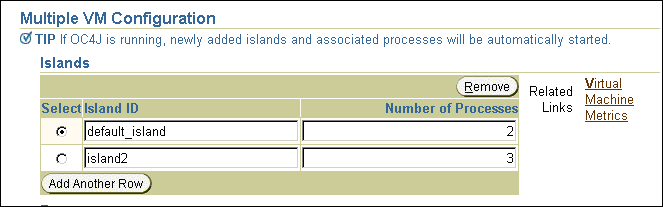
Create any islands for this OC4J instance within the cluster by clicking Add Another Row. You can supply a name for each island within the Island ID field. You can designate how many OC4J processes should be started within each island by the number configured in the Number of Processes field.
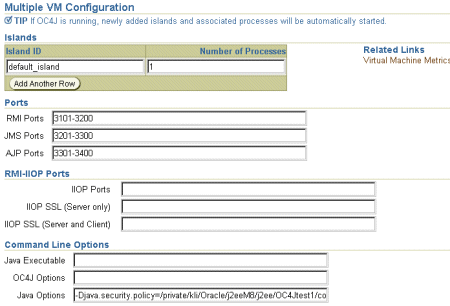
Figure 4-8 shows the section where you can modify these ports and set command line options.
To modify OC4J ports or the command line options, do the following:
Select the Administration link on the OC4J Home Page of the application server instance of interest in the cluster.
Select Server Properties in the Instance Properties area.
Scroll down to the Multiple VM Configuration section. This section defines the ports and the command line options for OC4J and for the JVM that runs OC4J processes.
Figure 4-8 shows the Ports and Command line options areas on the Server Properties page.
Figure 4-8 OC4J Ports and Command Line Options Configuration
This section describes Oracle HTTP Server configuration for OracleAS Clusters that are managed using repositories.
This section covers the following:
This section covers the following:
Using OracleAS Clusters, the Oracle HTTP Server module mod_oc4j load balances requests to OC4J processes. The Oracle HTTP Server, using mod_oc4j configuration options, supports different load balancing policies. By providing configurable load balancing policies, OracleAS Clusters can provide performance benefits along with failover and high availability for different types of systems, depending on the network topology and host machine capabilities.
By default, mod_oc4j uses weights to select a node to forward a request to. Each node has a default weight of 1 unless specified otherwise. A node’s weight is taken as a ratio compared to the weights of the other available nodes to define the number of requests the node should service compared to the other nodes in the cluster. Once a node is selected to service a particular request, by default, mod_oc4j uses the roundrobin policy to select OC4J processes on the node. If an incoming request belongs to an established session, the request is forwarded to the same node and the same OC4J process that started the session.
The OC4J load balancing policies do not take into account the number of OC4J processes running on a node when calculating which node to send a request to. Node selection is based on the configured weight for the node, and its availability. The number of OC4J processes to run is configured using Application Server Console.
To modify the mod_oc4j load balancing policy, Administrators use the Oc4jSelectMethod and Oc4jRoutingWeight configuration directives in the mod_oc4j.conf file.
To configure the mod_oc4j.conf file, using Application Server Console, select the HTTP_Server component in an application server instance. Then, select the Administration link and select the Advanced Server Properties link. On the Advanced Server Properties page, select the mod_oc4j.conf link. On the Edit mod_oc4j.conf page, within the <IfModule mod_oc4j.c> section, modify Oc4jSelectMethod and Oc4jRoutingWeight to select the desired load balancing option.
If you do not use Application Server Console, then edit mod_oc4j.conf and use the dcmctl command to propagate the changes to other mod_oc4j.conf files across the OracleAS Clusters as follows:
% dcmctl updateconfig -ct ohs
% opmnctl @cluster:<cluster_name> restartproc ias-component=HTTP_Server             process-type=HTTP_Server
The opmnctl restartproc command is required to restart all the Oracle HTTP Server instances in the OracleAS Clusters for the changes to take effect.
|
See Also:
|
The following are instance-specific parameters used by Oracle HTTP Server.
ApacheVirtualHost
Listen
OpmnHostPort
Port
User
Group
NameVirtualHost
ServerName
PerlBlob
You can modify the HTTP Server ports and listening addresses on the Server Properties Page, which can be accessed from the HTTP Server Home Page. You can modify the virtual host information by selecting a virtual host from the Virtual Hosts section on the HTTP Server Home Page.
To enable Oracle Application Server Single Sign-On to work with an OracleAS Cluster, the Single Sign-On server needs to be aware of the entry point into the cluster, which is commonly the load balancing mechanism in front of the Oracle HTTP Servers. This mechanism could exist as Oracle Application Server Web Cache, a network load balancer appliance, or an Oracle HTTP Server installation.
In order to register an OracleAS Cluster’s entry point with the Single Sign-On server, use the SSORegistrar tool, which can be executed through ossoreg.jar.
In order to participate in Single Sign-On functionality, all Oracle HTTP Server instances in a cluster must have an identical Single Sign-On registration.
Each Oracle HTTP Server is registered with the same Single Sign-On server.
Each Oracle HTTP Server redirects a success, logout, cancel, or home message to the public network load balancer. In a clustered environment, each Oracle HTTP Server should redirect message URLs to the network load balancer. Since the client cannot access an Oracle HTTP Server directly, the client interacts with the network load balancer.
As with all cluster-wide configuration information, the Single Sign-On configuration is propagated among all Oracle HTTP server instances in the cluster. However, the initial configuration is manually configured and propagated. On one of the application server instances, define the configuration with the ossoreg.jar tool. Then, DCM propagates the configuration to all other Oracle HTTP Servers in the cluster.
If you do not use a network load balancer, then the Single Sign-on configuration must originate with whatever you use as the incoming load balancer— Oracle Application Server Web Cache, Oracle HTTP Server, and so on.
To configure a cluster for Single Sign-On, execute the ossoreg.jar command against one of the application server instances in the cluster. This tool registers the Single Sign-On server and the redirect URLs with all Oracle HTTP Servers in the cluster.
Run the ossoreg.jar command with all of the options as follows, substituting information for the italicized portions of the parameter values.
The values are described fully in Table 4–5.
Specify the host, port, and SID of the database used by the Single Sign-On server.
Specify the host and port of the front-end load balancer in mod_osso_url parameter. This should be a HTTP or HTTPS URL depending on the site security policy regarding SSL access to OracleAS Single Sign-On protected resources.
Specify the root user of the host that you are executing this tool on in the -u option.
$ORACLE_HOME/jdk/bin/java -jar $ORACLE_HOME/sso/lib/ossoreg.jar
-oracle_home_path <orcl_home_path>
-site_name <site_name>
-config_mod_osso TRUE
-mod_osso_url <URL>
-u <userid>
[-virtualhost <virtual_host_name>]
[-update_mode CREATE | DELETE | MODIFY]
[-config_file <config_file_path>]
[-admin_info <admin_info>]
[-admin_id <adminid>]
Table 4-5 SSORegistrar Parameter Values
| Parameter | Value |
|---|---|
oracle_home_path <orcl_home_path>
|
Absolute path to the Oracle home of the application server instance, where you are invoking this tool. |
site_name <site_name>
|
Name of the sitetypically, the effective host name and port of the partner application. For example, application.mydomain.com.
|
config_mod_osso TRUE
|
If set to TRUE, this parameter indicates that the application being registered is mod_osso. You must include config_mod_osso for osso.conf to be generated.
|
mod_osso_url <URL>
|
The effective URL of the partner application. This is the URL that is used to access the partner application. The value should be specified in this URL format:
|
u <userid>
|
The user name that will start the Oracle HTTP Server. In UNIX, this name is usually "root." On Windows NT/2000, it is SYSTEM. The parameter u is mandatory.
|
virtualhost <virtual_ host_name>
|
Optional. Use this parameter only if registering an Oracle HTTP virtual host with the OracleAS Single Sign-On server.
If you create a virtual host, be sure, in the <VirtualHost host_name> OssoConfigFile $ORACLE_ HOME/Apache/Apache/conf/osso/host_name/osso.conf OssoIpCheck off #<Location /your_protected_url> # AuthType basic # Require valid-user #</Location> #Other configuration information for the virtual host </VirtualHost> The commented lines must be uncommented before the application is deployed. |
update_mode CREATE | DELETE | MODIFY
|
Optional. Creates, deletes, or modifies the partner registration record. CREATE, the default, generates a new record. DELETE removes the existing record. MODIFY deletes the existing record and then creates a new one.
|
config_file <config_ file_path>
|
Optional. Location of the osso.conf file for the virtual host if one is being configured. It may, for example, be $ORACLE_HOME/Apache/Apache/conf/osso/virtual_host_name/osso.conf.
Note that the |
admin_id <name>
|
(Optional) User name of the mod_osso administrator. This shows up in the Single Sign-On tool as contact information.
|
admin_info <text>
|
(Optional) Additional information about the mod_osso administrator, such as e-mail address. This shows up in the Single Sign-On tool as contact information.
|
The SSORegistrar tool establishes all information necessary to facilitate secure communication between the Oracle HTTP Servers in the cluster and the Single Sign-On server.
When using Single Sign-On with the Oracle HTTP Servers in the cluster, the KeepAlive directive must be set to OFF since the Oracle HTTP Servers are behind a network load balancer. If the KeepAlive directive is set to ON, then the network load balancer maintains state with the Oracle HTTP Server for the same connection, which results in an HTTP 503 error. Modify the KeepAlive directive in the Oracle HTTP Server configuration. This directive is located in the httpd.conf file of the Oracle HTTP Server.
You can configure a cluster of OracleAS instances to provide only certain limited advantages of clustering.
This section describes how to configure these advanced types of clusters.
If you have more than a single OracleAS instance in a farm, you can configure one of the Oracle HTTP Servers to be the load balancer for all of the instances. This eliminates the need for all but one of the Oracle HTTP Servers in the OracleAS instances. When you configure a single Oracle HTTP Server as a load balancer, the Oracle HTTP Server must be configured to know about all the OC4J instances in the farm and route the incoming requests appropriately.
Configure the following:
Retrieve the OracleAS instance name and its components of all instances in the farm.
Update the mod_oc4j.conf configuration file with the OC4J instance information for each root context, which enables mod_oc4j to route to each deployed application.
Change to the Apache directory of each OracleAS instance in the cluster.
cd ORACLE_HOME_Instance/Apache/Apache/conf
Edit the mod_oc4j.conf to include mount points for the root context of each deployed application in the other OC4J instances in the cluster. Each mod_oc4j configuration file contains mount points for each root context of the deployed applications to which it routes incoming requests.
To route to applications deployed in another instance, you must add a mount point for the other instances’ application root context with the additional keyword of "instance://". The syntax for this keyword requires the OracleAS Instance name and the OC4J instance name.
|
Note: We suggest that you mount all clustered applications to the same root context to avoid multiple entries in eachmod_oc4j configuration file involved in the cluster.
|
To route to applications deployed in another cluster, you must add a mount point for the application root context with the additional keyword of "cluster://". The syntax for this keyword requires the cluster name and the OC4J instance name.
Examples of routing to another instance, multiple instances, or another cluster are as follows:
Oc4jMount /myapp/* instance://Inst2:OC4J_Home
Oc4jMount /myapp1/* instance://Inst2:OC4J_Home, Inst3:OC4J_Home
Oc4jMount /myapp2/* cluster://Cluster1:OC4J_Home
Inform DCM of the configuration changes and restart DCM.
dcmctl updateConfig
dcmctl restart
Once configuration for the cluster is complete, you must ensure that each OracleAS instance and OC4J instance has the same configuration. This type of cluster does not replicate configuration across all instances. You must manage the configuration manually.
You can configure for OC4J state replication through the Application Server Console in the same way as for managed clustering.
Firewalls protect a company’s infrastructure by restricting illegal network traffic. Firewall configuration typically involves restricting the ports that are available to one side of the firewall. In addition, it can be set up to restrict the type of traffic that can pass through a particular port, such as HTTP. If a client attempts to connect to a restricted port or uses a protocol that is not allowed, then the client is disconnected immediately by the firewall. Firewalls can also be used within a company Intranet to restrict user access to specific servers.
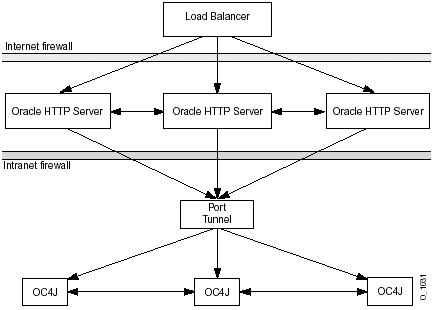
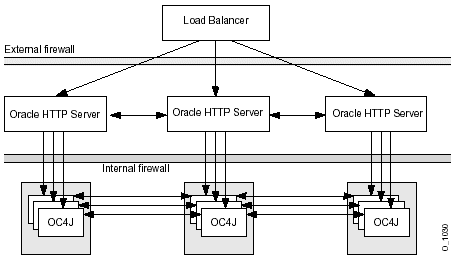
Some of the components of OracleAS can be deployed on different nodes, which can be separated by firewalls. Figure 4-9 demonstrates one recommended organization of OracleAS components between two firewalls:
An external firewall protects the Oracle HTTP Servers from external misuses.
The internal firewall protects the OC4J processes within an intranet in case the first firewall is penetrated.
All communication between the Oracle HTTP Servers and the OC4J processes behind the second firewall should use SSL encryption. Authorization should be provided using SSL client certificates.
Figure 4-9 Routing Between Oracle HTTP Servers and OC4J Processes Through Multiple Firewalls
However, the Oracle HTTP Server and OC4J processes communicate through several ports using DCM, OPMN, and mod_oc4j for this communication. This communication must continue, even if a firewall exists between them. You can continue the communication by exposing the OracleAS component ports through the firewall that are needed to communicate between the OC4J components. You can either manually open each port needed for this communication or you can use the OracleAS Port Tunnel, which opens a single port to handle all communication that normally occurs through several ports. These options are discussed in the following sections:
Instead of opening multiple ports on the intranet firewall, you can use the OracleAS Port Tunnel. The Port Tunnel is a process that facilitates the communication between Oracle HTTP Server and OC4J, including the communication for DCM, OPMN and mod_oc4j, using a single port exposed on the intranet firewall. Thus, you do not have to expose several ports for communication for a single OC4J process. Instead, the Port Tunnel exposes a single port and can handle all of the port requirements for several OC4J processes.
All communication between the Oracle HTTP Servers and the Port Tunnel is encrypted using SSL.
Figure 4-10 shows how three Oracle HTTP Servers communicate with three OC4J processes through the Port Tunnel. Only a single port is exposed on the intranet firewall. The Oracle HTTP Servers exist on a single machine; the Port Tunnel and OC4J processes exist on a separate machine.
However, if you have only a single process managing the communication between the Oracle HTTP Servers and the OC4J processes, you cannot guarantee high availability or failover. You can add multiple Port Tunnel processes, each listening on their own port, to manage the availability and the failover. We recommend that you use two Port Tunnel processes for each machine. You want to minimize the number of ports exposed on the intranet for security, but you also should provide for failover and availability.
Once the Port Tunnel processes are configured and initialized, then the Oracle HTTP Servers automatically balance the load among the port tunnel processes, just as they would among OC4J processes.
While you are risking exposure of a single port for each Port Tunnel process, the number of ports exposed using the Port Tunnel are much less than if you expose all of the ports needed for straight communication between Oracle HTTP Server and OC4J processes, as you can see in "Opening OracleAS Ports To Communicate Through Intranet" .
All of the details for configuring and initializing Port Tunnel processes are documented in the HTTP Security chapter in the Oracle Application Server 10g Security Guide.
You can route between Oracle HTTP Servers and OC4J processes that are located on either side of an intranet firewall by exposing each of the OracleAS component ports through the firewall that are needed to communicate between the OC4J components.
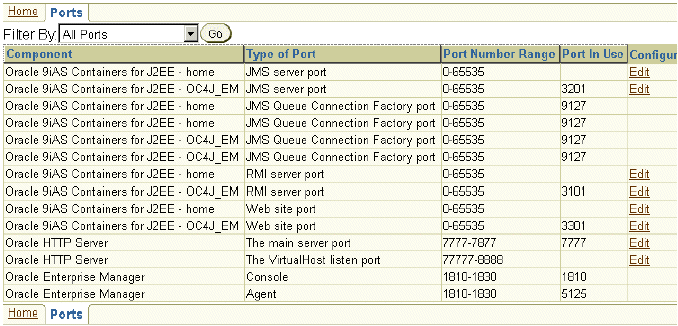
The ports that should be opened on the firewall depend on the services that you are using. Table 4–6 describes the ports that you should open for each service.
Table 4-6 Ports that Each Service Uses
| Service Name | Description | Configuration XML File |
|---|---|---|
| Oracle HTTP Server | Any incoming requests uses HTTP or HTTPS. | The ports listed in the listen directives in the httpd.conf configuration file.
|
| OPMN | OPMN uses HTTP ports to communicate between other OPMN processes in a OracleAS Cluster. OPMN communication is bidirectional, so the ports for all OPMN processes must be opened to each other and to the OC4J processes. | The ons.conf configuration file, which is modified either through hand editing or through the Application Server Console GUI. You can also find out these port numbers by executing dcmctl getOPMNPort.
|
| DCM | DCM uses JDBC to talk to the back-end Oracle-based repository. If it is not desirable to open up a port to the database, then you can use a file-based repository, instead of a database repository. See "Routing Between Instances in Same Farm" for directions on setting up a file-based repository. | The JDBC default port number is 1521. The JDBC database port number is defined in the listener.ora file in the Net8 database configuration.
|
|
|
DCM bootstraps with information from the Oracle Internet Directory over an LDAP port. | The default ports are 389 for LDAP and 636 for LDAP over SSL. If these are taken, then the next in the range are selected; the range is 4031-4040. You can change the port numbers in the ORACLE_HOME/config/ias.properties file.
|
| mod_oc4j module | Communicates with each OC4J process over an AJP port. The port range default is 3001-3100. | Defined in the <port> element either specifically or within a range in the opmn.xml file. We recommend that you specify exactly the number of ports needed for the number of OC4J processes used.
|
| RMI or JMS | You may use RMI or JMS to communicate with OC4J. The default for the port range for RMI ports is 3101 to 3200. The default for the port range for JMS ports is 3201 to 3300. | Defined in the <port> element either specifically or within a range in the opmn.xml file. We recommend that you specify exactly the number of ports needed for the number of OC4J processes used.
|
| Infrastructure | The Infrastructure database only executes on port 1521. | N/A |
| Portal | Uses the same AJP port range as configured for OC4J processes. | Defined in the <port> element either specifically or within a range in the opmn.xml file.
|
At installation time, the Oracle Installer picks available ports and assigns them to relevant processes. You can see the assigned ports for all components by selecting Ports in the default home page using Application Server Console.
|
Note: Some port numbers have multiple dependencies. If you change a port number, you may be required to alter other components. See the "Managing Ports" chapter in the Oracle Application Server 10g Administrator's Guide for a full discussion on how to manage your port numbers. |
You can view all of the ports that are in use through Application Server Console. From the OracleAS Home Instance, select Ports at the top left corner of the page. Figure 4-11 shows all of the ports in use for this OracleAS instance, including all Oracle HTTP Server and OC4J instances. See the "Managing Ports" chapter in the Oracle Application Server 10g Administrator's Guide for more information on managing ports.