6
Using Oracle Wireless and Voice Access
This chapter discusses Oracle Wireless and Voice Access and how to tailor how users receive notifications for any given situation.
This chapter contains the following topics:
Managing Wireless and Voice Settings
The wireless and voice settings enable you to create, manage, and select contact rules. You access the voice and wireless settings by clicking the Voice & Wireless button (as shown in Figure 6-1) on the Oracle Collaboration Suite portal page.
If you are a new user, you must create an account in the Voice Access and Alert Settings page.
Figure 6-1 The Voice and Wireless Button

Text description of the illustration nsv_vwbt.gif
Creating a Contact Rule
Voice Access and Alert Settings
Complete the fields as detailed below.
- My mobile phone number is: Enter the telephone number for your mobile telephone
Any valid telephone number is acceptable (for example, +1 650 123-4567 is the same as 16501234567).
- My work phone number is: Enter the telephone number for your workplace telephone
Any valid telephone number is acceptable (for example, +1 650 123-4567 is the same as 16501234567).
- Choose a voice & wireless PIN: Enter and confirm a numeric voice access personal identification number (PIN) six to ten digits long
- Alert me when I receive: Choose the types of communications you want to be alerted about by checking one or more of the following: Voicemails, Fax messages, Urgent messages, Messages from the following people. If you check Messages from the following people, enter the names in the field below. List the first and last name of each person, separating the peoples' names with commas (for example: Jerry West, Johnny Weissmuller).
- My voice & wireless inbox view: Choose how you want messages displayed by clicking one of the radio buttons
Click Cancel to discard all input information.
Click Finish to save your changes and go back to the portal page.
Click Advanced to save your changes and go to the Advanced Voice & Wireless Settings page.
Note:
You use the numbers you enter for mobile phone and your Voice and Wireless PIN to access contact rules using the Device Portal Access. You access the login page for the Device Portal Access through the following URL:
http://hostname:7777/ptg/rm
7777 is the default port number for Oracle9iAS Wireless. The port number range is 7777 to 7877. To ensure that you are using the correct port number, check the port number for Oracle9iAS Wireless stored in the ORACLE_HOME/install/portlist.ini file.
|
Advanced Voice and Wireless Settings
This page enables you to manage your contact rules and contact points. Two tables on this page--My Contact Rules and Contact Points--organize these items for your use.
- How to Reach Me
- Set Current: Click Set Current to set the selected contact rule as your current contact rule
- Edit: Edit a contact rule by selecting the radio button of the contact rule you want to change and click Edit
- Delete: Delete a contact rule by selecting the radio button of the contact rule you want to delete and click Delete
- Add: Add a new contact rule by clicking Add
- My Communication Devices
- Edit: Edit a communication device by selecting the radio button of the communication device you want to change and click Edit
- Delete: Delete a communication device by selecting the radio button of the communication device you want to delete and click Delete
- Add: Add a new communication device by choosing the type of device from the drop-down list and click Add
Click Back to return to the Voice and Wireless Settings page.
Click Finish to return to the portal page.
Adding a Contact Rule
To add a Contact Rule, click Add in the How to Reach Me table and complete the fields as detailed below.
- Contact Rule: Enter a name for your contact rule (for example, At My Desk)
- Call me at: Enter the communication device on which you want to be telephoned (for example, My Mobile Phone). You can select Do not call me if you do not want to be notified by telephone. Only communication devices that have a voice feature will be listed for selection.
- Email me at: Enter the communication device on which you want to be notified by e-mail (for example, My Email). You can select Do not email me if you do not want to be notified through e-mail. Only communication devices that have an e-mail feature will be listed for selection.
- Fax me at: Enter the communication device on which you want to receive faxes (for example, My Fax). You can select Do not fax me if you do not want to be notified through a fax. Only communication devices that have a fax feature will be listed for selection.
- Send me SMS at: Enter the communication device on which you want to receive short messages (for example, My SMS). You can select Do not call me if you do not want to be notified through short message service (SMS). Only communication devices that have an SMS feature will be listed for selection.
- The best way to reach me is: Enter your preferred method of receiving notifications
Ensure that the appropriate communication device is selected for the way you want to be notified, otherwise you will not be able to receive notification. For example, if you want to be notified through a telephone call, make sure that Call me at has a communication device selected.
Note:
Contact rules must be created before they can be selected.
|
Click Finish after entering your information.
Editing a Contact Rule
To edit a contact rule, select the radio button of the contact rule you want to modify. Complete the fields as detailed below.
- Contact Rule: Enter or change a name for your contact rule (for example, At My Desk)
- Call me at: Enter or change the communication device on which you want to be telephoned (for example, My Mobile Phone). You can select Do not call me if you do not want to be notified by telephone. Only communication devices that have a voice feature will be listed for selection.
- Email me at: Enter or change the communication device on which you want to be notified by e-mail (for example, My Email). You can select Do not email me if you do not want to be notified through e-mail. Only communication devices that have an e-mail feature will be listed for selection.
- Fax me at: Enter or change the communication device on which you want to receive faxes (for example, My Fax). You can select Do not fax me if you do not want to be notified through a fax. Only communication devices that have a fax feature will be listed for selection.
- Send me SMS at: Enter or change the communication device on which you want to receive short messages (for example, My SMS). You can select Do not call me if you do not want to be notified through SMS. Only communication devices that have an SMS feature will be listed for selection.
- The best way to reach me is: Enter or change your preferred method of receiving notifications.
Ensure that the appropriate communication device is selected for the way you want to be notified, otherwise you will not be able to receive notification. For example, if you want to be notified through a telephone call, make sure that Call me at has a communication device selected.
Note:
Contact rules must be created before they can be selected.
|
Click Finish after entering your information.
Deleting a Contact Rule
To delete a contact rule, select the contact rule radio button in the Contact Rule table, and click Delete.
Adding a Communications Device
Communications devices are identified devices on which you can receive notifications. To add a communications device, click Add in the Communications Devices table. You can add e-mail addresses, fax machines, mobile telephones, pagers, personal digital assistants (PDAs), and telephones.
To add a communications device, select the type of contact point you want to add and click Add to display the appropriate Add page.
Adding an E-mail Address
To add an e-mail address, do the following:
- Enter a name for your e-mail address in the Name field (for example, My Work Email).
- Enter the e-mail address in the Email Address field (for example,
Bo.Diddley@harvard.org).
- Click Finish after entering your information.
Adding a Fax Number
To add a fax number, do the following:
- Enter a name for your fax machine in the Name field (for example, My Work Fax).
- Enter the telephone number for your fax machine in the Fax Number field. Any valid telephone number is acceptable (for example, +1 650 123-4567 is the same as 16501234567).
- Click Finish after entering your information.
Adding a Mobile Phone
To add a mobile telephone, do the following:
- Enter a name for your mobile telephone in the Name field (for example, My Mobile Phone).
- Enter the telephone number for your mobile telephone in the Mobile Phone Number field. Any valid telephone number is acceptable (for example, +1 650 123-4567 is the same as 16501234567).
- Enter the e-mail address for messages transmitted to this mobile telephone in the Email Address field.
- Click Finish after entering your information.
Adding a Pager
To add a pager, do the following:
- Enter a name for your pager in the Name field (for example, My Pager).
- Enter an e-mail address for your pager in the Pager Email Address field (for example,
Bo.Diddley@harvard.org).
- Click Finish after entering your information.
Adding a PDA
To add a PDA, do the following:
- Enter a name for your PDA in the Name field (for example, My PDA).
- Enter the e-mail address for messages transmitted to this PDA in the PDA Email Address field.
- Click Finish after entering your information.
Adding a Phone Number
To add a telephone number, do the following:
- Enter a name for your telephone in the Name field (for example, My Home Phone).
- Enter the telephone number for your telephone in the Phone Number field. Any valid telephone number is acceptable (for example, +1 650 123-4567 is the same as 16501234567).
- Click Finish after entering your information.
Editing a Communications Device
To edit a communications device, select the radio button of the communications device you want to edit and click Edit to display the Edit page for that device.
Editing an E-mail Address
To edit an e-mail address, do the following:
- Edit the name of your e-mail address in the Name field.
- Edit the e-mail address for your e-mail in the Email Address field.
Click Finish after entering your information.
Editing a Fax Number
To edit a fax number, do the following:
- Edit the name for your fax machine in the Name field.
- Enter the telephone number for your fax machine in the Fax Number field.
Click Finish after entering your information.
Editing a Mobile Phone
To edit a mobile telephone number, do the following:
- Edit the name for your mobile telephone in the Name field.
- Edit the telephone number for your mobile telephone in the Mobile Phone Number field.
- Edit the e-mail address for your mobile phone in the Mobile Phone Email Address field.
Click Finish after entering your information.
Editing a Pager
To edit a pager, do the following:
- Edit the name for your pager in the Name field.
- Edit the e-mail address for your pager in the Pager Email Address field.
Click Finish after entering your information.
Editing a PDA
To edit a PDA, do the following:
- Edit the name for your PDA in the Name field.
- Edit the e-mail address for messages transmitted to this PDA in the PDA Email Address field.
Click Finish after entering your information.
Edit Phone Number
To edit a telephone number, do the following:
- Edit the name for your telephone in the Name field.
- Edit the telephone number for your telephone in the Phone Number field.
Click Finish after entering your information.
Deleting a Communications Device
To delete a communications device, select the radio button next to the communications device you want to delete and click Delete.
Managing Personal Contact Rules
You can select a contact rule from a Web-based interface, such as the Oracle Collaboration Suite home page, or from a registered communications device.
Selecting a Contact Rule from a Web-Based User Interface
You can change your contact rules from the Oracle Collaboration Suite home page or from any of voice and wireless settings screens. From these applications, you select a contact rule from the drop-down list and click Change.
Figure 6-2 Selecting a Contact Rule from the Oracle Collaboration Suite
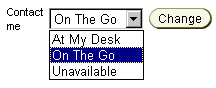
Text description of the illustration nsv_crsw.gif
Selecting a Contact Rule from a Device
You can also select contact rules from a variety of devices, because Wireless XML enables the conversion of XML from any Oracle9iAS Wireless application into several device-specific markup languages. As a result, you can select contact rules from a WAP-enabled device or from a telephone. In addition, async-enabled applications enable you to select contact rules from devices having such asynchronous messaging applications as SMS or e-mail, but lacking Internet access.
To change contact rules from these devices, send a message to ASK SMS or e-mail address set by the Oracle Collaboration Suite administrator.
From a device, such as a WAP-enabled mobile phone, select a contact rule from the displayed list. When you change a contact rule, Wireless switches from one rule's settings (which controls how you are contacted) to those of another contact rule.
This section describes the following:
Selecting a Contact Rule from a Device
A mobile device, such as a mobile phone, displays your contact rules as a list and notes your current contact rule with an asterisk (*). Select a new contact rule by using the device's navigation keys and selecting OK.
Figure 6-3 Selecting a Contact Rule from a Device
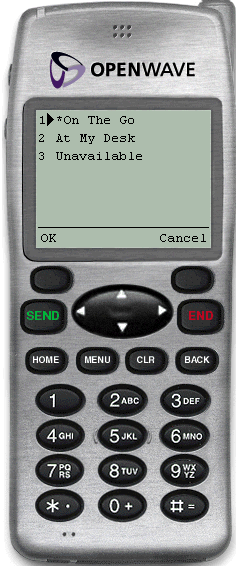
Text description of the illustration nsv_c1ph.gif
The confirmation screen displays, noting the new contact rule. Click OK to return to the main menu.
Figure 6-4 The Confirmation Page (from a Device)
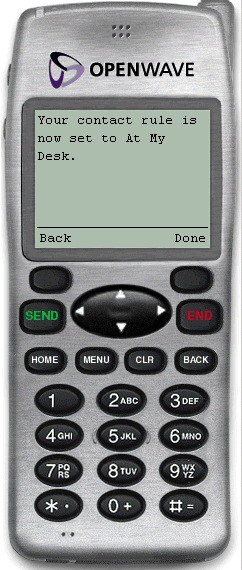
Text description of the illustration nsv_c2ph.gif
Selecting a Contact Rule from an SMS- or E-mail-Based Device
From devices using asynchronous applications, you can set your contact rules by sending commands as messages to the ASK SMS or e-mail address. You can use messages to set your contact rules as follows:
Method 1
For this method, change your contact rules by sending three separate messages as follows:
- Message 1: Enter
cr in the message subject line or body of the message. You will receive a message which prompts you for your mobile phone number and PIN.
- Message 2: Enter your mobile phone number and PIN in the subject line or body of the message. If you send this information in the body of an e-mail, you must enter it on the same line. You will receive a message with a numbered list of contact rules.
- Message 3: Enter the number of the new contact rule in the subject line or body of the message. For example, enter
2 if you wish to select 2. At My Desk from the numbered list. You will receive a message confirming the contact rule change.
Method 2
Using this method, you can change your contact rule by sending two separate messages, combining the cr command with the exact name of the contact rule as follows:
Method 3
You can also change your contact rule by sending a single message that combines the cr command, the name of the contact rule, and your user name and password together in the subject line or body of your message. For example, you can select a new contact rule by entering all of the information in the subject line or body of a message as follows:
cr "At My Desk"; 16501234567 12345
Note:
Use a semi-colon (;) to separate the cr and contact rule name command from the user name and password.
|
After you send this message, you will receive a message confirming the contact rule change.
Note:
If the name of your contact rule contains spaces, then you must enclose the entire name of the contact rule in quotation marks ("). The contact rule name is also case-sensitive.
|
Selecting a Contact Rule Using a Voice Application
After you dial in, do the following:
- Enter your mobile phone number.
- Enter your PIN.
- Confirm your PIN when prompted.
- Say
Contact Rules to launch the Contact Rules application. The system first announces your current contact rule and then lists the available contact rules.
- Say the name of the new contact rule. For example, say
At My Desk. The system replies, confirming the change and returns to the main menu.


