| Oracle® Enterprise Manager Cloud Administration Guide 12c Release 2 (12.1.0.2) Part Number E28814-03 |
|
|
PDF · Mobi · ePub |
| Oracle® Enterprise Manager Cloud Administration Guide 12c Release 2 (12.1.0.2) Part Number E28814-03 |
|
|
PDF · Mobi · ePub |
This chapter describes the server, storage and networking infrastructure that needs to be defined for providing Infrastructure as a Service (IaaS) cloud using the Oracle VM technology. It contains the following sections:
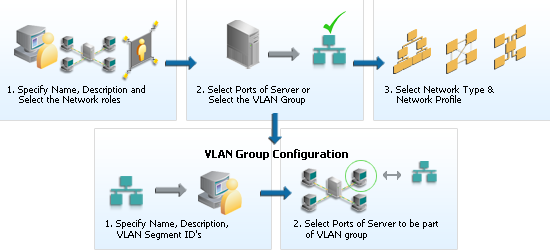
This section helps you get started with this chapter by providing an overview of the steps involved in setting up the virtualization infrastructure. Consider this section to be a documentation map to understand the sequence of actions you must perform to successfully set up virtualized systems.
Before you start monitoring and managing virtualization targets, you must register the Oracle VM Manager with Oracle Enterprise Manager. See Registering the Oracle VM Manager for details.
You can then discover one or more Oracle VM Server targets. See Discovering an Oracle VM Server for details.
Set up the storage infrastructure for the cloud. See Registering Storage Servers for details.
Configure networks and VLAN Groups. See Setting Up Networks for details.
Create a virtual server pool. See Creating a Virtual Server Pool for details.
Create a zone by grouping one or more server pools. See Creating a Zone for details.
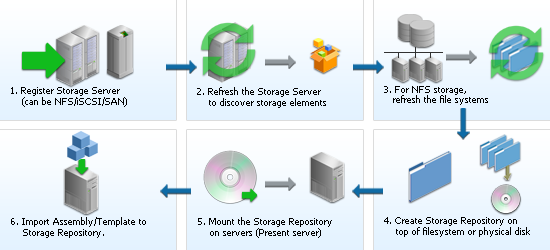
Figure 5-1 shows the sequence of steps involved in setting up the virtualization infrastructure.
The Oracle VM Manager provides the user interface that allows you to create and manage zones, virtual server pools, virtual servers, and guest virtual machines. Before you use the Oracle VM Manager to manage virtualization targets in Enterprise Manager, you must register an existing installation of the Oracle VM Manager. To register the Oracle VM Manager, you must first add it as an Enterprise Manager target. To do so, follow these steps:
Note:
The OVM Manager that you register with Enterprise Manager must be at least version 3.0.2 or higher.
The OVM Manager must be associated with only one Enterprise Manager installation.
As a best practice, it is recommended that the Management Agent and the Oracle VM Manager are present on the same physical machine.
From the Enterprise menu, select Cloud, then select Infrastructure Home.
From the Infrastructure Cloud menu, select Register OVM Manager. The Add Oracle VM Manager page appears.
You can register an existing installation of Oracle VM Manager by following these steps:
Enter a name for the Oracle VM Manager target to be registered.
Select the URL for the Management Agent. For example, https://agent.example.com:1830/emd/main/
Enter the URL (tcps://ovmmgr.example.com:54322/) of the physical machine on which the Oracle VM Manager is installed. Refer to Note 1456338.1 for details on configuring Oracle VM Manager for TCPS access.
To automatically synchronize the data from Oracle VM Manager into Enterprise Manager at fixed intervals of time, enable the Automatic Synchronization checkbox. The default interval is 5 minutes. This setting is optional.
Enter the user name and password for the Oracle VM Manager.
Note:
These credentials are required to launch the OVM Manager. These are not operating system credentials for the host on which the OVM Manager has been installed.Enter the URL for the Oracle VM Manager Console. For example, https://ovmmgr.example.com:7002/ovm/console
If you want to use separate credentials for managing Oracle VM Manager, check the Use Administration Credentials check box. If these credentials are not specified, the monitoring credentials are used by default.
Click Submit to register the Oracle VM Manager. You can now use the Oracle VM Manager to monitor and manage the virtualization targets in Enterprise Manager.
The older version of Oracle VM Manager 3.1.x is certified for registration with Enterprise Manager 12c Cloud Control. To register the Oracle VM Manager 3.1.x in Enterprise Manager 12c, ensure that the correct tcps URL (tcps://hostname) has been specified. A sample screenshot is shown below:
When upgrading from Oracle VM Manager 3.0.x to Oracle VM Manager 3.1.x, follow these steps:
Right click on the OVM Manager target that is to be upgraded and select Edit.
Enter a tcps based (tcps://hostname) URL in the Oracle VM Manager field.
You are prompted to import the OVM Manager certificate to the Agent Keystore.
Export the OVM Manager certificate <JAVA_HOME>/bin/keytool -keystore <OVM_MANAGER_HOME>/ovmmCoreTcps.ks -exportcert -alias ovmm -file <file_loc_for_certificate>
Import the OVM Manager certificate <AGENT_INSTANCE_HOME>/bin/emctl secure add_trust_cert_to_jks -trust_certs_loc <file_loc_for_certificate> -alias <alias_name>
After tcps has been configured, restart the OVM Manager, then you'll see that Oracle VM Manager is now listening for tcps requests on port 54322 by default.
Note:
If the OVM Manager and the Management Agent are running on the same host, edit the OVM Manager target and specify the URL astcp://localhost:54321.Automatic discovery is a process that detects hosts, virtual servers and other targets so that they can be monitored and managed by Enterprise Manager. If you know the Oracle VM Manager instances in your environment, see Registering the Oracle VM Manager for details on registering them with Enterprise Manager. Discovery and promotion of Oracle VM Manager should be attempted if you want to scan your networks to discover unknown Oracle VM Manager instances.
To discover an Oracle VM Manager, follow these steps:
From the Setup menu, select Add Target, then select Configure Auto Discovery.
In the Configure Auto Discovery section, click Configure in the Discovery Setup table for the row, Hosts and Virtual Server Discovery Using IP Scan. Enterprise Manager displays the Host Discovery (Agentless) page. Use this page to search, browse, and create host discovery specifications.
Enter the Name, Owner, and Description information and then click Search to find a host. The results appear in the Host table. Use the Scan Details tab to select an agent that performs the IP scan, and for each agent, specify the IP ranges for the scan. The following formats are supported: host name, IP address, and IP range. Use space to separate values.
Use the Job Details tab on the Host Discovery Specification Create page to schedule the discovery IP scan, allowing you to start it immediately or at a later specified time. Use the Credentials section to enter preferred credentials for the host. You can choose from Preferred Credentials, Named Credentials, or New Credentials. The discovery IP Scan is run as root. It is required that you set privileged host credentials or named credentials that use Sudo.
You can use the Host Discovery page to check the status of discovery and view newly discovered hosts.
After the target has been discovered, from the Setup menu, select Add Target, then select Auto Discovery Results. Enterprise Manager displays the Discovered Unmanaged Targets page where you can review discovered unmanaged targets and promote targets to be managed by Enterprise Manager for monitoring.
On the Non-Host targets tab, view the target discovery results. Select the OVM Manager target and click Promote. The OVM Manager Registration page is displayed. See Registering the Oracle VM Manager for details.
Enterprise Manager can monitor the OVM Manager and the various virtualization targets registered with the OVM Manager. The targets registered with the OVM Manager must also be monitored targets in Enterprise Manager. If some targets have been created directly in OVM Manager, you can use the Synchronize option to add them to Enterprise Manager. To synchronize the OVM Manager targets, follow these steps:
From the Enterprise menu, select Infrastructure Cloud, then select Home.
Right click on an OVM Manager target from the left panel and select Synchronize.
A confirmation message appears. Click Submit. The targets in Enterprise Manager and OVM Manager are synchronized.
Targets that are not present in OVM Manager will be removed.
For targets present only in OVM Manager, corresponding targets are created in Enterprise Manager.
Configuration collections are refreshed for all other targets.
A virtual server is a generic term used to describe a physical box which has virtualization software (hypervisor) running on it. A new virtual server can be provisioned by installing the OVM Hypervisor on a bare metal box. Before you add a virtual server to a server pool, it must be discovered.
To discover an Oracle VM Server, follow these steps:
From the Enterprise menu, select Cloud, then select Infrastructure Home.
Right click on an OVM Manager target from the left panel and select Discover Virtual Server.
Specify the host name or the IP address of the virtual server. You can enter multiple host names or IP addresses on separate lines.
Enter the user name and password of the Oracle VM Agent running on the virtual server to be discovered.
Click Submit to discover the virtual server.
The newly discovered Oracle VM Server contains some basic information about itself, and about any immediate connectivity to a network storage, but it is considered to be in an unconfigured state. After the storage and networking has been configured, the Oracle VM virtual servers are ready to be used as the infrastructure for cloud.
To rediscover a virtual server, follow these steps:
From the Enterprise menu, select Cloud, then select Infrastructure Home.
Right click on a Virtual Server target in the left panel and select Rediscover Virtual Server.
A confirmation message appears. Click OK to rediscover the virtual server and discover any new NICs and LUNs that have been added.
This section discusses creation and use of Oracle VM Networks. You can define a name or an alias for each logical network. When you have created your networks, you connect the physical network ports on Oracle VM Servers to the logical networks. Before you define the logical networks in Enterprise Manager, you have to review your physical network configuration that you intend to use, such as VLAN and subnet usage. Setting up an Oracle VM network involves:
Generating MAC Addresses
Creating and configuring VLAN Groups
Creating Networks
Virtual network interfaces (VNICs) are used to carry network traffic to virtual machines. You can generate MAC addresses that can be assigned to VNICs in a virtual machine. Specify a range of MAC addresses that need to be generated.
To create MAC Addresses, follow these steps:
From the Enterprise menu, select Cloud, then select Infrastructure Home.
Right click on an OVM Manager target from the left panel and select Manage Network.
Click the Virtual Network Interface Card Manager tab.
Click Generate. In the Generate MAC Addresses pop-up window, you are prompted to specify an initial MAC address in 3 sets of 3 characters. This is a two-digit number for the Initial MAC Address. Click OK to return to the previous page. You can now use these VNICs while creating virtual machines.
Note:
Configuring a VLAN Group is an optional feature. If VLANs exist in your physical network, you must follow the steps in this section to use them in the cloud.VLAN (Virtual Area Network) is a mechanism to virtualize network interfaces across subnets and physical location so that they appear to be on a single confined LAN. This concept is used to isolate (and group) the network traffic across these distributed interface, which enables secure network traffic within such nodes.
You can create multiple virtual LAN (VLANs) on the same NIC port. Each VLAN is an independent logical network operating with other VLANs over the same physical connection. Configuring VLANs involves creating one or more VLAN Groups, each of which contain multiple VLANs segments.
Each VLAN is assigned a distinct VLAN identification. The VLAN ID is used by an attached VLAN switch to segregate traffic among the different VLANs operating on the same link. Once a VLAN is configured, it functions exactly like a separate physical connection. VLANs need to be configured in the physical switches before you use them. To create a VLAN group, follow these steps:
From the Enterprise menu, select Cloud, then select Infrastructure Home.
Right click on an OVM Manager target from the left panel and select Manage Network.
Click the VLAN Groups tab and click Create.
Enter a name and description for the VLAN Group.
Enter one or more VLAN Segments. This is the VLAN ID that is enabled on the switch ports connecting the virtual server to the switch. The valid range is from 1 to 4095.
Click Add to select the ports to be added to the network. Select one or more virtual servers to be added to the network. If you add more than two ports of a virtual server, the first two ports will be bonded. Network bonding refers to the combination of network interfaces on one host for redundancy or increased throughput.
If your network supports jumbo frames, you must set the Maximum Transfer Unit size in the MTU field. Setting the MTU field, sets the maximum transmission rate, so that larger packets can be sent and received. You can set the MTU to a maximum of 1500 for Ethernet, 9000 for 1GbE, and 64,000 for 10GbE.
Note:
The ports that you have selected must have the VLAN Segment IDs enabled.Click OK to create the VLAN Group.
A network is a grouping of Oracle VM virtual server physical NIC ports. This section describes the procedure to create a logical network.
If you choose to associate a network profile with the network, then the network profile must be created before the network is created. A network profile stores the network interface configuration (IP address, subnet mask, host name, DNS servers) that is allocated to network interfaces of newly provisioned virtual machines.
Follow these steps to create a logical network:
From the Enterprise menu, select Cloud, then select Infrastructure Home.
Right click on an OVM Manager target from the left panel and select Manage Network.
Click the Create option in the Networks tab. You are prompted to configure the ports of the VLAN Groups. Click Create VLAN Group to configure VLAN Groups. See Configuring a VLAN Group for details. If you want to create the networks without configuring the VLAN groups, click Continue Network Creation. In the Create Network: General page, enter the name and description of the network.
Specify if you are creating an inter-server or intra-server network. An inter-server network is routable through standard switches. An intra-server network is available within a single server without a route to an external physical network.
Specify the network role by checking one or more check boxes in the Network Roles section.
Note:
To deploy a Guest VM, you must have at least one logical network with the Virtual Machine role.Server Management: Manages the physical virtual servers in a server pool, for example, to update the Oracle VM Agent on the different virtual servers.
Live Migrate: Carries live migrate traffic. You can migrate virtual machines from one virtual server to another in a server pool, without changing the status of the virtual machine.
Virtual Machine: Used for the network traffic between the different virtual machines in a server pool. The virtual machine role can either be an Inter-Server (routable through standard switches), or an Intra-Server (without a route to an external physical network). The Virtual Machine role must be unique on the network, which means that this network cannot have other network roles. It is however possible, and very likely, to have multiple networks with the Virtual Machine role in one Oracle VM Manager.
Storage: Used for all storage transport in a server pool. It is used by the virtual servers to connect to ethernet-based storage repositories.
Click Next. In the Configure Ports and VLAN Interfaces page, click Add and select a VLAN Group from the list. For more details, see Configuring a VLAN Group.
After adding the VLAN Segment, click Add the VLAN Interfaces and the ports. Select the ports to be added to network. A maximum of two ports can be added. If you select more than two ports, they will be bonded or aggregated into a single interface. Select the bonding mode which can be:
Active Passive: There is one active NIC. If this one goes down, another NIC becomes active.
Link Aggregation: All NICs act as one NIC which results in a higher throughput.
Load Balanced: The network traffic is equally balanced over the NICs of the machine.
If your network supports jumbo frames, you must set the Maximum Transfer Unit size in the MTU field. Setting the MTU field, sets the maximum transmission rate, so that larger packets can be sent and received. You can set the MTU to a maximum of 1500 for Ethernet, 9000 for 1GbE, and 64,000 for 10GbE
Click Next. The Network Profile and QoS page appears.
Note:
Defining the Network Profile and QoS is optional. A network profile stores the network interface configuration (IP address, subnet mask, host name, DNS servers) to be allocated to network interfaces of newly provisioned virtual machines.Specify the following:
Network Type: You can select Internet Routable, Non Internet Routable, or a predefined set of network types.
Network Profile: A network profile defines a set of IP Addresses, their associated host names (optionally), and common networking attributes for them. See Creating a Network Profile for details.
Review the details entered so far and click Finish to create the network.
A network profile is used to automate assignment of IP addresses to guest virtual machines. A network profile is a list of IP address along with host names. It defines a set of IP addresses, their associated host-names, and common networking attributes for them.
To create a network profile, follow these steps:
From the Setup menu, select Provisioning and Patching, then select Network Profile.
Click Create on the Network Profile page.
Enter the following details in the Create Network Profile pop-up window:
You can add a list of IP addresses or specify a range. If you select:
List: Specify IP addresses with host name and MAC address (optional).
Range: Specify a Hostname Pattern. The Start Value is appended to the host names generated. The First IP Address and the Last IP Address defines the range. For example: If the pattern is say hostprod and Start Value is 1, First IP Address is 10.1.1.1 and Last IP Address is 10.1.1.3, the host names will be hostprod1, hostprod2 and hostprod3.
Click OK to save the network profile.
You can create external storage elements like storage servers, file systems, and LUNs. An external storage element is created on dedicated storage hardware such as a server configured for NAS offering NFS shares. The server on which the storage element is present must be accessible by the Oracle VM Servers through a fibre channel or ethernet network.
To set up a storage server, follow these steps:
From the Enterprise menu, select Cloud, then select Infrastructure Home.
Right click on an OVM Manager target in the left panel and select Manage Storage. Figure 5-13 appears.
A list of file servers, storage arrays, and local file servers that have been defined appears. Enter the following details for the Register Storage Server window:
Type: Select the type of storage array that can be defined. A storage array is additional network provided storage that can be specifically used to store virtual disks for virtual machines. A server pool can be configured with multiple external storage devices. You can define 3 types of storage arrays:
iSCSI: An iSCSI target configured or discovered on the Oracle VM Server.
SAN: A Fiber Channel SAN target configured/discovered on the Oracle VM Server.
NFS: An NFS or NAS file system mounted locally.
Select File Server (NFS) or Storage Array (iSCSI or SAN).
Name: Name by which the storage server is to be identified.
Plugin Name: The Oracle VM Manager communicates with the external storage through a set of plug-ins. Generic plug-ins offer a limited set of standard storage operations on virtually all storage hardware, such as discovering and operating on existing storage resources. Vendor-specific plug-ins include a much larger set of operations (snapshot, clone, and so on).
Access Host: Host name or IP address of the server offering external storage.
Access Port: Port number used to access the storage.
Admin Host: Host name of the Administration Server.
Admin Username and Password: User name and password for the Administration Server.
Click Continue. In the Admin Server window, click Add to add one or more Administration Servers on which the storage plug-in has been installed. The Administration Server is responsible for information exchange with the Administration Host of the storage server.
Click Submit to create the storage server. The new server appears in the table. At this point, the Storage Connect plug-in has established a link to the storage location. No storage has been mounted yet.
Click Discover to start the discovery operation of the file systems available on the server. A confirmation message prompting you to refresh the file system appears. Click OK to refresh the file system and return to the Storage page.
Click a File Server link to view the Details page. This page contains the following tabs:
General: A list of Administration Servers is displayed. An Administration Server is a virtual server on which the storage plug-in has been installed. Select an Administration Server from the list and click Edit to configure it.
In the Storage QOS Mapping section, map the storage type defined by the Cloud Administrator to the QOS defined by the Storage Server.
File Systems: You can edit or refresh a file system in the list. Select a file system from the list and click Edit. You can modify the name and description of the file system.
To refresh, select a file system from the list and click Refresh. Select the name of the virtual server and click OK to refresh the file system.
Click a Storage Array link to view the Details page. This page has four tabs:
General: Provides general information on the storage array. Configuration details and Storage QoS Mapping for the array appears.
Physical Disks: Displays a list of all the physical disks on the storage array. Depending on the type of storage connector (You can Create, Clone, Edit, Resize (resize or extend the physical disk), Rescan (refreshes the physical disk), Delete, and Create File System (create OCFS2 file system on the physical disk).
Note: The operation allowed depends on the type of storage connect plug-in that has been installed. For example, if the generic storage connect plug-in has been installed, you cannot perform a Create operation on the physical disks.
Access Group: Shows the mapping between Storage Initiators and Physical Disks. You can Create, Edit, Present / Unpresent Access Group (Add or Delete physical disk), and Delete access group.
Volume Group: Displays the volume group available for this storage server.
Click on a Local File Server Servers link to view the Details page. This page contains the following tabs:
General: The configuration details of the selected Local File Server including the Administration Host, Plug-in Name, and so on are displayed.
File Systems: You can edit or refresh a file system in the list. Select a file system from the list and click Edit. You can modify the name and description of the file system.
To refresh, select a file system from the list and click Refresh. Select the name of the virtual server and click OK to refresh the file system.
A storage repository is virtual disk space on top of physical storage hardware, made available to the Oracle VM Servers in a server pool or various server pools. It defines where Oracle VM resources may reside. Resources include virtual machines, templates for virtual machine creation, virtual machine assemblies, ISO images, shared virtual disks, and so on.
After you have created the storage server, you can assign these storage resources to the server pools in a zone by creating a storage repository.
To create a storage repository, follow these steps:
From the Enterprise menu, select Cloud, then select Infrastructure Home.
Right click on an OVM Manager target in the left panel and select Manage Storage Repository.
The list of storage repositories that have been defined appears. Click Create to create a storage repository.
In the pop-up window, enter the name of the storage repository.
Click the Search icon in the Disk field to select the Storage Server and File System on which the storage repository is to be created and click OK.
If you select the NFS File System, you must select the location of the storage server and a virtual server. You can optionally specify the Share Path and a description. The storage repository has now been created and will be displayed in the Storage Repositories page.
After the storage repository has been created, you can perform a number of management operations on it. The listing of storage repositories depends on the server pool selection. If you select server pools, you see all the storage repositories. If you select an individual server pool, only the storage repositories related to that server pool appear. You can perform the following operations:
Edit: Select a repository and click Edit. You can modify the name and description or release the ownership of the repository. Click OK to save the changes.
Delete: Select a repository and click Delete. All the contents of the selected repository along with its associations will be deleted.
Refresh: Select a repository and click Refresh. The contents of the selected repository including assemblies, templates, ISO images, templates, and virtual disks will be refreshed.
Discover: Select this option to discover a repository that has been created externally through the Oracle Virtual Manager console.
After you have created the storage repository, you can propagate it to one or more server pools. When the storage repository is prepared and created, it still must be made available for use by your virtual servers before it can be used. Typically you present the storage repository to all the virtual servers in the server pool.
To present a storage repository to server pool, follow these steps:
From the Enterprise menu, select Cloud, then select Infrastructure Home.
Right click on an OVM Manager target from the left panel and select Manage Storage Repository.
In the Storage Repository page, select a storage repository from the list. The list of server pools on which the storage repositories have been propagated appears.
Select one or more server pools from the list and click Present. In the Present Servers dialog box, click the Select Servers icon. The list of members appears in the Select Targets dialog box. Expand the Members in this dialog box and check the boxes for zones, pools, or individual virtual servers and click Select to return to the previous dialog box. Click Present to mount the member on the server.
A storage repository associated with an Oracle VM server stores binary components associated with an Oracle VM servers. The following software components can be stored in the storage repository:
The Oracle Virtual Assemblies, Oracle VM Templates and ISO images need to be imported into the storage repository before guest virtual machines can be created using them. Follow these steps to import software components into the storage repository:
From the Enterprise menu, select Cloud, then select Infrastructure Home.
Right click on an OVM Manager target in the left panel and select Manage Storage Repository.
Click on a Repository Name link. The Storage Repository Details page shows the list of server pools on which the selected storage repository has been propagated.
Click the Assemblies tab. Assemblies can be imported as a set of .ovf (Open Virtualization Format) and .img (disk image) files, or it may all be contained in a single .ova file.
Click Import. You can import the assembly from the Software Library or from an external source. If you select:
Software Library: The list of assemblies present in the Software Library are displayed. Select the assemblies to be imported and click OK. After the assembly has been imported, select the assembly and click Unpack to create a series of templates. This option unpacks the contents of the assembly, for example, configuration files, disk images, and so on.
External: Specify a external URL from which the assembly is to be imported and click OK. The URL you specify must be accessible from the OVS Host on which the repository is presented.
Click on the ISOs tab to import the ISO images. Virtual machines have no access to the physical DVD or CD-ROM drive. You can assign virtual drives to virtual machines by offering .iso files containing the image of a DVD or CD-ROM. These image files can be found in the ISOs tab of the storage repository.
Click Import. You can import the ISO image from the Software Library or from an external source. If you select:
Software Library: The list of ISO images present in the Software Library are displayed. Select the ISO images to be imported and click OK. Select the ISO image that has been imported and click Assign to assign this template to a server pool.
External: Specify a valid external URL from which the ISO image is to be imported and click OK. The URL you specify must be accessible from the OVS Host on which the repository is presented.
Click the VM Templates tab. Templates contain the configuration of a single virtual machine. When you create a new virtual machine, you choose to either create it from scratch or from a template. In a storage repository, templates are typically imported as an archive (.tgz, .tar or other). The archive contains a .cfg file with the virtual machine configuration, and at least one .img file which is a virtual disk image.
Click Import. You can import the VM Template from the Software Library or from an external source. If you select:
Software Library: The list of VM Templates present in the Software Library are displayed. Select the VM Template to be imported and click OK. After the template has been imported, select the template and click Assign to assign this template to a server pool.
External: Specify a valid external URL from which the VM template is to be imported and click OK. The URL you specify must be accessible from the OVS Host on which the repository is presented.
Click on the Virtual Disks tab.
Click Create and size of virtual disk to be created.
Indicate if this is a shared disk by checking the Shared check box.
After the disk has been created, select the template and click Assign to assign this disk to a server pool.
Click Import. You can import the virtual disk from the Software Library or an external source. If you select:
Software Library: The list of virtual disks present in the Software Library are displayed. Select the virtual disks to be imported and click OK. Select the virtual disk has been imported, click Assign to assign this template to a server pool.
External: Specify a valid external URL from which the virtual disk is to be imported and click OK. The URL you specify must be accessible from the OVS Host on which the repository is presented. If you reference the virtual disk using http:// or ftp:// protocols, you must include user/pw in the reference.
For example, you must specify the URL as http://user:pw@host/virtualdisk_file_image_file or ftp://user:pw@host/virtual_disk_image_file. If the virtual disk is accessible by way of NFS, you can also specify file:///net/host/virtual_disk_image_file if the OVS is enabled for NFS automount.
Click Return to return to the Storage Repository page.
You can configure the virtual server to enable third party applications to back up the contents of the storage repository.
Prerequisites
The Repository Exports feature is available only for storage repositories based on physical disks and at least one server must have been presented to the repository.
The virtual server must be configured to provide an NFS share to access the contents of the repository.
The virtual server must be in a clustered server pool and have the OCFS2-based storage repository presented to it.
To create a repository export, follow these steps:
Click the Repository Exports tab in the Storage Repository Details page.
Click Create. The Create Repository Export window appears.
Enter a name of the host which is used to mount the contents of the storage repository to the Export Server.
Specify the options to restrict access to the respository. For Linux systems, the default is rw, async, no_root_squash.
Click Add in the Export Server(s) region. Select one or more virtual servers on which the storage repository is to be presented and click Select.
Click OK to submit the job and return to the Storage Repository Details page.
This section guides you through the ways of designing a server pool to meet your requirements.
Before creating a server pool, you need to consider how many physical servers will be contained in the server pool, and what functions each physical server will perform. The more virtual machines you will run in the server pool, the more resources these virtual machines will consume, therefore the more physical servers are needed to provide sufficient resources for the server pool.A server pool is scalable. If you find a server pool does not have sufficient resources, such as CPU and memory, to run the virtual machines and the applications inside, you can expand the server pool by adding more Virtual Machine Servers.
A virtual server pool contains one or more virtual servers and guest virtual machines. A virtual server can belong to one and only one virtual server pool at a time. Guest virtual machines and resources are also associated with the server pools.
A virtual server pool can contain a maximum of 32 Oracle VM servers.
There must be at least one virtual server in the server pool. One of the servers acts as a Master Server for the server pool.
All virtual servers in a server pool should have CPUs in the same CPU family. If they are not in the same CPU family, some operations such as live migration may fail. Though the CPUs should be in the same CPU family, they may have differing configurations, such as different number of cores. Other hardware components on the host computer may also differ, such as the amount of RAM, the number and size of disk drives, and so on.
Note:
Although the host computers may have differing configurations, Oracle recommends that all virtual servers in a server pool are identical.A dedicated file system (either a NAS export, or a LUN) to use as the server pool file system is available.
IP addresses for the virtual servers and the IP address to use as the Master Server's virtual IP address are available.
To create a virtual server pool, you must be logged in as an Administrator with Add Any Target privilege.
To delete a virtual server pool, you must have Full privilege on the server pool and appropriate privileges on the virtual servers and guest virtual machines belonging to the virtual server pool.
To create a virtual server pool:
From the Enterprise menu, select Cloud, then select Infrastructure Home.
Right click on an OVM Manager target in the left panel and select Create Virtual Server Pool.
Enter the server pool information:
Virtual Server Pool Name: The name of the server pool. A server pool name must consist of alphanumeric characters, and must not contain spaces or special characters, except the underscore (_) or hyphen (-) characters. The maximum length of a server pool name is 200 characters.
Description: A description of the server pool.
Keymap: Specify the keyboard type for the guest virtual machines created in this server pool.
VM Start Policy
Secure VM Migrate: Select this check box to ensure that live migration of guest virtual machines will be secured.
Activate Cluster: Select this check box to enable high availability on the server pool.
Cluster Timeout
Type of Pool File System: Select the pool file system to use for the server pool. The pool file system is used to hold the server pool and cluster data. This is a dedicated file system (either a NAS export or LUN) and can be 1 GB in size.
Virtual IP: An IP address used to locate the Master Server in the server pool. If the Master Server changes to another Oracle VM Server, this IP address is then assigned to the new host.
Click Add in the Virtual Servers section. Select one or more virtual servers from the Search window and click OK.
Note:
Before you add a virtual server to the server pool, it must have been discovered. See Discovering an Oracle VM Server for details.Select the Activate Cluster .
Click OK to create a virtual server pool.
To edit a virtual server pool, follow these steps:
From the Enterprise menu, select Cloud, then select Infrastructure Home.
Right click the virtual server pool that you wish to edit from the left panel and select Edit.
You can edit the following details:
Description: A description of the server pool.
Master Server: Select the master server for the virtual server pool.
Keymap: Specify the keyboard type for the guest virtual machines created in this server pool
Secure VM Migrate: Select this check box to ensure that live migration of guest virtual machines will be secured.
Click Add in the Virtual Servers section. Select one or more virtual servers from the Search window and click OK.
Note:
Before you add a virtual server to the server pool, it must have been discovered. See Discovering an Oracle VM Server for details.Click Add in the Anti-Affinity Group section. Anti-affinity groups specify that a group of virtual machines cannot run on the same server. In the Add Anti-Affinity Group window, enter a name for the group and select one or more virtual machines that should be part of this group. The virtual machines that are part of this group cannot run on the same server.
Click OK to apply the changes to the virtual server pool.
A zone is used to group related cloud resources together. Cloud zones can be created based on location, software lifecycle status, for grouping resources according to a cost center or for metering and chargeback purposes. Typically, a zone can cover a department or possibly a small data center. The cloud environment can comprise of one or more zones. Each zone has a set of metrics that show the aggregate utilization of the zone.
To create a zone, you must be logged in as an Administrator with Add Any Target privilege.
To remove a zone, you must have Operator / Full privilege on the zone.
Follow these steps to create a zone:
From the Enterprise menu, select Cloud, then select Infrastructure Home.
Right click the OVM Manager target for which the zone is to be created in the left panel and select Create Zone.
In the Create Zone page, specify the zone name and description.
Indicate if this zone will be used by the self service users by checking the Cloud Self Service Zone check box.
Click Add in the Virtual Server Pool section to add one or more virtual server pools. See Creating a Virtual Server Pool for details. You can add the virtual server pools for which you have the privileges and that are not part of any other zone.
Click OK. The virtual server pools and the storage arrays appears in the newly created zone on the Home page.
Storage QoS refers to quality of service that is defined at the storage server level. Setting up the storage QoS involves defining various storage properties. Before deploying a guest virtual machine, you can define the storage QoS, map this QoS to a storage server, and specify this QoS while deploying a guest virtual machine.
This involves defining the machine size, network type, and the storage QoS. After you have set up the storage QoS, you can set up the storage servers, network repositories, and storage arrays. This storage QoS can then be used during deployment of guest virtual machines.
To define the storage QoS, follow these steps:
From the Enterprise menu, select Cloud, then select Infrastructure Home.
Right click on the Infrastructure Cloud menu in the left panel and select Setup.
Click Create in the Storage Quality of Service page.
In the pop-up window, specify the name and description of the storage QoS and click OK. The newly added storage QOS appears on the Storage Quality of Service page.
Navigate to the OVM Manager Home page and select Storage from the OVM Manager menu.
Click the Storage link under File Servers. In the General tab, scroll down to the Storage QOS Mapping region.
Click Edit. The Storage QOS Mapping window appears. Click Add and select that you had created earlier. The Storage QOS you have added appears in the Storage QOS Mapping table.
To see how this mapping is used when you deploy an assembly, navigate to the Home page of a Zone under the OVM Manager. From the Zone menu, select Deploy, then select Assembly.
In the Deployment Configuration page, click Override in the Disk section and select the Storage QOS you have created. This storage QOS will be used for deploying the assembly.
You can define the QoS for network by defining some network types like routable, internet-facing, and so on. After the network QoS has been defined, you can map this to any network that is being created. You can then use this network type while deploying a guest virtual machine.
To define the network QoS, follow these steps:
From the Enterprise menu, select Infrastructure Cloud, then select Home.
Select Setup from the Infrastructure Cloud menu.
Click the Network Types link on the Infrastructure Cloud page.
Click Create in the Network Types page.
Enter a name and description of the network type and click OK.
You can define the machine size that will be available to the SSA users and during deployment. To define the machine size, follow these steps:
From the Enterprise menu, select Cloud, then select Infrastructure Home.
Right click on the Infrastructure Cloud menu in the left panel and select Setup.
Click the Machine Sizes link on the Infrastructure Cloud page.
Click Add Machine Size.
Enter the name (internal name of the machine size), description, number of VCPUs, amount of memory and local storage assigned to machines of this size. Click Save to add this machine size.
While setting up the storage repository, you can import VM Templates, Assemblies, and other software components into the storage repository. To configure the software library user who has the privileges to perform these tasks, follow these steps:
From the Enterprise menu, select Cloud, then select Infrastructure Home.
Right click on the Infrastructure Cloud menu and select Setup.
Click the Software Library User Configuration link on the Infrastructure Cloud page.
Enter the password for the Cloud Software Library user who is allowed to import components from the Software Library. This password must be specified when the user accesses the Software Library and download the required components.
All deployment requests can be retained for a certain period and then purged. To specify the number of days for which the requests should be available, follow these steps:
From the Enterprise menu, select Cloud, then select Infrastructure Home.
Right click on the Infrastructure Cloud menu and select Setup.
Click the Request Archiving Policy link on the Infrastructure Cloud page.
Select the Enable Archiving check box, specify the Archiving Duration, and click Apply. The requests will be archived for the specified period and will then be purged.
Oracle provides a publicly available YUM repository which includes repositories for Oracle VM. These repositories include the full releases of Oracle VM and mirror those releases on the Oracle VM DVDs/ISOs. The Oracle VM Server must be patched to ensure that the latest software updates and enhancements are applied. Patching the Oracle VM Server involves the following:
Configuring the YUM Repository
Upgrading the Virtual Server
You can configure the YUM repository that is to be used to upgrade the virtual server. The configured YUM repository can be used for to upgrade all discovered virtual servers.
Prerequisites
The YUM repository being configured must be present at a http location. You can configure an internal or public YUM repository.
To configure the YUM repository, follow these steps:
From the Enterprise menu, select Cloud, then select Infrastructure Home.
Right click on an OVM Manager target in the left panel, then select Manage YUM Repository.
Enter the following details in the YUM Repository page:
Name: Name of the YUM repository.
YUM Base URL: HURL for the YUM repository.
Enable GPG Key: Select this check box if you want to enable the GPG key. The GPG key checks the validity of the YUM repository and packages downloaded from the repository.
YUM GPG Key: If the Enable GPG Key field has been checked, specify the YUM GPG Key here.
Click OK. The YUM repository will be configured for the Oracle VM Manager.
After you have configured the YUM repository, you must upgrade the virtual server to ensure that it has the latest updates. The virtual server being upgraded must be in maintenance mode. To upgrade the virtual server, follow these steps:
From the Enterprise menu, select Cloud, then select Infrastructure Home.
Right click on a VM Server in the left panel and select Upgrade.
A confirmation message appears. Click OK to proceed with the upgrade. After the virtual server has been upgraded, the virtual server will be restarted.
OVM events are generated for all operations performed on a server, server pool, storage, or network. The event can be Informational, Minor, or Critical. When a target is in an error state, a Critical event is generated. Targets with a Critical status cannot be used to perform any operations. The EM_CLOUD_ADMINISTRATOR can acknowledge such events as the associated targets cannot be used. To acknowledge an OVM event, follow these steps:
From the Enterprise menu, select Cloud, then select Infrastructure Home.
Click on a VM Server in the left panel to navigate to the VM Server Home page.
From the VM Server menu, select OVM Events. The list of unacknowledged events appears. Select an event from the list and click Acknowledge to acknowledge the event.
|
Copyright © 2011, 2012, Oracle and/or its affiliates. All rights reserved. Legal Notices |
|