| Oracle® Enterprise Manager Cloud Administration Guide 12c Release 2 (12.1.0.2) Part Number E28814-03 |
|
|
PDF · Mobi · ePub |
| Oracle® Enterprise Manager Cloud Administration Guide 12c Release 2 (12.1.0.2) Part Number E28814-03 |
|
|
PDF · Mobi · ePub |
Self service provisioning is an important aspect of the cloud infrastructure. It is used to delegate some of the infrastructure provisioning and management to self service administrators (SSA) so that cloud administrators can focus on more strategic initiatives. After the cloud components have been configured, you (SSA user) can log into the Self Service Application and identify the images required, reserve some resources (for example, compute power, storage, memory, and so on) to provision the images to, and specify how long the images will be required. This chapter contains the following sections:
The Self Service Portal allows administrators to configure the cloud and perform various operations such as defining policies for the cloud, exposing it to certain users, deciding the total amount of resources each user can reserve, and so on. Users can log in to the Self Service Portal and identify the images they need, reserve some resources (for example, compute power, storage, memory, and so on) and define policies specific for their system.
Before the Self Service Portal can be used, the user quota, roles for zone access, and software components must be defined.
Prerequisites
Enterprise Manager Cloud Control is set up to manage the cloud environment.
The Enterprise Manager administrator has the privileges to set up the self service application. This user must have the EM_SSA_ADMINISTRATOR role. See Managing Users and Roles for details.
Follow this process to set up and configure the Self Service Portal.
From the Setup menu, select Cloud, then select Infrastructure. Click Machines Sizes in the left panel. Small, Medium, and Large machine sizes are available out-of-the-box.
To view a demo on setting up the self service portal, click the video link next to the Page Refreshed section of the page. Click Create to add a machine size. You are prompted for the Name (internal name of the machine size), number of VCPUs, amount of memory and local storage to be assigned to machines of this size. Click Save to add this machine size.
Select a machine size from the list and click Edit. You can configure the machine sizes by specifying the amount of memory, number of CPUs, and the local storage for each machine. While requesting a server, the SSA user can specify any of the machine sizes defined here.
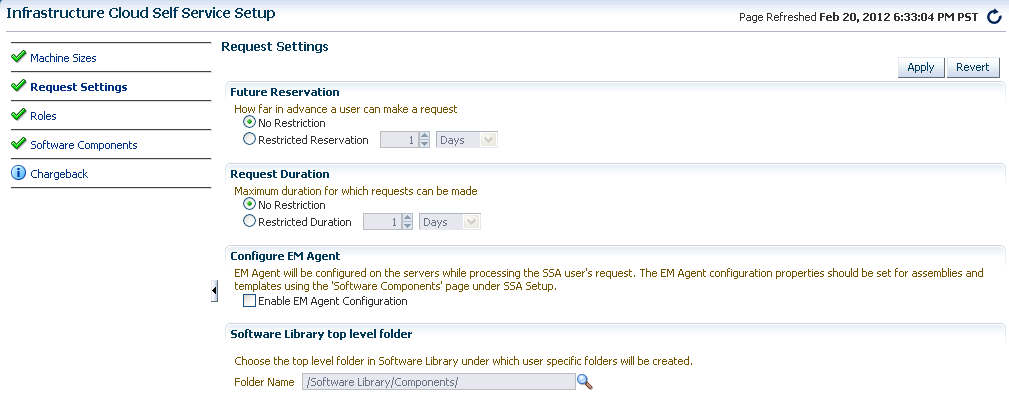
Click Request Settings in the left panel to define request related policies. On this page, you can enter the following details:
Future Reservation: Indicate how far in advance you can make a request.
Request Duration: The maximum duration for which requests should be made.
Configure EM Agent: Select the Enable EM Agent Configuration check box to configure the Management Agent on the servers while the SSA user's request is being processed.
Note:
If you have chosen to configure the Management Agent, you must ensure that the user has:Write permissions to the directory specified in the Installation Base Directory field.
Write permissions to the /home/oracle/agent directory specified during assembly or template deployment.
Software Library Top Folder: Select the top level folder in the Software Library in which user specific folders need to be created. This folder is used by the SSA users to save their environment and store their assemblies and templates.
Click Roles in the left panel to define the mappings between roles and other entities like zones, quota, and network profiles. The SSA administrator can control the quota that the SSA user can request which ensures that there is no over provisioning of cloud resources.
In the Roles page, click Assign Quota to Role to define quota at the role level. The quota assigned to a role is available to all users with that role. For example, if the Number of Servers for the SSA_USER_ROLE1 is set to 5, all users with this role can have a maximum of 5 servers. The quota is the aggregate amount of resources that can be granted to each self service user belonging to a certain role. If the user has more than one role, his quota is calculated as the absolute maximum across the roles for each attribute value.
Select Roles: Click the torch icon to select a role for which the mapping is to be defined. The list of all the SSA roles appears.
Select Zones: Click the torch icon. All zones marked as Cloud Self Service Zones during zone creation are displayed here. Select a zone from the list and click OK.
Number of Servers: Maximum number of servers that can be reserved at any time. This number is across the zones. For example if the quota for a user is 5. Then, the total number of instances from all zones is 5. So the user can have 3 instances in zone 1 and 2 instances in zone 2, or all 5 instances in the same zone.
Number of VCPUs: Maximum number of VCPUs that can be allocated.
Memory: Maximum amount of memory that can be allocated.
Local Disk: Maximum amount of local storage that can be allocated.
Additional Storage: Maximum amount of additional storage that can be allocated.
Allow Archiving to Software Library: Indicate whether the machine images can be stored in the Software Library after expiry. You can also select this option to save the machine image as a template when the guest virtual machine is stopped .
Select Network Profiles: Select the network profile to assigned to the selected role. All deployments are done in a specific network defined by the network profile.
Select a role and click Edit. You can modify the role mappings in the Assign Quotas, Zones & Network Profiles to Role page.
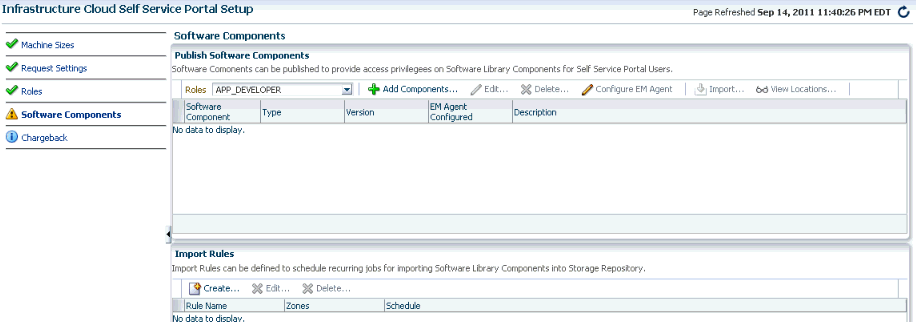
Click Software Components in the left panel to select the set of templates or assemblies that are accessible to the SSA users. You can publish the assemblies and templates to the SSA Portal and provide SSA users with access to these software components.
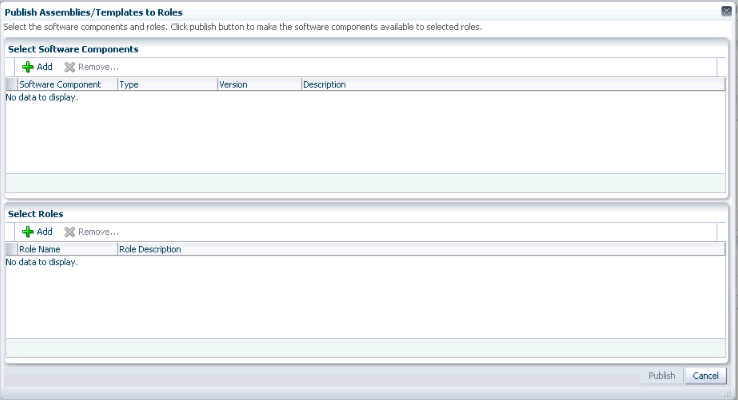
Click Add Components. The Publish Assemblies / Templates to Roles page appears.
In this page, do the following:
Click Add. Select the assembly or template from the list and click Select.
Click Add in the Select Roles section. Select the role from the list and click Select.
Click Publish to publish these software components to the SSA Portal. These software components are now available to the SSA users and can be deployed.
Note:
You will see a list of assemblies or templates if they have been uploaded to the Software Library. See the Oracle Enterprise Manager Cloud Control Administration Guide for details on uploading components to the Software Library.You can import the published assembly to a selected set of server pools and zones. Select the assembly and click Import. In the Zone and Server Pool selection page, select one or more zones and pools and click Save to import the assembly to the selected server pools and zones.
You can define rules to import published assemblies and templates to server pools and zones on a periodic basis based on a predefined schedule. Click Create in the Import Rules section. Enter a Rule Name, select a set of zones and server pools, a schedule for the import and click Save. The published assembly or template is imported to the selected server pools and zones on a regular basis.
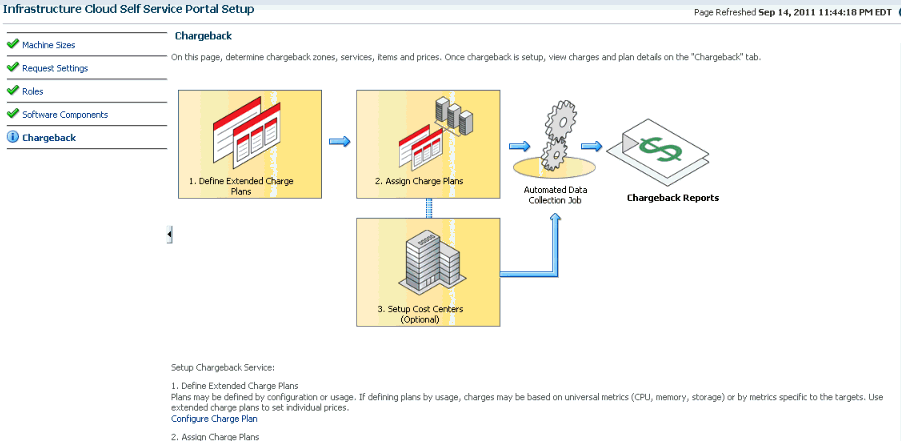
Click Chargeback tab in the left panel. The Chargeback application allows the SSA Administrator to define a charge plan and assign the plan to a specific zone or target.
Setting up the Chargeback Plan involves:
Defining Extended Charge Plans: Click Configure Charge Plan. You can edit the Base Charge Plan or create an Extended Charge Plan to customize the charge plan for a specified target type.
Assigning Charge Plans: Click Configure Targets. You can assign charge plans to a set of targets.
Setting Up the Cost Center: Click Configure Cost Center. You can setup cost centers to aggregate costs among groups of users.
For more details on setting up the chargeback plan, see Chapter 4, "Chargeback Administration".
The Self Service Portal provides a dashboard for business users and cloud consumers to request resources. It allows SSA users to request and manage resources, view the metering and usage of these resources, and define policies to manage the workload and deployment automatically. The SSA Portal allows users to:
Create new deployment requests
Manage requested deployments
Track metering and chargeback information
Author and enforce cloud policies.
To use the Self Service Portal, follow these steps:
Log in as a user with the EM_SSA_USER role.
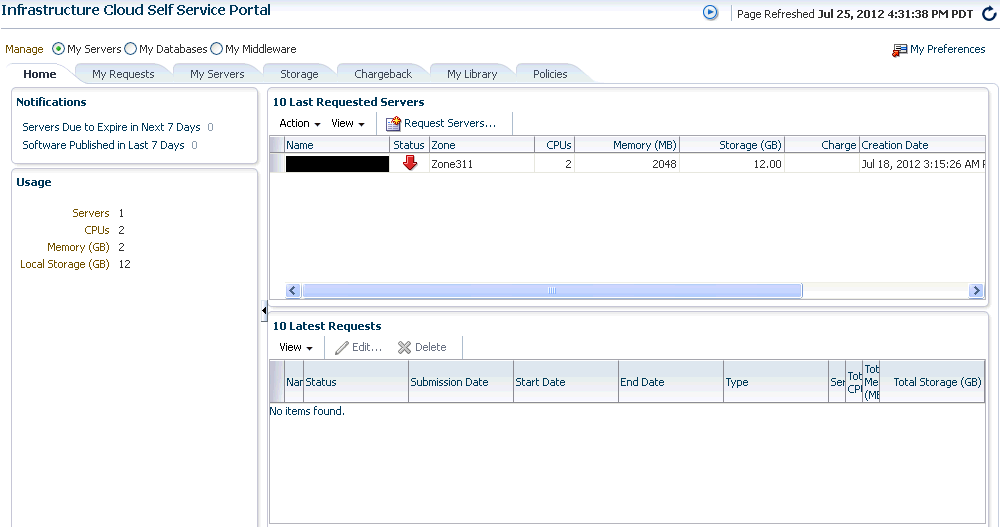
The Cloud Self Service Portal Home page appears. Click on the video link next to the Page Refreshed section to view a demo on using the self service portal. The following details are displayed:
Notifications: Lists notifications related to machine expiry and new assemblies, errors during requests, and quota used.
Your Usage: Lists the total quota allowances available for server and storage requests and quota that has been used.
Servers Expiring Soon: Lists the top 10 machines that you own in descending order of expiry date. Click a Server Name to view the server details. See Server Details Pagefor more information.
Latest Requests: This section lists the top 10 requests which are sorted as follows:
Descending order of the End Date.
Descending order of the Creation Date.
Click a Request Name to view the request details.
Click Request Servers. The New Server Request wizard appears. See Requesting Servers for details.
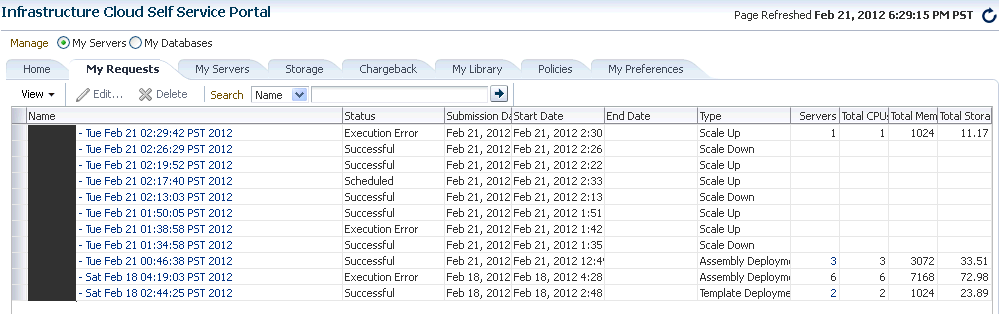
The My Requests tab lists all the requests made by the SSA user.
The name of the request, status, start and end date, type of request, number of servers, total CPU, and memory appears. Click a Name to drill down to the Request Details page which shows complete details about the request.
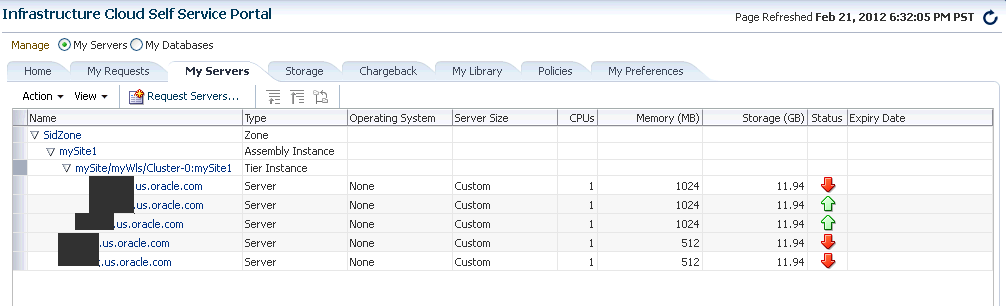
Click the My Servers tab to view a list of servers grouped according to the zone. On this page, the SSA user can view the specific assembly and template deployments, the tiers, and the servers in each tier.
You can drill down to the Assembly or Tier Instance Home page or click a server name to drill down to the Server Details page. From this page, you can perform the following actions:
Request Servers: You can request or reserve servers for a specific duration. See Requesting Servers for details.
Assemblies: You can start, stop, and delete an assembly instance. Select an assembly instance from the list and from the Actions menu, select an appropriate option.
Tiers: You can start, stop, scale up, and scale down a tier instance.
Servers: You can modify the configuration of the server, stop, start or restart a server, clone a server, and launch a VNC Console.
The Server Details page contains the following sections:
General: Displays information like status of server, the associated zone, date from which it is available, and the expiry date.
Configuration: Displays configuration details of the server such as number of CPUs, memory, storage, operating system, and other software installed on the server.
Availability: Shows the availability status of the server over the last 24 hours.
Charts: You can see the Availability chart that displays the status of the server for past 24 hours, and the CPU, Memory, and Storage Utilization charts.
Chargeback Details: This section displays all the charge back break-up data for the server. The charge incurred will be calculated from the server requested date to the current date.
A scalable tier allows creation of multiple servers and has a minimum and maximum limit. The scalability of the tier depends on how it is defined in the Assembly. See Provisioning Guest Virtual Machines Using Oracle Virtual Assemblies (OVA) for details. To scale up a tier instance, follow these steps:
From the Enterprise menu, select Infrastructure Cloud, then select Self Service Portal.
Click the My Servers tab, expand an assembly and click on a tier of the assembly.
In the Tier Instance Home page, click the Scale Up option from the Tier menu.
The Scale Up: General page appears. The name of the request, the assembly, zone, and number of instances appears. Click Next to continue.
In the Server Selection page, select the servers for the scale up operation. As a part of the Scale Up operation, either the existing shutdown servers of the tier are brought up and/or new servers are created to the Max Instance Number Limit if required.
If the Max Instance Number Limit of the tier is 4 and only 1 server has been created during the assembly deployment, 3 new servers can be added if the existing server is Up. If the existing server is down, 4 servers can be added to the tier. Click Next to continue.
If new servers are to be provisioned, you can modify their configuration in the Server Configuration page. The values are pre-filled with the values that specified during the deployment of the assembly. Modify the details if required and click Next to continue.
Note:
If the tier is auto scalable, the Server Configuration page cannot be modified.Specify the schedule for this operation and click Next.
Review the details and click Finish to scale up the tier.
You can scale down the servers belonging to a tier. To scale down a tier, follow these steps:
From the Enterprise menu, select Infrastructure Cloud, then select Self Service Portal.
Click the My Servers tab, expand an assembly and click on a tier of the assembly.
In the Tier Instance Home page, click the Scale Down option from the Tier menu.
In the Scale Down page, select the servers to be included in the Scale Down operation and click OK. The selected servers will be stopped and scaled down.
Click the Storage tab to view all the storage elements grouped by the Guest VMs with which they are associated. The Storage tab lists all the Servers owned by the EM_SSA_USER along with all the storage resources in tree format. The top level nodes represent the servers owned by the user and the sub nodes represent the storage disks that belong to the server. You can do the following:
Request Storage: This action allows the user to add a shared or non-shared storage disk to a server. Select one or more servers and click Request Storage. Enter the Disk Name, Size, and Mode. Select the Shared Disk check box to add a shared disk. If you create a non-shared storage disk, it is available only for the server on which it is created. A shared storage disk can be assigned to other servers. If you select multiple servers, you can create only non-shared storage disks.
Assign Storage: This action allows the user to assign shared storage disk to any other server owned by the EM_SSA_USER. Select a server and click Assign Storage. The list of available shared storage disks are displayed. Select a disk from the list and click OK to assign the shared storage disk to the server.
Release Storage: Select a server and click Release Storage. This action allows the user to delete existing shared or non-shared storage disks.
Click the Chargeback tab to view the chargeback details. The tab contains the following sections:
Charge Trend: The Charge Trend shows the charges across a date range for various metrics. You can set a date range and click Go to recalculate charges.
Details: This section shows charge details for the specified date range. You can reorder the data by selecting an option from the Detail Level drop-down menu. Click Export to export the details of the charge plan to a .csv file.
Charge Plans: This section allows you to select a zone to see the charge plan in effect for the target type.
Oracle VM Guest (Default): If you are using the Extended Charge Plan, the base plan for the Oracle Guest VM target type appears here.
Click the My Library tab to view the list of assemblies, templates, and deployment plans that you can access. You can choose to view:
Public: The list published by the SSA Administrator for your role. The assemblies, templates and deployment plans on which you have view privileges. You will see the assemblies, templates, or deployment plans if the EM_SSA_ADMINISTRATOR has published them or if another EM_SSA_USER has made them shareable.
Private: These include the assemblies, templates, and deployment plans that you own. Generally, an SSA user may not own assemblies but may own templates and deployment plans.
You can upload software, share, delete, or stop sharing a software component that you own. Select a component from the list and click Share. Select one or more users with whom the entity is to be shared and click Share.
To unshare an entity, select a shared entity from the list and click Stop Sharing. The list of users with whom this component has been shared appears. Select one or users from the list and click Stop Sharing.
To upload software, click Create Software Component. In the dialog box that appears, select the source file to be upload, enter a name and description, and specify the type (Assembly or Template) of component being uploaded. Click Create to upload to software to My Library. If you see an error message while uploading the file: Error: The file is too large. Please add a smaller file, you must modify the configuration settings in the web.xml file:
Locate the web.xml configuration file by navigating to the following location in the Oracle Management Service Home
./oms/sysman/archives/emgc/deployments/EMGC_DOMAIN/emgc.ear/em.war/WEB-INF/web.xml
If this directory structure is not present, navigate to the following location in the Oracle Management Service Home
./oms/sysman/archives/emgc/deployments/GCDomain/emgc.ear/em.war/WEB-INF/web.xml
Open the web.xml and locate the following four lines. If these lines are not present in the web.xml, you must add them:
<context-param>
<param-name>org.apache.myfaces.trinidad.UPLOAD_MAX_DISK_SPACE</param-name>
<param-value>40960000</param-value>
</context-param>
<param-name>org.apache.myfaces.trinidad.UPLOAD_MAX_FILE_SIZE</param-name>
<param-value>40960000</param-value>
</context-param>
Increase the size of the <param_value> parameter to a value larger than the size of the file to be uploaded.
Save, exit, and restart the Oracle Management Service.
If the file to be uploaded is huge, the page may expire while the upload is still in progress (usually after 10 minutes). To avoid this, the OMS property oracle.sysman.eml.maxInactiveTime must be set to a value (in seconds) greater than the expected time for the upload to complete. For example, set $ORACLE_HOME/bin/emctl set property -name oracle.sysman.eml.maxInactiveTime -value 3600
While the file upload is in progress, the uploaded chunks are written in a default location on the Oracle Management Service (OMS). This default location is usually a subdirectory of where the application is deployed on the WLS server. This location can be configured by setting the parameter org.apache.myfaces.trinidad.UPLOAD_TEMP_DIR in the web.xml file to a custom location. If there are multiple users uploading files concurrently on the OMS, you must ensure that this location has enough disk space to accommodate all of this data. It is recommended that this location is on a different volume than the location on which the OMS is installed. This ensures that if volume runs out of space, the OMS performance is not impacted.
Click the Policies tab to view the list of policies that you have defined. You can create a new Performance or Schedule Based Policy or a Policy Group. For example, you can define a policy to start an automatic scale up for a tier if the CPU Utilization is greater than 90 for 5 consecutive occurrences. For more details, see Managing Cloud Policies.
Click Apply to save the preferences. The values specified here will be used when you request resources using SSA.
Click My Preferences. Before you request resources using SSA, you can set up your user profile by specifying the following details:
Default Host Password: The default password for the host.
Default Zone: The default zone for the requests.
Default Source Software: The default location in which the assemblies, templates, and deployment plans are present.
Default Email Address for Notifications: The default email address to be used to receive notifications.
Days Before the First / Second Notification: The number of days before the first and second notifications are sent.
Enable Quota Related Notification: If you select this checkbox, notifications are sent when the quota reaches a specified threshold.
Quota Threshold for Receiving Notifications: If you have selected the Enable Quota Related Notification checkbox, specify the quota threshold in this field.
Database Preferences
Default Zone: Select the default zone for the requests.
My Middleware Preferences
Default Zone: Select the default zone for the requests.
My Servers Preferences
Default Server Root Password
Default Zone for New Requests
Default Source Software
Follow this process if you need to request or reserve servers for a specific duration:
From the Enterprise menu, select Infrastructure Cloud, then select Self Service Portal.
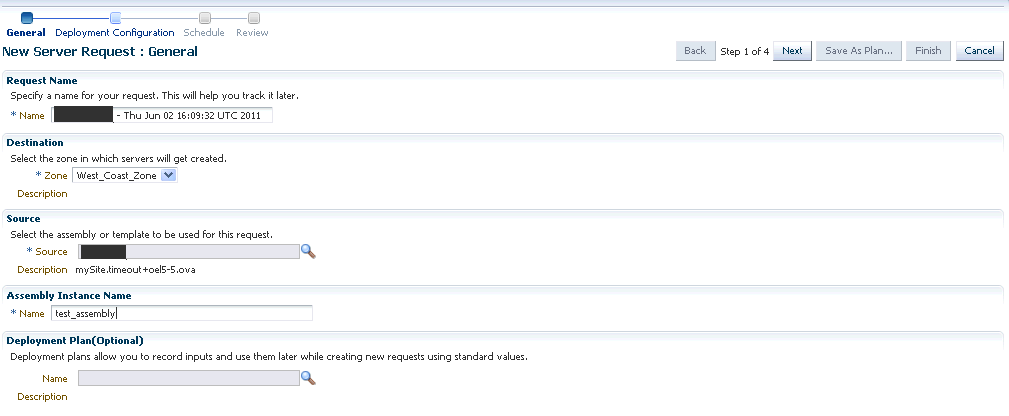
On the Cloud Self Service Portal page, click Request Servers to create a new request for a virtual machine.
In the General page, enter a name for the request and select a zone in which the server is to be created.
Click the Search icon in the Source field. Select an assembly or template to be used for this request and enter the server name. For details on assemblies, see Provisioning Guest Virtual Machines Using Oracle Virtual Assemblies (OVA). For details on templates, see Provisioning a Guest Virtual Machine Using Oracle VM Templates.
You can optionally select a Deployment Plan to pre-fill values in the deployment flow from an existing saved or imported deployment plan.
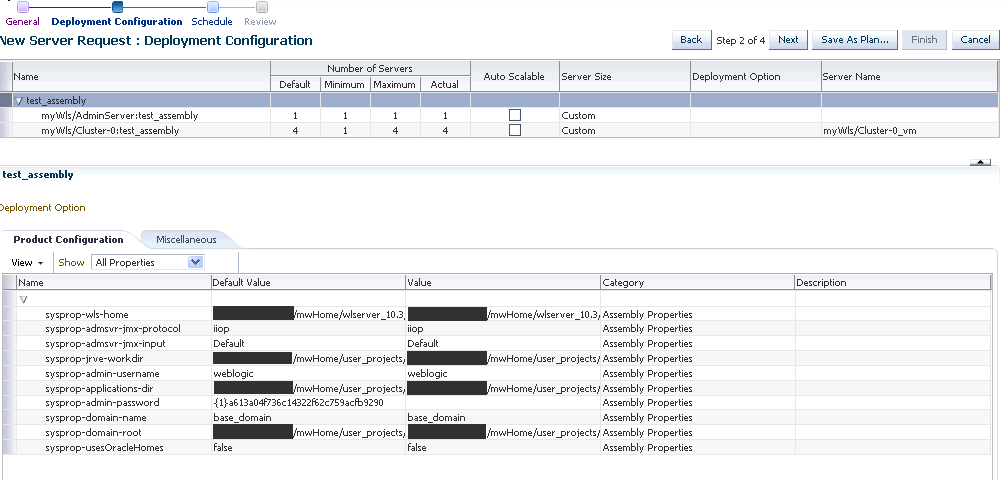
Click Next. In the Deployment Configuration page, specify the resource configuration parameters such as number of servers, server size, network, and storage details for the assembly and click Next. See Setting Up Networks and Creating a Storage Repository for details.
Specify the schedule for the request and click Finish to submit the request or Save as Deployment Plan. If you select the Save as Deployment Plan option, the request will be saved as a Deployment Plan that can be used to record inputs that can be used to create new request.
|
Copyright © 2011, 2012, Oracle and/or its affiliates. All rights reserved. Legal Notices |
|