| Oracle® Enterprise Manager Cloud Control Advanced Installation and Configuration Guide 12c Release 2 (12.1.0.2) Part Number E24089-17 |
|
|
PDF · Mobi · ePub |
| Oracle® Enterprise Manager Cloud Control Advanced Installation and Configuration Guide 12c Release 2 (12.1.0.2) Part Number E24089-17 |
|
|
PDF · Mobi · ePub |
This chapter introduces you to some key concepts of Enterprise Manager Cloud Control, and describes some important aspects of installation that you must know before you proceed any further.
In particular, this chapter covers the following:
This section describes the fundamental aspects of the installation process. In particular, this section covers the following:
What Is Enterprise Manager Cloud Control Installation Wizard?
What Installation Types Are Offered by the Installation Wizard?
What Data Files Are Created While Configuring Oracle Management Repository?
You can install Enterprise Manager Cloud Control or any of its core components either in an interactive, graphical mode or in a silent mode.
In both these modes, you can perform a software-only installation. A Software-Only installation is an approach that enables you to install only the software binaries of Enterprise Manager Cloud Control or a Management Agent, that is, without any configuration to the installation. This is best suited when you want to install the software at one point and configure it later.
Enterprise Manager Cloud Control Installation Wizard is a Java-based wizard that helps you install or upgrade to Enterprise Manager Cloud Control in graphical mode. If you are installing Enterprise Manager Cloud Control or any of its core components for the first time, then Oracle strongly recommends you to use this installation wizard.
Note:
To invoke the installation wizard on UNIX platforms, runrunInstaller. To invoke on Microsoft Windows platforms, run setup.exe.Figure 2-1 describes the key elements of the installation wizard.
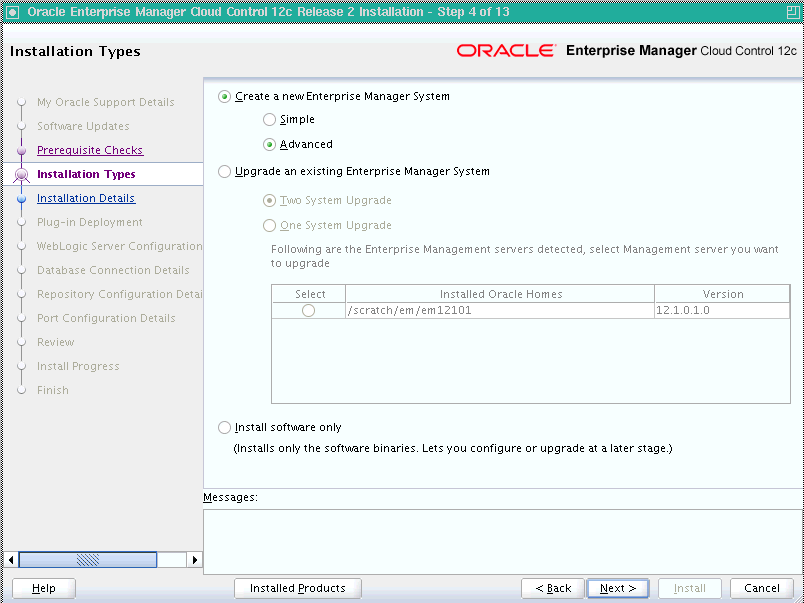
The Enterprise Manager Cloud Control Installation Wizard offers the following installation types:
This installation type enables you to install a new Enterprise Manager Cloud Control system with either simple or advanced configuration settings. For information about simple and advanced installation types, refer to Oracle Enterprise Manager Cloud Control Basic Installation Guide.
For information about what is installed for both simple and advanced installation types, refer to Oracle Enterprise Manager Cloud Control Basic Installation Guide.
This installation type enables you to upgrade the following to Enterprise Manager Cloud Control 12c Release 2 (12.1.0.2):
Enterprise Manager Cloud Control 12c Release 1 (12.1.0.1)
Enterprise Manager 11g Grid Control Release 1 (11.1.0.1)
Enterprise Manager 10g Grid Control Release 5 (10.2.0.5)
For upgrading Enterprise Manager 10g Grid Control Release 5 (10.2.0.5) and Enterprise Manager 11g Grid Control Release 1 (11.1.0.1), you can select one of the following approaches. However, for upgrading Enterprise Manager Cloud Control 12c Release 1 (12.1.0.1), you can select only One System Upgrade approach.
One System Upgrade, enables you to upgrade to Enterprise Manager Cloud Control on the same host where your earlier release of Enterprise Manager is running. This approach also upgrades the Management Repository in the existing Oracle Database itself. Since the upgrade happens on the same host, there is a reasonable downtime involved.
Two System Upgrade, enables you to install Enterprise Manager Cloud Control on a host that is different from the host where your existing Enterprise Manager system is running. This approach does not upgrade the Management Repository in the existing Oracle Database, but upgrades the one in the backed up database, thus offering the scope for two Enterprise Manager systems to exist. Since a new Enterprise Manager system coexists with the old one, there is no or near zero downtime involved.
Note:
For more information on these upgrade options, see the Oracle Enterprise Manager Cloud Control Upgrade Guide.This installation type enables you to install only the software binaries of Enterprise Manager Cloud Control at one point, and configure it at a later point.
This approach helps you divide the installation process into two phases, mainly the installation phase and the configuration phase. Understandably, the installation phase takes less time compared to the configuration phase because the installation phase involves only copying of binaries.
For information about what is installed during the installation phase and what is configured during the configuration phase, refer to Overview.
When you install Enterprise Manager Cloud Control with advanced configuration settings (Advanced installation type), you have an option of selecting the deployment size of your choice. This option is available in both graphical mode (Enterprise Manager Cloud Control Installation Wizard) and silent mode (response file).
The deployment size essentially indicates the number of targets you plan to monitor, the number Management Agents you plan to have, and the number of concurrent user sessions you plan have.
Table 2-1 describes each deployment size.
The prerequisite checks are run regardless of the selection you make, but the values to be set for the various parameters checked depend on the selection you make. For more information about these deployment sizes, and the database parameters set for each of them, refer to Chapter 11.
After installing Enterprise Manager Cloud Control with a particular deployment size, you can choose to increase or decrease the count of targets, Management Agents, or concurrent user sessions. However, if you do increase the count to a level that is not appropriate for the selected deployment size, then the performance might suffer. Under such circumstances, Oracle recommends you to modify the database parameters according to the desired deployment size, as described in Chapter 11.
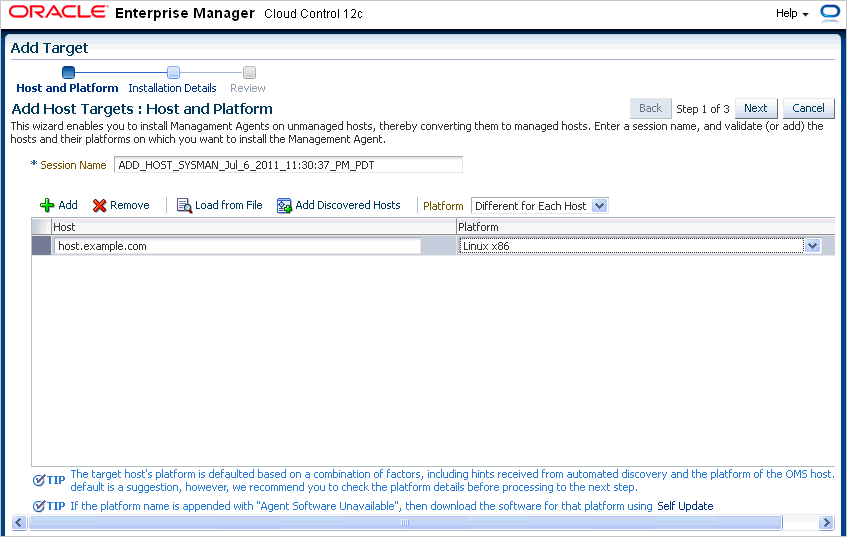
The Add Host Targets Wizard (Figure 2-2) is a GUI-rich application accessible from within the Cloud Control console, and used for installing Management Agents on unmanaged hosts and converting them to managed hosts in the Enterprise Manager system.
Using the Add Host Targets Wizard, you can do the following:
Install a fresh Management Agent
Clone an existing well-tested, pre-patched, and running Management Agent
Install a Management Agent from an existing, centrally shared Management Agent
Although the Add Host Targets Wizard can be used for remotely installing one Management Agent, the wizard is best suited for mass-deployment of Management Agents, particularly while mass-deploying Management Agents of different releases on hosts of different platforms. The wizard gives you the flexibility to select hosts on which you want to install a Management Agent. This helps you when you want to install the Management Agent on several hosts, in one attempt.
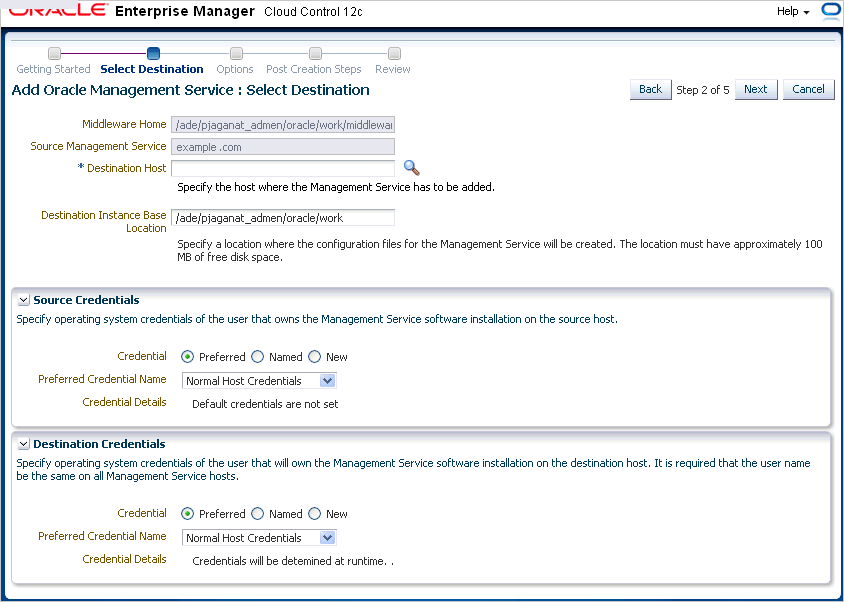
A deployment procedure is a procedure that contains a hierarchal sequence of provisioning or patching steps, where each step may contain a sequence of other steps. In other words, the workflow of all tasks that need to be performed for a particular life cycle management activity is encapsulated in a deployment procedure.
Enterprise Manager Cloud Control offers deployment procedures, and all of these can be accessed from within the Cloud Control console. One of the deployment procedures that falls within the context of Enterprise Manager Cloud Control installation is the Add Management Service deployment procedure.
The Add Management Service deployment procedure (Figure 2-3) helps you meet high-availability requirements by enabling you to install an additional OMS using an existing OMS that is running on an AdminServer host.
In simple words, the Add Management Service deployment procedure enables you to install additional OMS instances in your environment. The deployment procedure clones an existing OMS and replicates its configuration to the destination host.
The earlier releases of Enterprise Manager offered this installation type from the Enterprise Manager Installation Wizard. However, for the Enterprise Manager Cloud Control release, this installation type is offered as a deployment procedure.
For more information about the deployment procedure, see the chapter on adding additional management service in the Oracle Enterprise Manager Cloud Control Basic Installation Guide.
This section describes the default ports that are honored while installing Enterprise Manager Cloud Control. In particular, this section covers the following:
The following are the default ports used for installation:
Enterprise Manager Cloud Control
The default upload port for Management Agent is 3872. The same port is used for both HTTP and HTTPS. If 3872 is not available, then the first available free port from the range 1830 to 1849 is selected.
The default HTTPS port for Admin Server is 7101. If 7101 is not available, then the first available free port from the range 7101 to 7200 is selected.
The default HTTPS port for Node Manager is 7401. If 7401 is not available, then the first available free port from the range 7401 to 7500 is selected.
The default HTTP port for Managed Server is 7201. If 7201 is not available, then the first available free port from the range 7201 to 7300 is selected.
The default HTTPS port for Managed Server is 7301. If 7310 is not available, then the first available free port from the range 7301 to 7400 is selected.
Enterprise Manager Cloud Control offers you the flexibility to use custom ports instead of default ports.
Customizing Ports While Installing Enterprise Manager Cloud Control
If you are installing Enterprise Manager Cloud Control in graphical mode, that is, using the Enterprise Manager Cloud Control Installation Wizard, then you can use the Port Configuration Details screen to enter custom ports. You can also import a staticports.ini file that already captures the custom ports.
If you are installing Enterprise Manager Cloud Control in silent mode, that is, using the installation procedures described in Part II, then update the staticports.ini file with suitable custom ports.
The staticports.ini file is available at the following location of the software kit (DVD, downloaded software, and so on):
<software_kit>/response/staticports.ini
Customizing HTTP/HTTPS Console and Upload Ports After Installing Enterprise Manager Cloud Control
If you want to change the HTTP/HTTPS console ports and upload ports after installing Enterprise Manager Cloud Control, then follow these steps:
Stop the OMS:
$<OMS_HOME>/bin/emctl stop oms -all
Update the emgc properties with HTTP and HTTPS ports as described in Table 2-2. Specify the values for parameters <http_upload_new>, <https_upload_new>, <http_console_new>, and <https_console_new>):
Table 2-2 Updating EMOMS Properties with HTTP and HTTPS Ports
| Port/Property Type | Command to Run |
|---|---|
|
HTTP Upload Port |
|
|
HTTPS Upload Port |
|
|
HTTP Console Port |
|
|
HTTPS Console Port |
|
Back up the following file:
$<OMS_INSTANCE_HOME>/emgc.properties
After backing up the file, open the original emgc.properties file, and specify the new port numbers for the following parameters:
EM_UPLOAD_HTTP_PORT=<http_upload_new>
EM_UPLOAD_HTTPS_PORT=<https_upload_new>
EM_CONSOLE_HTTP_PORT=<http_console_new>
EM_CONSOLE_HTTPS_PORT=<https_console_new>
Back up the files httpd.conf, ssl.conf, and httpd_em.conf from the following location:
$<WEBTIER_INSTANCE_HOME>/config/OHS/ohs#/
After backing up the files, open the original files, and specify the new port numbers:
In httpd.conf file, in the Listen directive, replace <http_console_orig> with <http_console_new>.
In ssl.conf file, in the Listen directive, replace <https_console_orig> with <https_console_new>.
In httpd_em.conf file, in the Listen and VirtualHost directive, replace <http_upload_orig> with <http_upload_new>, and <https_upload_orig> with <https_upload_new>, respectively.
Start the OMS, and verify its status:
$<OMS_HOME>/bin/emctl start oms
$<OMS_HOME>/bin/emctl status oms -details
If the OMS is configured with any Server Load Balance (SLB), then update the ports in the SLB pools, monitors, and so on.
If the OMS is configured for SSO or OAM, then re-run the SSO or OAM configuration.
Back up the following file:
$<AGENT_INSTANCE_HOME>/sysman/config/emd.properties
Note:
Back up theemd.properties file from all Management Agents that are communicating with the OMS.After backing up the file, open the original emd.properties file, and verify the URL mentioned in REPOSITORY_URL. If the URL is an HTTPS URL, then change the port number to <https_upload_new>. If the URL is an HTTP URL, then change the port number to <http_upload_new>.
If there are any EM CLI instances set up on the ports you have changed, then set up those instances again. To do so, from each EM CLI instance, run the command emcli setup or emcli status, and note the EM URL that appears.
If you have changed that port number, run the following command:
emcli setup -url=http(s)://<host>:<new_port#>/em -dir=<dir>....
While updating the staticports.ini file, you must be extremely careful because an error in the file can cause the installation wizard to use default ports without displaying any warning. Therefore, before updating the staticports.ini file, check for these points:
Always enter port numbers that are greater than 1024 and less than 65536.
If a port is already being used by a component or any other application, do not enter that port (used port) in the staticports.ini file. If you do, then the related configuration assistant also fails.
If you have entered the same port for more than one component, then the installation displays an error after the prerequisite checks phase. You must rectify this error before proceeding with the installation.
If you have syntax errors in the staticports.ini file (for example, if you omitted the equal (=) character for a line), then the installation wizard ignores the line. For the components specified on such lines, the installation wizard assigns the default ports. The installation wizard does not display a warning for lines with syntax errors.
If you misspell a component name, then the installation wizard assigns the default port for the component. Names of components in the file are case-sensitive. The installation wizard does not display a warning for lines with unrecognized names.
If you enter a nonnumeric value for the port number, then the installation wizard ignores the line and assigns the default port number for the component. It does this without displaying any warning.
If you misspell the parameter on the command line, then the installation wizard does not display a warning. It continues and assigns default ports to all components.
If you enter a relative path to the staticports.ini file (for example, ./staticports.ini) in the command line, then the installation wizard does not find the file. It continues without displaying a warning and it assigns default ports to all components. You must enter a full path to the staticports.ini file.
The following are the data files created while configuring Oracle Management Repository:
To delete the data files, you must drop the SYSMAN/MDS schema. To do so, run the following command from the OMS home.
$<OMS_HOME>/sysman/admin/emdrep/bin/RepManager <repository_database_host> <repository_database_port> <repository_database_sid> -action dropall -dbUser <repository_database_user> -dbPassword <repository_database_password> -dbRole <repository_database_user_role> -mwHome <middleware_home> -mwOraHome <oms_home> -oracleHome <oms_home>
Note:
For Microsoft Windows, invoke RepManager.bat.
If you are dropping the schemas that belong to a 10g Release 2 (10.2.x.x) Management Repository, then run previous command without these arguments:
-mwHome <middleware_home> -mwOraHome <middleware_ora_home> -oracleHome <OMS_HOME>
After dropping the schema, manually delete the database files mgmt.dbf and mgmt_ecm_depot1.dbf.
You can find these files by running the following command as SYS:
SELECT FILE_NAME FROM DBA_DATA_FILES WHERE UPPER (TABLESPACE_NAME) LIKE 'MGMT%';
Table 2-3 describes the -action options that are supported by the different versions of RepManager.
Table 2-3 RepManager Support for -action dropall Command
| RepManager Version | Command Supported |
|---|---|
|
|
|
RepManager 11.1 |
|
|
RepManager 10.2.0.5 |
Drops only SYSMAN. |
Enterprise Manager Cloud Control requires Oracle WebLogic Server 11g Release 1 (10.3.5) and Java Development Kit 1.6 v24+.
If Oracle WebLogic Server 11g Release 1 (10.3.5) and Java Development Kit 1.6 v24+ are NOT already installed in your environment, then the installation wizard automatically installs them for you while installing a new Enterprise Manager Cloud Control.
This section describes some important aspects related to Oracle WebLogic Server that you must know before you install Enterprise Manager Cloud Control.
In particular, this section covers the following:
How Do I Verify Whether Oracle WebLogic Server Is Installed?
If Oracle WebLogic Server Already Exists, Is the Existing Domain Used?
When and Why Do You Need Oracle WebLogic Server Credentials?
How Do You Find Admin Server Port After Installing Enterprise Manager?
To verify whether Oracle WebLogic Server is installed, check the following file in the Oracle WebLogic Server home:
$<WLS_HOME>/logs/log.txt
The following is the sample output of the log.txt file:
release  10.3.5.0 [Added]
    |_____Common Infrastructure Engineering 7.1.0.0 [Added]
    |    |_____Uninstall [Added]
    |    |_____Patch Client [Added]
    |    |_____Patch Attachment Facility [Added]
    |    |_____Clone Facility [Added]
    |_____WebLogic Server 10.3.5.0 [Added]
    |    |_____Core Application Server [Added]
    |    |_____Administration Console [Added]
    |    |_____Configuration Wizard and Upgrade Framework [Added]
    |    |_____Web 2.0 HTTP Pub-Sub Server [Added]
    |    |_____WebLogic SCA [Added]
    |    |_____WebLogic JDBC Drivers [Added]
    |    |_____Third Party JDBC Drivers [Added]
    |    |_____WebLogic Server Clients [Added]
    |    |_____WebLogic Web Server Plugins [Added]
    |    |_____UDDI and Xquery Support [Added]
    |    |_____Server Examples [Added]
    |    |_____Evaluation Database [Added]
    |    |_____Workshop Code Completion Support [Added]
    |_____Oracle Configuration Manager 10.3.3.1 [Added]
    |    |_____Data Collector [Added]
    |_____Oracle Coherence 3.6.0.3 [Not Installed]
         |_____Coherence Product Files [Not Installed]
         |_____Coherence Examples [Not Installed]
Oracle WebLogic Server cluster consists of Oracle WebLogic Servers running simultaneously and working together to provide increased scalability and reliability. A cluster appears to be a single Oracle WebLogic Server instance. The server instances that constitute a cluster can run on the same host, or be located on different hosts.
You can install Enterprise Manager Cloud Control on an Oracle WebLogic Server Cluster, however, you cannot take advantage of the cluster configurations.
If Oracle WebLogic Server already exists, then the existing domain is NOT used. Instead, the Enterprise Manager Cloud Control Installation Wizard creates a new domain and deploys the Enterprise Manager Cloud Control software to it.
While installing or upgrading to Enterprise Manager Cloud Control, you are prompted to enter the Oracle WebLogic Server credentials (user name and password). The credentials are used for creating the WebLogic domain and other associated components such as the Admin Server, the managed server, and the node manager.
The WebLogic user name is the default user name that will be used as the administrative user for the WebLogic Domain. By default, the user name is weblogic. And the WebLogic password is the password for this default administrative user account.
While installing or upgrading to Enterprise Manager Cloud Control, you are prompted to enter the Node Manager password for the default Node Manager user account, which is nodemanager. The password is used for configuring the Node Manager. A Node Manager enables you to start, shut down, or restart an Oracle WebLogic Server instance remotely, and is recommended for applications with high availability requirements.
To find the Admin Server port, view the value set for the AS_HTTPS_PORT parameter in the emgc.properties file. This file is available in the Oracle Management Service Instance Base location.
For example,
/DATA/oracle/Middleware/gc_inst/em/EMGC_OMS1/emgc.properties
To install an additional OMS, the Admin Server that is used by the first OMS must be up and running. To verify whether the Admin Server is running, access the Admin Server console using the following URL:
https://host:port/console
Here, host and port are values specified in the EM_INSTANCE_HOST and AS_HTTPS_PORT parameters, respectively, in the emgc.properties file. This properties file is available in the following location, that is, in the OMS home (first OMS) that was initially installed:
$<MIDDLEWARE_HOME>/gc_inst/em/EMGC_OMS1/emgc.properties
You can start the Admin Server by running the following command. Although the command is used essentially to start the OMS, the command in turn starts the Admin Server on which that OMS is running. So run this command even if you know that the OMS is already running.
emctl start oms
This section describes the installation directories that need to be entered while installing Enterprise Manager Cloud Control or any of its core components. In particular, this section covers the following:
If Enterprise Manager Cloud Control is the first Oracle product that you are installing, then the Enterprise Manager Cloud Control Installation Wizard prompts you to enter an inventory directory (also called the oraInventory directory).
This inventory directory is used by the installation wizard to place all the installer files and directories on the host. The installation wizard automatically sets up subdirectories for each Oracle product to contain the inventory data.
You can enter the oraInventory directory in two ways:
While installing Enterprise Manager Cloud Control using the installation wizard, you can enter the oraInventory directory in the Oracle Inventory screen. When you enter it in this screen, you must also select the appropriate operating system group name that will own the oraInventory directories. The group you select must have write permission on the oraInventory directories.
While installing Enterprise Manager Cloud Control in silent mode, that is, without using the installation wizard, you can enter the oraInventory directory using the -invPtrLoc parameter. This parameter considers the path to a location where the inventory pointer file (oraInst.loc) is available. However, this parameter is supported only on UNIX platforms, and not on Microsoft Windows platforms.
For example
./runInstaller -invPtrLoc /scratch/OracleHomes/oraInst.loc
Note:
Ensure that the oraInventory directory is not in a shared location. If it is, change it to a non-shared location.If you already have an Oracle product installed on the host, then the installation wizard uses the existing oraInventory directory that was created while installing that Oracle product. Ensure that you have write permission on that directory. To do so, run the installer as the same operating system user as the one who installed the other Oracle product.
Note:
The oraInventory directory is different from Installation Directory. For information about Installation Directory, see What Is Oracle Middleware Home?.While installing or upgrading to Enterprise Manager Cloud Control, you are required to enter the Oracle Middleware home.
Oracle Middleware home (Middleware home) is the parent directory that has the Oracle WebLogic Server home, the Java Development Kit, the Web tier instance files, one or more Oracle homes, the OMS instance base directory, and other relevant files. This is where the OMS and the plug-ins are deployed.
For example,
/u01/app/Oracle/Middleware
If you are installing or upgrading to Enterprise Manager Cloud Control, then:
If Oracle WebLogic Server 11g Release 1 (10.3.5) and Java Development Kit 1.6 v24+ are already installed in your environment, then the installation wizard automatically detects them and displays the absolute path to the Middleware home where they are installed.
In this case, validate the Middleware home that is detected and displayed by default. If the location is incorrect, then enter the path to the correct location. Ensure that the Middleware home you select or enter is a Middleware home that does not have any Oracle homes for the OMS and the Management Agent.
If Oracle WebLogic Server 11g Release 1 (10.3.5) and Java Development Kit 1.6 v24+ are NOT already installed in your environment, then the installation wizard automatically installs them for you while installing Enterprise Manager Cloud Control.
In this case, enter the absolute path to a directory where you want to have them installed. Ensure that the directory you enter does not contain any files or subdirectories.
For example,
/u01/app/Oracle/Middleware/
Note:
Oracle Middleware home is different from Oracle Home of OMS or Management Agent. For information about Oracle Home, see What Is Oracle Home?.While installing Enterprise Manager Cloud Control, you are required to enter the Oracle Management Service Instance Base Location.
Oracle Management Service Instance Base Location is a directory (gc_inst) inside the Middleware home where the configuration files of the OMS are stored.
The installation wizard uses its built-in algorithm to identify this location, and displays it for you to validate. If the Middleware home is /u01/app/Oracle/Middleware/, then by default, the following is the Oracle Management Service Instance Base Location:
/u01/app/Oracle/Middleware/gc_inst
You can either accept the default location or specify another location that has write permission.
Oracle Home or Oracle home is the directory where the OMS, the Management Agent, and the plug-ins are installed. Table 2-4 lists the default Oracle homes are created.
Table 2-4 Oracle Homes of OMS, Management Management Plug-Ins
| Component | Default Oracle Home | Sample Location |
|---|---|---|
|
|
|
|
|
|
|
|
|
|
|
|
|
|
|
Note:
Oracle Home is different from OraInventory. For information about OraInventory directory, see What Is Oracle Inventory Directory?.While installing Enterprise Manager Cloud Control and a standalone Management Agent using the Add Host Targets Wizard, you are required to enter an installation base directory, which is essentially the agent base directory.
Agent Base Directory is a directory outside the Oracle Mdidleware Home, where the Management Agent home is created.
For example, if the agent base directory is /u01/app/Oracle/agent, then the Management Agent home is created as /u01/app/Oracle/agent/core/12.1.0.2.0.
Agent Instance Directory is a directory (agent_inst) created for storing all Management Agent-related configuration files.
Agent Instance Directory is created inside the agent base directory.
For example, if the agent base directory is /u01/app/Oracle/agent, then by default, the following is the agent instance directory:
/u01/app/Oracle/agent/agent_inst
When you invoke the Enterprise Manager Cloud Control Installation Wizard, it automatically copies some executable files and link files to a temporary directory on the host.
For example, the default /tmp directory on UNIX hosts, and C:\Temp on Microsoft Windows hosts.
If the host is set to run cron jobs along with many other processes that may be running periodically, then these jobs attempt to clean up the default temporary directory, thereby deleting some files and causing the installation wizard to fail.
If there are any cron jobs or processes that are automatically run on the hosts to clean up the temporary directories, then ensure that you set the TMP or TEMP environment variable to a location that is different from the default location. Ensure that the non-default location you set is secure on the hard drive, that is, the non-default location is a location where cleanup jobs are not run. Also ensure that you have write permissions on this alternative directory.
This must be done before you run the installer to invoke the Enterprise Manager Cloud Control Installation Wizard. (For UNIX operating systems, you invoke runInstaller, and for Microsoft Windows, you invoke setup.exe).
Note:
Specifying an alternative temporary directory location is not mandatory, and is requiredonly if any cron jobs are set on the computers to clean up the /tmp directory.This section describes the additional components that are installed along with the core components of Enterprise Manager Cloud Control. In particular, this section covers the following:
With Enterprise Manager Cloud Control, you can choose to enable Oracle Configuration Manager. Alternatively, you can enable it after installing Enterprise Manager Cloud Control.
Oracle Configuration Manager automatically collects configuration information from your environment at regular intervals and uploads it to Oracle repository. This helps Oracle maintain up-to-date information about your environment, identify security vulnerabilities, quickly diagnose support issues, and offer better solutions consistently.
However, no business or personal information is collected and uploaded, except for local contact name in the event of transmission problems. Oracle guarantees that all the information collected will be kept strictly confidential and under no circumstances will this information be shared with any other party.
Oracle recommends that the host from where you are running the installation wizard have a connection to the Internet so that the configuration information can be automatically collected and uploaded to My Oracle Support.
If the host from where you are running the installation wizard has a connection to the Internet, then on the Oracle Configuration Manager screen of the installation wizard, enter the My Oracle Support user name (or e-mail address) and password.
Otherwise, enter only the e-mail address and leave the other fields blank. After you complete the installation, manually collect the configuration information and upload it to My Oracle Support. To understand how the configuration information can be manually collected and uploaded, see the steps outlined in Manually Collecting and Uploading Configuration Information.
If you want to enable it after installing Enterprise Manager Cloud Control, then see Enabling Oracle Configuration Manager After Installing Enterprise Manager Cloud Control.
To manually collect the configuration information, follow these steps:
Navigate to the OMS home and run the following command:
$<OMS_HOME>/ccr/bin/emCCR collect
For Oracle Configuration Manager 10.2.7 and higher, the collected configuration information is stored in the /ccr/hosts/state/upload/ocmconfig.jar file. For lower versions of Oracle Configuration Manager, the collected configuration information is stored in the /ccr/state/upload/ocmconfig.jar file. When you run the same command next time, the ocmconfig.jar file gets overwritten with fresh data. Therefore, at any point, you will see only one ocmconfig.jar file.
Upload the ocmconfig.jar file to a Service Request on My Oracle Support.
Repeat Step (1) and Step (2) from the Management Agent home.
To enable Oracle Configuration Manager at a later point, do the folllowing:
Set the environment variable ORACLE_CONFIG_HOME to the Oracle Management Service instance base directory. Oracle Management Service instance base is the directory where the configuration files of the OMS are created.
In bash terminal, run the following command:
export ORACLE_CONFIG_HOME=<absolute_path_to_gc_inst>
In other terminals, run the following command:
setenv ORACLE_CONFIG_HOME <absolute_path_to_gc_inst>
Note:
For information about Oracle Management Service instance base directory, refer to What Is Oracle Management Service Instance Base Location?.From the OMS home, run the following command:
$<OMS_HOME>/ccr/bin/setupCCR
While installing or upgrading Enterprise Manager Cloud Control, you can choose to install software updates.
Software updates include interim patches, critical patch updates, prerequisite updates, install updates, and so on released by Oracle periodically.
You can either manually download the software updates or have the Enterprise Manager Cloud Control Installation Wizard automatically download them for you.
Manual Download by User: If you choose to manually download the software updates yourself, then invoke the Enterprise Manager Cloud Control Installation Wizard with the -downloadUpdates argument in the following way. This argument ensures that the installation wizard is invoked only for downloading the software updates.
./runInstaller -downloadUpdates
On the Software Updates screen, enter the My Oracle Support account user name and password, and click Search for Updates. The installation wizard downloads the software updates to scratchPath/updates directory.
Manual download option is best suited when you are installing Enterprise Manager Cloud Control in silent mode. Oracle recommends you to use this option even while installing in graphical mode.
Automatic Download by Installation Wizard: If you choose to have the Enterprise Manager Cloud Control Installation Wizard automatically download the software updates, then on the Software Updates screen of the installation wizard, enter the My Oracle Support account user name and password. The installation wizard will connect to My Oracle Support and automatically download the updates from there.
You can apply the software updates in one of the following ways depending on the download mechanism:
Manual Download by User: If you have manually downloaded the software updates, then:
In Graphical Mode: On the Software Updates screen of the installation wizard, select Search for Updates, and then, select Local Directory. Enter the location where the updates are available, and click Search for Updates. To search the computer and select the location, click Browse.
In Silent Mode: Before you invoke the installer using the response file, edit the response file to set the INSTALL_UPDATES_SELECTION parameter to "staged". Then, for the STAGE_LOCATION parameter, enter the absolute path to the location where the updates are available.
Automatic Download by Installation Wizard: If you want to automatically download and apply the software updates from My Oracle Supoprt, then:
In Graphical Mode: On the Software Updates screen of the installation wizard, select Search for Updates, then select My Oracle Support. Enter the My Oracle Support account user name and password, and click Search for Updates. Once the search results appear with patch numbers and their details, click the patch number to view the ReadMe associated with that patch.
In Silent Mode: Before you invoke the installer using the response file, edit the response file to set the INSTALL_UPDATES_SELECTION parameter to "download". Then, enter your My Oracle Support credentials in the MYORACLESUPPORT_USERNAME_FOR_SOFTWAREUPDATES and the MYORACLESUPPORT_PASSWORD_FOR_SOFTWAREUPDATES parameters.
Oracle strongly recommends you to apply them while the installation is in progress for the following reasons:
Keeping track of the availability of software updates at the time of installation is difficult
Keeping track of the patch numbers, and manually downloading them and applying them after installation is a cumbersome process
Automatically downloading and applying the software updates during installation saves time and effort, and ensures that you do not miss out on important software updates.
This section describes the postinstallation activities that are performed by the installation wizard. In particular, this section covers the following:
While installing or upgrading to Enterprise Manager Cloud Control in either GUI mode (using the installation wizard) or silent mode (using a response file), a set of configuration assistants are run at the end of the installation process to configure the installed or upgraded components. Your installation or upgrade process is complete only after all the components are configured using these configuration assistants.
Note:
Even when you perform a software-only installation of Enterprise Manager, when you run theConfigureGC.sh script to configure the installation, the configuration assistants are internally run. (On Microsoft Windows, run the ConfigureGC.bat script.)This section lists the configuration assistants run by the installation wizard for the different installation types.
Configuration Assistants Run While Installing a New Enterprise Manager
Configuration Assistants Run While Upgrading an Existing Enterprise Manager
Configuration Assistants Run While Upgrading an Additional Oracle Management Service
The following are the configuration assistants that are run while installing a new Enterprise Manager, that is, when you select Create a new Enterprise Manager System in the installation wizard.
Plugins Prerequisites Check Configuration Assistant
Repository Configuration Assistant
Note:
If you use a database instance that was created with a preconfigured Management Repository using the database templates offered by Oracle, then Repository Out-of-Box Configuration Assistant is run instead of Repository Configuration Assistant.MDS Schema Configuration Assistant
OMS Configuration Assistant
Plugins Deployment and Configuration Assistant
Start Oracle Management Service Configuration Assistant
Oracle Configuration Manager for OMS Configuration Assistant
Agent Configuration Assistant
The following are the configuration assistants that are run while upgrading an existing Enterprise Manager, that is, when you select Upgrade an existing Enterprise Manager System in the installation wizard.
Plugins Prerequisites Check Configuration Assistant
Repository Upgrade Configuration Assistant
MDS Schema Configuration Assistant
OMS Configuration Assistant
Plugins Deployment and Configuration Assistant
Start Oracle Management Service Configuration Assistant
Oracle Configuration Manager for OMS Configuration Assistant
Plugins Inventory Migration Configuration Assistant
In addition, while upgrading 12c Release 1 (12.1.0.1) to 12c Release 2 (12.1.0.2), the following are run:
Stopping APM Engines Configuration Assistant
Stop Admin Server Configuration Assistant
Note:
Agent Configuration Assistant is not run because the Management Agent is not upgraded as it is either predeployed by the Enterprise Manager 12c Upgrade Console (for 10.2.0.5 or 11.1 Management Agents) or upgraded using the Upgrade Agents Console (for 12.1.0.1 Management Agents).Plugins Prerequisites Check Configuration Assistant
Repository Upgrade Configuration Assistant
MDS Schema Configuration Assistant
OMS Configuration Assistant
Plugins Deployment and Configuration Assistant
Plugins Inventory Migration Configuration Assistant
Start Oracle Management Service Configuration Assistant
Oracle Configuration Manager for OMS Configuration Assistant
Agent Configuration Assistant
1-System Upgrade Approach on a Different Host
Plugins Prerequisites Check Configuration Assistant
Repository Upgrade Configuration Assistant
MDS Schema Configuration Assistant
OMS Configuration Assistant
Plugins Deployment and Configuration Assistant
Plugins Inventory Migration Configuration Assistant
Start Oracle Management Service Configuration Assistant
Oracle Configuration Manager for OMS Configuration Assistant
Agent Configuration Assistant
The following are the configuration assistants that are run while upgrading an additional OMS, that is, when you select Upgrade an existing Enterprise Manager System, then select an additional OMS in the installation wizard.
Plugins Prerequisites Check Configuration Assistant
OMS Configuration Assistant
Plugins Deployment and Configuration Assistant
Plugins Inventory Migration Configuration Assistant
Start Oracle Management Service Configuration Assistant
Oracle Configuration Manager for OMS Configuration Assistant
In addition, while upgrading 12c Release 1 (12.1.0.1) to 12c Release 2 (12.1.0.2), the following are run:
Stopping APM Engines Configuration Assistant
Stop Admin Server Configuration Assistant
Note:
The Agent Configuration Assistant is not run because the Management Agent is not upgraded as it is either predeployed by the Enterprise Manager 12c Upgrade Console (for 10.2.0.5 or 11.1 Management Agents) or upgraded using the Upgrade Agents Console (for 12.1.0.1 Management Agents).1-System Upgrade Approach on a Different Host
Plugins Prerequisites Check Configuration Assistant
OMS Configuration Assistant
Plugins Deployment and Configuration Assistant
Plugins Inventory Migration Configuration Assistant
Start Oracle Management Service Configuration Assistant
Oracle Configuration Manager for OMS Configuration Assistant
If an optional configuration assistant fails, then the installation wizard ignores the failure and runs to the next configuration assistant automatically. However, if a mandatory configuration assistant fails, then the installation wizard stops the installation process. In this case, you are expected to resolve the issue and rerun the configuration assistant.
For information about the log files to review when a configuration assistant fails, and the actions to be taken to resolve the issue, see Appendix G.
Every time you install Enterprise Manager Cloud Control using the installation wizard, a set of prerequisite checks are run to verify if the environment meets the minimum requirements for a successful installation. The installation wizard checks for a variety of things including required operating system patches, operating system packages, kernel parameters, and so on.
The following sections describe these prerequisite checks. In particular, this section covers the following:
The following are the default prerequisite checks that are run for different installation types—Creating a New Enterprise Manager System and Upgrading an Existing Enterprise Manager System:
Prerequisite check for verifying whether the installation is being done on a certified operating system.
Prerequisite check for verifying whether all the certified packages and libraries have been installed.
Prerequisite check for verifying whether the glibc package has been installed. (Not applicable for Management Agent installation)
Prerequisite check for verifying whether there is sufficient disk space in the temp directory. (Not applicable for Management Agent installation)
Prerequisite check for verifying whether there is sufficient disk space in the inventory directory.
Prerequisite check for verifying whether there is write permission in the inventory directory.(Not applicable for OMS installation)
Prerequisite check for verifying whether the software is compatible with the current operating system.
Prerequisite check for verifying whether there is sufficient physical memory.
Prerequisite check for verifying the required ulimit value. (Not applicable for Management Agent installation)
Prerequisite check for verifying the host name.
Prerequisite check for verifying whether the LD_ASSUME_KERNEL environment variable is set. (Not applicable for Management Agent installation)
Prerequisite check for verifying whether proper timezone is set.
Prerequisite check for verifying whether there is 4 GB of swap space. (Not applicable for Management Agent installation)
You can run the prerequisite checks in standalone mode before invoking the installation wizard. This helps you identify and resolve issues that might otherwise cause the installation to fail.
Table 2-5 shows the commands you need to run to run the prerequisite checks in standalone mode:
Table 2-5 Running Prerequisite Checks in Standalone Mode
| Installation Type | Command |
|---|---|
|
|
Note:
On Microsoft Windows, replace/runInstaller with setup.exe. Also, <Software_Location> mentioned in the commands in Table 2-5 refer to the location where the Enterprise Manager software is available. For example, DVD. If you have downloaded the software from Oracle Technology Network (OTN), then enter the absolute path to that downloaded location.This section describes the limitations you might face while using Enterprise Manager Cloud Control. In particular, this section covers the following:
Although the installation media in your media pack contain many Oracle components, you are permitted to use only those components for which you have purchased licenses. Oracle Support Service does not provide support for components for which licenses have not been purchased.
For more information, access the Enterprise Manager documentation library at the following URL and view the Oracle Enterprise Manager Licensing Information Guide:
http://www.oracle.com/technetwork/indexes/documentation/index.html
Do NOT run the OMS on a computer that is DHCP enabled. Oracle strongly suggests that you use a static host name or IP address assigned on the network for Enterprise Manager Cloud Control components to function properly.
For more information, refer to My Oracle Support Note 428665.1 at:
This section covers miscellaneous concepts related to the installation of Enterprise Manager Cloud Control. In particular, this section covers the following:
While using the Add Host Targets Wizard, you can enter the hosts on which you want to install Oracle Management Agent, in two ways — you can either enter the host name or the IP address, or select an external file that contains a list of hosts mentioned.
If you choose to select an external file, then ensure that the file contains only the host name (Example 2-1), or the host name followed by the platform name (Example 2-2).
At least once during or after the installation of Enterprise Manager Cloud Control or Management Agent, you are prompted to log in as a root user and run oraInstRoot.sh, allroot.sh, or root.sh. You must log in as a root user because the scripts edit files in the /etc directory and create files in the local bin directory (/usr/local/bin, by default).
After every installation, a check is performed to identify the Central Inventory (oraInventory) directory. The Central Inventory directory is a directory that is automatically created by the installation wizard when an Oracle product is installed on a host for the very first time.
Note:
Ensure that the central inventory location you specify must NOT be on a shared file system. If it is already on a shared file system, then switch over to a non-shared file system.If you have NOT installed an Oracle product before on the host, then run the oraInstRoot.sh script from the Central Inventory:
$Home/oraInventory/oraInstRoot.sh
The oraInstRoot.sh script is run to create the oraInst.loc file. The oraInst.loc file contains the Central Inventory location.
However, if you already have an Oracle product on the host, then run allroot.sh script from the OMS home:
<OMS_HOME>/allroot.sh
|
Copyright © 2012, Oracle and/or its affiliates. All rights reserved. Legal Notices |
|