| Oracle® Enterprise Manager Cloud Control Basic Installation Guide 12c Release 2 (12.1.0.2) Part Number E22624-15 |
|
|
PDF · Mobi · ePub |
| Oracle® Enterprise Manager Cloud Control Basic Installation Guide 12c Release 2 (12.1.0.2) Part Number E22624-15 |
|
|
PDF · Mobi · ePub |
This chapter describes how you can install a new Enterprise Manager system while utilizing an existing, certified Oracle Database to store Oracle Management Repository (Management Repository). In particular, this chapter covers the following:
Note:
For information on the releases Enterprise Manager Cloud Control has had so far, refer to Oracle Enterprise Manager Cloud Control Advanced Installation and Configuration Guide.This section covers the following:
You can install Enterprise Manager Cloud Control with either simple or advanced configuration. Table 6-1 describes the basic differences between the two installation types.
Table 6-1 Differences Between Simple and Advanced Installation
| Simple Installation | Advanced Installation |
|---|---|
|
Meant for demo or evaluation purposes, and small deployments, and when you do not want to worry about the granular control of the installer and want to install the Enterprise Manager system quickly, with less memory, and for monitoring fewer targets in their environment |
Meant for small, medium, and large deployments, and when you want to customize your installation with custom locations, directory names, and passwords. |
|
Installs with minimal, default configuration settings and preferences that you need for a complete Enterprise Manager system. Does not offer too many options to customize your installation. |
Offers custom or advanced configuration options that you can select to suit your environment and customize your installation. |
|
Configures with less memory to monitor up to 30 targets, with 2 Oracle Management Agents (Management Agent) and 2 concurrent user sessions for handling about 10 jobs per day. |
Offers an option to select the deployment size (small, medium, or large) of your choice, and depending on the deployment size you select, configures with the required memory. The deployment size essentially indicates the number of targets you plan to monitor, the number Management Agents you plan to have, and the number of concurrent user sessions you plan have. The prerequisite checks are run regardless of the selection you make, but the values to be set for the various parameters checked depend on the selection you make For more information on deployment sizes, the prerequisite checks that are run, the database parameters that are set, and how you can modify the deployment size after installation, refer to Oracle Enterprise Manager Cloud Control Advanced Installation and Configuration Guide. |
|
Sets fewer database parameters. For information about the database parameters that are set, refer to Setting Database Initialization Parameters |
Sets more database parameters. For information about the database parameters set for different deployment sizes, refer to the Oracle Enterprise Manager Cloud Control Advanced Installation and Configuration Guide. |
|
Allows you to use a database where the Management Repository is preconfigured using the database templates offered by Oracle. |
Allows you to use a database where the Management Repository is preconfigured using the database templates offered by Oracle. |
|
Installs four mandatory plug-ins such as Oracle Database plug-in, Oracle Fusion Middleware plug-in, Oracle My Oracle Support plug-in, and Oracle Exadata plug-in. |
Installs four mandatory plug-ins such as Oracle Database plug-in, Oracle Fusion Middleware plug-in, Oracle My Oracle Support plug-in, and Oracle Exadata plug-in, and any other plug-in you select. |
|
Creates a default user account weblogic for the WebLogic domain GCDomain. |
Allows you to change the name of the default user account weblogic for the WebLogic domain GCDomain. |
|
Prompts for a common password for WebLogic Server administration, Node Manager, SYSMAN user account, and Management Agent registration. |
Prompts for separate, distinct passwords for WebLogic Server administration, Node Manager, SYSMAN user account, and Management Agent registration. |
|
Creates a default OMS instance base directory |
Allows you to change the name of the default OMS instance base directory |
|
Creates tablespaces for management, configuration data, and JVM diagnostics data in default locations. |
Allows you to change the locations of the tablespaces for management, configuration data, and JVM diagnostics data. |
|
Installs with default ports. |
Allows you to customize the ports according to your environment. |
|
Has only a few interview screens to fill in the Enterprise Manager Cloud Control Installation Wizard. |
Has many interview screens to fill in the Enterprise Manager Cloud Control Installation Wizard |
As part of a new Enterprise Manager system, the installation wizard does the following:
Installs the following components in the Middleware home you enter in the installation wizard:
Oracle Management Service 12c Release 2 (12.1.0.2)
Oracle JRF 11g Release (11.1.1.6.0), which includes oracle_common directory
Oracle Web Tier 11g Release (11.1.1.6.0), which includes Oracle_WT directory
Oracle Database Plug-In
Oracle Fusion Middleware Plug-In
Oracle My Oracle Support Plug-In
Oracle Exadata Plug-In
Note:
Java Development Kit (JDK) 1.6 v24 and Oracle WebLogic Server 11g Release 1 (10.3.5) are installed only if they do not exist in your environment.
If you want to manually install Oracle WebLogic Server 11g Release 1 (10.3.5), then follow the guidelines outlined in Before You Begin.
For advanced installation, in addition to the mandatory plug-ins listed above, you can optionally install other plug-ins available in the software kit (DVD, downloaded software). The installer offers a screen where you can select the optional plug-ins and install them. However, if you want to install some plug-ins that are not available in the software kit (DVD, downloaded software), then refer to Advanced Installer Options.
Installs Oracle Management Agent 12c Release 2 (12.1.0.2) in the agent base directory you specify (outside the Middleware home).
For example, if the middleware home is /u01/app/Oracle/Middleware/, then you can specify the agent base directory as /u01/app/Oracle/agent12c.
Creates an Oracle WebLogic domain called GCDomain. For this WebLogic Domain, a default user account, weblogic, is used as the administrative user. In advanced installation, you can choose to change this if you want.
Creates a Node Manager user account called nodemanager. A Node Manager enables you to start, shut down, or restart an Oracle WebLogic Server instance remotely, and is recommended for applications with high availability requirements.
Configures an Oracle Management Service Instance Base location (gc_inst) in the Oracle Middleware home (Middleware home), for storing all configuration details related to Oracle Management Service 12c. In advanced installation, you can choose to change this if you want.
For example, if the Middleware home is /u01/app/Oracle/Middleware/, then the instance base location is /u01/app/Oracle/Middleware/gc_inst. You can choose to change this, if you want, in the installer. However, you can change it for only advanced installation and not for simple installation.
Configures Oracle Management Repository in the existing, certified Oracle Database. If the database instance is created using the database template offered by Oracle, then this step is skipped.
Note:
The existing, certified Oracle Database must be one of the certified databases listed in the Enterprise Manager certification matrix available on My Oracle Support, or a database instance created with a preconfigured Oracle Management Repository (Management Repository) using the database templates offered by Oracle.To access the Enterprise Manager certification matrix, follow the steps outlined in Appendix E.
For information about creating a database instance with a preconfigured Management Repository using the database templates offered by Oracle, refer to Appendix D.
The database can be on a local or remote host, and if it is on a remote host, it must be monitored by Oracle Management Agent. However, Oracle Real Application Clusters (Oracle RAC) databases must only be on a shared disk.
Runs the following configuration assistants to configure the installed or upgraded components:
Plugins Prerequisites Check Configuration Assistant
Repository Configuration Assistant
Note:
If you use a database instance that was created with a preconfigured Management Repository using the database templates offered by Oracle, then Repository Out-of-Box Configuration Assistant is run instead of Repository Configuration Assistant.MDS Schema Configuration Assistant
OMS Configuration Assistant
Plugins Deployment and Configuration Assistant
Start Oracle Management Service Configuration Assistant
Oracle Configuration Manager for OMS Configuration Assistant
Agent Configuration Assistant
This section describes the following:
Overview of the Directory Structure for Enterprise Manager Installation
Overview of the Directory Structure for Management Agent Installation
By default, the following are the contents of the Middleware home for this type of installation:
<middleware_home>
    |_____wlserver_10.3
    |_____jdk16
    |_____oms
    |_____plugins
    |_____gc_inst
    |_____Oracle_WT
    |_____oracle_common
    |_____utils
    |_____logs
    |_____modules
    |_____user_projects
    |_____ocm.rsp
    |_____registry.dat
    |_____domain-registry.xml
    |_____registry.xml
By default, the following are the contents of the agent base directory for this type of installation:
<agent_base_directory>
    |_____core
         |_____12.1.0.2.0
    |_____plugins
    |_____agent_inst
    |_____sbin
    |_____plugins.txt
    |_____plugins.txt.status
    |_____agentimage.properties
Before you begin, keep these points in mind:
You must ensure that you have the latest Enterprise Manager Cloud Control software.
To download the latest software, access the following URL:
http://www.oracle.com/technetwork/oem/enterprise-manager/downloads/index.html
For information about downloading the latest software, refer to the Oracle Enterprise Manager Cloud Control Advanced Installation and Configuration Guide.
Ensure that there are no white spaces in the name of the directory where you download and run the Enterprise Manager Cloud Control software from. For example, do not download and run the software from a directory titled EM Software because there is a white space between the two words of the directory name.
You can install Enterprise Manager Cloud Control using the installation wizard only on a single host, that is, locally on the server where the wizard is invoked. You cannot install on multiple or remote hosts.
Oracle Management Service 12c Release 2 (12.1.0.2) can communicate only with Oracle Management Agent 12c Release 2 (12.1.0.2) and Oracle Management Agent 12c Release 1 (12.1.0.1), and not with any earlier release of the Management Agent.
And Oracle Management Service 12c Release 1 (12.1.0.1) can communicate only with Oracle Management Agent 12c Release 1 (12.1.0.1), and not with any earlier release or higher release of the Management Agent.
Do not install on a symlink. If you do, then you will not be able to clone this OMS later.
You must not set the ORACLE_HOME and ORACLE_SID environment variables. You must ensure that the Oracle directories do NOT appear in the PATH.
You must set the DISPLAY environment variable.
In bash terminal, run the following command:
export DISPLAY=<hostname>:<vnc port>.0
For example, export DISPLAY=example.com:1.0
In other terminals, run the following command:
setenv DISPLAY <hostname>:1.0
For example, setenv DISPLAY example.com:1.0
The Enterprise Manager Cloud Control Installation Wizard installs Java Development Kit (JDK) 1.6 v24 and Oracle WebLogic Server 11g Release 1 (10.3.5) only if they do not exist in your environment.
If Oracle WebLogic Server 11g Release 1 (10.3.5) does not exist and if you want to manually install it, then ensure that you install it using JDK 1.6 v24+ (64-bit version for 64-bit platforms and 32-bit version for 32-bit platforms).
Download JDK 1.6 v24+ for your platform from the platform vendor's Web site.
For example, download SUN JDK 1.6 v24+ for Linux platforms from the following Oracle Web site URL:
http://www.oracle.com/technetwork/java/javase/downloads/index.html
Similarly, download the JDK for other platforms from other vendors' trusted Web sites.
If you already have JDK, then verify its version by navigating to the <JDK_Location>/bin directory and running the following command:
"./java -fullversion"
To verify whether it is a 32-bit or a 64-bit JDK, run the following command:
"file *"
If you want to manually install Oracle WebLogic Server 11g Release 1 (10.3.5) on Linux 64-bit platforms, first install the 64-bit JDK for that platform, and then download and use the wls1035_generic.jar file to install Oracle WebLogic Server.
For example,
<JDK home>/bin/java -d64 -jar <absolute_path _to_wls1035_generic.jar>
If you want to manually install Oracle WebLogic Server 11g Release 1 (10.3.5) on Linux 32-bit platforms, then download and use either the wls1035_linux32.bin file or the wls1035_generic.jar file.
For example,
<JDK home>/bin/java -jar <absolute_path _to_wls1035_generic.jar>
You must procure the Oracle WebLogic Server 11g Release 1 (10.3.5) software and install it following the instructions outlined in the Oracle® Fusion Middleware Installation Guide for Oracle WebLogic Server. Ensure that it is a default installation. The guide is available in the Fusion Middleware documentation library available at:
http://www.oracle.com/technetwork/middleware/weblogic/documentation/index.html
You must ensure that the Oracle WebLogic Server installation is a typical installation, and even if you choose to perform a custom installation, ensure that components chosen for custom installation are the same as the ones associated with a typical installation.
You must ensure that the user installing the WebLogic Server is the same as the one installing Enterprise Manager Cloud Control.
You must ensure that the Oracle WebLogic Server 11g Release 1 (10.3.5) installed by the Enterprise Manager Cloud Control Installation Wizard or by you is dedicated for Enterprise Manager Cloud Control. You must not have any other Oracle Fusion Middleware product installed in that Middleware home.
Enterprise Manager Cloud Control cannot coexist with any Oracle Fusion Middleware product in the same Middleware home because the ORACLE_COMMON property is used by both the products.
You can optionally use the database templates offered by Oracle to create a database instance with a preconfigured Management Repository. To do so, refer to Appendix D. You can use such a database instance for simple as well as advanced installation.
However, note that the database templates are essentially designed for simple installation, although they can be used for advanced installation. Therefore, while performing an advanced installation (possibly with small, medium, or large deployment size selection), when you provide the details of such a database, you will be prompted that the database parameters need to be modified to suit the deployment size you selected. You can confirm the message to proceed further. The installation wizard will automatically set the database parameters to the required values.
If you want to optionally follow the configuration guidelines for deploying the Management Repository so that your management data is secure, reliable, and always available, refer to the Oracle Enterprise Manager Cloud Control Administrator's Guide.
In addition to the mandatory plug-ins, you can optionally install other plug-ins available in the software kit (DVD, downloaded software). The installer offers a screen where you can select the optional plug-ins and install them. However, if you want to install some plug-ins that are not available in the software kit (DVD, downloaded software), then refer to Advanced Installer Options.
Oracle offers bug fixes for a product based on the Oracle Lifetime Support Policy. When the license period expires for a particular product, the support for bug fixes offered by Oracle also ends. For more information, see the Oracle Lifetime Support Policy available at:
http://www.oracle.com/support/library/brochure/lifetime-support-technology.pdf
When determining supportability and certification combinations for an Enterprise Manager Cloud Control installation, you must consider Enterprise Manager Cloud Control's framework components as well as the targets monitored by Enterprise Manager Cloud Control. Oracle recommends keeping your Cloud Control components and targets updated to the latest certified versions in order to receive code fixes without having to purchase an Extended Support license.
You can find the OMS and Management Agent entries in the /etc/oragchomelist file for all UNIX platforms except HPUNIX, HPia64, Solaris Sparc.
On HPUNIX, HPia64, Solaris Sparc platforms, the entries are present in /var/opt/oracle/oragchomelist.
As a prerequisite, you must have an existing Oracle Database to configure the Management Repository. This database can also have the Automatic Memory Management (AMM) feature enabled.
Table 6-2 lists the prerequisites you must meet before installing Enterprise Manager Cloud Control.
Table 6-2 Prerequisites for Installing Enterprise Manager Cloud Control
| Requirement | Description |
|---|---|
|
Hardware Requirements |
Ensure that you meet the hard disk space and physical memory requirements as described in Chapter 2. |
|
Operating System Requirements |
Ensure that you install Enterprise Manager Cloud Control only on certified operating systems as mentioned in the Enterprise Manager certification matrix available on My Oracle Support. To access the Enterprise Manager certification matrix, follow the steps outlined in Appendix E. For information about platforms receiving future support, refer to My Oracle Support note 793512.1. Note: If you use Oracle Solaris 10, then ensure that you have update 9 or higher installed. To verify whether it is installed, run the following command:
You should see the output similar to the following. Here,
|
|
Package Requirements |
Ensure that you install all the operating system-specific packages as described in Chapter 3. |
|
Operating System Groups and Users Requirements |
Ensure that you create the required operating system groups and users as described in Chapter 4. |
|
Middleware Home Location Requirements |
If you are installing Enterprise Manager Cloud Control in a Middleware home that is on an NFS-mounted drive, then do the following:
|
|
Middleware Home Path Requirements |
(Only for Microsoft Windows) Ensure that the number of characters in the middleware home path does not exceed 25 characters. For example, the middleware home path |
|
Agent Base Directory Path Requirements |
(Only for Microsoft Windows) Ensure that the number of characters in the agent base directory path does not exceed 25 characters. For example, the agent base directory path |
|
Unique Host Name and Static IP Address Requirements |
Ensure that you check the network configuration to verify that the host on which you are installing resolves to a unique host name and a static IP address that are visible to other hosts in the network. Note: Oracle recommends that you use static IP address. If you use dynamic IP address, and if the host is rebooted, then the host might receive a new IP, and as a result, the OMS startup will fail. |
|
Ensure that you allocate 400 MB of space for a temporary directory where the executables can be copied. By default, the temporary directory location set to the environment variable |
|
|
Ensure that you allocate 100 MB of space for the central inventory directory. Also ensure that the central inventory directory is not in a shared file system. If it is already in a shared file system, then create a new inventory in a non-shared file system. You can optionally migrate the products that were previously installed in the shared file system to this new inventory in the non-shared file system. |
|
|
Ensure that you set the default file mode creation mask (umask) to 022 in the shell startup file. For example:
|
|
|
|
Unset the |
|
File Descriptor Requirements |
Ensure that you set the file descriptor to a minimum of 4096. To verify the current value set to the file descriptors, run the following command:
If the current value is not 4096 or greater, then as a root user, update the
|
|
Ensure that the existing database is a certified database as mentioned in the Enterprise Manager certification matrix available on My Oracle Support. Alternatively, the database can be a database instance created with a preconfigured Management Repository using the database templates offered by Oracle. For information about creating a database instance with a preconfigured Management Repository using the database templates offered by Oracle, refer to Appendix D. To access the Enterprise Manager certification matrix and identify whether your database is a certified database, follow these steps in Appendix E. Important:
|
|
|
Ensure that the host name specified in the Ensure that localhost is pingable and resolves to The following is the recommended format of the
For example,
According to RFC 952, the following are the assumptions: A name (Net, Host, Gateway, or Domain name) is a text string up to 24 characters drawn from the alphabet (A-Z), digits (0-9), minus sign (-), and period (.). Note that periods are only allowed when they serve to delimit components of domain style names. No blank or space characters are permitted as part of a name. No distinction is made between upper and lower case. The first character must be an alpha character. Also, if DNS server is configured in your environment, then you should be able to use DNS to resolve the name of the host on which you want to install the OMS. For example, all these commands must return the same output:
|
|
|
Ensure that you meet the following requirements:
|
|
|
|
|
Ensure that the Central Inventory ( |
|
|
Proximity Requirements |
Ensure that the host on which the OMS is being installed and the host on which the Management Repository is being configured are located in close proximity to each other. Ideally, the round trip network latency between the two should be less than 1 millisecond. |
|
Ensure that the ports you assign (within the given range) to the following components are free and available:
To verify if a port is free, run the following command:
|
|
|
Internet Connection Requirements |
Oracle recommends that the host from where you are running the installer have a connection to the Internet so that the configuration information can be automatically collected and uploaded to My Oracle Support. |
This section describes the following:
To install Enterprise Manager Cloud Control with simple configuration, follow these steps:
Note:
The simple installation type installs with default configuration settings and preferences that you need for a complete Enterprise Manager system. It does not offer too many options to customize your installation. This installation type is meant for demo or evaluation purposes, and small deployments, and when you do not want to worry about the granular control of the installer and want to install the Enterprise Manager system quickly, with less memory, and for monitoring fewer targets in their environment.Note:
Oracle recommends you to run the EM Prerequisite Kit before invoking the installer to ensure that you meet all the repository requirements beforehand. Even if you do not run it manually, the installer anyway runs it in the background while installing the product. However, running it manually beforehand sets up your Management Repository even before you can start the installation or upgrade process. For information on the kit, to understand how to run it, and to know about the prerequisite checks it runs, see Appendix A.Invoke the Enterprise Manager Cloud Control Installation Wizard.
Invoke the installation wizard as a user who belongs to the oinstall group you created following the instructions in Chapter 4.
<Software_Location>/runInstaller
In this command, <Software_Location> is either the DVD location or the location where you have downloaded the software kit.
Note:
To invoke the installation wizard on UNIX platforms, run runInstaller. To invoke on Microsoft Windows platforms, run setup.exe.
Ensure that there are no white spaces in the name of the directory where you download and run the Enterprise Manager Cloud Control software from. For example, do not download and run the software from a directory titled EM Software because there is a white space between the two words of the directory name.
When you invoke runInstaller or setup.exe, if the Enterprise Manager Cloud Control Installation Wizard does not appear, then it is possible that you do not have read and write access to the /stage subdirectory, which a subdirectory in the Disk1 directory of the Enterprise Manager software.
There is a classpath variable that the installation wizard computes for OPatch as ../stage/Components/, and when the TEMP variable is set to /tmp, the installation wizard tries to look for the opatch JAR file in the /tmp/../stage directory, which is equivalent to /stage. However, if you do not have read and write permission on /stage, then the installation wizard can hang. Under such circumstances, verify if you have read and write access to the /stage directory. If you do not have, then set the TEMP variable to a location where the install user has access to, and then relaunch the installation wizard.
Enter My Oracle Support Details.
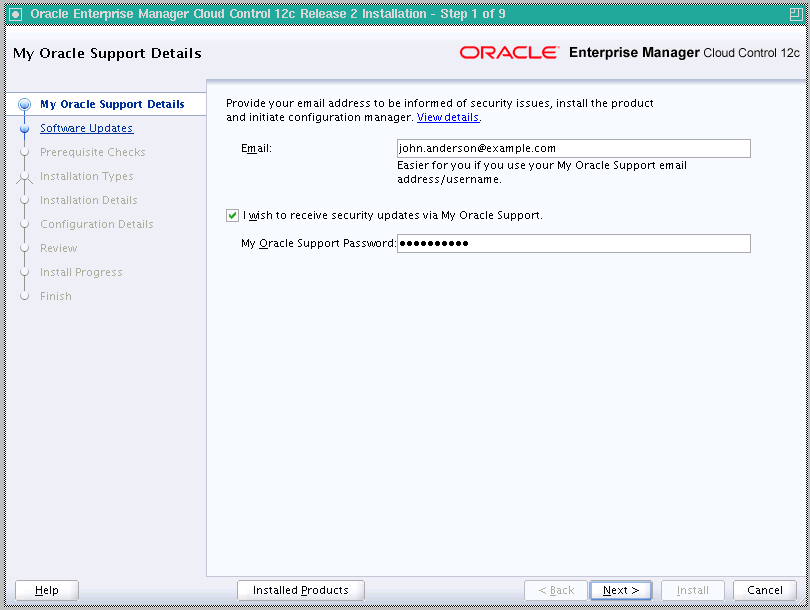
(Optional) On the My Oracle Support Details screen, enter your My Oracle Support credentials to enable Oracle Configuration Manager. If you do not want to enable Oracle Configuration Manager now, go to Step (3).
If the host from where you are running the installation wizard does not have a connection to the Internet, then enter only the e-mail address and leave the other fields blank. After you complete the installation, manually collect the configuration information and upload it to My Oracle Support.
Click Next.
Install Software Updates.
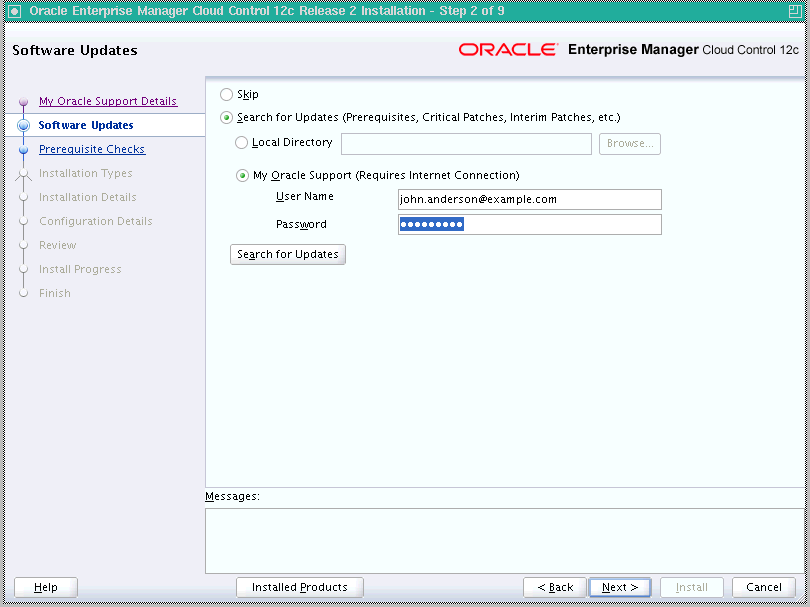
On the Software Updates screen, select one of the following sources from where the software updates can be installed while the installation of the Enterprise Manager system is in progress. If you do not want to apply them now, then select Skip.
(Recommended) Select Search for Updates, then select Local Directory if you have already manually downloaded the software updates to an accessible local or remote location.
Note:
For instructions to manually download the software updates, refer to Oracle Enterprise Manager Cloud Control Advanced Installation and Configuration Guide.Enter the location where the updates are available, and click Search for Updates. To search the computer and select the location, click Browse. Once the search results appear with patch numbers and their details, click the patch number to view the ReadMe associated with that patch.
If the updates have been downloaded to the default location, then select or enter the full path to the scratch path location. For example, if the scratch path location is /scratch/OracleHomes and if the software updates are available in /scratch/OracleHomes/Updates, then enter /scratch/OracleHomes/Updates.
If the software updates have been downloaded to a custom location, then select or enter the full path to the custom location. For example, if the custom location is /home/john and if the software updates are available in /home/john/Updates, then enter /home/john/Updates.
Select Search for Updates, then select My Oracle Support if you want the installer to connect to My Oracle Support and automatically download the updates from there.
Enter the My Oracle Support account user name and password, and click Search for Updates. Once the search results appear with patch numbers and their details, click the patch number to view the ReadMe associated with that patch
Note:
Despite providing the My Oracle Support credentials, if you are unable to download the software updates, then exit the installer, and invoke the installer again passing the-showProxy parameter in the following way:
<Software_Location>/runInstaller -showProxy
Note:
If you choose to skip installing the software updates during installation by not providing the My Oracle Support credentials, you can always register the credentials later using the Enterprise Manager Cloud Control console and view the recommended security patches. To do so, log in to Enterprise Manager Cloud Control, and from the Setup menu, select My Oracle Support, then click Set Credentials. On the My Oracle Support Preferred Credentials page, enter the credentials and click Apply.Click Next.
If Enterprise Manager Cloud Control is the first Oracle product you are installing on the host that is running on UNIX operating system, then the Oracle Inventory screen appears. For details, see step (6). Otherwise, the Check Prerequisites screen appears. For details, see step (8).
If Enterprise Manager Cloud Control is the first Oracle product you are installing on the host that is running on Microsoft Windows operating system, then the Oracle Inventory screen does not appear. On Microsoft Windows, the following is the default inventory directory:
<system drive>\Program Files\Oracle\Inventory
Enter Oracle Inventory Details.
On the Oracle Inventory screen, do the following. You will see this screen only if this turns out to be your first ever installation of an Oracle product on the host.
Enter the full path to a directory where the inventory files and directories can be placed.
Note:
The central inventory location you enter must NOT be on a shared file system. If it is already on a shared file system, then switch over to a non-shared file system by following the instructions outlined in My Oracle Support note 1092645.1
If this is the first Oracle product on the host, then the default central inventory location is <home directory>/oraInventory. However, if you already have some Oracle products on the host, then the central inventory location can be found in the oraInst.loc file. The oraInst.loc file is located in the /etc directory for Linux and AIX, and in the /var/opt/oracle directory for Solaris, HP-UX, and Tru64.
Select the appropriate operating system group name that will own the Oracle inventory directories. The group that you select must have write permissions on the Oracle Inventory directories.
Click Next.
Check Prerequisites.
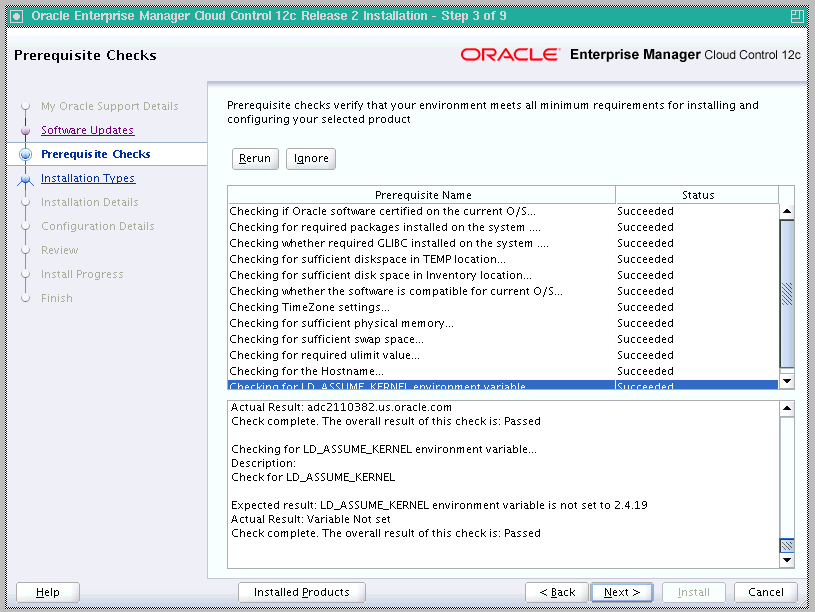
On the Prerequisite Checks screen, check the status of the prerequisite checks run by the installation wizard, and verify whether your environment meets all the minimum requirements for a successful installation.
The installation wizard runs the prerequisite checks automatically when you come to this screen. It checks for the required operating system patches, operating system packages, and so on.
The status of the prerequisite check can be either Warning, Failed, or Succeeded.
If some checks result in Warning or Failed status, then investigate and correct the problems before you proceed with the installation. The screen provides details on why the prerequisites failed and how you can resolve them. After you correct the problems, return to this screen and click Rerun to check the prerequisites again.
However, all package requirements must be met or fixed before proceeding any further. Otherwise, the installation might fail.
Click Next.
Select Installation Type.
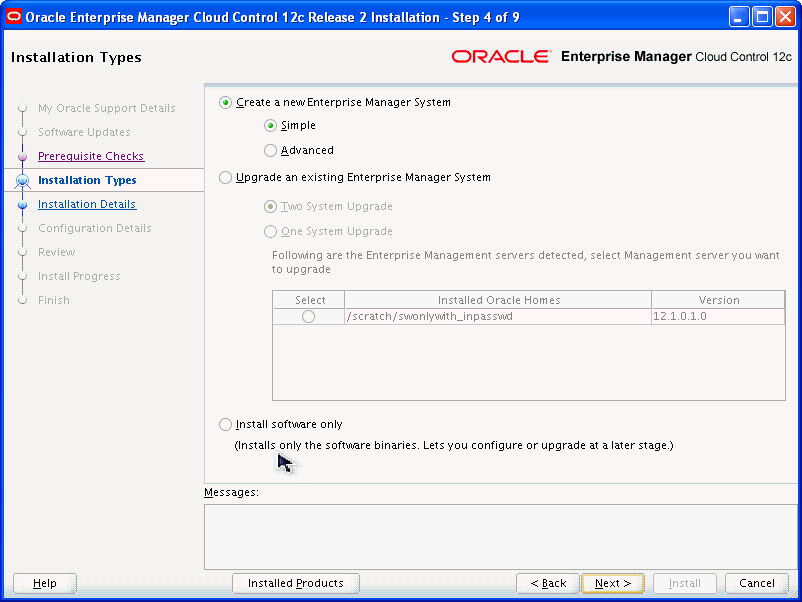
On the Installation Types screen, select Create a New Enterprise Manager System, then select Simple.
Click Next.
Enter Installation Details.
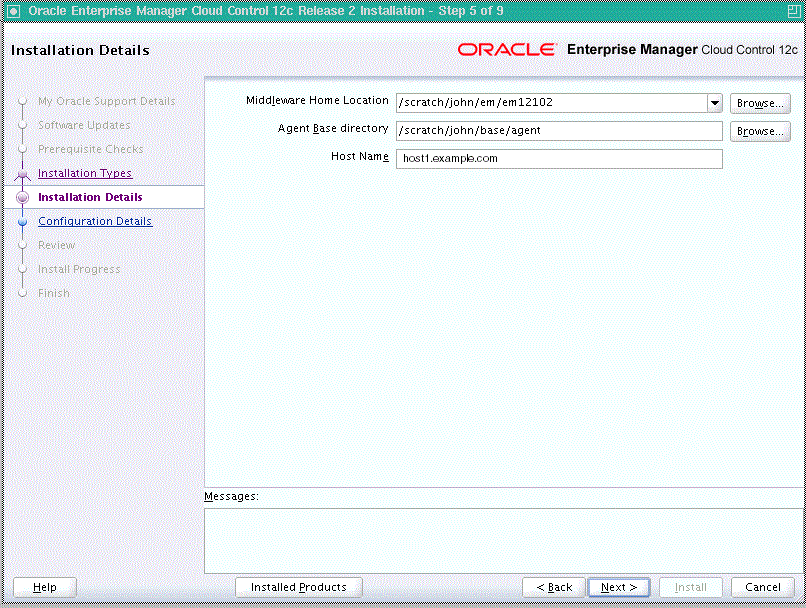
On the Installation Details screen, do the following:
Enter or validate the Middleware home where you want to install the OMS and other core components.
Note:
If you have Oracle WebLogic Server and Java Development Kit already installed, then ensure that they are of the supported releases—Oracle WebLogic Server 11g Release 1 (10.3.5) and JDK 1.6 v24+. If you have the supported releases, the installer automatically detects them and displays the absolute path to the Middleware home where they are installed. In this case, validate the Middleware home. If the location is incorrect, then enter the path to the correct location. Ensure that the Middleware home you select or enter is a Middleware home that does not have any Oracle homes for Oracle Management Service and Oracle Management Agent.
If you do not have Oracle WebLogic Server 11g Release 1 (10.3.5) and JDK 1.6 v24+, then the installer automatically installs them for you while installing the Enterprise Manager system. In this case, enter the absolute path to a directory where you want to have them installed. For example, /oracle/software/. Ensure that the directory you enter does not contain any files or subdirectories.
If you want to manually install Oracle WebLogic Server 11g Release 1 (10.3.5), then follow the guidelines outlined in Before You Begin.
(Only for Microsoft Windows) Ensure that the number of characters in the middleware home path does not exceed 25 characters.
For example, the middleware home path C:\Oracle\MW\EM containing only 15 characters is acceptable. However, C:\Oracle\MW\new\EM\dir\a123 containing more than 25 characters is not acceptable.
Enter the absolute path to the agent base directory, a location outside the Oracle Middleware home where the Management Agent can be installed. For example, /oracle/agent. Ensure that this location is empty and has write permission. Also ensure that it is always maintained outside the Oracle Middleware home.
Note:
(Only for Microsoft Windows) Ensure that the number of characters in the agent base directory path does not exceed 25 characters.For example, the agent base directory path C:\Oracle\Agent\ containing only 16 characters is acceptable. However, C:\Oracle\ManagementAgent\12c\new containing more than 25 characters is not acceptable.
Validate the name of the host where you want to configure the OMS.
The host name appears as a fully qualified name. The host name can also appear as a virtual host name if your host is configured with virtual machine.
You can choose to accept the default host name and proceed with the installation. Alternatively, you can change the name if it is incorrect, or enter another host name for this host. Ensure that the host name you enter is accessible from other hosts in the network (other hosts must be able to ping this host).
Click Next.
Enter Configuration Details.
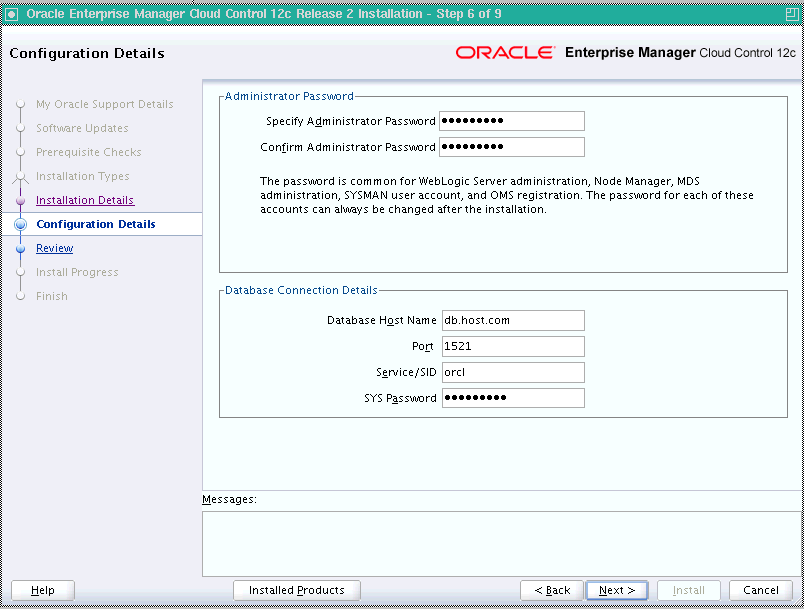
On the Configuration Details screen, do the following:
Enter an administrator password, which can be used as a common password for configuring the Enterprise Manager Cloud Control.
Note:
Ensure that your password contains at least 8 characters without any spaces, begins with a letter, and includes at least one numeric value.Table 6-3 describes what the administrator password is used for.
Table 6-3 Usage of Administrator Password
| Purpose | Description |
|---|---|
|
Creates SYSMAN User Account |
The user account is used as the super administrator for configuring the SYSMAN schema in the Management Repository. |
|
Creates Default WebLogic User Account |
The user account is used as the administrator for creating the default WebLogic domain |
|
Creates Default Node Manager User Account |
The user account is automatically created during the configuration of Enterprise Manager Cloud Control. A Node Manager enables you to start, shut down, or restart an Oracle WebLogic Server instance remotely, and is recommended for applications with high availability requirements. |
|
Authenticates New Management Agents |
The agent registration password is used for authenticating new Management Agents that join Enterprise Manager system, where the communication between the OMS and the Management Agent is secure. |
Provide details of the existing, certified database where the Management Repository needs to be created. If you have already created a database instance with a preconfigured Management Repository using the database templates offered by Oracle, then provide details about that database instance.
The installer uses this information to connect to the existing database for creating the SYSMAN schema and plug-in schemas. If you provide details of a database that already has a preconfigured Management Repository, then the installer only creates plug-in schemas.
Note:
For information about creating a database instance with a preconfigured Management Repository using the database templates offered by Oracle, refer to Appendix D.
If you connect to a database instance that was created using the database template offered by Oracle, then the password assigned to user accounts SYSMAN, SYSMAN_MDS, SYSMAN_APM, and SYSMAN_OPSS, which were created while preconfiguring the Management Repository, are automatically reset with the administrator password you enter here on this screen. We also unlock all these user accounts.
To identify whether your database is a certified database listed in the certification matrix, follow the steps outlined in Appendix E.
Oracle Real Application Cluster (Oracle RAC) nodes are referred to by their virtual IP (vip) names. The service_name parameter is used instead of the system identifier (SID) in connect_data mode, and failover is turned on. For more information, refer to Oracle Database Net Services Administrator's Guide.
If any repository-related prerequisite check fails, see Appendix A to manually run the prerequisite check.
Click Next.
Note:
If you are connecting to an Oracle RAC database, and if you have specified the virtual IP address of one of its nodes, then the installation wizard prompts you with a Connection String dialog and requests you to update the connection string with information about the other nodes that are part of the cluster. Update the connection string and click OK. If you want to test the connection, click Test Connection.
If your Oracle RAC database is configured with Single Client Access Name (SCAN) listener, then you can enter a connection string using the SCAN listener.
Oracle Real Application Cluster (Oracle RAC) nodes are referred to by their virtual IP (vip) names. The service_name parameter is used instead of the system identifier (SID) in connect_data mode, and failover is turned on. For more information, refer to Oracle Database Net Services Administrator's Guide.
If you see an error stating that the connection to the database failed with ORA-01017 invalid user name/password, then follow these steps to resolve the issue:
(1) Verify that SYS password provided is valid.
(2) Verify that the database initialization parameter REMOTE_LOGIN_PASSWORDFILE is set to Shared or Exclusive.
(3) Verify that password file with the file name orapw<SID> exists in the <ORACLE_HOME>/dbs directory of the database home. If it does not, create a password file using the ORAPWD command.
Review and Install
On the Review screen, review the details you provided for the selected installation type.
If you want to change the details, click Back repeatedly until you reach the screen where you want to make the changes.
After you verify the details, if you are satisfied, click Install to begin the installation process.
Track the Progress
On the Install Progress screen, view the overall progress (in percentage) of the installation and the status of each of the configuration assistants. Configuration assistants are run for configuring the installed components of Enterprise Manager Cloud Control.
Note:
If a configuration assistant fails, the installer stops and none of the subsequent configuration assistants are run. Resolve the issue and retry the configuration assistant.
For more information, see the appendix on troubleshooting tips in the Oracle Enterprise Manager Cloud Control Advanced Installation and Configuration Guide.
If you accidently exit the installer before clicking Retry, then do NOT restart the installer to reach the same screen; instead, invoke the runConfig.sh script from the OMS home to rerun the Configuration Assistant in silent mode. For Microsoft Windows platforms, invoke runConfig.bat script.
$<OMS_HOME>/oui/bin/runConfig.sh ORACLE_HOME=<absolute_path_to_OMS_home> MODE=perform ACTION=configure COMPONENT_XML={encap_oms.1_0_0_0_0.xml}
If the runConfig.sh script fails, then clean up your environment and redo the installation.
Run Scripts
Once the software binaries are copied and configured, you are prompted to run the allroot.sh script, and the oraInstRoot.sh script if this is the first Oracle product installation on the host. Open another window, log in as root, and manually run the scripts.
If you are installing on Microsoft Windows operating system, then you will NOT be prompted to run this script.
End the Installation
On the Finish screen, you should see information pertaining to the installation of Enterprise Manager. Review the information and click Close to exit the installation wizard.
For more information about this installation, refer to the following file in the OMS home:
$<OMS_HOME>/install/setupinfo.txt
Note:
If the installation fails for some reason, review the log files listed in Oracle Enterprise Manager Cloud Control Advanced Installation and Configuration Guide.Note:
If you have run the installation wizard and let the installation wizard take corrective actions to correct the repository settings, and if you have exited the wizard without completing the installation process, then remember that the repository settings might not reset to their original values because you abruptly ended the installation. In this case, before invoking the installation wizard again, run the following command to manually reset the values.<Software_Location>/install/requisites/bin/emprereqkit -executionType install -prerequisiteXMLLoc <prereq_xml_location> -connectString <connect_string> -dbUser SYS -dbPassword <db_password> -reposUser sysman -reposPassword <repo_user_password> -dbRole sysdba -runPrerequisites -runPostCorrectiveActions -useHistory
To install Enterprise Manager Cloud Control with advanced configuration, follow these steps:
Note:
Oracle recommends you to run the EM Prerequisite Kit before invoking the installer to ensure that you meet all the repository requirements beforehand. Even if you do not run it manually, the installer anyway runs it in the background while installing the product. However, running it manually beforehand sets up your Management Repository even before you can start the installation or upgrade process. For information on the kit, to understand how to run it, and to know about the prerequisite checks it runs, see Appendix A.Invoke the Enterprise Manager Cloud Control Installation Wizard.
Invoke the installation wizard as a user who belongs to the oinstall group you created following the instructions in Chapter 4.
<Software_Location>/runInstaller
In this command, <Software_Location> is either the DVD location or the location where you have downloaded the software kit.
Note:
To invoke the installation wizard on UNIX platforms, run runInstaller. To invoke on Microsoft Windows platforms, run setup.exe.
Ensure that there are no white spaces in the name of the directory where you download and run the Enterprise Manager Cloud Control software from. For example, do not download and run the software from a directory titled EM Software because there is a white space between the two words of the directory name.
When you invoke runInstaller or setup.exe, if the Enterprise Manager Cloud Control Installation Wizard does not appear, then it is possible that you do not have read and write access to the /stage subdirectory, which a subdirectory in the Disk1 directory of the Enterprise Manager software.
There is a classpath variable that the installation wizard computes for OPatch as ../stage/Components/, and when the TEMP variable is set to /tmp, the installation wizard tries to look for the opatch JAR file in the /tmp/../stage directory, which is equivalent to /stage. However, if you do not have read and write permission on /stage, then the installation wizard can hang. Under such circumstances, verify if you have read and write access to the /stage directory. If you do not have, then set the TEMP variable to a location where the install user has access to, and then relaunch the installation wizard.
Enter My Oracle Support Details.
(Optional) On the My Oracle Support Details screen, enter your My Oracle Support credentials to enable Oracle Configuration Manager. If you do not want to enable Oracle Configuration Manager now, go to Step (3).
If the host from where you are running the installation wizard does not have a connection to the Internet, then enter only the e-mail address and leave the other fields blank. After you complete the installation, manually collect the configuration information and upload it to My Oracle Support.
Click Next.
Install Software Updates.
On the Software Updates screen, select one of the following sources from where the software updates can be installed while the installation of the Enterprise Manager system is in progress. If you do not want to apply them now, then select Skip.
(Recommended) Select Search for Updates, then select Local Directory if you have already manually downloaded the software updates to an accessible local or remote location.
Note:
For instructions to manually download the software updates, refer to Oracle Enterprise Manager Cloud Control Advanced Installation and Configuration Guide.Enter the location where the updates are available, and click Search for Updates. To search the computer and select the location, click Browse. Once the search results appear with patch numbers and their details, click the patch number to view the ReadMe associated with that patch.
If the updates have been downloaded to the default location, then select or enter the full path to the scratch path location. For example, if the scratch path location is /scratch/OracleHomes and if the software updates are available in /scratch/OracleHomes/Updates, then enter /scratch/OracleHomes/Updates.
If the software updates have been downloaded to a custom location, then select or enter the full path to the custom location. For example, if the custom location is /home/john and if the software updates are available in /home/john/Updates, then enter /home/john/Updates.
Select Search for Updates, then select My Oracle Support if you want the installer to connect to My Oracle Support and automatically download the updates from there.
Enter the My Oracle Support account user name and password, and click Search for Updates. Once the search results appear with patch numbers and their details, click the patch number to view the ReadMe associated with that patch
Note:
If you choose to skip installing the software updates during installation by not providing the My Oracle Support credentials, you can always register the credentials later using the Enterprise Manager Cloud Control console and view the recommended security patches. To do so, in Cloud Control, from the Setup menu, select Security, then click Preferred Credentials. On the Preferred Credentials page, click Set MOS Credentials and register the credentials.Note:
Despite providing the My Oracle Support credentials, if you are unable to download the software updates, then exit the installer, and invoke the installer again passing the-showProxy parameter in the following way:
<Software_Location>/runInstaller -showProxy
Click Next.
If Enterprise Manager Cloud Control is the first Oracle product you are installing on the host that is running on UNIX operating system, then the Oracle Inventory screen appears. For details, see step (6). Otherwise, the Check Prerequisites screen appears. For details, see step (8).
If Enterprise Manager Cloud Control is the first Oracle product you are installing on the host that is running on Microsoft Windows operating system, then the Oracle Inventory screen does not appear. On Microsoft Windows, the following is the default inventory directory:
<system drive>\Program Files\Oracle\Inventory
Enter Oracle Inventory Details.
On the Oracle Inventory screen, do the following. You will see this screen only if this turns out to be your first ever installation of an Oracle product on the host.
Enter the full path to a directory where the inventory files and directories can be placed.
Note:
The central inventory location you enter must NOT be on a shared file system. If it is already on a shared file system, then switch over to a non-shared file system by following the instructions outlined in My Oracle Support note 1092645.1
If this is the first Oracle product on the host, then the default central inventory location is <home directory>/oraInventory. However, if you already have some Oracle products on the host, then the central inventory location can be found in the oraInst.loc file. The oraInst.loc file is located in the /etc directory for Linux and AIX, and in the /var/opt/oracle directory for Solaris, HP-UX, and Tru64.
Select the appropriate operating system group name that will own the Oracle inventory directories. The group that you select must have write permissions on the Oracle Inventory directories.
Click Next.
Check Prerequisites.
On the Prerequisite Checks screen, check the status of the prerequisite checks run by the installation wizard, and verify whether your environment meets all the minimum requirements for a successful installation.
The installation wizard runs the prerequisite checks automatically when you come to this screen. It checks for the required operating system patches, operating system packages, and so on.
The status of the prerequisite check can be either Warning, Failed, or Succeeded.
If some checks result in Warning or Failed status, then investigate and correct the problems before you proceed with the installation. The screen provides details on why the prerequisites failed and how you can resolve them. After you correct the problems, return to this screen and click Rerun to check the prerequisites again.
Note:
You can choose to ignore the checks with Warning status by clicking Ignore. However, all package requirements must be met or fixed before proceeding any further.Click Next.
Select Installation Type.
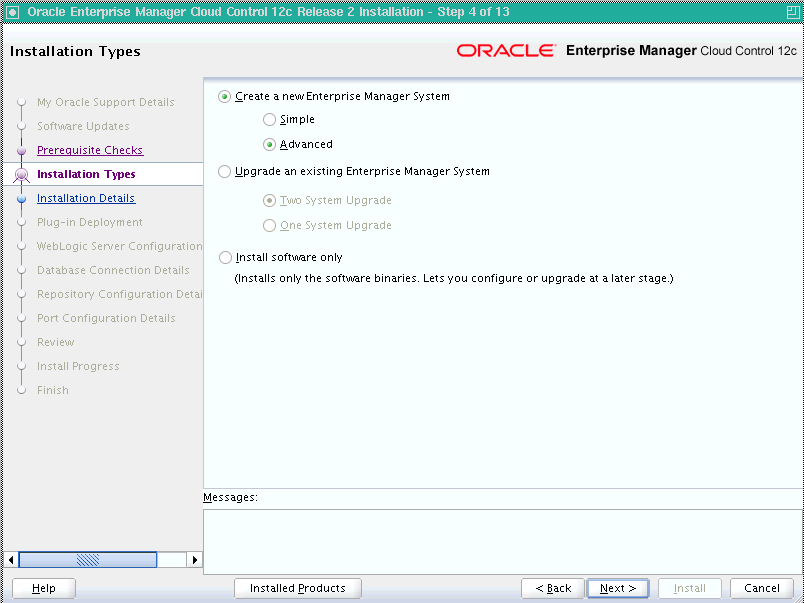
On the Installation Types screen, select Create a New Enterprise Manager System, then select Advanced.
Click Next.
Enter Installation Details.
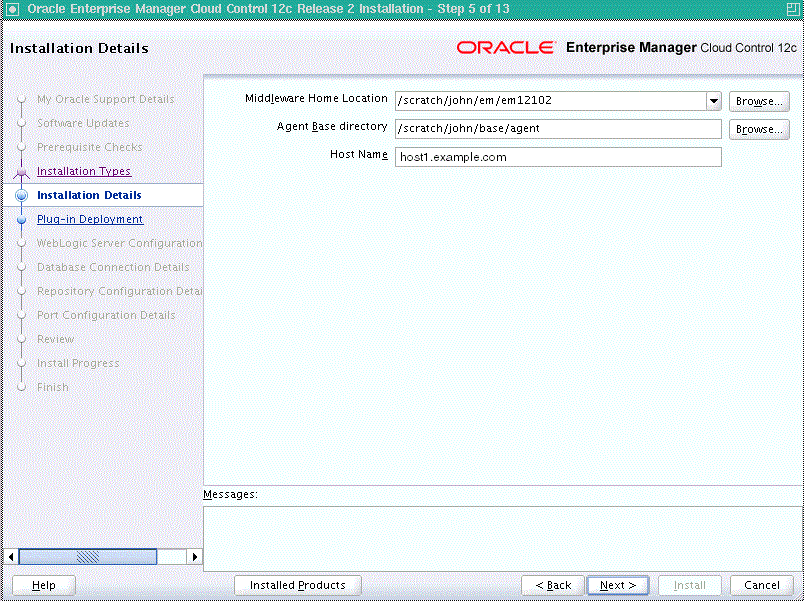
On the Installation Details screen, do the following:
Enter or validate the Middleware home where you want to install the OMS and other core components.
Note:
If you have Oracle WebLogic Server and Java Development Kit already installed, then ensure that they are of the supported releases—Oracle WebLogic Server 11g Release 1 (10.3.5) and JDK 1.6 v24+. If you have the supported releases, the installer automatically detects them and displays the absolute path to the Middleware home where they are installed. In this case, validate the Middleware home. If the location is incorrect, then enter the path to the correct location. Ensure that the Middleware home you select or enter is a Middleware home that does not have any Oracle homes for Oracle Management Service and Oracle Management Agent.
If you do not have Oracle WebLogic Server 11g Release 1 (10.3.5) and JDK 1.6 v24+, then the installer automatically installs them for you while installing the Enterprise Manager system. In this case, enter the absolute path to a directory where you want to have them installed. For example, /oracle/software/. Ensure that the directory you enter does not contain any files or subdirectories.
If you manually install Oracle WebLogic Server 11g Release 1 (10.3.5), then follow the guidelines outlined in Before You Begin.
(Only for Microsoft Windows) Ensure that the number of characters in the middleware home path does not exceed 25 characters.
For example, the middleware home path C:\Oracle\MW\EM containing only 15 characters is acceptable. However, C:\Oracle\MW\new\EM\dir\a123 containing more than 25 characters is not acceptable.
Enter the absolute path to the agent base directory, a location outside the Oracle Middleware home where the Management Agent can be installed. For example, /oracle/agent. Ensure that this location is empty and has write permission. Also ensure that it is always maintained outside the Oracle Middleware home.
Note:
(Only for Microsoft Windows) Ensure that the number of characters in the agent base directory path does not exceed 25 characters.For example, the agent base directory path C:\Oracle\Agent\ containing only 16 characters is acceptable. However, C:\Oracle\ManagementAgent\12c\new containing more than 25 characters is not acceptable.
Validate the name of the host where you want to configure the OMS.
The host name appears as a fully qualified name. The host name can also appear as a virtual host name if your host is configured with virtual machine.
You can choose to accept the default host name and proceed with the installation. Alternatively, you can change the name if it is incorrect, or enter another host name for this host. Ensure that the host name you enter is accessible from other hosts in the network (other hosts must be able to ping this host).
Click Next.
Deploy Plug-Ins.
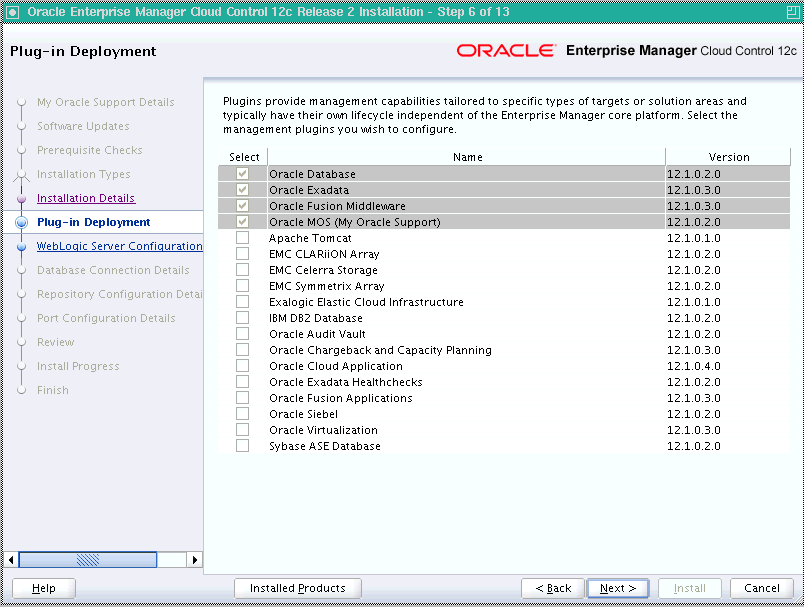
On the Plug-In Deployment screen, select the optional plug-ins you want to install from the software kit (DVD, downloaded software) while installing the Enterprise Manager system.
The pre-selected rows are mandatory plug-ins that will be installed by default. Select the optional ones you want to install.
Note:
During installation, if you want to install a plug-in that is not available in the software kit, then refer to Advanced Installer Options for the point that describes how you can install additional plug-ins.Click Next.
Enter WebLogic Server Configuration Details.
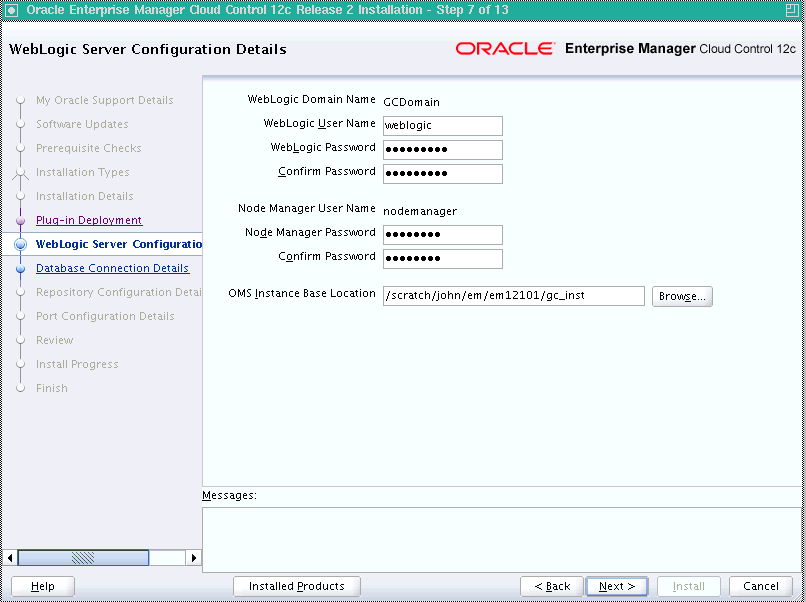
On the WebLogic Server Configuration Details screen, enter the credentials for the WebLogic Server user account and the Node Manager user account, and validate the path to the Oracle Management Service instance base location.
Note:
Ensure that your password contains at least 8 characters without any spaces, begins with a letter, and includes at least one numeric value.By default, the WebLogic Domain name is GCDomain, and the Node Manager name is nodemanager. These are non-editable fields. The installer uses this information for creating Oracle WebLogic Domain and other associated components such as the admin server, the managed server, and the node manager. A Node Manager enables you to start, shut down, or restart an Oracle WebLogic Server instance remotely, and is recommended for applications with high availability requirements.
Note:
If you are installing in an NFS-mounted location, and if you see an error message prompting you not to enter an NFS-mounted location for the OMS instance base location, then click Back repeatedly to reach the Software Updates screen. On the Software Updates screen, select an appropriate option to search and apply the patch 14145094. For more information, click Help on that screen.The patch converts the error message to a warning that you can ignore. The installer exits automatically, applies the patch, and invokes itself again for you to proceed with the installation. Once the installation ends, move the lock file location from the NFS-mounted location to a local file system location. Modify the lock file location in the httpd.conf file to map to the location on the local file system. For instructions, refer to After You Install.
Click Next.
Enter Database Connection Details.
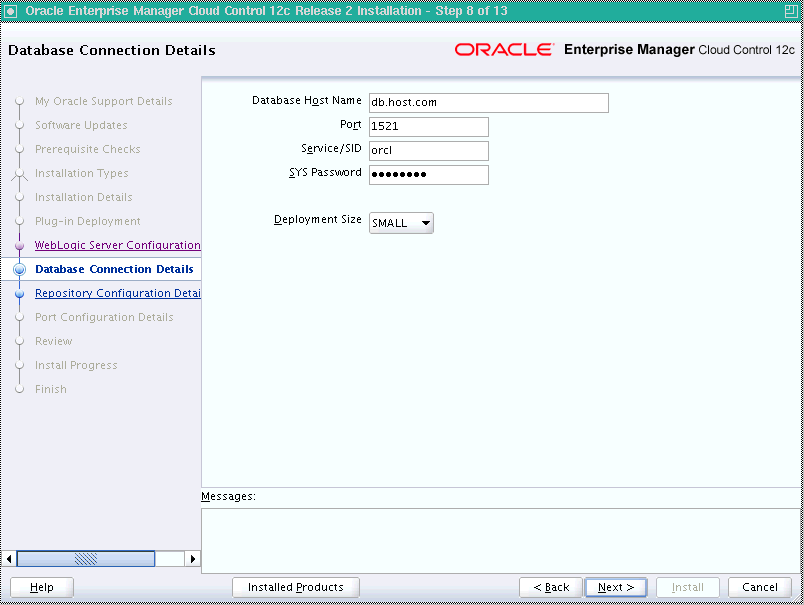
On the Database Connection Details screen, do the following:
Provide details of the existing, certified database where the Management Repository needs to be created. If you have already created a database instance with a preconfigured Management Repository using the database templates offered by Oracle, then provide details about that database instance.
The installer uses this information to connect to the existing database for creating the SYSMAN schema and plug-in schemas. If you provide details of a database that already has a preconfigured Management Repository, then the installer only creates plug-in schemas.
Note:
If you connect to a database instance that was created using the database template offered by Oracle, then note that the password assigned to the user accounts SYSMAN_MDS, SYSMAN_APM, and SYSMAN_OPSS, which were created while preconfiguring the Management Repository, are automatically reset with the SYSMAN password you enter on the Repository Configuration Details screen (as described in Step (20)).
Oracle Real Application Cluster (Oracle RAC) nodes are referred to by their virtual IP (vip) names. The service_name parameter is used instead of the system identifier (SID) in connect_data mode, and failover is turned on. For more information, refer to Oracle Database Net Services Administrator's Guide.
Select the deployment size from the Deployment Size list to indicate the number of targets you plan to monitor, the number Management Agents you plan to have, and the number of concurrent user sessions you plan have.
Table 6-4 describes each deployment size.
| Deployment Size | Targets Count | Management Agents Count | Concurrent User Session Count |
|---|---|---|---|
|
Small |
Up to 999 |
Up to 99 |
Up to 10 |
|
Medium |
Between 1000 and 9999 |
Between 100 and 999 |
Between 10 and 24 |
|
Large |
10,000 or more |
1000 or more |
Between 25 and 50 |
For more information on deployment sizes, the prerequisite checks that are run, the database parameters that are set, and how you can modify the deployment size after installation, refer to Oracle Enterprise Manager Cloud Control Advanced Installation and Configuration Guide.
Click Next.
Note:
If you connect to a database instance that was created using the database template offered by Oracle, then you will be prompted that the database parameters need to be modified to suit the deployment size you selected. This is because the templates are essentially designed for simple installation, and the database parameters are set as required for simple installation. Since it is used for advanced installation, the parameters must be set to different values. You can confirm the message to proceed further. The installation wizard will automatically set the parameters to the required values.
If you are connecting to an Oracle RAC database, and if you have specified the virtual IP address of one of its nodes, then the installation wizard prompts you with a Connection String dialog and requests you to update the connection string with information about the other nodes that are part of the cluster. Update the connection string and click OK. If you want to test the connection, click Test Connection.
If your Oracle RAC database is configured with Single Client Access Name (SCAN) listener, then you can enter a connection string using the SCAN listener.
Oracle Real Application Cluster (Oracle RAC) nodes are referred to by their virtual IP (vip) names. The service_name parameter is used instead of the system identifier (SID) in connect_data mode, and failover is turned on. For more information, refer to Oracle Database Net Services Administrator's Guide
If you see an error stating that the connection to the database failed with ORA-01017 invalid user name/password, then follow these steps to resolve the issue:
(1) Verify that SYS password provided is valid.
(2) Verify that the database initialization parameter REMOTE_LOGIN_PASSWORDFILE is set to Shared or Exclusive.
(3) Verify that password file with the file name orapw<SID> exists in the <ORACLE_HOME>/dbs directory of the database home. If it does not, create a password file using the ORAPWD command.
Enter Repository Configuration Details
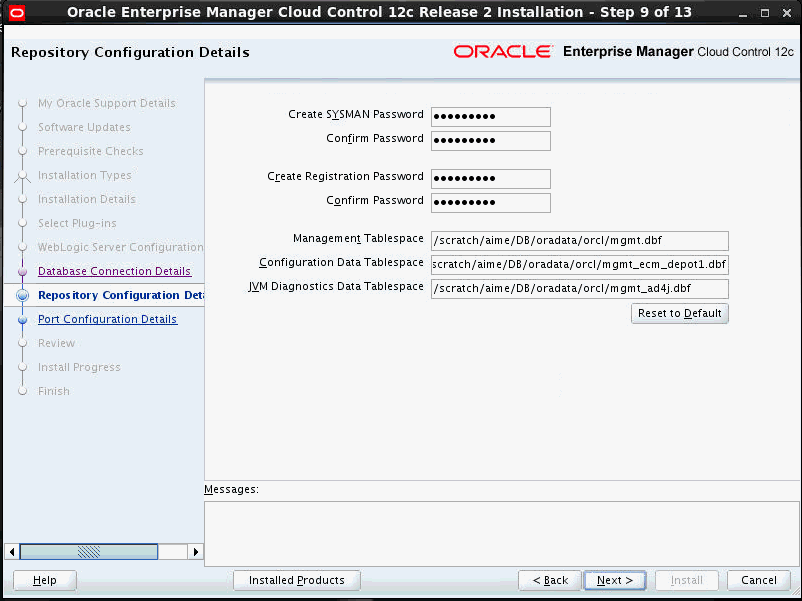
On the Repository Configuration Details screen, do the following:
For SYSMAN Password, enter a password for creating the SYSMAN user account. The SYSMAN user account is used for creating the SYSMAN schema, which holds most of the relational data used in managing Enterprise Manager Cloud Control. SYSMAN is also the super administrator for Enterprise Manager Cloud Control.
Note:
Ensure that your password contains at least 8 characters without any spaces, begins with a letter, and includes at least one numeric value.
If you connect to a database instance that was created using the database template offered by Oracle, then note that the password assigned to the user accounts SYSMAN_MDS, SYSMAN_APM, and SYSMAN_OPSS, which were created while preconfiguring the Management Repository, are automatically reset with the SYSMAN password you enter on this screen.
For Registration Password, enter a password for registering the new Management Agents that join the Enterprise Manager system.
Note:
Ensure that your password contains at least 8 characters without any spaces, begins with a letter, and includes at least one numeric value.For Management Tablespace, enter the full path to the location where the data file for management tablespace (mgmt.dbf) can be stored. The installer uses this information for storing data about the monitored targets, their metrics, and so on. Ensure that the specified path leads up to the file name.
For example, /u01/oracle/prod/oradata/mgmt.dbf
For Configuration Data Tablespace, enter the full path to the location where the data file for configuration data tablespace (mgmt_ecm_depot1.dbf) can be stored. This is required for storing configuration information collected from the monitored targets. Ensure that the specified path leads up to the file name.
For example, /u01/oracle/prod/oradata/mgmt_ecm_depot1.dbf
For JVM Diagnostics Data Tablespace, enter the full path to a location where the data file for JVM Diagnostics data tablespace (mgmt_ad4j.dbf) can be stored. Ensure that the specified path leads up to the file name. Enterprise Manager Cloud Control requires this data file to store monitoring data related to JVM Diagnostics and Application Dependency Performance (ADP).
For example, /u01/oracle/prod/oradata/mgmt_ad4j.dbf
Note:
If you are configuring the Management Repository on a database that uses Oracle Automatic Storage Management (Oracle ASM) for storage, then when you enter the data file location, only the disk group is used for creating the tablespaces. For example, if you specify+DATA/a.dbf, then only +DATA is used for creating the tablespaces on Oracle ASM, and the exact location of the data file on the disk group is decided by Oracle Managed Files.Click Next.
Customize Ports
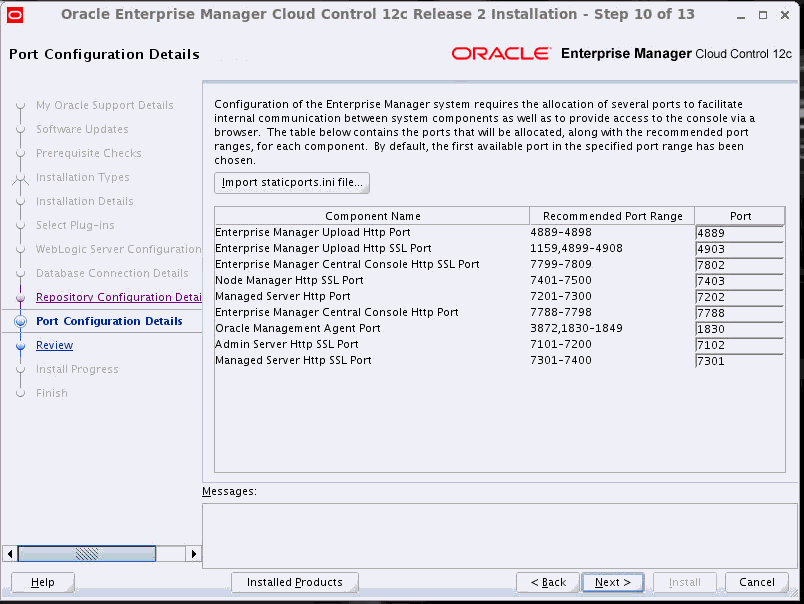
On the Port Configuration Details screen, customize the ports to be used for various components.
Note:
If all the ports on this screen appear as -1, then it indicates that the installer is unable to bind the ports on the host. To resolve this issue, exit the installer, verify the host name and the IP configuration of this host (ensure that the IP address of the host is not being used by another host), restart the installer, and try again.You can enter a free custom port that is either within or outside the port range recommended by Oracle.
To verify if a port is free, run the following command:
On Unix:
netstat -an | grep <port no>
On Microsoft Windows:
netstat -an|findstr <port_no>
However, the custom port must be greater than 1024 and lesser than 65535. Alternatively, if you already have the ports predefined in a staticports.ini file and if you want to use those ports, then click Import staticports.ini File and select the file.
Note:
If thestaticports.ini file is passed during installation, then by default, the ports defined in the staticports.ini file are displayed. Otherwise, the first available port from the recommended range is displayed.
The staticports.ini file is available in the following location:
<Software_Extracted_Location>/response
Click Next.
Review and Install
On the Review screen, review the details you provided for the selected installation type.
If you want to change the details, click Back repeatedly until you reach the screen where you want to make the changes.
After you verify the details, if you are satisfied, click Install to begin the installation process.
Track the Progress
On the Install Progress screen, view the overall progress (in percentage) of the installation and the status of each of the Configuration Assistants. Configuration Assistants are run for configuring the installed components of Enterprise Manager Cloud Control.
Note:
If a configuration assistant fails, the installer stops and none of the subsequent configuration assistants are run. Resolve the issue and retry the configuration assistant.
For more information, see the appendix on troubleshooting tips in the Oracle Enterprise Manager Cloud Control Advanced Installation and Configuration Guide.
If you accidently exit the installer before clicking Retry, then do NOT restart the installer to reach the same screen; instead, invoke the runConfig.sh script from the OMS home to rerun the Configuration Assistant in silent mode. For Microsoft Windows platforms, invoke runConfig.bat script.
$<OMS_HOME>/oui/bin/runConfig.sh ORACLE_HOME=<absolute_path_to_OMS_home> MODE=perform ACTION=configure COMPONENT_XML={encap_oms.1_0_0_0_0.xml}
If the runConfig.sh script fails, then clean up your environment and redo the installation.
Run Scripts
Once the software binaries are copied and configured, you are prompted to run the allroot.sh script, and the oraInstRoot.sh script if this is the first Oracle product installation on the host. Open another window, log in as root, and manually run the scripts.
If you are installing on Microsoft Windows operating system, then you will NOT be prompted to run this script. You will directly reach the Finish screen as described in Step (27).
End the Installation
On the Finish screen, you should see information pertaining to the installation of Enterprise Manager. Review the information and click Close to exit the installation wizard.
For more information about this installation, refer to the following file available in the OMS home:
$<OMS_HOME>/install/setupinfo.txt
Note:
If the installation fails for some reason, review the log files listed in Oracle Enterprise Manager Cloud Control Advanced Installation and Configuration Guide.Note:
If you have run the installation wizard and let the installation wizard take corrective actions to correct the repository settings, and if you have exited the wizard without completing the installation process, then remember that the repository settings might not reset to their original values because you abruptly ended the installation. In this case, before invoking the installation wizard again, run the following command to manually reset the values.<Software_Location>/install/requisites/bin/emprereqkit -executionType install -prerequisiteXMLLoc <prereq_xml_location> -connectString <connect_string> -dbUser SYS -dbPassword <db_password> -reposUser sysman -reposPassword <repo_user_password> -dbRole sysdba -runPrerequisites -runPostCorrectiveActions -useHistory
The following are some additional, advanced options you can pass while invoking the installer:
By default, GCDomain is the default name used for creating the WebLogic Domain. To override this and use a custom WebLogic Domain name, invoke the installer with the WLS_DOMAIN_NAME option, and enter a unique custom name.
For example, if you want to use the custom name EMDomain, then run the following command:
./runInstaller WLS_DOMAIN_NAME=EMDomain
By default, a Provisioning Advisor Framework (PAF) staging directory is created for copying the Software Library entities related to the deployment procedures. By default, this location is the scratch path location (/tmp). The location is used only for provisioning activities—entities are copied for a deployment procedure, and then, deleted once the deployment procedure ends.
If you want to override this location with a custom location, then invoke the installer with the EM_STAGE_DIR option, and enter a unique custom location.
For example,
./runInstaller EM_STAGE_DIR=/home/john/software/oracle/pafdir
During installation, if you want to install some plug-ins that are not in the software kit (DVD, downloaded software), then follow these steps:
Manually download the plug-ins from the Enterprise Manager download page on OTN, and store them in an accessible location:
http://www.oracle.com/technetwork/oem/grid-control/downloads/oem-upgrade-console-502238.html
Invoke the installer with the following option, and pass the location where the plug-ins you want to install are available:
./runInstaller -pluginLocation <absolute_path_to_plugin_software_location>
This displays a list of plug-ins available in the software kit (DVD, downloaded software) as well as the plug-ins available in this custom location. You can choose the ones you want to install.
After the installation ends successfully, the OMS and the Management Agent start automatically. If you do not want them to start automatically, then invoke the installer with START_OMS and b_startAgent options, and set them to true or false depending on what you want to control.
For example, if you do not want the Management Agent to start automatically, then run the following command:
./runInstaller START_OMS=true b_startAgent=false
To understand the limitations involved with this advanced option, see Limitations.
When you use START_OMS and b_startAgent as advanced options to control the way the OMS and the Management Agent start up automatically, sometimes the Management Agent and the host on which it was installed do not appear as targets in the Cloud Control console.
Table 6-5 lists the different combinations of these advanced options, and describes the workaround to be followed for each combination:
Table 6-5 Advanced Options and Workarounds
| Advanced Option | Workaround |
|---|---|
|
|
|
|
|
Start the Management Agent:
|
|
|
|
After you install, do the following:
(Only for UNIX Operating Systems) If you did not run the allroot.sh script when the installer prompted you to do so, then run it manually now:
If this is the first Oracle product you just installed on the host, then run the oraInstroot.sh script from the inventory location specified in the oraInst.loc file that is available in the Management Agent home.
For example, if the inventory location specified in the oraInst.loc file is $HOME/oraInventory, then run the following command:
$HOME/oraInventory/oraInstRoot.sh
Note:
If you are not a root user, then use SUDO to change to a root user. For example, run the following command:/usr/local/bin/sudo $HOME/oraInventory/oraInstRoot.sh
Run the allroot.sh script from the OMS home:
$<OMS_HOME>/allroot.sh
Note:
If you are not a root user, then use SUDO to change to a root user. For example, run the following command:/usr/local/bin/sudo $<OMS_HOME>/allroot.sh
Navigate to the OMS home and run the following command to see a message that confirms that OMS is up and running.
$<OMS_HOME>/bin/emctl status oms
For example,
/u01/middleware/oms/bin/emctl status oms
Navigate to the Management Agent home and run the following command to see a message that confirms that the Management Agent is up and running.
$<AGENT_HOME>/bin/emctl status agent
For example,
/u01/agent/core/12.1.0.2.0/bin/emctl status agent
Navigate to the Management Agent home and run the following command to see a message that confirms that EMD upload completed successfully.
$<AGENT_HOME>/bin/emctl upload agent
For example,
/u01/agent/core/12.1.0.2.0/bin/emctl upload agent
Note:
By default, you can access Enterprise Manager Cloud Control only using the HTTPS protocol. If you want to use the HTTP protocol, then unlock it by running the following command from the OMS home:emctl secure unlock -console
Verify if all the plug-ins were installed successfully. To do so, access the following log file from the Management Agent home, and search for the sentence WARN:Plugin configuration has failed.
$<AGENT_HOME>/cfgtoollogs/cfgfw/CfmLogger-<timestamp>.log
For example,
$/u01/agent/core/12.1.0.2.0/cfgtoollogs/cfgfw/CfmLogger-<timestamp>.log
If you find the sentence, resolve the issue by running the AgentPluginDeploy.pl script from the Management Agent home.
$<AGENT_BASE_DIR>/agent/core/12.1.0.2.0/perl/bin/perl <AGENT_BASE_DIR>/agent/core/12.1.0.2.0/bin/AgentPluginDeploy.pl -oracleHome <AGENT_BASE_DIR>/agent/core/12.1.0.2.0 -agentDir <AGENT_BASE_DIR> -pluginIdsInfoFile <AGENT_BASE_DIR>/plugins.txt -action configure -emStateDir <AGENT_INSTANCE_HOME>
For example,
/u01/agent/core/12.1.0.2.0/perl/bin/perl /u01/agent/core/12.1.0.2.0/bin/AgentPluginDeploy.pl -oracleHome /u01/agent/core/12.1.0.2.0/ -agentDir /u01/agent -pluginIdsInfoFile /u01/agent/plugins.txt -action configure -emStateDir /u01/agent/agent_inst
(Optional) If the repository prerequisites had failed, and if you had manually run the EM Prerequisite Kit and taken corrective actions to meet the repository requirements, then run the utility again to reset the repository settings to what it had originally:
<Software_Location>/install/requisites/bin/emprereqkit -executionType install -prerequisiteXMLLoc <prereq_xml_location> -connectString <connect_string> -dbUser SYS -dbPassword <db_password> -reposUser sysman -reposPassword <repo_user_password> -dbRole sysdba -runPrerequisites -runPostCorrectiveActions -useHistory
Note:
If you had run the installation wizard and let the installation wizard take corrective actions to correct the repository settings, and if you had exited the wizard without completing the installation process, then remember that the repository settings might not reset to their original values because you abruptly ended the installation. In this case, before invoking the installation wizard again, run this command to manually reset the values.By default, the following targets get automatically discovered and monitored in the Enterprise Manager Cloud Control console:
Oracle WebLogic Domain (for example, GCDomain)
Oracle WebLogic AdminServer
Oracle WebLogic Server
Oracle Web Tier
Application deployments, one for the Enterprise Manager Cloud Control console and one for the platform background services.
Oracle Management Service
Oracle Management Repository
Oracle Management Agent
The host on which you installed Enterprise Manager Cloud Control
However, the other targets running on that host and other hosts do not get automatically discovered and monitored. To monitor the other targets, you need to add them to Enterprise Manager Cloud Control either using the Auto Discovery Results page, the Add Targets Manually page, or the discovery wizards offered for the targets you want to monitor.
For information about discovering targets in Enterprise Manager Cloud Control, refer to the chapter on adding targets in the Oracle Enterprise Manager Cloud Control Administrator's Guide.
If you installed in a Middleware home that is on an NFS-mounted drive, then ensure that you maintain the lock file in a local file system and not in that NFS-mounted location. To do so, modify the lock file location in the httpd.conf file to map to a location on a local file system.
Stop the OMS:
<OMS_HOME>/bin/emctl stop oms -all
Open the following file:
Note:
Oracle recommends you to take a backup of this file before editing it.<WEBTIER_INSTANCE_HOME>/config/OHS/ohs1/httpd.conf
Search for sections related to the modules mpm_prefork_module and mpm_worker_module. In both these sections, modify the value for the LockFile parameter so that the path leads to a location on the local file system.
<IfModule mpm_prefork_module>
StartServers 5
MinSpareServers 5
MaxSpareServers 10
MaxClients 150
MaxRequestsPerChild 0
AcceptMutex fcntl
LockFile "${ORACLE_INSTANCE}/diagnostics/logs/${COMPONENT_TYPE}/${COMPONENT_NAME}/http_lock"
</IfModule>
....
<IfModule mpm_worker_module>
StartServers 2
MaxClients 150
MinSpareThreads 25
MaxSpareThreads 75
ThreadsPerChild 25
MaxRequestsPerChild 0
AcceptMutex fcntl
LockFile "${ORACLE_INSTANCE}/diagnostics/logs/${COMPONENT_TYPE}/${COMPONENT_NAME}/http_lock"
</IfModule>
Save the changes.
Restart the OMS:
<OMS_HOME>/bin/emctl start oms
Configure your proxy server as described in Appendix C.
(Optional) If you want to change the passwords of SYSMAN and all other internal user accounts such as SYSMAN_MDS, SYSMAN_OPSS, and SYSMAN_APM, then shut down the OMS, run the following command from the OMS home, and then restart the OMS. You will be prompted to enter the old and the new password.
<OMS_HOME>/bin/emctl config oms -change_repos_pwd
An encryption key is generated to encrypt sensitive data in the Management Repository. If this key is lost, all encrypted data in the Management Repository become unusable. Therefore, back up the Management Service configuration including the emkey, and maintain the backup on another host.
To back up the Management Service configuration including the emkey, run the following command:
<OMS_HOME>/bin/emctl exportconfig oms -dir <path_to_backup_location>
Before accessing the Enterprise Manager Cloud Control Console in a browser, install a security certificate from a trusted certification authority on the browser.
This it to ensure that the Enterprise Manager Cloud Control Console that you are accessing over HTTPS protocol is recognized as a genuine and secure Web site.
For instructions to install a security certificate on your browser and avoid security certificate alerts, refer to Oracle Enterprise Manager Cloud Control Administrator's Guide.
|
Copyright © 2012, Oracle and/or its affiliates. All rights reserved. Legal Notices |
|