| Oracle® Enterprise Manager System Monitoring Plug-in Installation Guide for Sybase Adaptive Server Enterprise (ASE) Release 12.1.0.2.0 Part Number E25214-04 |
|
| PDF · Mobi · ePub |
| Oracle® Enterprise Manager System Monitoring Plug-in Installation Guide for Sybase Adaptive Server Enterprise (ASE) Release 12.1.0.2.0 Part Number E25214-04 |
|
| PDF · Mobi · ePub |
System Monitoring Plug-in Installation Guide for Sybase Adaptive Server Enterprise (ASE)
Release 12.1.0.2.0
E25214-04
September 2012
This document provides a brief description about the Oracle System Monitoring Plug-in for Sybase Adaptive Server Enterprise, details on the versions the plug-in supports, prerequisites for installing the plug-in, and step-by-step instructions on how to install, verify, and validate the plug-in.
The System Monitoring Plug-in for Sybase Adaptive Server Enterprise extends Oracle Enterprise Manager Cloud Control to add support for managing Sybase Adaptive Server instances. By deploying the plug-in within your Cloud Control environment, you gain the following management features:
Monitor Sybase Adaptive Server instances.
Gather configuration data and track configuration changes for Sybase Adaptive Server instances.
Raise alerts and violations based on thresholds set on monitored metrics and configuration data.
Provide rich out-of-box reports based on the gathered data.
Support monitoring by a remote Agent. Local Agent is an agent running on the same host as the Sybase Adaptive Server. Remote Agent is an agent running on a host that is different from the host where Sybase Adaptive Server is running.
This plug-in supports the following versions of products:
Enterprise Manager 12c Cloud Control Release 1 (12.1.0.1.0) or higher
Version 12.5.4 to 15.5 or higher of Express (XE), Enterprise (EE), and Developer (DE) editions of Sybase Adaptive Server
Note:
The system monitoring plug-in for Sybase Adaptive Server is not certified for monitoring Sybase Adaptive Server Clusters. For more information, refer to the known issues described in the Oracle Enterprise Manager System Monitoring Plug-in Troubleshooting Guide.The following prerequisites must be met before you can deploy the plug-in:
Sybase Adaptive Server Enterprise version 12.5.4 to 15.5 or higher is installed.
The following components of Oracle Enterprise Manager Cloud Control are installed and running:
Oracle Enterprise Manager Cloud Control 12.1.0.1.0 or higher
Oracle Management Agent 12.1.0.1.0 or higher (any platform supported by this release of agent)
You can install the agent on the same computer as Sybase Adaptive Server (referred to as local agent monitoring), or you can install the agent on a different computer from Sybase Adaptive Server (referred to as remote agent monitoring).
The MDA tables must be installed before they can be queried. The MDA tables only exist on 12.5.0.3 and higher. To install MDA tables, do the following:
Ensure that the configuration parameter enable cis is set to 1. If not, restart ASE. Run the following command:
sp_configure 'enable cis', 1
go
Add 'loopback' server name alias (assuming @@servername is also defined in the interfaces file). This step is no longer required in 15.0 ESD#2 or later.
use master
go
sp_addserver loopback, null, @@servername
go
Test this configuration. This step is no longer required in 15.0 ESD#2 or later.
set cis_rpc_handling on
go
Alternatively, run the following command and then disconnect and reconnect your session:
sp_configure 'cis rpc handling', 1
exec loopback...sp_who  -- note: 3 dots!
go
Install the MDA tables. Do not run this script with 'sqsh' as it will cause errors. 'sqsh' sees a '$' as the start of a sqsh variable, and this distorts the native RPC names, since these start with a '$' as well. Instead, either use 'isql' as below, or run 'sqsh' with the '-Lexpand=0' option to disable sqsh variable expansion feature. For ASE 15.0.2 and higher, this script is included in the installmaster.
isql -U sa -P yourpassword -S YOURSERVER \
     -i $SYBASE/$SYBASE_ASE/scripts/installmontables
Assign mon_role to logins allowed MDA access. This also applies to the 'sa' login.
use master
go
grant role mon_role to sa
go
Test basic MDA configuration as follows. You may need to disconnect and reconnect to activate mon_role when you grant this role to the login you are currently using.
select * from master..monState
go
Enable all configuration parameters. These are all dynamic (except the per object statistics active parameter). For all 'pipe' tables, the number of messages is set to 100 here, but you can choose a larger size.
sp_configure "enable monitoring", 1
go
sp_configure "sql text pipe active", 1
go
sp_configure "sql text pipe max messages", 100
go
sp_configure "plan text pipe active", 1
go
sp_configure "plan text pipe max messages", 100
go
sp_configure "statement pipe active", 1
go
sp_configure "statement pipe max messages", 100
go
sp_configure "errorlog pipe active", 1
go
sp_configure "errorlog pipe max messages", 100
go
sp_configure "deadlock pipe active", 1
go
sp_configure "deadlock pipe max messages", 100
go
sp_configure "wait event timing", 1
go
sp_configure "process wait events", 1
go
sp_configure "object lockwait timing", 1
go
sp_configure "SQL batch capture", 1
go
sp_configure "statement statistics active", 1
go
sp_configure "per object statistics active", 1
go
For ASE 15.0.2, also run the following command:
sp_configure "enable stmt cache monitoring", 1
go
Set the following static parameter to a higher value (the setting is in bytes per user connection) if you're expecting a lot of (or long) SQL batches:
sp_configure "max SQL text monitored", 2048
go
Note:
Enabling the following configuration parameters will result in >5% performance overhead:sp_configure "sql text pipe active", 1 sp_configure "sql text pipe max messages", 100 sp_configure "max SQL text monitored", 2048 sp_configure "plan text pipe active", 1 sp_configure "plan text pipe max messages", 100 sp_configure "statement pipe active", 1 sp_configure "statement pipe max messages", 100 sp_configure "statement statistics active", 1 sp_configure "per object statistics active", 1
As part of JDBC URL, either IP Address or host name can be provided. Ensure that the host name can be resolved consistently on the network. Standard TCP tools such as "nslookup" and "traceroute" can be used to verify the host name. Validate using the following commands on Management Agent where plug-in is deployed:
nslookup <hostname>
This returns the IP address and fully qualified host name.
nslookup <IP>
This returns the IP address and fully qualified host name.
The plug-in may sometimes depend on the cache size of the TemDB.
If the monitoring user does not have permission on all databases in Sybase ASE target, provide permission to query SYSSEGMENTS table to monitoring user or else create guest user account in each database.
To monitor the Sybase Adaptive Server target using Enterprise Manager, the Sybase Adaptive Server user must have the role mon_role. In addition to mon_role permissions, the monitoring user must also have Select permissions to access the following sys tables:
syslisteners
sysloginroles
syssrvroles
The following commands will grant Select permission to the monitoring user:
grant select on syslisteners to public go grant select on sysloginroles to public go grant select on syssrvroles (name, srid) to public go
The above steps will give Select permission to all existing users in the database. To grant Select permission to only the monitoring user, referred to as monuser below, run the following commands. To execute these commands, the user must have sa_role permissions.
Create a group.
sp_addgroup OracleEMGroup go
Add the user monuser to the group.
sp_adduser monuser, null, OracleEMGroup go
Grant Select permission on the tables to OracleEMGroup.
grant select on syslisteners to OracleEMGroup go grant select on sysloginroles to OracleEMGroup go grant select on syssrvroles (name, srid) to OracleEMGroup go
To configure the Agent, you must first ensure that the user starting the Agent service belongs to the Local Administrators Group. Also, you must set the preferred credentials on all Agents where you want to deploy the plug-in. To do so, follow the instructions given in the following sections.
(For Microsoft Windows ONLY) To assign advanced privileges in a Microsoft Windows environment, do the following:
Locally on the Microsoft Windows node hosting the Agent, check that the user starting the Agent service belongs to the Local Administrators Group. If not, add it.
Open the Local Security Settings Windows Tool and give the following Advanced Privileges to the user starting the Agent service:
Act as part of the operating system
Adjust memory quotas for a process
Logon as batch job
Replace a process level token
Restart the Agent service if it is running.
Set the Preferred Credentials for the Host and the Agent in Cloud Control. For more information, see "Setting up the JDBC Driver".
The OS user set in the Preferred Credentials must belong to the Local Administrators Group.
This OS user must have the following Advanced Privileges:
Act as part of the operating system
Adjust memory quotas for a process
Logon as batch job
Replace a process level token
To set the preferred credentials on all Agents where you want to deploy the plug-in, do the following:
In Enterprise Manager Cloud Control, from the Setup menu, select Security, then Preferred Credentials.
The Preferred Credentials page appears, showing a table of targets.
Select Host target type from the table and then click Managed Preferred Credentials.
The Host Preferred Credentials page appears.
In the Host Preferred Credentials page, in the Target Credentials section, select the host that is running the Management Agent where the plug-in has to be deployed, and click Set.
In the Select Named Credential dialog box, Select Credential as New and specify the user name and password and click Test and Save. If your test runs successfully, your credentials are set correctly.
Run the OS Command job for the Management Agent where the plug-in has to be deployed.
Log in to Enterprise Manager Cloud Control.
From the Enterprise menu, select Job and then Activity.
In the Job Activity page, from the Create Job list, select OS Command, and click Go.
Fill up the details required in the following pages, and click Submit to run the job. If the job runs successfully, your credentials are set correctly.
See the Plug-in Manager chapter in the Oracle Enterprise Manager Cloud Control Administrator's Guide for steps to deploy the plug-in:
http://docs.oracle.com/cd/E24628_01/doc.121/e24473/plugin_mngr.htm
Following are the steps to set up jConnect for the Sybase Adaptive Server plugin:
Download the jConnect JDBC driver version 6.0 from www.sybase.com.
If it does not already exist, create the directory $ORACLE_HOME/plugins/dependencies/oracle.em.ssad/jdbcdriver/.
Copy the JDBC driver file (jConn3.jar) into the directory $ORACLE_HOME/plugins/dependencies/oracle.em.ssad/jdbcdriver/.
The following sections provide information you require to enable the TCP/IP port and to find the TCP/IP port for a particular Sybase Adaptive Server instance.
For all editions of Sybase Adaptive Server
From the Sybase Adaptive Server Configuration Manager, select Sybase Adaptive Server Network Configuration in the left panel and navigate to the Sybase Adaptive Server instance.
The right panel displays all protocols for the specified Sybase Adaptive Server instance and their status.
Ensure that TCP/IP is enabled.
(If TCP/IP is disabled), right-click TCP/IP and select Properties. The TCP/IP Properties dialog box appears.
In the Protocol tab, select enabled, and click Apply.
Restart the Sybase Adaptive Server instance.
After successfully deploying the plug-in, follow these steps to add the plug-in target to Cloud Control for central monitoring and management:
From the Setup menu, select Add Target and then Add Targets Manually.
In the Add Targets Manually page, select Add Non-Host Targets by Specifying Target Monitoring Properties, select Target Type as Sybase Adaptive Server Enterprise, select a Monitoring Agent and click Add Manually.
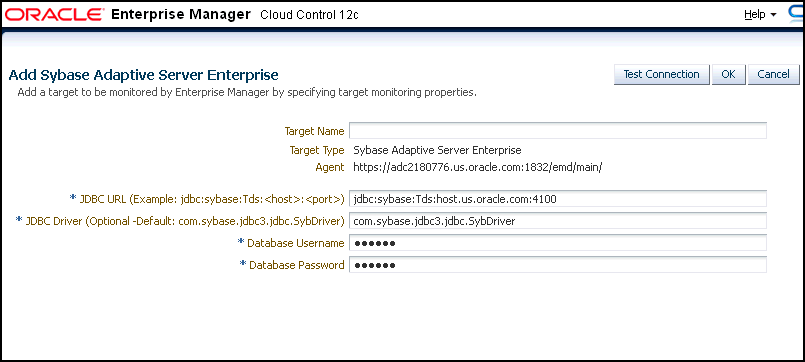
In the Add Sybase Adaptive Server page (Figure 1), provide the following information for the properties:
Target Name — Unique target name across all the Cloud Control targets, such as SybaseServer_Hostname. This is the display name in Cloud Control. It represents this Sybase Adaptive Server target across all user interfaces within Cloud Control.
JDBC URL — Provide the URL in the format jdbc:sybase:Tds:<system>:<tcp/ip port>
For example, jdbc:sybase:Tds:stmpi2.idc.oracle.com:5000
JDBC Driver — Optional parameter. Provide this value in the format com.sybase.jdbc3.jdbc.SybDriver
Database Username — Valid user for the database in mon_role.
Database Password — Corresponding password for the database user
Click Test Connection to make sure the parameters you entered are correct.
After you deploy and configure the plug-in to monitor one or more targets in the environment, you can customize the monitoring settings of the plug-in. This alters the collection intervals and threshold settings of the metrics to meet the particular needs of your environment. If you decide to disable one or more metric collections, this could impact the reports that the metric is a part of.
After waiting a few minutes for the plug-in to start collecting data, use the following steps to verify and validate that Enterprise Manager is properly monitoring the plug-in target:
Click the Sybase Adaptive Server target link from the All Targets page. The Sybase Adaptive Server home page appears.
The Sybase Adaptive Server home page appears.
Verify that no metric collection errors are reported by clicking Monitoring and then Metric Collection Errors from the Target menu.
Ensure that reports can be seen and no errors are reported by clicking Information Publisher Reports in the Target menu and viewing reports for the Sybase ASE target type.
Ensure that configuration data can be seen by clicking Configuration and then Last Collected in the Target menu. If configuration data does not immediately appear, click Refresh in the Latest Configuration page.
See the Plug-in Manager chapter in the Oracle Enterprise Manager Cloud Control Administrator's Guide for steps to undeploy the plug-in:
http://docs.oracle.com/cd/E24628_01/doc.121/e24473/plugin_mngr.htm
If the following parameters are not enabled for the Sybase Adaptive Server plug-in, metric collection errors may occur:
sp_configure "sql text pipe active", 1
sp_configure "sql text pipe max messages", 100
sp_configure "max SQL text monitored", 2048
sp_configure "plan text pipe active", 1
sp_configure "plan text pipe max messages", 100
sp_configure "statement pipe active", 1
sp_configure "statement pipe max messages", 100
sp_configure "statement statistics active", 1
sp_configure "per object statistics active", 1
For information about the troubleshooting scenarios that you might encounter while working with the System Monitoring plug-ins, see Oracle Enterprise Manager System Monitoring Plug-in Troubleshooting Guide.
For information about Oracle's commitment to accessibility, visit the Oracle Accessibility Program website at http://www.oracle.com/pls/topic/lookup?ctx=acc&id=docacc.
Oracle customers have access to electronic support through My Oracle Support. For information, visit http://www.oracle.com/pls/topic/lookup?ctx=acc&id=info or visit http://www.oracle.com/pls/topic/lookup?ctx=acc&id=trs if you are hearing impaired.
System Monitoring Plug-in Installation Guide for Sybase Adaptive Server Enterprise (ASE), Release 12.1.0.2.0
E25214-04
Copyright © 2012, Oracle and/or its affiliates. All rights reserved.
This software and related documentation are provided under a license agreement containing restrictions on use and disclosure and are protected by intellectual property laws. Except as expressly permitted in your license agreement or allowed by law, you may not use, copy, reproduce, translate, broadcast, modify, license, transmit, distribute, exhibit, perform, publish, or display any part, in any form, or by any means. Reverse engineering, disassembly, or decompilation of this software, unless required by law for interoperability, is prohibited.
The information contained herein is subject to change without notice and is not warranted to be error-free. If you find any errors, please report them to us in writing.
If this is software or related documentation that is delivered to the U.S. Government or anyone licensing it on behalf of the U.S. Government, the following notice is applicable:
U.S. GOVERNMENT RIGHTS Programs, software, databases, and related documentation and technical data delivered to U.S. Government customers are "commercial computer software" or "commercial technical data" pursuant to the applicable Federal Acquisition Regulation and agency-specific supplemental regulations. As such, the use, duplication, disclosure, modification, and adaptation shall be subject to the restrictions and license terms set forth in the applicable Government contract, and, to the extent applicable by the terms of the Government contract, the additional rights set forth in FAR 52.227-19, Commercial Computer Software License (December 2007). Oracle USA, Inc., 500 Oracle Parkway, Redwood City, CA 94065.
This software or hardware is developed for general use in a variety of information management applications. It is not developed or intended for use in any inherently dangerous applications, including applications that may create a risk of personal injury. If you use this software or hardware in dangerous applications, then you shall be responsible to take all appropriate fail-safe, backup, redundancy, and other measures to ensure its safe use. Oracle Corporation and its affiliates disclaim any liability for any damages caused by use of this software or hardware in dangerous applications.
Oracle and Java are registered trademarks of Oracle and/or its affiliates. Other names may be trademarks of their respective owners.
Intel and Intel Xeon are trademarks or registered trademarks of Intel Corporation. All SPARC trademarks are used under license and are trademarks or registered trademarks of SPARC International, Inc. AMD, Opteron, the AMD logo, and the AMD Opteron logo are trademarks or registered trademarks of Advanced Micro Devices. UNIX is a registered trademark of The Open Group.
This software or hardware and documentation may provide access to or information on content, products, and services from third parties. Oracle Corporation and its affiliates are not responsible for and expressly disclaim all warranties of any kind with respect to third-party content, products, and services. Oracle Corporation and its affiliates will not be responsible for any loss, costs, or damages incurred due to your access to or use of third-party content, products, or services.
Copyright © 2012, Oracle and/or its affiliates. All rights reserved. Legal Notices |
|