| Oracle® Enterprise Manager Cloud Control Upgrade Guide 12c Release 2 (12.1.0.2) Part Number E22625-11 |
|
|
PDF · Mobi · ePub |
| Oracle® Enterprise Manager Cloud Control Upgrade Guide 12c Release 2 (12.1.0.2) Part Number E22625-11 |
|
|
PDF · Mobi · ePub |
While upgrading Enterprise Manager, all the Application Dependency and Performance (ADP) engines and JVM Diagnostics (JVMD) engines are stopped as a part of the preupgrade process. Once the Enterprise Manager is successfully upgraded to 12c Release 2 (12.1.0.2), the ADP and JVMD Managers that were part of your enterprise before the upgrade must be re-created.
Note:
For information about deploying the JVMD Managers and JVMD Agents with basic and advanced options, see the following guides:Oracle Enterprise Manager Cloud Control Basic Installation Guide
Oracle Enterprise Manager Cloud Control Advanced Installation and Configuration Guide
For information about deploying ADP Managers and ADP Agents with basic and advanced options, see the following guides:
Note:
The ADP engines and the JVMD engines are both part of Application Performance Management (APM). In this document, we may refer to either of the engines as APM engines.To do upgrade or redeploy APM engines in graphical mode, follow the steps listed in each of these sections:
Upgrading or Redeploying JVMD and ADP Managers in Graphical Mode
Upgrading or Redeploying Diagnostic Agents in Graphical Mode
To re-create all the ADP and JVMD Managers in graphical mode after an Enterprise Manager 12c upgrade process, follow these steps:
In Cloud Control, from Setup menu, select Application Performance Management.
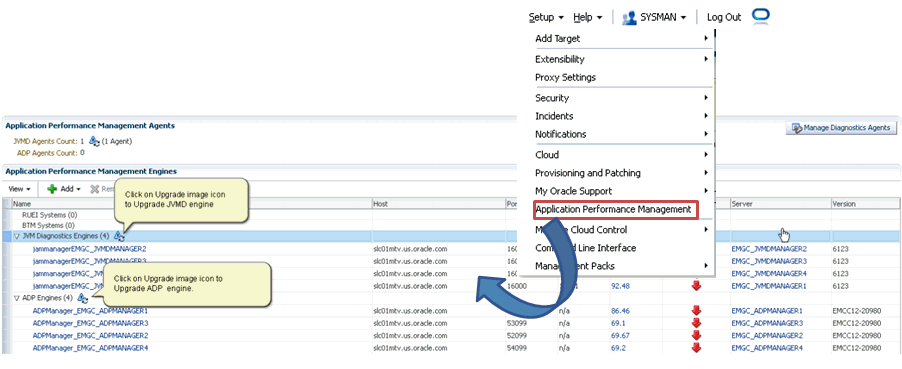
The Application Performance Management screen is displayed.
On the Application Performance Management screen, use the Upgrade icon shown in the following graphic to upgrade or redeploy an APM engine.

To upgrade the JVMD Diagnostics engine, select JVM Diagnostics Engine, and perform the following steps:
On the Redeploy/Upgrade JVMD Engines screen, do the following:
- Select the JVMD engines from local or existing WebLogic Servers that are part of the WebLogic Domain.
- Specify the Host Credentials, which are the credentials for the host machine where the Managed Server is created.
Note:
If each of the Managed Servers are running on a different host, then select the row and apply the corresponding credential for the selected host. When applying credentials for a selected engine, the credentials are automatically applied to all engines that are on the same host.- Specify the Administrator WebLogic Credentials, which are the credentials for the WebLogic Domain where the Cloud Control OMS is deployed.
- Click Apply.
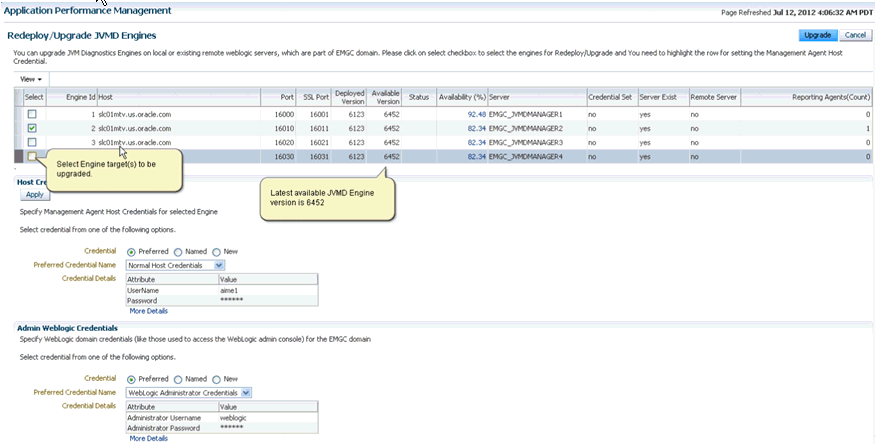
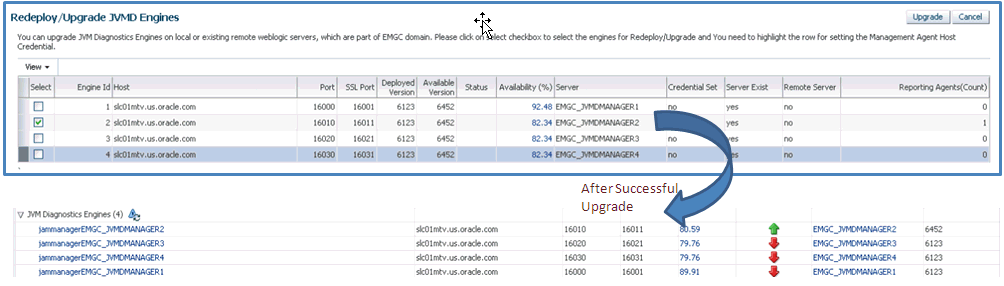
Click Upgrade.
A job is submitted, click the job link to verify the status of the job to completion.
After successful completion of the job, you can go back to the Application Performance Management page to view the status of the engines.
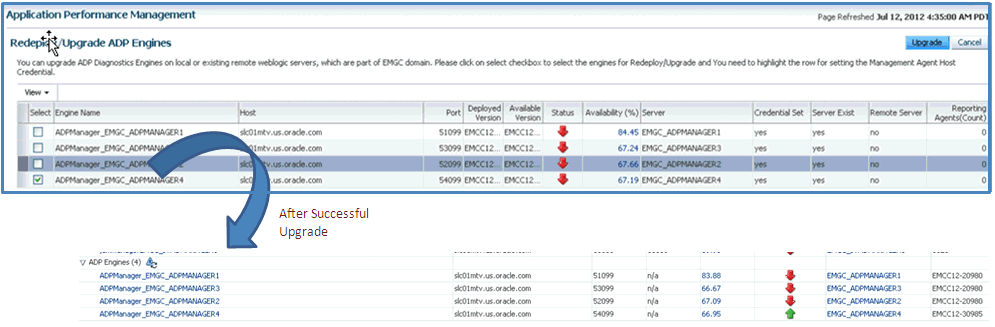
To upgrade the ADP engines, select ADP Engines, and perform the following steps:
On the Redeploy/Upgrade ADP Engines screen, do the following:
- Select the ADP engines from local or existing WebLogic Servers that are part of the WebLogic Domain.
- Specify the Host Credentials, which are the credentials for the host machine where the Managed Server is created.
Note:
If each of the Managed Servers are running on a different host, then select the row and apply the corresponding credential for the selected host. However, if all the Managed Servers are on the same host, then, select all the rows, and apply the same host credentials for all of them.- Specify the Administrator WebLogic Credentials, which are the credentials for the Weblogic domain where the Cloud Control OMS is deployed.
- Click Apply.

Click Upgrade.
A job is submitted, click the job link to verify the status of the job to completion.
After successful completion of the job, you can go back to the Application Performance Management page to view the status of the engines.
This section describes the following:
Deploying Diagnostics Agents On All the Monitored WebLogic Domains (Multi-Domain Deployment)
Upgrading Diagnostics Agents On All the Monitored WebLogic Domains
Note:
After an upgrade, if you have multiple OMS's, some of the Oracle WebLogic Server managed servers that an OMS is deployed to may be re-created or renamed by the upgrade process. If this occurs, you will need to deploy the JVMD Agent to those new servers directly, since they will not have old agents that the JVMD agent upgrade UI can pick up.For the upgrade process and the bulk deployment process, JVMD and ADP Agents use the new Manage Diagnostic Agents Wizard. The new wizard described in Figure 6-0 enables bulk deployment of Diagnostic Agents, which means you can now deploy any number of Diagnostic Agents on all the monitored WebLogic Domains using a single Wizard. In addition to deploying the agents, you can upgrade any of the existing Diagnostic Agents in the domains available in your Enterprise Manager.
Note:
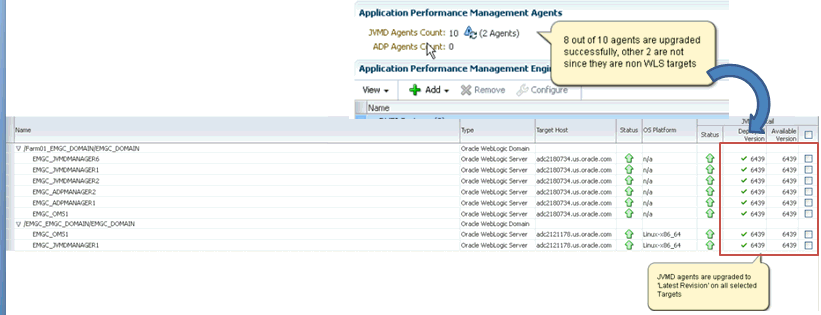
Using Application Performance Management UI for upgrading the Non-Weblogic Server targets are not supported in Enterprise Manager 12c. To do so, you must use the manual upgrade approach.For example, if your enterprise contains 10 Management Agents that require an upgrade (8 of which are WebLogic Server targets, and two of which are Non-WebLogic Server targets), then after performing a bulk upgrade, you will notice that only 8 agents have been successfully upgraded, while two of them still appear as non-upgraded. This is an expected behavior, and to fix this issue Oracle recommends using manual approach to upgrade the remaining Non-WebLogic Server targets.
Follow these steps to deploy and upgrade the Diagnostic Agents:
In Cloud Control, from Setup menu, select Application Performance Management (APM).
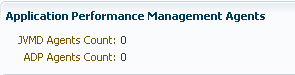
The Application Performance Management screen is displayed. The Application Performance Management Agent displays the number of Agents deployed.
On the Application Performance Management screen, click Manage Diagnostic Agents.
The Deploy/Upgrade Diagnostic Agents Wizard appears.
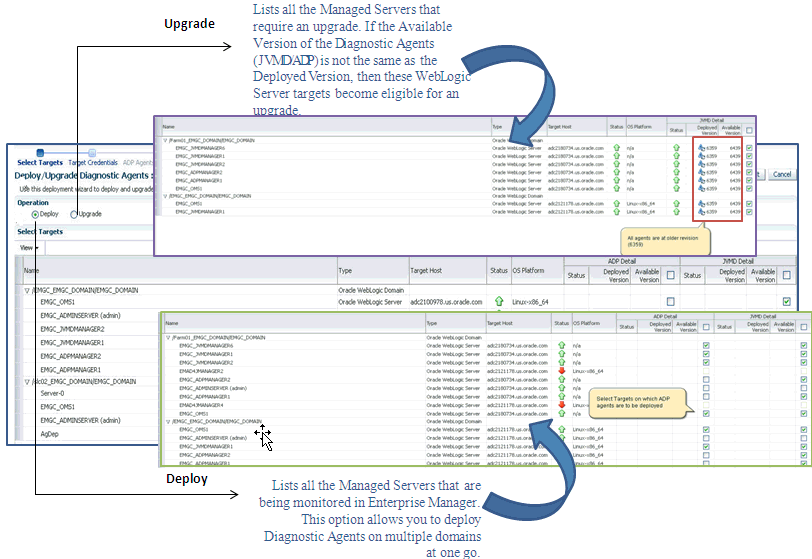
From the Select Targets screen, select Deploy.
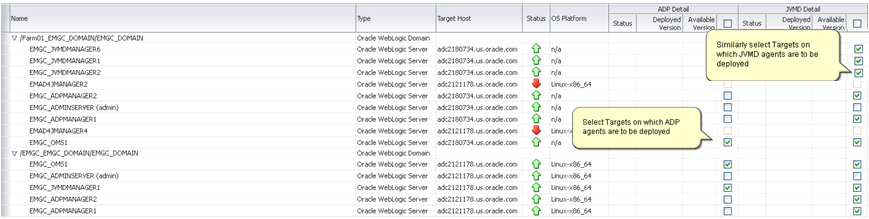
If you select Expand All from the View menu, you will be able to see information about all the discovered WebLogic Targets along with their host, Operating System platform, and Status.
Select the targets on which the ADP and JVMD Agents are to be deployed as follows, and click Next.
On the Target Credentials screen, you need to select one or more WebLogic Domains and set the following credentials:
Oracle WebLogic Administration Server Host Credentials: Provide the host credentials where the Management Agent that is monitoring WebLogic Domain is running.
Oracle WebLogic Domain Credentials: Provide the WebLogic Domain credentials.
Click Apply to apply the credentials to the selected WebLogic Domains, and then click Next.
On the ADP Agents Configurations screen, select one or more WebLogic Domain from the table. All the corresponding ADP Engines will appear in the Available ADP Engine drop down list. From the menu, select the ADP Engine to which the ADP Agents will report, and click Apply. This will ensure that the selected ADP Engines are applied to the respective WebLogic Domains.
Click Next.
On the JVMD Agents Configurations screen, select one or more WebLogic Domain from the table. All the corresponding JVMD Engines will appear in the Available JVMD Engine drop down list. From the menu, select the JVMD Engine to which the JVMD Agents will report. You can alternatively select Other to connect to a load Balancer in case of multiple engines. Click Apply to apply the selected JVMD Engines to the respective WebLogic Domains.
Click Next.
On the Enterprise Manager Credentials screen, you will need to provide some additional credentials for updating, and restarting the ADP engines:
Oracle Enterprise Manager WebLogic Administration Server Host Credentials: Provide the Enterprise Manager OMS Host credentials.
Oracle Enterprise Manager WebLogic Domain Credentials: Provide the Enterprise Manager OMS WebLogic Domain credentials.
Click Save to save the credential information.
Click Next.
On the Review screen, review all the target credentials, and the engine details, and then click Deploy.
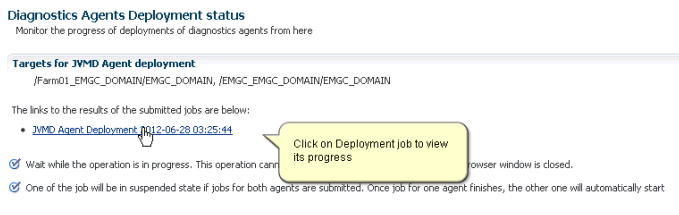
Separate jobs are created for bulk APD and bulk JVMD agents deployment. Click the links to view the progress of the jobs. Only after the first job is executed will the second job start execution, until then, it remains in suspended state.

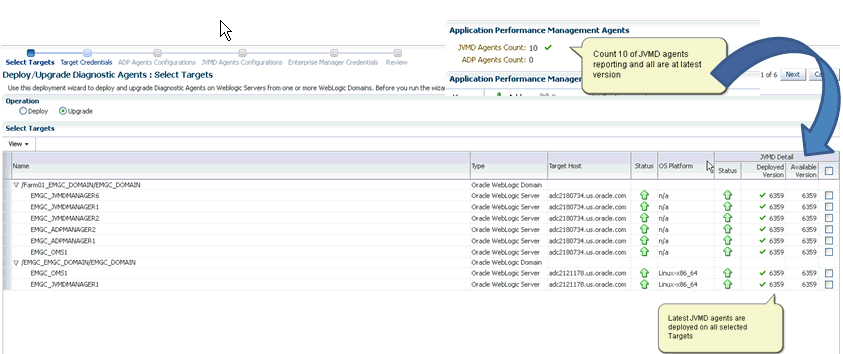
Once the JVMD Agent deployment is successful, you can verify if the agents are deployed by going back to the APM page, and checking under the Application Performance Management Agents section, as follows:
Follow these steps to deploy and upgrade the Diagnostic Agents:
In Cloud Control, from Setup menu, select Application Performance Management (APM).
The Application Performance Management screen is displayed. The Application Performance Management Agents section displays the number of Agents that requires upgrade:
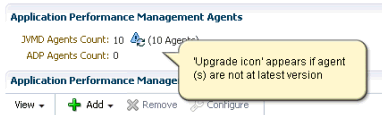
On the Application Performance Management screen, either click the upgrade icon displayed in the earlier graphic or, click Manage Diagnostic Agents.
The Deploy/Upgrade Diagnostic Agents Wizard appears.
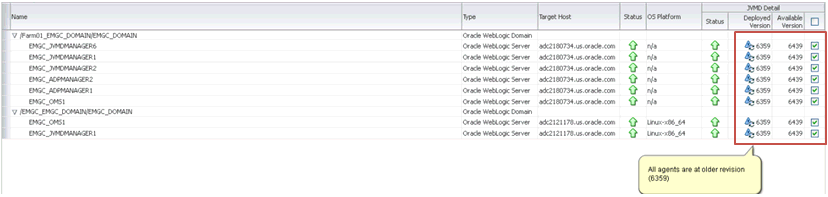
On the Select Targets screen, select Upgrade. All the Diagnostic Agents that are at an older revision and require upgrade appear preselected. You can select the targets on which Diagnostic Agent upgrade needs to be performed.
Click Next.
On the Target Credentials screen, you need to select one or more WebLogic Domains and set the following credentials:
Oracle WebLogic Administration Server Host Credentials: Provide the host credentials where the Management Agent that is monitoring WebLogic Domain is running.
Oracle WebLogic Domain Credentials: Provide the WebLogic Domain credentials.
Click Apply to apply the credentials to the selected WebLogic Domains, and then click Next.
On the ADP Agents Configurations screen, select one or more WebLogic Domain from the table. All the corresponding ADP Engines will appear in the Available ADP Engine drop down list. From the menu, select the ADP Engine to which the ADP Agents will report, and click Apply. This will ensure that the selected ADP Engines are applied to the respective WebLogic Domains.
Click Next.
On the JVMD Agents Configurations screen, select one or more WebLogic Domain from the table. All the corresponding JVMD Engines will appear in the Available JVMD Engine drop down list. From the menu, select the JVMD Engine to which the JVMD Agents will report. You can alternatively select Other to connect to a load Balancer in case of multiple engines. Click Apply to apply the selected JVMD Engines to the respective WebLogic Domains.
Click Next.
On the Enterprise Manager Credentials screen, you will need to provide some additional credentials for updating, and restarting the ADP engines:
Oracle Enterprise Manager WebLogic Administration Server Host Credentials: Provide the Enterprise Manager OMS Host credentials.
Oracle Enterprise Manager WebLogic Domain Credentials: Provide the Enterprise Manager OMS WebLogic Domain credentials.
Click Save to save the credential information.
Click Next.
On the Review screen, review all the target credentials, and the engine details, and then click Upgrade.
Once the JVMD Upgrade deployment is successful, you can verify by going back to the APM page, and checking under the Application Performance Management Agents section, as follows:
|
Copyright © 2012, Oracle and/or its affiliates. All rights reserved. Legal Notices |
|